Bästa kund,
Tack för att du valde ett Windrose-fordon.
Läs denna ägarhandbok noggrant innan du använder fordonet för första gången. Den innehåller viktig information om fordonets funktioner, säker användning, underhållskrav och tekniska specifikationer. Genom att göra dig förtrogen med denna information bidrar du till säker körning och optimal prestanda för fordonet.
På grund av olika fordonskonfigurationer och tillval kan fordonet du har fått levererat avvika något från beskrivningarna eller illustrationerna i denna handbok. Windrose förbehåller sig rätten att ändra fordonets konstruktion, specifikationer och utrustning utan föregående meddelande som ett led i kontinuerlig produktförbättring.
Informationen, illustrationerna och de tekniska uppgifterna i denna handbok var korrekta vid publiceringstidpunkten. De är endast avsedda som referens och utgör ingen avtalsmässig förpliktelse.
Ingen del av denna ägarhandbok får reproduceras eller överföras i någon form utan skriftligt föregående samtycke från Windrose.
Observera: Omslagsbilderna och illustrationerna i denna handbok är endast avsedda som referens. Fordonets faktiska utseende och specifikationer kan variera.
Innehållsförteckning

Anmärkningar till användare
↑ Till toppenInnan du kör
Detta fordon är ett batterielektriskt dragfordon.
Vid daglig användning och underhåll måste du följa alla varningar och anvisningar i denna ägarhandbok (hädanefter kallad ”denna handbok”) för att undvika skada på fordonet eller personskada.
Innan du använder fordonet för första gången måste du läsa denna handbok noggrant för att bli förtrogen med funktionerna och kraven för användning. Om det uppstår problem under användning, kontakta Windrose servicetelefon.
Upphovsrätten till denna handbok tillhör Windrose. Ingen del av denna handbok får reproduceras, överföras eller distribueras utan skriftligt föregående samtycke från Windrose.
Windrose förbehåller sig rätten att uppdatera innehållet i denna handbok utan föregående meddelande som ett led i kontinuerlig produktförbättring. Se den elektroniska ägarhandboken i mittdisplayen eller i Windrose-appen för den senaste informationen om fordonet.
Windrose webbplats:
Windrose servicetelefon:Du kan söka efter ”Windrose” i den officiella appbutiken för att ladda ner appen.
ObserveraFörkortningar introduceras i formatet ”fullständigt namn (förkortning)” första gången de nämns. Därefter används förkortningen.
Beskrivning av varningar
↑ Till toppenInnan du kör
Följande signalord och symboler används i denna handbok:
VarningAnger en farlig situation som, om den inte undviks, kan leda till allvarlig personskada eller dödsfall.
Anmärkning
↑ Till toppenAnmärkningAnger en situation som kan leda till skada på fordonet eller dess komponenter.
Observera
↑ Till toppenObserveraGer ytterligare användbar information eller vägledning om användning.
Miljöskydd
↑ Till toppenMiljöskyddAnger information kopplad till miljöskydd eller energieffektivitet.
Stjärna (*)
↑ Till toppenEn stjärna (*) efter ett funktionsnamn anger att funktionen endast gäller vissa fordonsmodeller eller tillvalskonfigurationer.
Illustrationsinformation
↑ Till toppen
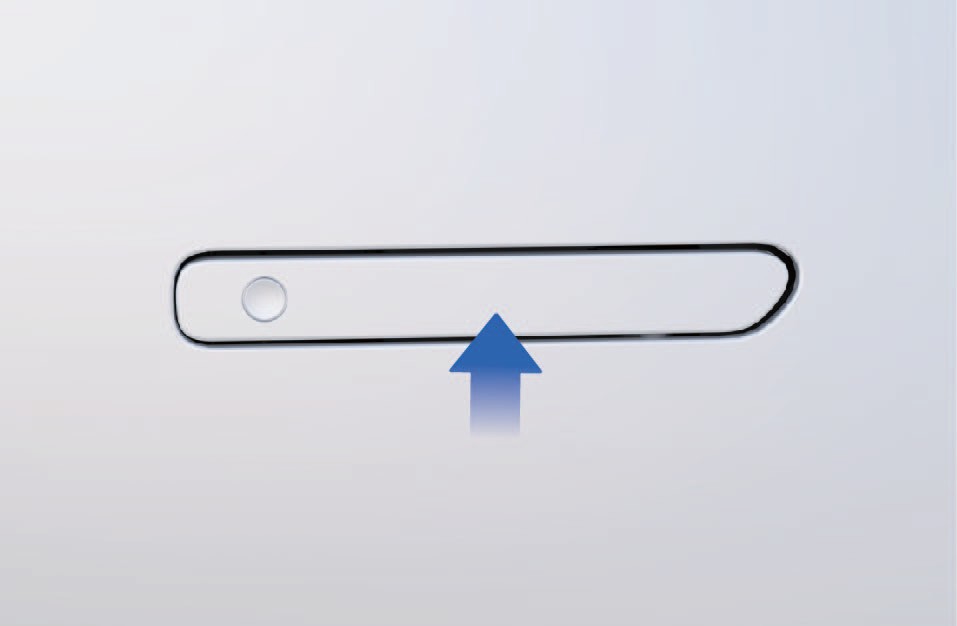
Denna pil anger den exakta placeringen av objektet som visas på bilden.
Denna pil anger rörelseriktningen för objektet som visas på bilden.
Denna pil anger rotationsriktningen för objektet som visas på bilden.
Denna pil anger tippriktningen för objektet som visas på bilden.
Miljöskydd
↑ Till toppenInnan du kör
Windrose är förbundet till hållbar utveckling och miljöskydd. Detta fordon är konstruerat för att förbättra energieffektiviteten och minska utsläpp. Du kan bidra till miljöskydd genom att köra ansvarsfullt och använda fordonet på ett energieffektivt sätt.
Driftsäkerhet
Innan du kör
Iaktta alltid största tillåtna totalvikt och axeltryck. Överlasta inte fordonet, eftersom överlastning kan leda till skada på fordonet, förlust av kontroll eller personskada.
Byt ut varje säkerhetsbälte som har utsatts för stötkrafter i en kollision, även om ingen synlig skada är
Varningnärvarande.
Varning
Frigör aldrig nedför i frigear. Detta avlägsnar motorbromsningen från drivmotorn och kan leda till förlust av kontroll över fordonet.
Justera sätet till rätt läge innan du kör. En felaktig sittställning kan leda till trötthet, oväntad sätesrörelse eller förlust av kontroll över fordonet. Se till att sätesläget tillåter korrekt användning av säkerhetsbältet.
Säkerhetsbälten är livsviktig säkerhetsutrustning. Alla i fordonet måste använda säkerhetsbälte korrekt när fordonet är i rörelse.
Luta inte ryggstödet för långt bakåt under körning. Vid en nödbromsning kan en felaktig sittställning
minska säkerhetsbältets effektivitet.
Överskrid inte 30 km/t i någon av följande situationer:
Vid körning in på eller ut från fält för icke-motoriserade fordon, plankorsningar, skarpa svängar, smala vägar eller broar.
Vid U-sväng, sväng eller körning ned en brant stigning.
När sikten är mindre än 50 m på grund av dimma, regn, snö, damm eller hagel.
Vid körning på isiga, snötäckta eller leriga vägar.
Vid bogsering av ett havererat fordon.
↑ Till toppen
AnmärkningHåll säkert avstånd vid körning i närheten av ett radioastronomiskt observatorium. Fordon med radar kan orsaka elektromagnetisk interferens med observatoriets utrustning.
Originaldelar
Innan du kör
Windrose ger inte garantitäckning för delar under följande omständigheter:
Otillåtna ändringar av fordonet, särskilt på system kopplade till körsäkerhet (t.ex. högspänningssystem, elektriska system, bromsar, styrning eller TBOX).
Ingrepp i fordonets OBD-system.
Användning av icke-godkända delar eller vätskor som medför säkerhetsrisk eller skada på fordonet.
Saknad dokumentation som bekräftar användning av godkända vätskor under garantiperioden.
Bristande underhåll av fordonet vid ett auktoriserat Windrose-servicecenter i enlighet med underhållskraven.
Datasäkerhet
↑ Till toppenInnan du kör
I enlighet med gällande lagar och förordningar samlar Windrose in och behandlar fordonsdata, inklusive positionsinformation, data om körbeteende, ljud- och videoinspelningar samt personuppgifter.
Windrose vidtar lämpliga tekniska och organisatoriska åtgärder för att skydda sådana data i enlighet med gällande integritetsregelverk och branschstandarder.
Ändring av fordonet
Innan du kör
↑ Till toppenMaterial som krävs före ändring
Varje ändring av fordonet måste vara i enlighet med gällande tekniska och föreskriftsmässiga krav. Före ändring måste relevant teknisk dokumentation skickas till Windrose.
Dokumentationen ska som ett minimum omfatta:
Syfte och driftsförhållanden för det ändrade fordonet.
Totalvikt och axeltryck efter ändring.
Totala mått för det ändrade fordonet (inklusive arbetskonfiguration).
Påbyggnadens golvhöjd över marknivå.
Monteringsmetod för påbyggnad.
Schematisk ritning av hjälpram.
Skrotning av fordonet
Innan du kör
↑ Till toppenFordon som inte längre uppfyller kraven för trafiksäkert skick måste kasseras i enlighet med gällande miljöförordningar.
Skrotning av fordon och återvinning av högspänningsbatteri måste utföras av Windrose eller auktoriserade återvinningsverksamheter.
VarningFelaktig hantering av högspänningsbatterier kan orsaka brand eller miljöskada. Demontera eller kassera inte högspänningsbatterier utan godkännande.
Återvinning av högspänningsbatteri
Windrose testar högspänningsbatteriets kapacitet och tillstånd och återvinner högspänningsbatteriet i enlighet med gällande lagar, förordningar och marknadsförhållanden vid den aktuella tidpunkten.
Återvinning av högspänningsbatteri: Återvinning och vidare behandling ska utföras av Windrose eller en tredjeparts återvinningsverksamhet utsedd av Windrose.
Transport av högspänningsbatteri: Högspänningsbatterier transporteras av ett professionellt transportföretag. Kontakta det auktoriserade Windrose-servicecentret för att meddela en professionell återvinningsverksamhet om behandling.
Varning
Kassera inte eller gör dig av med använda högspänningsbatterier, för att undvika oavsiktlig brand eller allvarlig förorening av miljön.
Överlåt inte kasserade högspänningsbatterier till andra verksamheter eller privatpersoner. Du hålls ansvarig för all miljöförorening eller säkerhetsolycka som beror på demontering av högspänningsbatterier utan tillstånd.
Ekonomisk körning
Innan du kör
Följande åtgärder bidrar till att maximera räckvidd och energieffektivitet:
Håll jämn hastighet och undvik kraftig acceleration eller bromsning.
Håll fordonet i gott skick genom regelbundet underhåll.
Frigör aldrig i frigear, eftersom detta ger otillräcklig smörjning av E-axeln och leder till komponentskada.
Vinterkörning
↑ Till toppenInnan du kör
Förberedelse för vinterkörning
Använd kylvätska av hög kvalitet anpassad till den lägsta temperaturen, och kylvätskans fryspunkt ska vara lägre än lägsta lokala temperatur.
Se till att batteriet alltid är fulladdat för att förhindra att batteriet fryser vid låga temperaturer.
Användning av kylvätska på vintern
↑ Till toppenUnder den kalla årstiden, eller när fordonet är parkerat på en kall plats, måste kylvätskans frostskyddande egenskaper säkerställas. Använd kylvätskan som Windrose rekommenderar.
Försiktighetsåtgärder vid vinterkörning
Det rekommenderas att använda snökedjor eller vinterdäck.
Undvik tvär acceleration, tvär bromsning och skarpa svängar vid hög hastighet.
Vid körning på snö- och istäckta vägar, håll låg hastighet för att säkerställa bättre driftbromsning.
Håll rimligt avstånd till andra fordon (öka avståndet vid körning i regn och snö
Efter att snökedjorna är monterade, starta fordonet och kontrollera om kedjorna är lösa eller om däcken inte är korrekt monterade.
↑ Till toppenVarningVid användning av snökedjor är det förbjudet att överskrida största effektiva körhastighet, för att undvika olyckor.
dagar eller på isiga vägar kan öka bromssträckan för driftbromsen).
Användning av snökedjor
Innan du kör
Var uppmärksam på följande vid användning av snökedjor:
Det rekommenderas att använda snökedjor vid körning på vägar täckta av tjocka lager snö eller is.
Snökedjorna måste vara kompatibla med däckstorleken och däcktypen som är monterad på fordonet.
Montera snökedjor på de yttre däcken på drivaxeln (båda sidor).
Var noga med att inte skada däcken vid montering eller demontering av snökedjor.
Anmärkning
 Ta bort snökedjorna vid körning på långa sträckor utan snö och is.
Se till att snökedjorna inte berör eller kommer i konflikt med fordonskomponenter under körning.
Montera och demontera snökedjor endast när fordonet är parkerat på plant underlag.
Körning i tropiska områden och områden med hög temperatur
Innan du kör
Kontrollera fordonets tillstånd före körning:
Kontrollera att kylvätskenivån är inom normalområdet, och leta efter läckage.
Låt inte brännbara föremål (t.ex. tändare, aerosolprodukter, parfymer) ligga på instrumentpanelen eller i direkt solljus under längre tid. Höga temperaturer kan få trycksatta behållare att spricka och medföra brandfara.
Var uppmärksam på följande under körning:
lamporna tänds, stanna körningen omedelbart och
kontakta ett auktoriserat Windrose-servicecenter.
Följ med på däcktryck och däcktemperatur. Om däcktrycket eller däcktemperaturen är onormal, stanna körningen omedelbart och låt däcken svalna naturligt. Sänk inte trycket eller kyl ner däcken genom att spruta vatten eller släppa ut luft, eftersom detta lätt accelererar åldring och slitage på däcken och i allvarliga fall kan leda till däckexplosion.
Om ett däck exploderar under körning, tryck omedelbart på knappen för varningsblinkers, håll ratten med händerna i läge klockan 9 och 3 utan att vrida, och tryck bromspedalen nedåt i stötar för att gradvis bromsa ner fordonet och varna andra trafikanter.
Övervaka däcktryck och däcktemperatur.
Om någon av dem är onormal, stanna fordonet så snart det är säkert, och låt däcken svalna naturligt. Kyl inte ner däcken med vatten eller genom att släppa ut luft, eftersom detta kan accelerera åldring av däcken och öka faran för däckexplosion.
Håll ögonen på indikatorerna och varningslamporna i instrumentpanelen, och om fordonets fellampor (MIL) eller varning
Körning på guppiga och hala vägar
Innan du kör
Var uppmärksam på följande vid körning på guppiga och hala vägar:
På guppiga vägar, minska hastigheten för att förbättra komforten och minimera slitage på fjädring och stötdämpande komponenter.
På hala vägar, minska hastigheten och bromsa försiktigt för att förhindra förlust av väggrepp och sidsladd hos fordonet.
Om fordonet börjar sladda i sidled på vått eller halt underlag, minska hastigheten jämnt med driftbromsen och undvik tvära rattrörelser.
Körning på ramper
↑ Till toppenInnan du kör
Försiktighetsåtgärder vid körning uppförsbacke
Om fordonet rullar bakåt vid start i en stigning, tryck omedelbart ned bromspedalen, aktivera den elektroniska parkeringsbromsen, och starta sedan körproceduren på nytt.
Håll låg och jämn hastighet vid körning uppför. Använd gaspedalen gradvis och undvik tvär acceleration eller bromsning.
Försiktighetsåtgärder vid körning nedförsbacke
Minska hastigheten före nedfarten så att fordonet kommer in i nedförsbacken med kontrollerad hastighet.
Frigör aldrig nedför i frigear. Detta avlägsnar motorbromsningen från drivmotorn och kan leda till förlust av kontroll över fordonet.
Före nedfart, kontrollera att bromssystemet fungerar som det ska. Om ett fel misstänks måste felet åtgärdas innan du fortsätter.
Undvik tvära rattrörelser i nedförsbackar för att minska faran för vältning.
I långa utförsbackar, undvik sammanhängande bromsning. Använd lämplig fartkontroll och bromsteknik för att förhindra överhettning av bromsarna och möjlig bromssvikt (brake fade).
Rapportering av säkerhetsfel
↑ Till toppenInnan du kör
Om du misstänker att fordonet har ett säkerhetsrelaterat fel måste du stanna fordonet på en säker plats så snart det är praktiskt möjligt och omedelbart kontakta Windrose kundsupport eller en auktoriserad Windrose-servicestation.
Windrose kan utfärda säkerhetsvarningar, servicekampanjer eller återkallelser där gällande lagar och förordningar kräver det. Följ alla säkerhetsanvisningar och krav för servicekampanjer från Windrose.
Windrose servicetelefon: [NORSK SERVICETELEFON – BEKREFTES]
Windrose servicewebbplats: [SERVICENETTSTED – BEKREFTES]
Auktoriserat servicenätverk: [AUTORISERT SERVICENETTVERK – BEKREFTES]
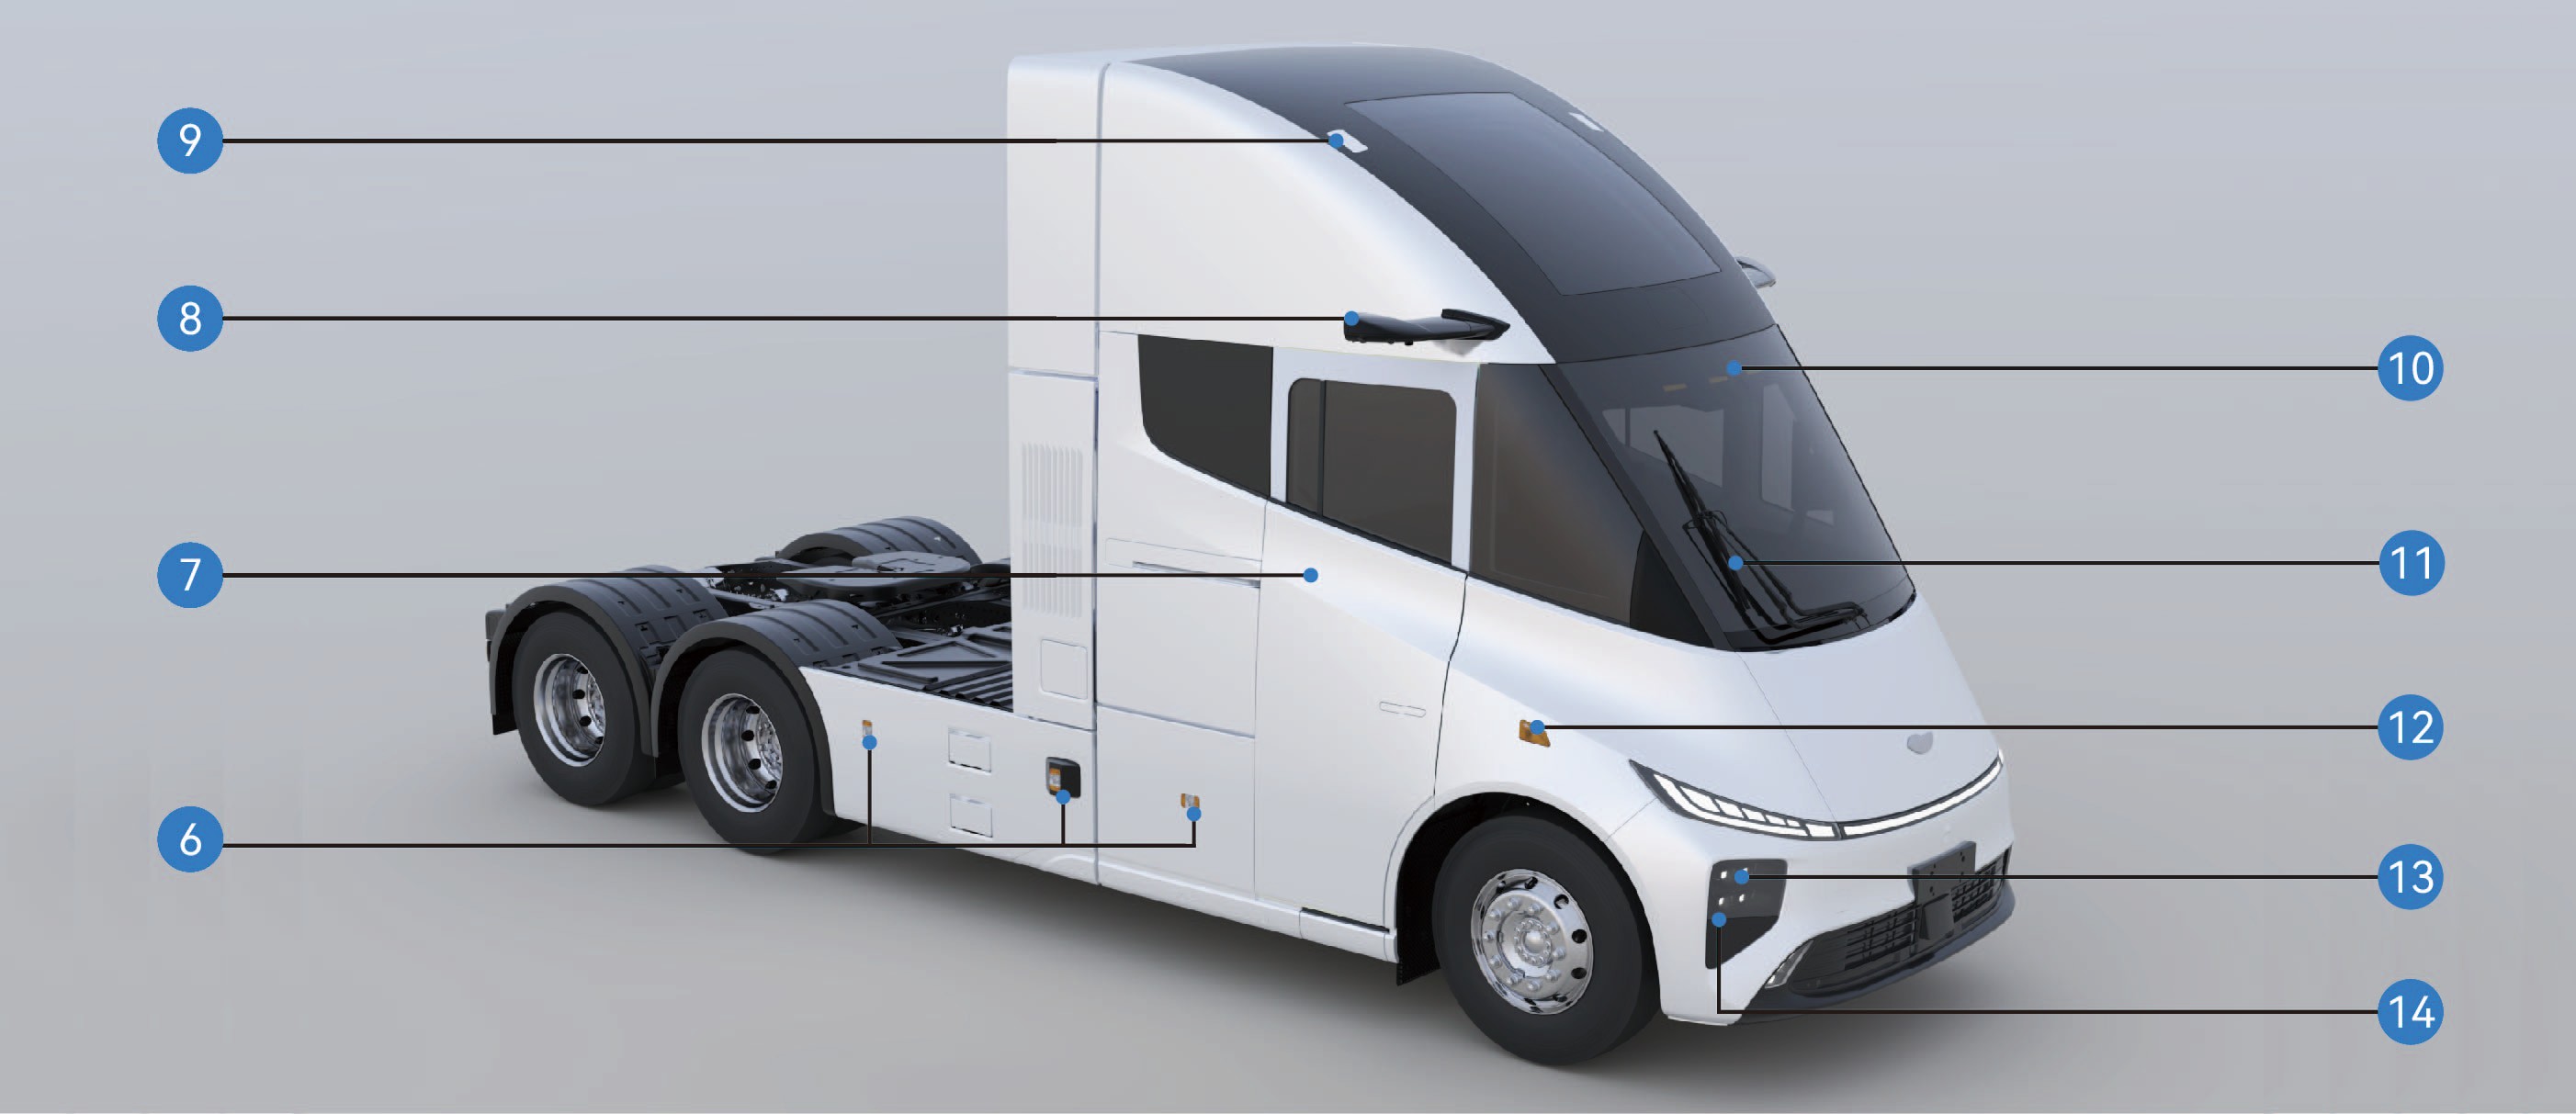
Översikt över fordonets utsida
Fordonsidentifikation
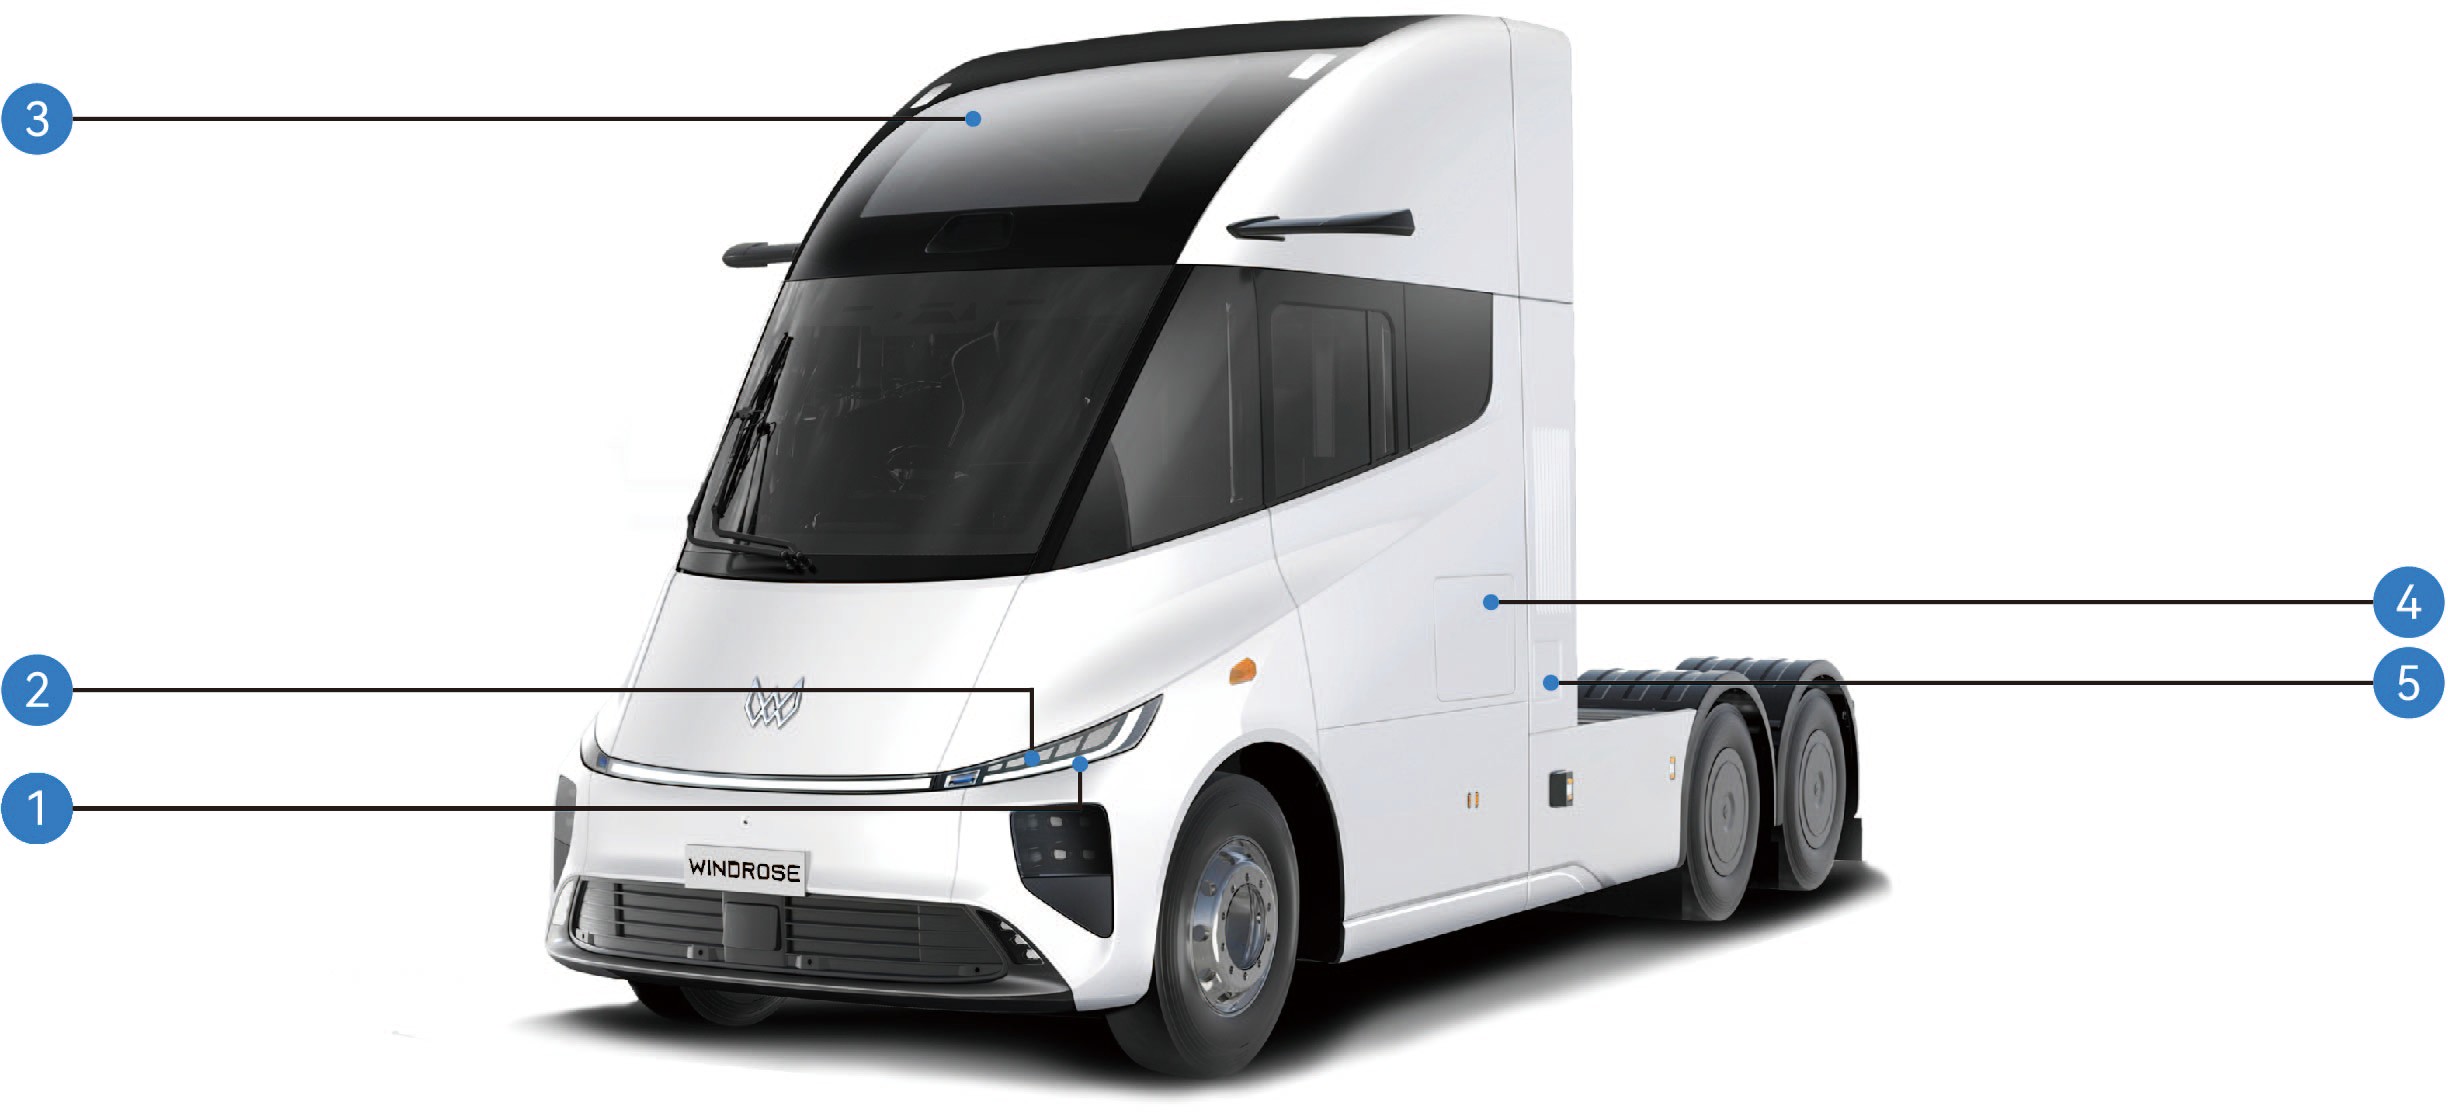
Främre blinkers / körljus
Parkeringsljus 3. Panorama-soltak
4. Verktygslåda på sidan 5. Laddport
|
|
|
|
|
|
|---|---|---|---|---|---|
|
|
|
|
|
|
|
|
|
|
|
|
Översikt över fordonets invändiga utrymme
Fordonsidentifikation

|
|
2. |
|
3. |
|
|---|---|---|---|---|---|
|
|
5. |
|
6. |
|
|
|
8. |
|
9. |
|
|
|
11. |
|
12. |
|
|---|---|---|---|---|---|
|
|
14. |
|
15. |
|
Fordonets typskylt och VIN
Fordonsidentifikation
Fordonets typskylt
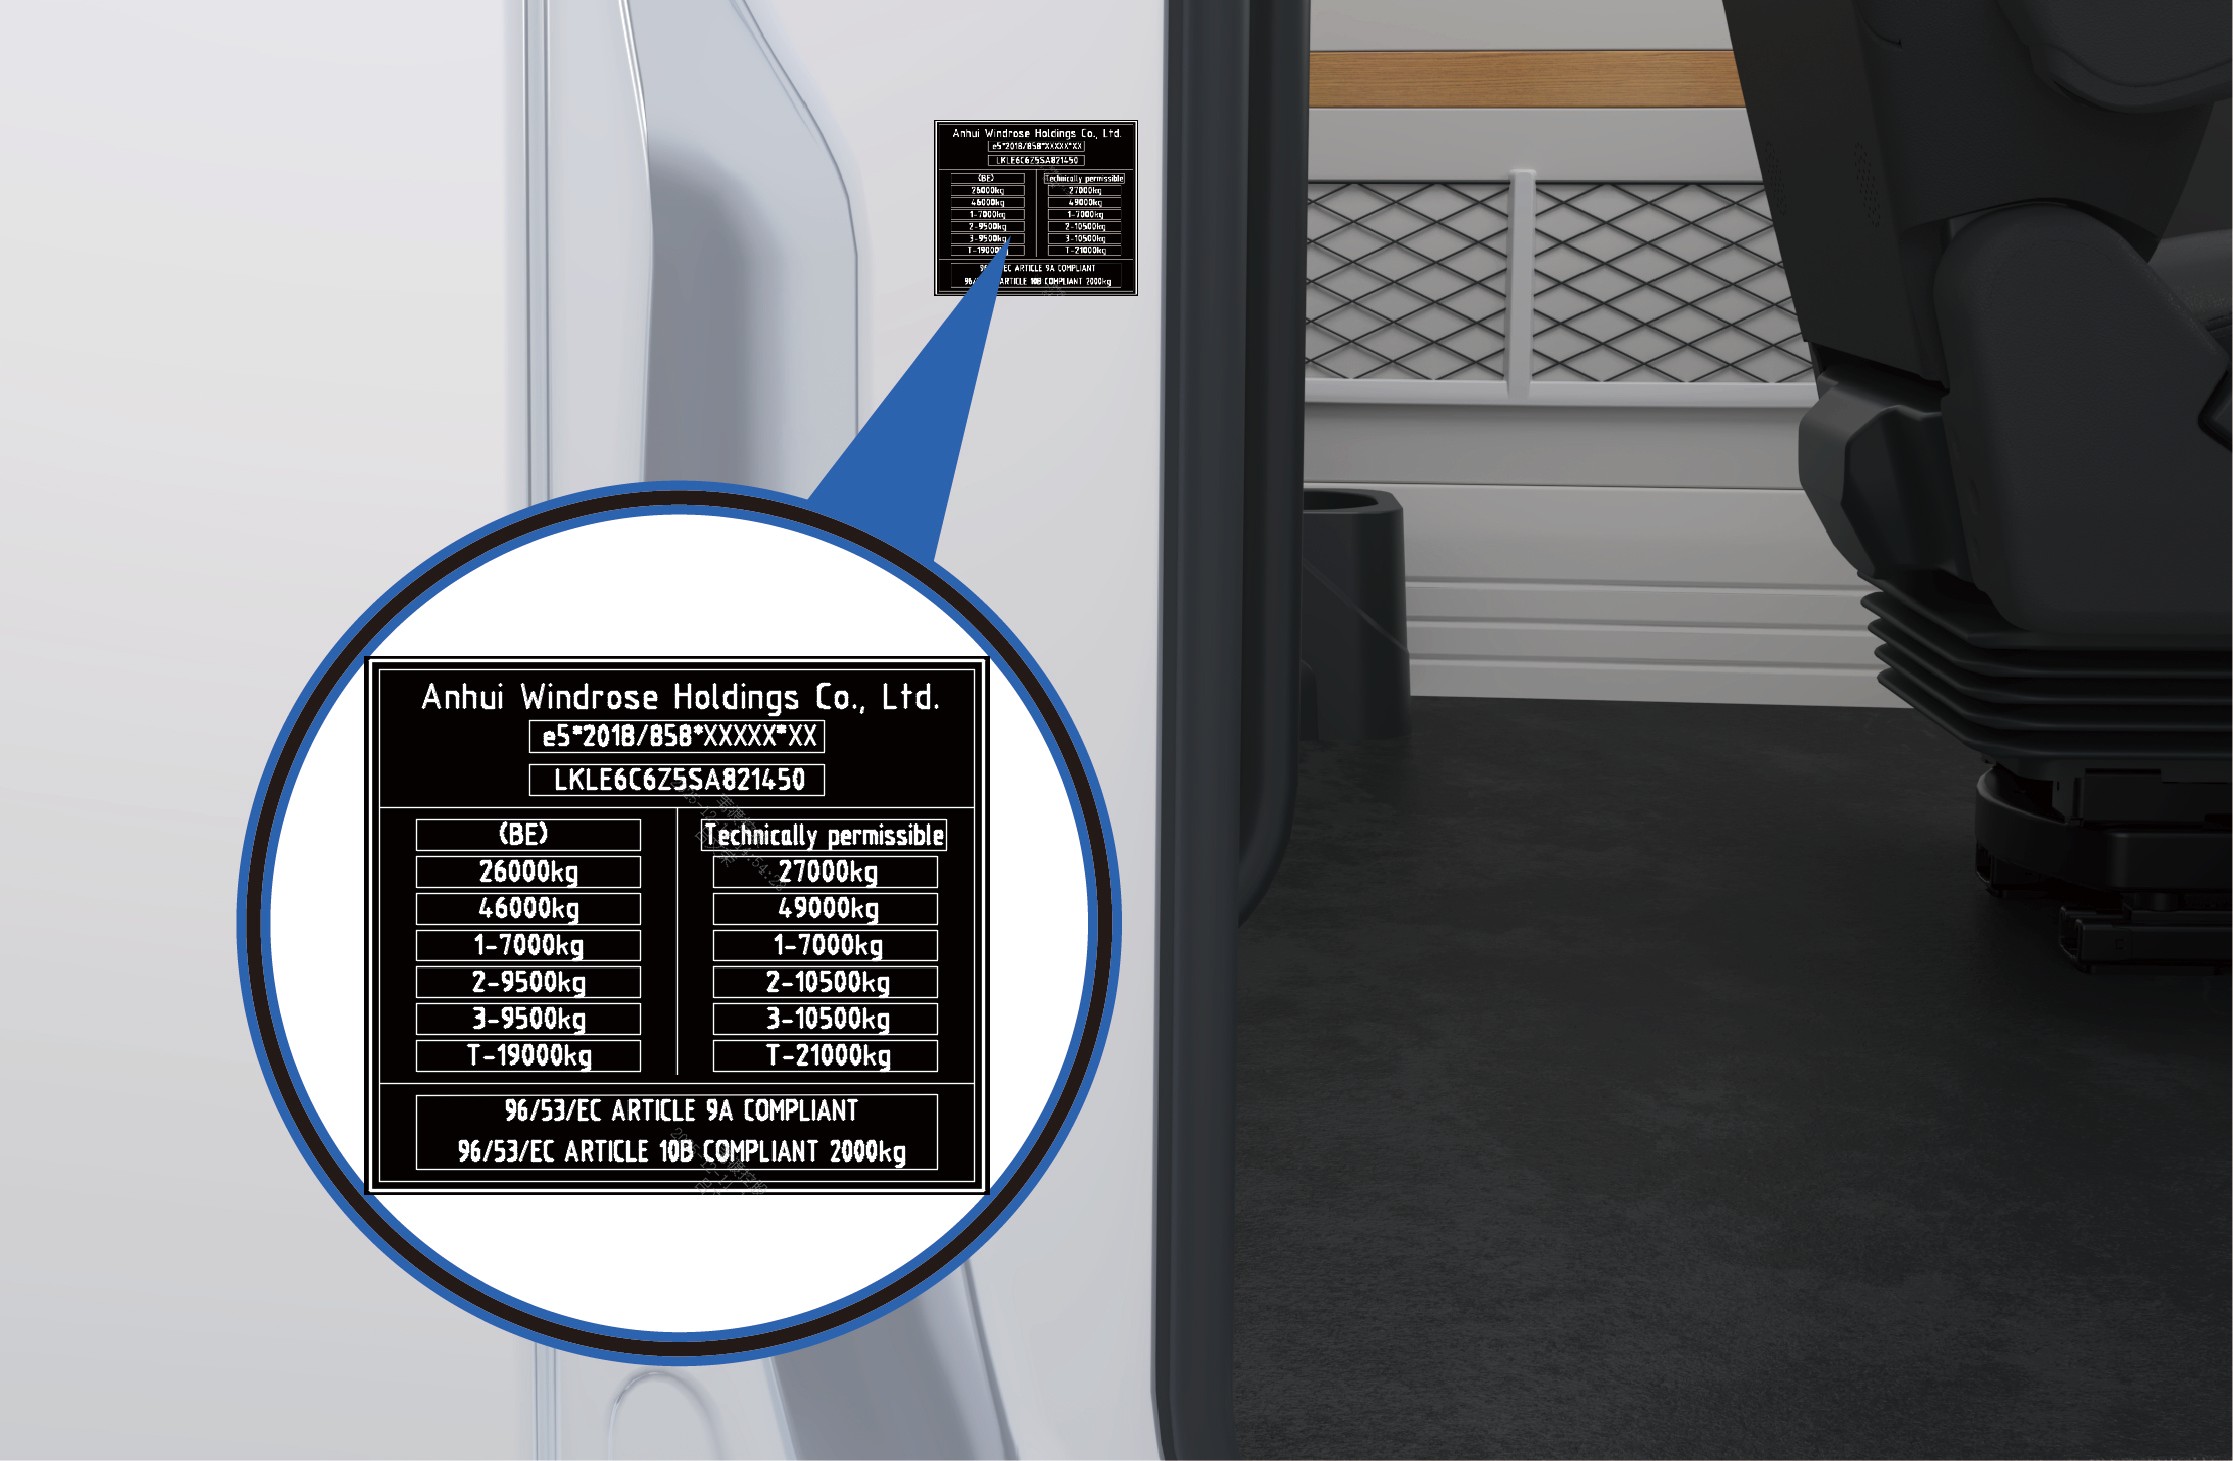
Fordonets typskylt är placerad på ramen till den högra skjutdörren (C-stolpen).
Typskylten visar följande information:
Tillverkarens namn
Nummer för helfordonsgodkännande (WVTA)
Fordonets identifikationsnummer (VIN)
Tillåten totalmassa vid registrering
Tekniskt tillåten totalmassa
Annan föreskriftsmässig information som krävs av gällande regelverk
Fordonets identifikationsnummer
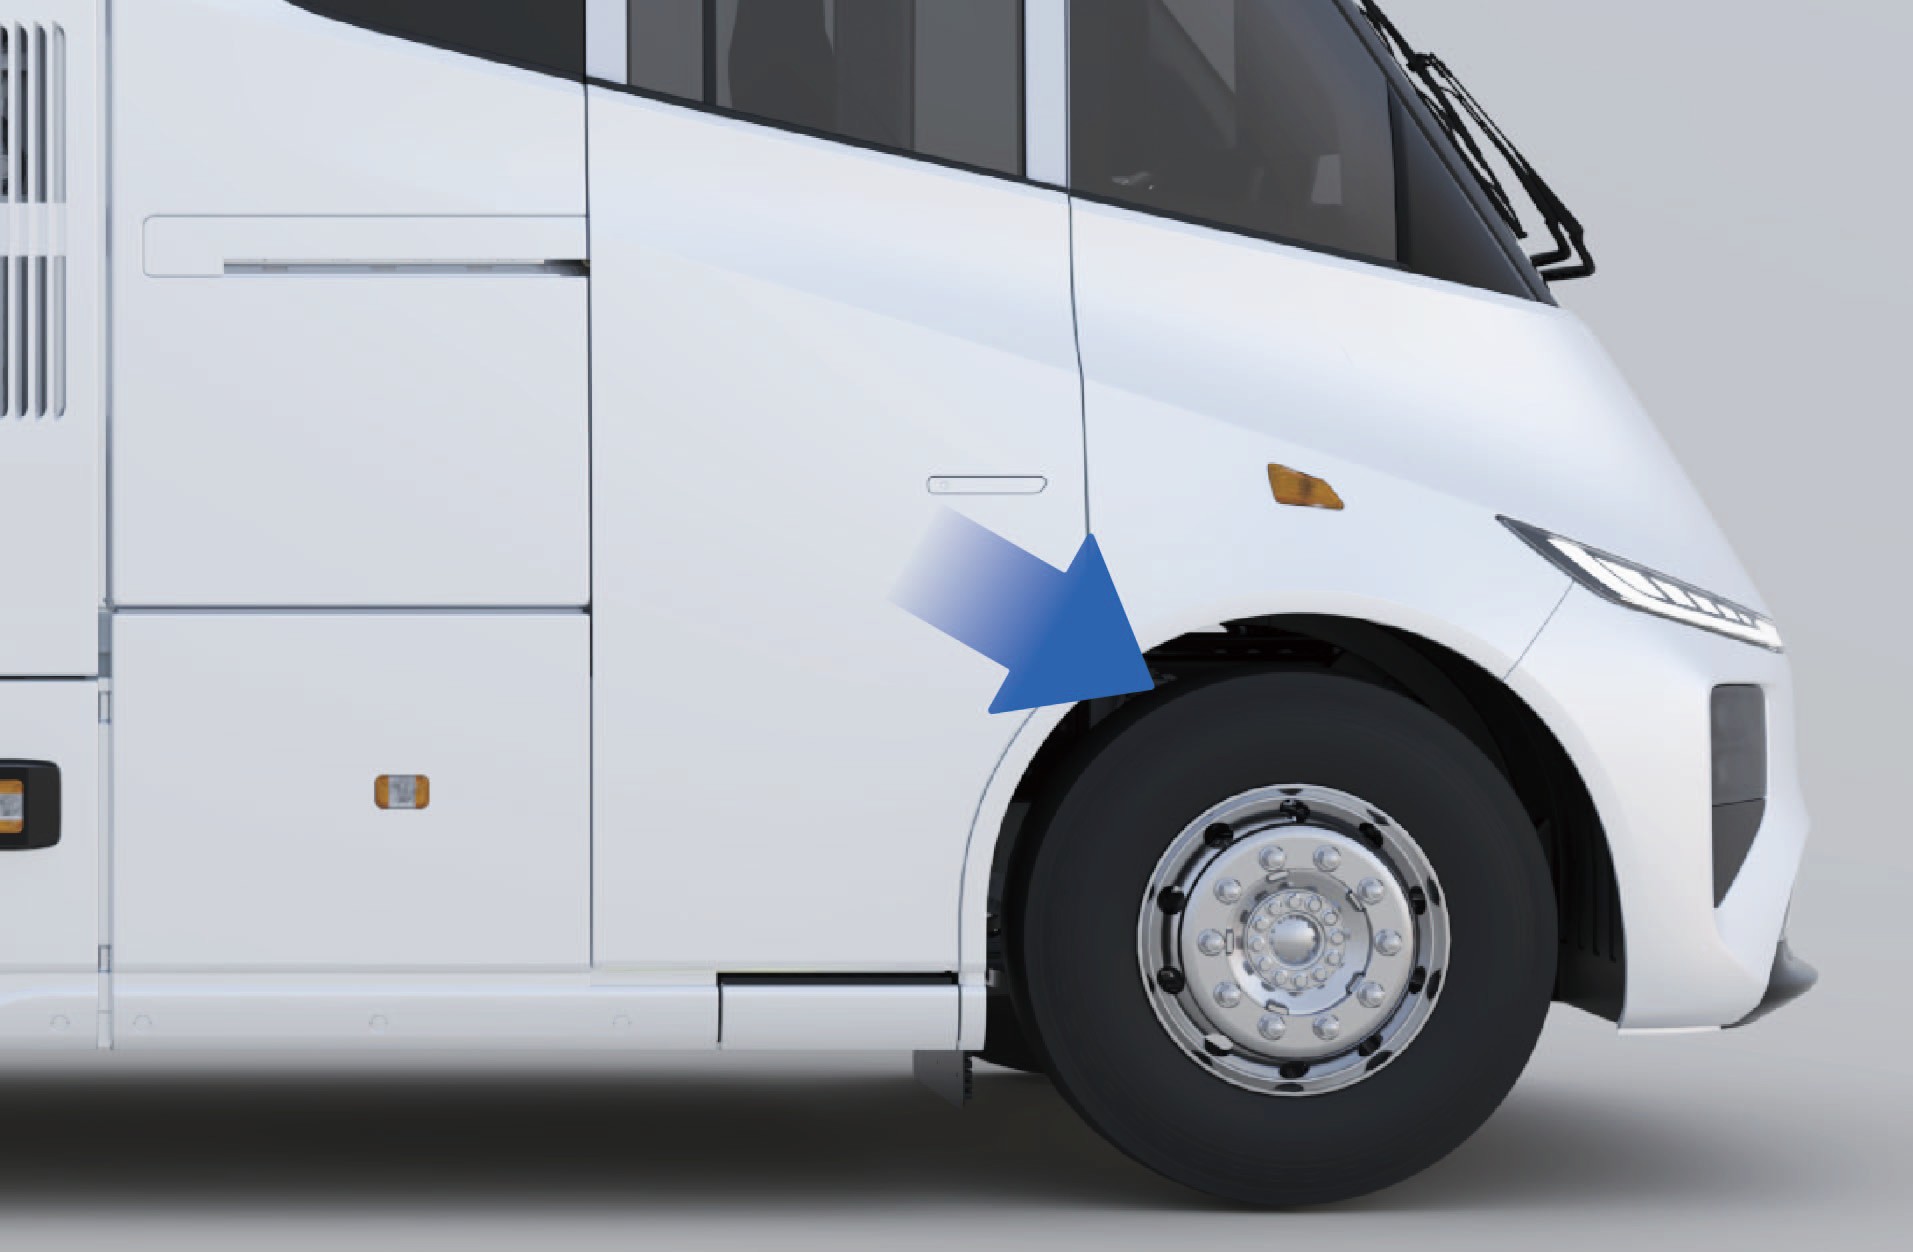
Fordonets identifikationsnummer (VIN) är stämplat på den högra ramvangen, nära mittlinjen till framaxeln.
Placering av motorns typskylt och kod
Fordonsidentifikation

Placering av motorns typskylt
Placering av motorns serienummer (SN)
Anmärkning
Avtrycket (gnuggkopian) av motorns serienummer följer med motordokumentationen när fordonet levereras från fabriken. Spara detta dokument för framtida referens.
Eftersom traktionsmotorer från olika tillverkare kan variera, kan informationen på motorns typskylt och tillhörande dokumentation avvika. Se den faktiska produkten.
Mikrovågs-/RF-genomtränglighet för framruta Fordonsidentifikation
Framrutan på detta fordon innehåller inga metalliska beläggningar som stör överföring av radiofrekvenssignaler (RF).
Utrustning för elektronisk vägtullsuppbörd (ETC), tullbrickor, telematikutrustning eller andra RF-baserade enheter kan därför monteras på framrutan i enlighet med monteringsanvisningarna från utrustningstillverkaren.
Elektrisk skjutdörr
↑ Till toppenTillgång till fordonet
En elektrisk skjutdörr är monterad på höger sida av fordonet. Dörren kan öppnas eller stängas med flera betjäningssätt.
Bruksanvisning
Utvändig betjäning
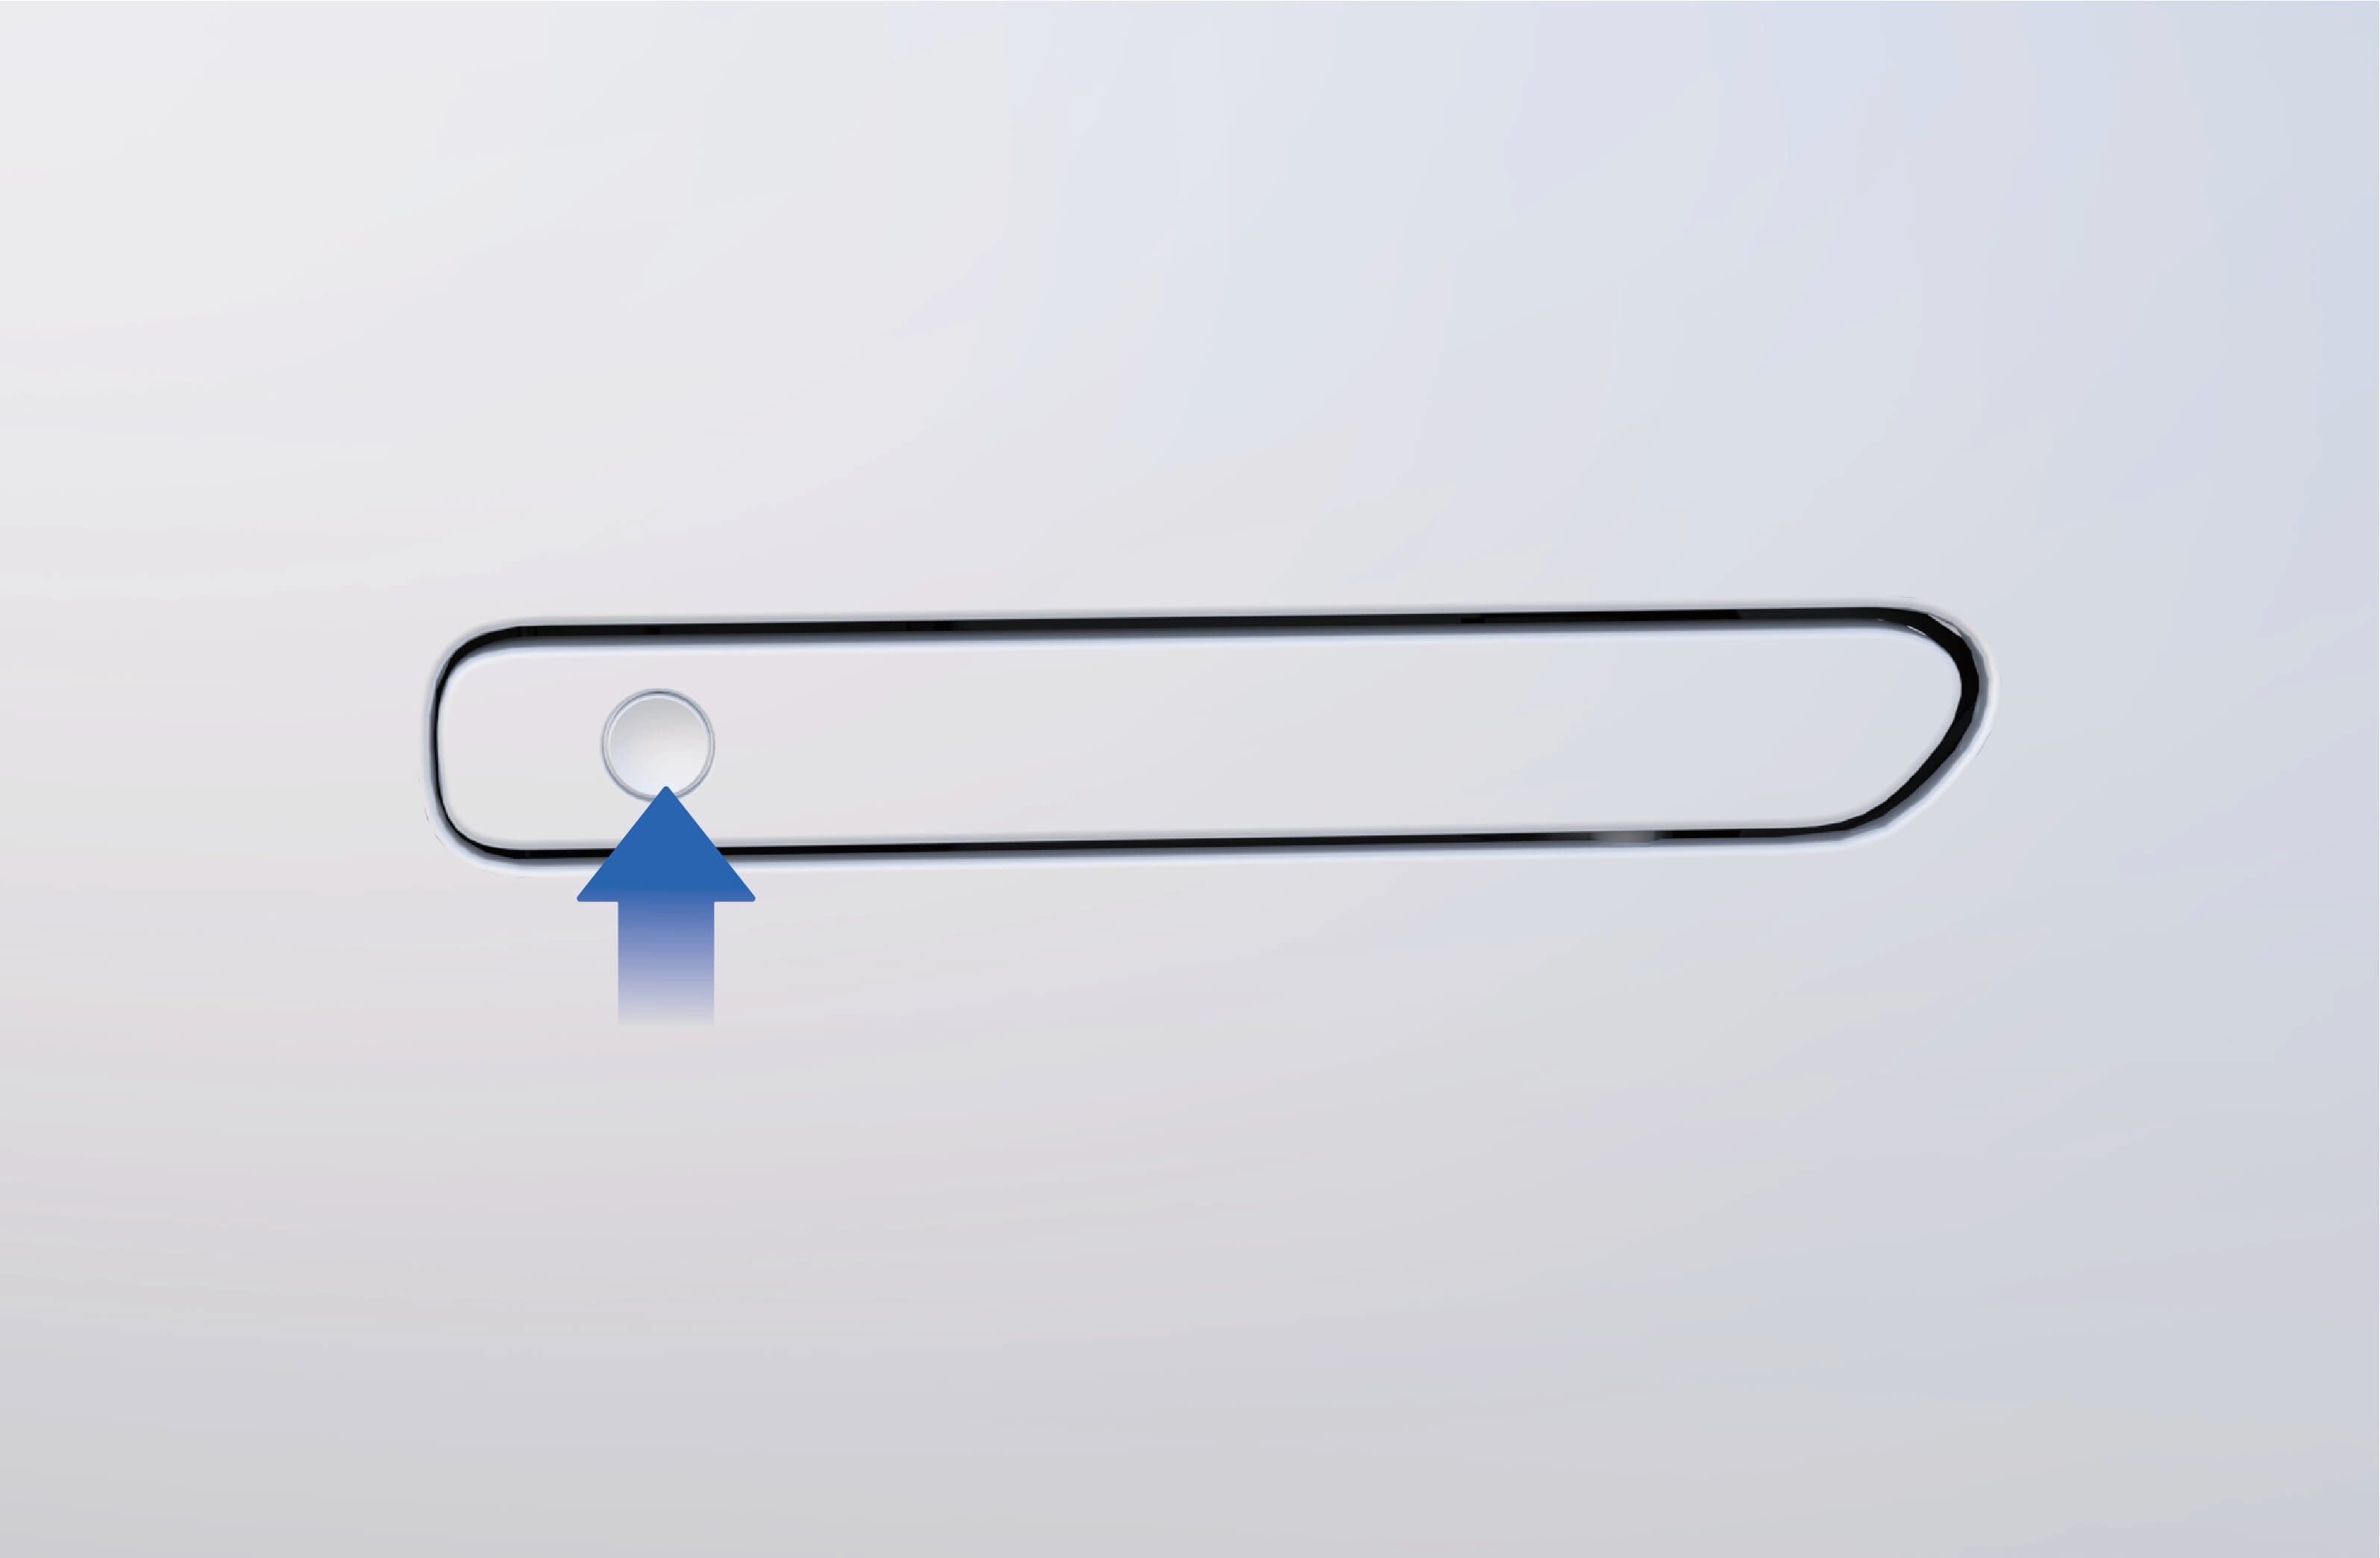
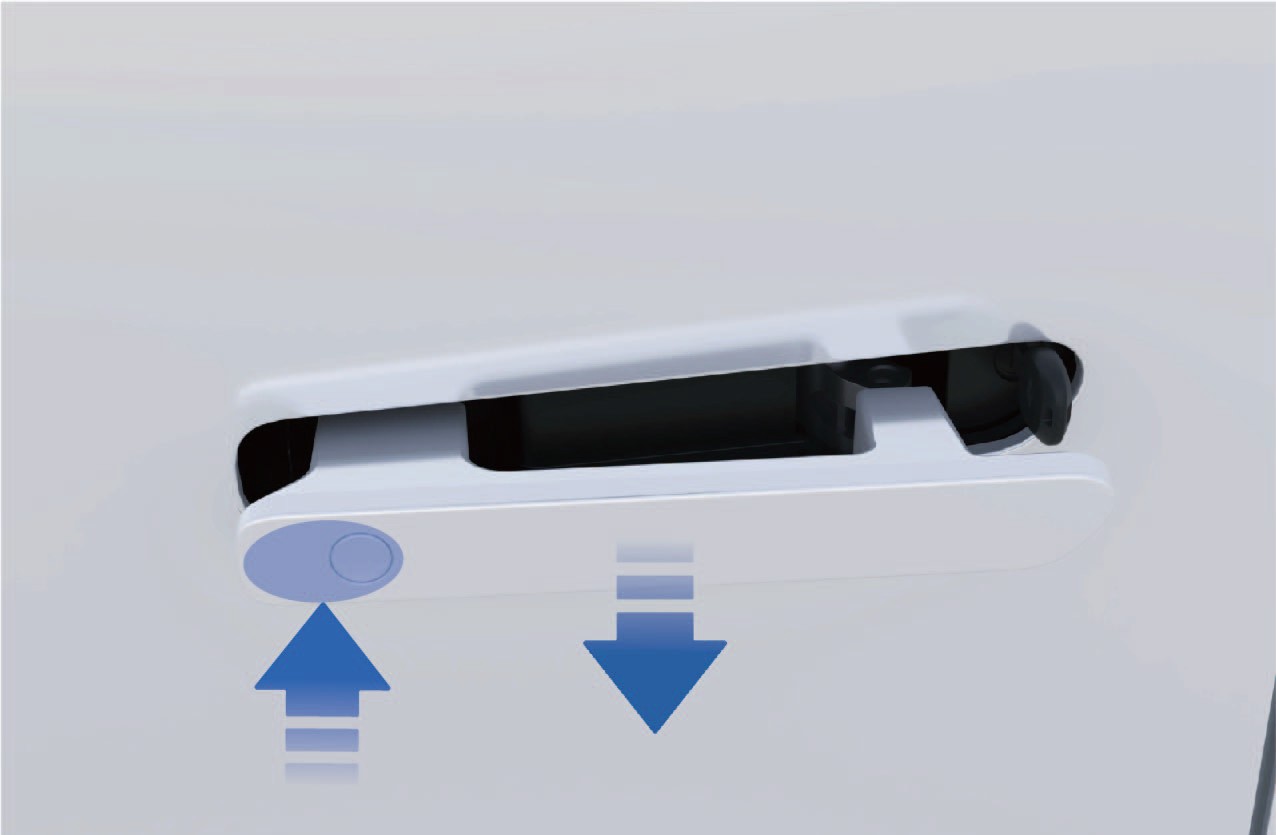
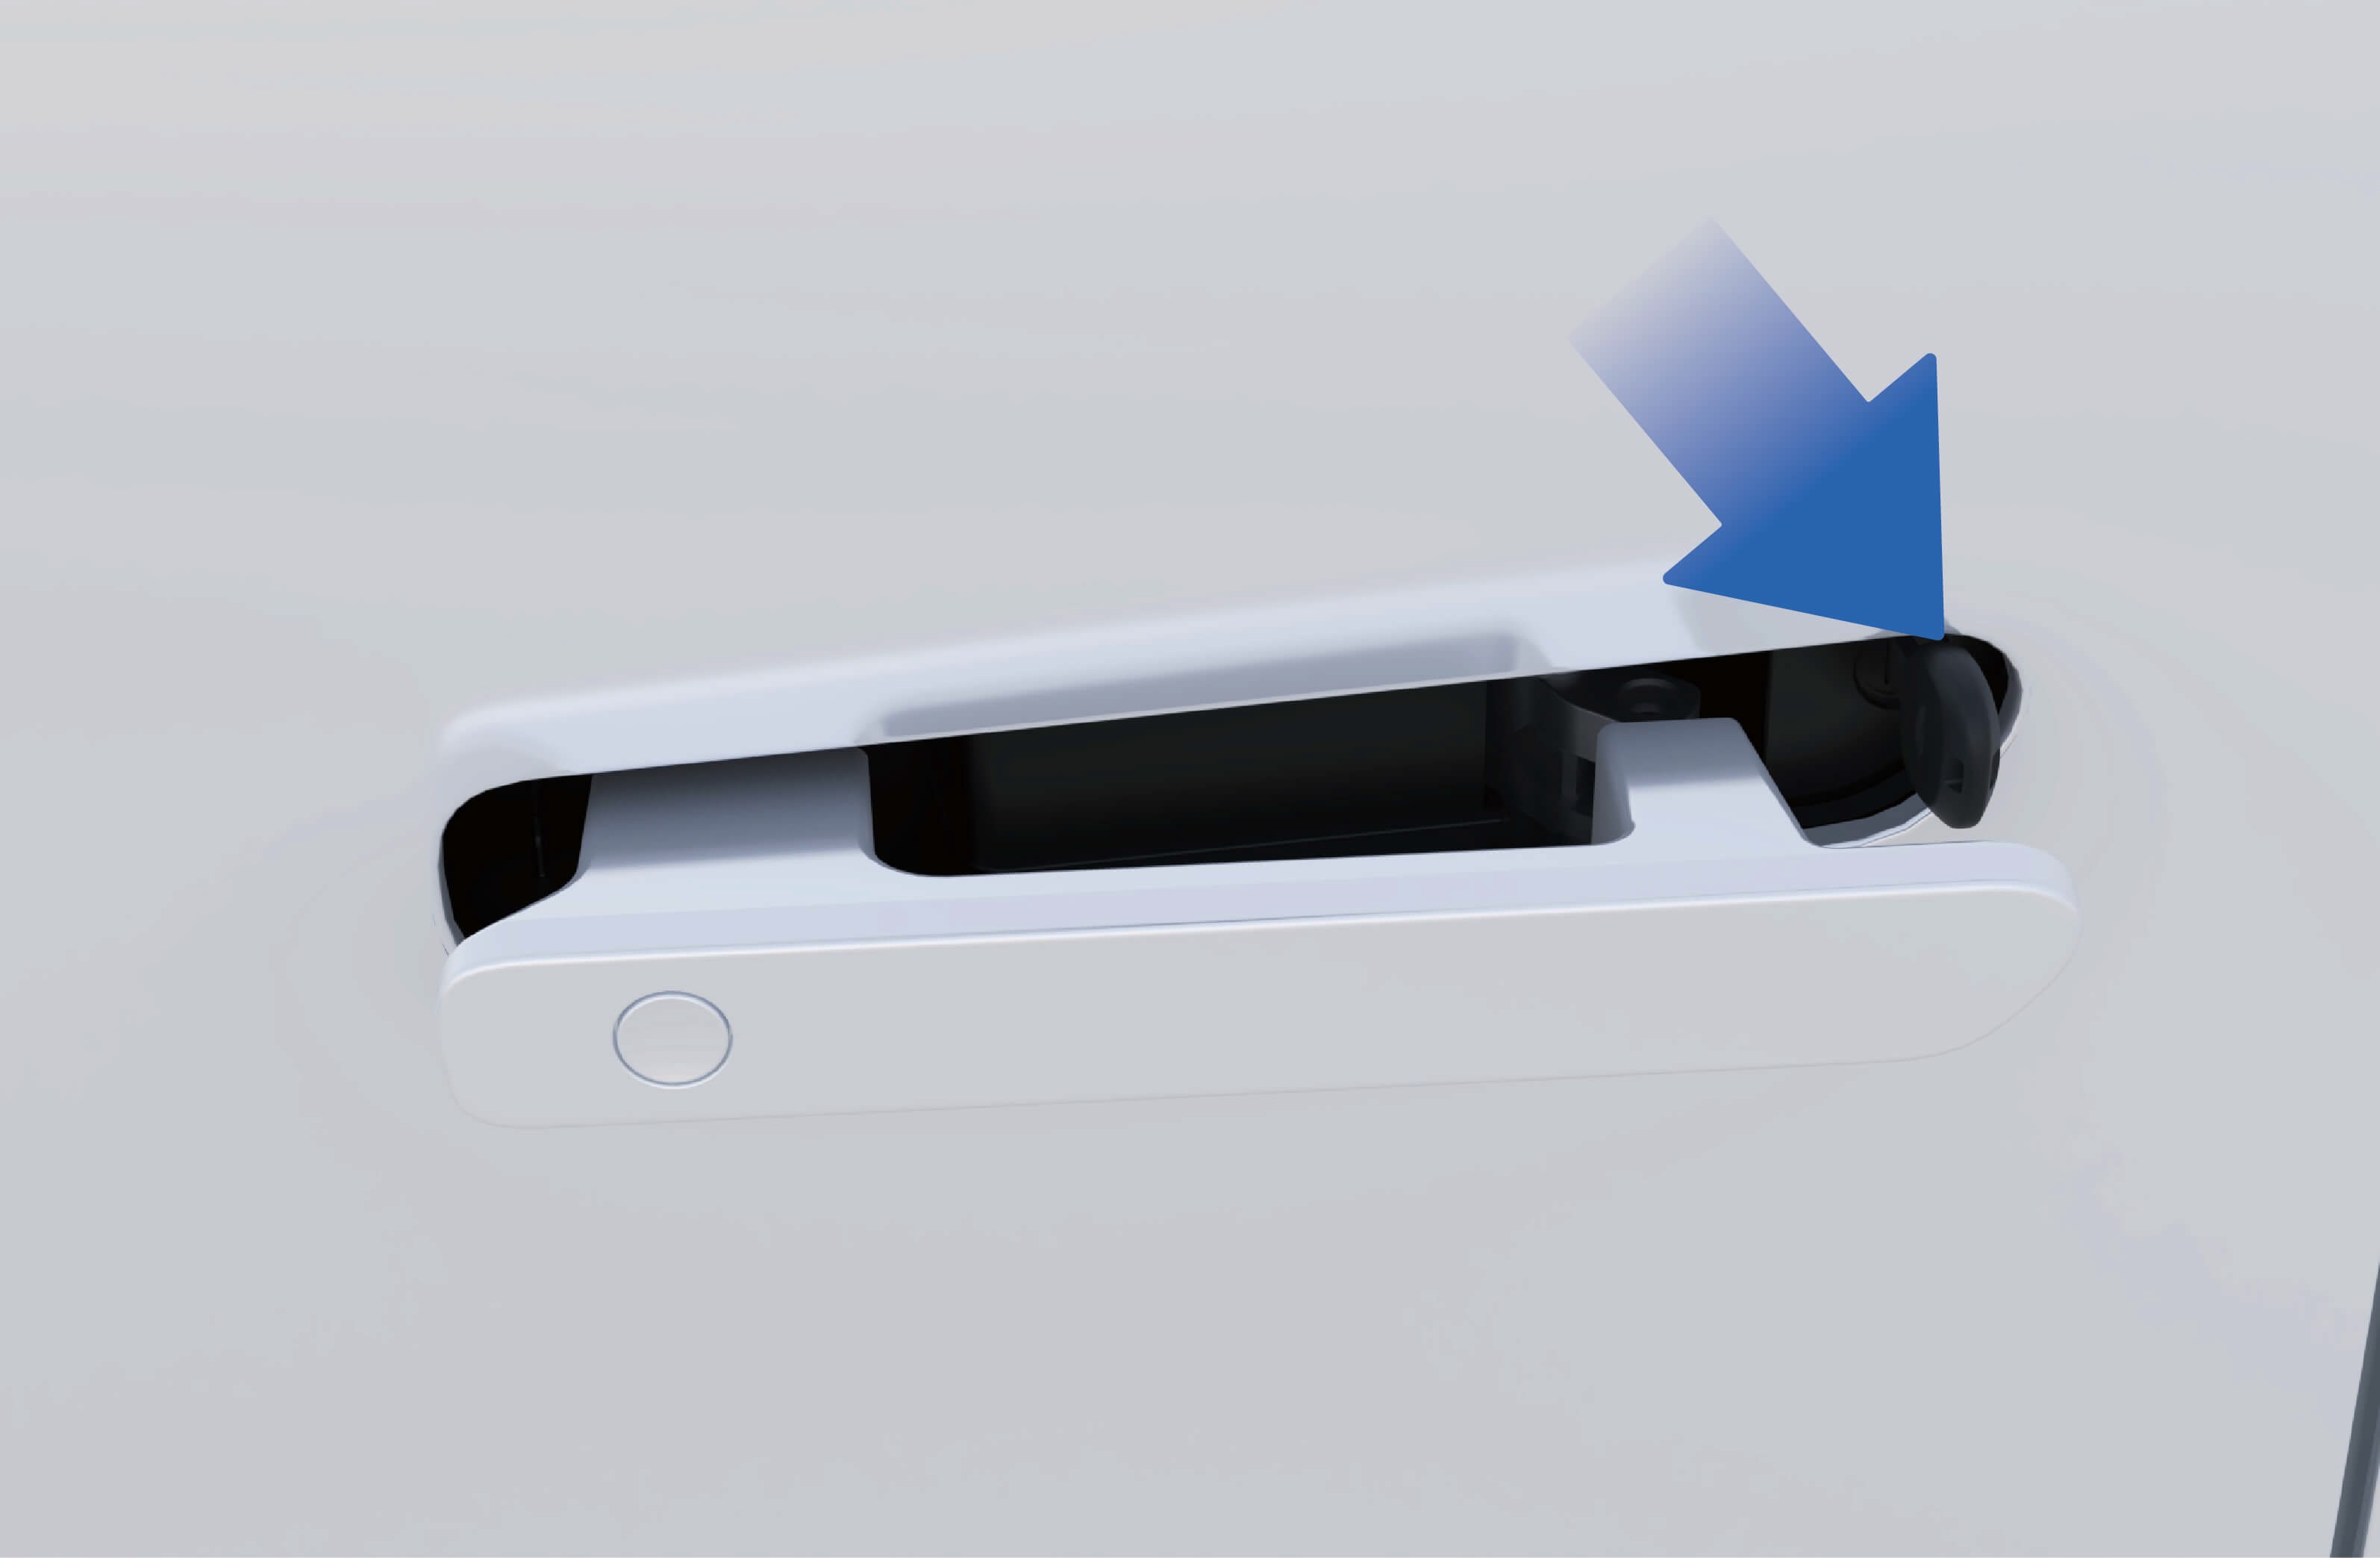
↑ Till toppenElektriskt: När fordonet är upplåst, tryck på brytaren i det infällda dörrhandtaget. Den elektriska skjutdörren öppnas eller stängs automatiskt.
Manuellt: När fordonet är upplåst:
1. Tryck på den främre änden av det infällda dörrhandtaget för att lösa ut det.
2. Dra handtaget utåt för att låsa upp skjutdörren.
3. Skjut dörren upp manuellt.
Stiga in i fordonet

Efter att den elektriska skjutdörren är öppnad, stig in i förarhytten så här:
Vänd mot dörren och grip vänster och höger handtag med båda händerna.
Sätt ena foten på nedersta steget och dra dig uppåt.
Sätt den andra foten på översta steget.
Flytta den nedre handen till en högre position på handtaget.
Stig in i förarhytten.
Att halka eller falla vid in- eller utstigning kan leda till personskada.
Vått eller smutsigt skodon ökar faran för att halka betydligt. Visa extra försiktighet vid in- och utstigning av förarhytten.
Ha alltid trepunktskontakt med fordonet vid in- och utstigning av förarhytten (två händer och en fot, eller två fötter och en hand).
Hoppa aldrig ut ur fordonet.
Invändig betjäning
När fordonet är upplåst:
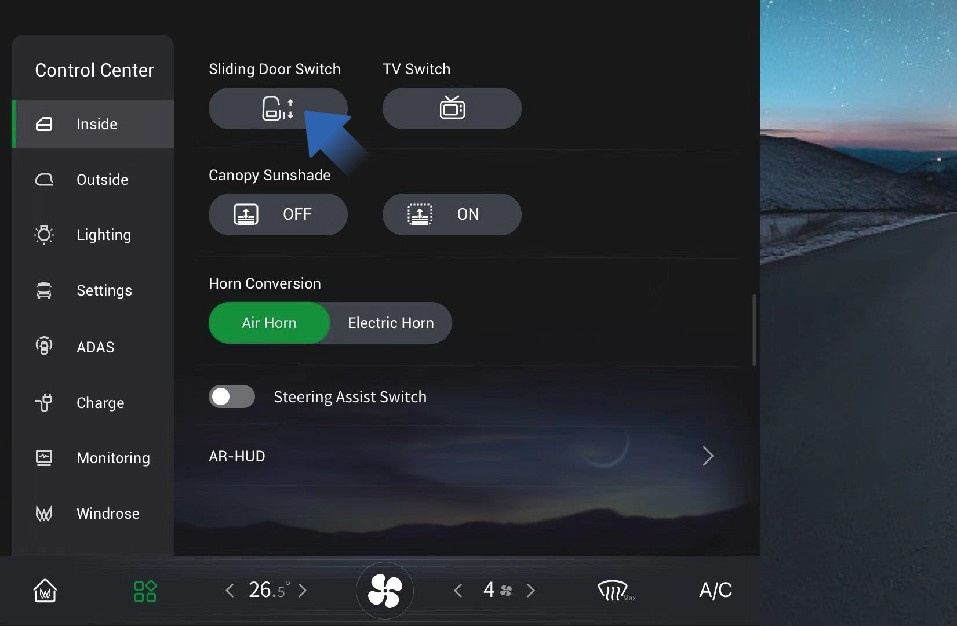
Välj ”Control Center” på fordonets informationsskärm.
Byt till gränssnittet ”Inside”.
Tryck på manöverknappen ”Sliding Door” för att öppna eller stänga den elektriska skjutdörren
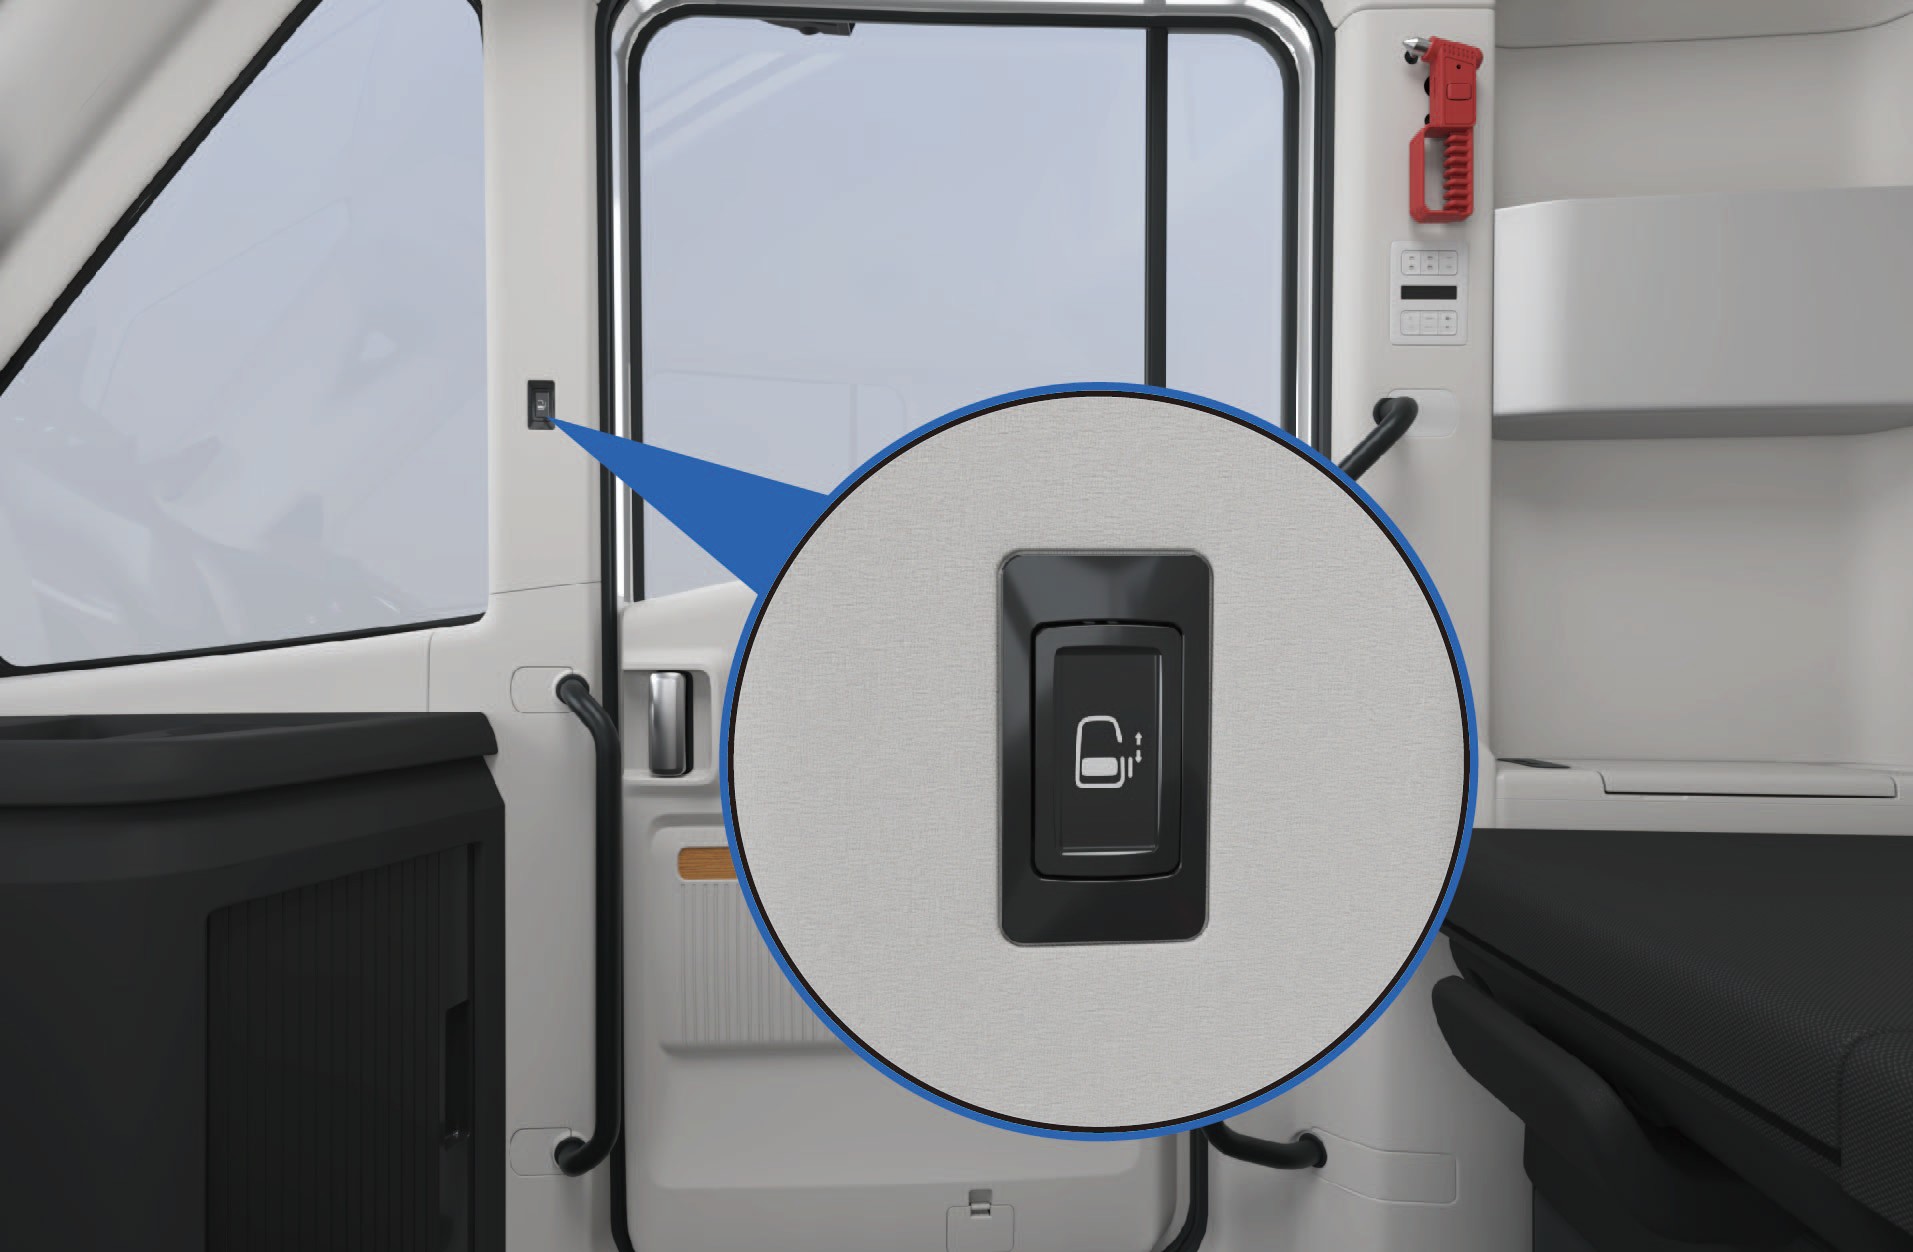
Elektriskt: När fordonet är upplåst, tryck på brytaren på B-stolpens klädselpanel framför skjutdörren för att öppna eller stänga dörren.
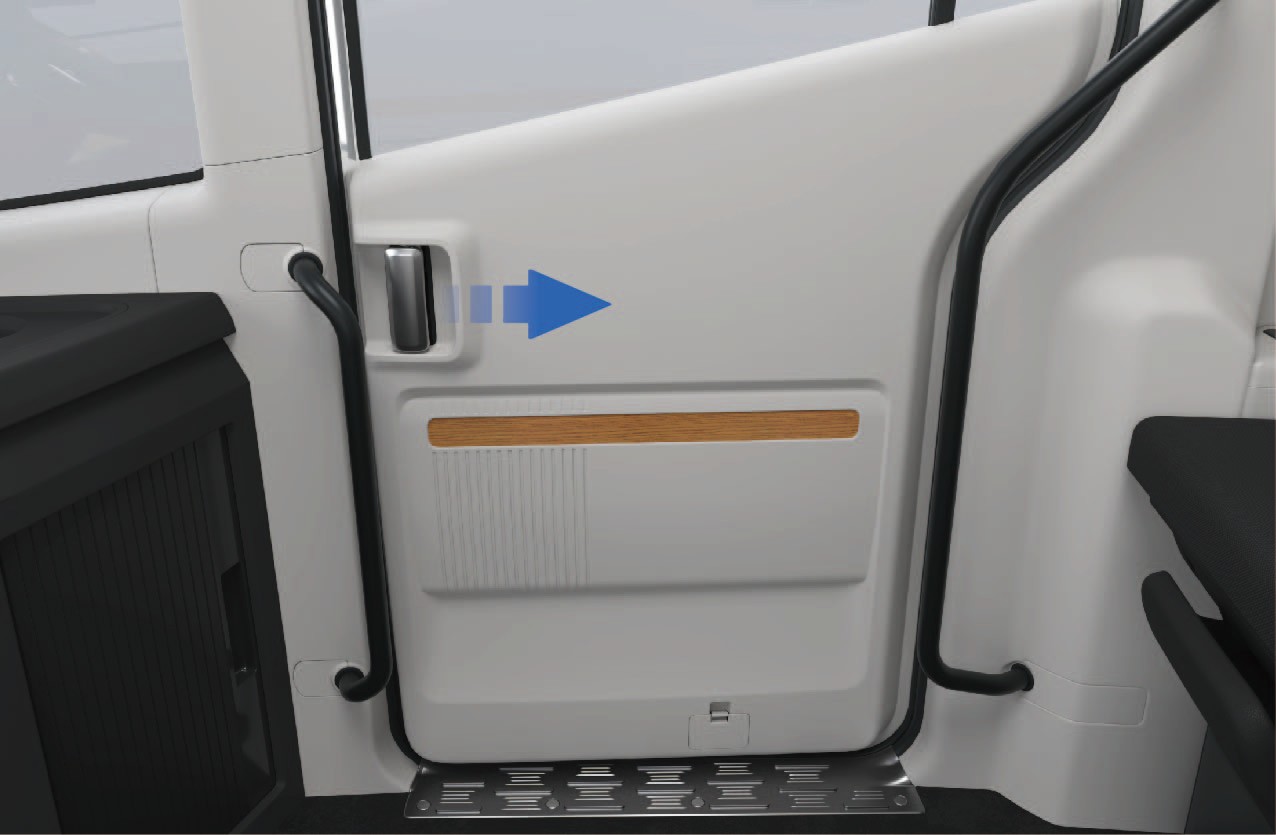
Manuellt: Om skjutdörren är stängd, dra det invändiga handtaget bakåt för att låsa upp dörren och skjut den upp manuellt.
Om skjutdörren är öppen, håll det invändiga handtaget och skjut dörren framåt för att stänga den.
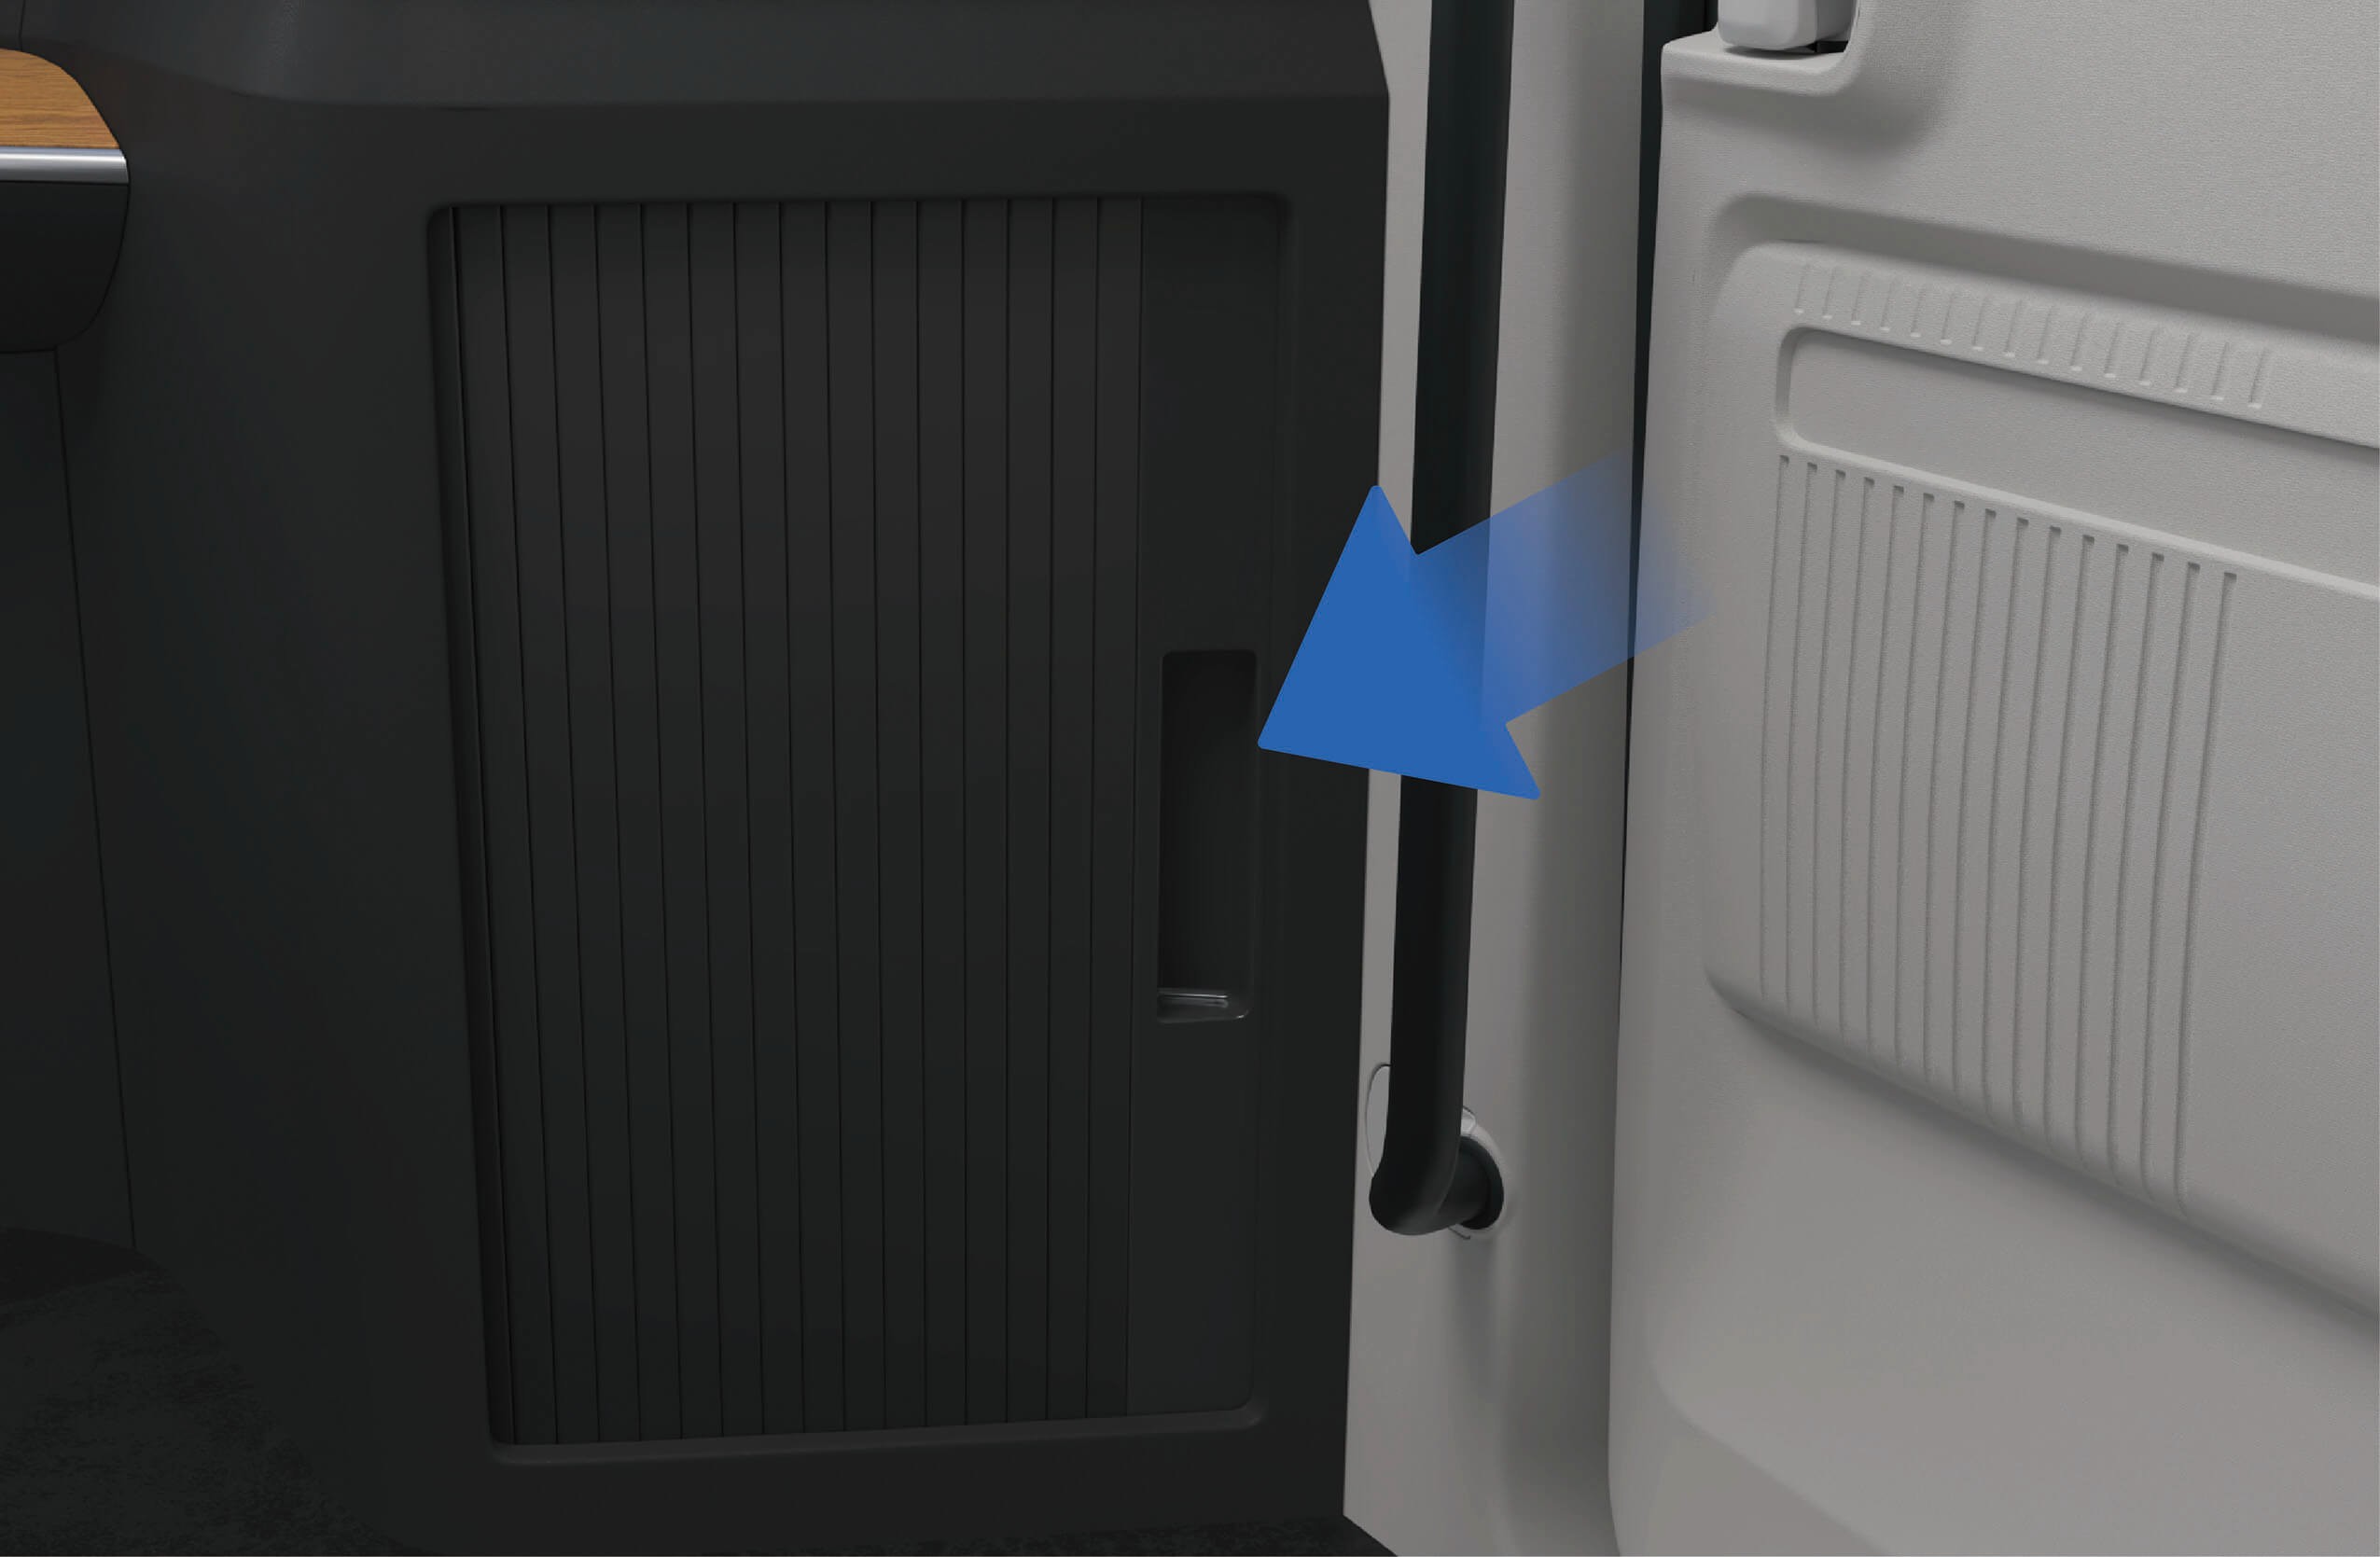
Nödsituationer i fordonet
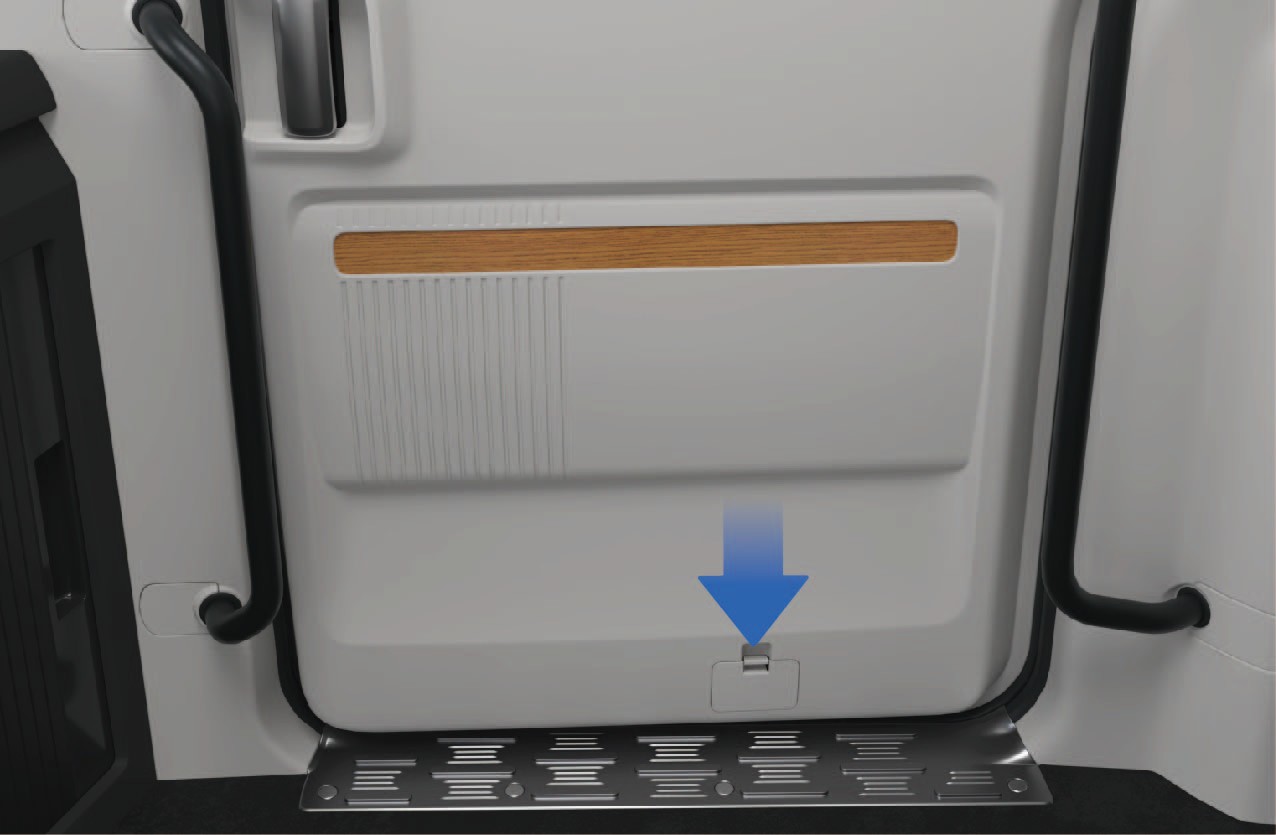
Om den elektriska brytaren eller det invändiga handtaget sviktar:
Ta av nedre täckplattan på skjutdörrens skyddspanel.
Dra i nödutlösarkabeln för att låsa upp skjutdörren manuellt.
Centrallåsbrytare
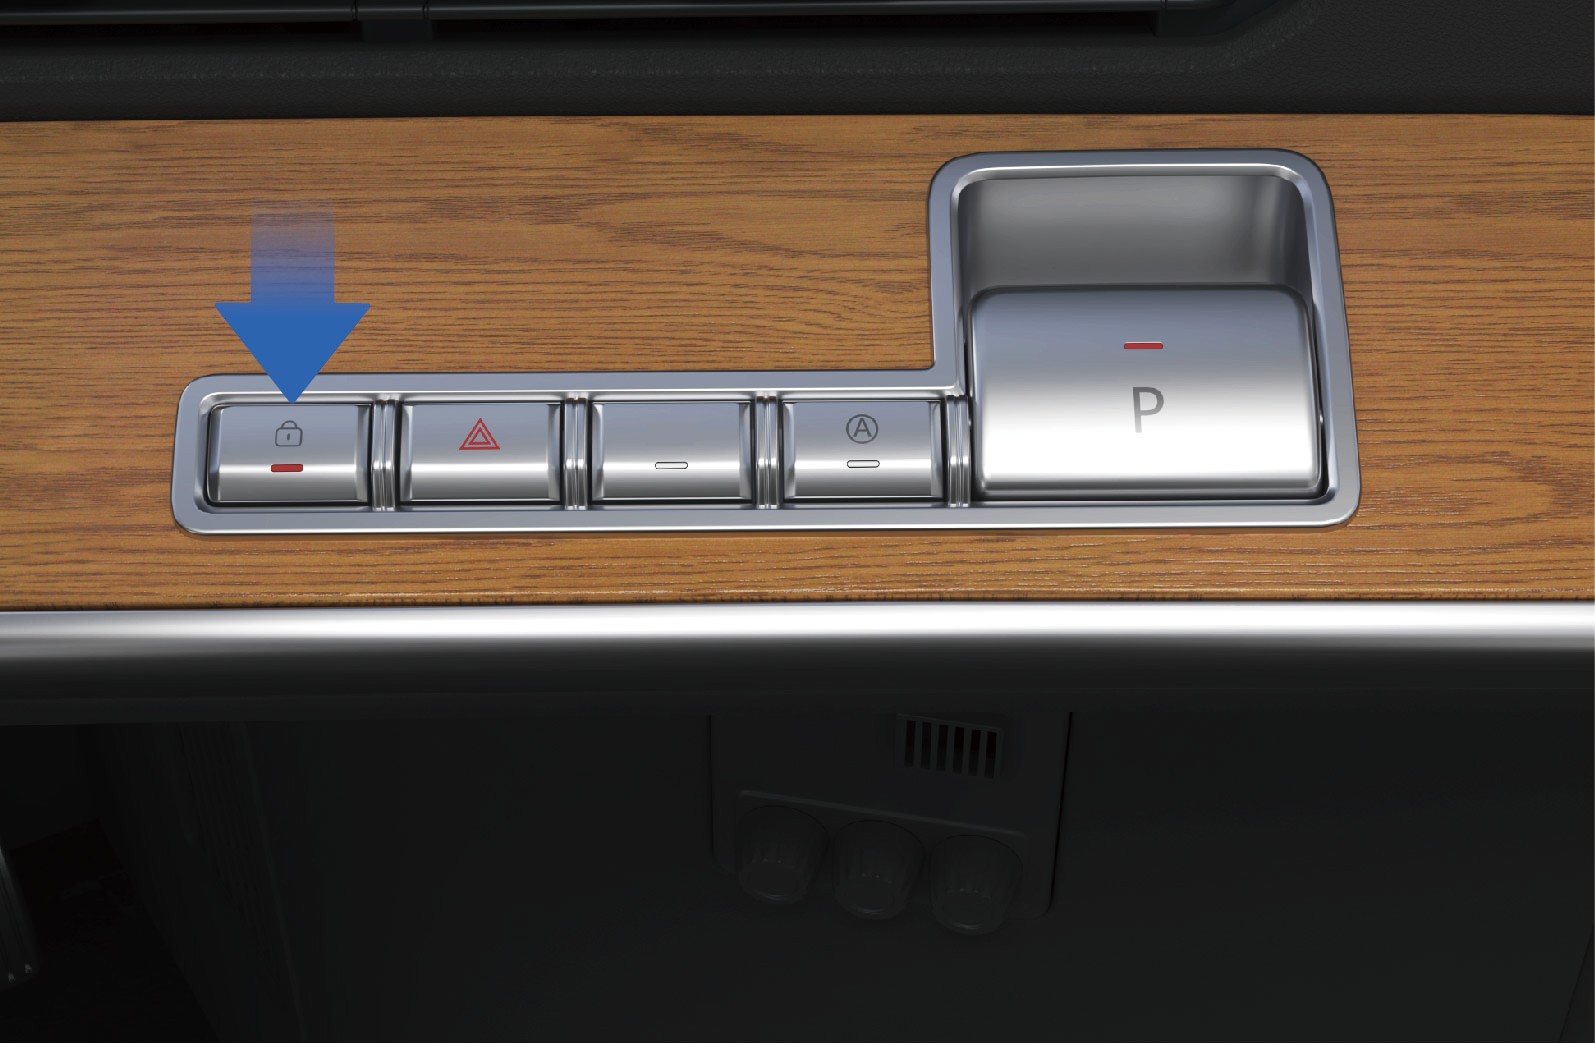
Efter att skjutdörren är stängd:
Tryck på centrallåsbrytaren i knappgruppen på höger sida av instrumentpanelen för att låsa skjutdörren.
Statusindikatorn lyser när dörren är låst.
Tryck på brytaren igen för att låsa upp dörren.
Manuellt läge för skjutdörr
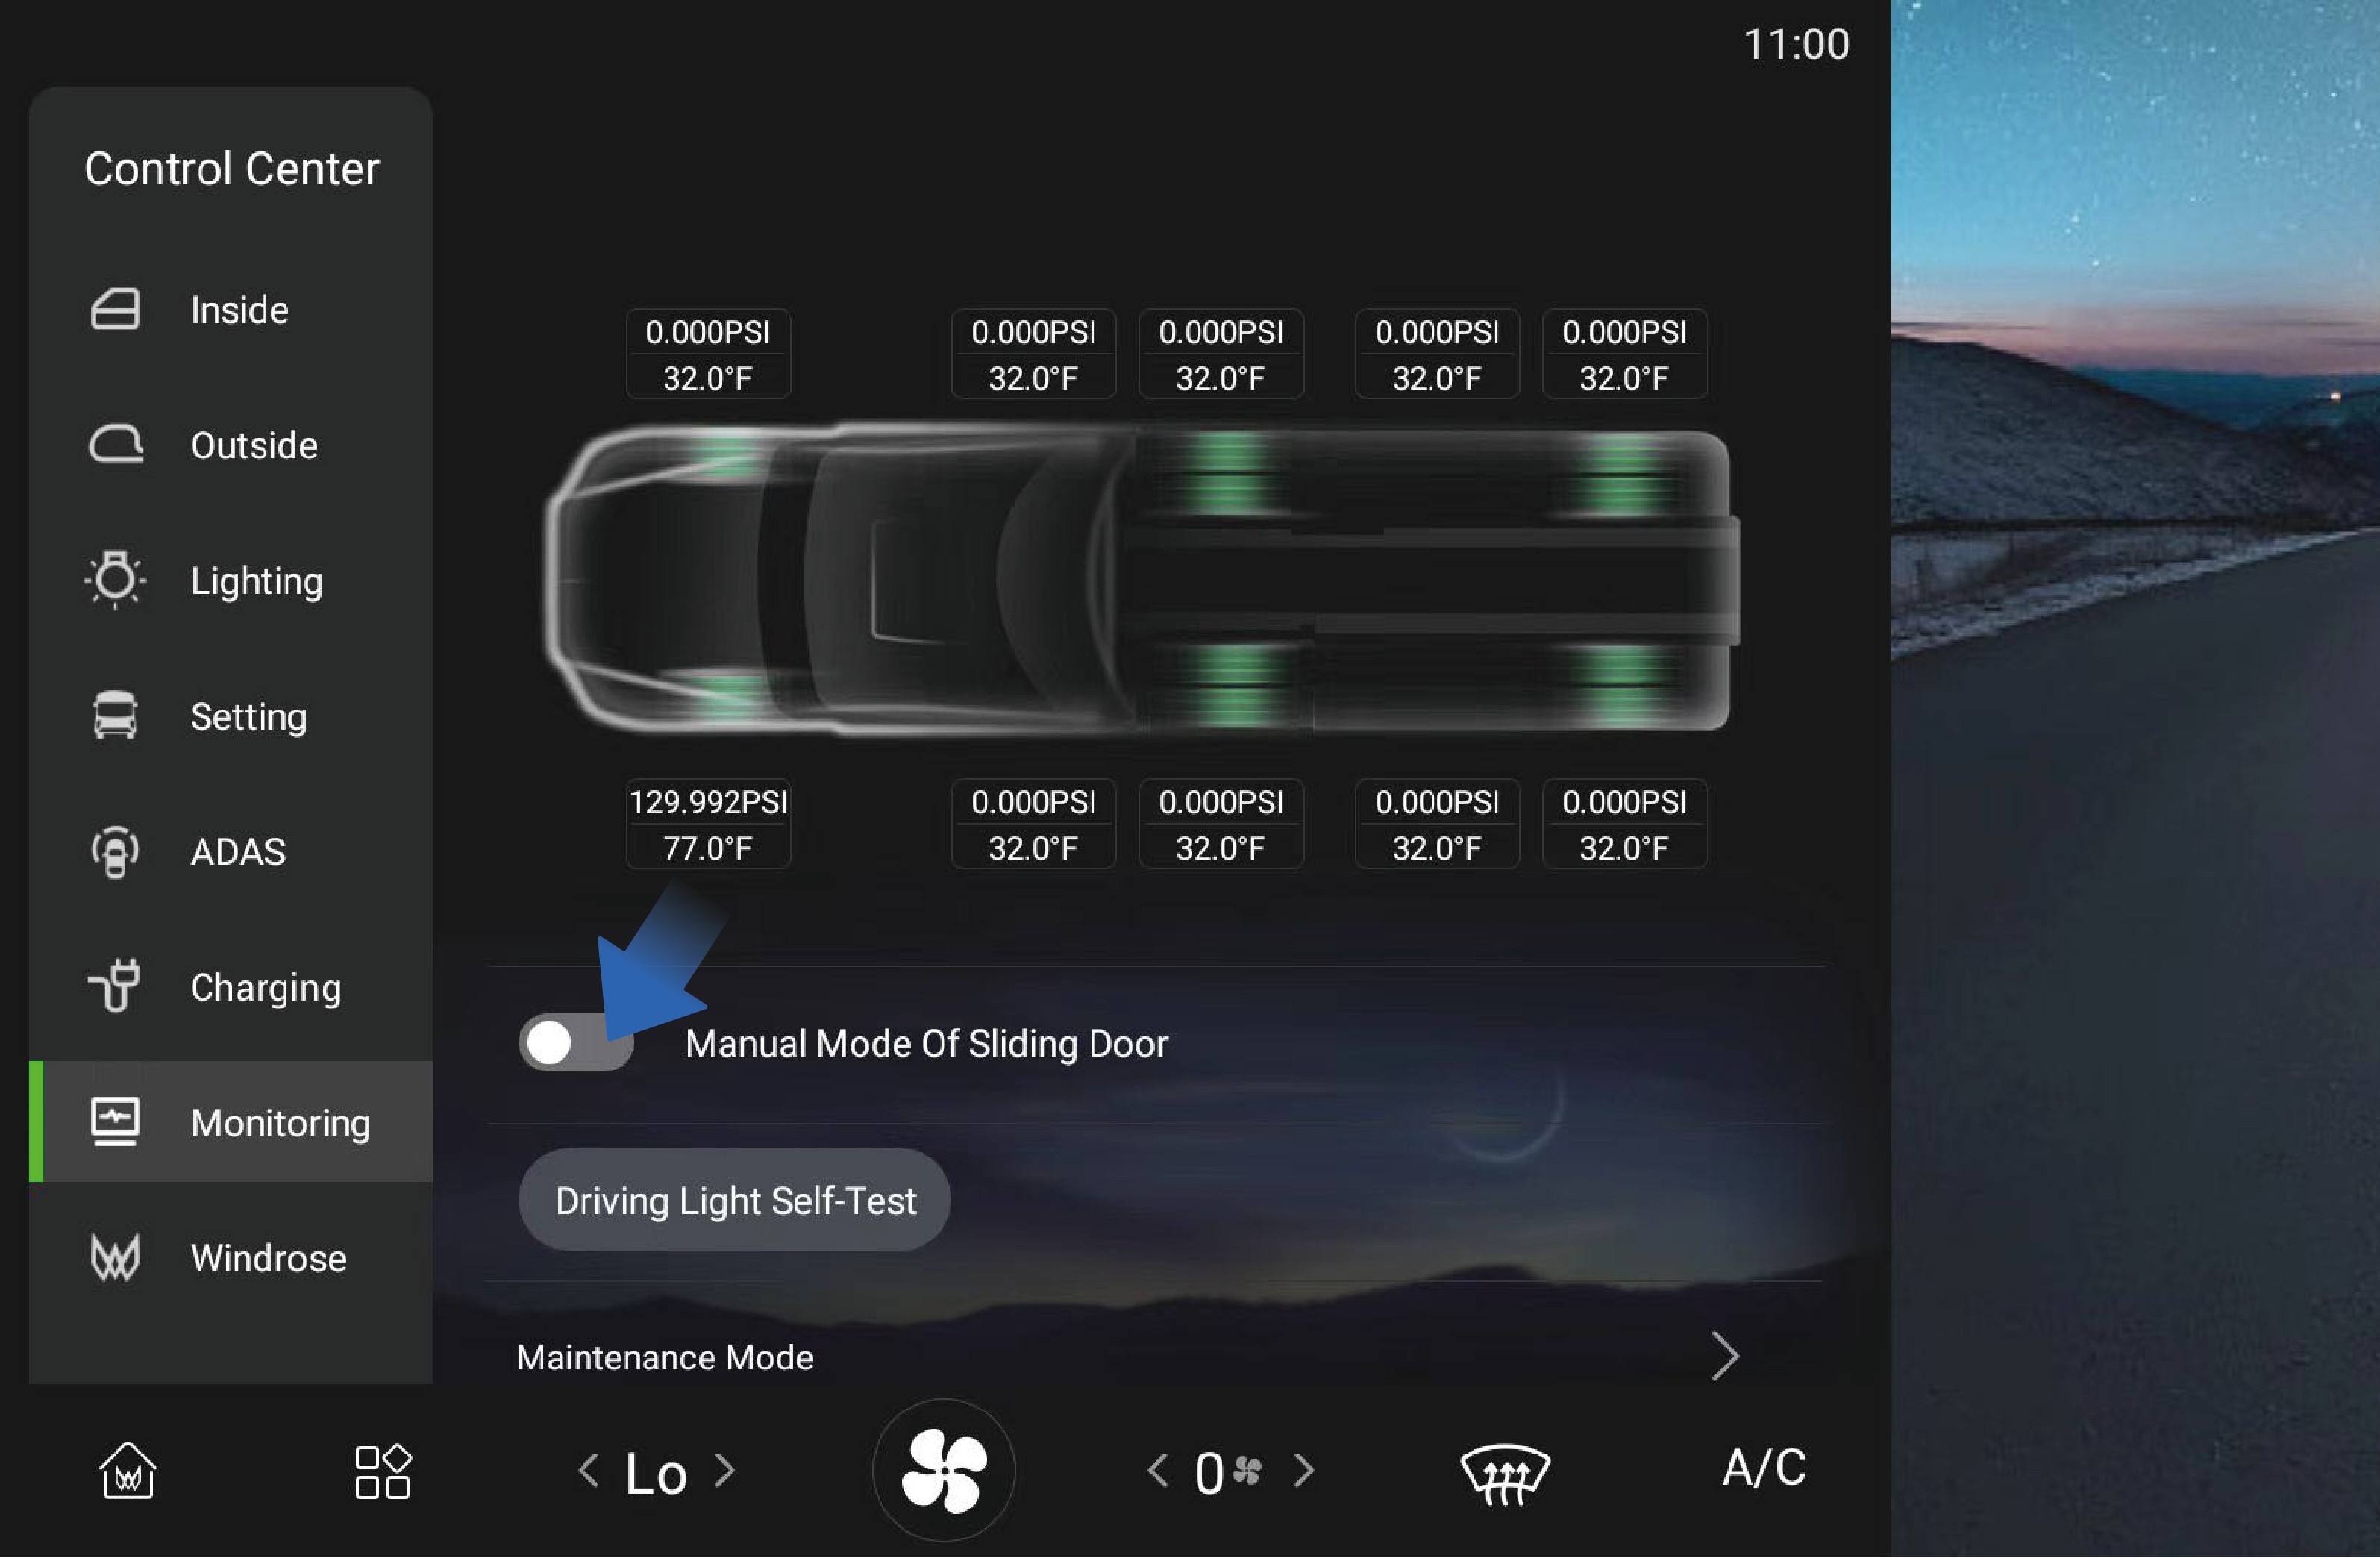
Det manuella läget kan aktiveras eller inaktiveras via fordonets informationsskärm:
Välj ”Control Center”.
Byt till gränssnittet ”Monitoring”.
Välj ”Sliding Door Manual Mode”.
↑ Till toppenNär manuellt läge är aktiverat kan skjutdörren endast betjänas manuellt.
Klämskydd för skjutdörr
Om skjutdörren registrerar ett hinder under automatisk stängning, slutar den att stänga och går automatiskt tillbaka till öppet läge.
Försiktighetsåtgärder
↑ Till toppenVarningKlämskyddet är endast aktivt under elektrisk stängning. Det är inte aktivt när dörren betjänas manuellt.
Säkerhetsbälte
↑ Till toppenTillgång till fordonet
Förarsätet och passagerarsätet fram är utrustade med säkerhetsbälten. Säkerhetsbälten bidrar till att förhindra eller minska skada på personer i fordonet vid nödbromsning eller kollision.
Bruksanvisning
↑ Till toppenFörarens säkerhetsbälte sitter på vänster sida av förarsätet och kan dras rakt ut för att fästas.
Passagerarsätets säkerhetsbälte sitter på höger sida av passagerarsätet fram. När passagerarsätet är i bruk, påminn passageraren om att ta på säkerhetsbältet korrekt innan fordonet sätts i rörelse.
Korrekt användning av säkerhetsbälte
Följ dessa riktlinjer vid användning av säkerhetsbälte:
• Höftdelen av bältet ska ligga lågt över bäckenet (höfterna) och inte över magen.
• Bältet ska ligga tätt intill kroppen utan vridningar.
• Axeldelen ska gå över mitten av axeln.
• Placera aldrig bältet över halsen eller under armen.
• Efter att säkerhetsbältet är fäst, dra axeldelen uppåt för att säkerställa att höftdelen ligger väl över höfterna.
• Kontrollera alltid att säkerhetsbältet är korrekt låst innan körning.
Påminnelse om säkerhetsbälte
Om förarens säkerhetsbälte inte är fäst, lyser varningslampan för säkerhetsbälte i kombinationsinstrumentet.
När föraren fäster säkerhetsbältet, slocknar varningslampan.
Rengöring av säkerhetsbälten
Om ett säkerhetsbälte blir smutsigt, rengör det med mild tvål och vatten.
1. Dra säkerhetsbältet helt ut och fäst det.
2. Applicera en mild tvållösning på det nedsmutsade området.
3. Rengör bältet försiktigt med en mjuk borste eller trasa.
4. Skölj med rent vatten om nödvändigt.
5. Låt säkerhetsbältet torka helt innan det dras in igen.
Dra inte ett vått säkerhetsbälte in i upprullningsmekanismen.
Försiktighetsåtgärder
VarningAlla i fordonet måste använda säkerhetsbälte korrekt medan fordonet är i rörelse. Korrekt användning av säkerhetsbälte minskar faran för skada betydligt vid nödbromsning eller kollision.
Saknad eller felaktig användning av säkerhetsbälte kan leda till allvarlig personskada eller dödsfall.
Sitt inte på platser som inte är utrustade med säte och säkerhetsbälte.
Använd inte ett säkerhetsbälte som är skadat eller inte fungerar.
Varje säkerhetsbälte är avsett för endast en person. Dela aldrig ett säkerhetsbälte med en annan person.
Placera aldrig axelbältet runt halsen eller under armen.
Ta inte bort, ändra eller gör ingrepp i säkerhetsbältessystemet.
Använd inte blekmedel, färgämnen eller kemiska lösningsmedel för att rengöra säkerhetsbälten, eftersom detta kan försvaga bältesmaterialet.
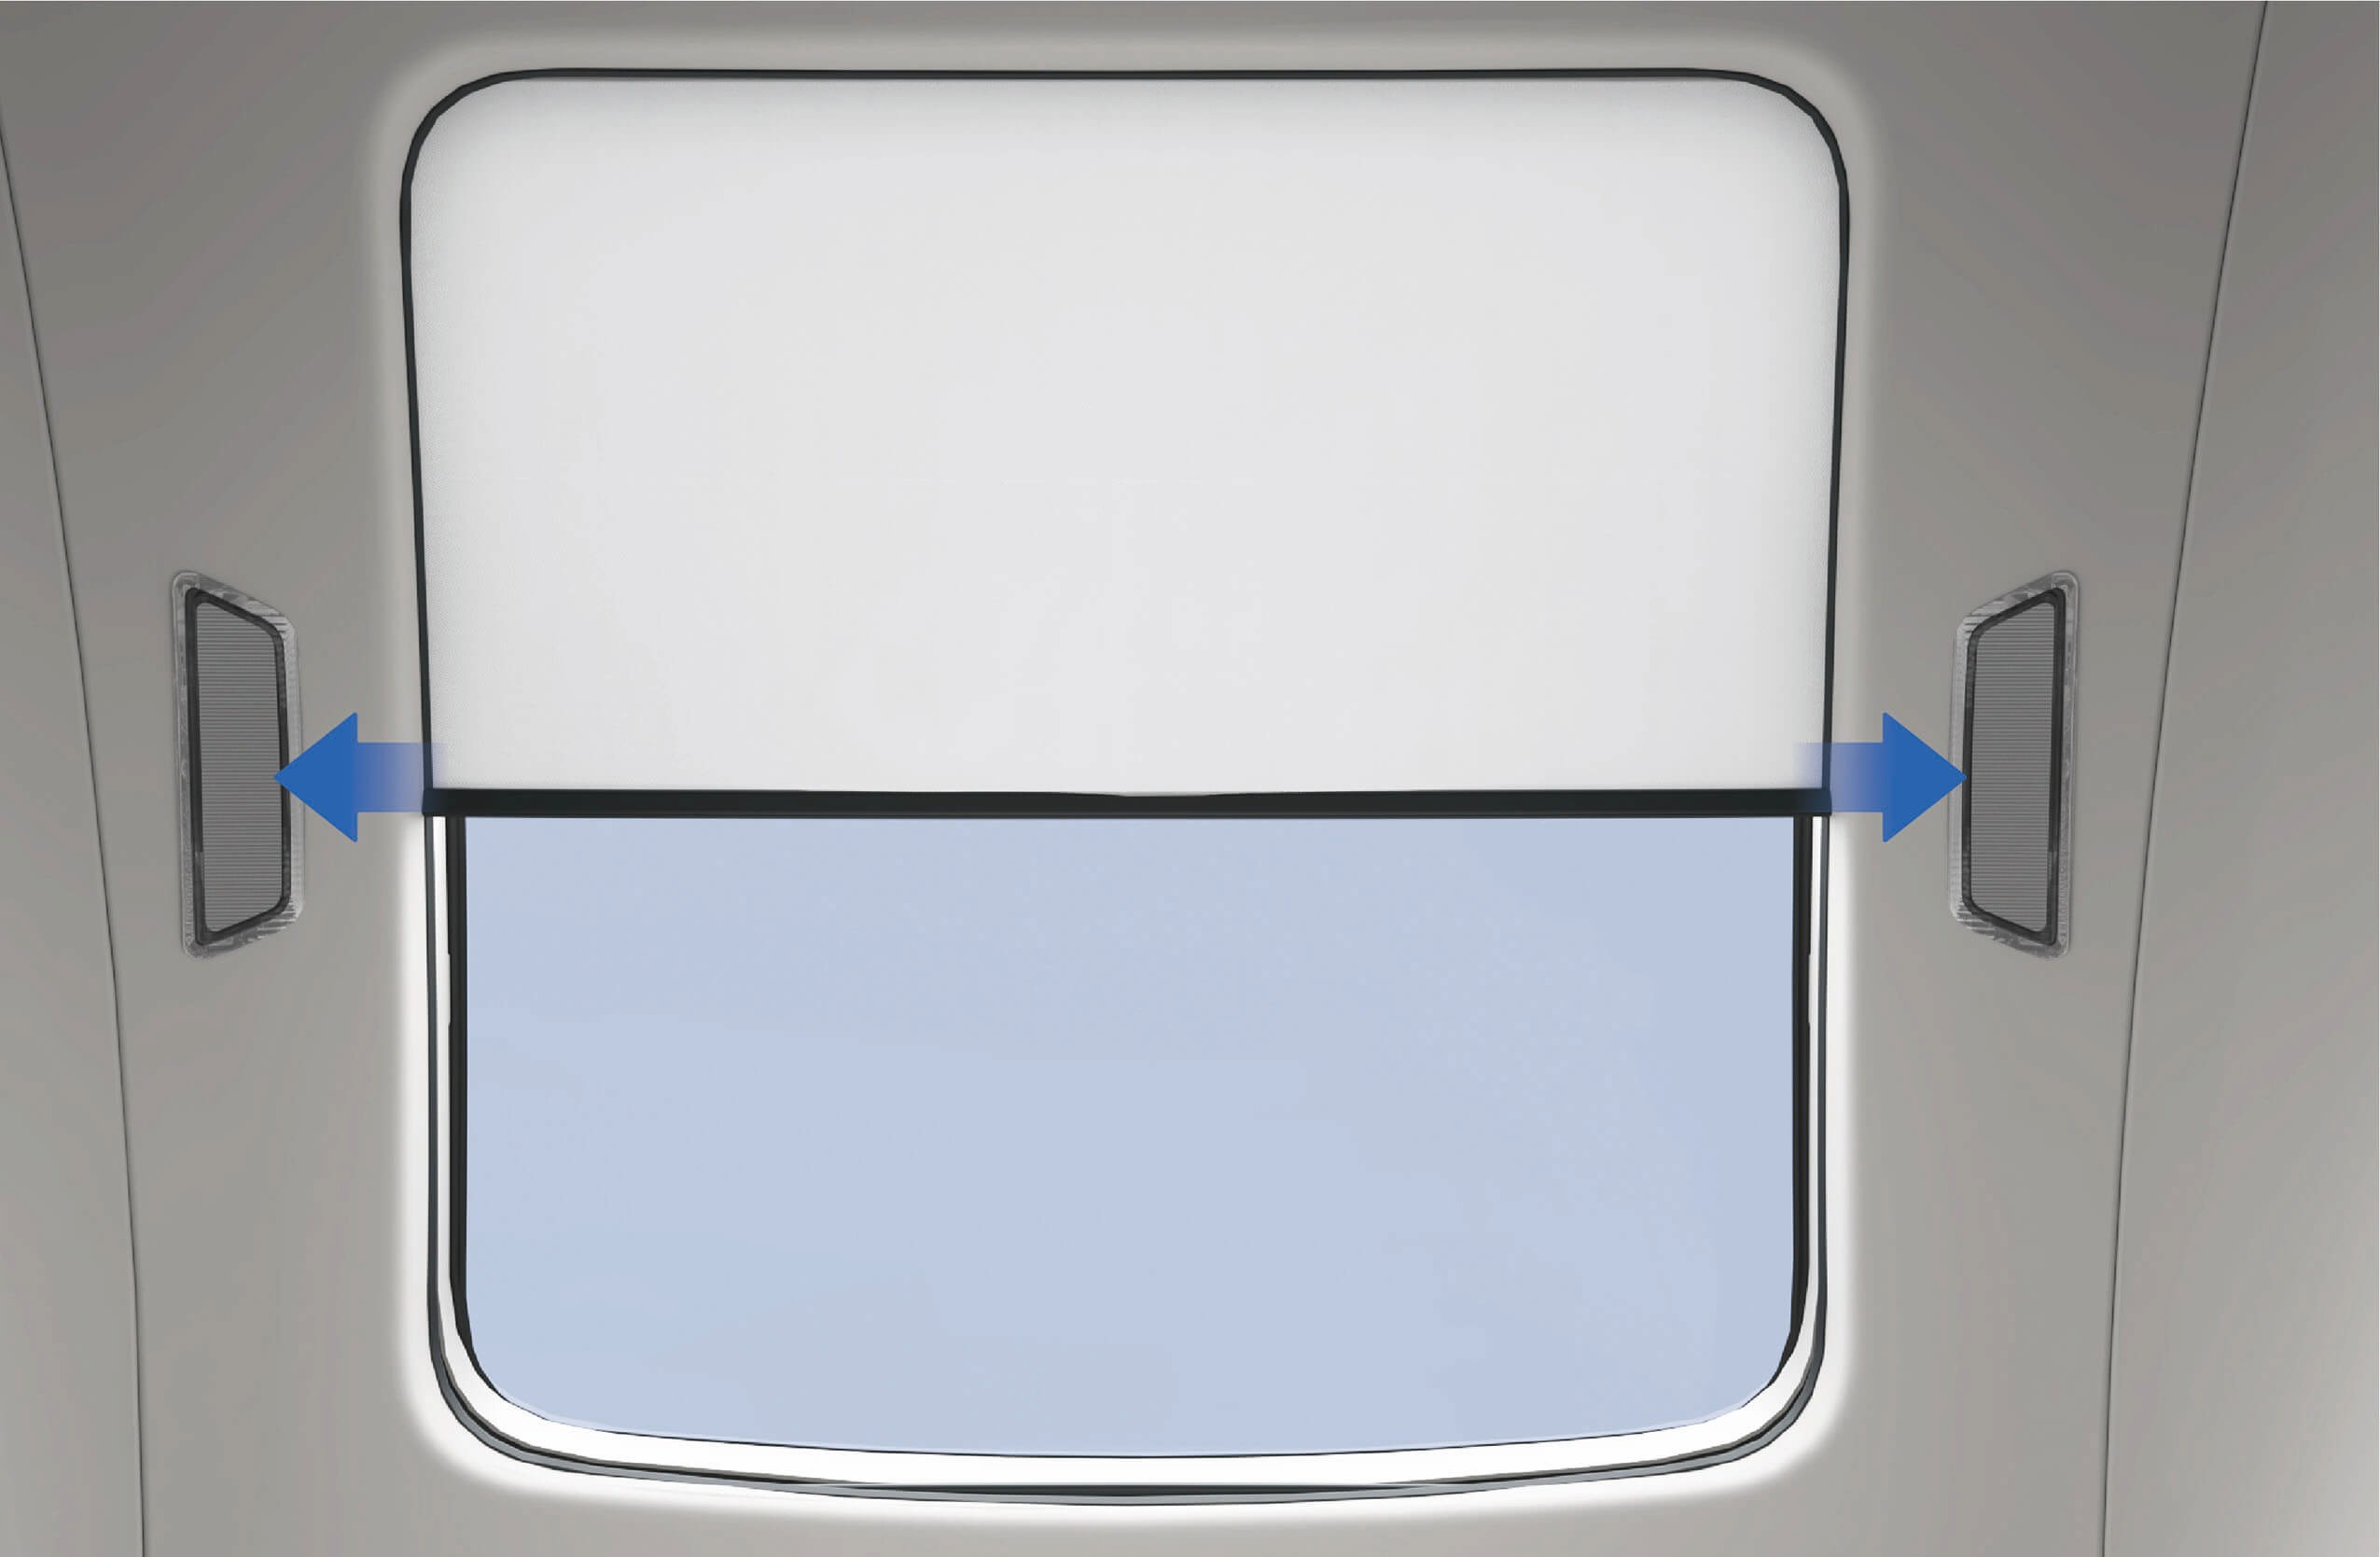
Elektrisk fönsterhiss
↑ Till toppenTillgång till fordonet
Sidofönstren kan betjänas med fönsterbrytarna på vänster sida av instrumentpanelen eller på manöverpanelen vid kojen.
Fordonet har en funktion för automatisk stängning av fönster. När fordonet är avstängt och låst, stängs fönstren automatiskt om de inte redan är helt stängda.
Bruksanvisning
Fönsterjustering via kombinationsbrytare
Vänster fönsterbrytare: Tryck och håll upp- och ned-knapparna för att styra öppningen av vänster fönster. Tryck och släpp vänster fönsterbrytare upp eller ned för att höja eller sänka vänster fönster med ett tryck.
Höger fönsterbrytare: Tryck och håll upp- och ned-knapparna för att styra öppningen av höger fönster. Tryck och släpp höger fönsterbrytare upp
eller ned för att höja eller sänka höger fönster med ett tryck.
Fönsterjustering via kojbrytare

Vänster fönsterbrytare: Tryck och håll upp och ned
↑ Till toppenstänga eller öppna fönstret helt automatiskt (enkeltrycksbetjäning).
Försiktighetsåtgärder
Varning
Innan fönstren stängs är det viktigt att säkerställa att ingen i fordonet sticker ut någon kroppsdel, annars kan det uppstå allvarlig personskada.
Betjäna inte fönstren vid hög hastighet.
ObserveraTa bort snö och is från fönsterytan i tid för att undvika att fönstret fastnar under rörelse, eller för att förhindra att fönstret inte kan öppnas och stängas normalt.
brytarknappar för att styra öppningen av vänster fönster.
Tryck snabbt och släpp de två knapparna var för sig för att stänga eller öppna fönstret helt automatiskt (enkeltrycksbetjäning).
Höger fönsterbrytare: Tryck och håll upp- och ned-knapparna för att styra öppningen av höger fönster. Tryck snabbt och släpp de två knapparna var för sig för att
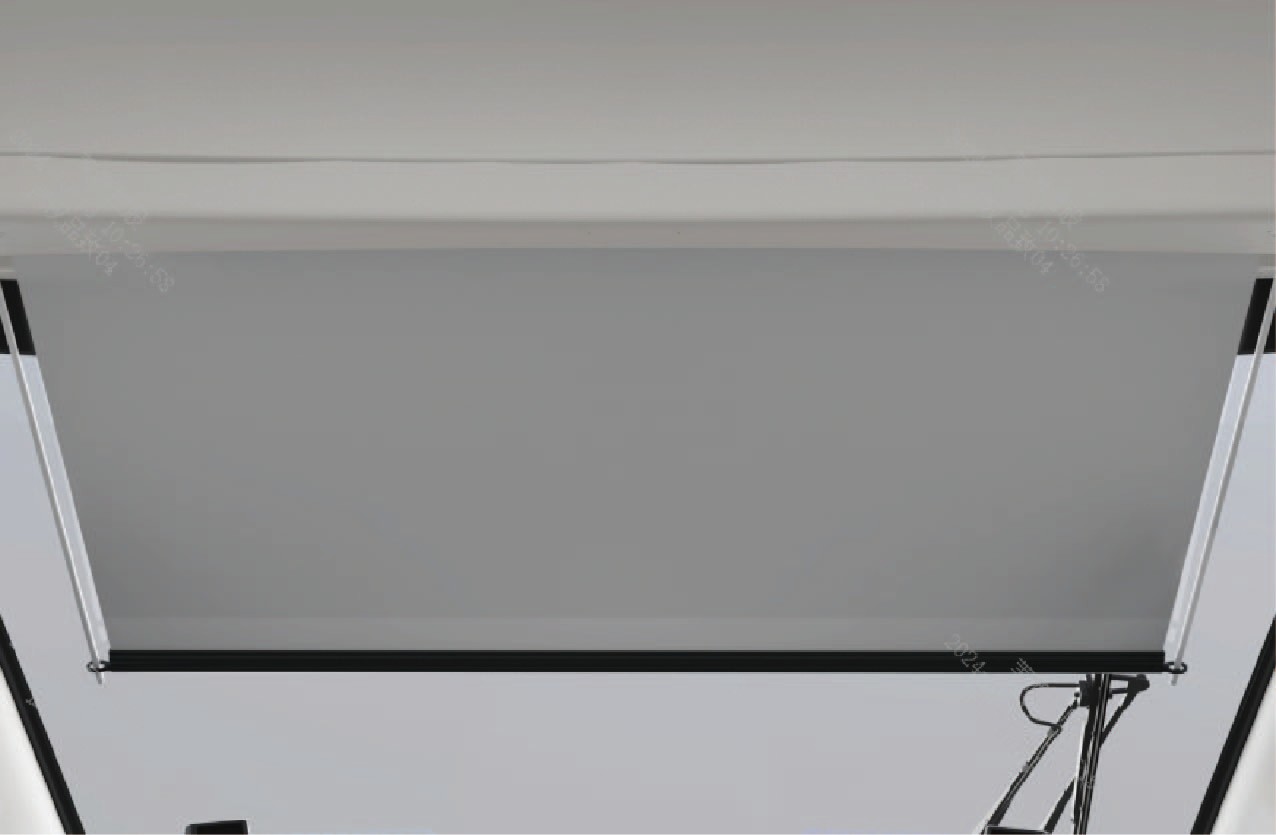
Skärmningsgardin för koj*
↑ Till toppenTillgång till fordonet
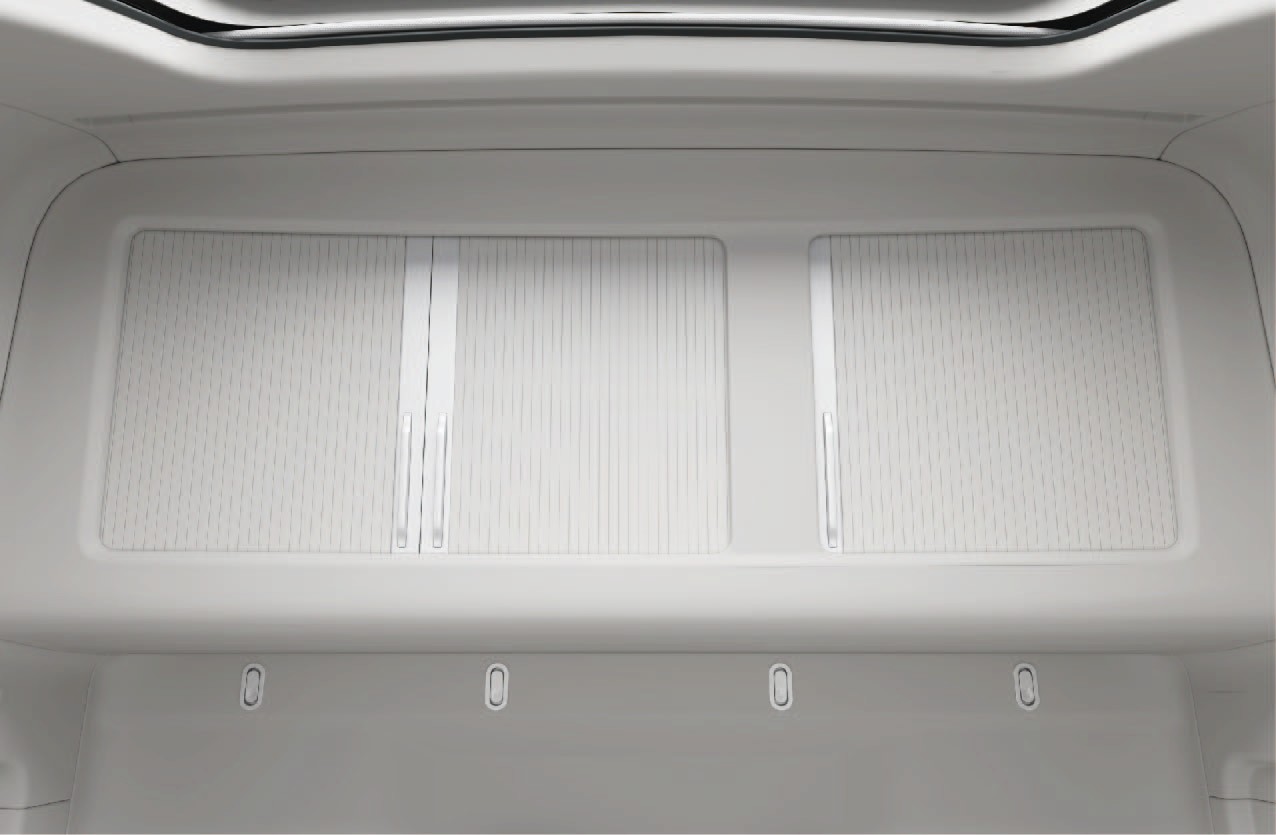
Kojområdet är utrustat med skenor för skärmningsgardiner som gör det möjligt att montera skärmningsgardiner. Gardinerna bidrar till skärmning och minskar solljus i kojområdet.
* Denna funktion är endast tillgänglig på vissa fordonsmodeller.
Bruksanvisning
Skena för skärmningsgardin vid koj
Gardinskenorna är monterade i taket över kojområdet. Skärmningsgardiner kan fästas på skenorna efter behov.
Skärmningsgardin för koj*
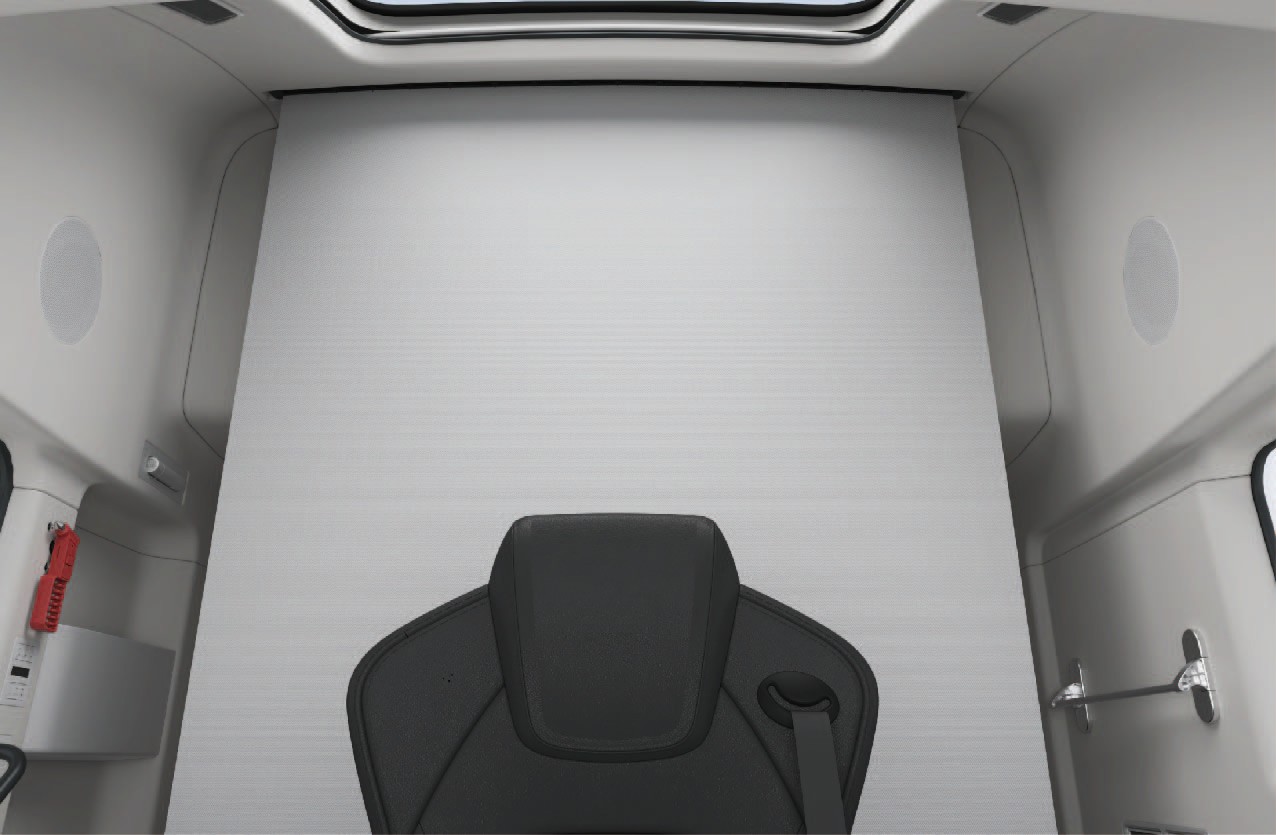
↑ Till toppenNär de är monterade kan skärmningsgardinerna dras för kojområdet för att ge skärmning och blockera solljus under vila.
Försiktighetsåtgärder
↑ Till toppenAnmärkningDra inte hårt i skärmningsgardinen, så att den inte faller ned.
Panorama-soltak
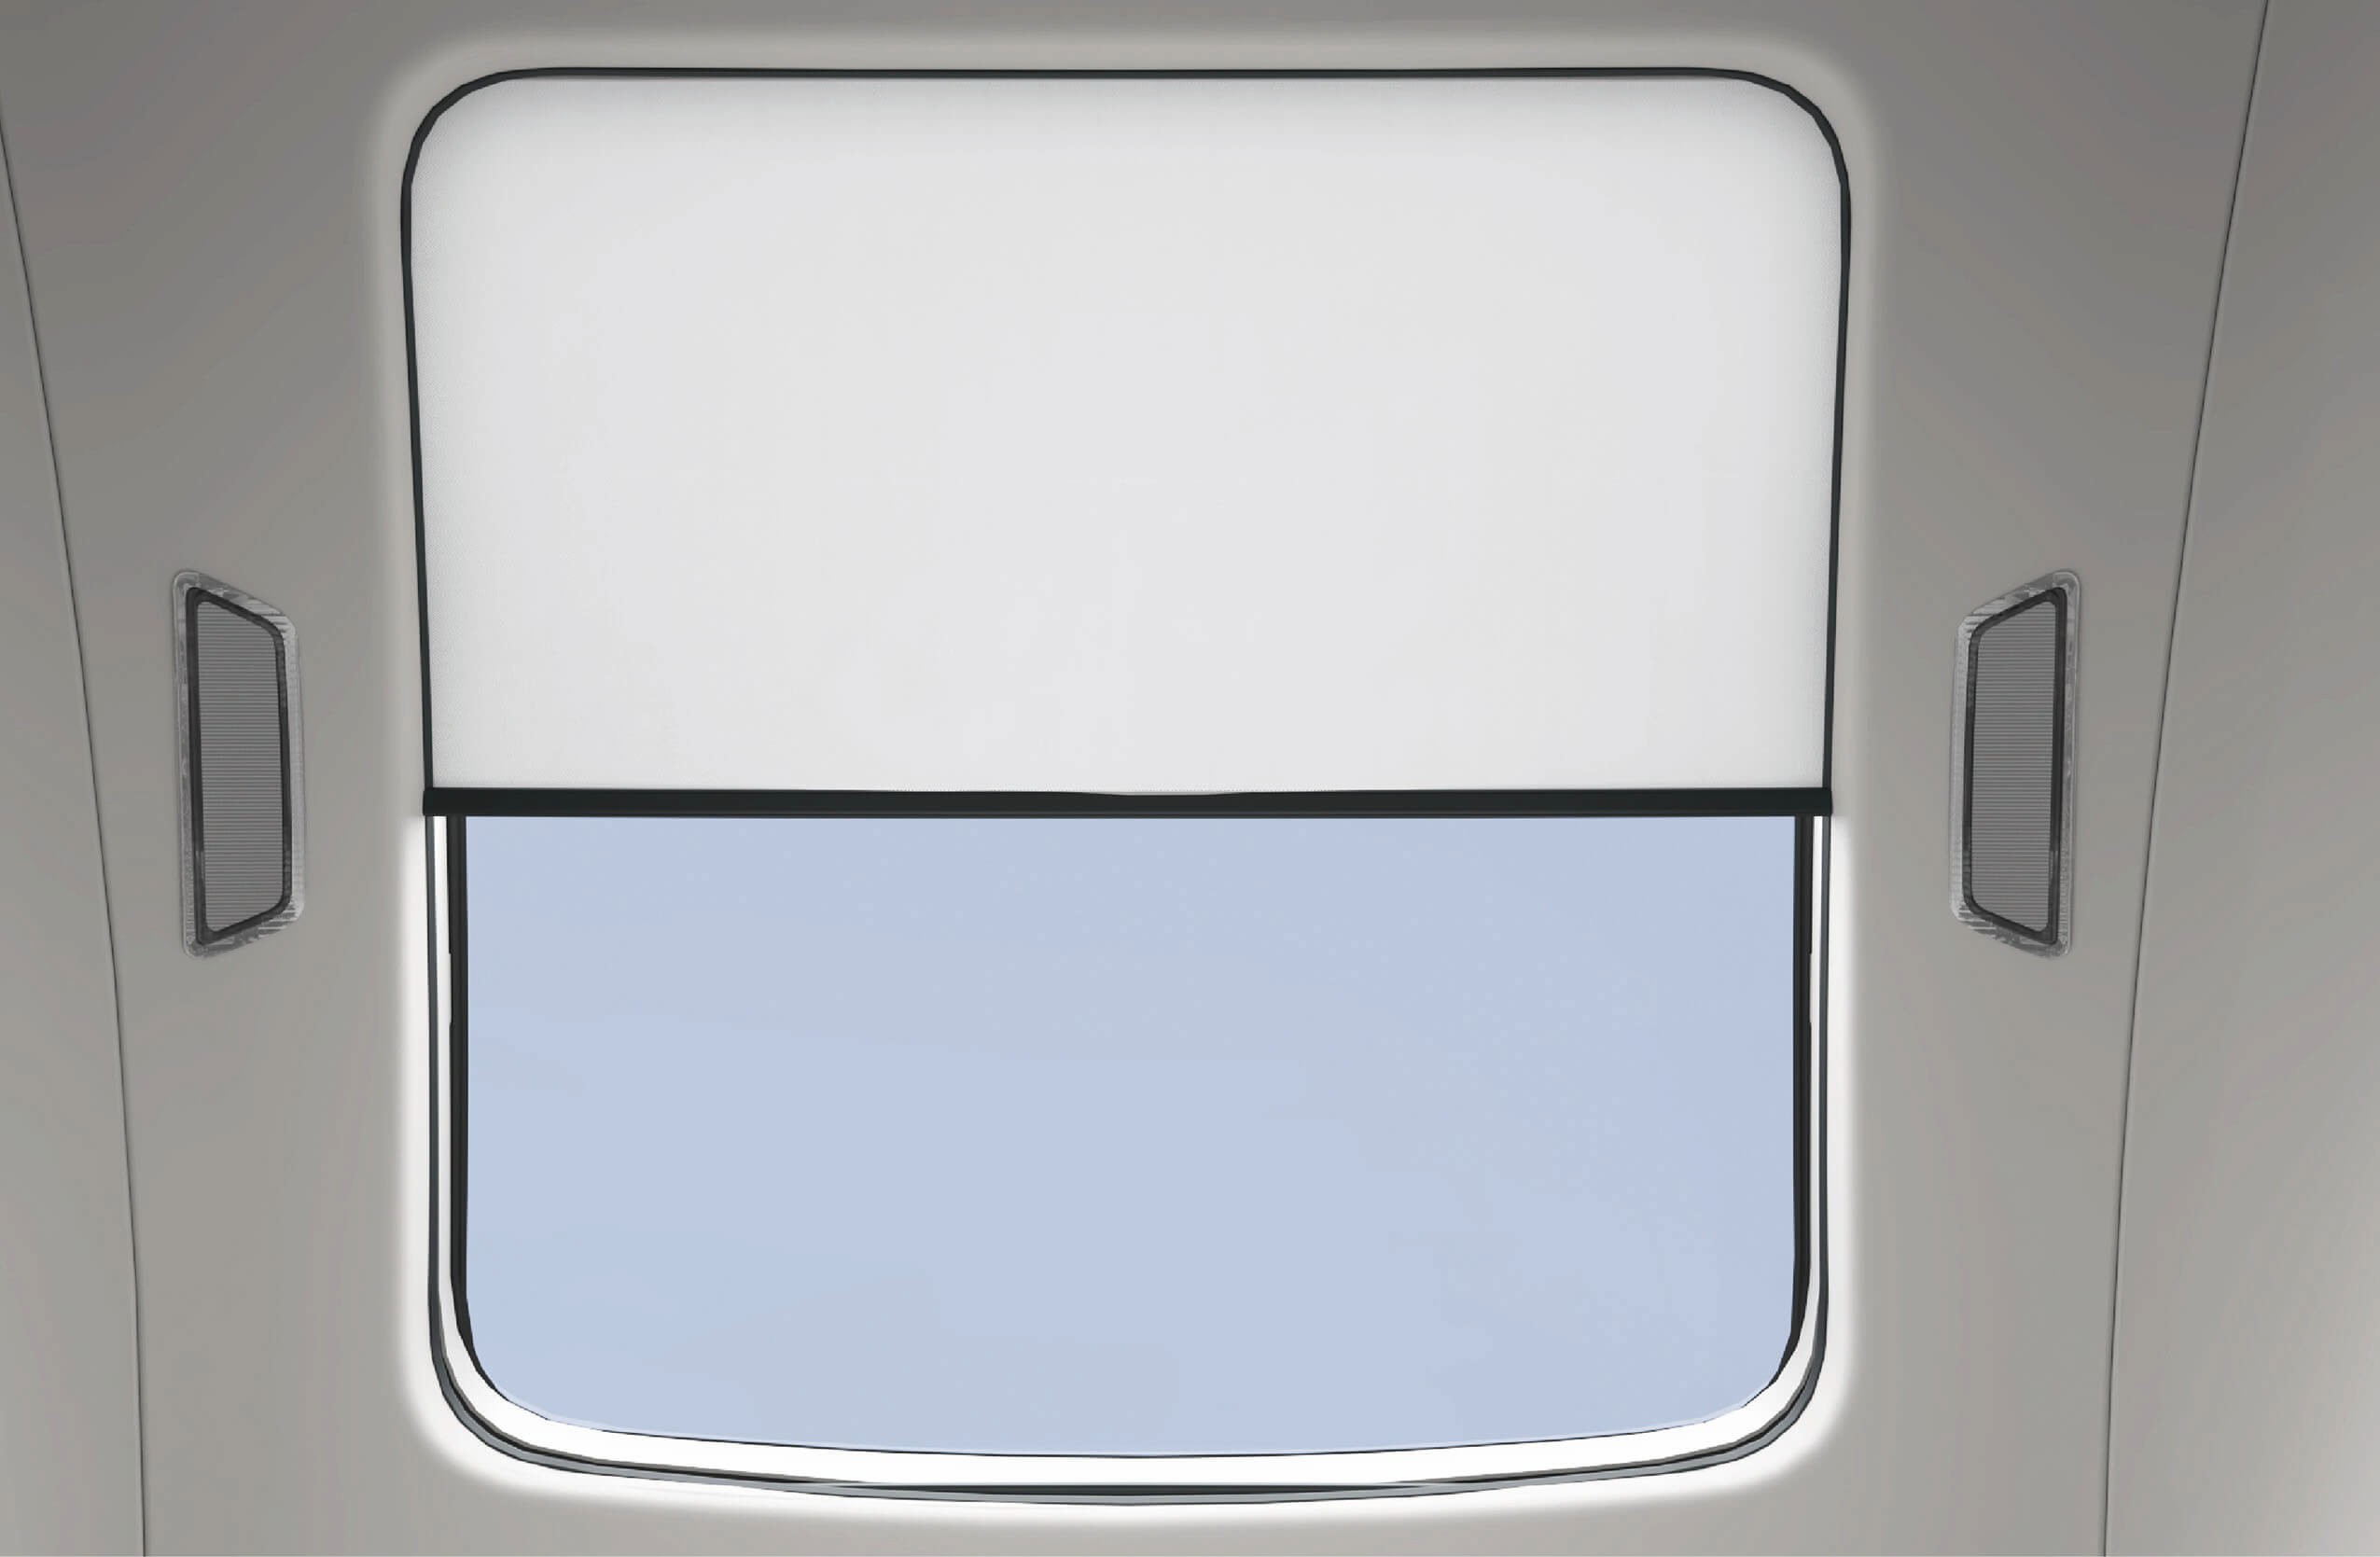
↑ Till toppenTillgång till fordonet
Fordonet är utrustat med ett panoramatak och en elektrisk solskydd. Panoramataket är fast och kan inte betjänas. Det släpper in naturligt ljus i förarhytten och ger utsikt. Solskyddet kan öppnas eller stängas för att blockera solljus vid behov.
Bruksanvisning
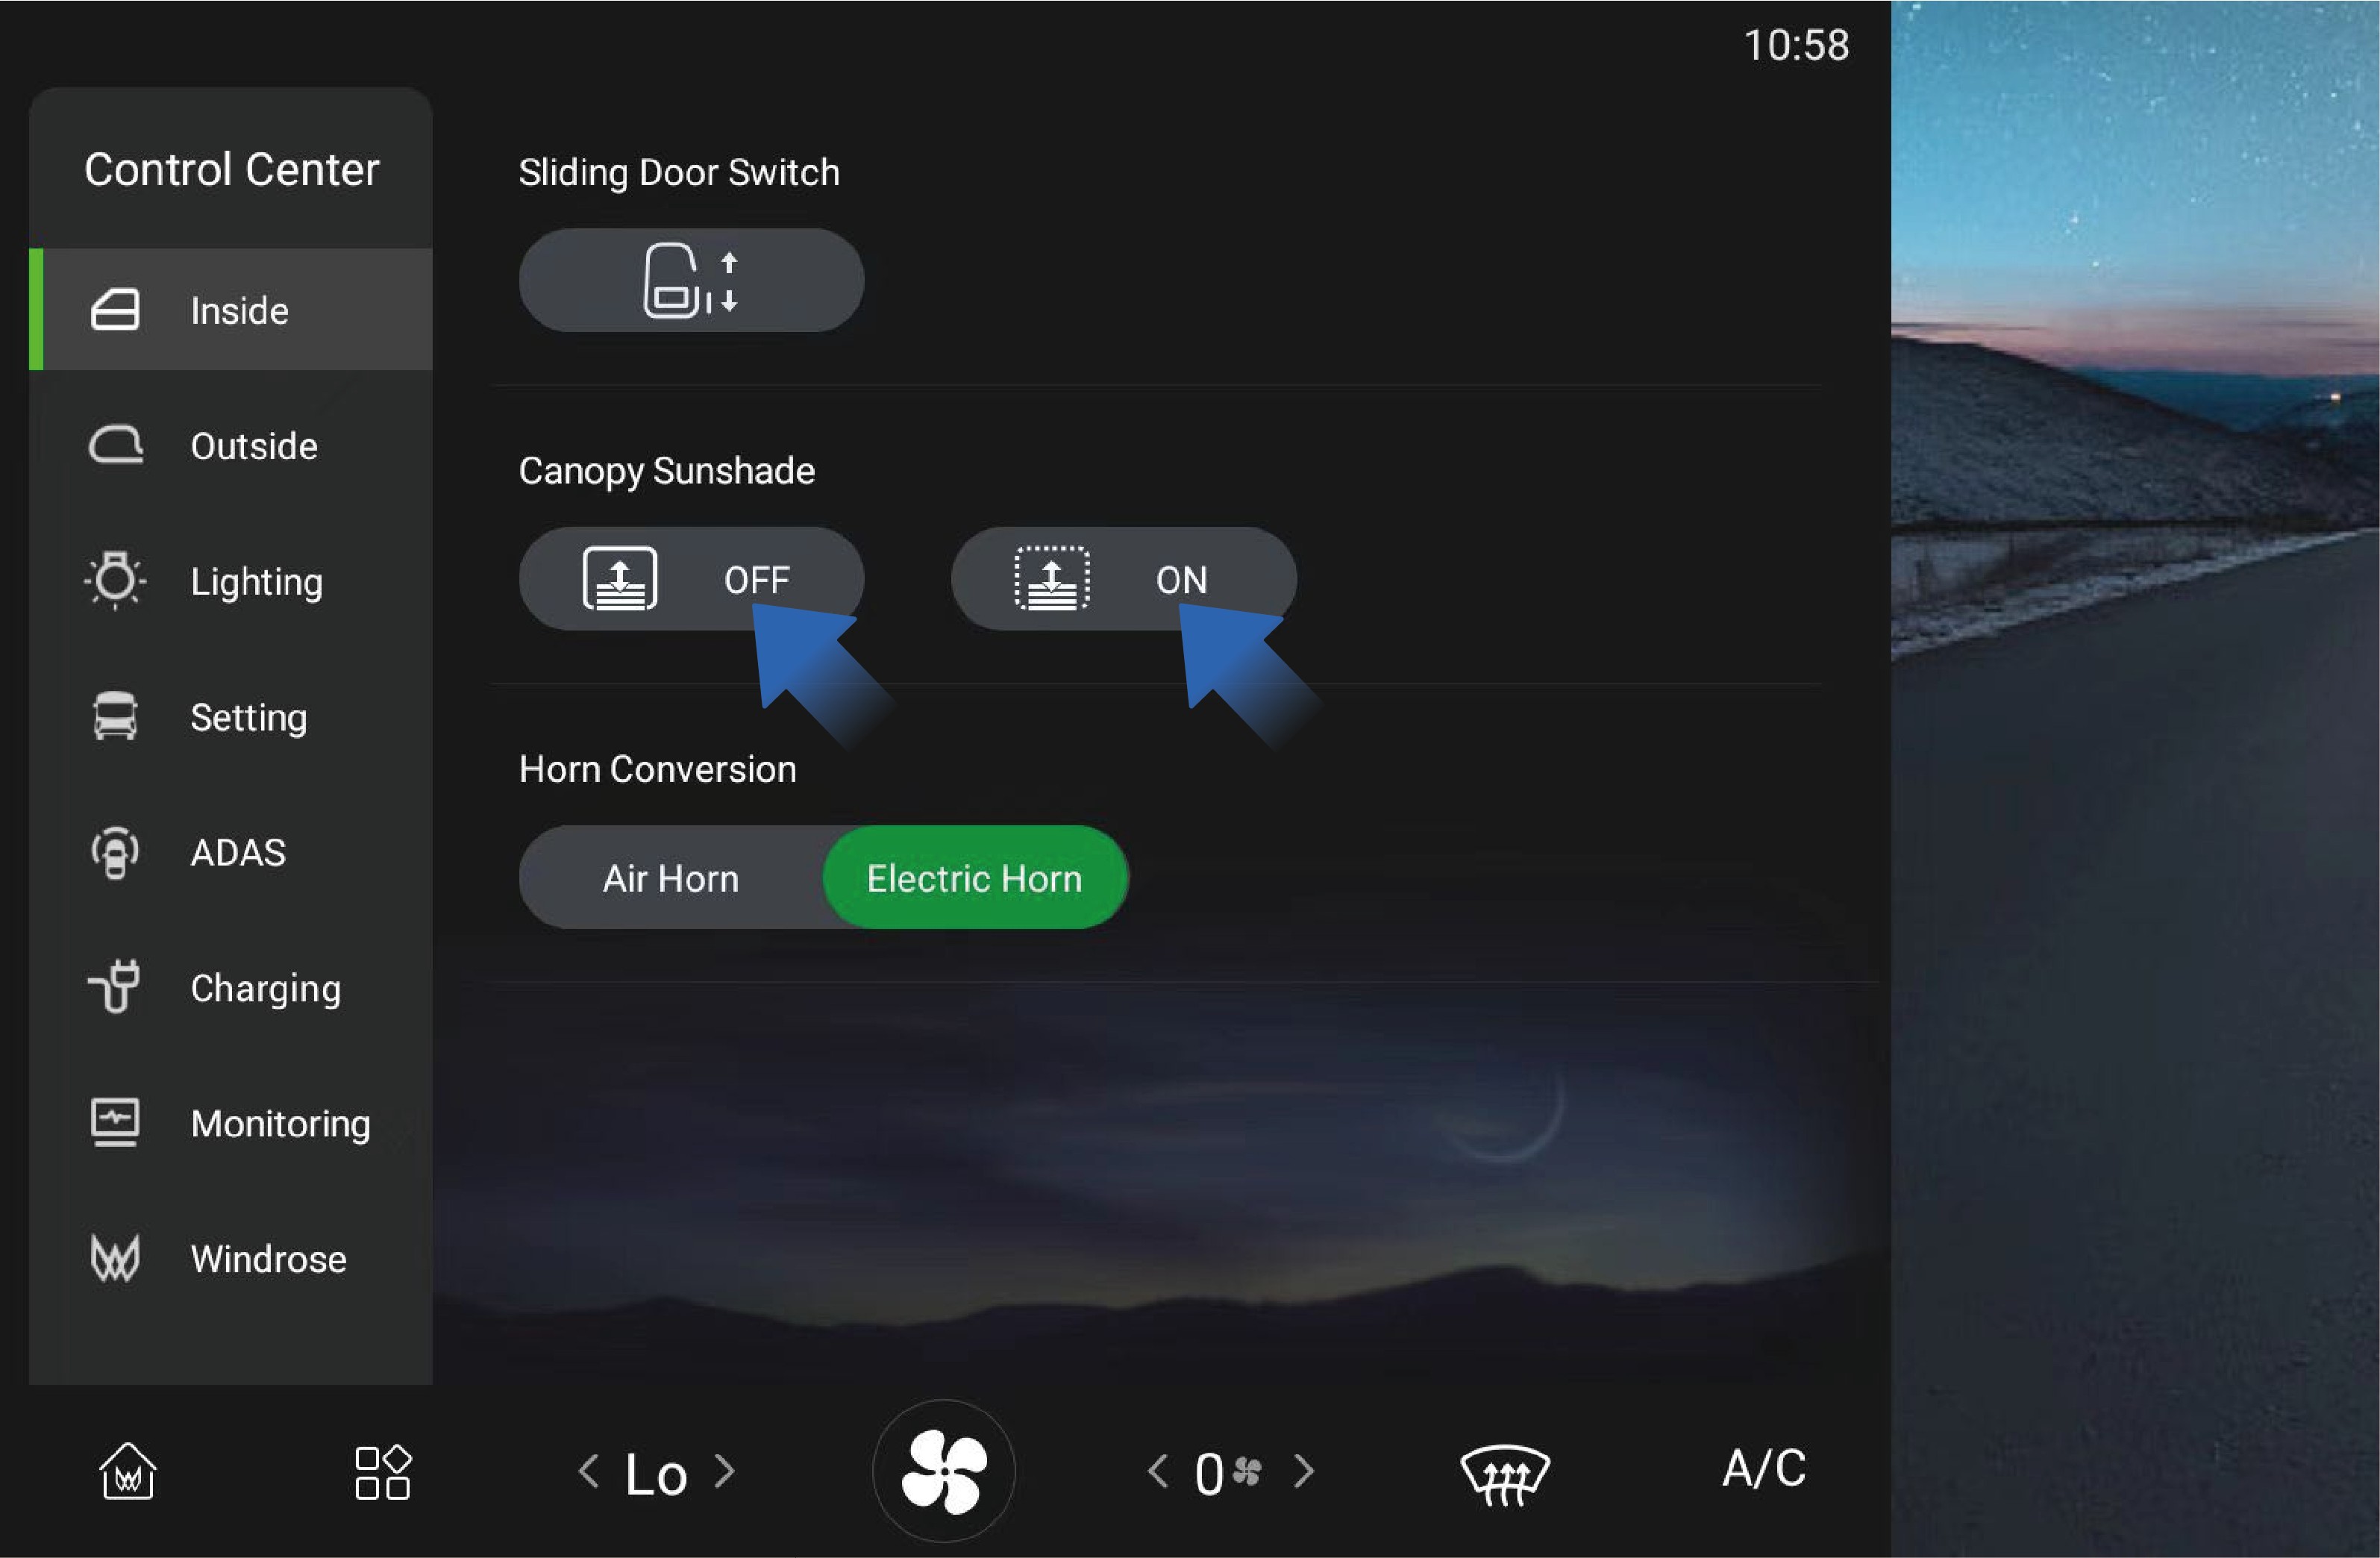
Panoramatakets solskydd kan betjänas via fordonets informationsskärm.
Välj ”Canopy Sunshade” i gränssnittet ”Inside” på fordonets informationsskärm.
Tryck och håll ON/OFF-knappen för att öppna eller stänga solskyddet. Släpp knappen för att stoppa rörelsen.
Tryck kort och släpp ON/OFF-knappen för att aktivera automatisk betjäning, som öppnar eller stänger solskyddet helt.
Försiktighetsåtgärder
Anmärkning
Dra inte takfönstrets solskydd manuellt, för att undvika skada.
Skrapa inte takfönstrets glas, takfönstrets solskydd eller limlisterna runt glaset med vassa föremål.
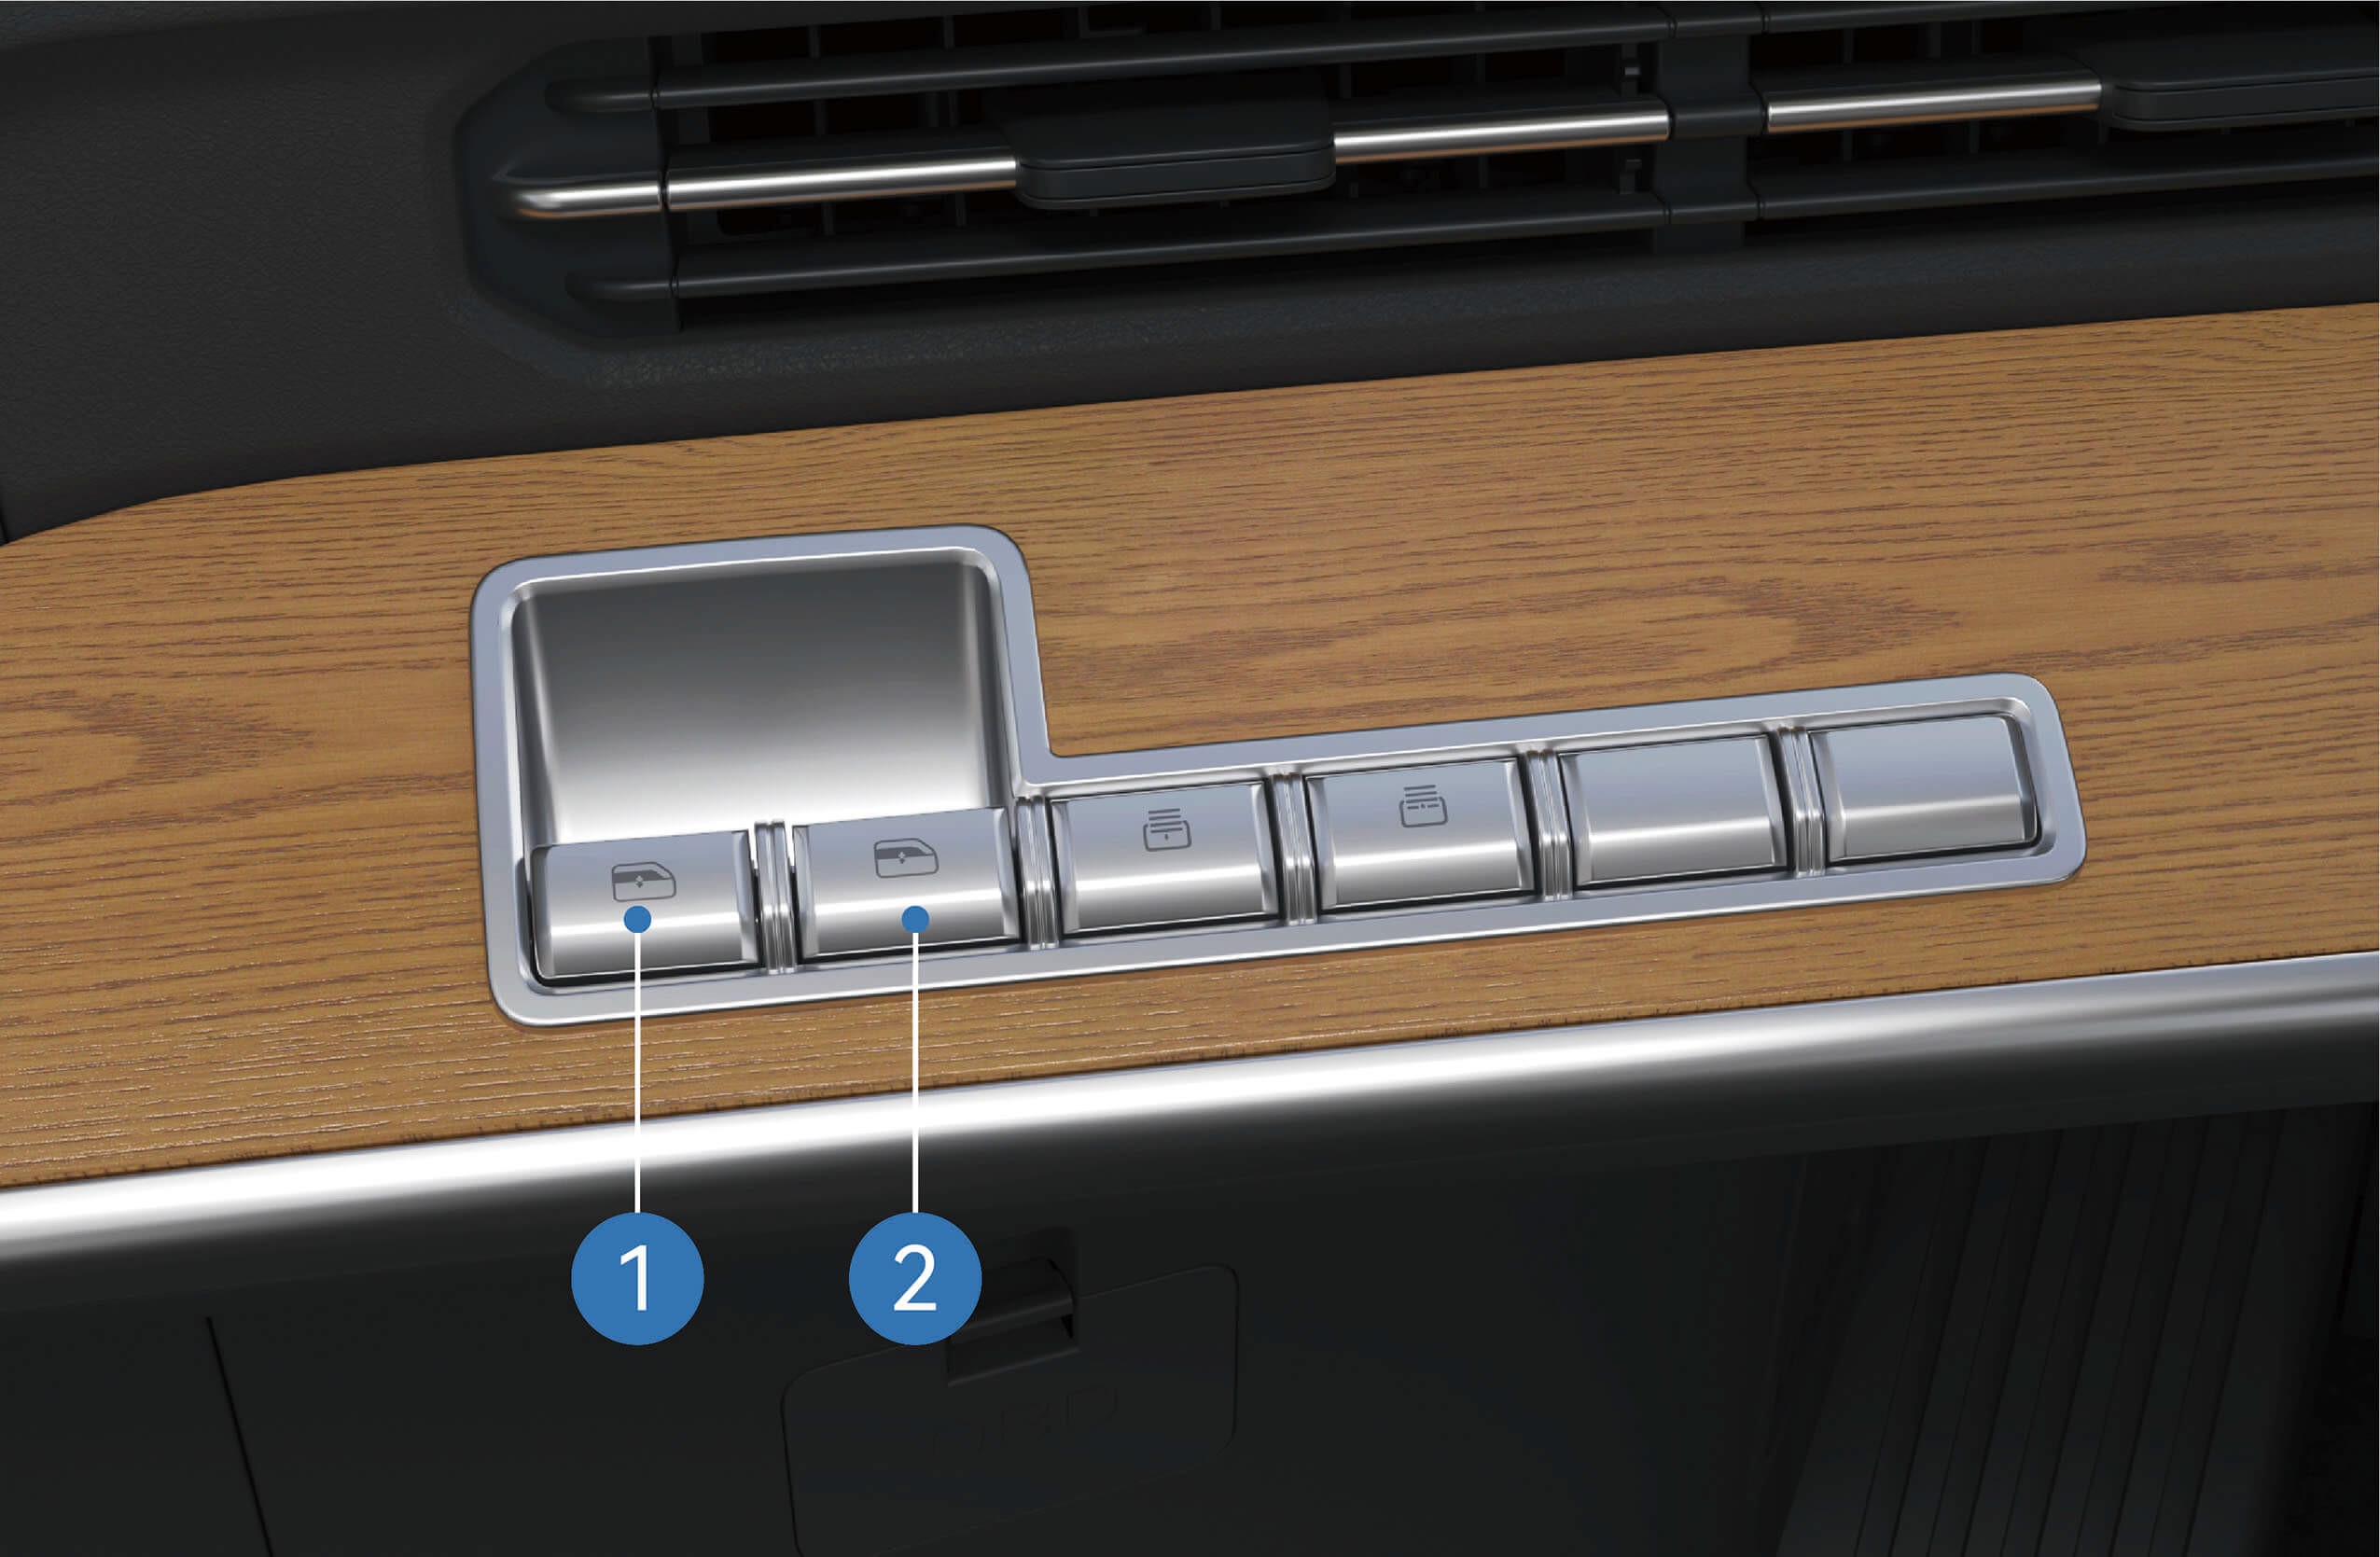
Elektrisk solskydd för framruta
↑ Till toppenTillgång till fordonet
Vid körning mot starkt solljus kan den elektriska solskyddet för framrutan användas för att minska bländning och förbättra körkomforten.
Bruksanvisning
Den elektriska solskyddet för framrutan betjänas med brytarna på vänster sida av instrumentpanelen.
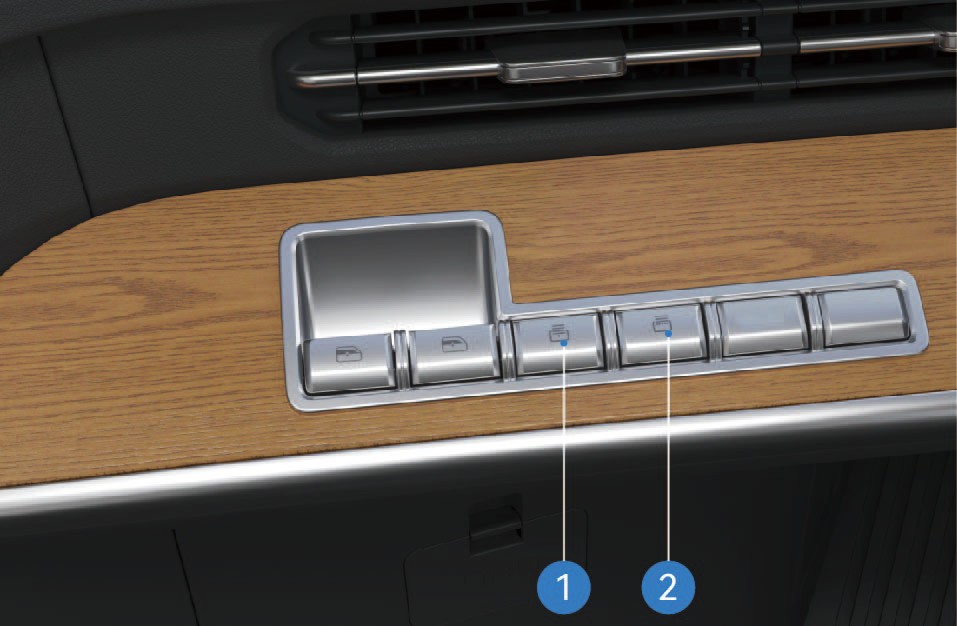
Brytare för att sänka solskydd
Tryck och håll denna brytare för att sänka solskyddet för framrutan. Släpp brytaren för att stoppa rörelsen.
Brytare för att höja solskydd
Tryck och håll denna brytare för att höja solskyddet för framrutan. Släpp brytaren för att stoppa rörelsen.
Försiktighetsåtgärder
↑ Till toppenAnmärkningDra inte den elektriska solskyddet för framrutan manuellt, för att undvika skada.
ObserveraVid användning av solskyddet, se till att det inte hindrar god sikt.
Invändig bädd
↑ Till toppenTillgång till fordonet
I fordonet finns det bäddar där föraren och passagerarna kan vila.
Bruksanvisning
Den övre högra dynan på bädden kan fällas manuellt och fällas åt vänster för att ge plats åt främre passagerarsätet. Om en höjdjusterbar bädd är monterad på höger sida av fordonet kan den övre dynan på höger bädd höjas manuellt och fästas så att den kan användas som nackstöd för bädden i flera steg. För att lägga ner bädden kan du höja den övre dynan på höger bädd till högsta läget och sedan släppa.
Skyddsnät för bädd
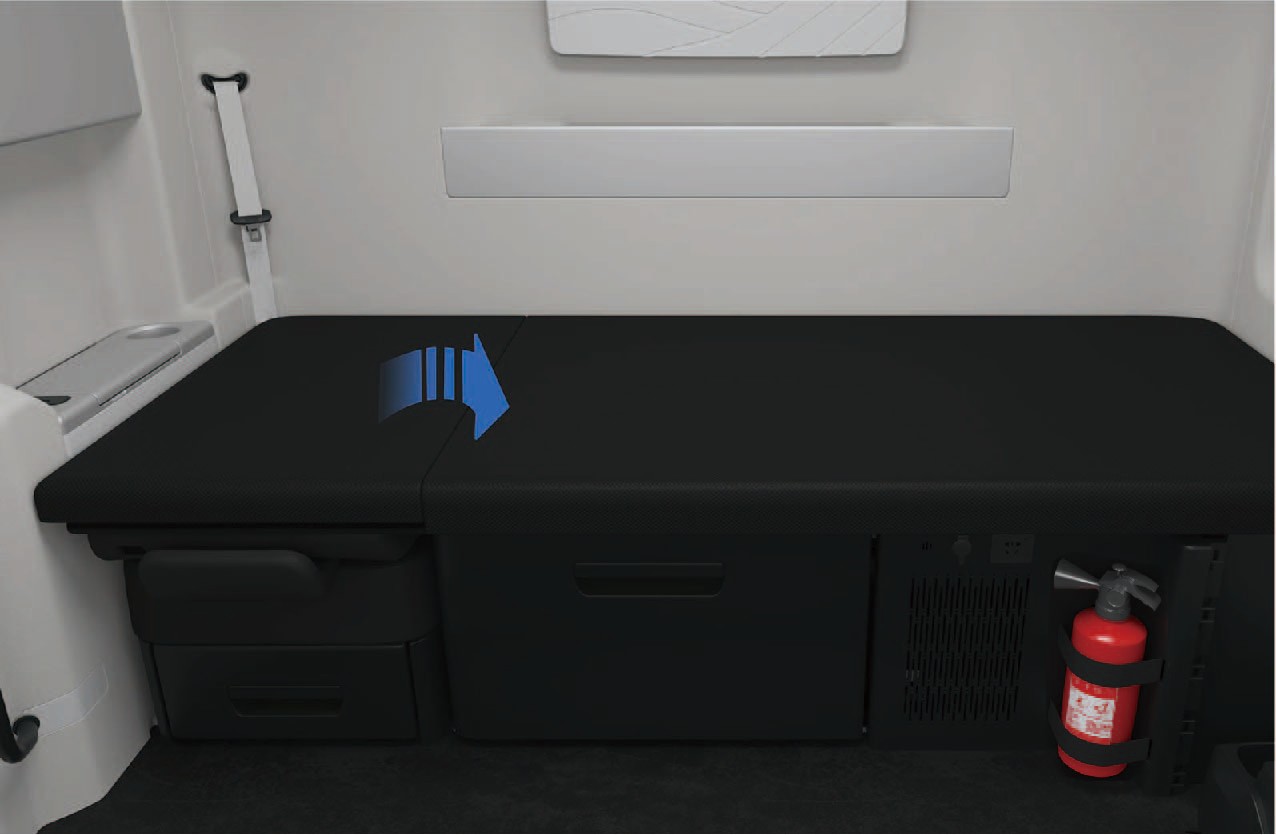
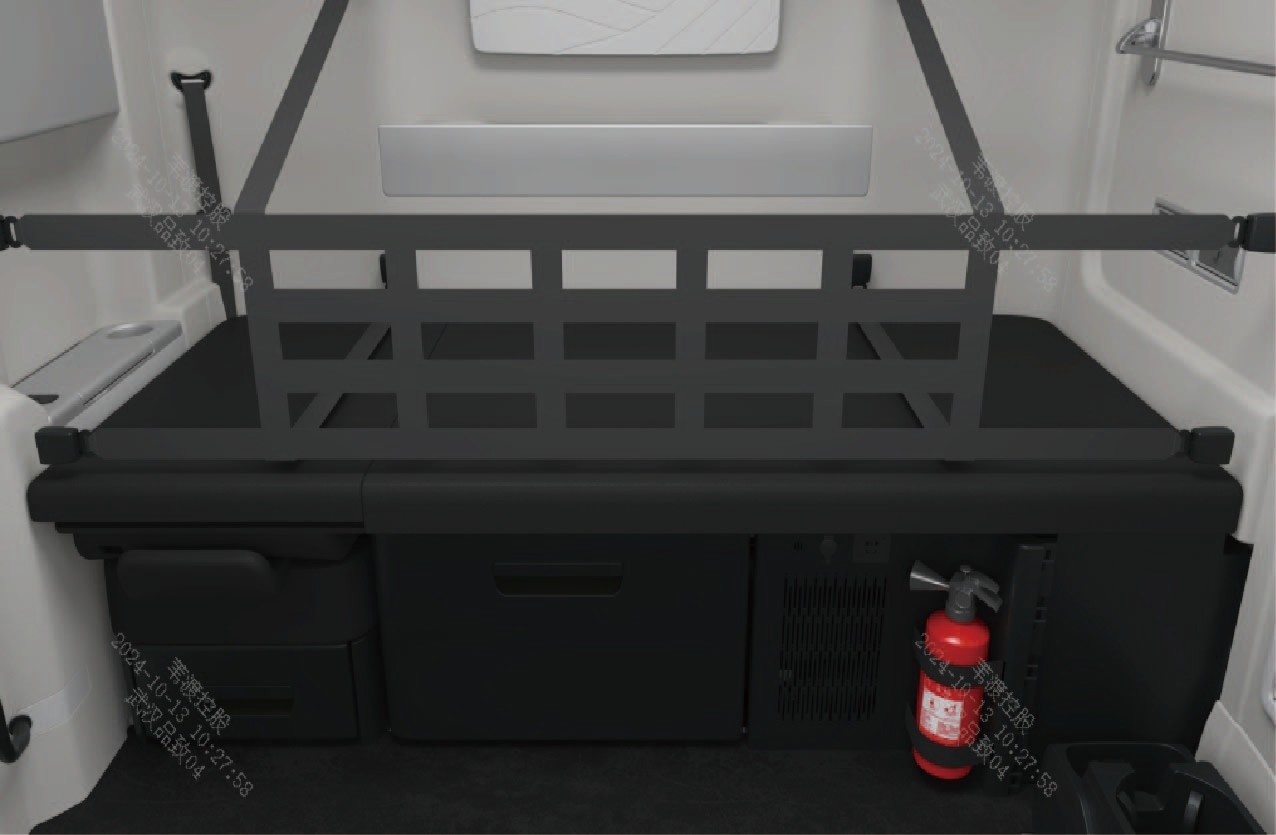
Fordonet har ett skyddsnät för bädden. Innan bädden tas i bruk, vik ut skyddsnätet som visas på figuren, och sätt sedan in de 8 tungorna i bäddens vänstra, högra och bakre vägg i de 8 spännena i nätets vänstra, högra respektive bakre ände för att låsa skyddsnätet på plats.
Anmärkning
Var noga med att inte klämma fingrarna när passagerarsätet fälls eller den övre bäddynan lyfts.
Montera skyddsnätet korrekt innan bädden tas i bruk. Om skyddsnätet inte används finns det risk att personer faller ut ur bädden, vilket ökar sannolikheten för personskada och dödsfall vid olyckor.
Backspegel
↑ Till toppenTillgång till fordonet
Fordonet är utrustat med fysiska backspeglar som ger föraren god sikt under körning.
Du kan justera de fysiska backspeglarna genom att välja «Control Center» och byta till gränssnittet «Outside» på fordonets informationsskärm i instrumentpanelen.
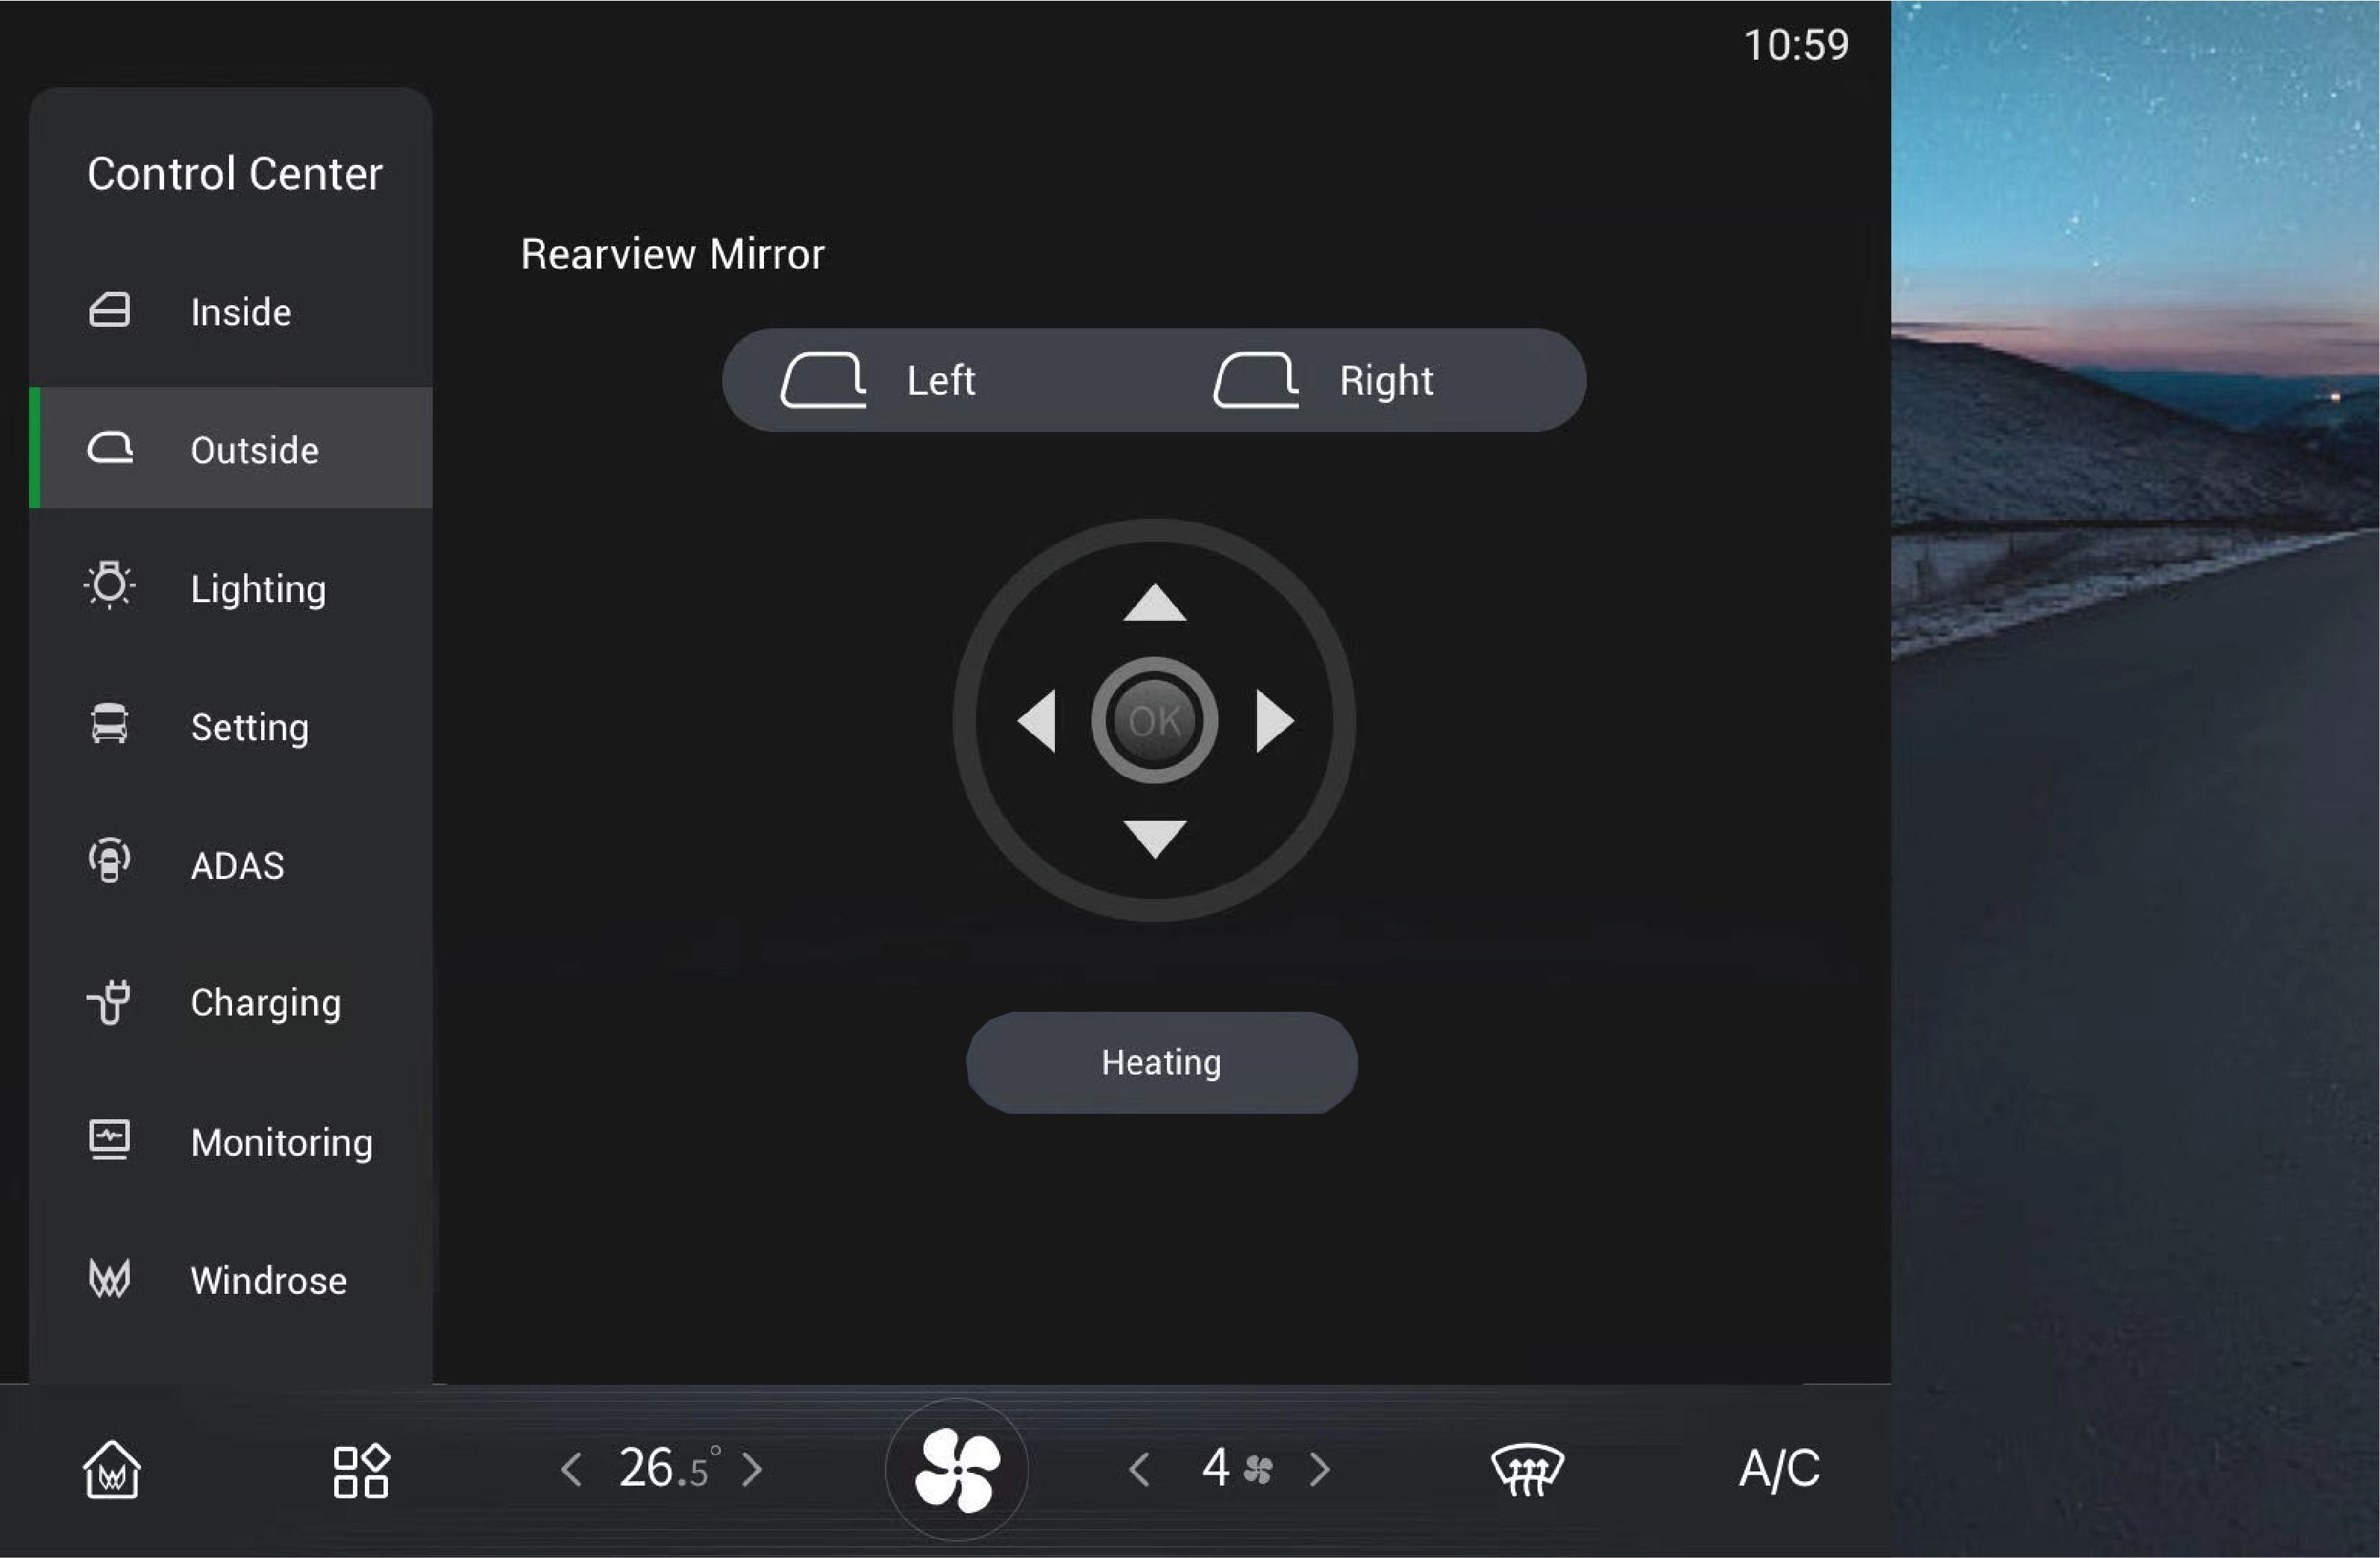
Justering vänster/höger
Klicka för att välja och justera vänster/höger fysisk backspegel var för sig.
Uppvärmning av backspegel
Klicka för att välja detta alternativ, så kommer de fysiska backspeglarna
att värmas upp för att ta bort is och imma. Klicka igen för att stänga av det, annars
stängs det av automatiskt när fordonet stängs av.
Varning
Se till att justera backspeglarna korrekt innan körning, eftersom detta är strängt förbjudet under körning. Underlåtenhet att följa detta krav kan leda till personskada eller dödsfall och materiella skador.
Täck inte över sensorn. Smuts, is och snö på kameran kan försämra funktionen och prestandan. Håll alltid kameran och området runt den rent för att undvika trafikolyckor.
Mugghållare
↑ Till toppenTillgång till fordonet
Mugghållare är placerade på vänster och höger sida av instrumentpanelen var för sig, samt på armstödet till främre passagerarsätet, så att du kan ställa vattenglas eller dryckesbehållare i den aktuella mugghållaren.
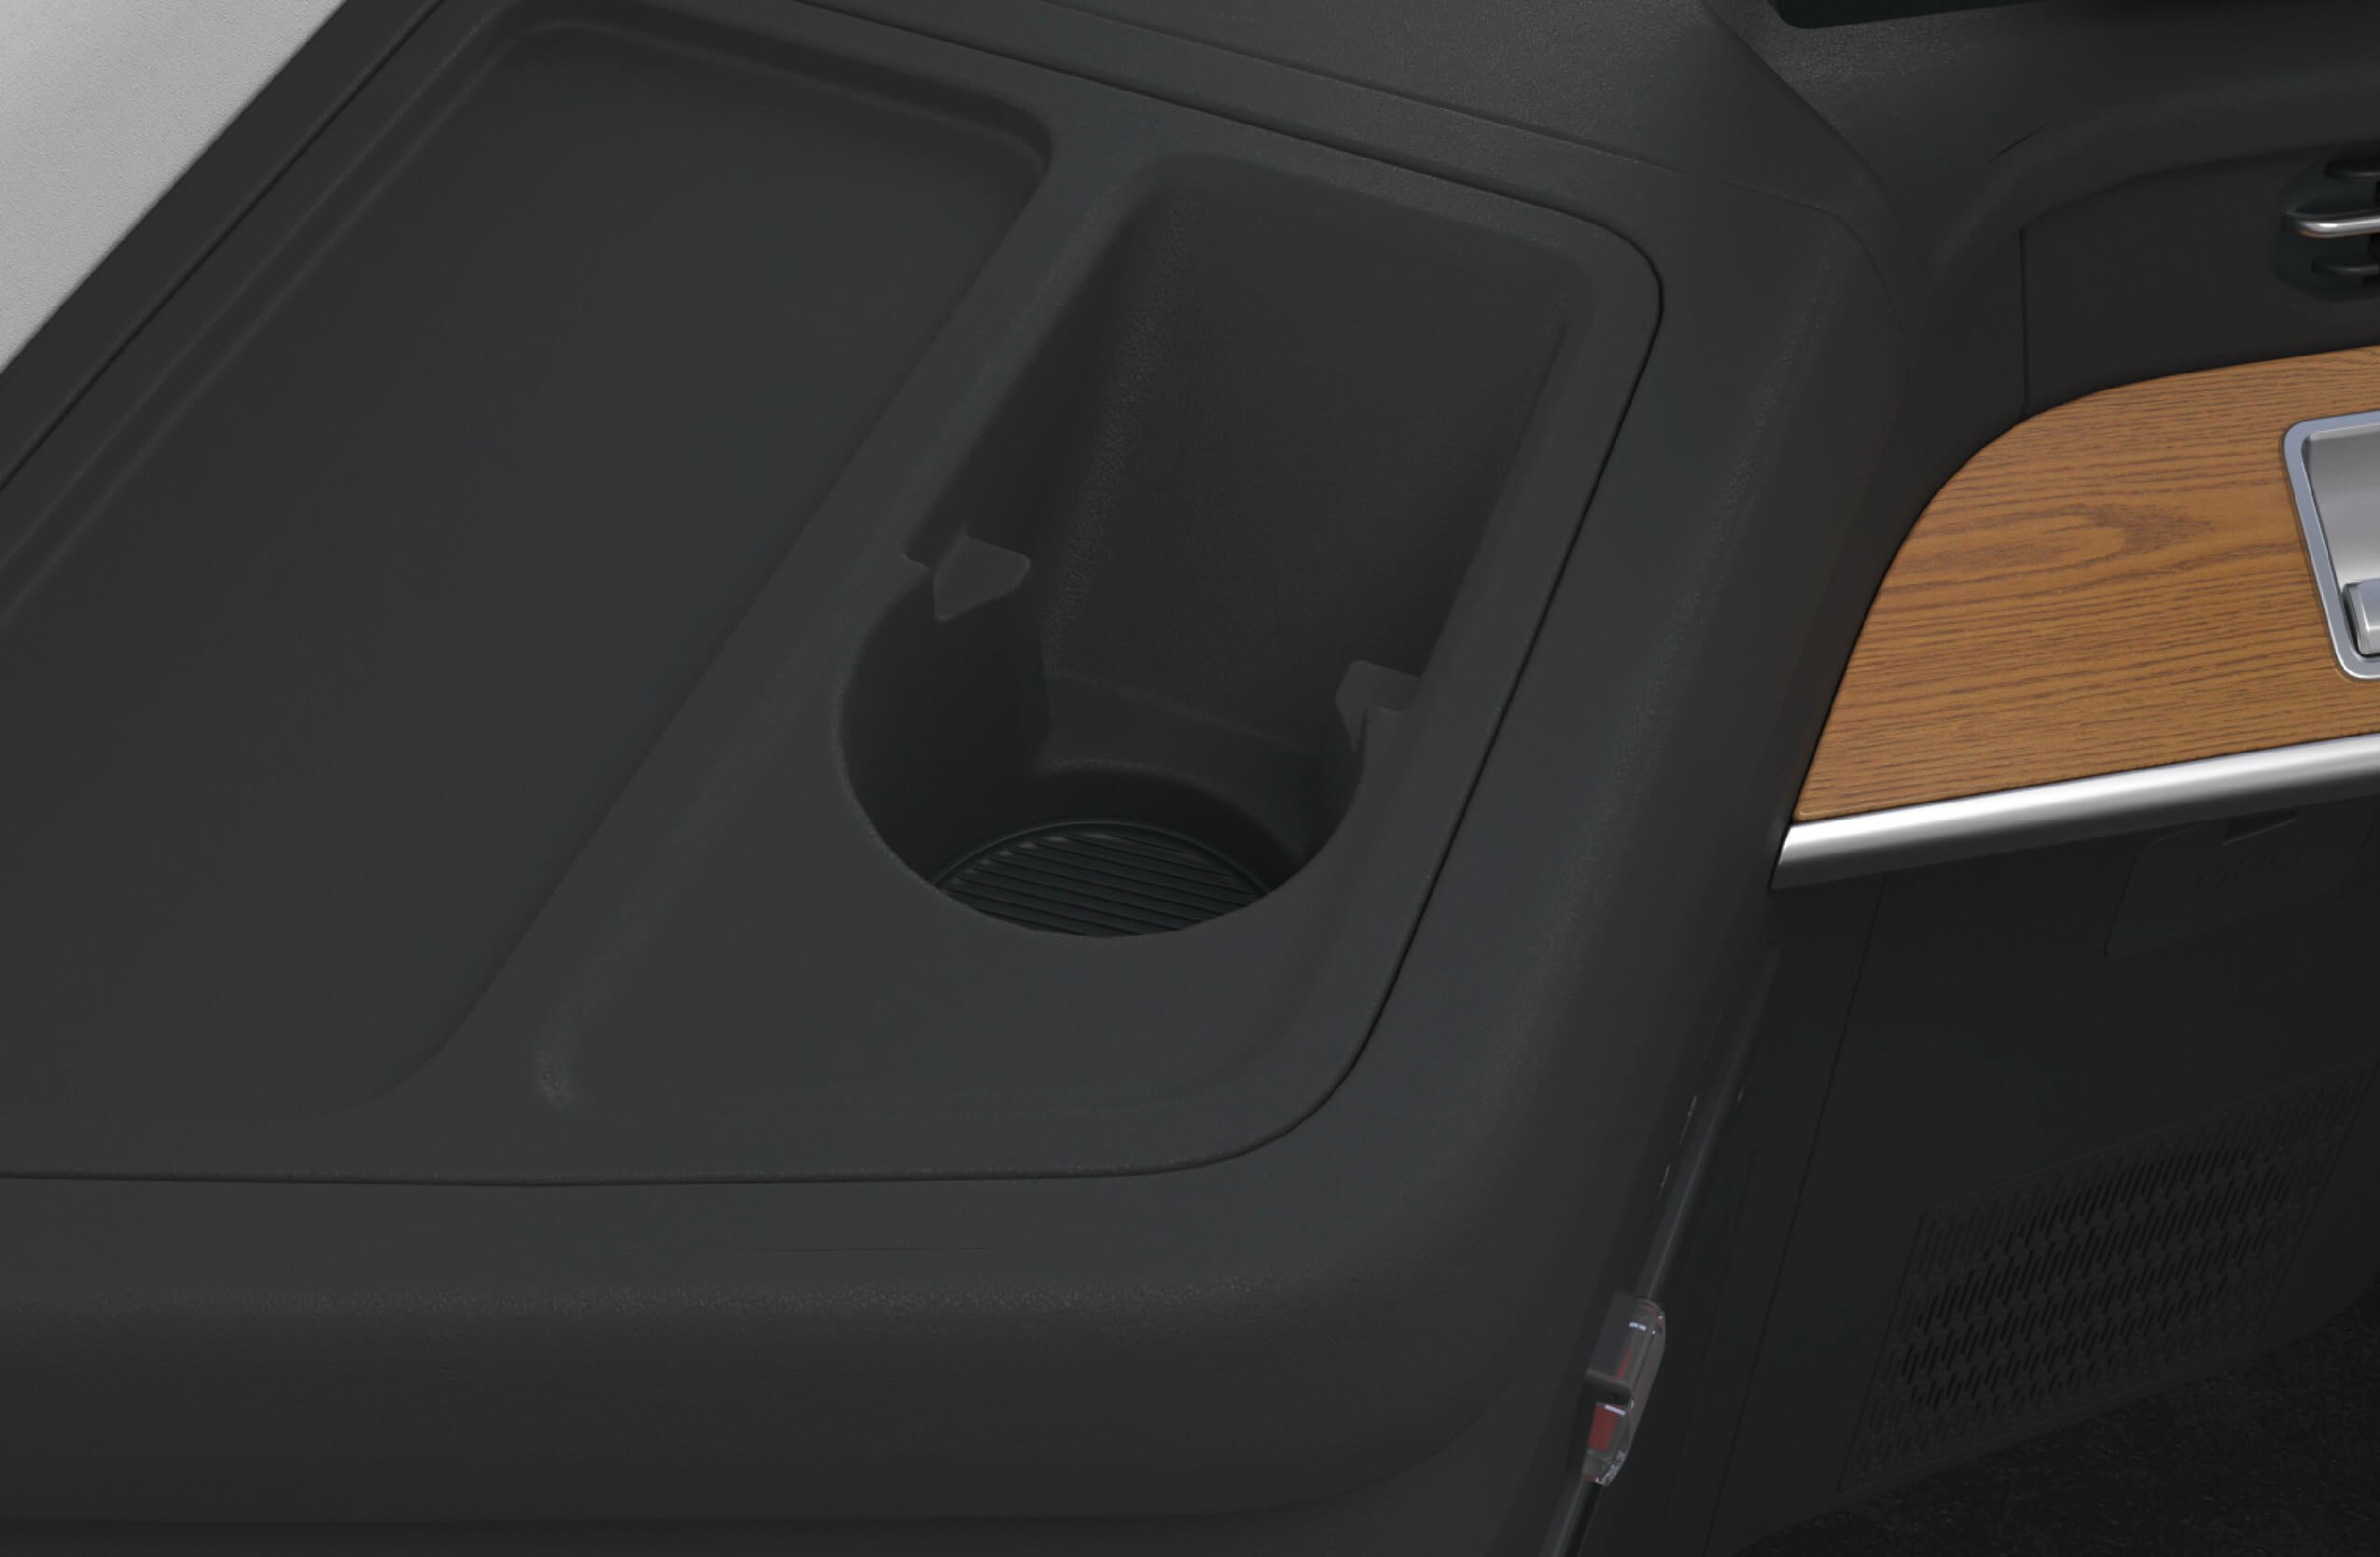
Mugghållare (vänster)
Mugghållare (höger) • Mugghållare på höger sida av främre passagerarsätet
Försiktighetsåtgärder
VarningStäll inte varma drycker utan tätt lock i mugghållaren. Annars kan de spillas ut när fordonet skakar, och orsaka personskada eller skada på fordonskomponenter.
Observera
Endast dryckesbehållare som kan stängas och har rätt storlek får ställas i mugghållaren för att förhindra spill.
Pressa inte ner en olämplig behållare i mugghållaren, annars kan behållaren eller fordonet skadas.
Askkopp
↑ Till toppenTillgång till fordonet
Fordonet har en askkopp för praktisk förvaring av cigarettfimpar och aska.
Bruksanvisning
↑ Till toppenAskkoppen är monterad i mugghållaren på höger sida av instrumentpanelen. Du kan placera askkoppen på andra ställen vid behov.
Försiktighetsåtgärder
Varning
Rök inte under körning, för att undvika olyckor eller brott mot gällande regelverk.
Innan cigarettfimpar slängs i askkoppen, se till att de är släckta för att undvika brand orsakad av glödande fimpar.
Vid montering av askkoppen, se till att den är ordentligt monterad och fäst för att förhindra att den skakar i fordonet eller lossnar från fästanordningen.
↑ Till toppenObserveraNär askkoppen är färdiganvänd, se till att sätta på locket för att undvika att fimpar eller aska spills ut.
Verktygslåda på sidan
↑ Till toppenTillgång till fordonet
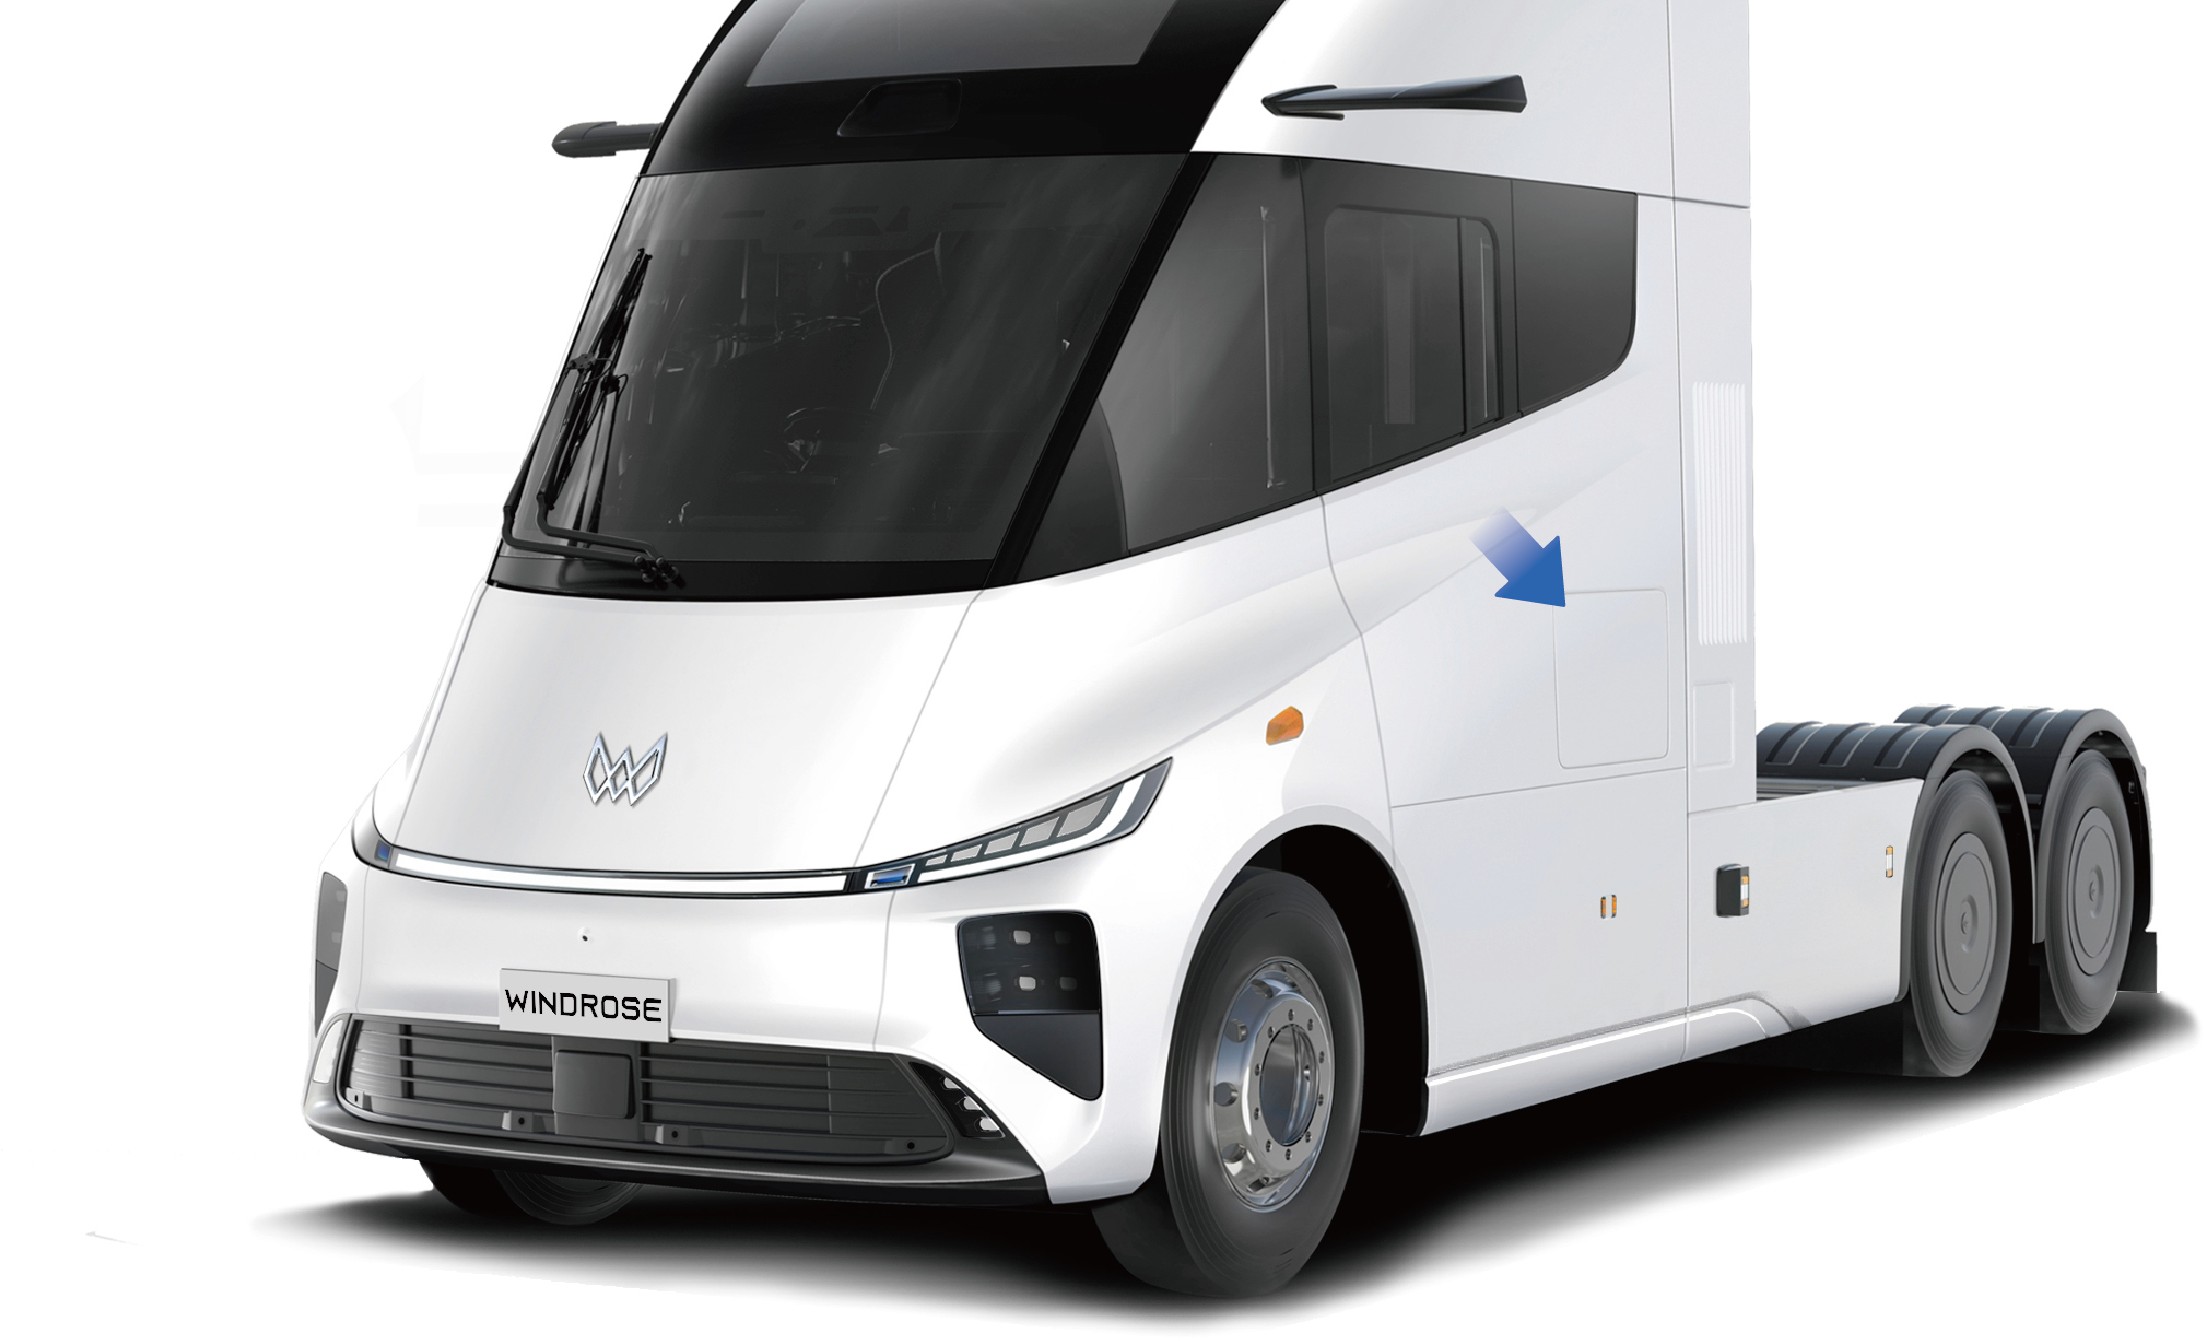
Fordonets förarverktyg förvaras i verktygslådan på vänster sida av fordonet för användning i nödsituationer.
Bruksanvisning
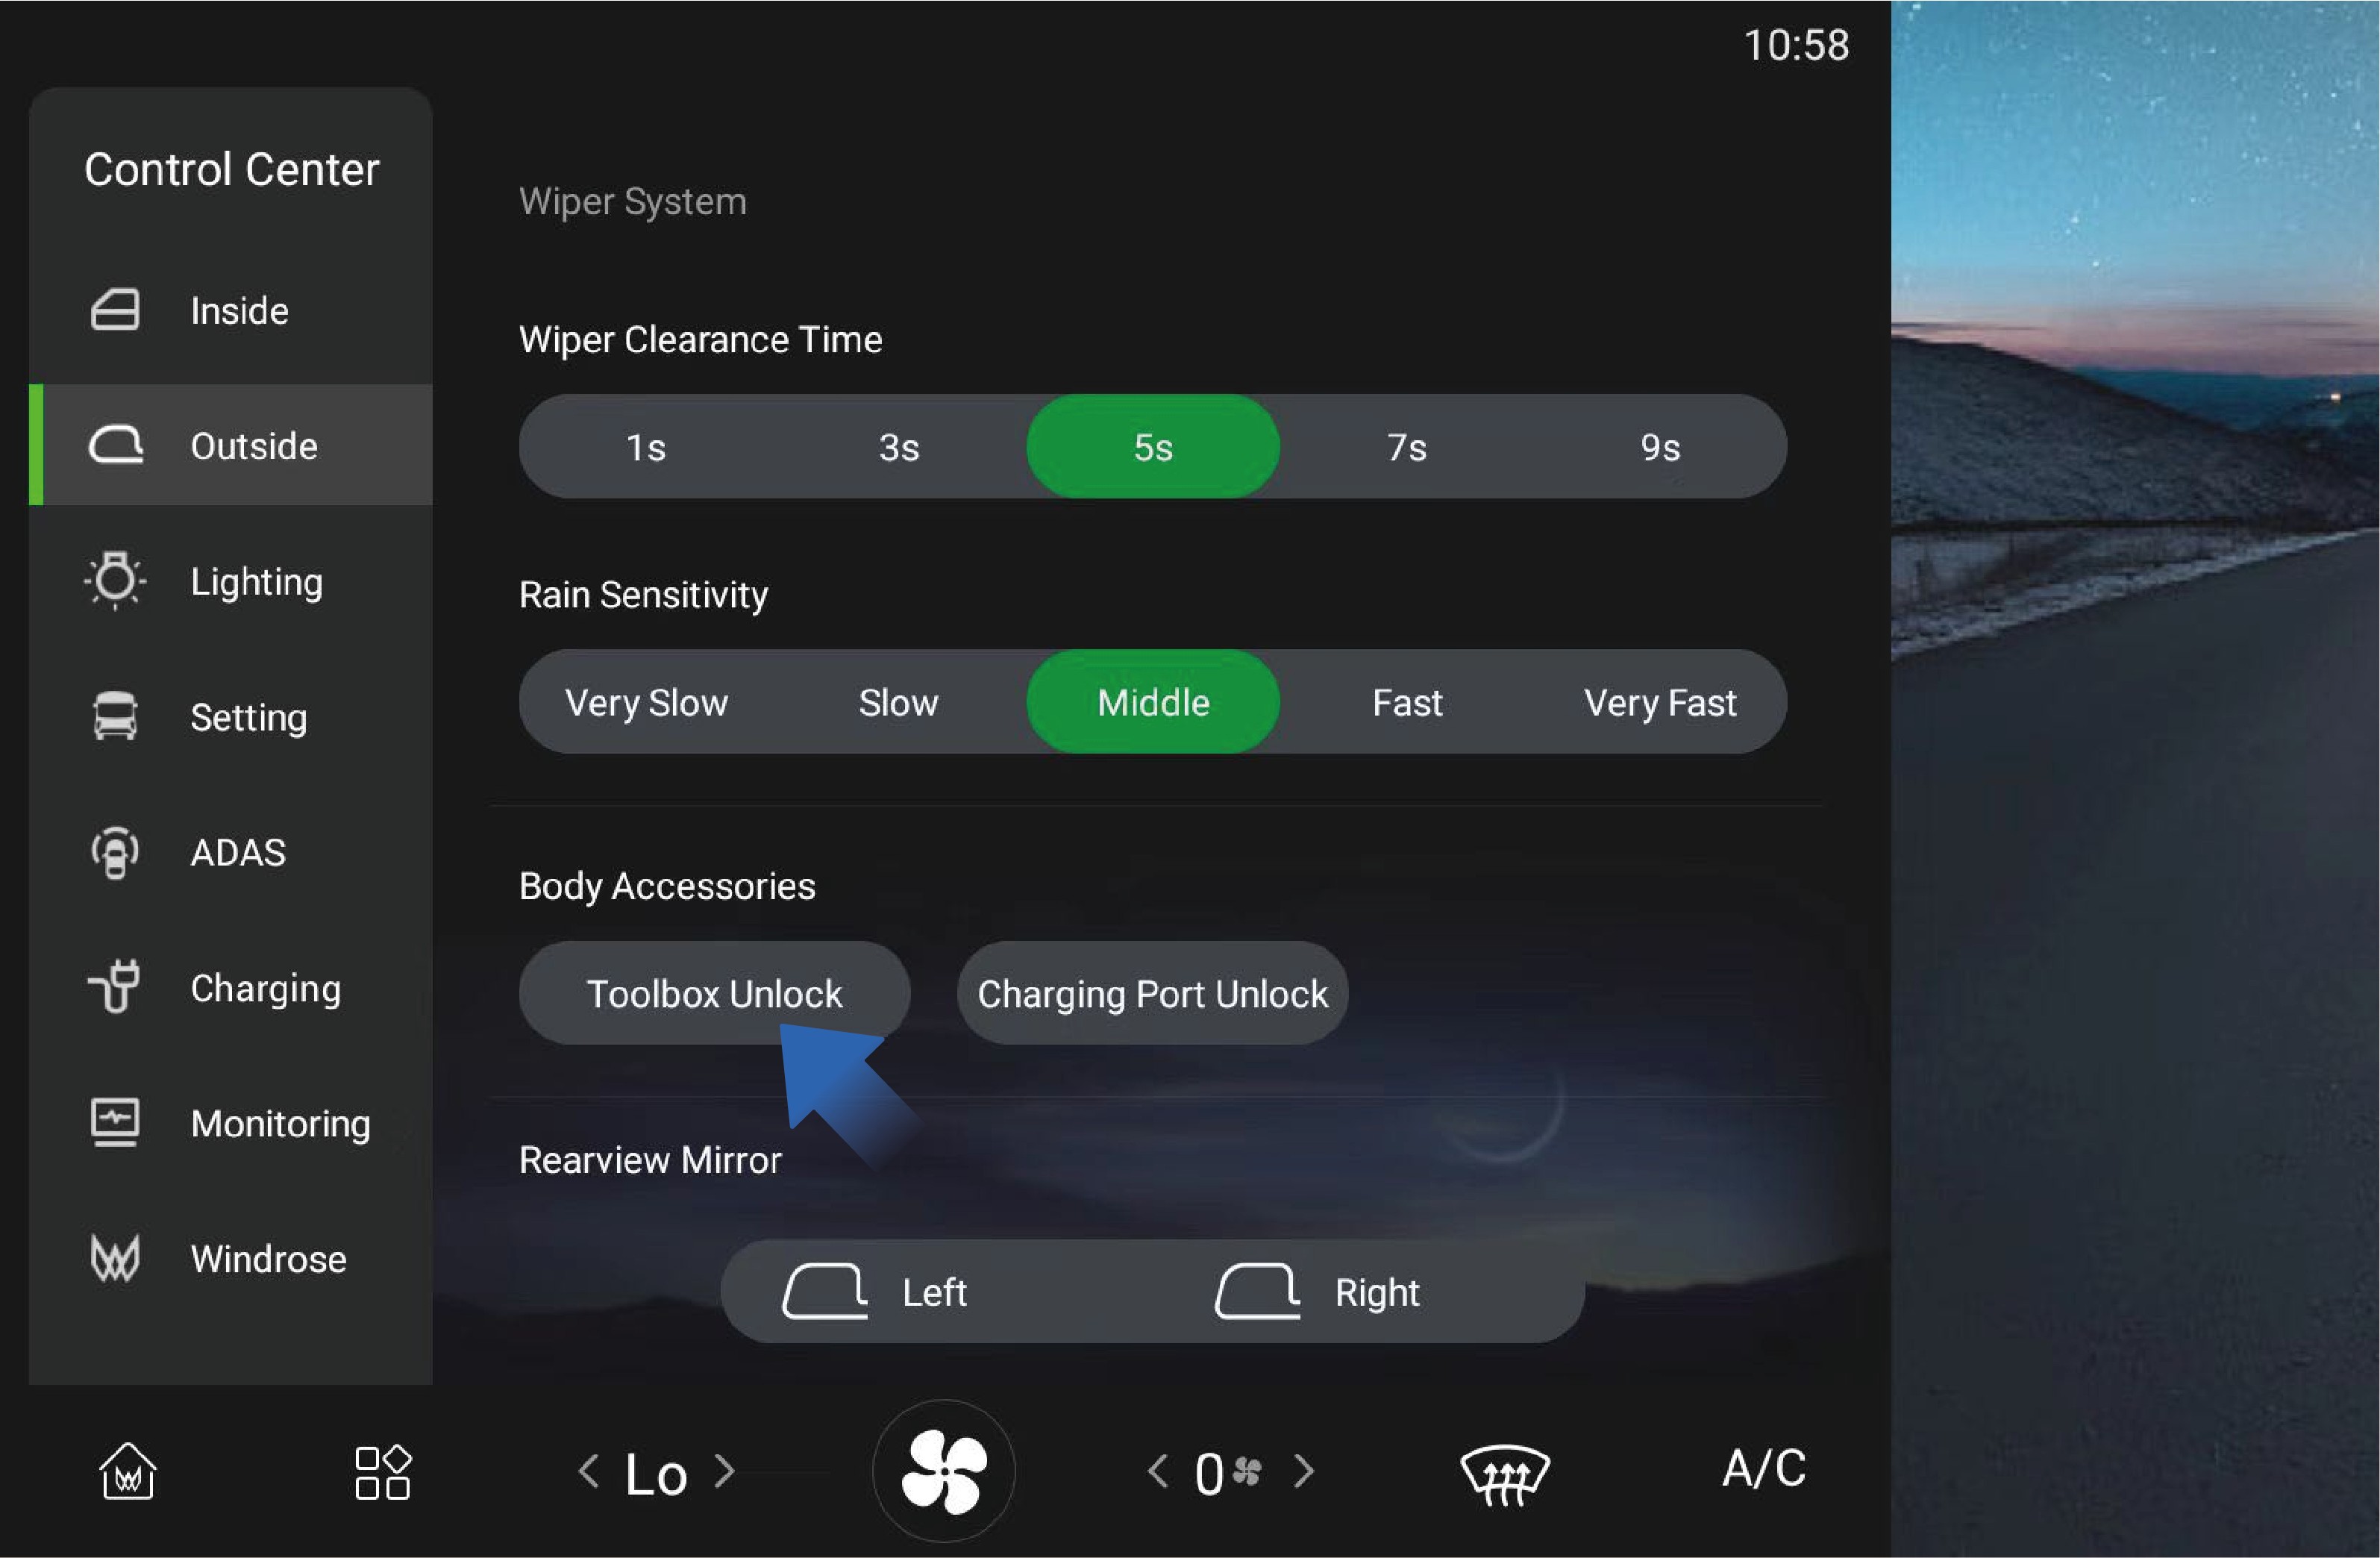
↑ Till toppenDu kan låsa upp verktygslådan genom att välja «Control Center», byta till gränssnittet «Outside» och klicka på knappen «Toolbox Unlock» på fordonets informationsskärm i instrumentpanelen. Verktygslådan stängs manuellt från utsidan av fordonet.
Det finns en lampa i verktygslådan som tänds automatiskt när lådan öppnas, och släcks automatiskt när lådan stängs.
Försiktighetsåtgärder
↑ Till toppenVarningHåll verktygslådan stängd under körning för att undvika olyckor.
Invändig förvaring
↑ Till toppenTillgång till fordonet
Det finns flera förvaringslösningar i fordonet där du kan förvara föremål av olika storlek.
Bruksanvisning
Det finns ett förvaringsfack längst ner till höger på instrumentpanelen där du kan förvara föremål.
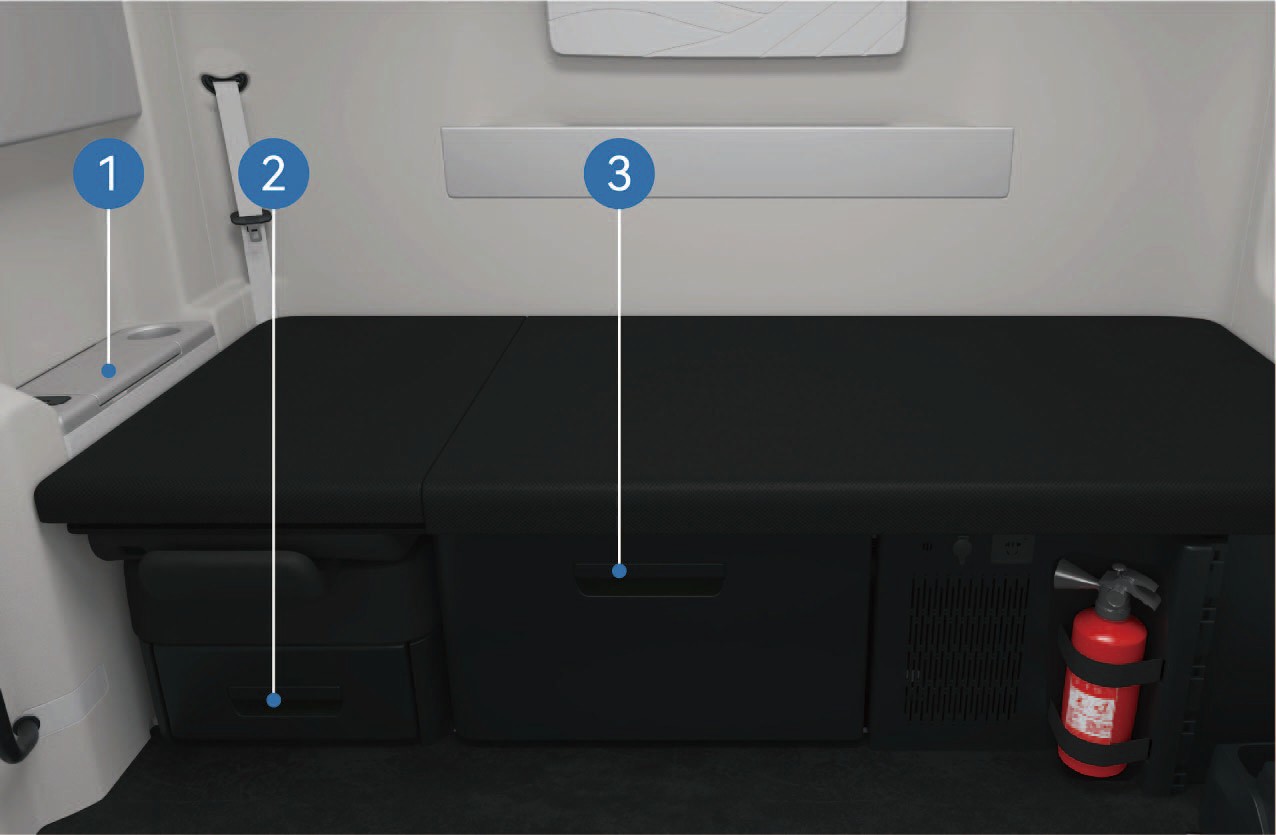
Förvaringsfack på höger sida av främre passagerarsätet
Förvaringsfack under främre passagerarsätet
Förvaringsfack under bädden
↑ Till toppenDet finns förvaringsfack under bädden och främre passagerarsätet. Du kan dra ut det för att använda det. Ett förvaringsfack är placerat på höger sida av främre passagerarsätet där du kan förvara mindre föremål.
Det finns ett förvaringsfack ovanför bädden. Lampan i förvaringsfacket tänds automatiskt när facket öppnas, och släcks automatiskt när facket stängs. Maximal bärförmåga för det stora förvaringsfacket ovanför bädden är 25kg, och för det lilla förvaringsfacket 15kg.
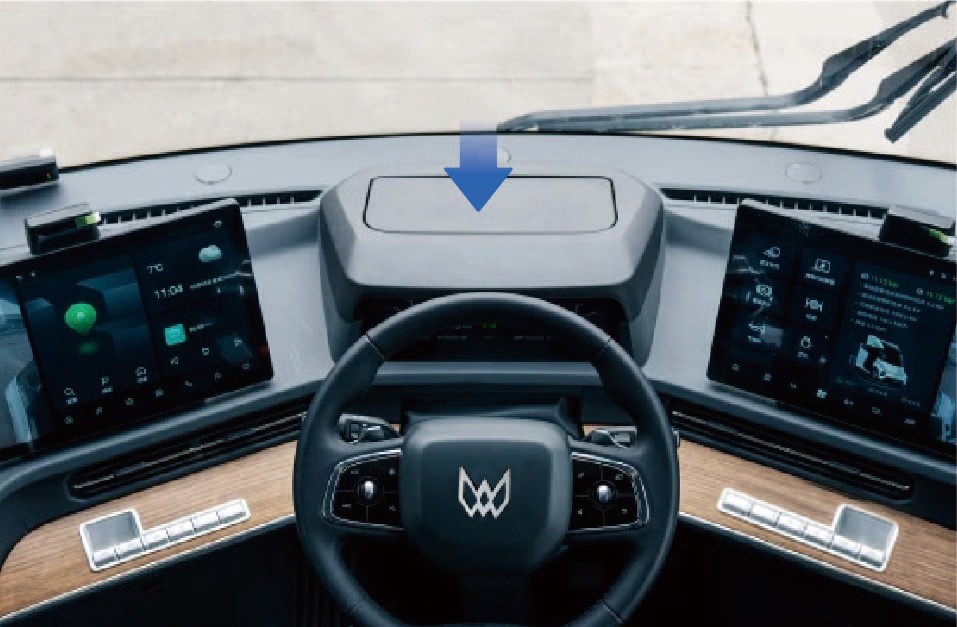
På fordon utan AR-HUD finns ett förvaringsfack placerat där AR-HUD annars sitter, där du kan lägga mindre föremål. Lägg små och lätta föremål i facket, inte vassa föremål, för att undvika skada på fackets invändiga skinn.
Försiktighetsåtgärder
↑ Till toppenObserveraSe till att förvaringsfacken är stängda innan körning, för att undvika skada på föremål eller personskada när föremål faller ner under körning.
Nätficka
↑ Till toppenTillgång till fordonet
Det finns en nätficka längst ner till vänster i fordonet för förvaring av mindre föremål.
Bruksanvisning
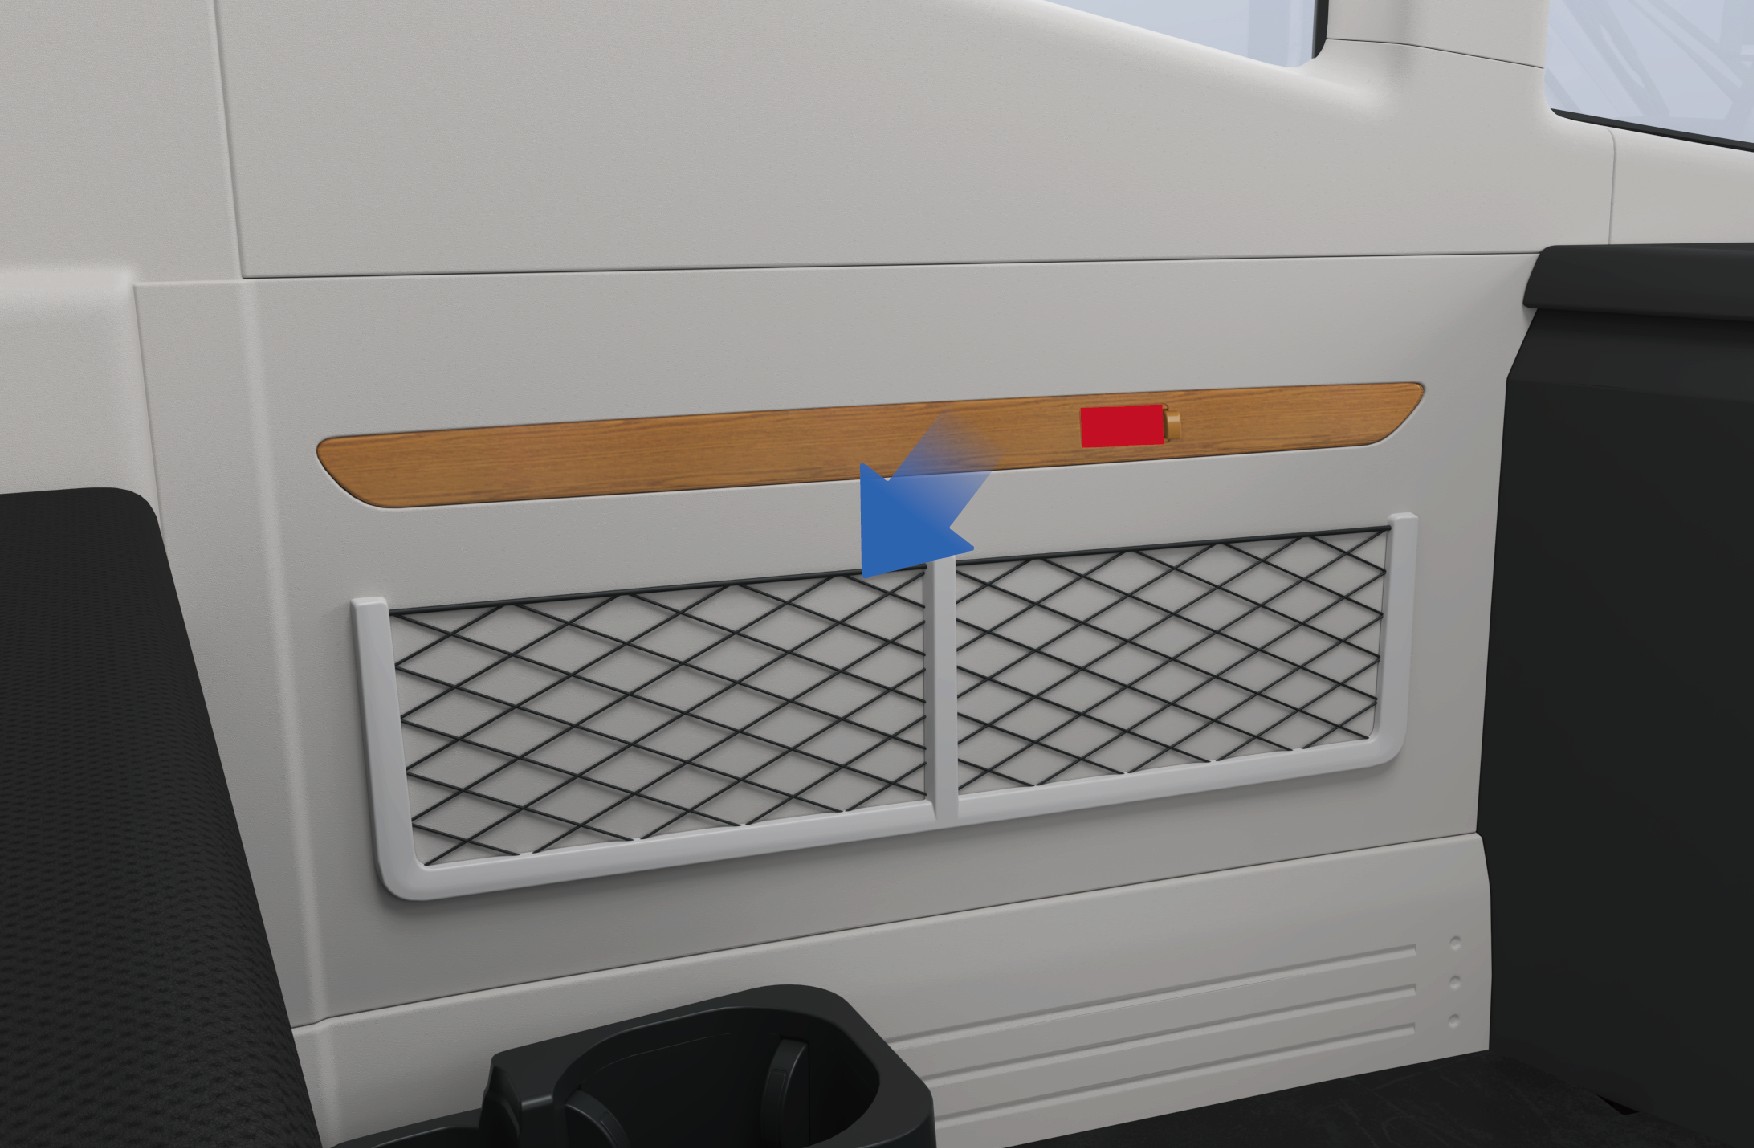
Nätficka
Försiktighetsåtgärder
ObserveraLägg inte vassa föremål i nätfickan, för att undvika skada på nätfickan eller på föraren.
Hållare för tidningar och tidskrifter
↑ Till toppenTillgång till fordonet
Det finns en ficka för tidningar och tidskrifter på baksidan av förarsätet, som kan användas för att förvara små föremål som tidningar och kartor.
Bredvid bädden finns en hållare för tidningar och tidskrifter där du kan förvara tidningar, tidskrifter och andra föremål.
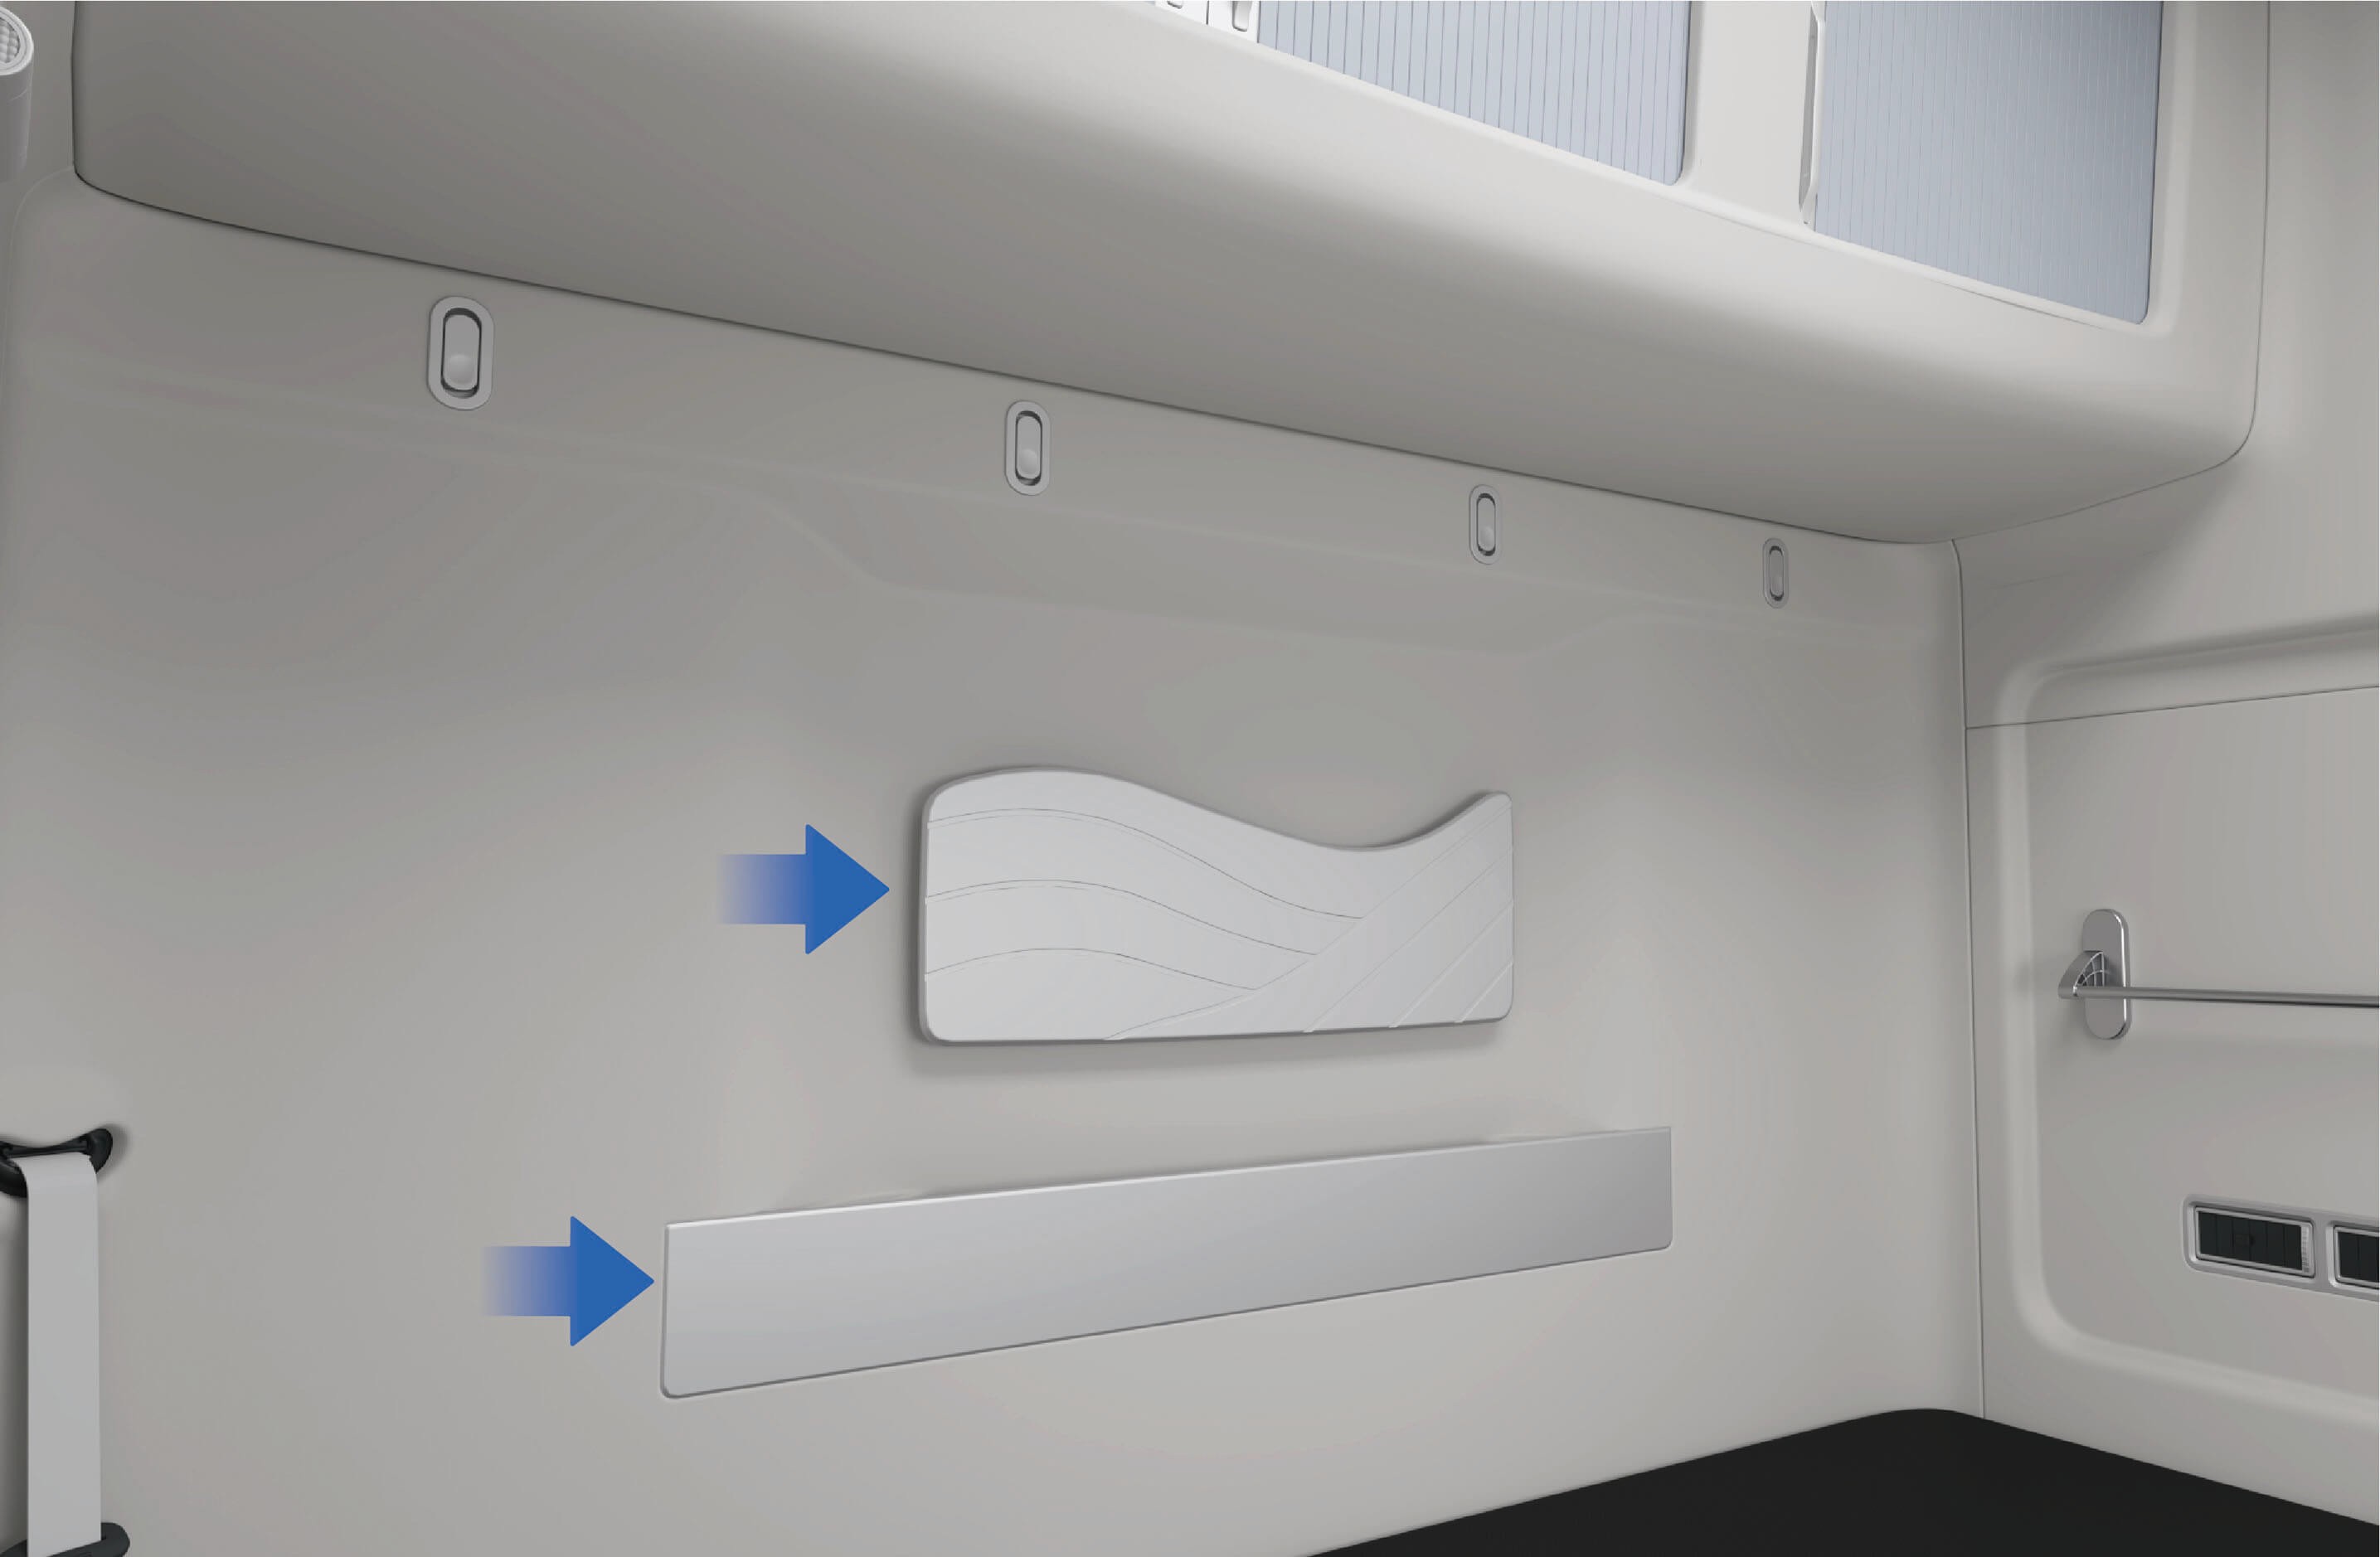
Ficka för tidningar och tidskrifter ovanför bädden • Ficka för tidningar och tidskrifter på höger sida av
bädden
Försiktighetsåtgärder
↑ Till toppenObserveraHållaren för tidningar och tidskrifter som är fäst vid bädden kan endast användas för föremål som tidningar och tidskrifter. Små föremål som läggs i fickan kan inte tas ut igen.
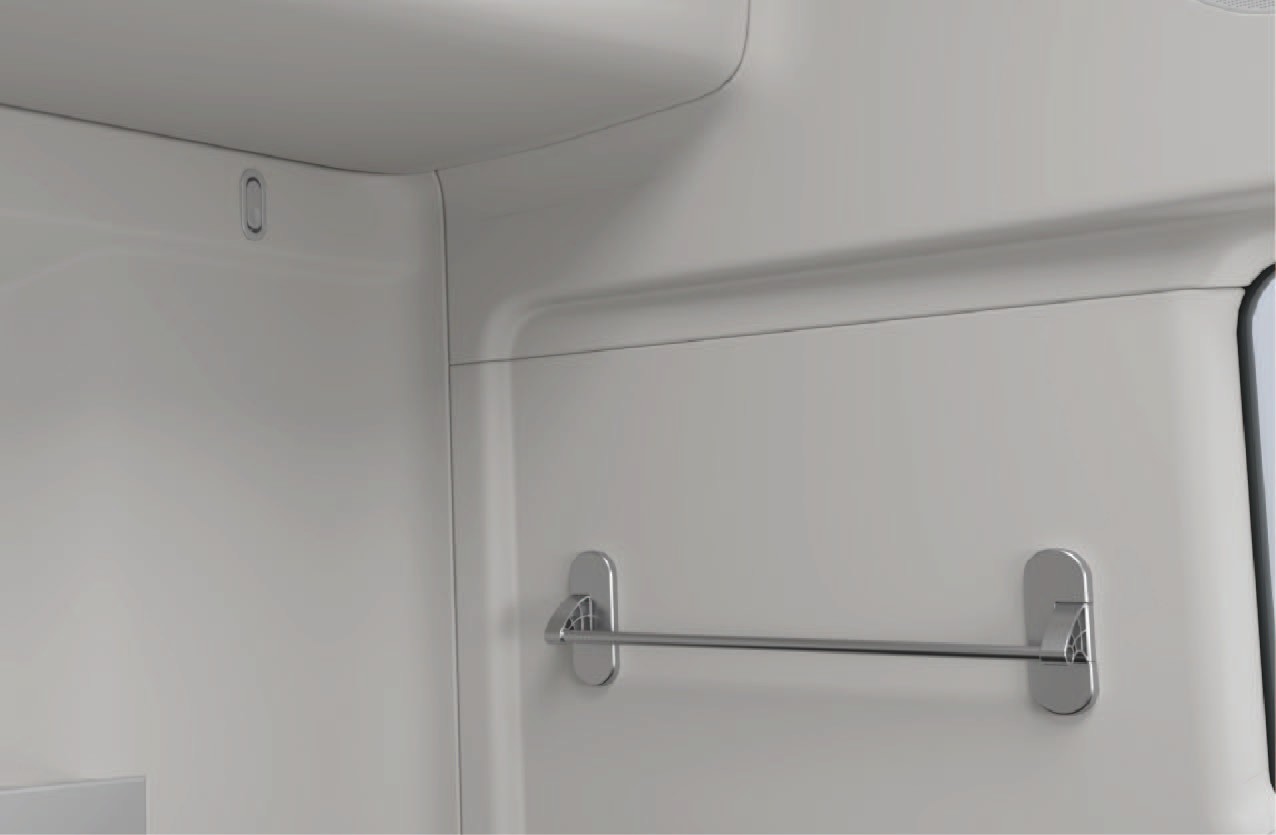
Klädkrok
↑ Till toppenTillgång till fordonet
Det finns en klädkrok ovanför bädden som används för att hänga upp kläder.
Bruksanvisning
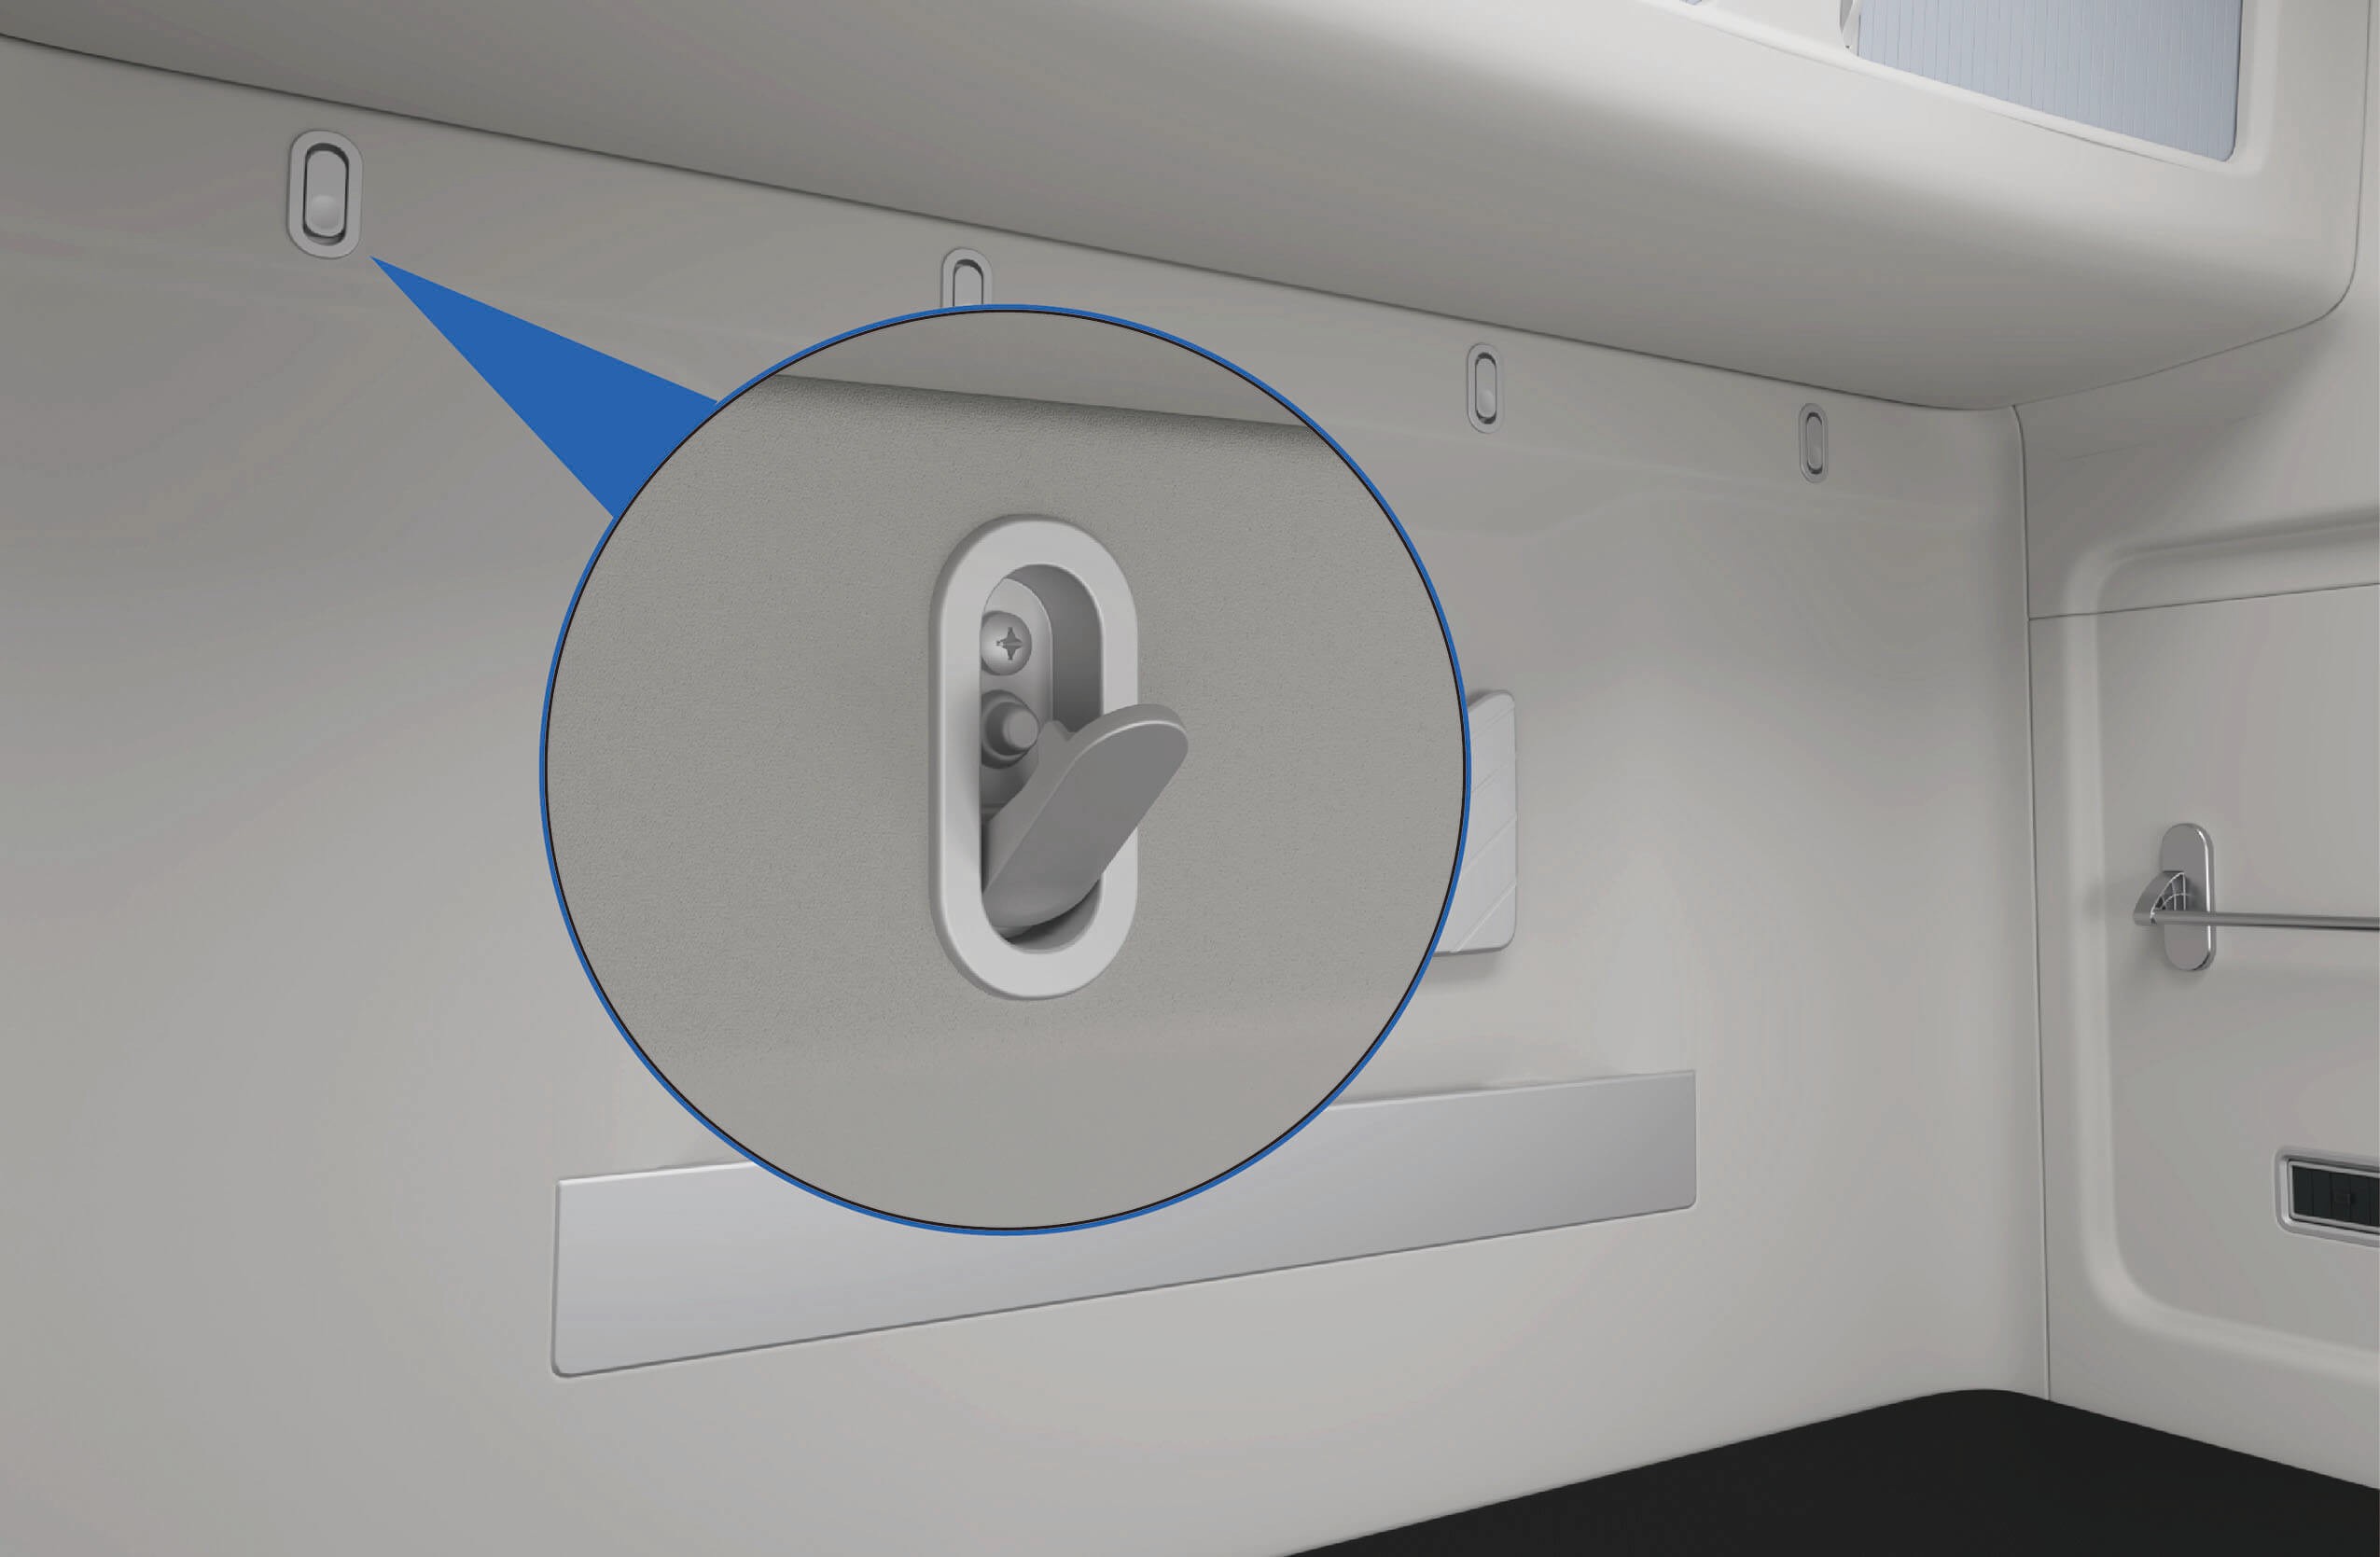
Klädkrok
Försiktighetsåtgärder
ObserveraKlädkroken tål endast lätta kläder eller hattar o.d. Häng inte upp tunga föremål.
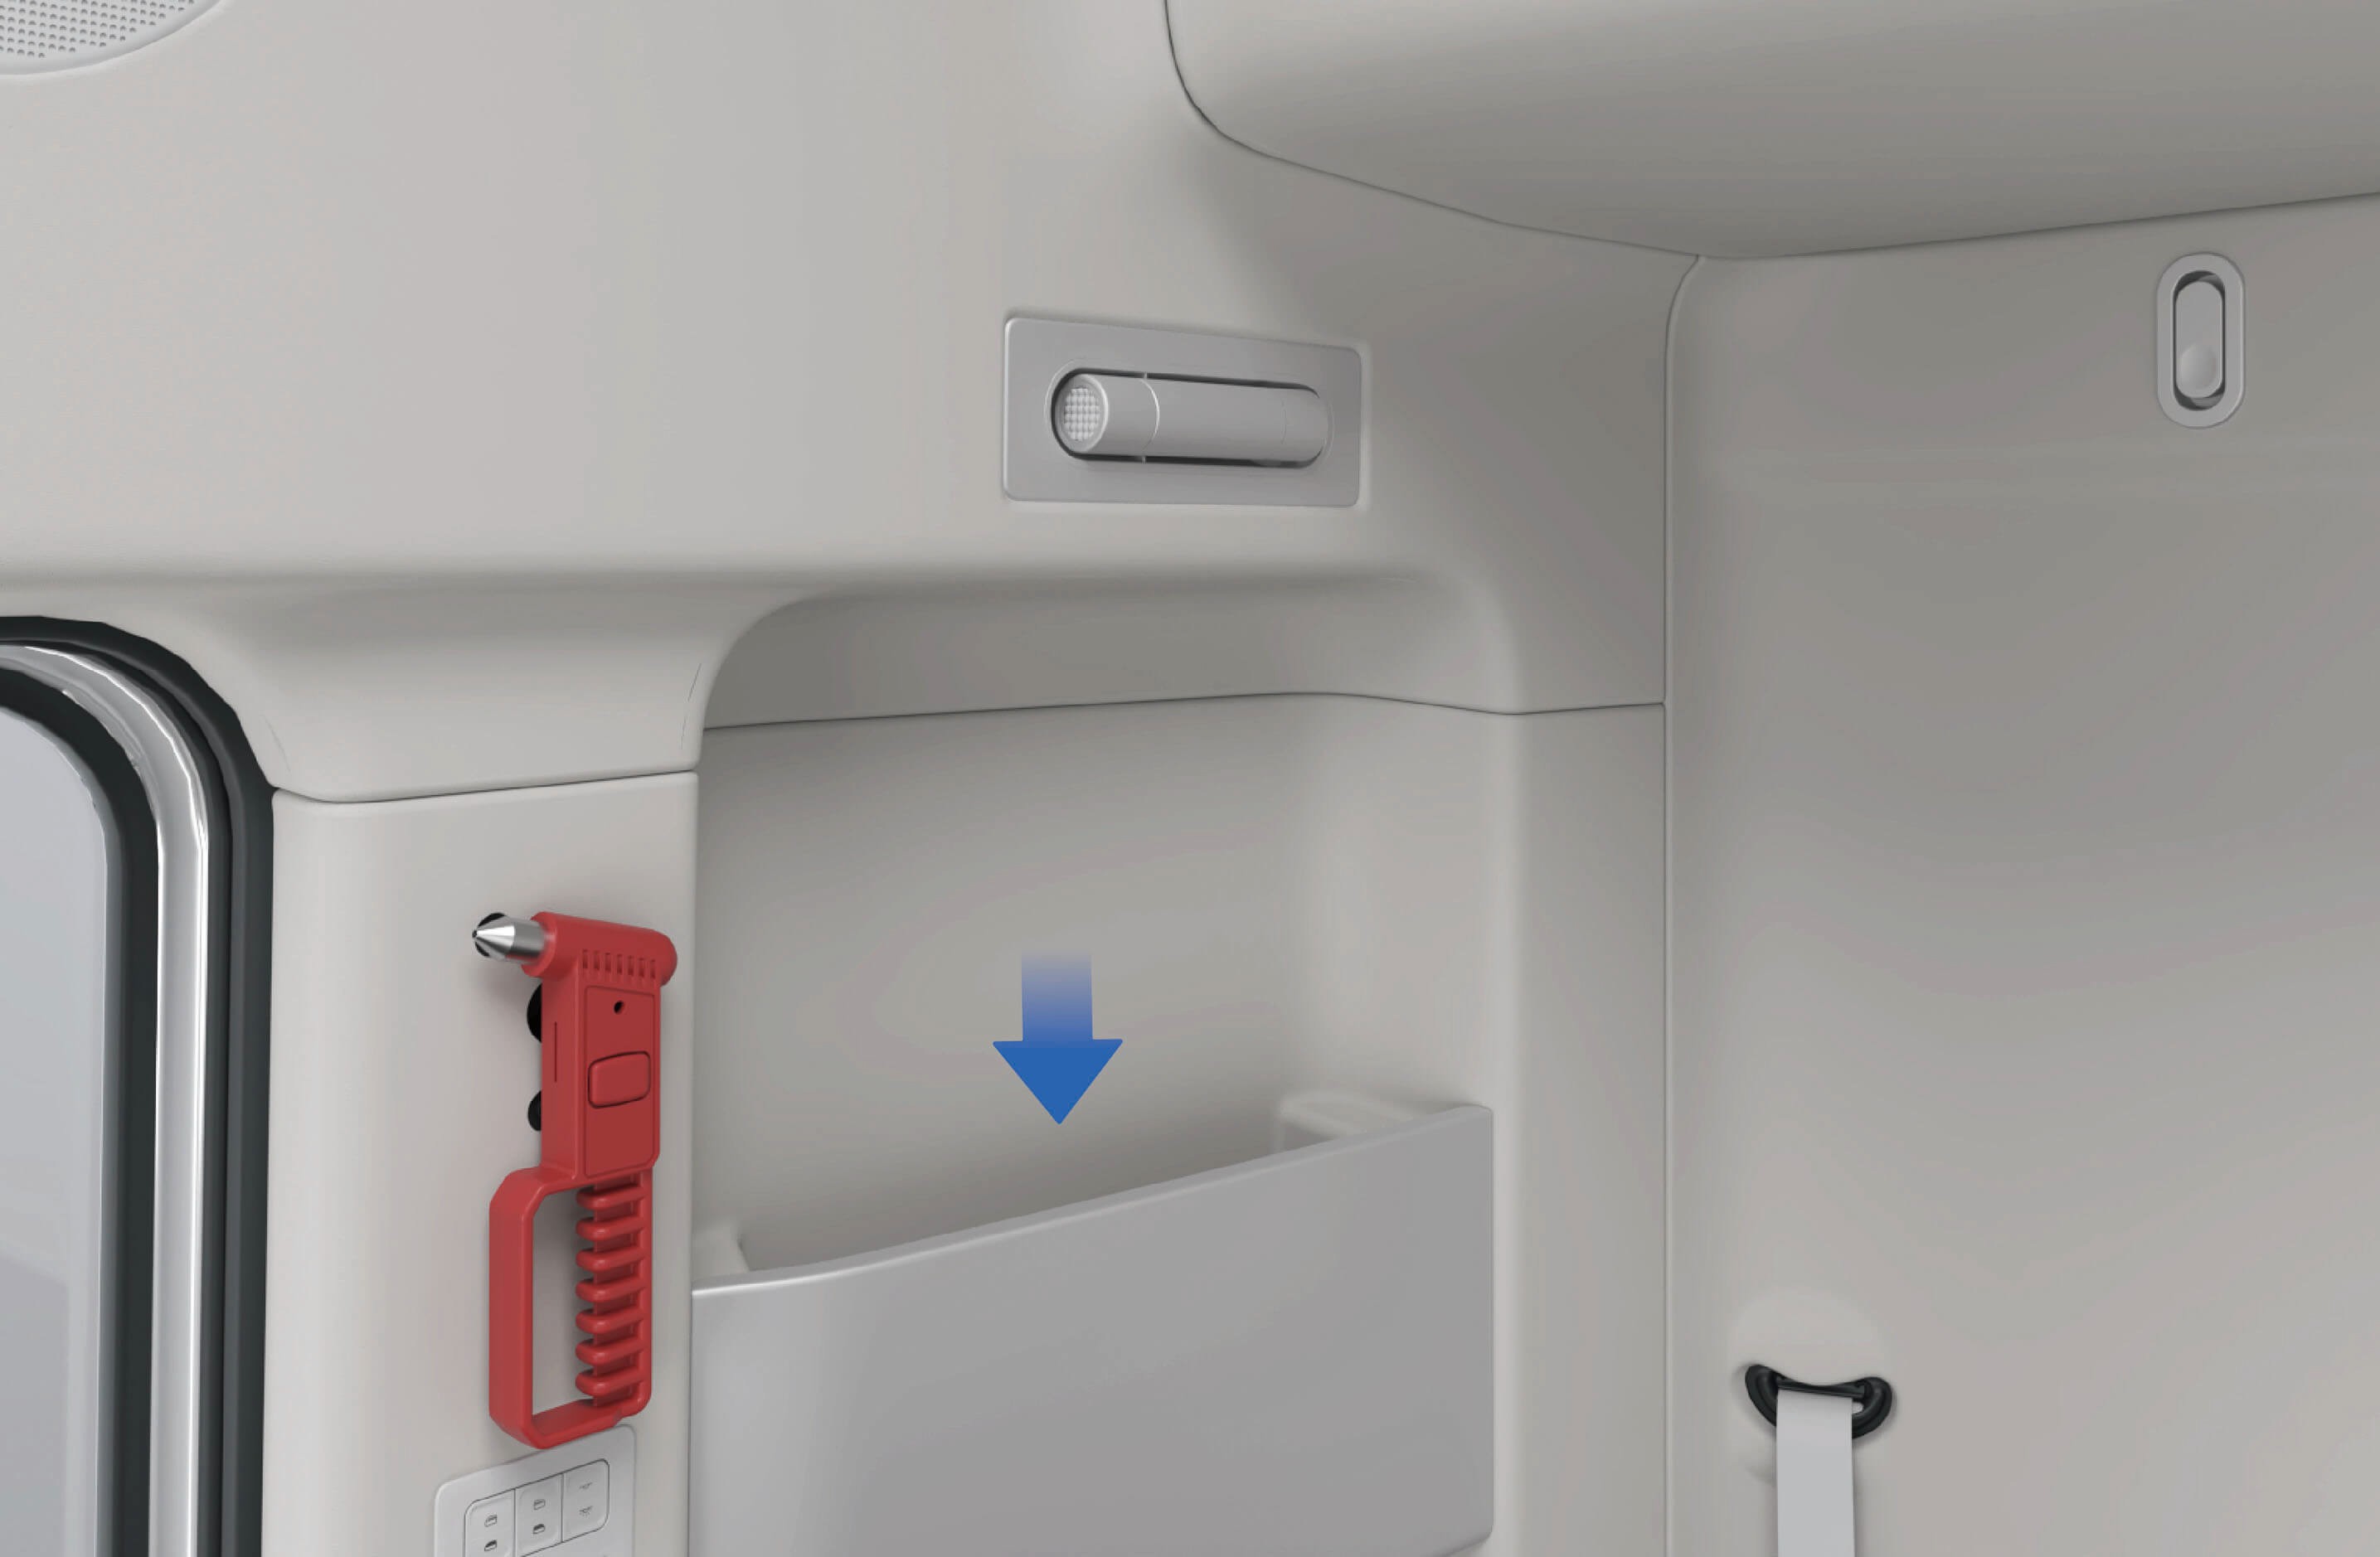
Upphängningskrok
↑ Till toppenTillgång till fordonet
Det finns en upphängningskrok på sidan av bädden som kan användas för att hänga upp handdukar eller små klädesplagg.
Bruksanvisning
Upphängningskrok
Försiktighetsåtgärder
ObserveraUpphängningskroken kan endast användas för att hänga upp torra handdukar eller små klädesplagg. Häng inte upp tunga föremål, för att undvika skada på upphängningskroken och olyckor.
USB-laddning
↑ Till toppenTillgång till fordonet
Fordonet har USB-portar, placerade på vänster del av instrumentpanelen respektive på armstödet till främre passagerarsätet. USB-portarna kan användas för att ladda mobiltelefon med en laddeffekt på 15W. Både type-C- och type-A-portar stöds.
Bruksanvisning
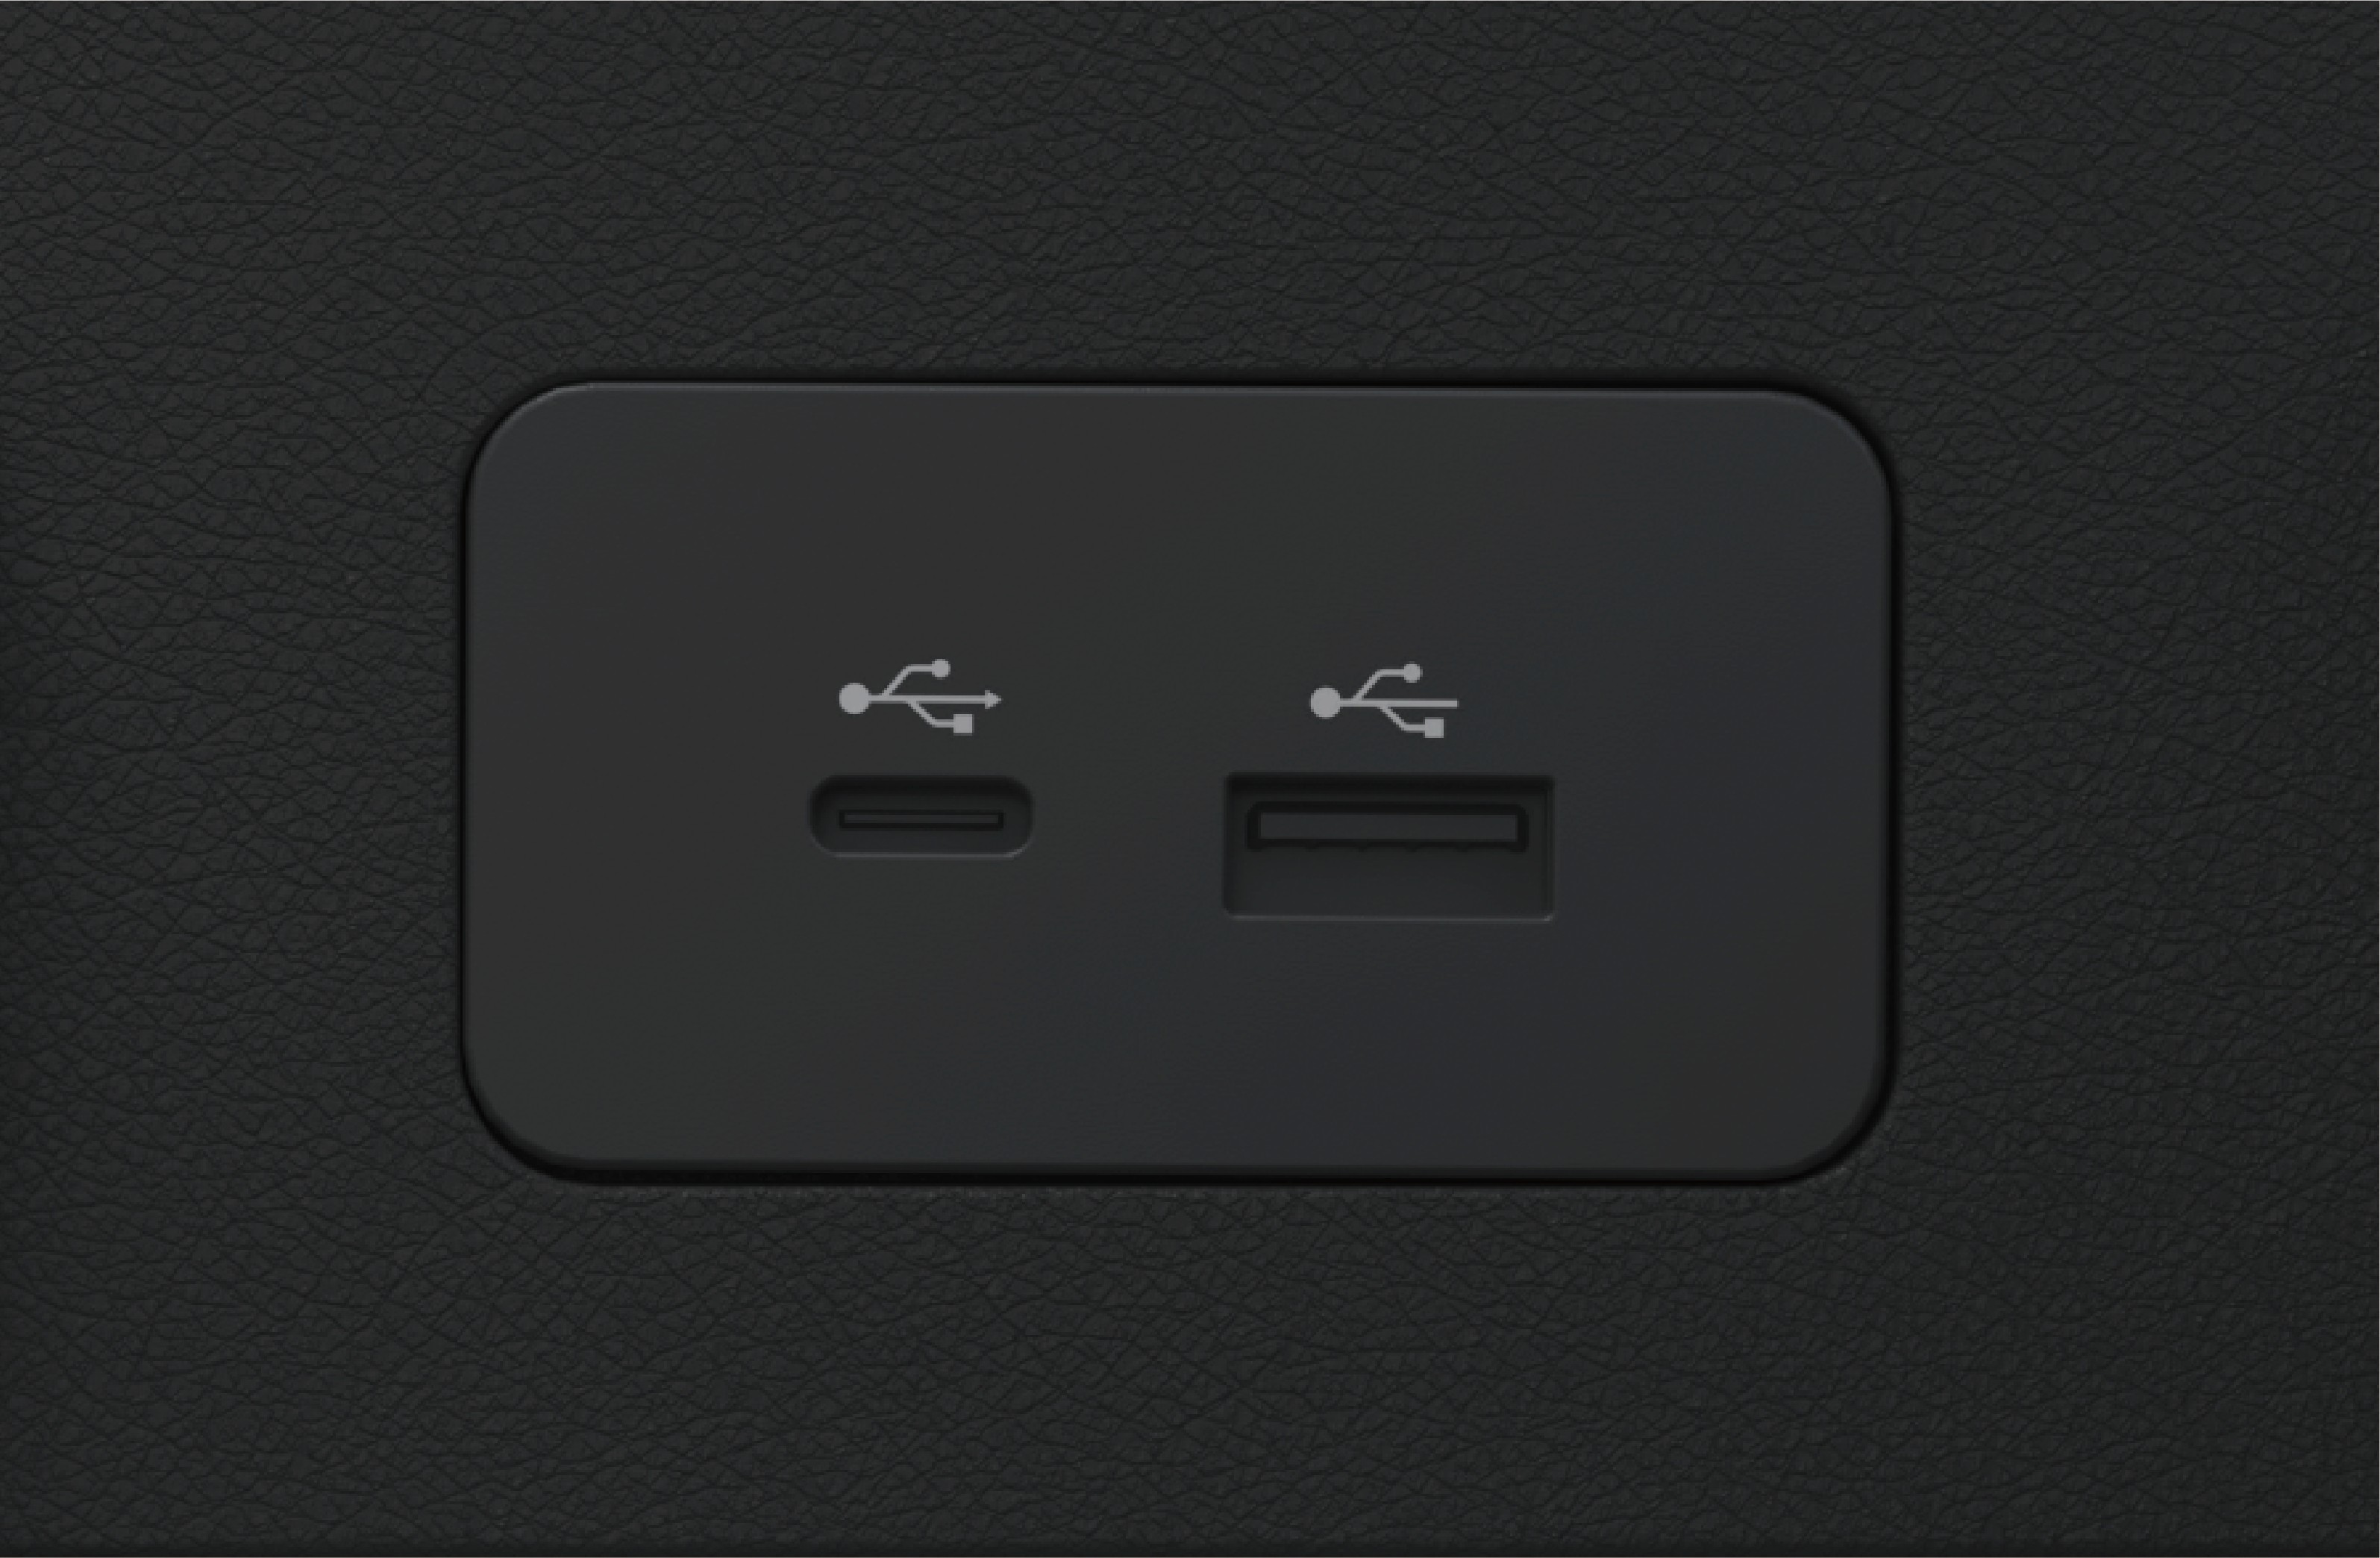
Vänster USB-port på instrumentpanelen
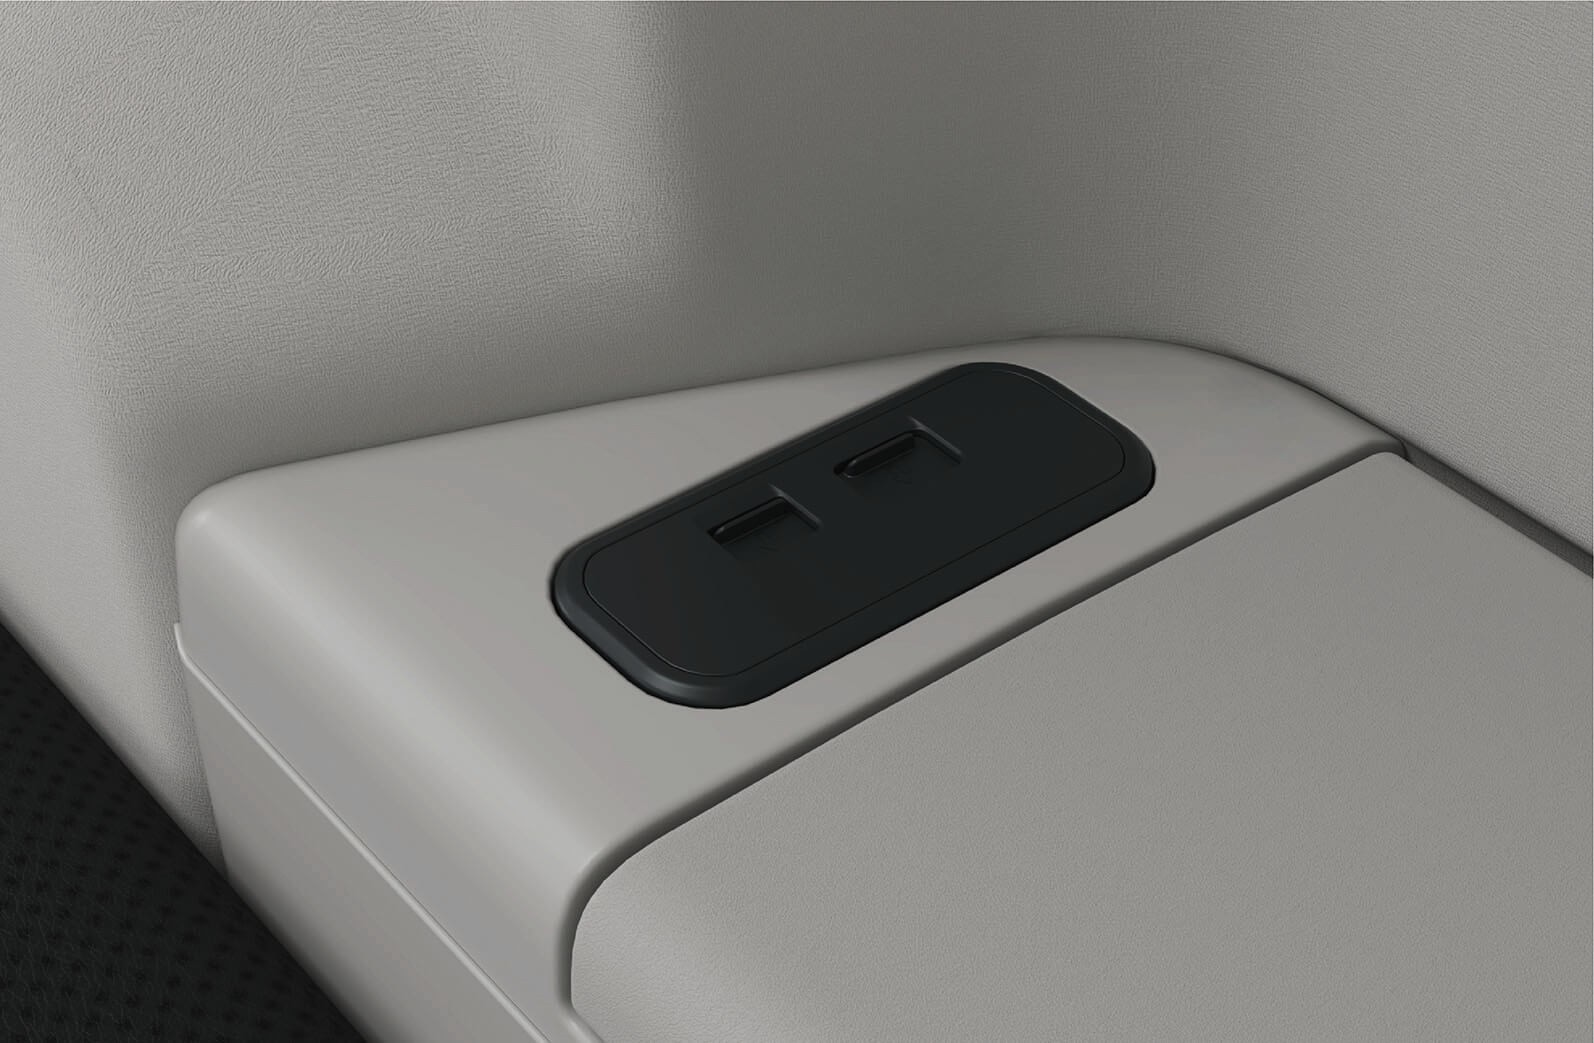
USB-port på armstödet till främre passagerarsätet
Försiktighetsåtgärder
↑ Till toppenVarningSpill aldrig vätska vid porten.
AnmärkningAnslutna enheter kan bli varma under laddning. Se till att varma enheter inte utgör en fara för personer eller leder till materiella skador.
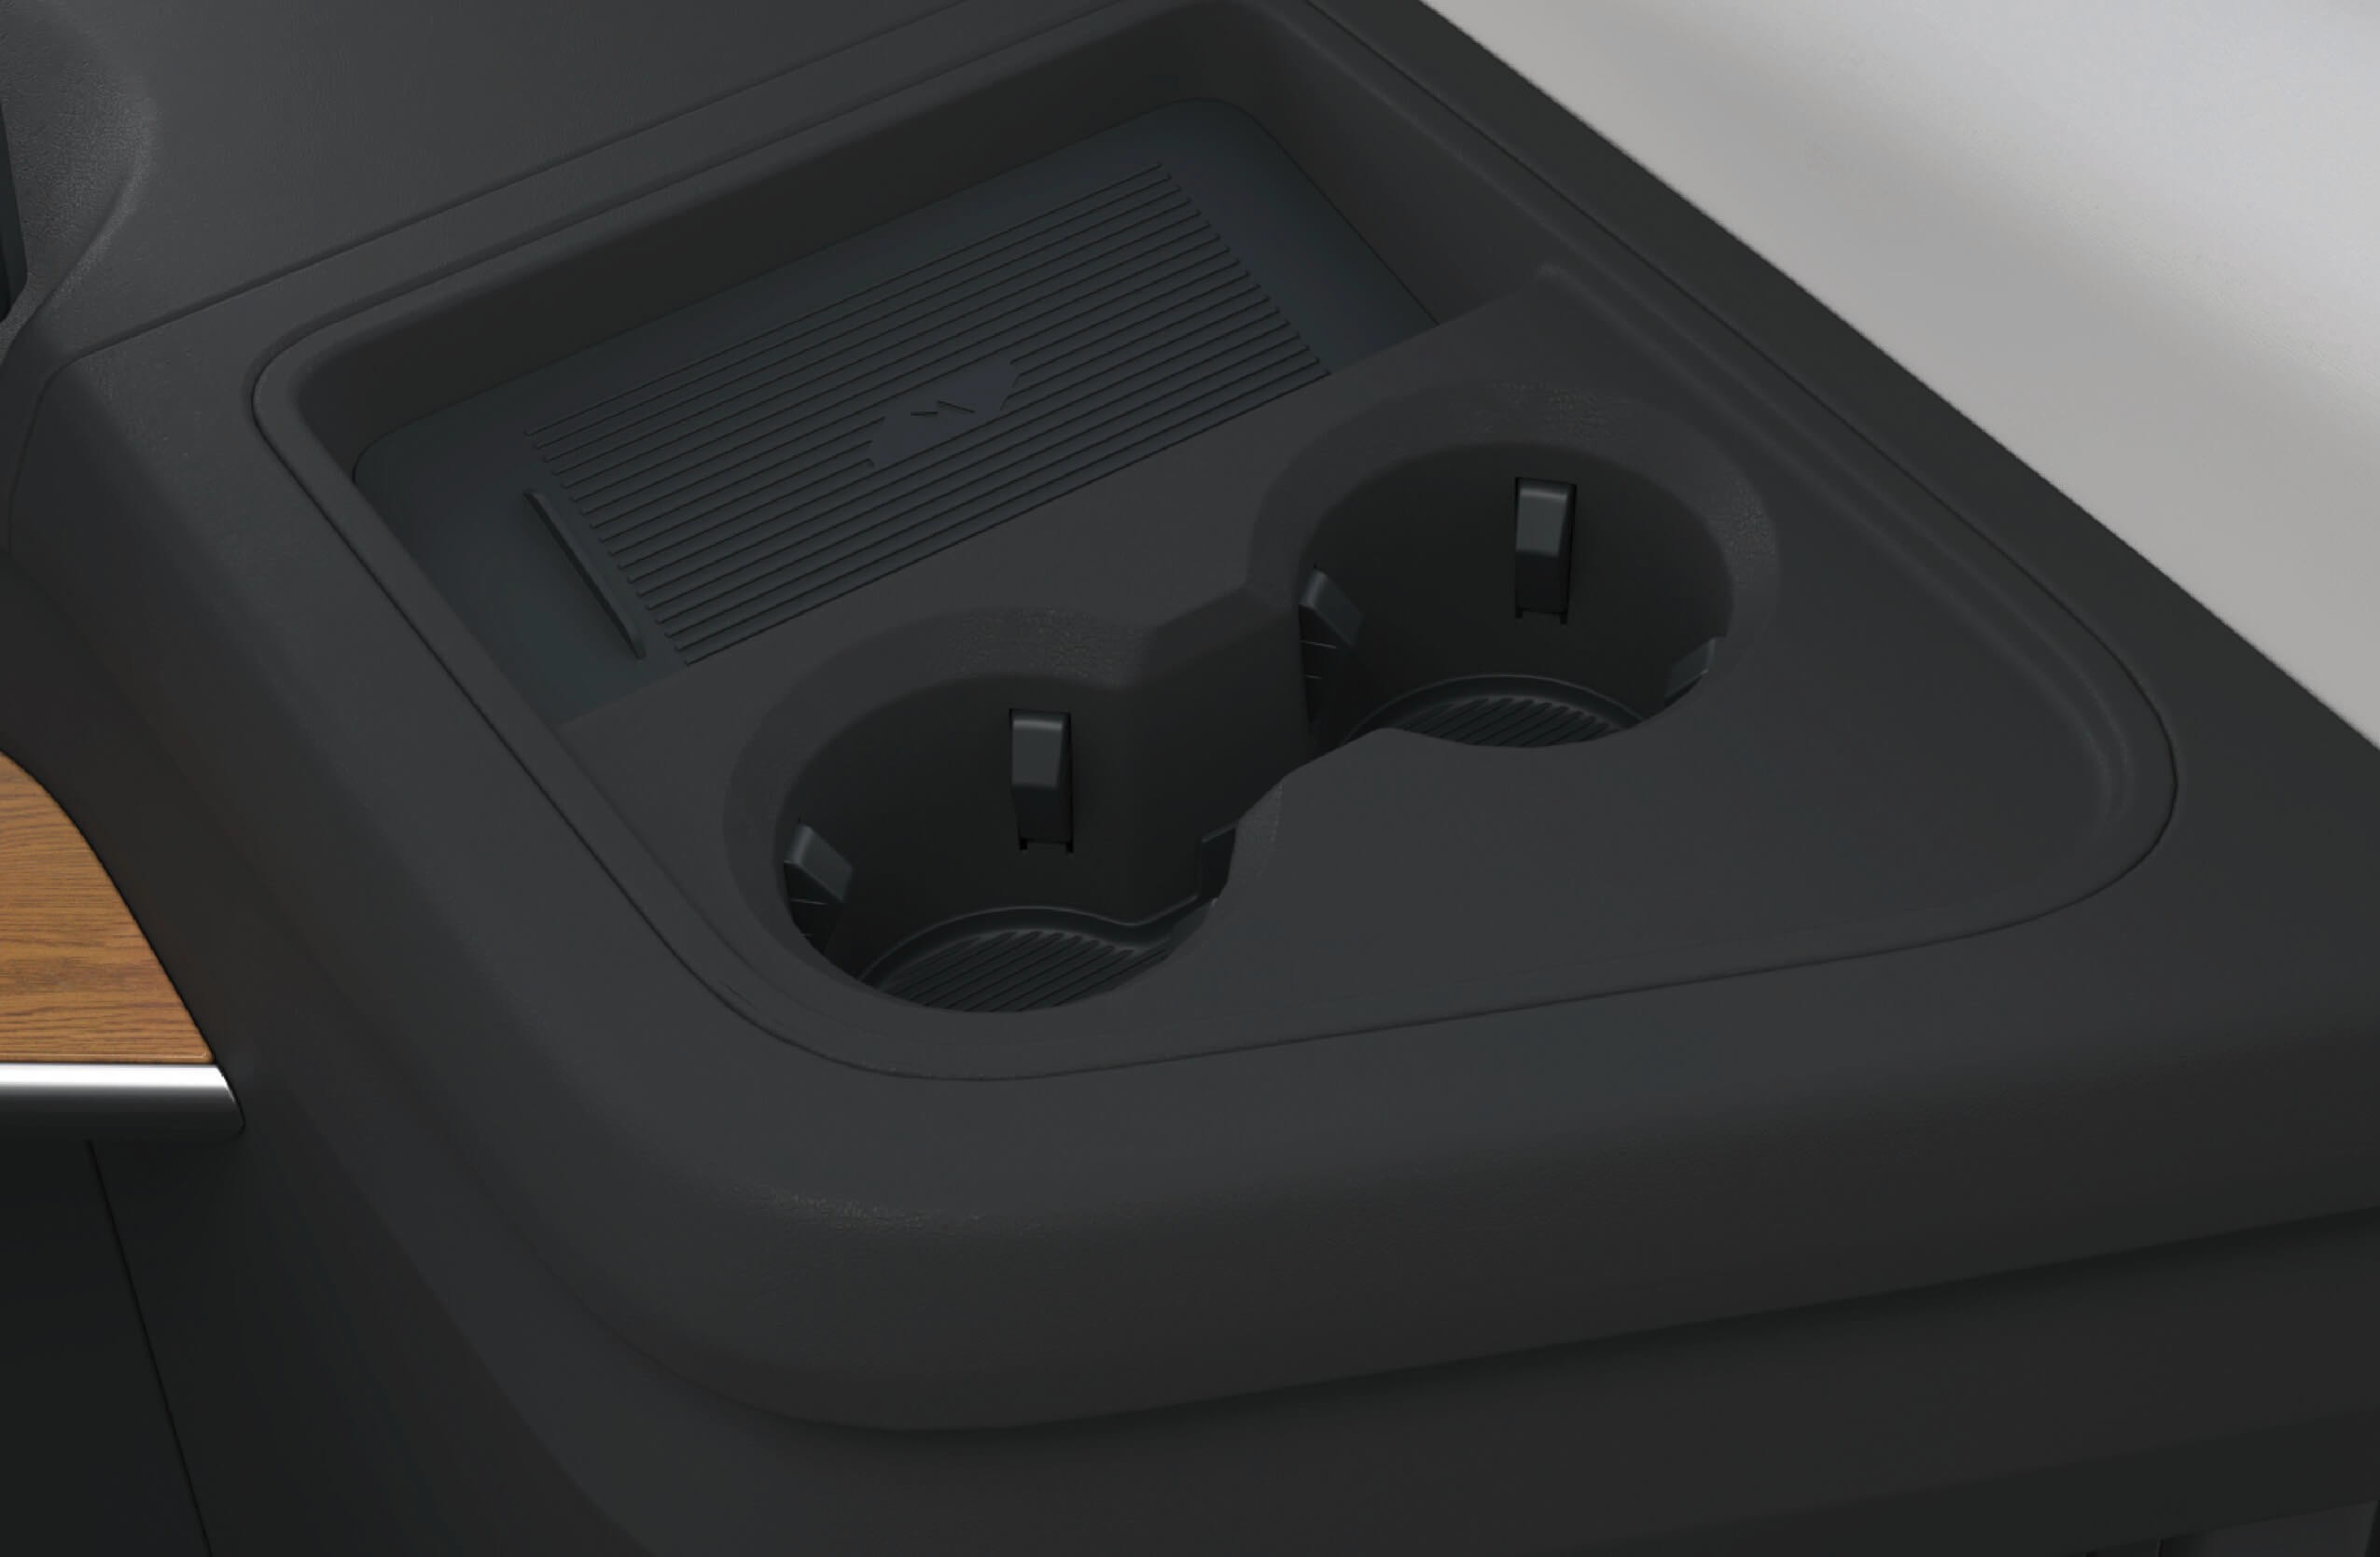
Trådlös telefonladdning
↑ Till toppenHöger del av instrumentpanelen är utrustad med en trådlös laddare som kan användas för att ladda mobiltelefoner trådlöst med en laddeffekt på 15W.
Försiktighetsåtgärder
↑ Till toppenVarningLägg inte föremål med metalldelar i induktionsområdet för trådlös laddning tillsammans med mobiltelefonen, annars kan föremålen med metalldelar bli varma eller skadade och orsaka en säkerhetsolycka.
Vid laddning, lägg mobiltelefonen med skärmen uppåt inom
induktionsområdet för trådlös laddning.
Bruksanvisning
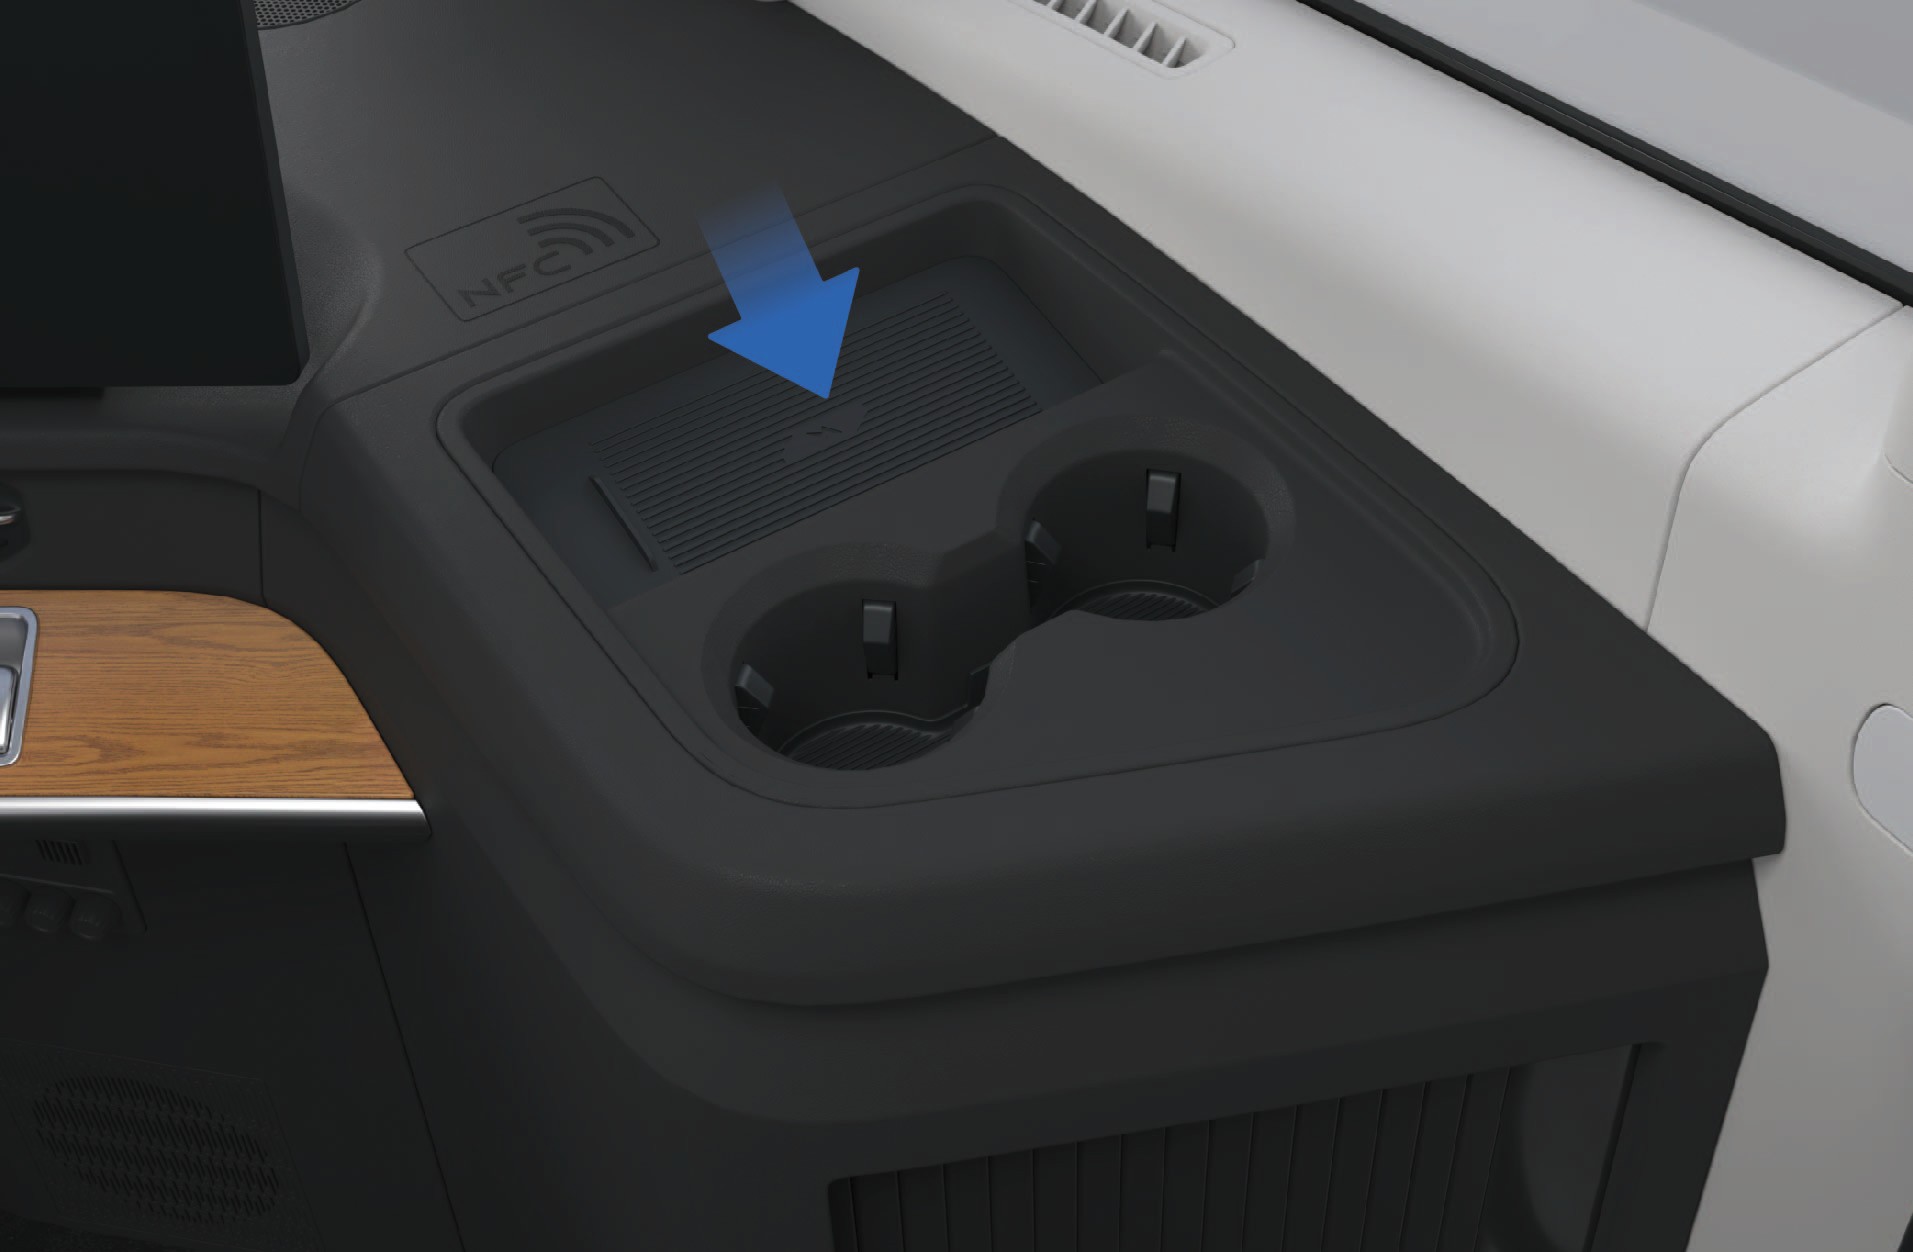
Område för trådlös telefonladdning
Anmärkning
- Innan den trådlösa laddfunktionen för telefonen aktiveras, se till att kortnyckel, kreditkort eller andra magnetiska föremål hålls borta från laddområdet.
Låt inte mobiltelefonen laddas utan uppsikt i fordonet, för att undvika säkerhetsrisk.
Spill inte vätska i området för trådlös laddning, för att undvika skada på de elektroniska komponenterna.
Lägg inte tunga föremål i laddområdet, för att undvika skada på mobiltelefonens trådlösa laddmodul.
Observera
Det är normalt att mobiltelefonen blir något varmare under laddning.
När mobiltelefonen är varm kan fordonet stoppa laddningen för att skydda telefonens batteri, och laddningen återupptas inte förrän telefonen har svalnat.
Den trådlösa laddfunktionen stöder endast mobiltelefoner, hörlurar, högtalare och andra enheter som uppfyller protokollet för trådlös laddning.
Vid användning av trådlös laddning, placera enheten mitt i laddområdet för att förhindra att enheten inte laddas eller laddas ineffektivt.
Endast 1 mobiltelefon kan laddas åt gången.
Om telefonfodralet är tillverkat av ett speciellt material (till exempel ett fodral med metallfäste/metallmagnet) eller är för tjockt, kan det leda till att laddningen misslyckas.
När fordonet kör på guppig väg kan den trådlösa laddningen av mobiltelefonen stoppa periodvis.
Om mobiltelefonen inte laddas ordentligt, kontrollera alltid att telefonen är placerad i området för trådlös laddning utan främmande föremål, eller vänta tills induktionsområdet för trådlös laddning
↑ Till toppenhar svalnat innan du försöker igen. Om laddning fortfarande
är omöjlig, kontakta ett auktoriserat Windrose-servicecenter i tid.
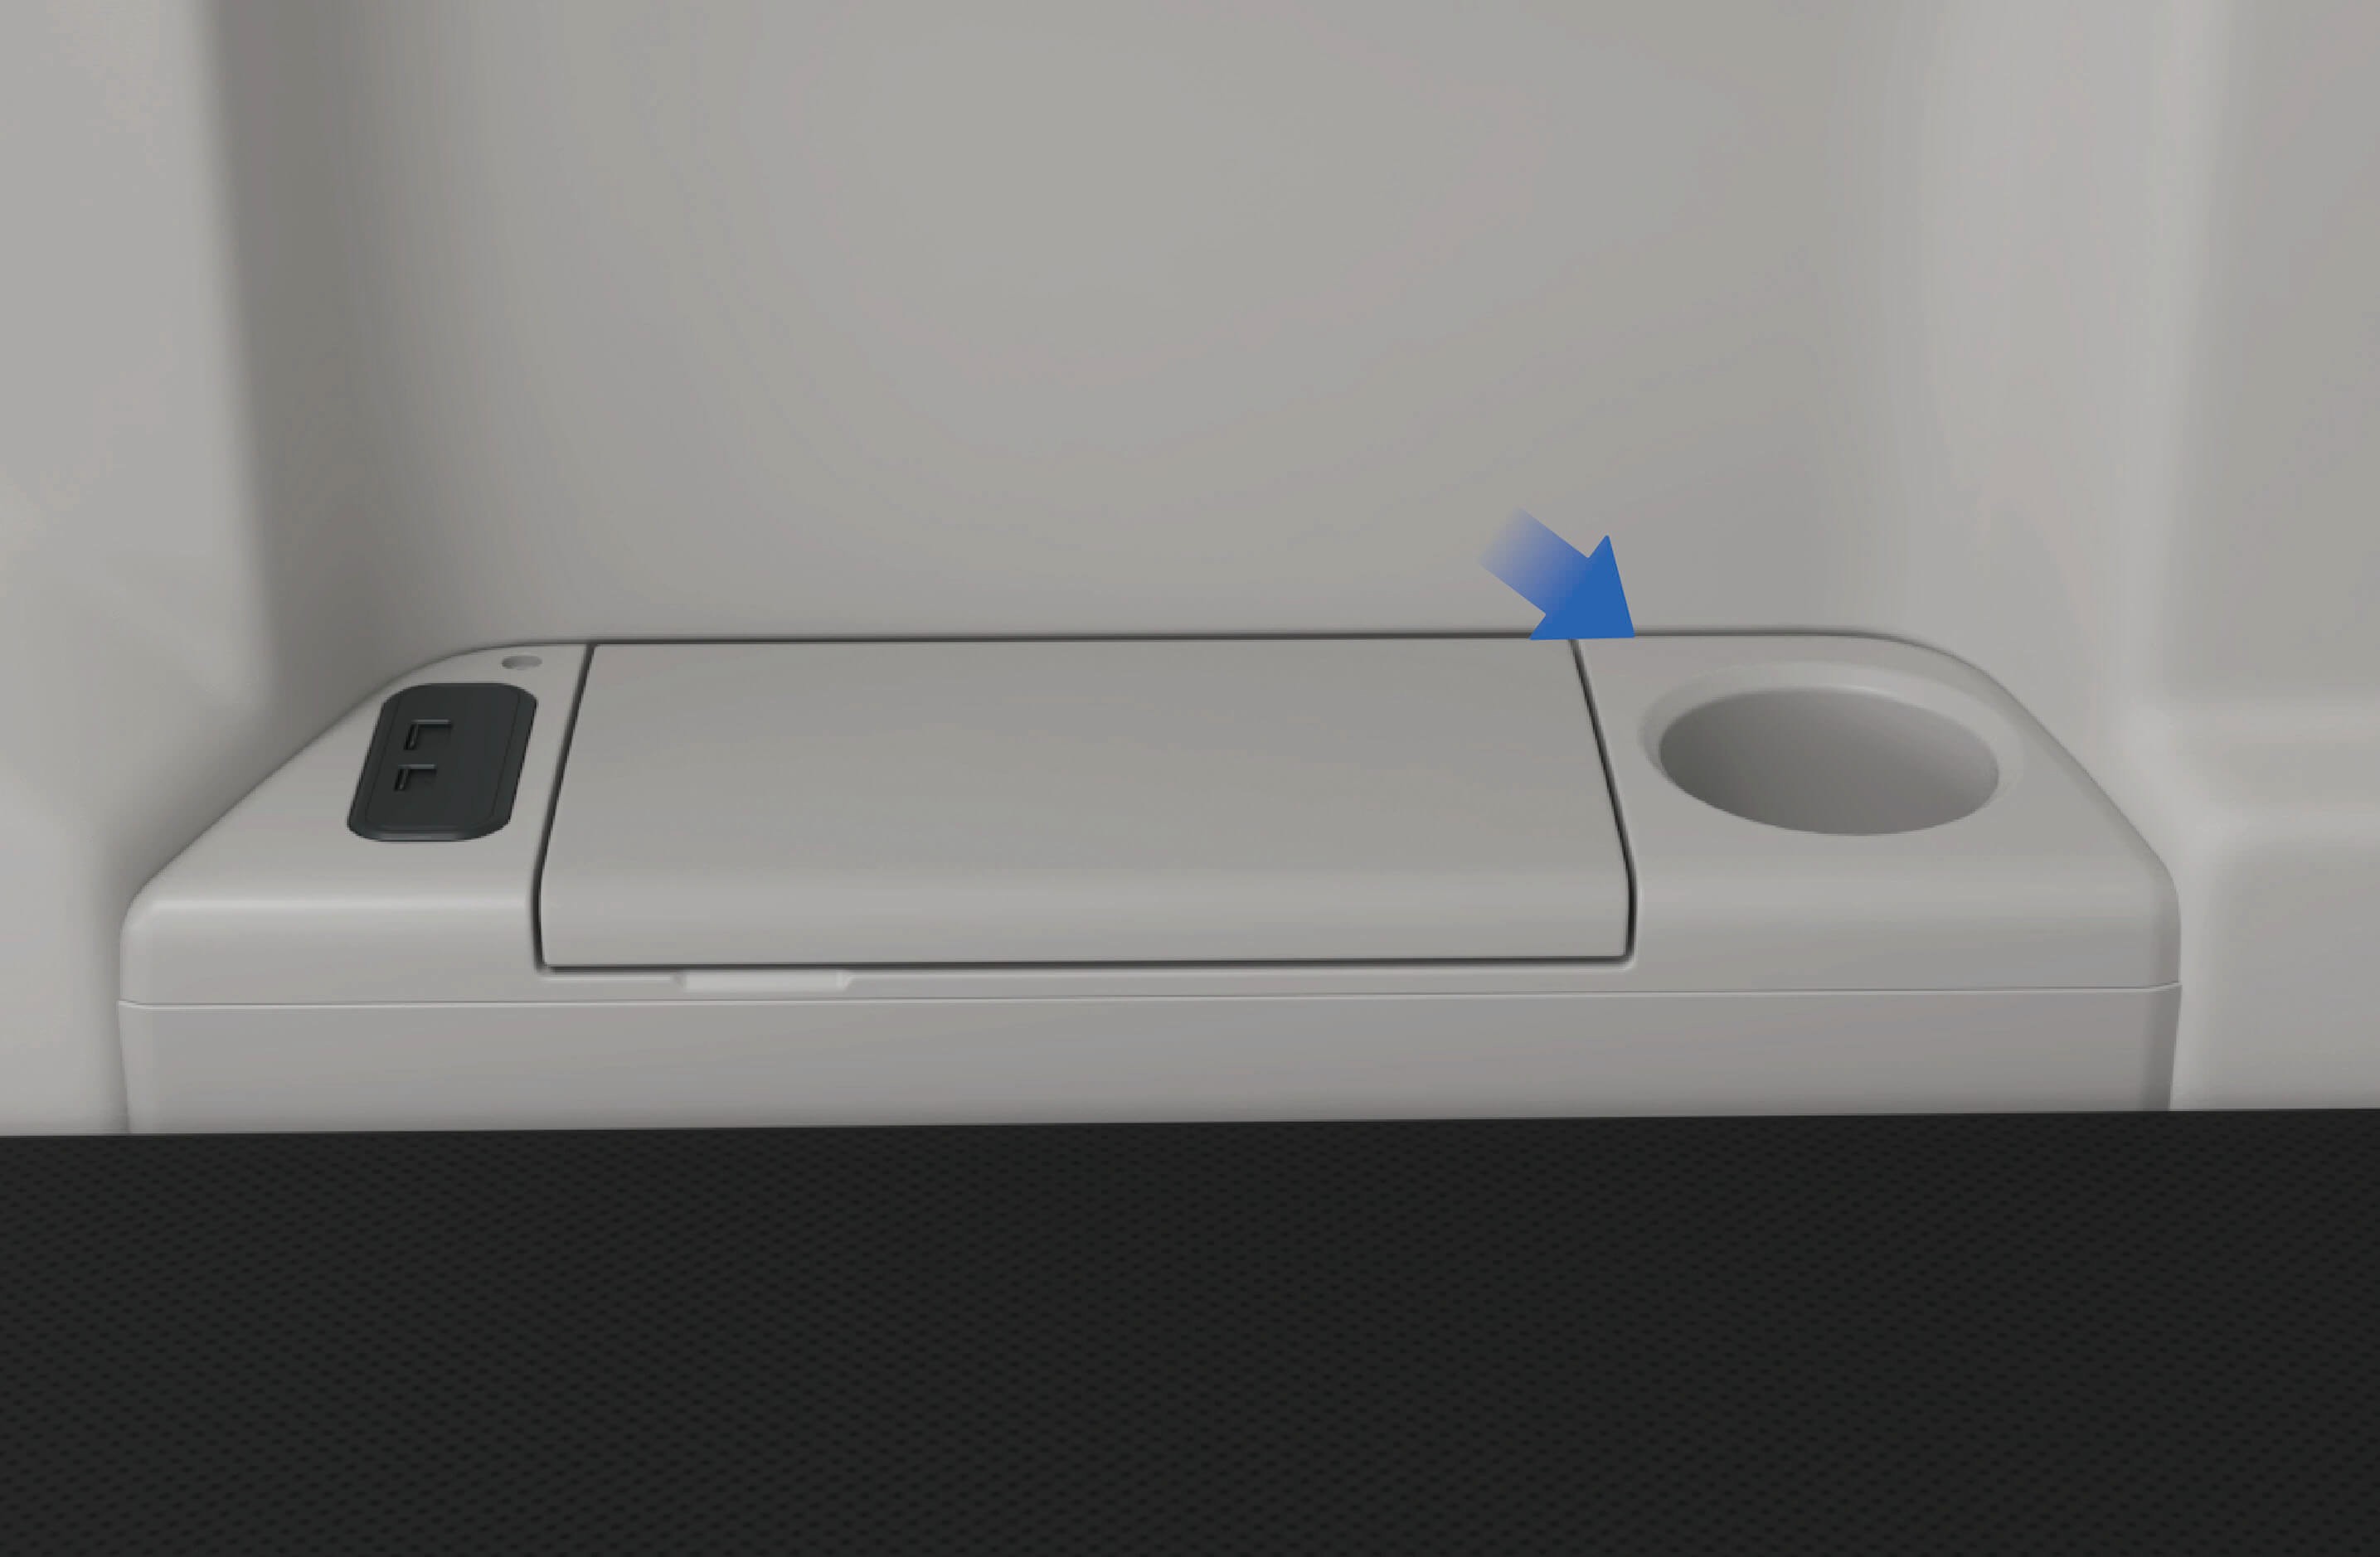
Strömuttag
↑ Till toppenTillgång till fordonet
Längst ner i vänster hörn av bädden är 2 likströmsuttag monterade, med följande konfiguration:
Nominell spänning: 24V
Maximal ström: 15A Nominell spänning: 12V
Maximal ström: 10A
Längst ner i vänster hörn av bädden är en 230V växelriktare med stickkontakt monterad, med följande konfiguration:
Nominell effekt: 1000W
Nominell spänning: AC230V
Utgångsfrekvens: 50Hz ± 0.5Hz
Bruksanvisning
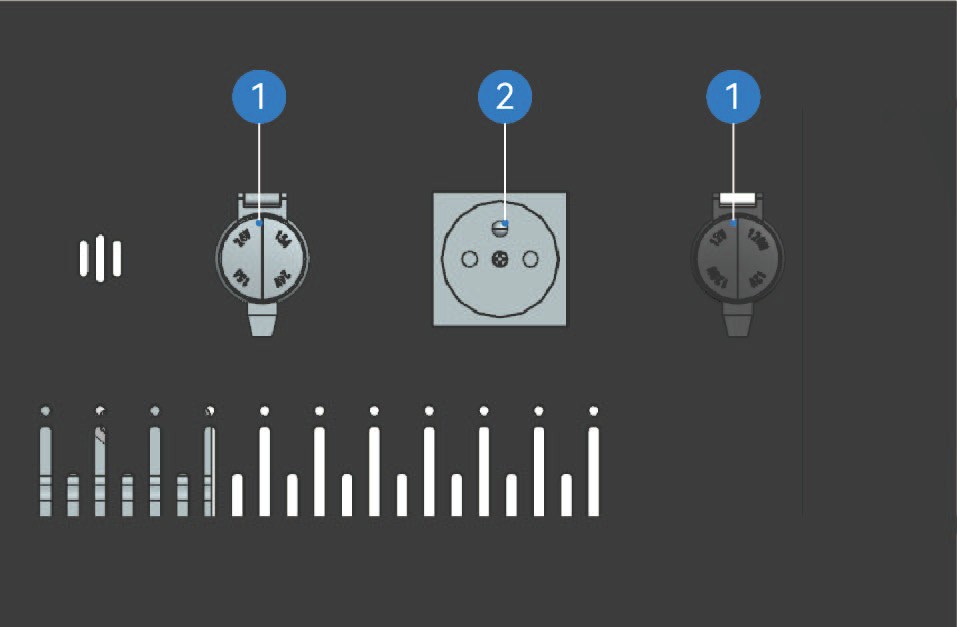
Likströmsuttag
Växelströmsuttag
24V strömuttag för släpvagn: Maximal säker driftseffekt: 2 kW
Försiktighetsåtgärder
↑ Till toppenAnmärkning230V-växelriktaren kan endast användas när fordonet är anslutet till högspänning. Om fordonet är avstängt är endast 12V- eller 24V-strömförsörjningen tillgänglig.
Taklampa
Invändig belysning
Taklampan kan slås på och av på två sätt.
Brytare för att slå på taklampa
 Brytare för att slå av taklampa/invändig lampa
Tryck på den övre på-brytaren för att slå på taklampan. Tryck och släpp den nedre av-brytaren för taklampa/invändig lampa för att slå av taklampan, och tryck och håll in den övre av-brytaren för taklampa/invändig lampa för att slå av taklampan.
Dessutom kan du slå taklampan på/av genom att välja «Control Center», byta till gränssnittet «Lighting» och klicka på knappen «Top Light» på fordonets informationsskärm i instrumentpanelen.
På/av med dörr öppna/stänga-funktion
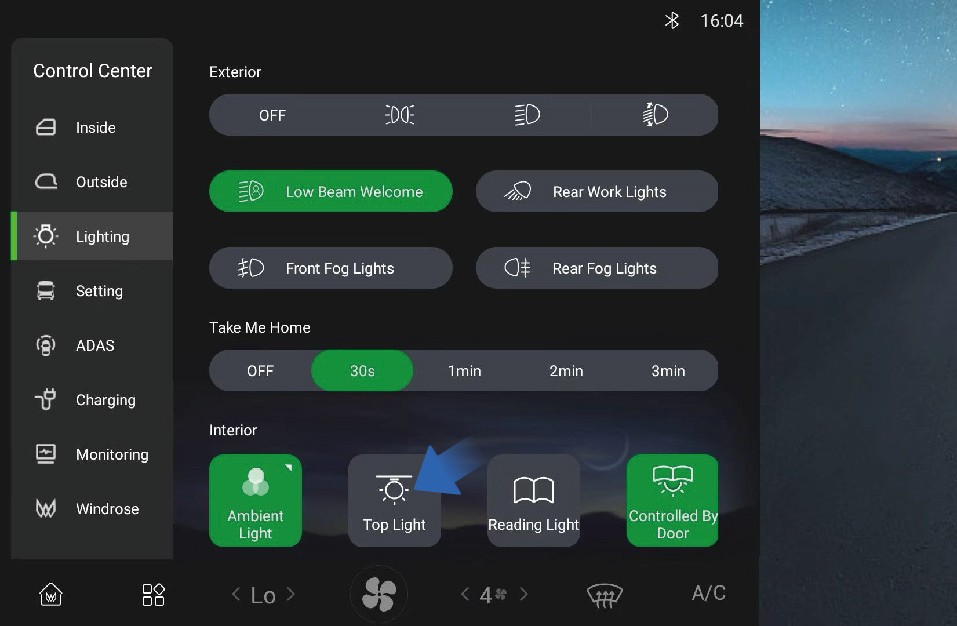

Du kan aktivera/inaktivera på/av med dörr öppna/stänga-funktionen genom att välja «Control Center», byta till gränssnittet «Lighting» och klicka på knappen «Controlled By Door» på fordonets informationsskärm i instrumentpanelen. När denna funktion är aktiverad tänds eller släcks taklampan när dörren öppnas eller stängs.
Försiktighetsåtgärder
↑ Till toppenVarningAnvänd inte främre invändiga lampor vid körning på natten. Starkt ljus inne i fordonet kan minska sikten vid nattkörning och kan orsaka kollision.
Bruksanvisning
Insteglius
↑ Till toppenFordonet har en välkomstljusfunktion.
Invändig belysning
Du kan aktivera/inaktivera välkomstfunktionen för halvljus genom att välja «Control Center», byta till gränssnittet «Lighting» och klicka på knappen «Low Beam Welcome» på fordonets informationsskärm i instrumentpanelen.
Följ-mig-hem
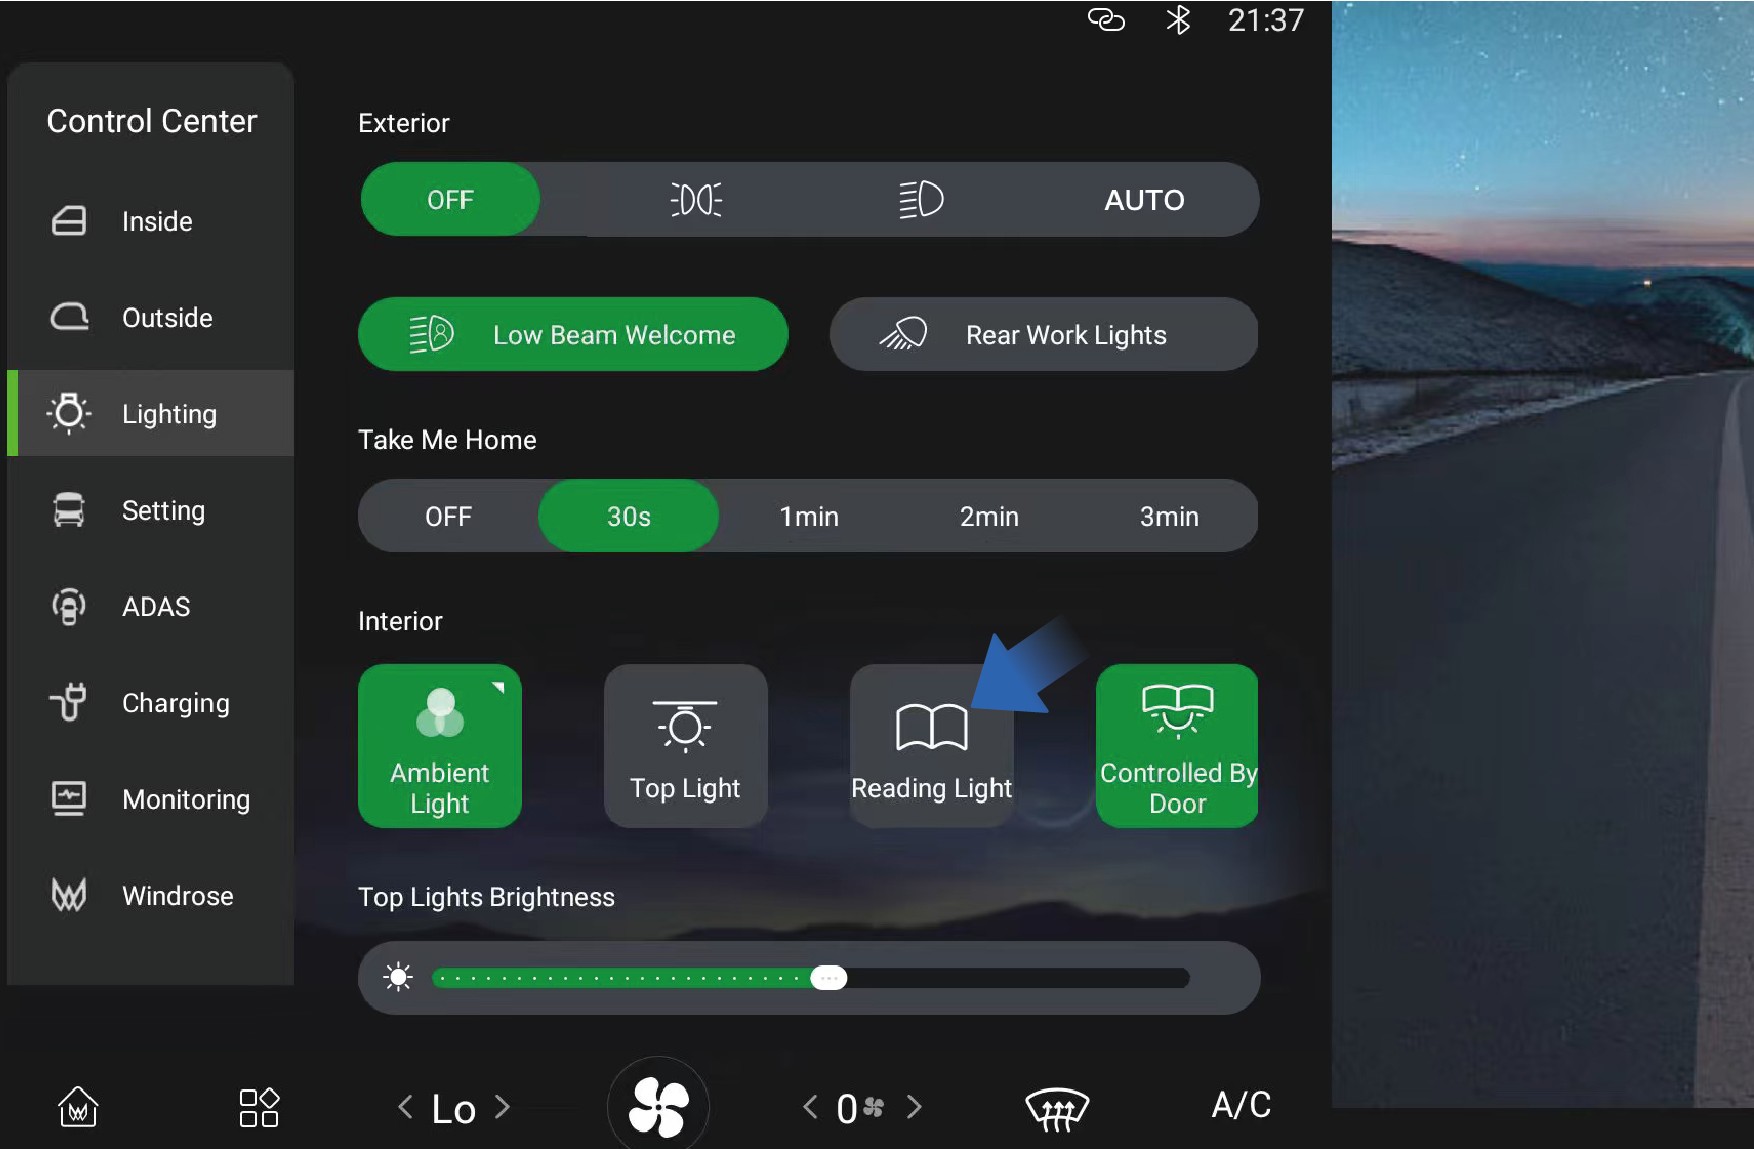
Läslampa
↑ Till toppen
Invändig belysning
Förarhytten och bädden är utrustade med läslampor som kan slås på när du behöver ljus för läsning.
Bruksanvisning
↑ Till toppenLäslampa i förarhytt
Du kan aktivera/inaktivera följ-mig-hem-funktionen genom att välja «Control Center» och byta till gränssnittet «Lighting» på fordonets informationsskärm i instrumentpanelen.
Försiktighetsåtgärder
ObserveraDu kan ställa in varaktigheten för följ-mig-hem efter behov.
Läslampa i förarhytt
Du kan aktivera/inaktivera läslampan genom att välja «Control Center», byta till gränssnittet «Lighting» och klicka på knappen «Reading Light» på fordonets informationsskärm.
Läslampa vid bädd
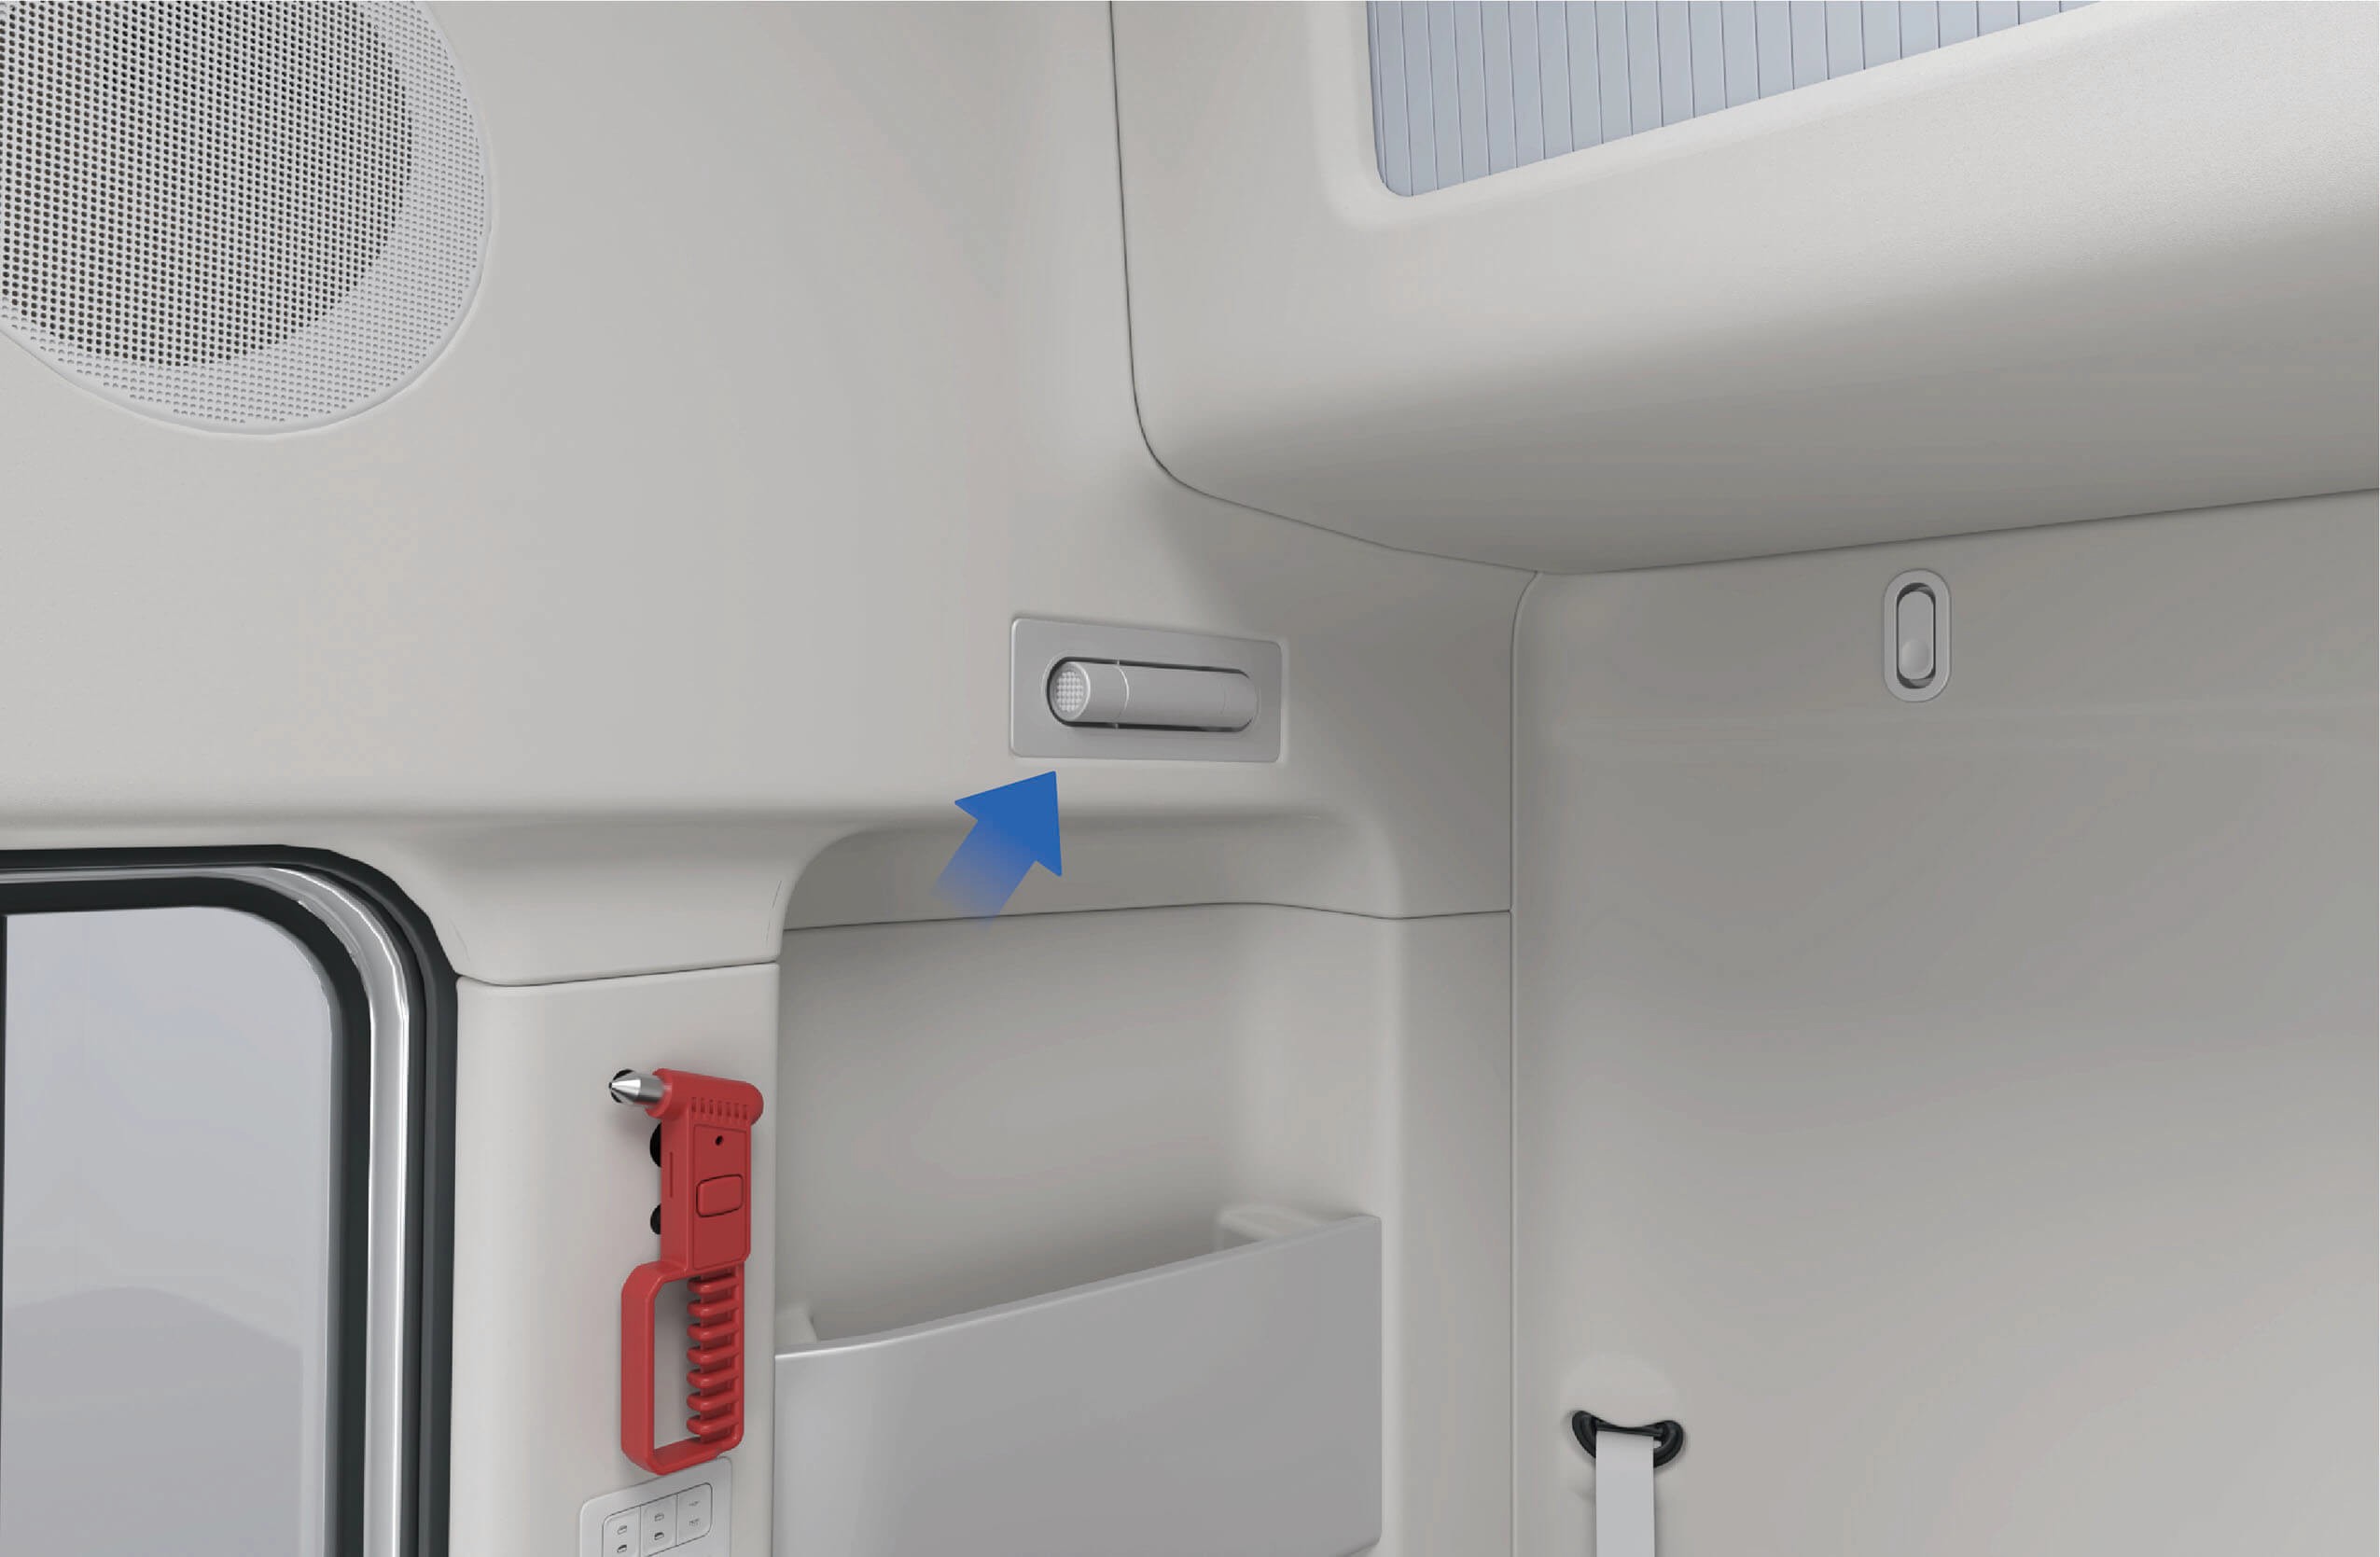
↑ Till toppenDet finns en läslampa ovanför bädden som kan dras ut genom att trycka på den främre änden för att slå på brytaren. Lampan tänds automatiskt när den dras ut, och du kan justera lampvinkeln efter behov. Skjut tillbaka läslampan, så släcks den automatiskt.
Försiktighetsåtgärder
↑ Till toppenObserveraNär omgivningsljuset är svagt, slå inte på läslamporna
Stämningsljus
↑ Till toppen
Invändig belysning
under körning. Annars kan vindrutan få reflexer,
vilket ger oklar sikt mot vägen framför och vidare kan leda till en säkerhetsolycka.
Fordonet har stämningsljus som kan växla mellan en rad färger och följa musikrytmen.
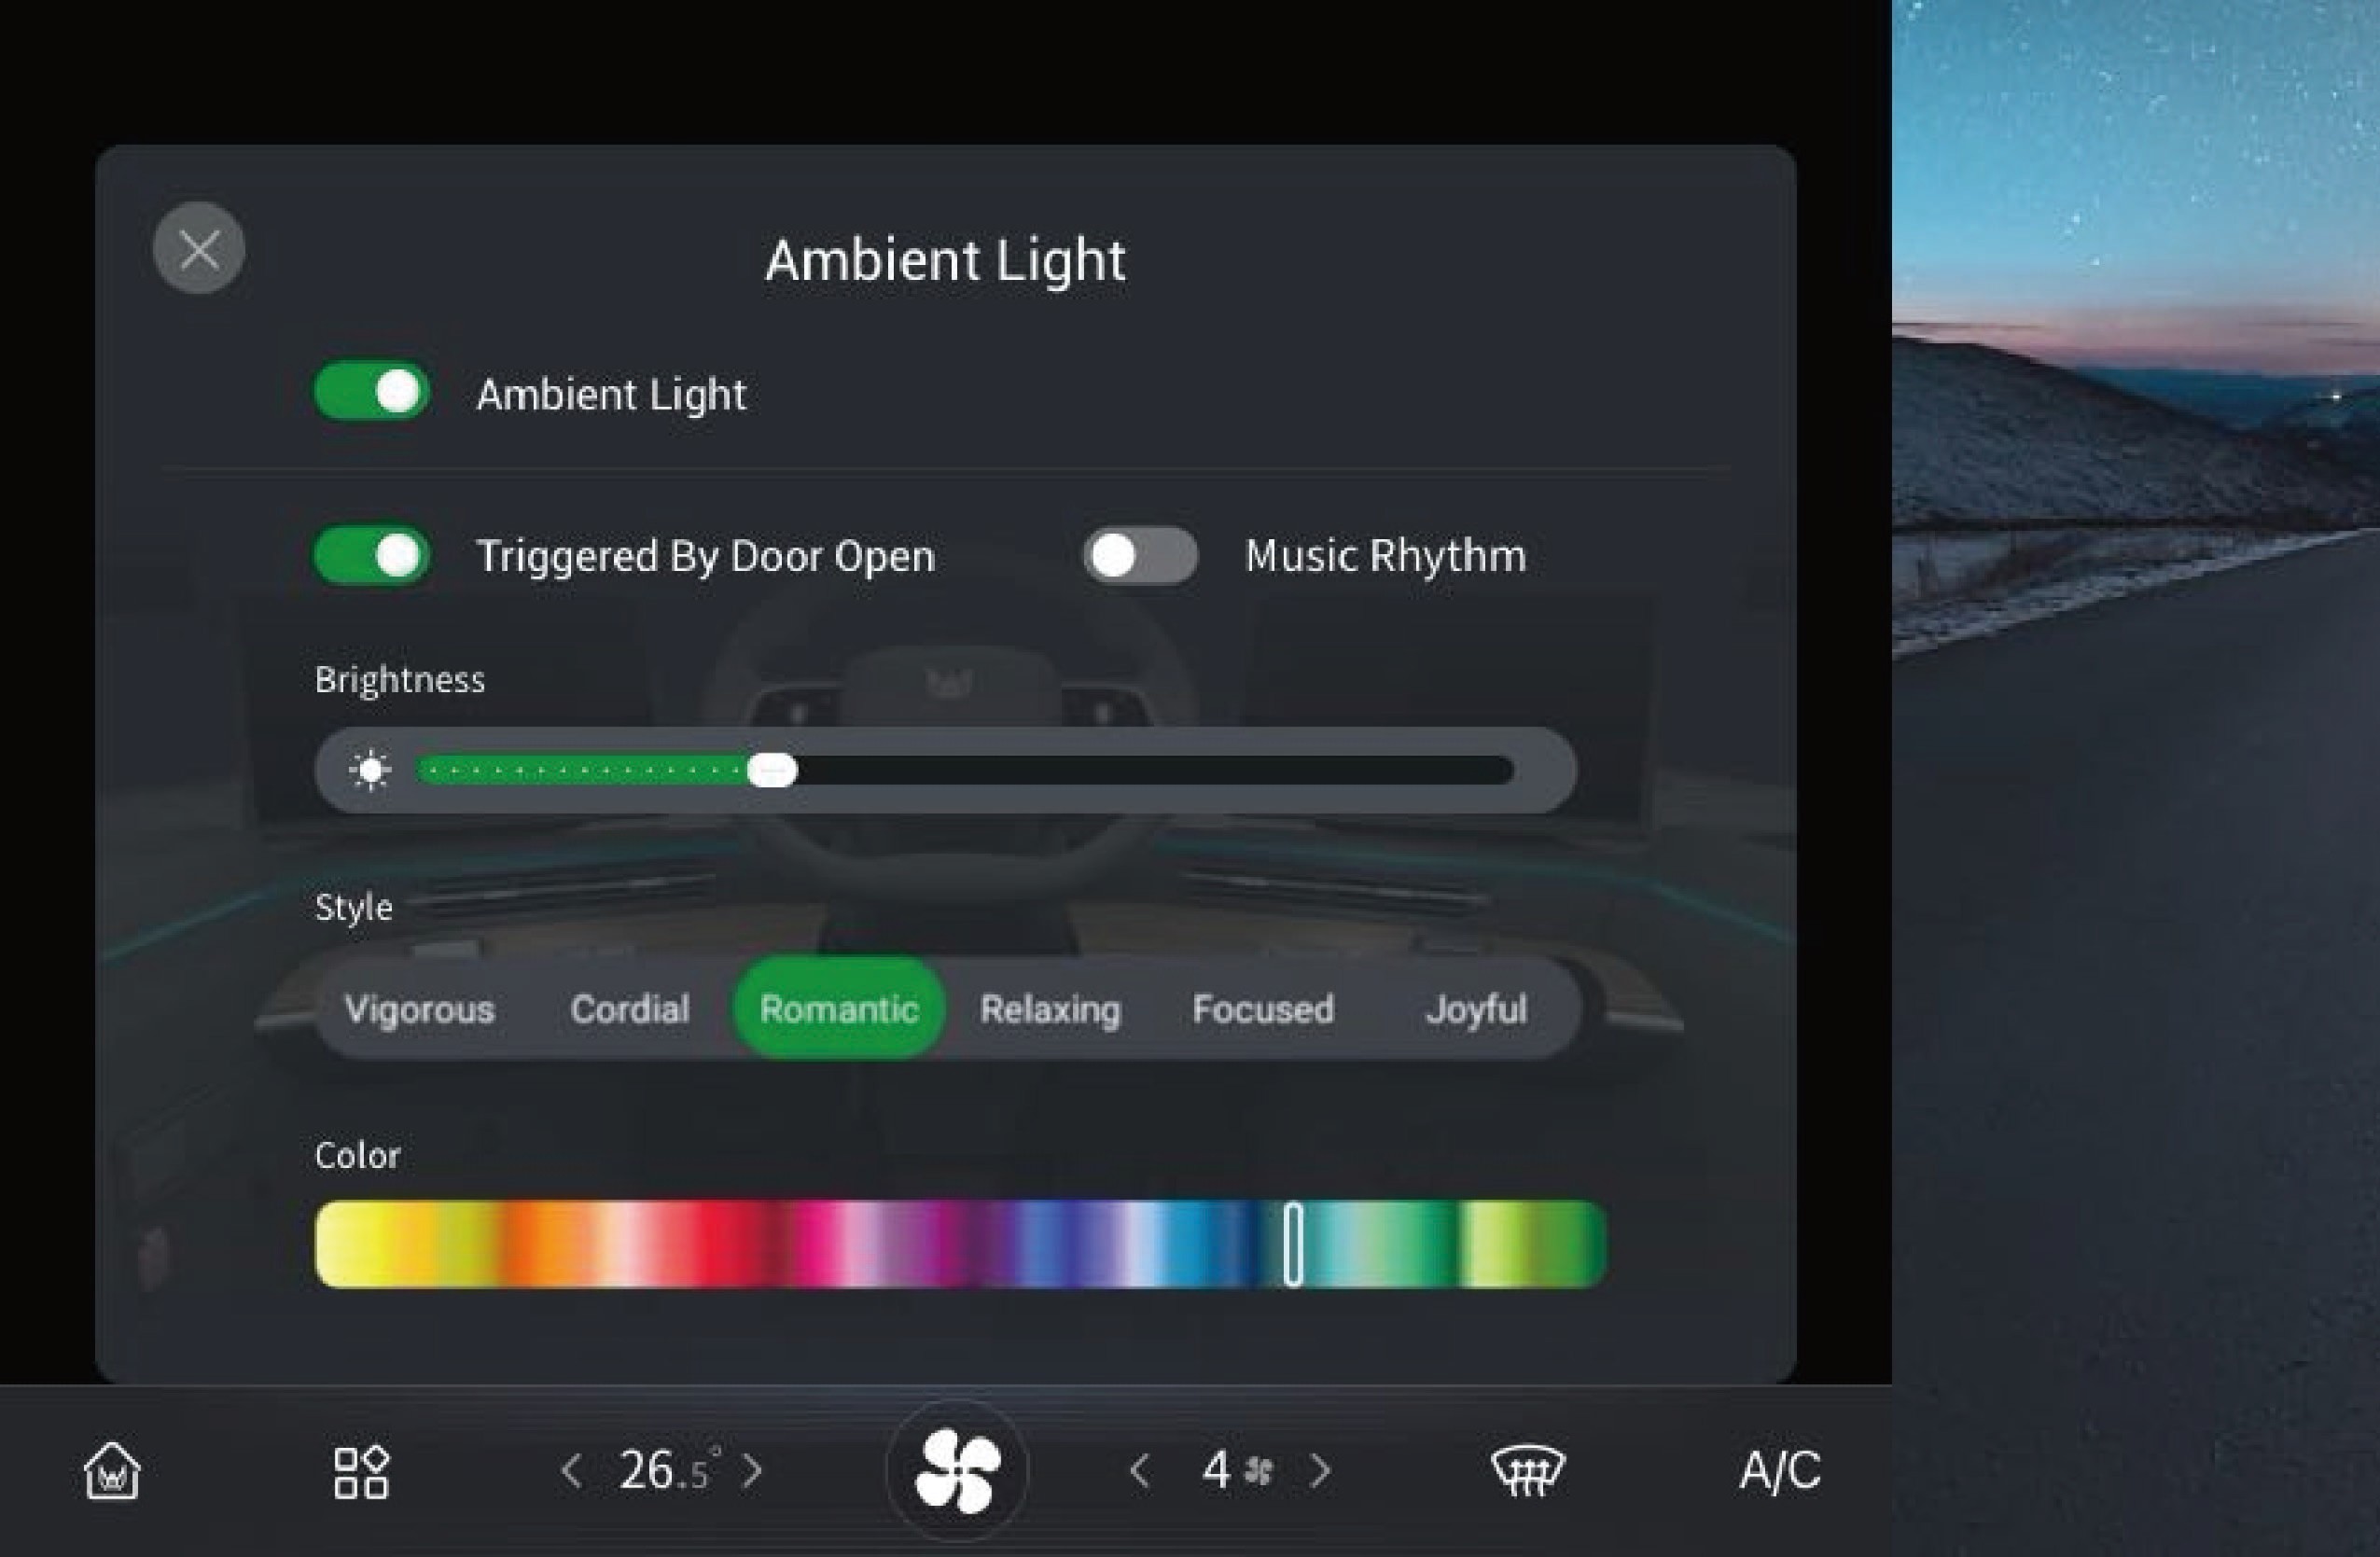
Bruksanvisning
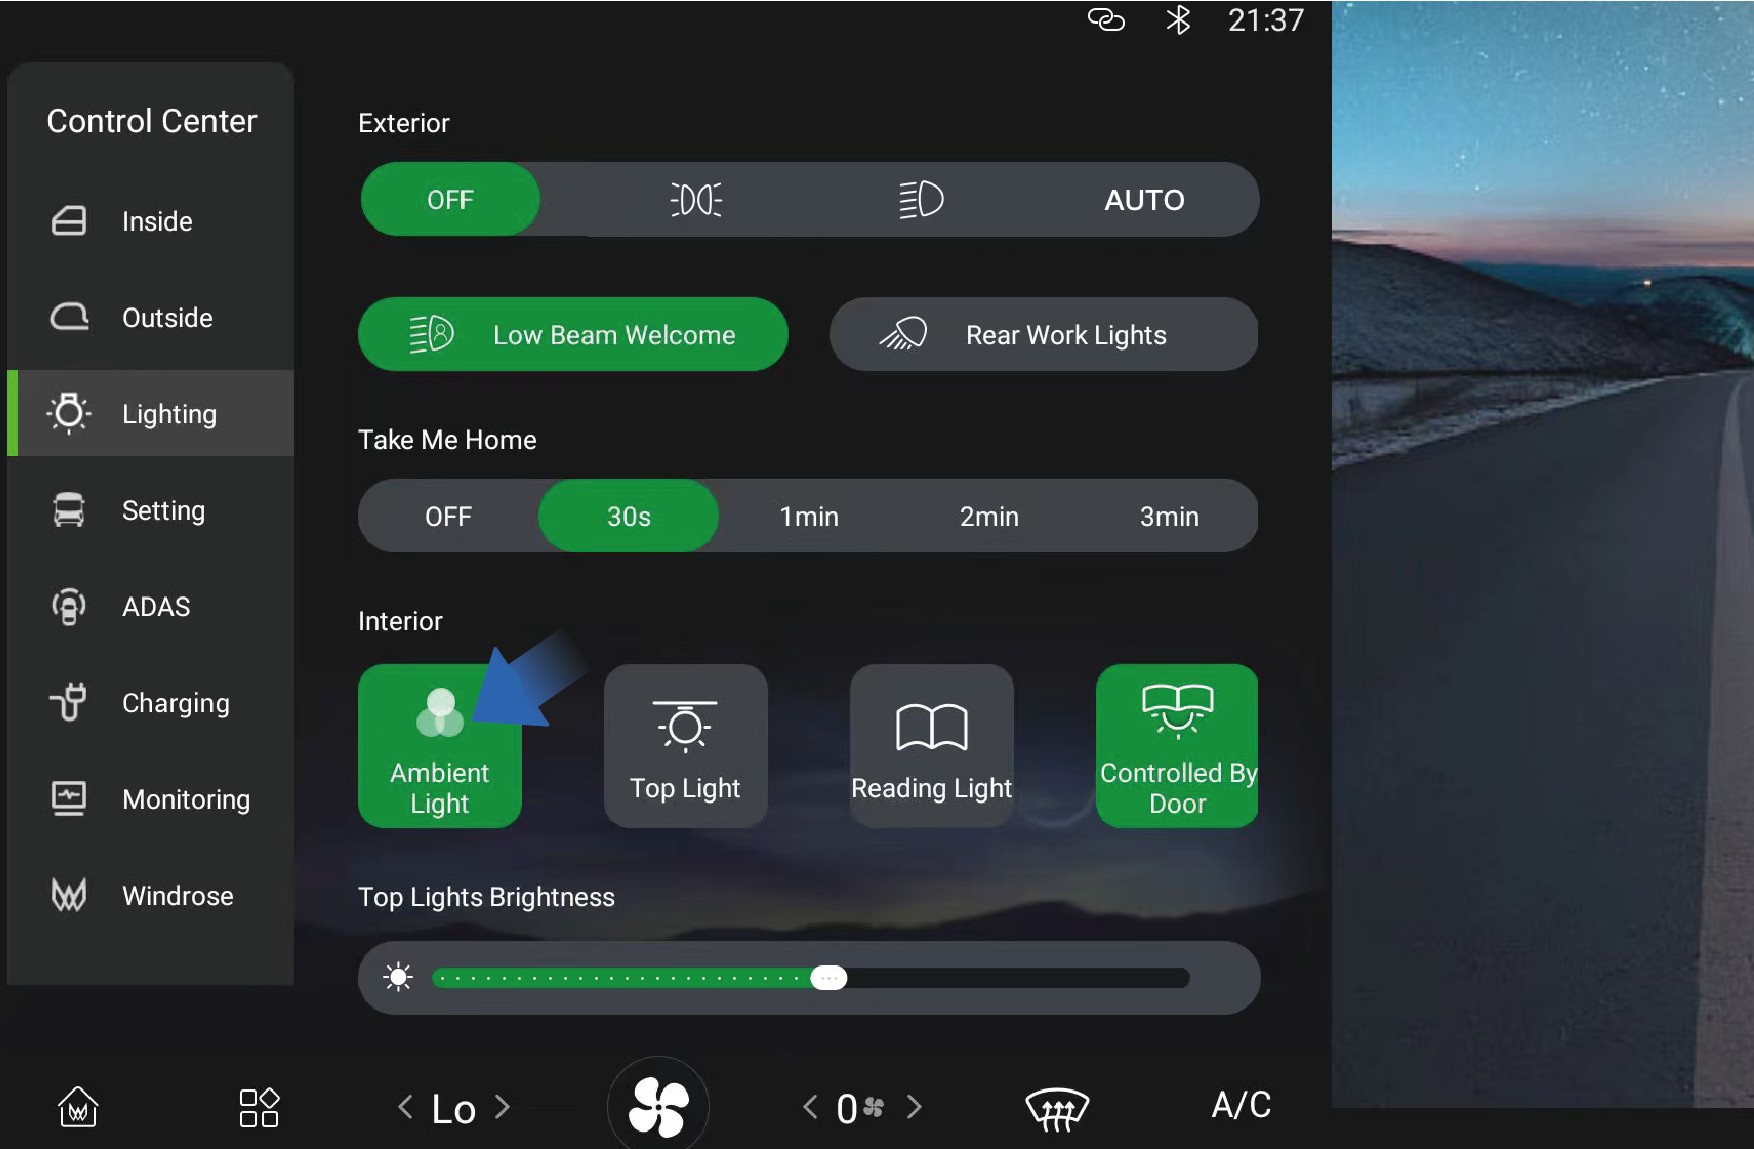
↑ Till toppenDu kan justera stämningsljuset genom att välja «Control Center», byta till gränssnittet «Lighting» och välja knappen «Ambient Light» på fordonets informationsskärm i instrumentpanelen.
Du kan justera stämningsljuset själv efter behov och preferenser.
Försiktighetsåtgärder
↑ Till toppenObserveraVid användning av stämningsljus, se till att ljusfärgen inte stör förarens sikt, och värna om körsäkerheten.
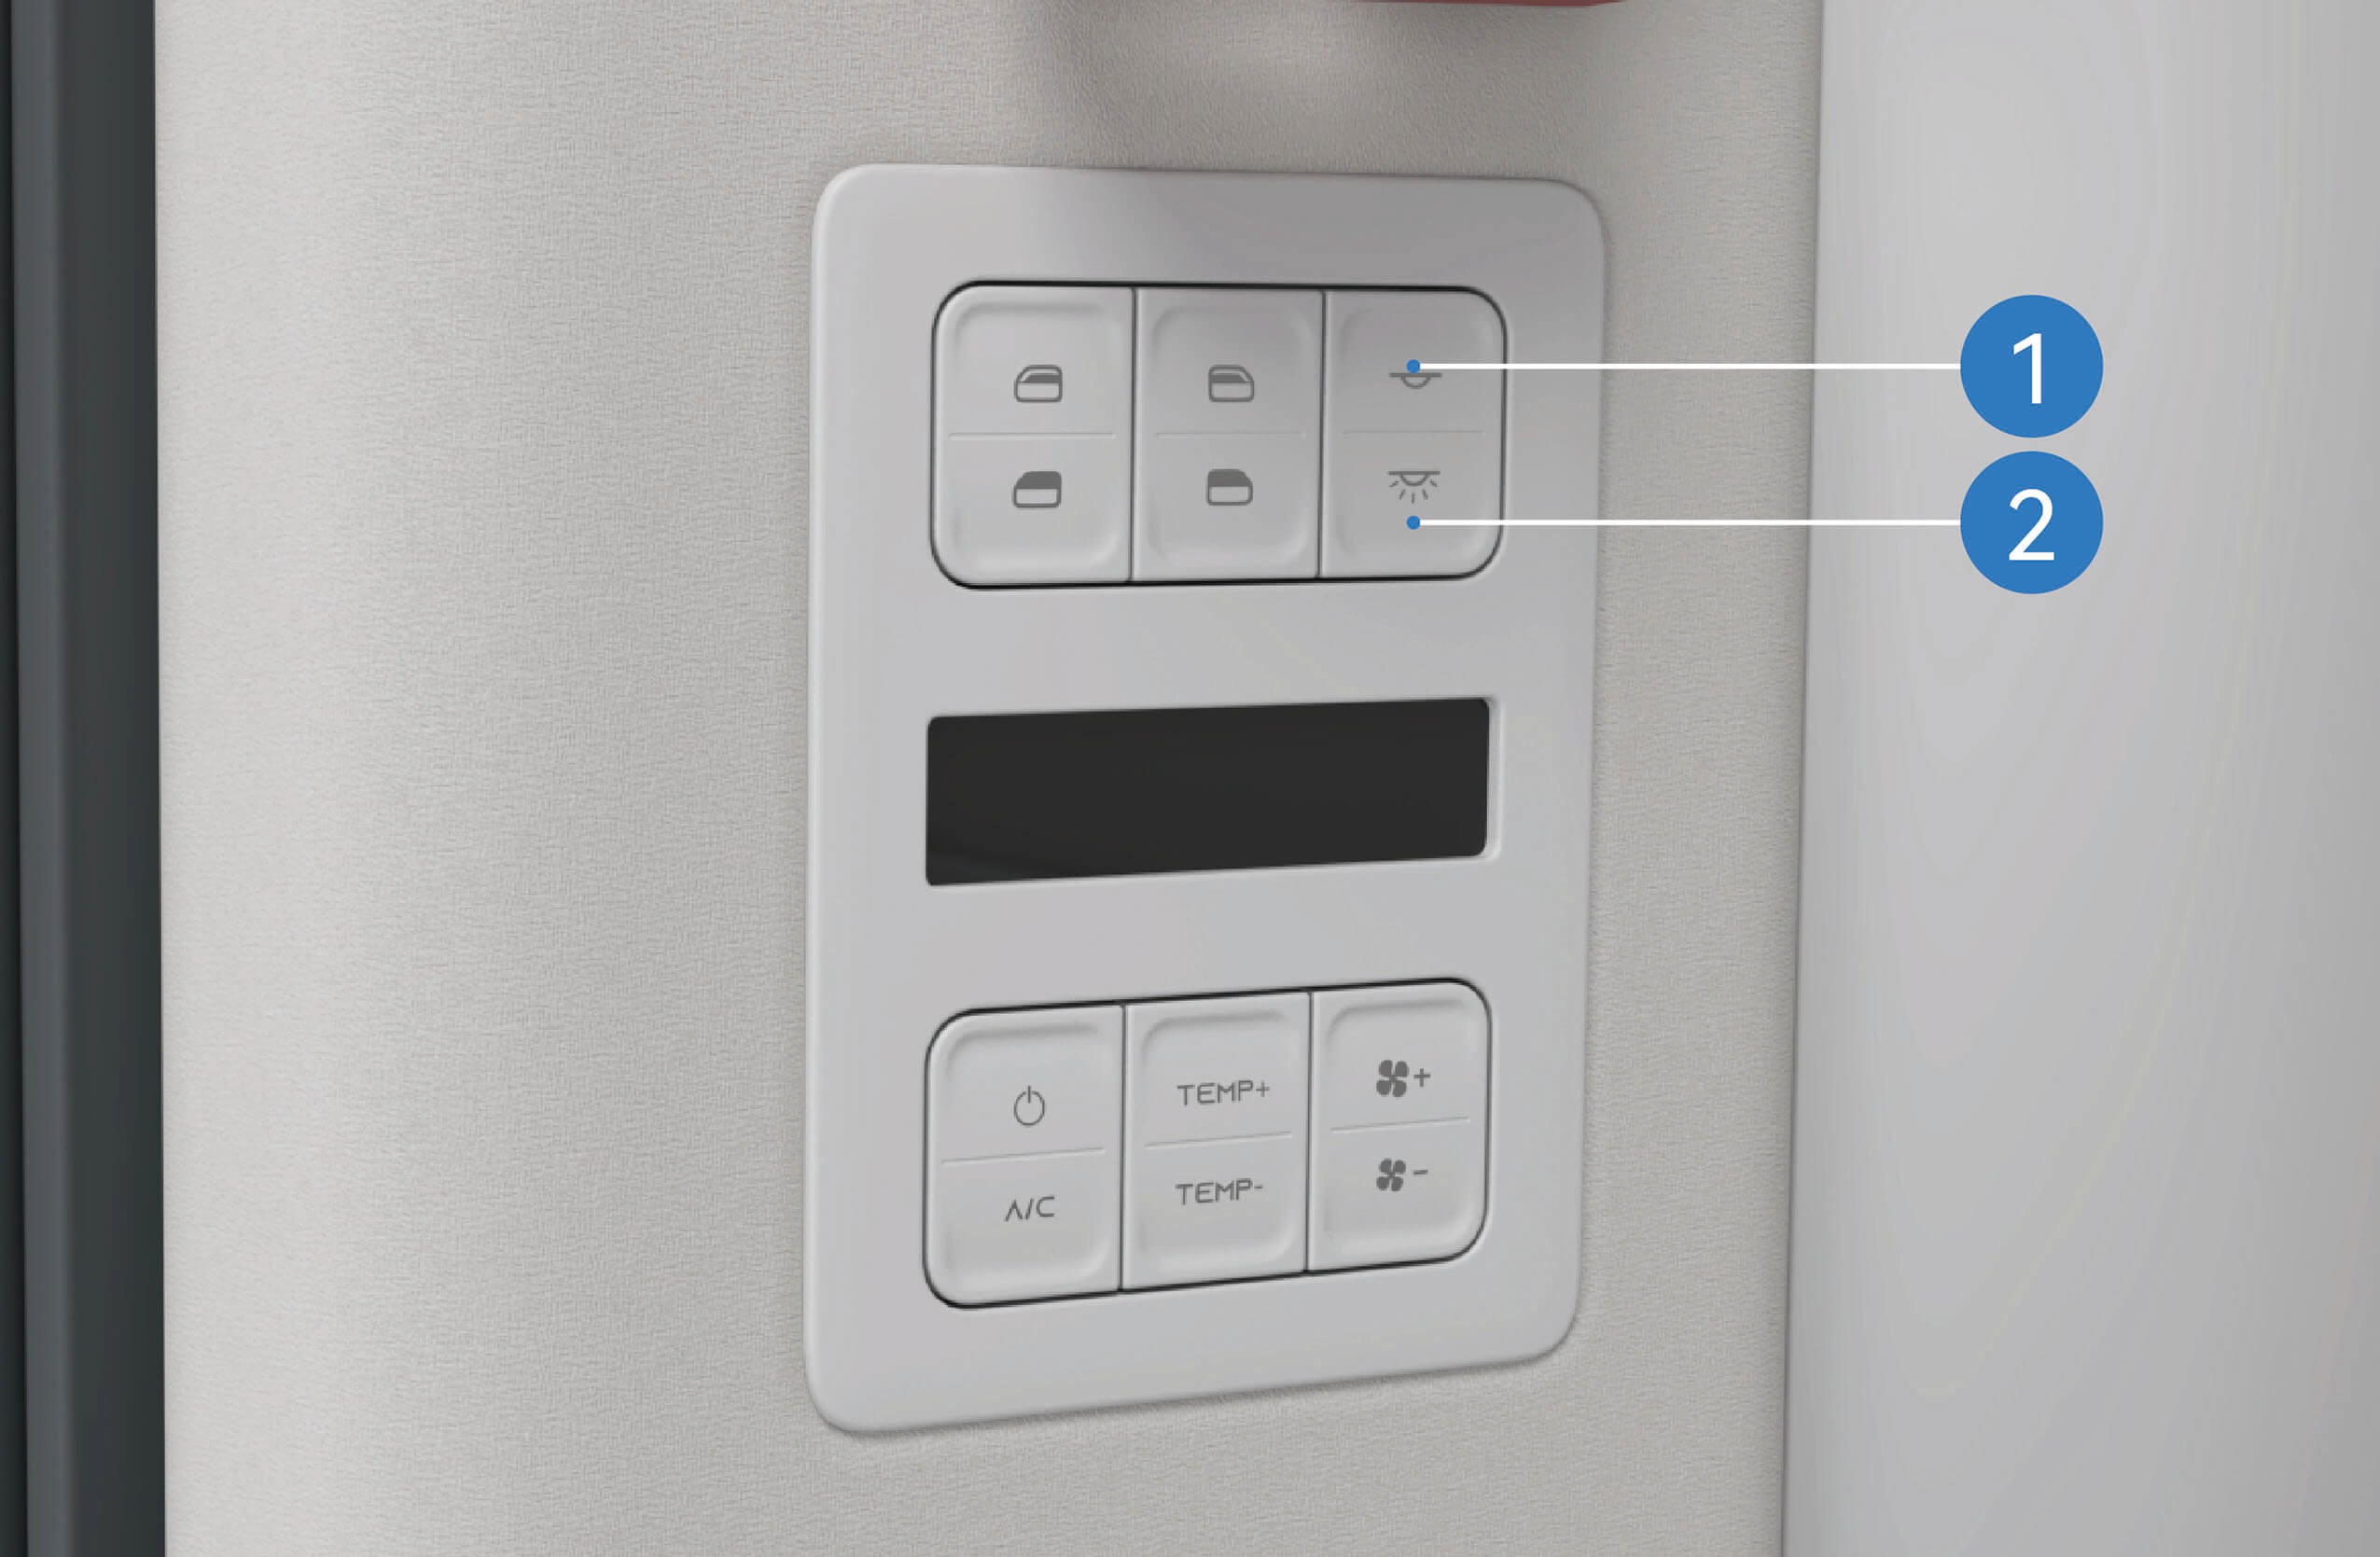
Styrsystem för klimatanläggning
↑ Till toppenKlimatanläggning i fordonet
Du kan ställa in och styra klimatanläggningen via klimatgränssnittet på fordonets informationsskärm eller via manöverpanelen för klimatanläggningen längst upp till höger vid bädden.
Gränssnitt för främre klimatanläggning
I klimatgränssnittet på fordonets informationsskärm kan du ställa in luftmängd, temperatur eller luftriktning för främre och bakre klimatanläggning genom att växla mellan gränssnittet för främre och bakre klimatanläggning.
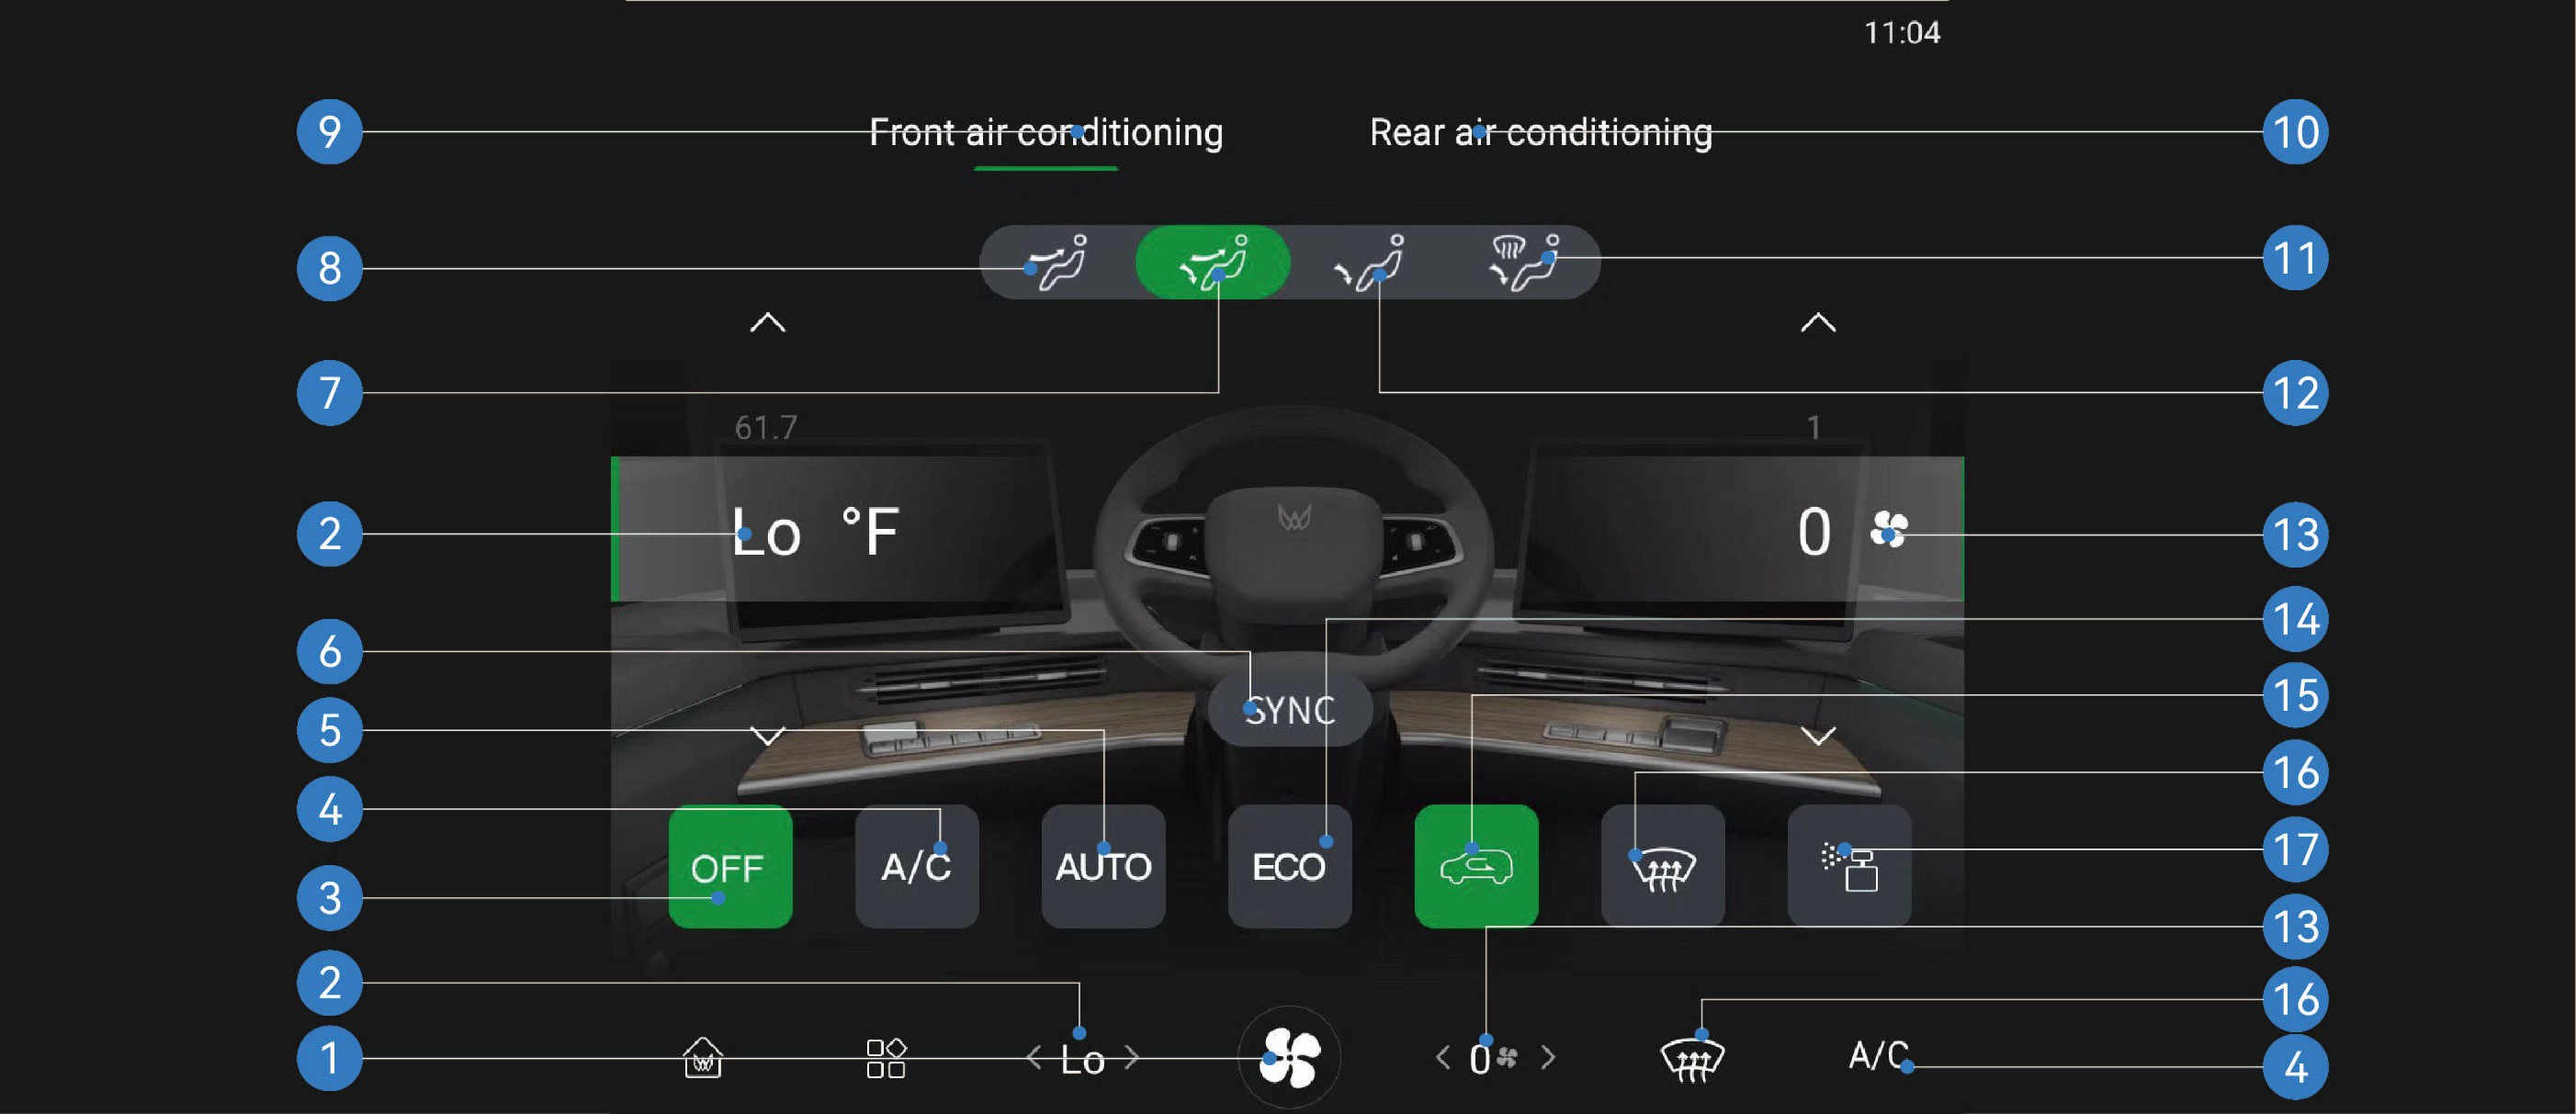
Öppna klimatgränssnitt 6. Brytare för temperatursynkronisering av klimatanläggningen
11. Fotbrunns- och avfrostningsläge
Brytare för avfrostning/avimning av vindruta
Temperatur främre klimatanläggning 7. Ansikts- och fotbrunnsläge 12. Fotbrunnsläge 17. Doftgränssnitt*
Av-brytare främre klimatanläggning 8. Ansiktsblåsläge 13. Luftmängd främre klimatanläggning
Kompressorbrytare 9. Gränssnitt främre klimatanläggning 14. ECO-lägesbrytare
Automatiskt läge-brytare 10. Gränssnitt bakre klimatanläggning 15. Intern/extern cirkulation
brytare
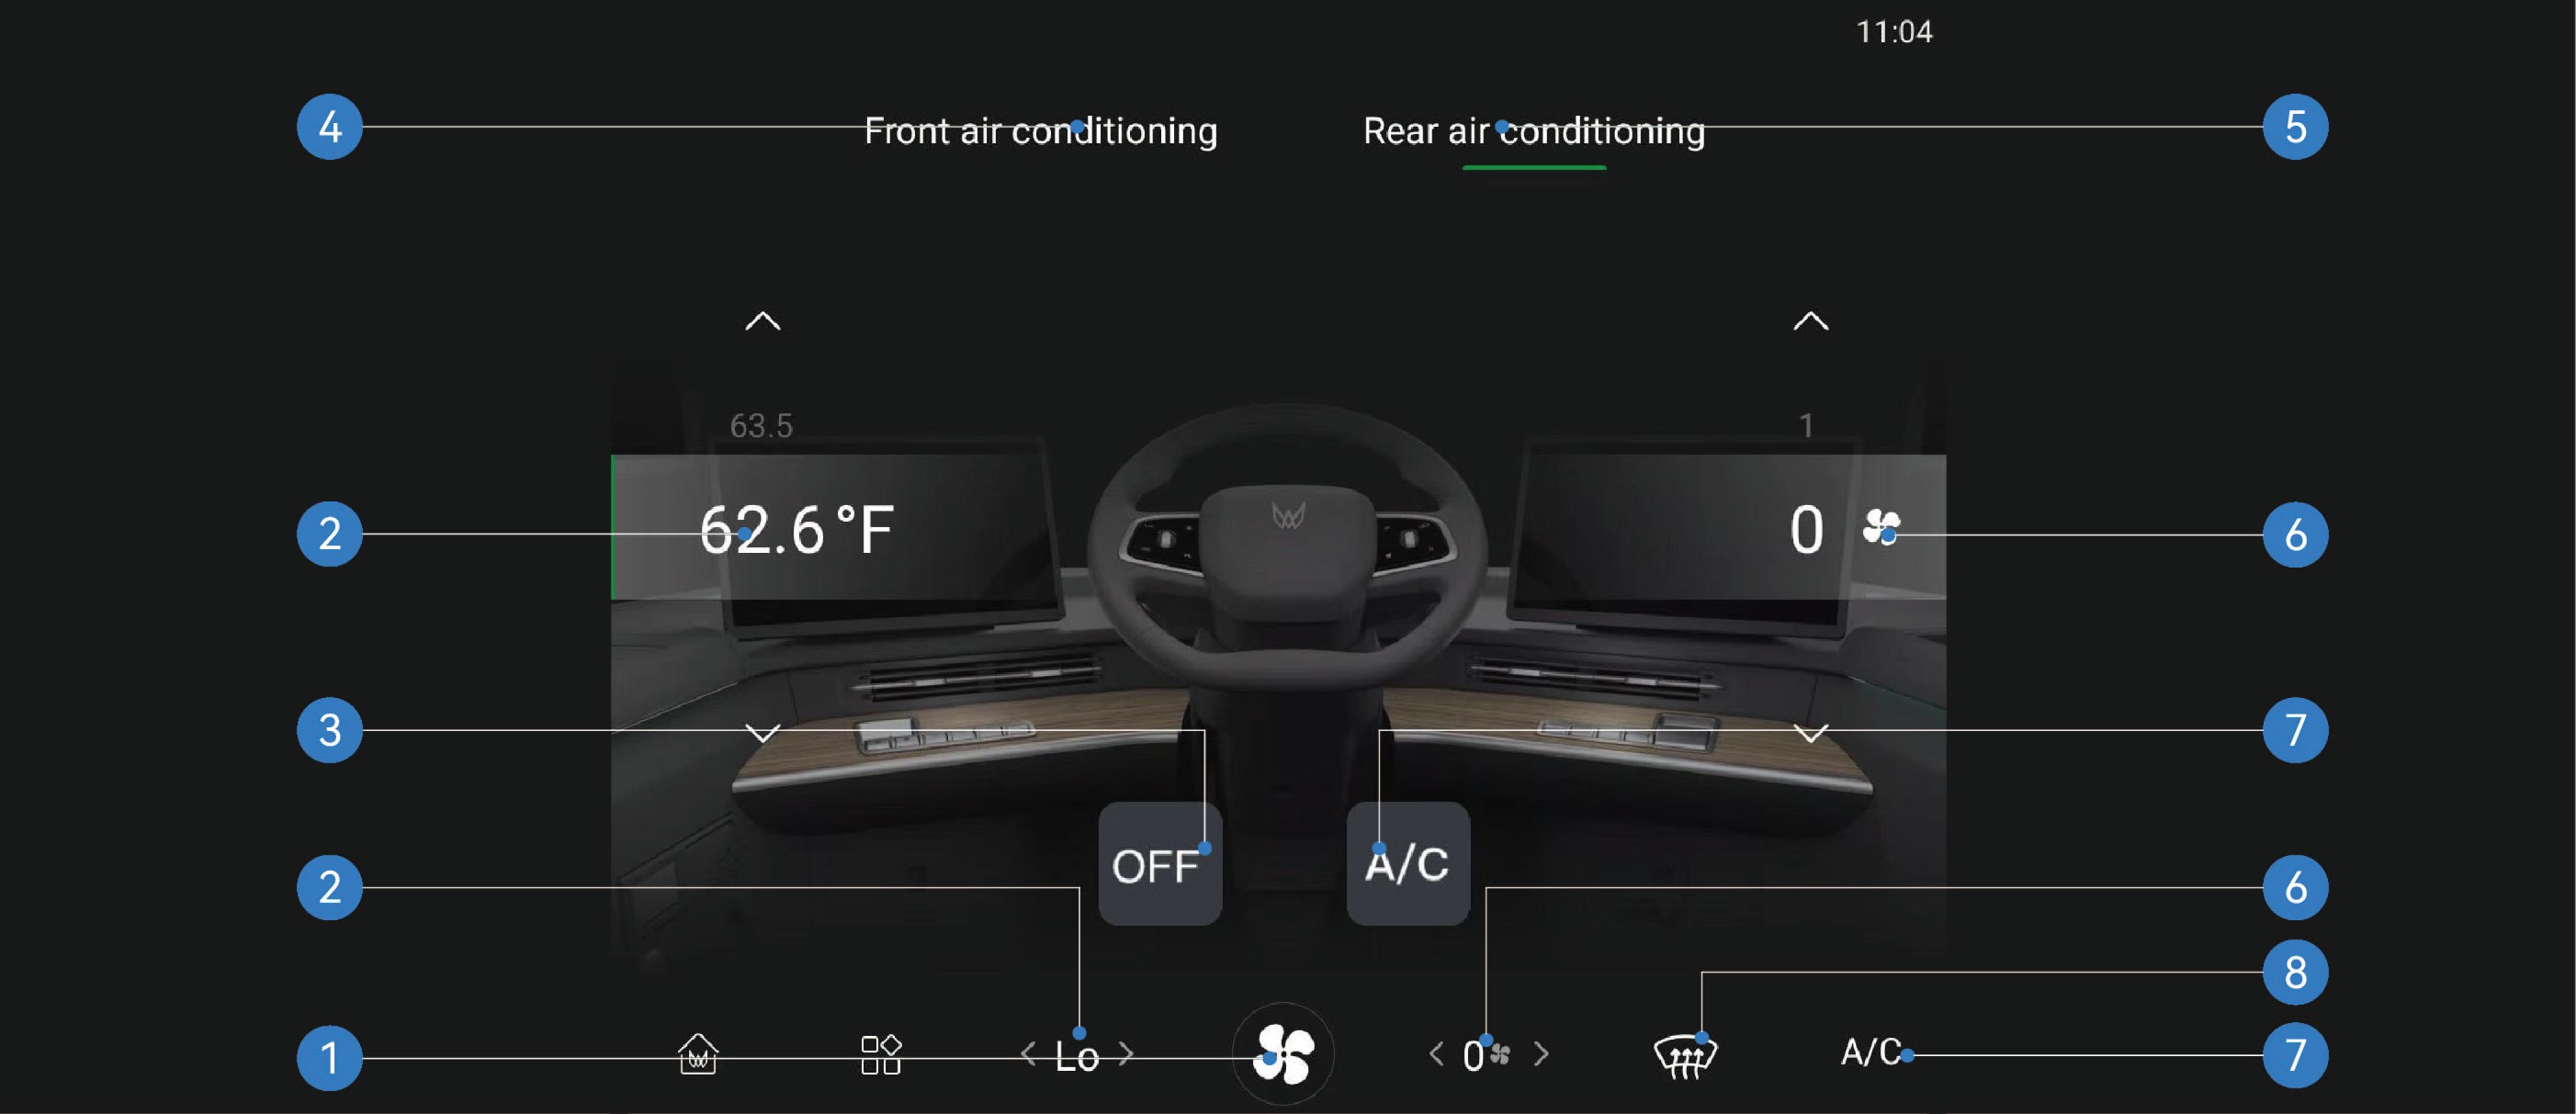
Gränssnitt för bakre klimatanläggning
|
|
|
|
|---|---|---|---|
|
|
|
|
Bruksanvisning
|
|
|
|---|---|---|
|
|
|
|
|
|
|
|
|
|
|
|
|
|
|
|
|


|
|
|
|---|---|---|
|
|
|
|
|
|
|
|
|
|
|
|
|
|


|
|
|
|---|---|---|
|
|
|
|
|


Manöverpanel för klimatanläggning
Manöverpanelen för klimatanläggningen styr endast motsvarande funktioner för den bakre klimatanläggningen.
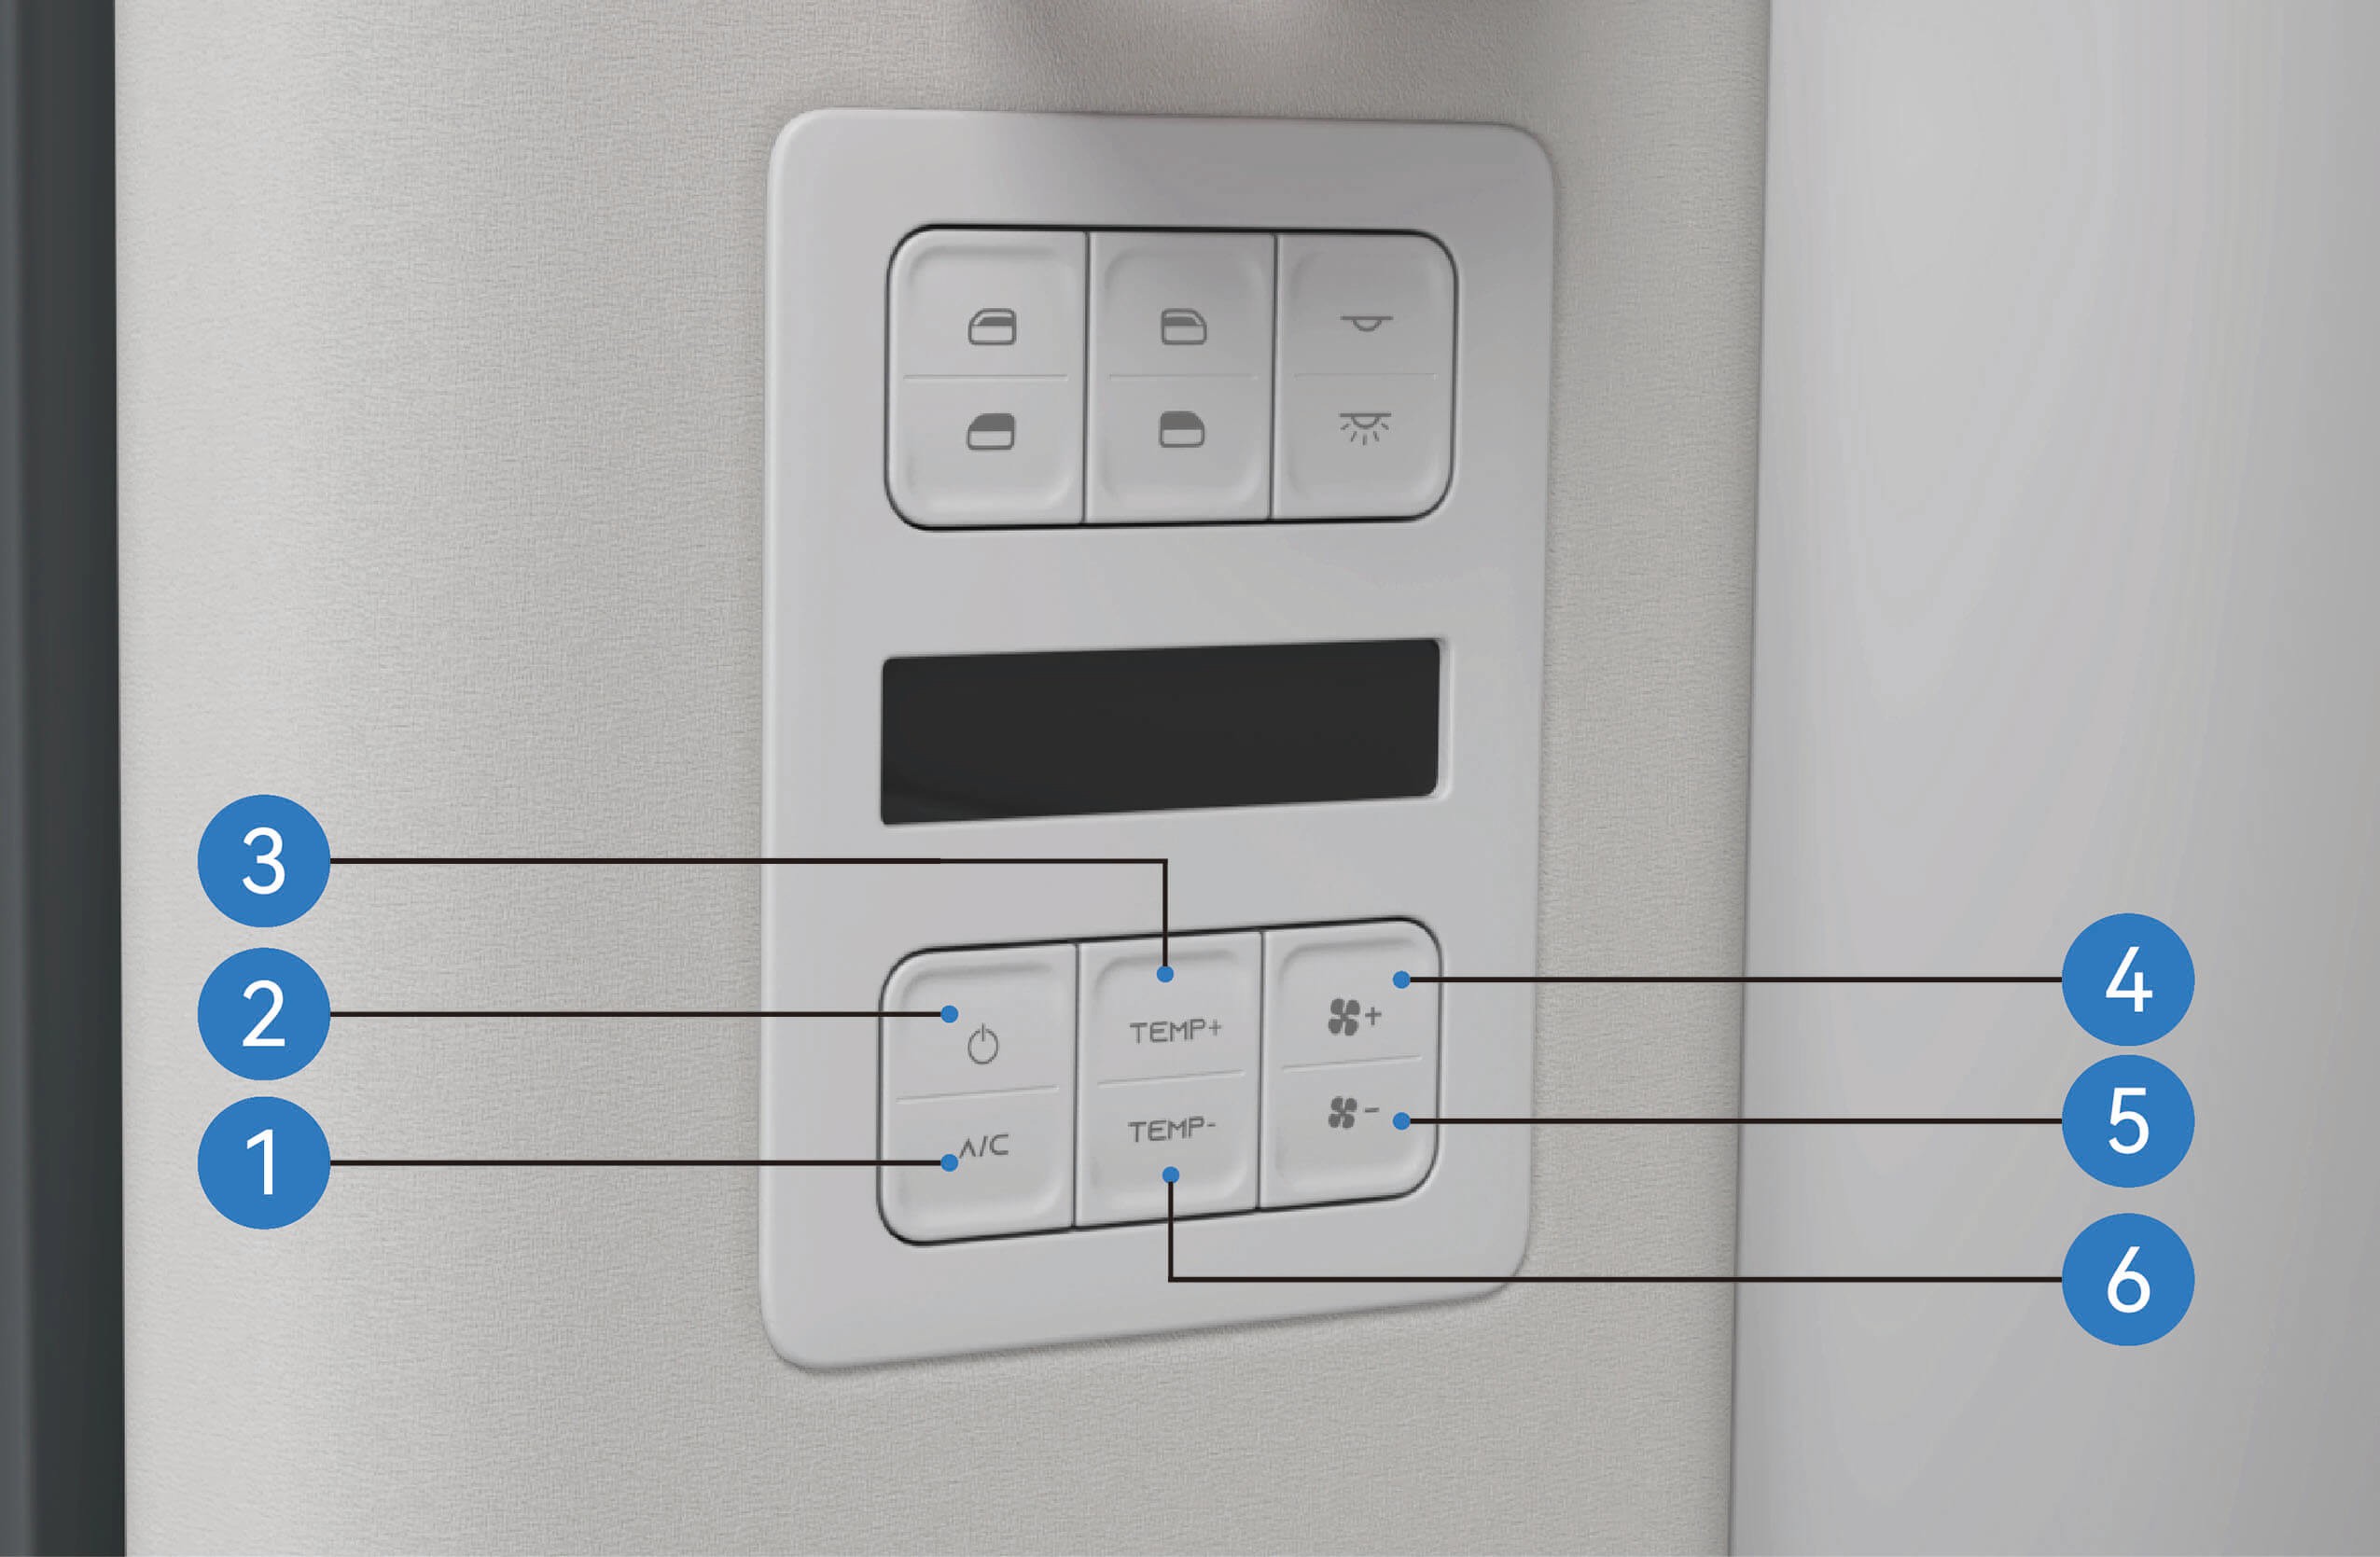
Brytarknapp för bakre kompressor
Brytare för bakre klimatanläggning
Öka temperatur bakre klimatanläggning
Luftmängd bakre klimatanläggning +
Luftmängd bakre klimatanläggning −
Minska temperatur bakre klimatanläggning
Försiktighetsåtgärder
Varning
Innan körning, kontrollera att alla fönster är fria från is, snö eller imma, annars hindras sikten och det kan uppstå en trafikolycka.
Ha inte intern cirkulation på under längre tid, då detta kan göra luften i fordonet dålig och imma fönstren.
Observera
Att slå av kompressorbrytaren slår inte av klimatanläggningen, och värmesystemet kan fortfarande vara i drift.
När du slår på klimatanläggningen för första gången i mycket fuktiga omgivningar är det normalt att vindrutan immar lite.
Om klimatanläggningen låter, kan du manuellt minska luftmängden.
Ett svagt ljud som rinnande vatten eller ett susande ljud kan
höras när klimatanläggningen är i drift eller slås av. Detta
ljud skapas av köldmediet under normal drift av klimatanläggningen och är normalt.
När du tycker att luften i fordonet är tung och instängd, kan du slå på extern cirkulation för att släppa in uteluft och hålla luften i fordonet frisk.
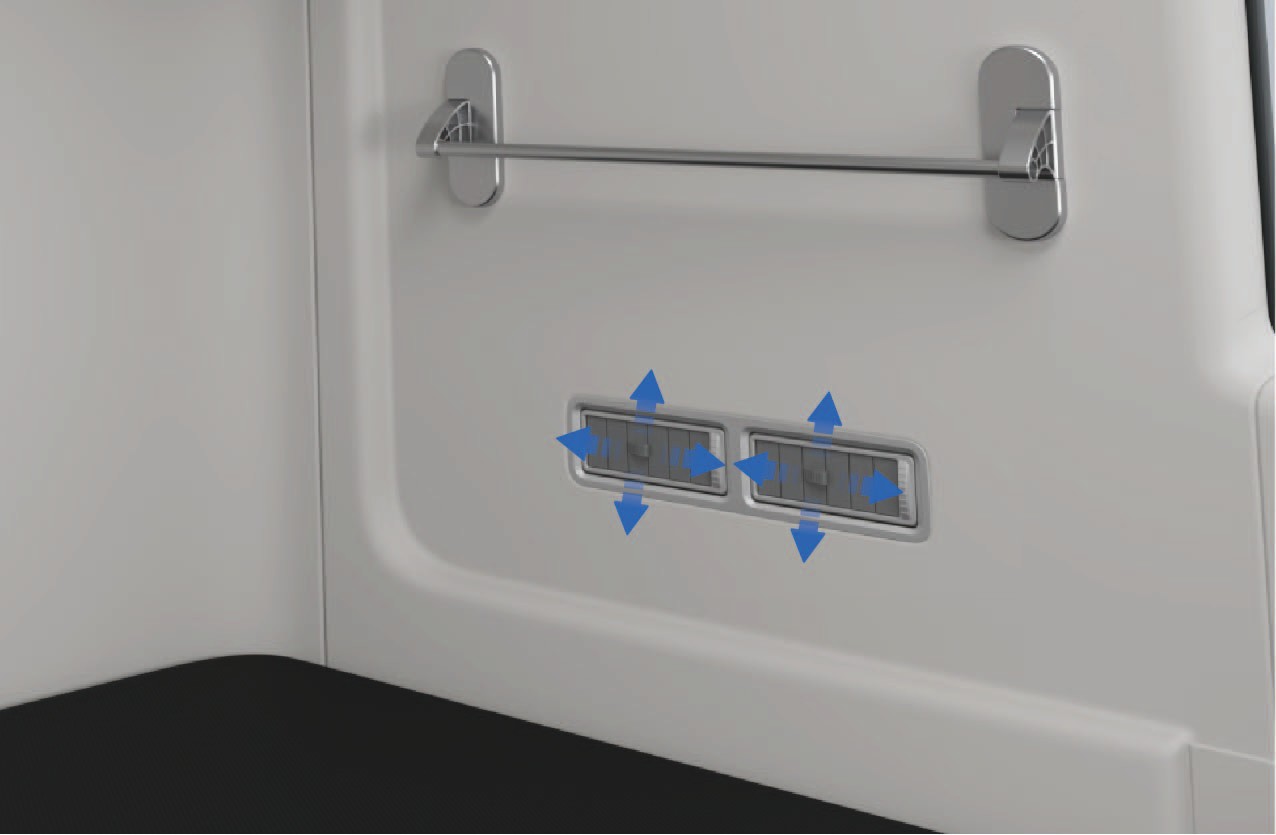
Justering av luftmunstycken
↑ Till toppenKlimatanläggning i fordonet
De främre luftmunstyckena är placerade i vindrutan, instrumentpanelen och i benutrymmet under instrumentpanelen. De bakre luftmunstyckena är placerade på vänster sida av bädden i fordonet.
Bruksanvisning
Justering av främre luftmunstycke
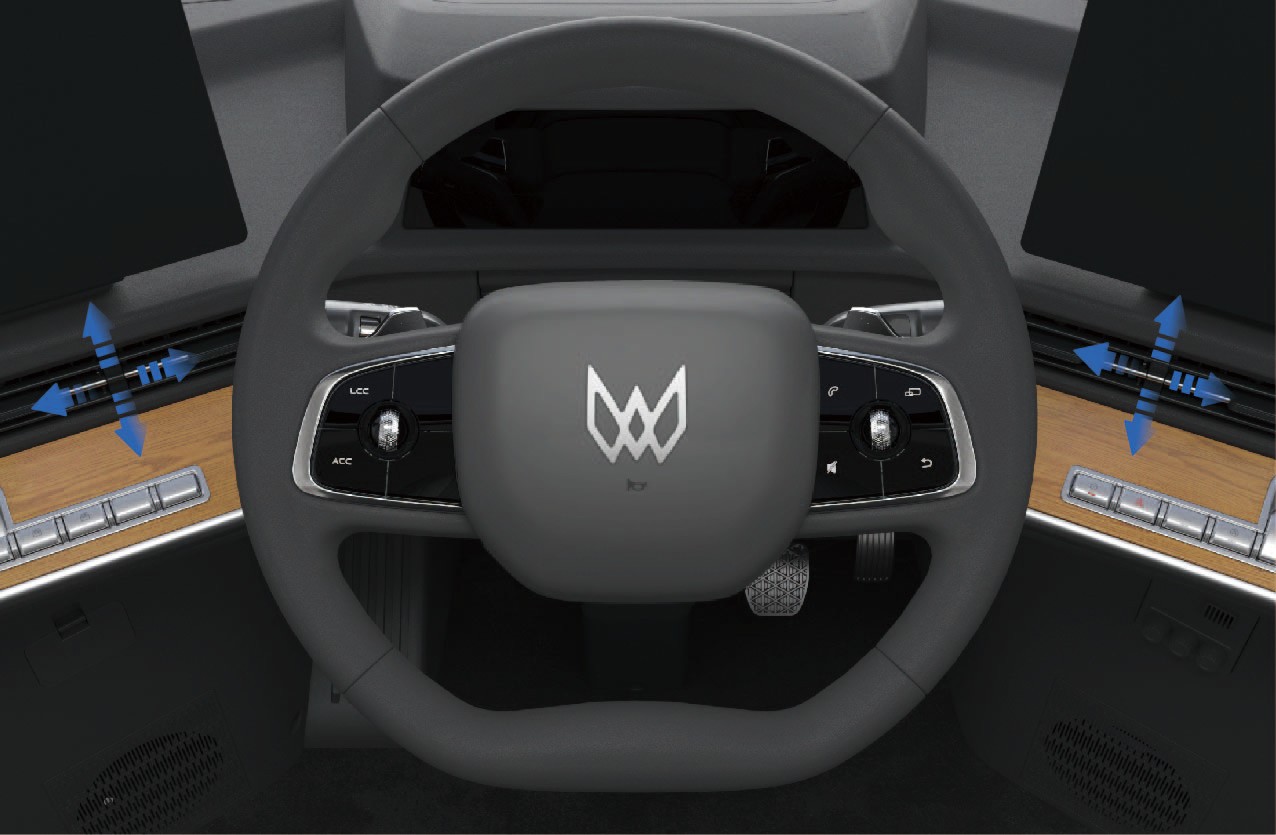
↑ Till toppenDu kan justera spakarna vid det främre munstycket manuellt för att styra blåsriktningen upp/ner eller vänster/höger för det främre munstycket.
Justering av bakre luftmunstycke
Du kan justera spakarna vid det bakre munstycket manuellt. Du kan vrida spaken upp och ner för att justera blåsvinkeln upp/ner för det bakre munstycket, eller vrida spaken åt vänster och höger för att justera blåsvinkeln vänster/höger för det bakre luftmunstycket eller stänga munstycket. Håll minst ett munstycke öppet när du justerar de bakre luftmunstyckena.
Försiktighetsåtgärder
↑ Till toppenAnmärkningVid justering av munstyckesspakarna, använd inte stor kraft, för att undvika skada på spakarna.
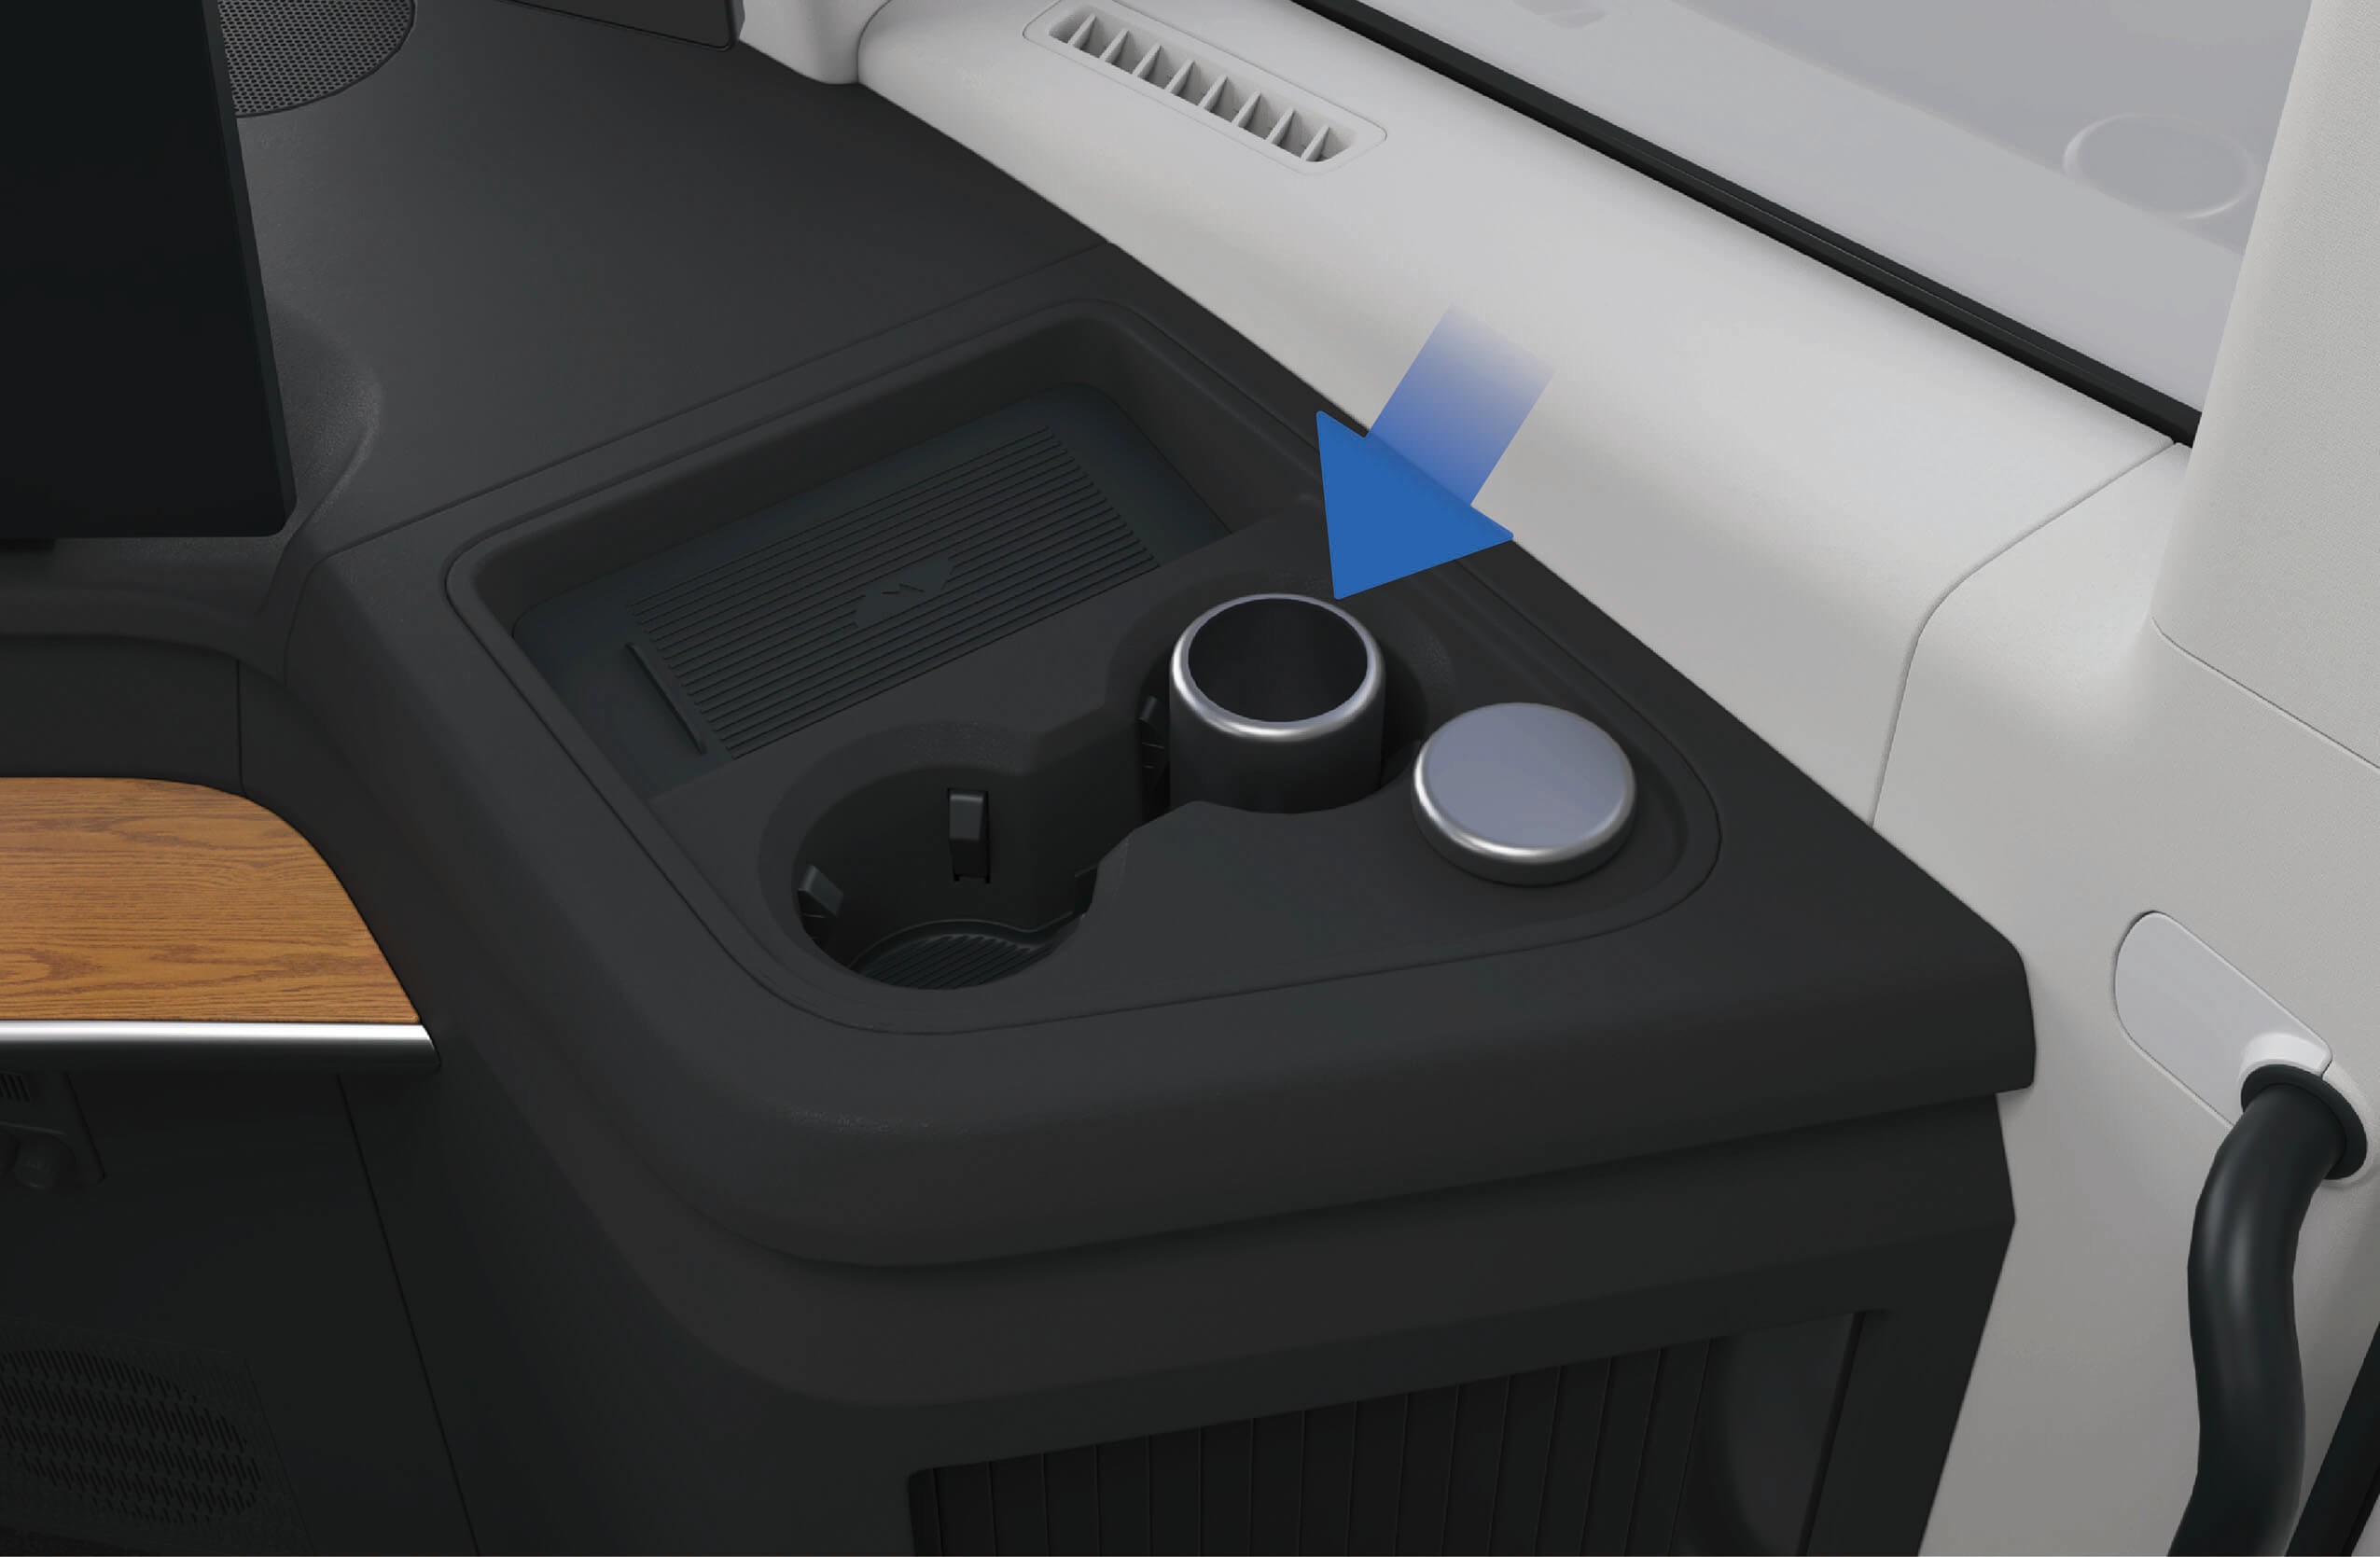
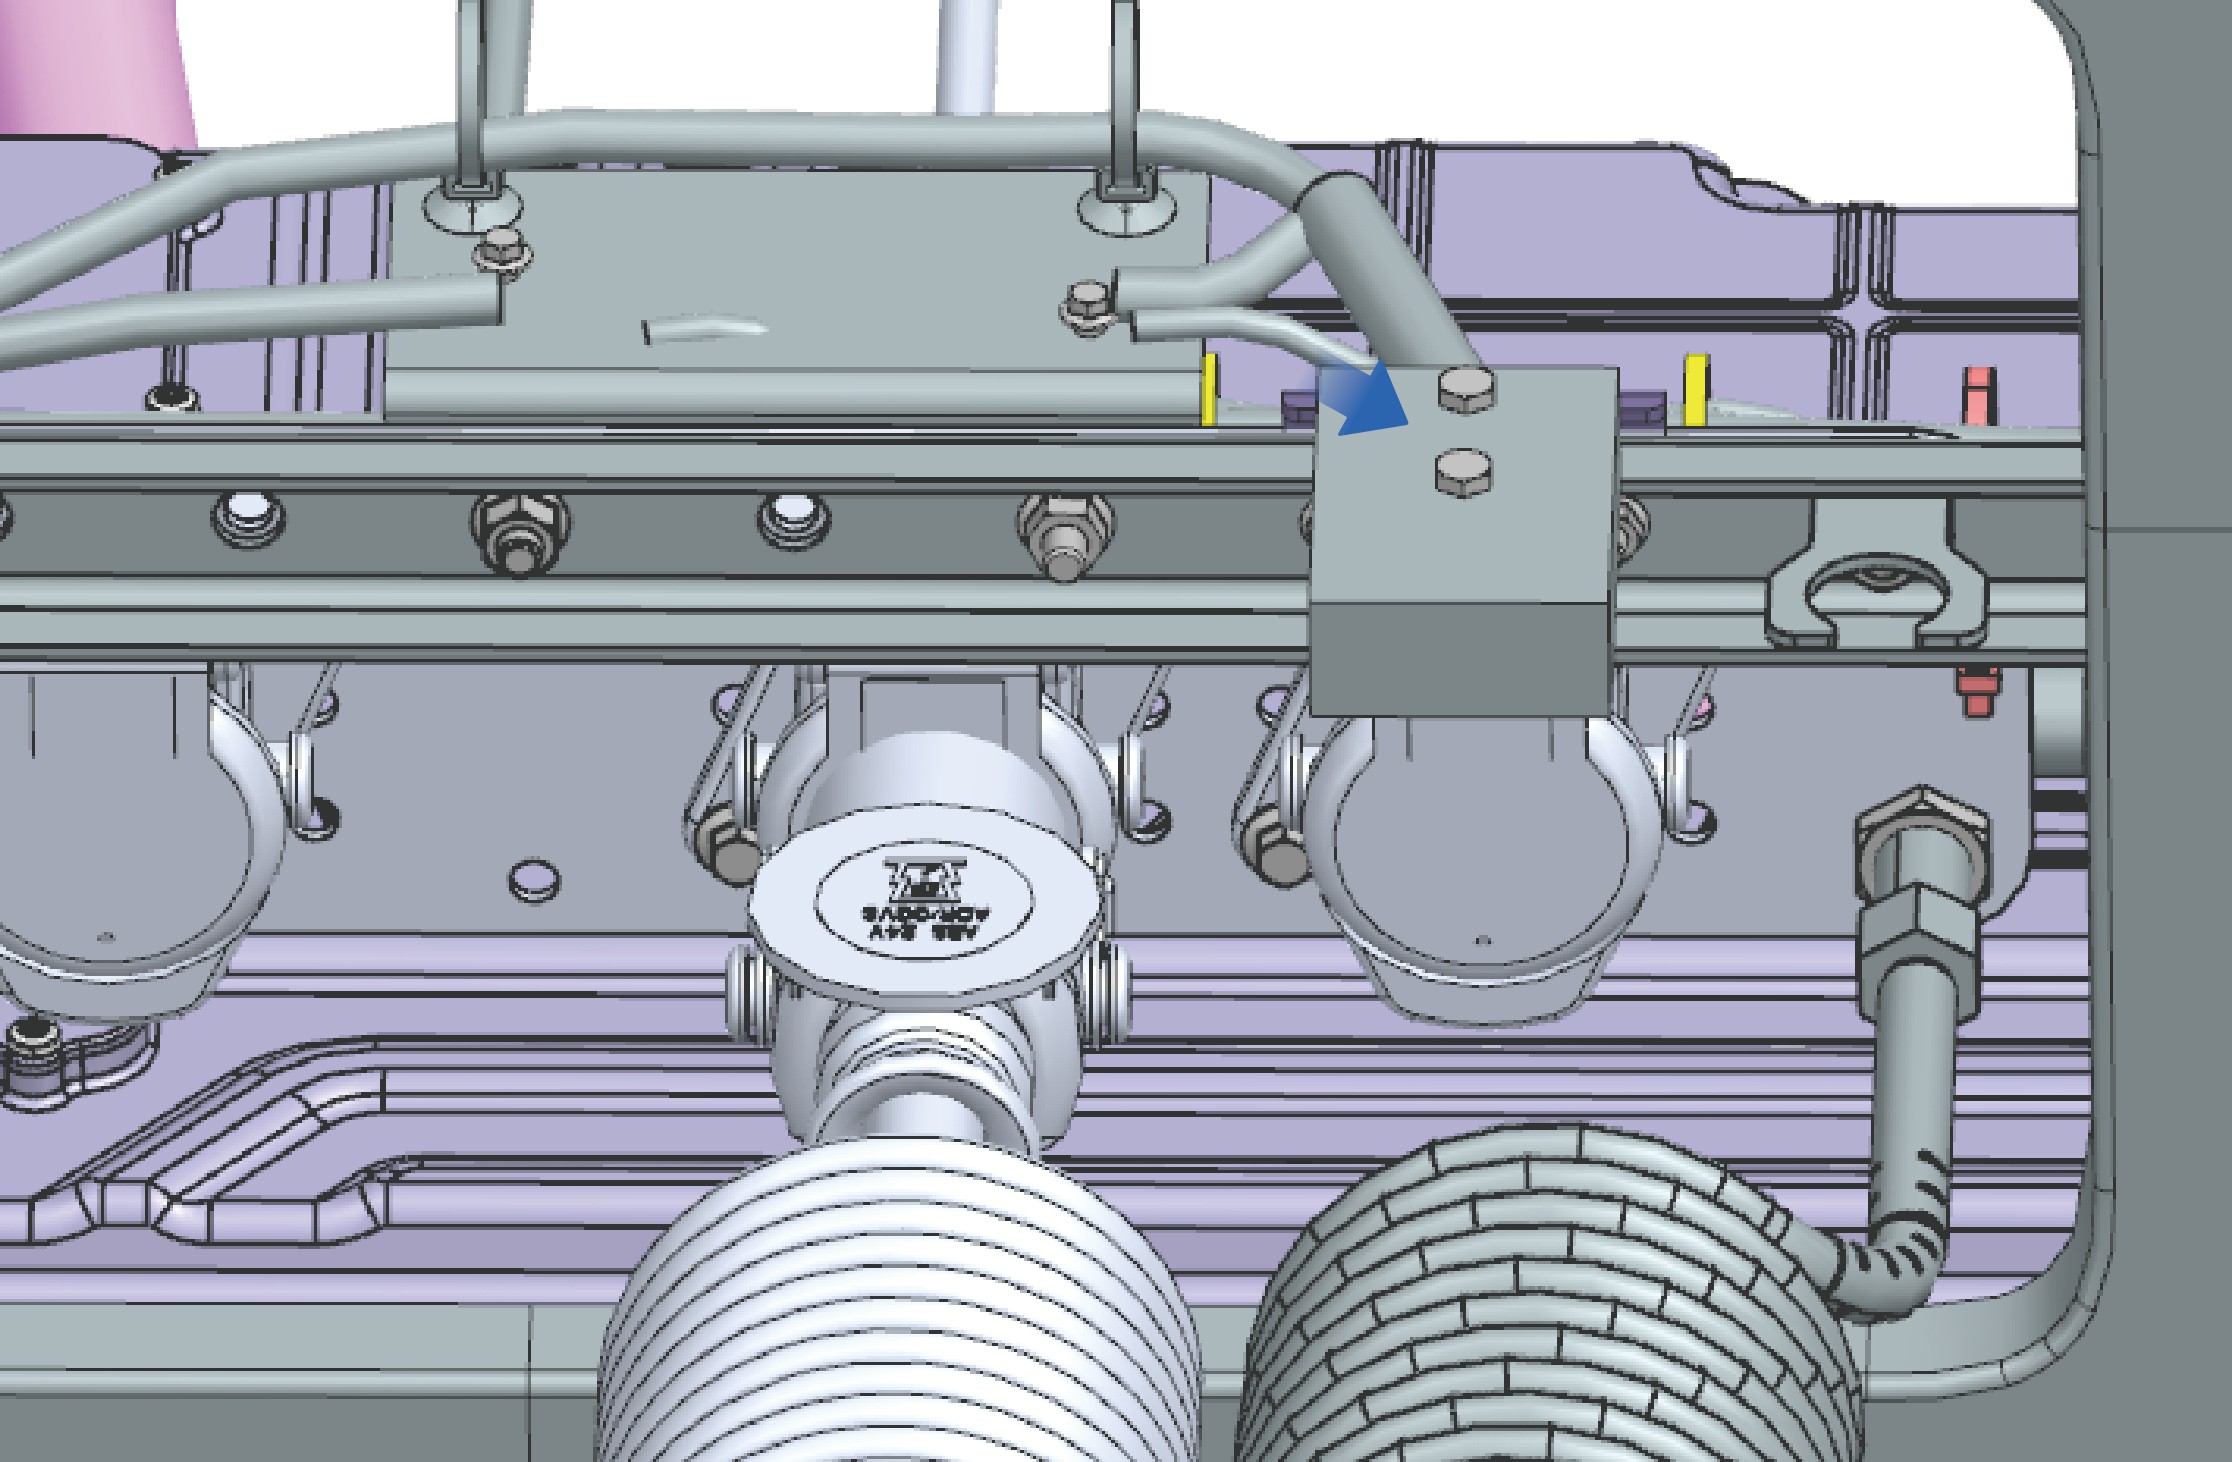
Doftsystem i fordonet
↑ Till toppenKlimatanläggning i fordonet
Fordonet har ett doftsystem som kan monteras i doftboxen i det nedre draghandtagsområdet på höger sida av förarsätet efter eget önskemål.
Bruksanvisning
Öppna locket på doftflaskan, sätt in den tunna änden av flaskan i hålet i doftmekanismen ovanför det nedre högra draghandtagsområdet vid sätet, och tryck försiktigt ner för att montera doftflaskan på plats.
När doftflaskan sätts in i hålet hålls den på plats av magneten i doft-
mekanismen.
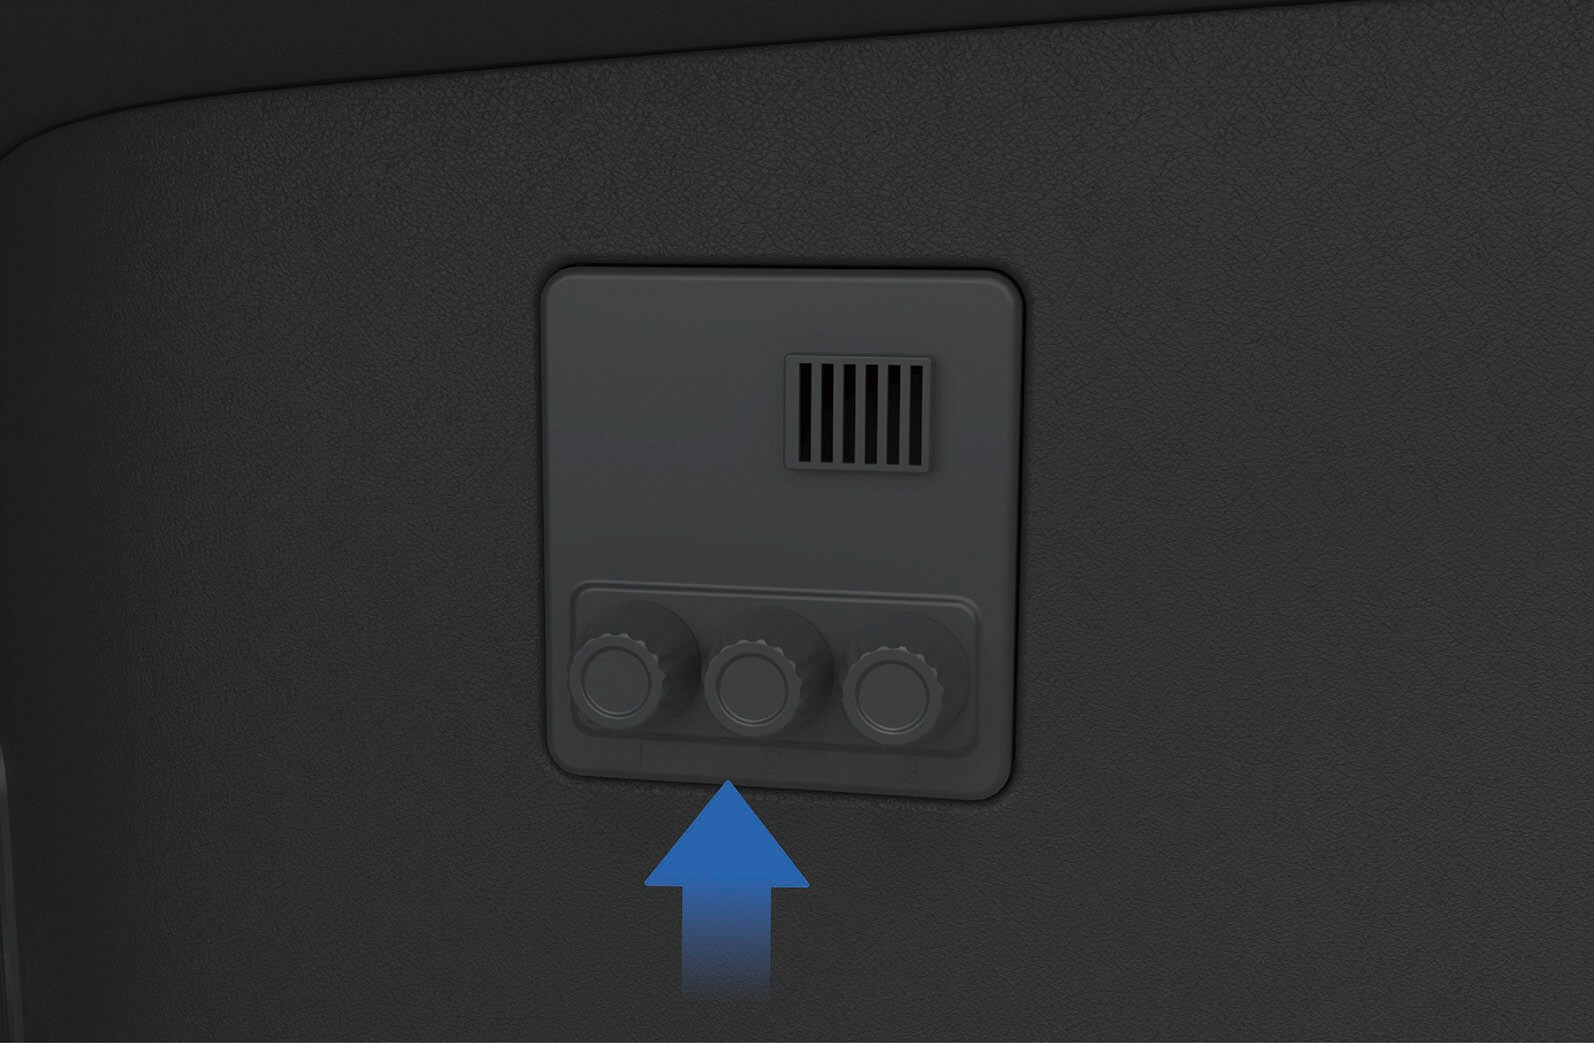
Efter att doftflaskan har monterats på plats visas information om doften i det aktuella hålet på fordonets informationsskärm.
Vid byte av doftflaska måste du klämma flaskans botten med fingrarna och dra flaskan långsamt ut ur doftmekanismen.
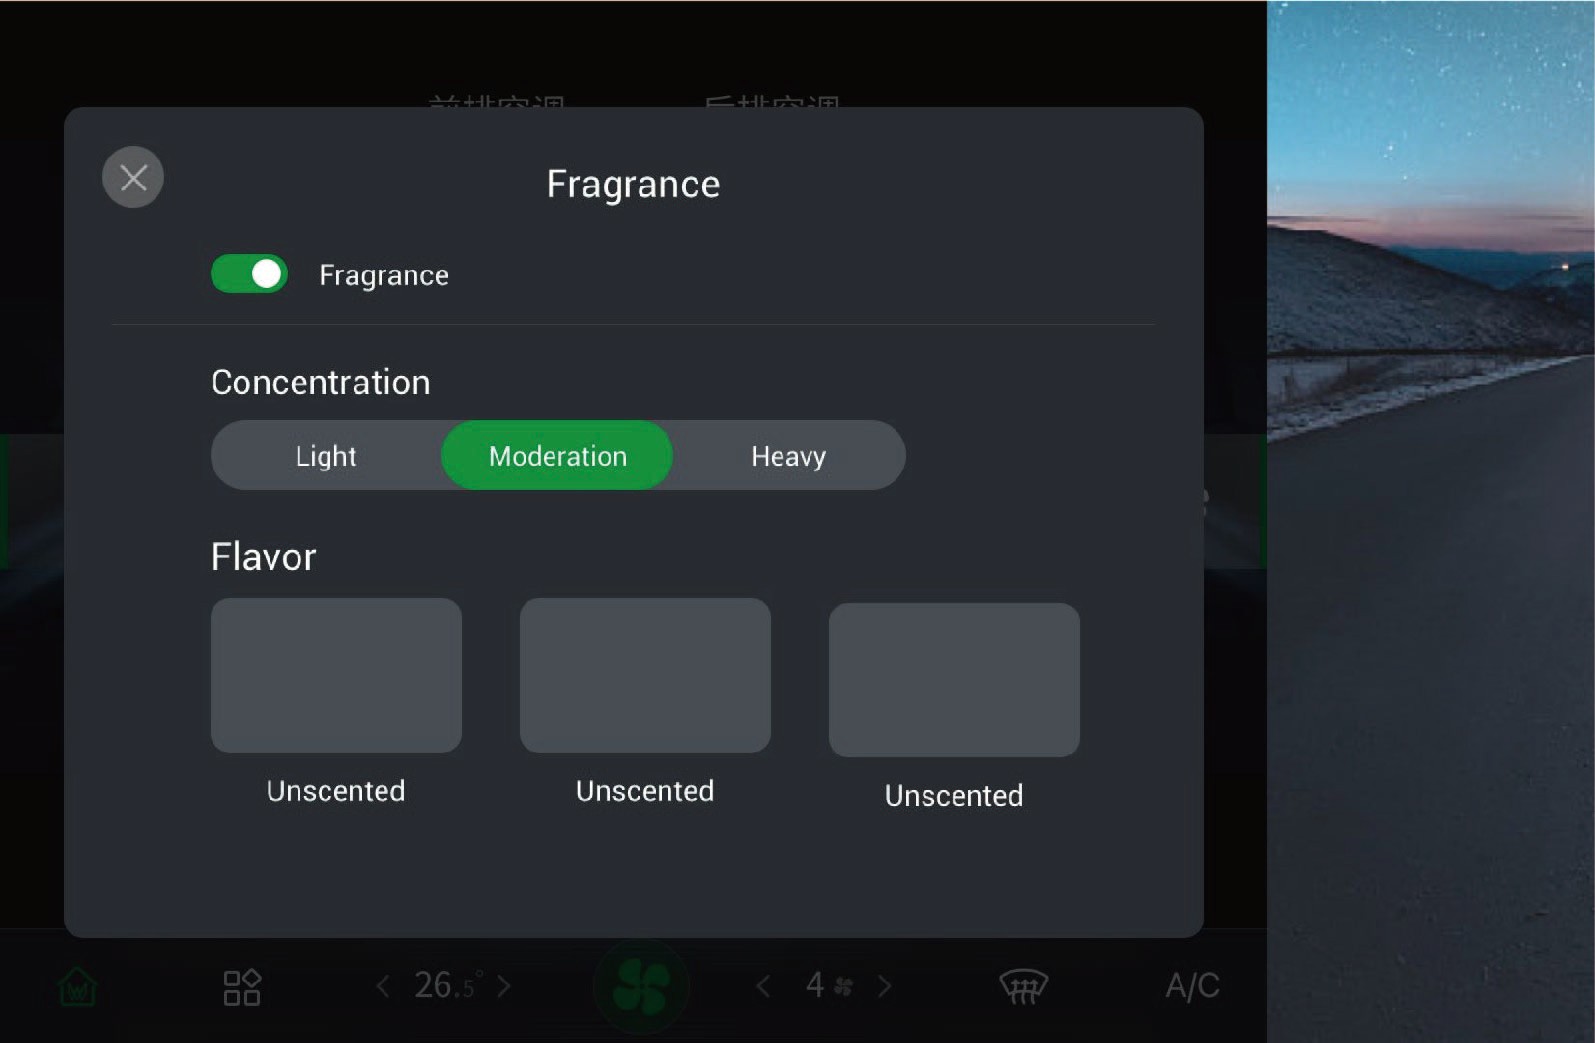
När doften är monterad kan du öppna klimatinställningarna på fordonets informationsskärm och klicka på «Fragrance» för att slå på/av doftsystemet, justera koncentrationen av den aktuella doften och välja olika dofter i detta gränssnitt.
Försiktighetsåtgärder
Varning
Förvara doftflaskan oåtkomlig för barn för att undvika förgiftning vid oavsiktlig sväljning av innehållet i flaskan.
Stick inte in fingrarna i hålrummet i doftmekanismen, för att undvika personskada.
Montera eller byt inte doftflaskan under körning, för att undvika olyckor.
Om du känner obehag vid användning av doften, sluta använda
doftsystemet omedelbart.
Om personer med allergi eller luftvägssjukdomar sitter i fordonet, använd doftsystemet med försiktighet.
Anmärkning
Var uppmärksam på doftflaskans hållbarhetsdatum före montering. Oöppnad håller doften i 1 år, medan öppnad håller i 3 månader. Använd doften inom hållbarhetsdatumet, och byt ut den när datumet är nått.
Vid byte av doftflaska, håll händerna rena och kontrollera att doftsystemet fungerar som det ska.
Det sitter en magnet under doftmekanismen. Lägg inte mobiltelefoner, surfplattor eller andra elektroniska enheter nära dofthålet ovanför det öppna förvaringsområdet i mittkonsolen, för att undvika att påverka funktionen hos elektroniska enheter och doftmoduler.
Eftersom dofter kan reagera kemiskt med organiska ämnen är direkt kontakt med plastdelarna förbjuden för den keramiska doftkärnan i flaskan.
Observera
 Doftupplevelsen varierar med innertemperaturen, klimatanläggningens luftmängd och ditt fysiologiska tillstånd.
Den keramiska doftkärnan i flaskan bör köpas via officiella kanaler för att undvika skada på flaskan och säkerställa doftens kvalitet.
Om doftsystemet inte känner igen flaskan efter montering, montera doftflaskan på nytt.
Laddport
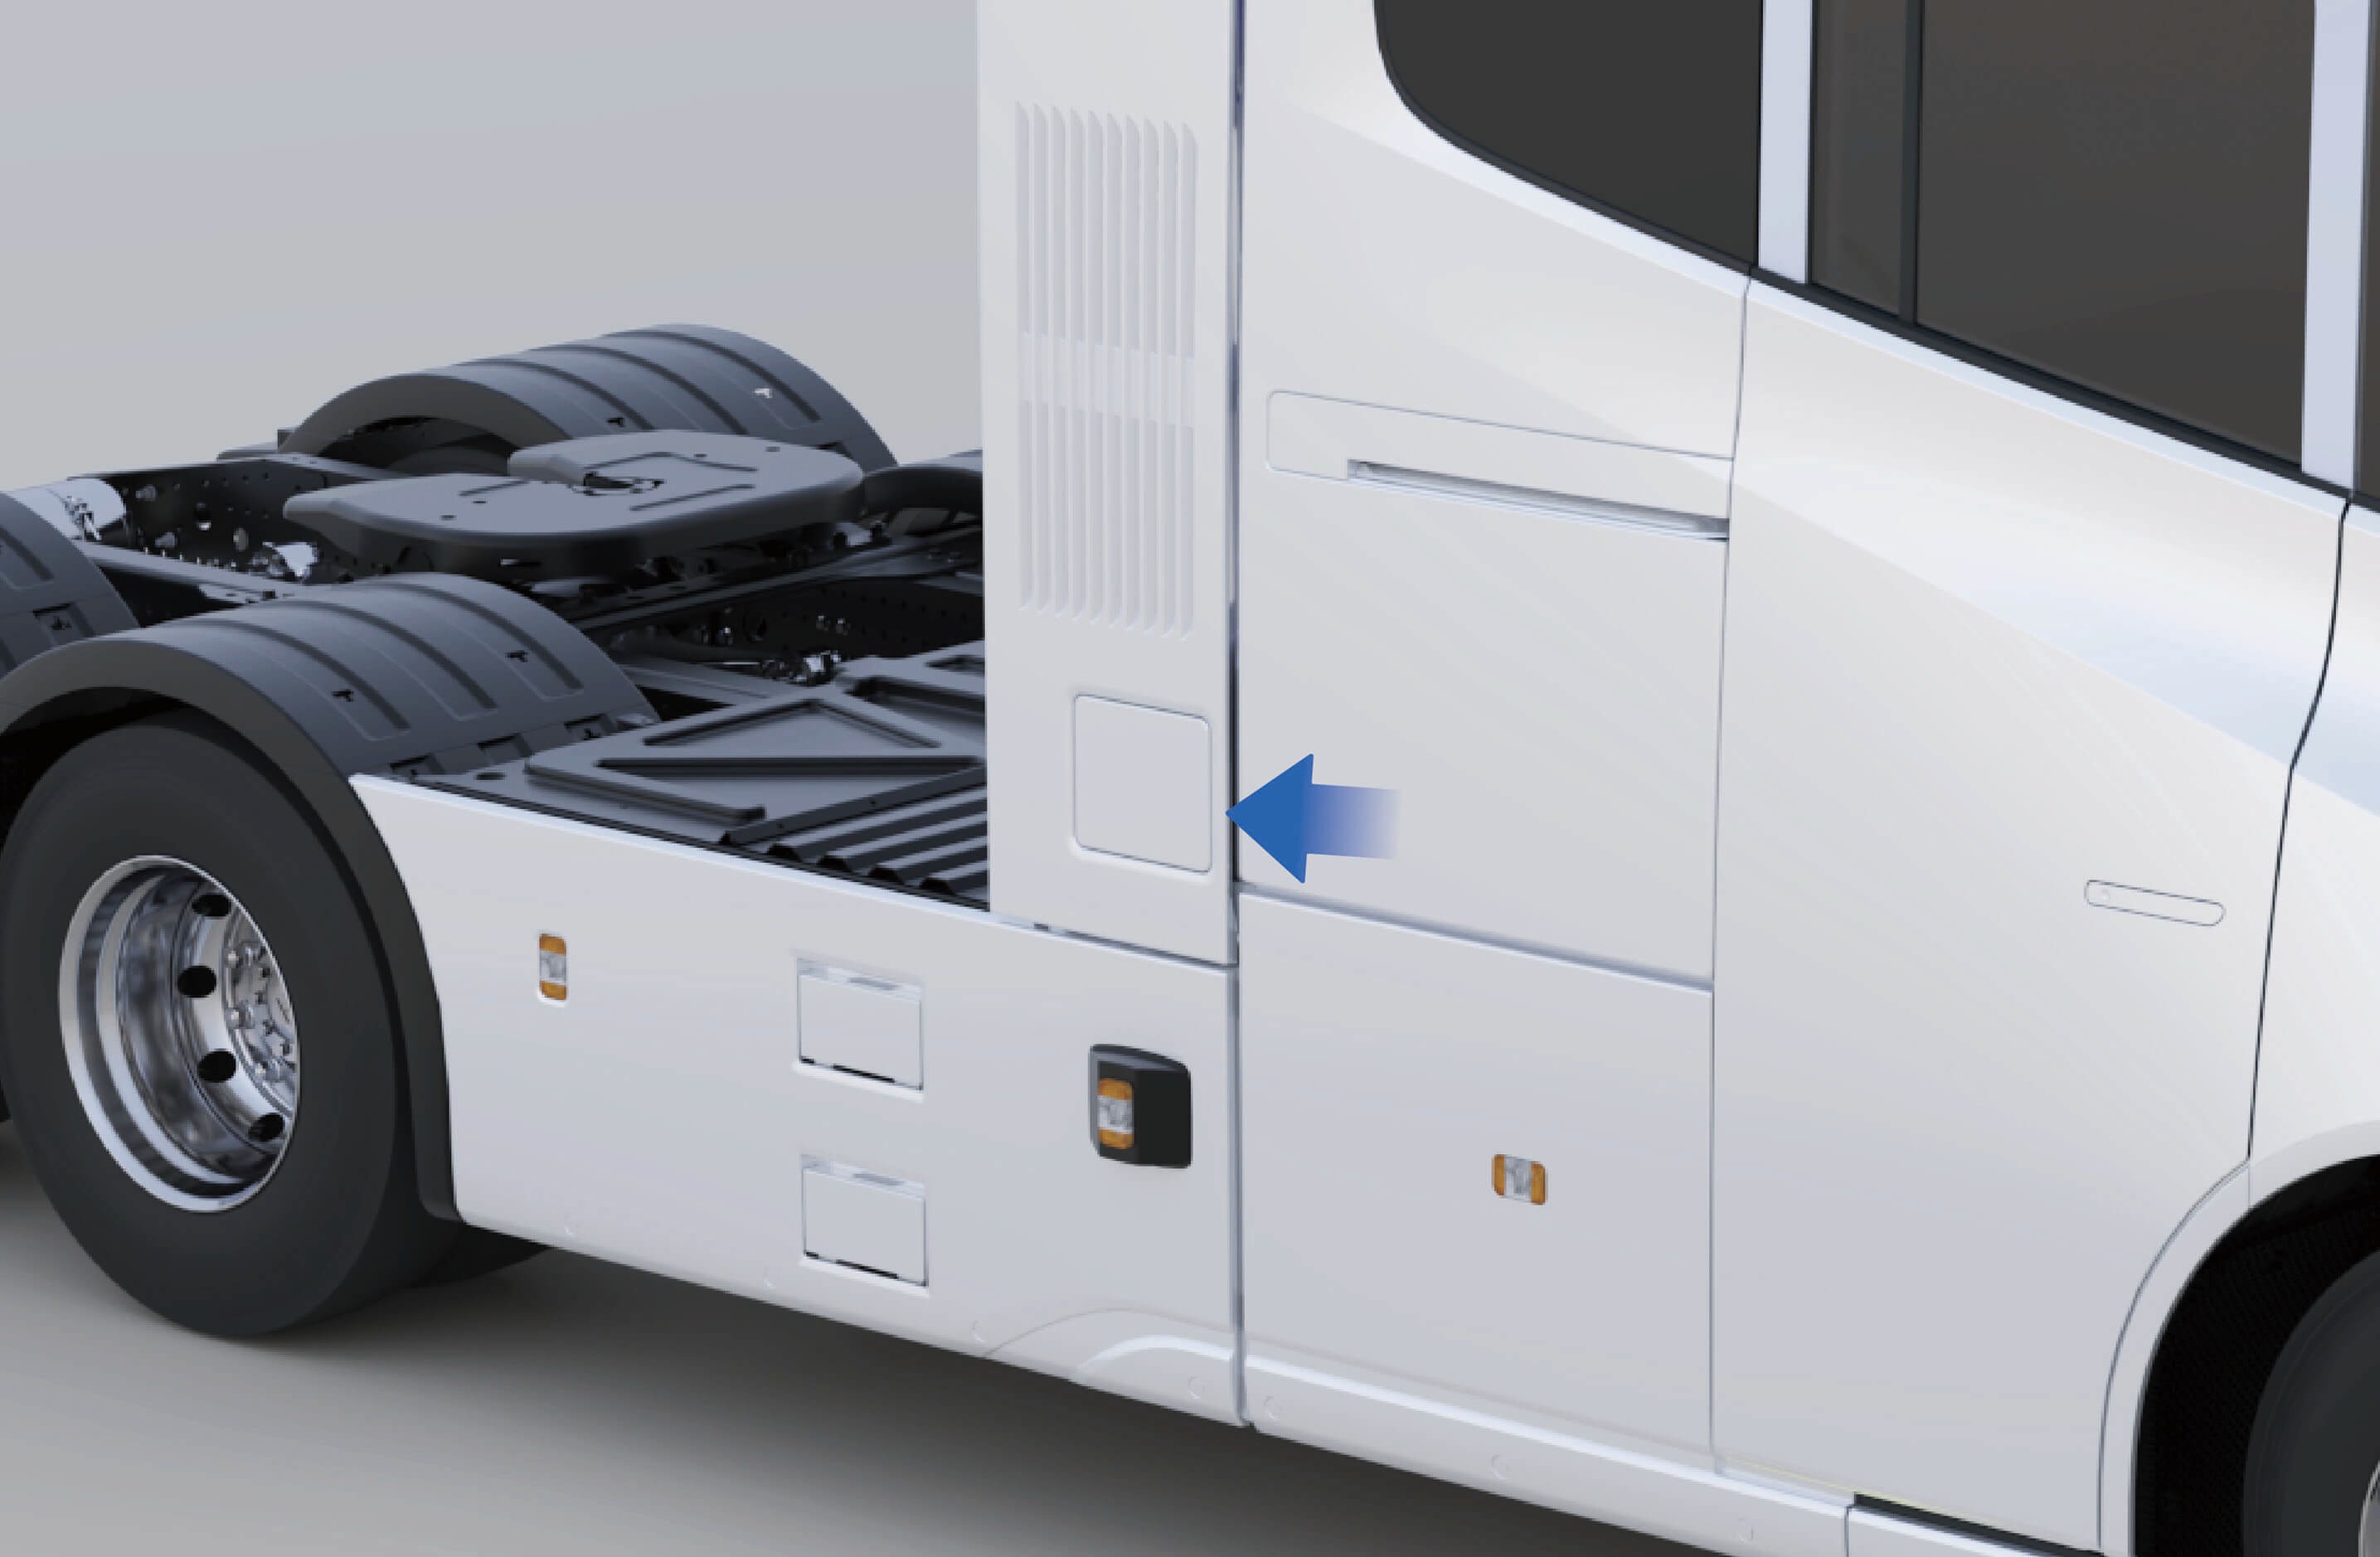
Laddning av fordonet
 Laddport
Fordonet har laddportar på båda sidor.
Bruksanvisning
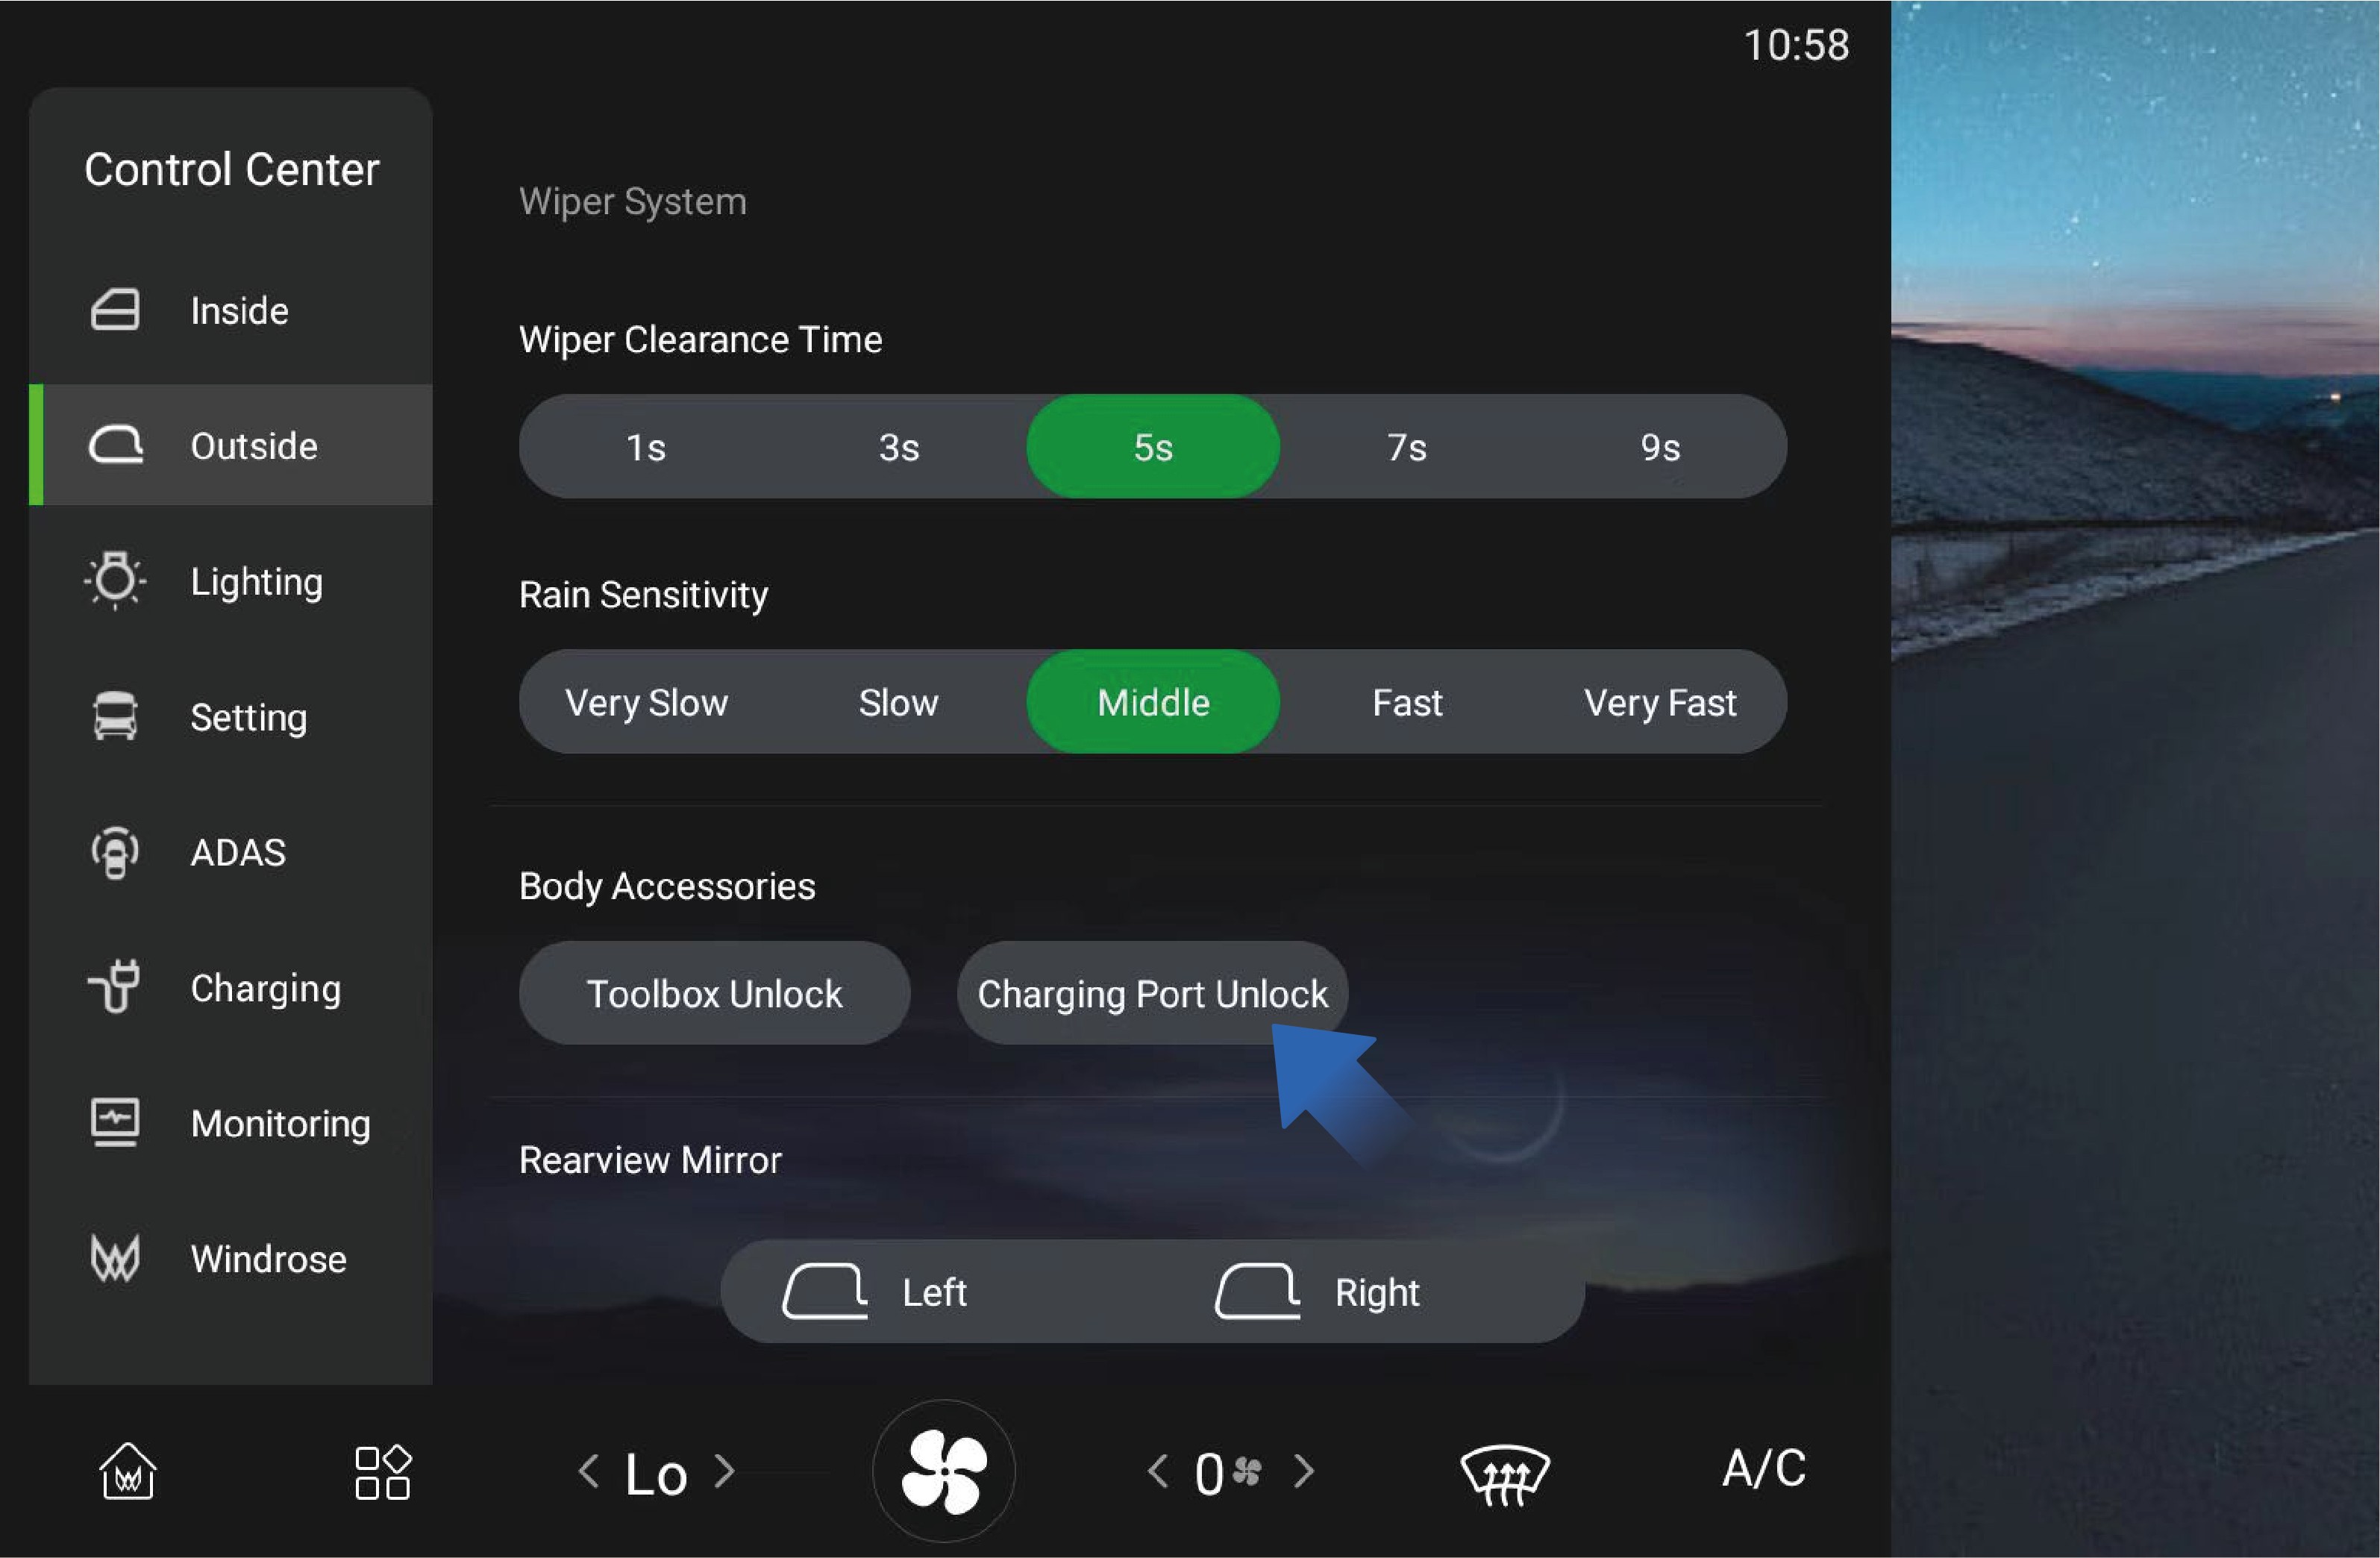
↑ Till toppenInvändig manövrering
Du kan låsa upp laddportluckan genom att välja «Control Center», byta till gränssnittet «Outside» och klicka på knappen «Charging Port Unlock» på fordonets informationsskärm i instrumentpanelen. Därefter kan laddportluckan aktiveras genom att trycka på den.
Försiktighetsåtgärder
Observera
Laddportluckan kan endast låsas upp – inte stängas – via fordonets informationsskärm. För att stänga laddportluckan måste du fortfarande manövrera den från utsidan av fordonet.
Förberedelse för laddning
↑ Till toppenLaddning av fordonet
Vid laddning av detta fordon, använd en laddenhet med spänning ≥ 1000V. Laddenheter under denna standard kommer inte att kunna ladda fordonet.
Bruksanvisning
Förberedelse
Kontrollera laddstationens kabel och fordonets laddkontakt för skada, vatteninträngning, brännskada och andra tydliga avvikelser, och kontrollera att det inte finns uppenbara säkerhetsfaror vid laddstationen och i omgivningen före laddning.
Parkera fordonet nära laddenheten och kontrollera att fordonet är fritt från avvikelser som isolationsfel. Fordonet kan laddas både med och utan högspänning ansluten.
Förberedelse för laddning

Sätt in laddkontakten i laddporten. När den är korrekt på plats hör du ett «klick» som betyder att anslutningen är lyckad. Därefter aktiveras det elektroniska låset i laddporten, och kombinationsinstrumentet visar symbolen för laddanslutning.
Följ instruktionerna på laddskärmen för att starta laddningen genom att dra kortet eller skanna koden.
På laddstationens display, välj rätt
laddläge och laddparametrar, bekräfta att informationen är korrekt, och klicka på knappen «Start charging» för att starta laddningen av fordonet med laddenheten. Laddstationens display visar laddförlopp, laddtid, laddeffekt och annan information i realtid.
Under laddning kan du när som helst klicka på knappen «Stop charging» för att stoppa laddningen. När laddningen är slutförd visar enhetens display att laddningen är klar. Klicka på knappen «Stop charging» för att stoppa laddningen och låsa upp det elektroniska låset i laddporten. Dra ut laddkontakten och sätt tillbaka den i kontakthållaren på laddenheten.
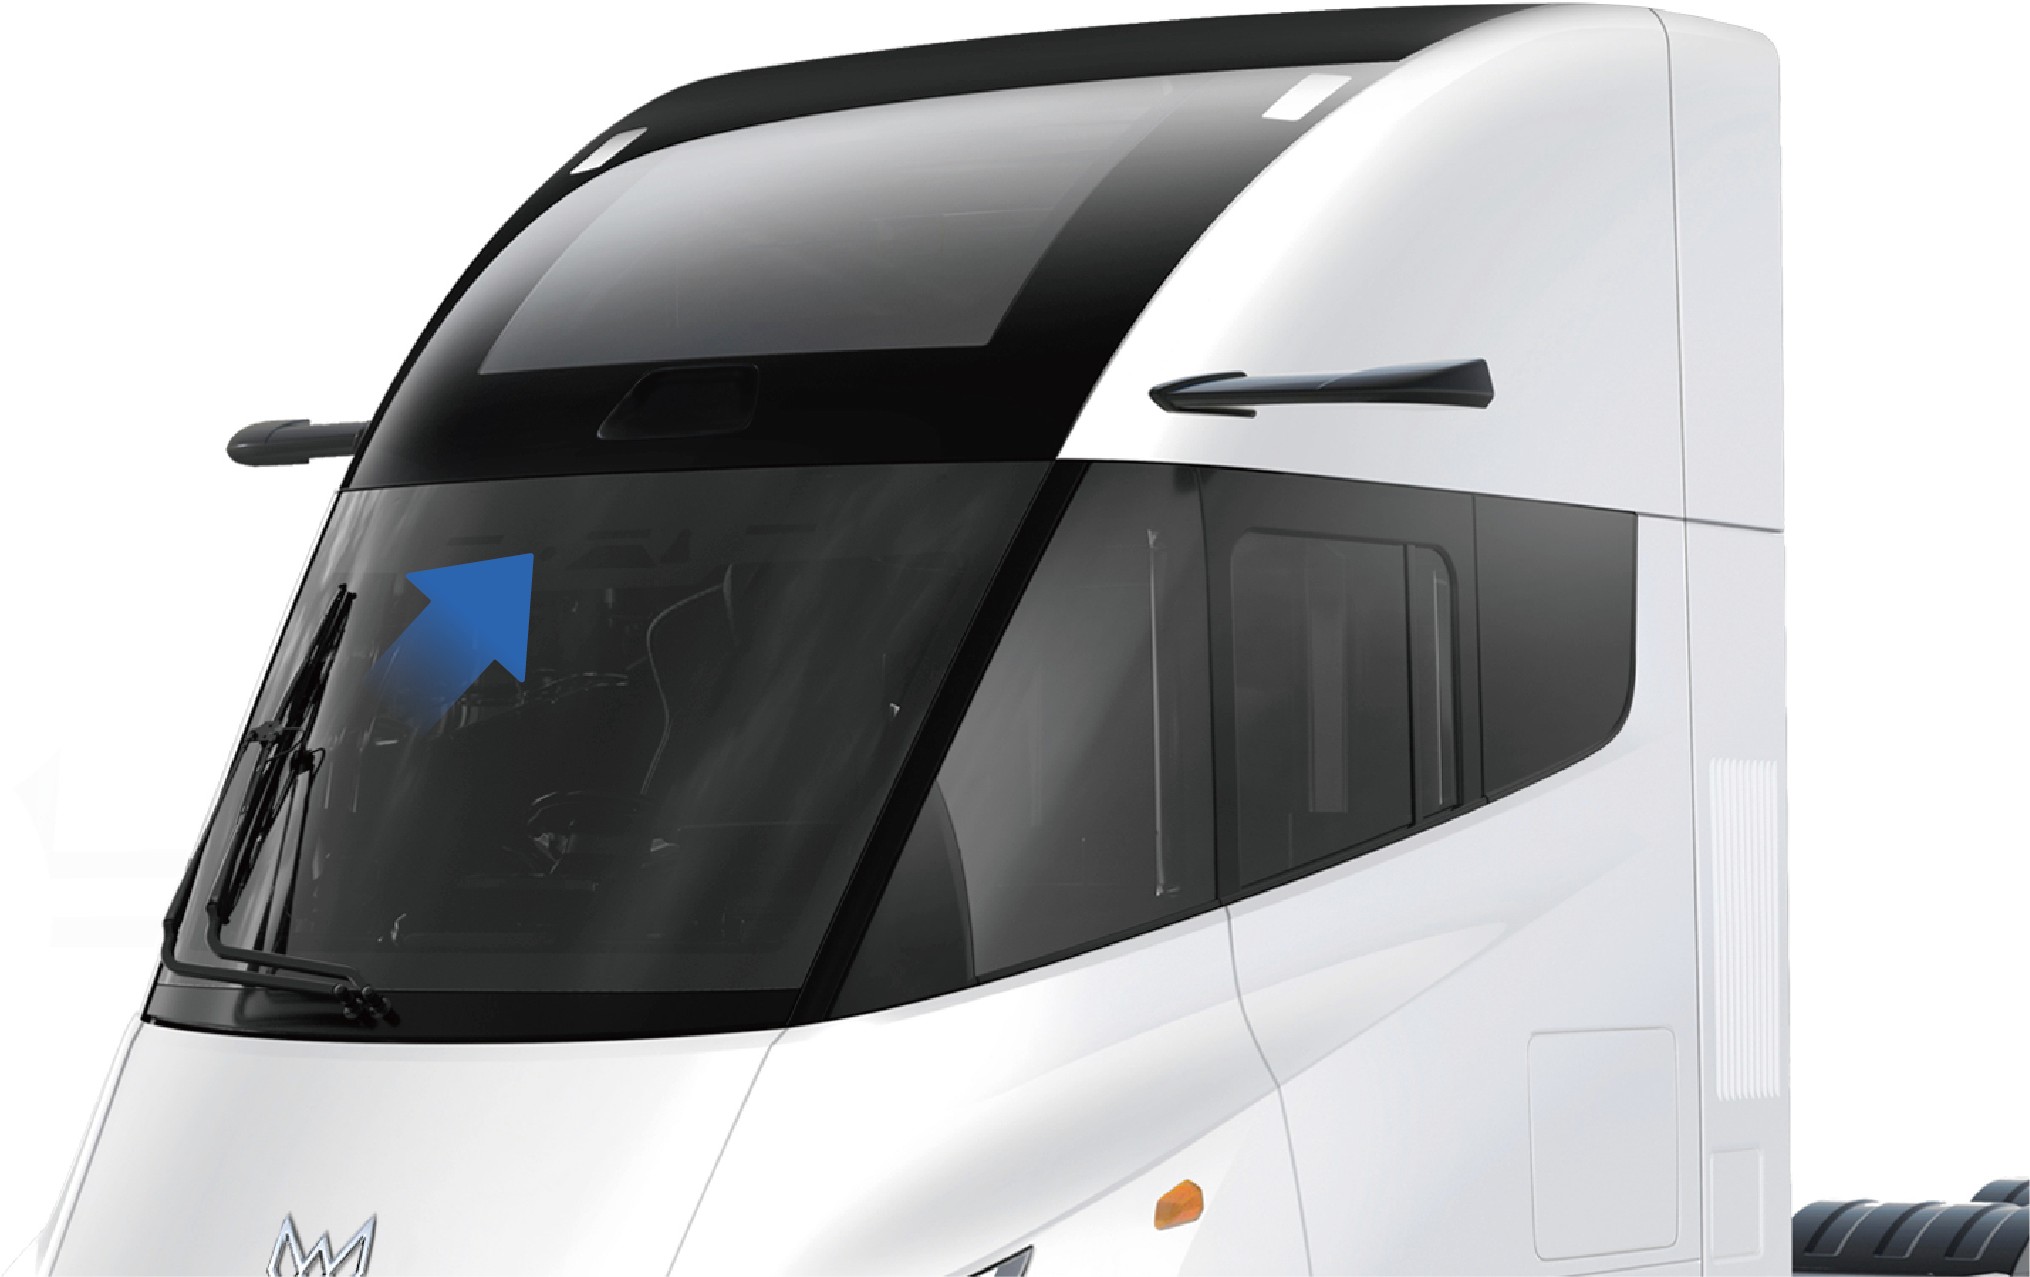
Laddindikator
Indikatorn längst upp på vindrutan ändras till en laddindikator under laddning. När högspänningsbatteriets laddnivå (SOC) är under 30 %, blinkar den vänstra laddindikatorn. När SOC är 30–90 %, lyser den vänstra laddindikatorn fast. När högspännings-
batteriets SOC är över 90 %, lyser vänster och mittre laddindikator fast och den högra blinkar. När SOC når 100 %, lyser vänster, mittre
och höger laddindikator fast.
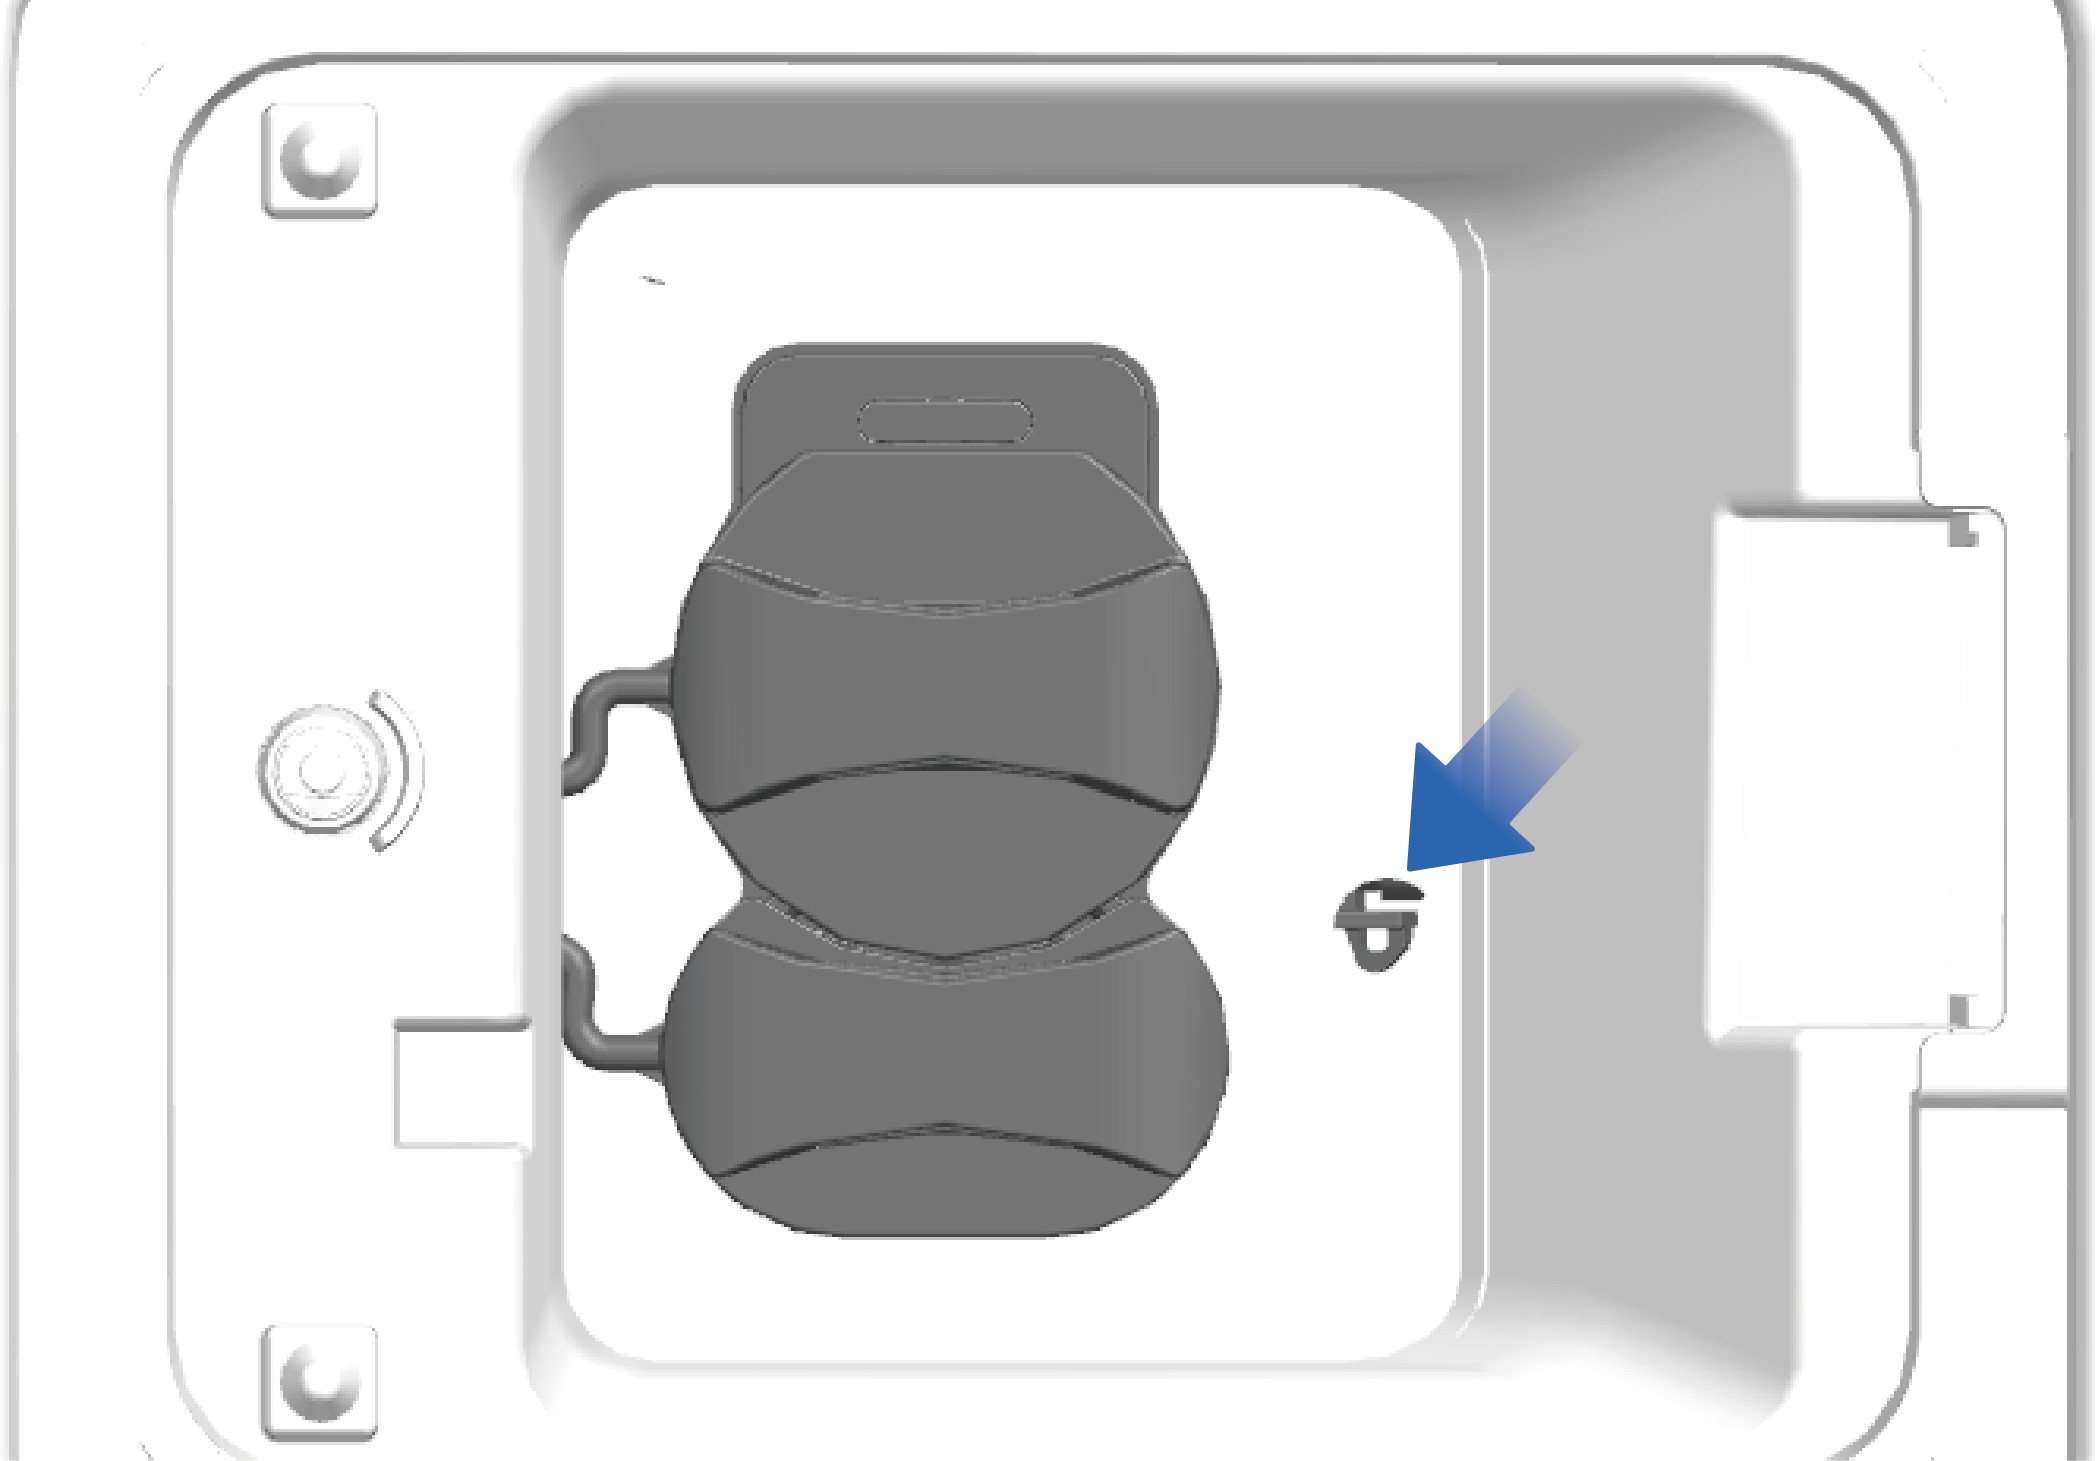
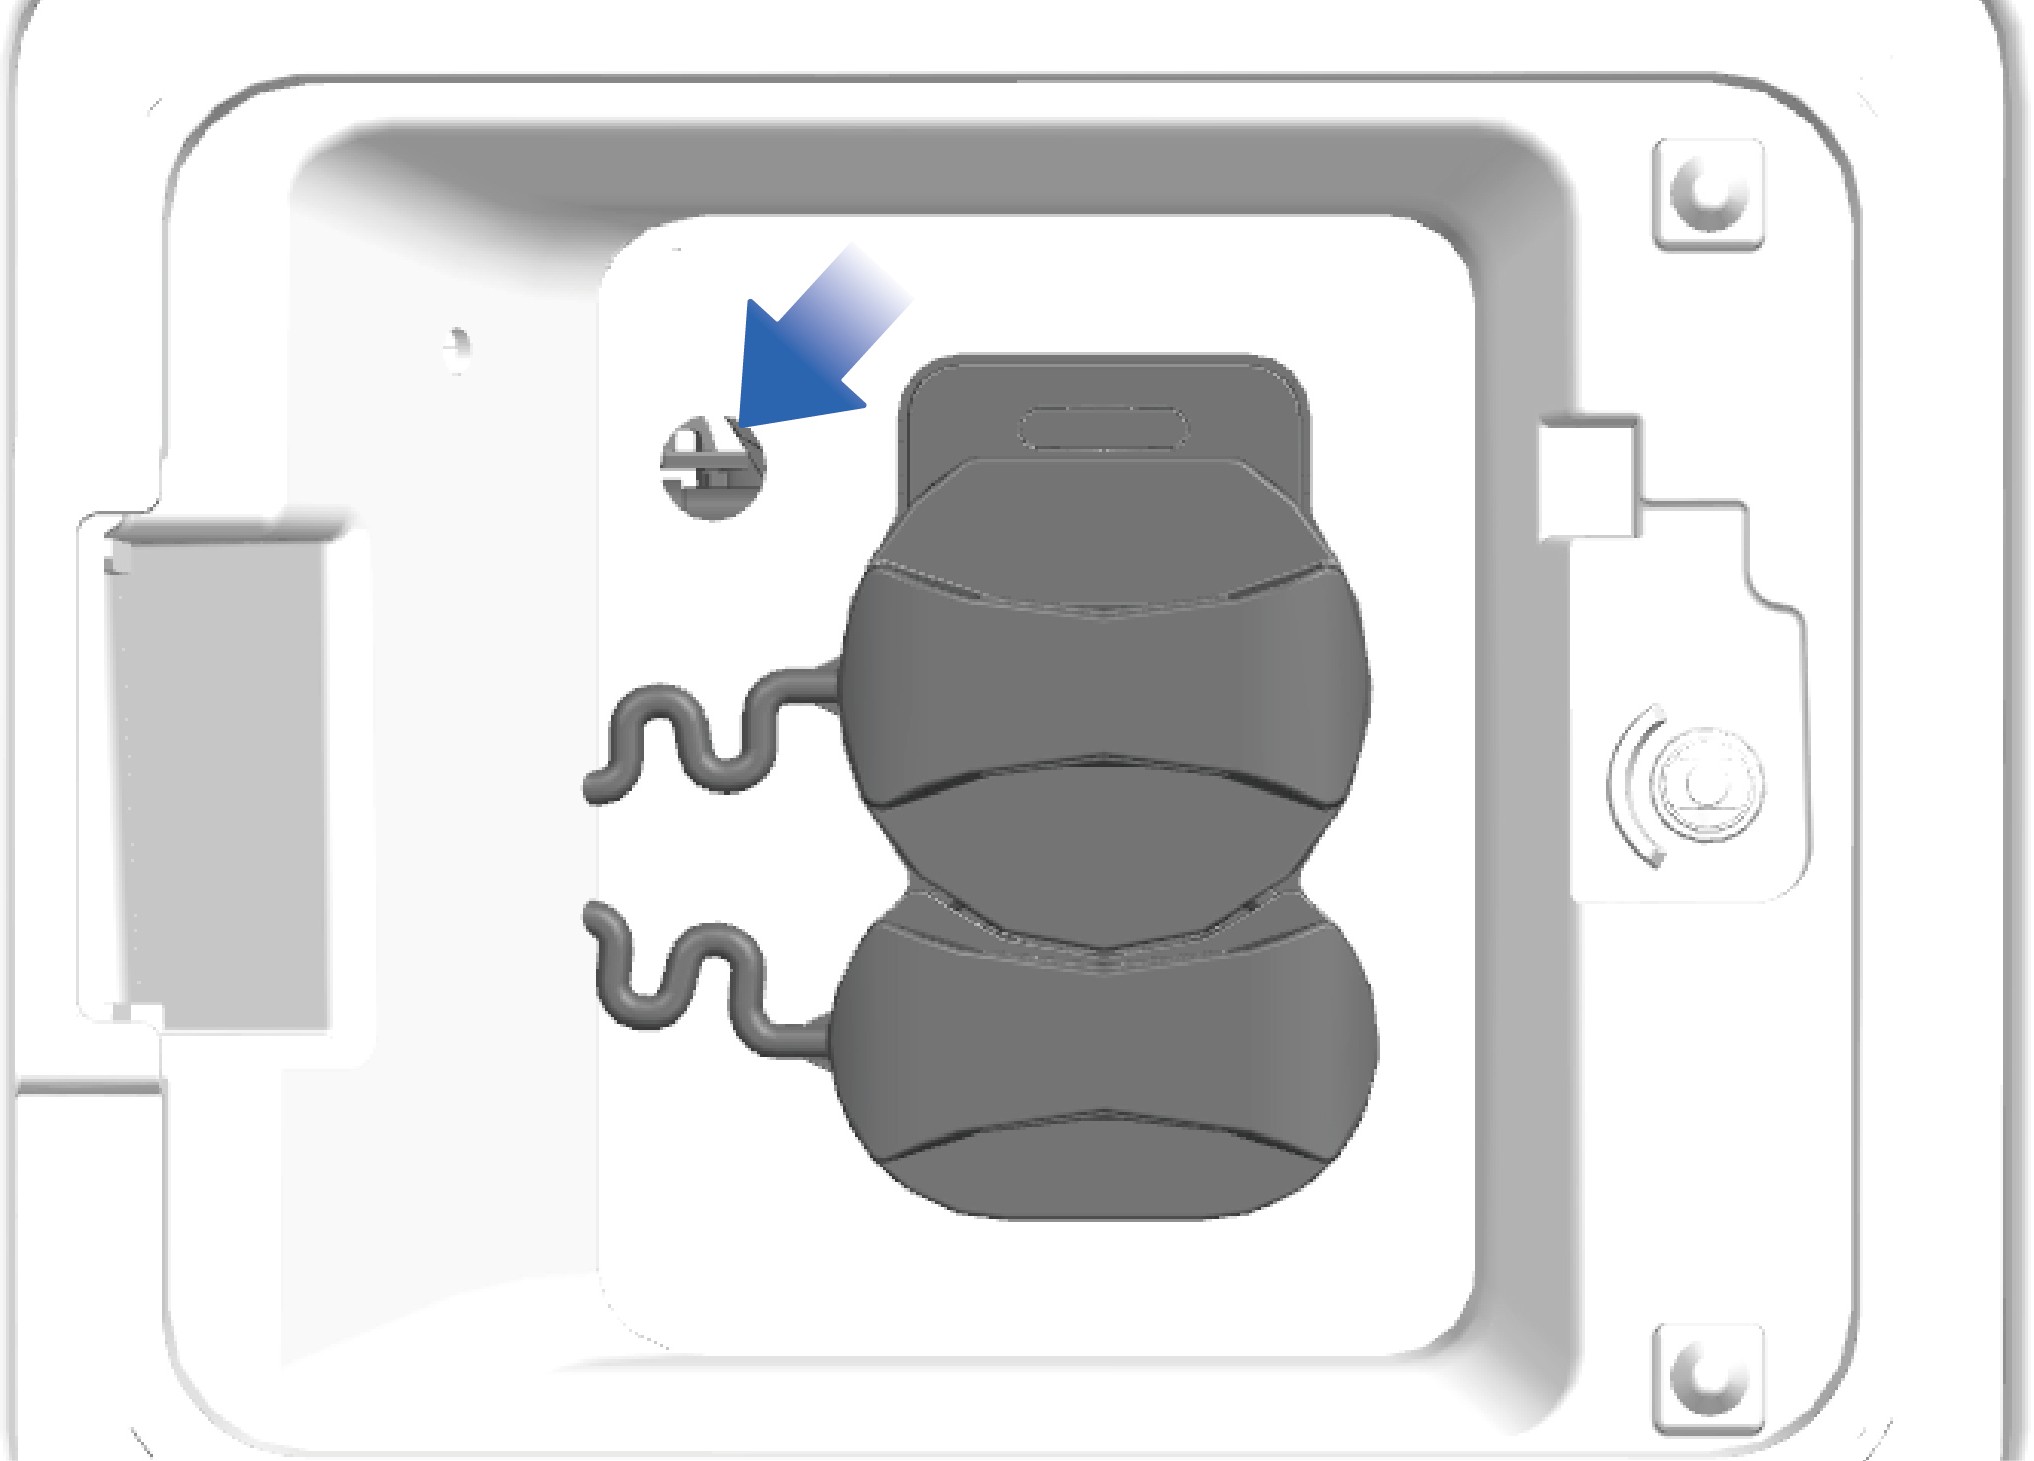
Nödöppning
↑ Till toppen
Om laddkontakten inte kan dras ut efter att laddningen är slutförd, kan nödöppningsmekanismen vid sidan av laddkontakten användas för att låsa upp. Använd ett verktyg för att skjuta öppningsmekanismen inåt mot fordonet, så att den ändrar position från parallell med fordonets körriktning till vinkelrät mot den. Placering av nödöppningsmekanismen för laddkontakten.
Försiktighetsåtgärder
Varning
Innan laddning är det viktigt att bekräfta att laddenhetens utgångsspänning och lågspännings-hjälpströmförsörjning passar till fordonet, och att laddkontakten överensstämmer med kraven i regelverket.
Det är förbjudet att lagra brännbara och explosiva material runt laddstationen, och det är viktigt att hålla omgivningen runt laddenheten väl ventilerad.
Under laddning är det förbjudet att röra vid laddpluggen och fordonets laddport, för att undvika elektrisk stöt.
Om enheten beter sig onormalt, till exempel ryker, avger lukt, ger ifrån sig onormalt ljud osv., stoppa laddningen omedelbart och kontakta en fackperson för underhåll.
Lås upp fordonet innan du sätter in / drar ut ladd-
pluggen, utan skevhet, skakning eller hårdhänt hantering.
Det elektroniska låset i laddporten aktiveras och låses när laddningen startar, därför är det förbjudet att dra ut laddpluggen med våld. När laddningen avslutas, lås upp
fordonet och avsluta laddningen på fordonets informationsskärm för att frigöra det elektroniska låset i laddporten.
Manövrera inte upplåsningsbulten till det elektroniska låset under normal laddning.
AnmärkningÖverurladdning av högspänningsbatteriet bör undvikas så mycket som möjligt för att säkerställa batteriets säkra livslängd. När högspänningsbatteriets SOC är under 20 %, visar kombiinstrumentet en varning om att SOC är för låg. När SOC är under 5 %, går fordonet i effektbegränsat läge, och hastigheten reduceras allteftersom urladdningsdjupet (DoD) för högspänningsbatteriet ökar. Hitta då en laddenhet i närheten så snart som möjligt för att ladda fordonet.
Högspänningsbatteriet bör användas vid en temperatur på 10 °C–30 °C. Batteriets livslängd förkortas vid för hög eller för låg omgivningstemperatur.
Om fordonet inte används under längre tid, bör huvudströmbrytaren slås av, och högspänningsbatteriet bör laddas en gång varje halvmånad.
När fordonet är i underspänningsskydd, bör du ladda det i tid före användning. Annars kan överurladdning av högspänningsbatteriet uppstå och påverka batteriets prestanda och livslängd.
Observera
Fordonet kan inte laddas om det elektroniska låset i laddporten inte är aktiverat, vilket kan kontrolleras genom att vrida lite på laddpluggen.
Förberedelse inför körning
Förberedelse innan körning
Innan fordonet tas i bruk, kontrollera det för att säkerställa säkerheten:
Kontrollera anslutning och fastsättning av varje del.
Kontrollera om motorn och E-axeln ger ifrån sig onormalt ljud under drift.
Kontrollera monteringen av tillbehöret.
Kontrollera oljenivån i E-axeln och styroljetanken.
Kontrollera vätskenivån i spolvätskebehållaren och kylvätskebehållaren.
Kontrollera oljetillståndet vid varje smörjpunkt.
Kontrollera om bromssystemet och styrsystemet fungerar som de ska.
Kontrollera om den elektriska utrustningen och ledningarna är väl anslutna.
Kontrollera däcktrycket.
Kontrollera om förarverktyget och den medföljande tekniska dokumentationen är komplett.
Förarsäte
↑ Till toppenFörberedelse innan körning
Du kan justera funktionerna på förarsätet efter eget behov och önskemål för en mer bekväm körupplevelse.
Bruksanvisning
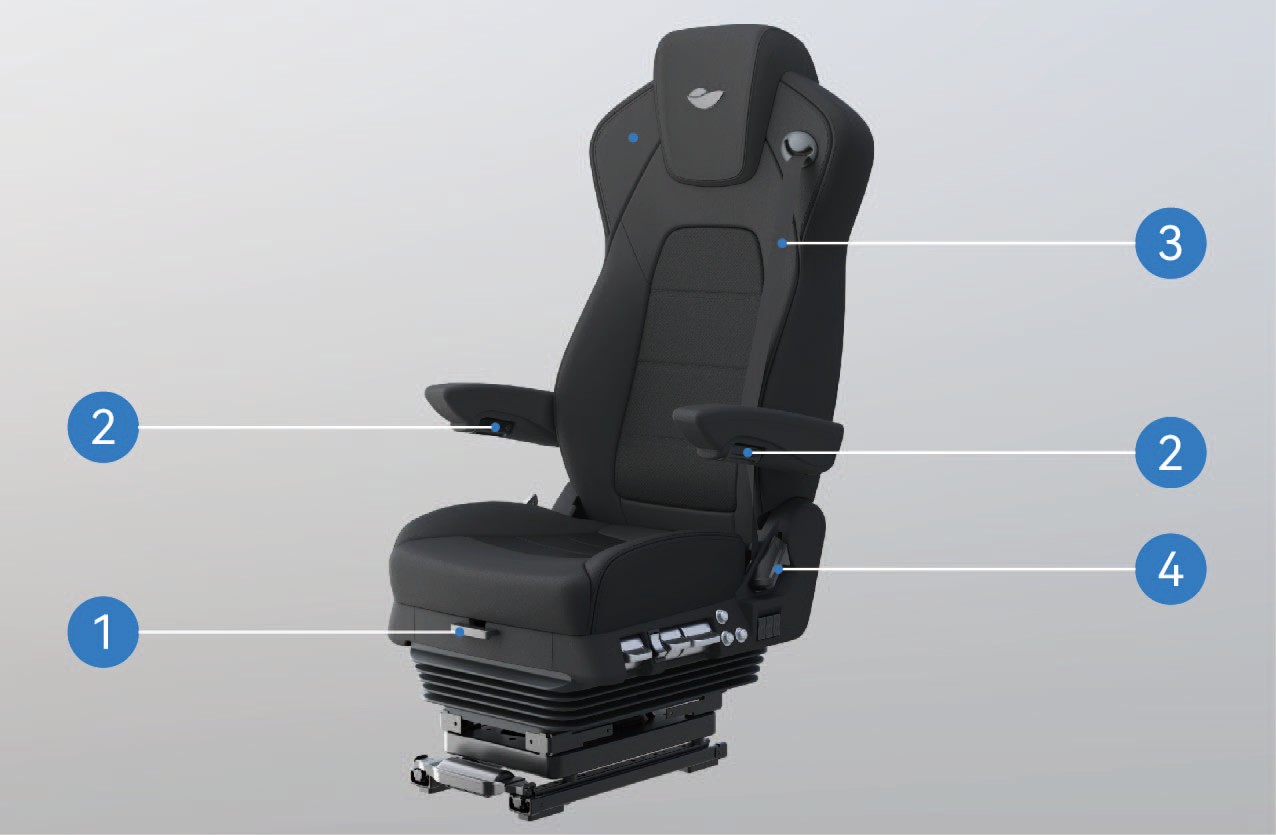
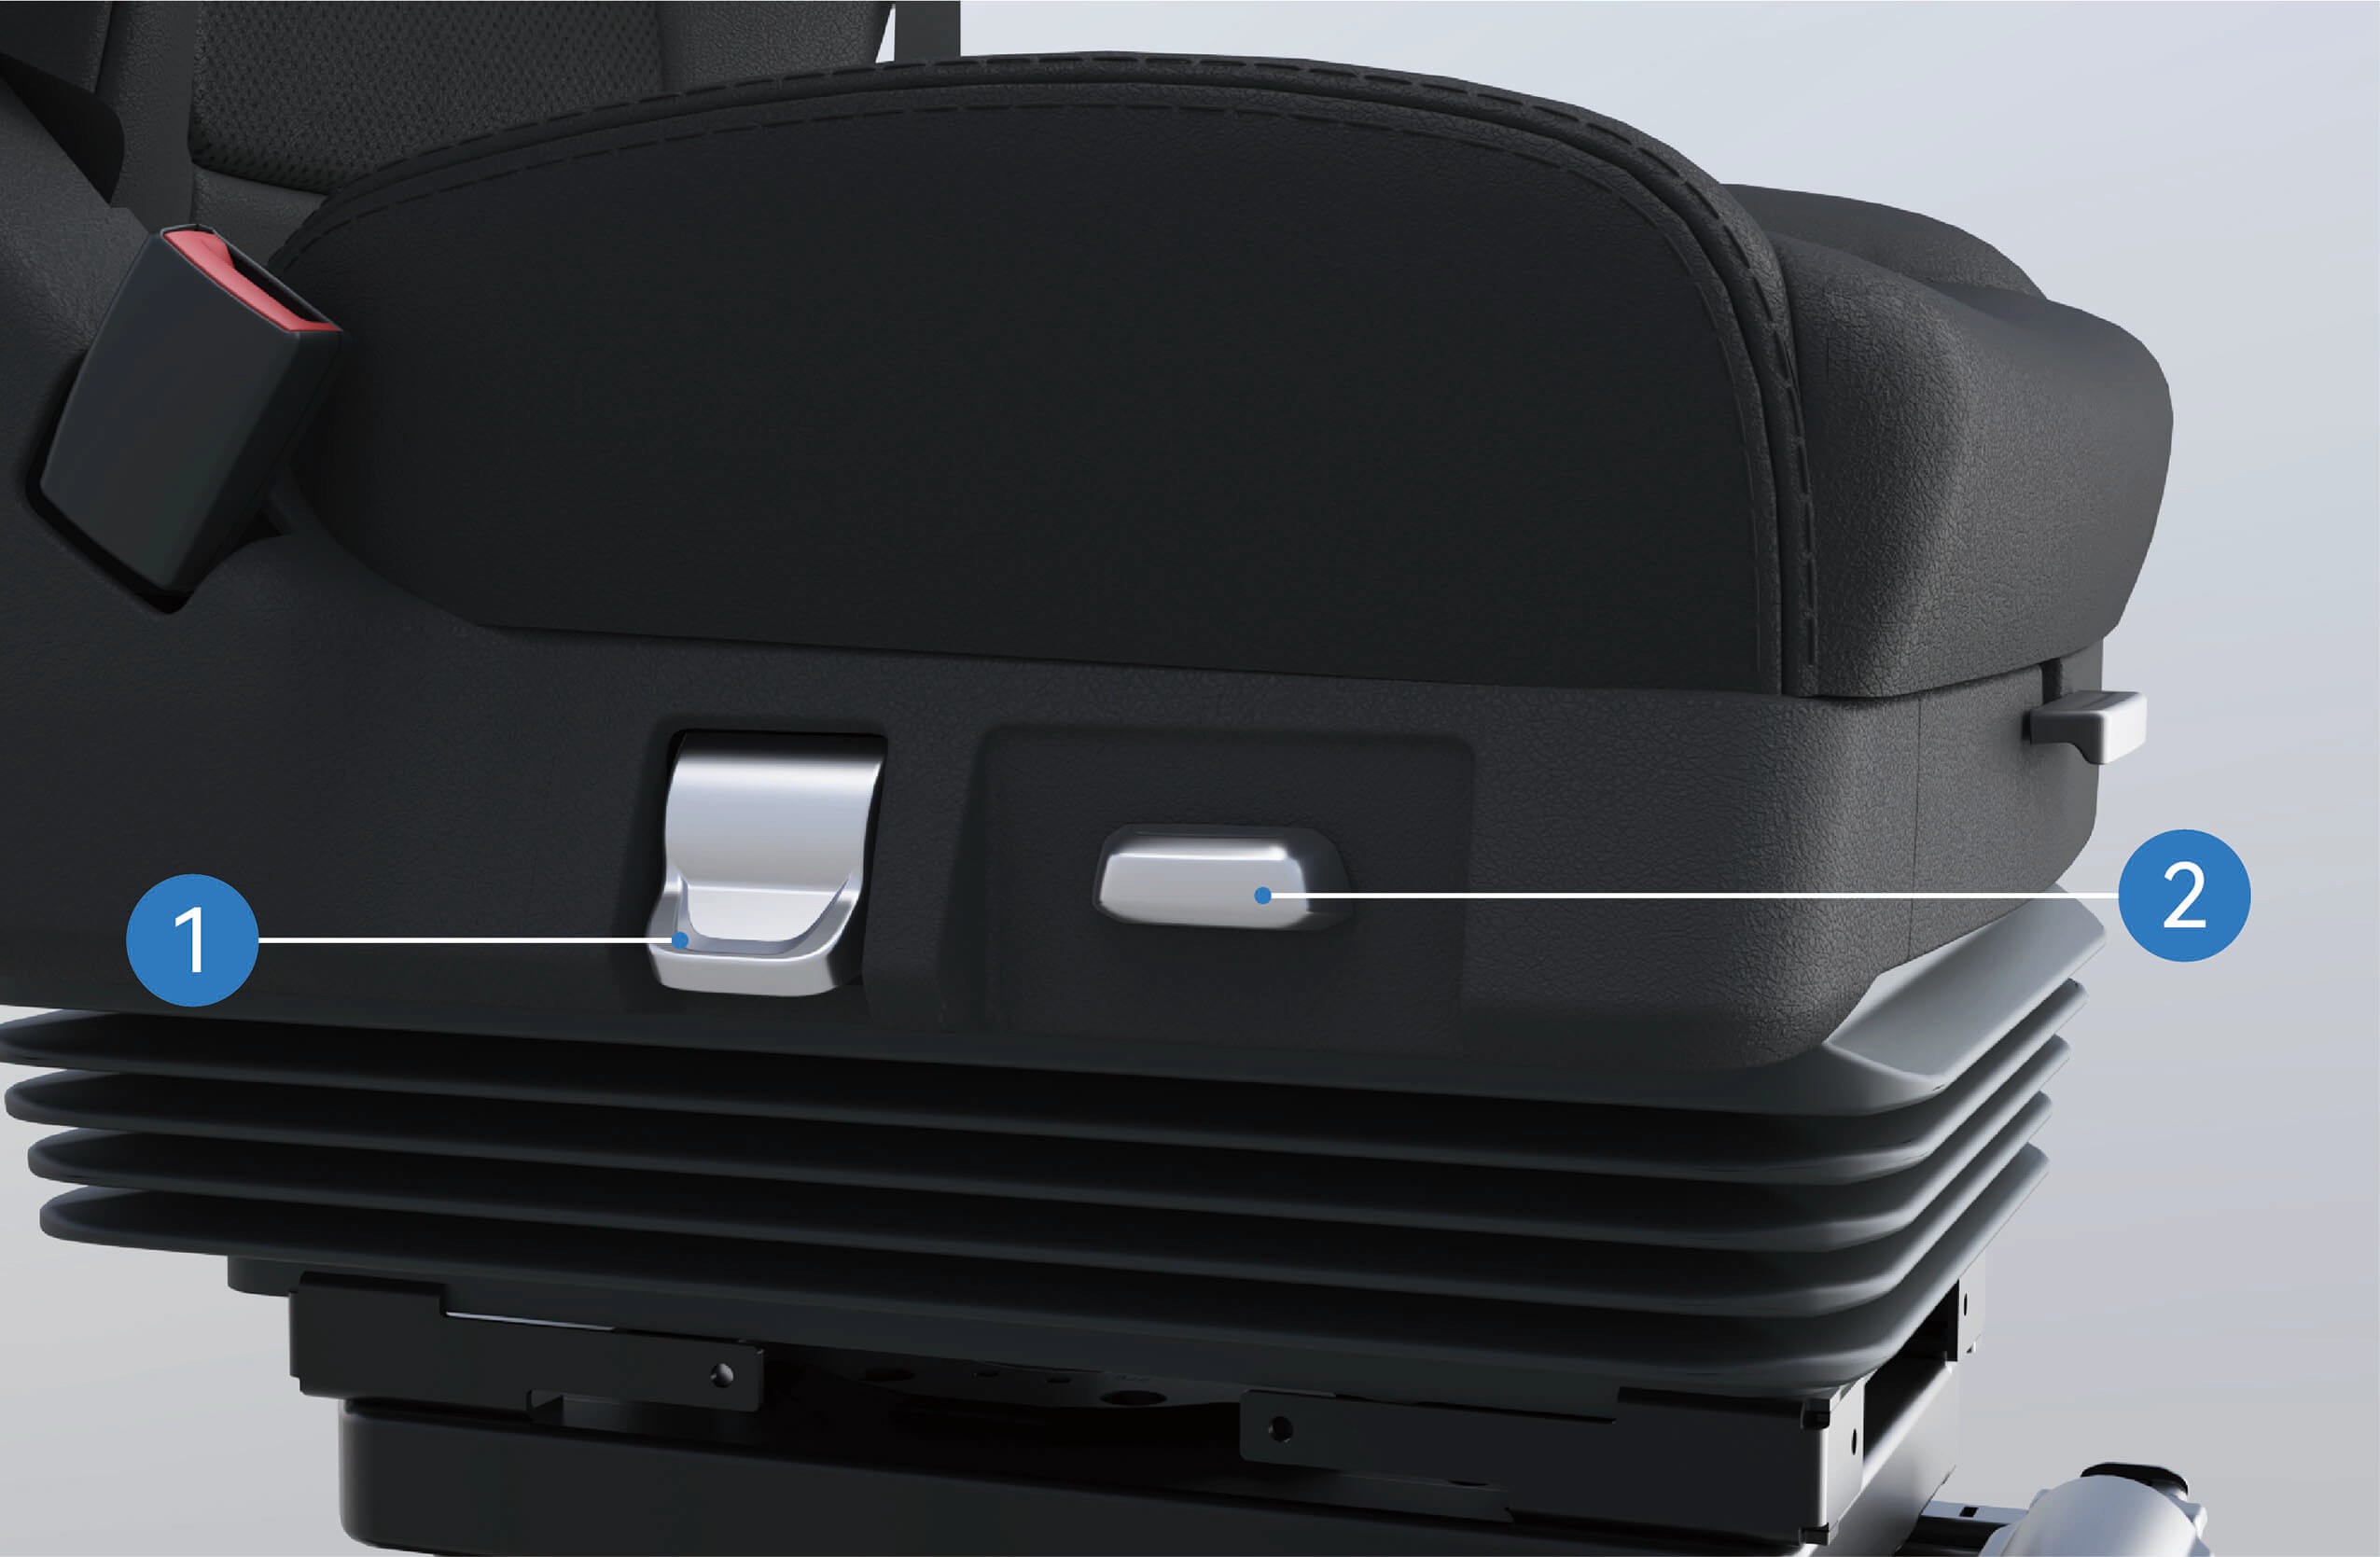
Spak för justering av sittdynan fram/bak på förarsätet
Lyft och håll spaken, skjut sittdynan fram eller bak själv, och släpp upplåsningsspaken när du har hittat rätt position för att låsa sittdynan.
Armstödsbrytare på förarsätet
Vrid armstödsbrytaren för att justera armstödet. När brytaren vrids åt vänster, sänks armstödet. När brytaren vrids åt höger, höjs armstödet.
Förarens säkerhetsbälte
Du kan dra ut säkerhetsbältet rakt för att använda det.
Handtag för justering av ryggvinkel på förarsätet
Lyft handtaget för ryggvinkel för att låsa upp ryggstödet; luta dig försiktigt bakåt mot ryggstödet eller rör dig sakta bort fromittoadjustthebackresttoyourdesiredangle.Slipphåndtaket, så låses ryggstödet automatiskt.
Handtag för rotationsjustering av förarsätet
Vrid rotationshandtaget på förarsätet, så kan sätet roteras 90° mot bildörren.
Brytare för justering av förarsätet fram/bak
Vrid brytaren framåt eller bakåt för att justera sätets position fram/bak.
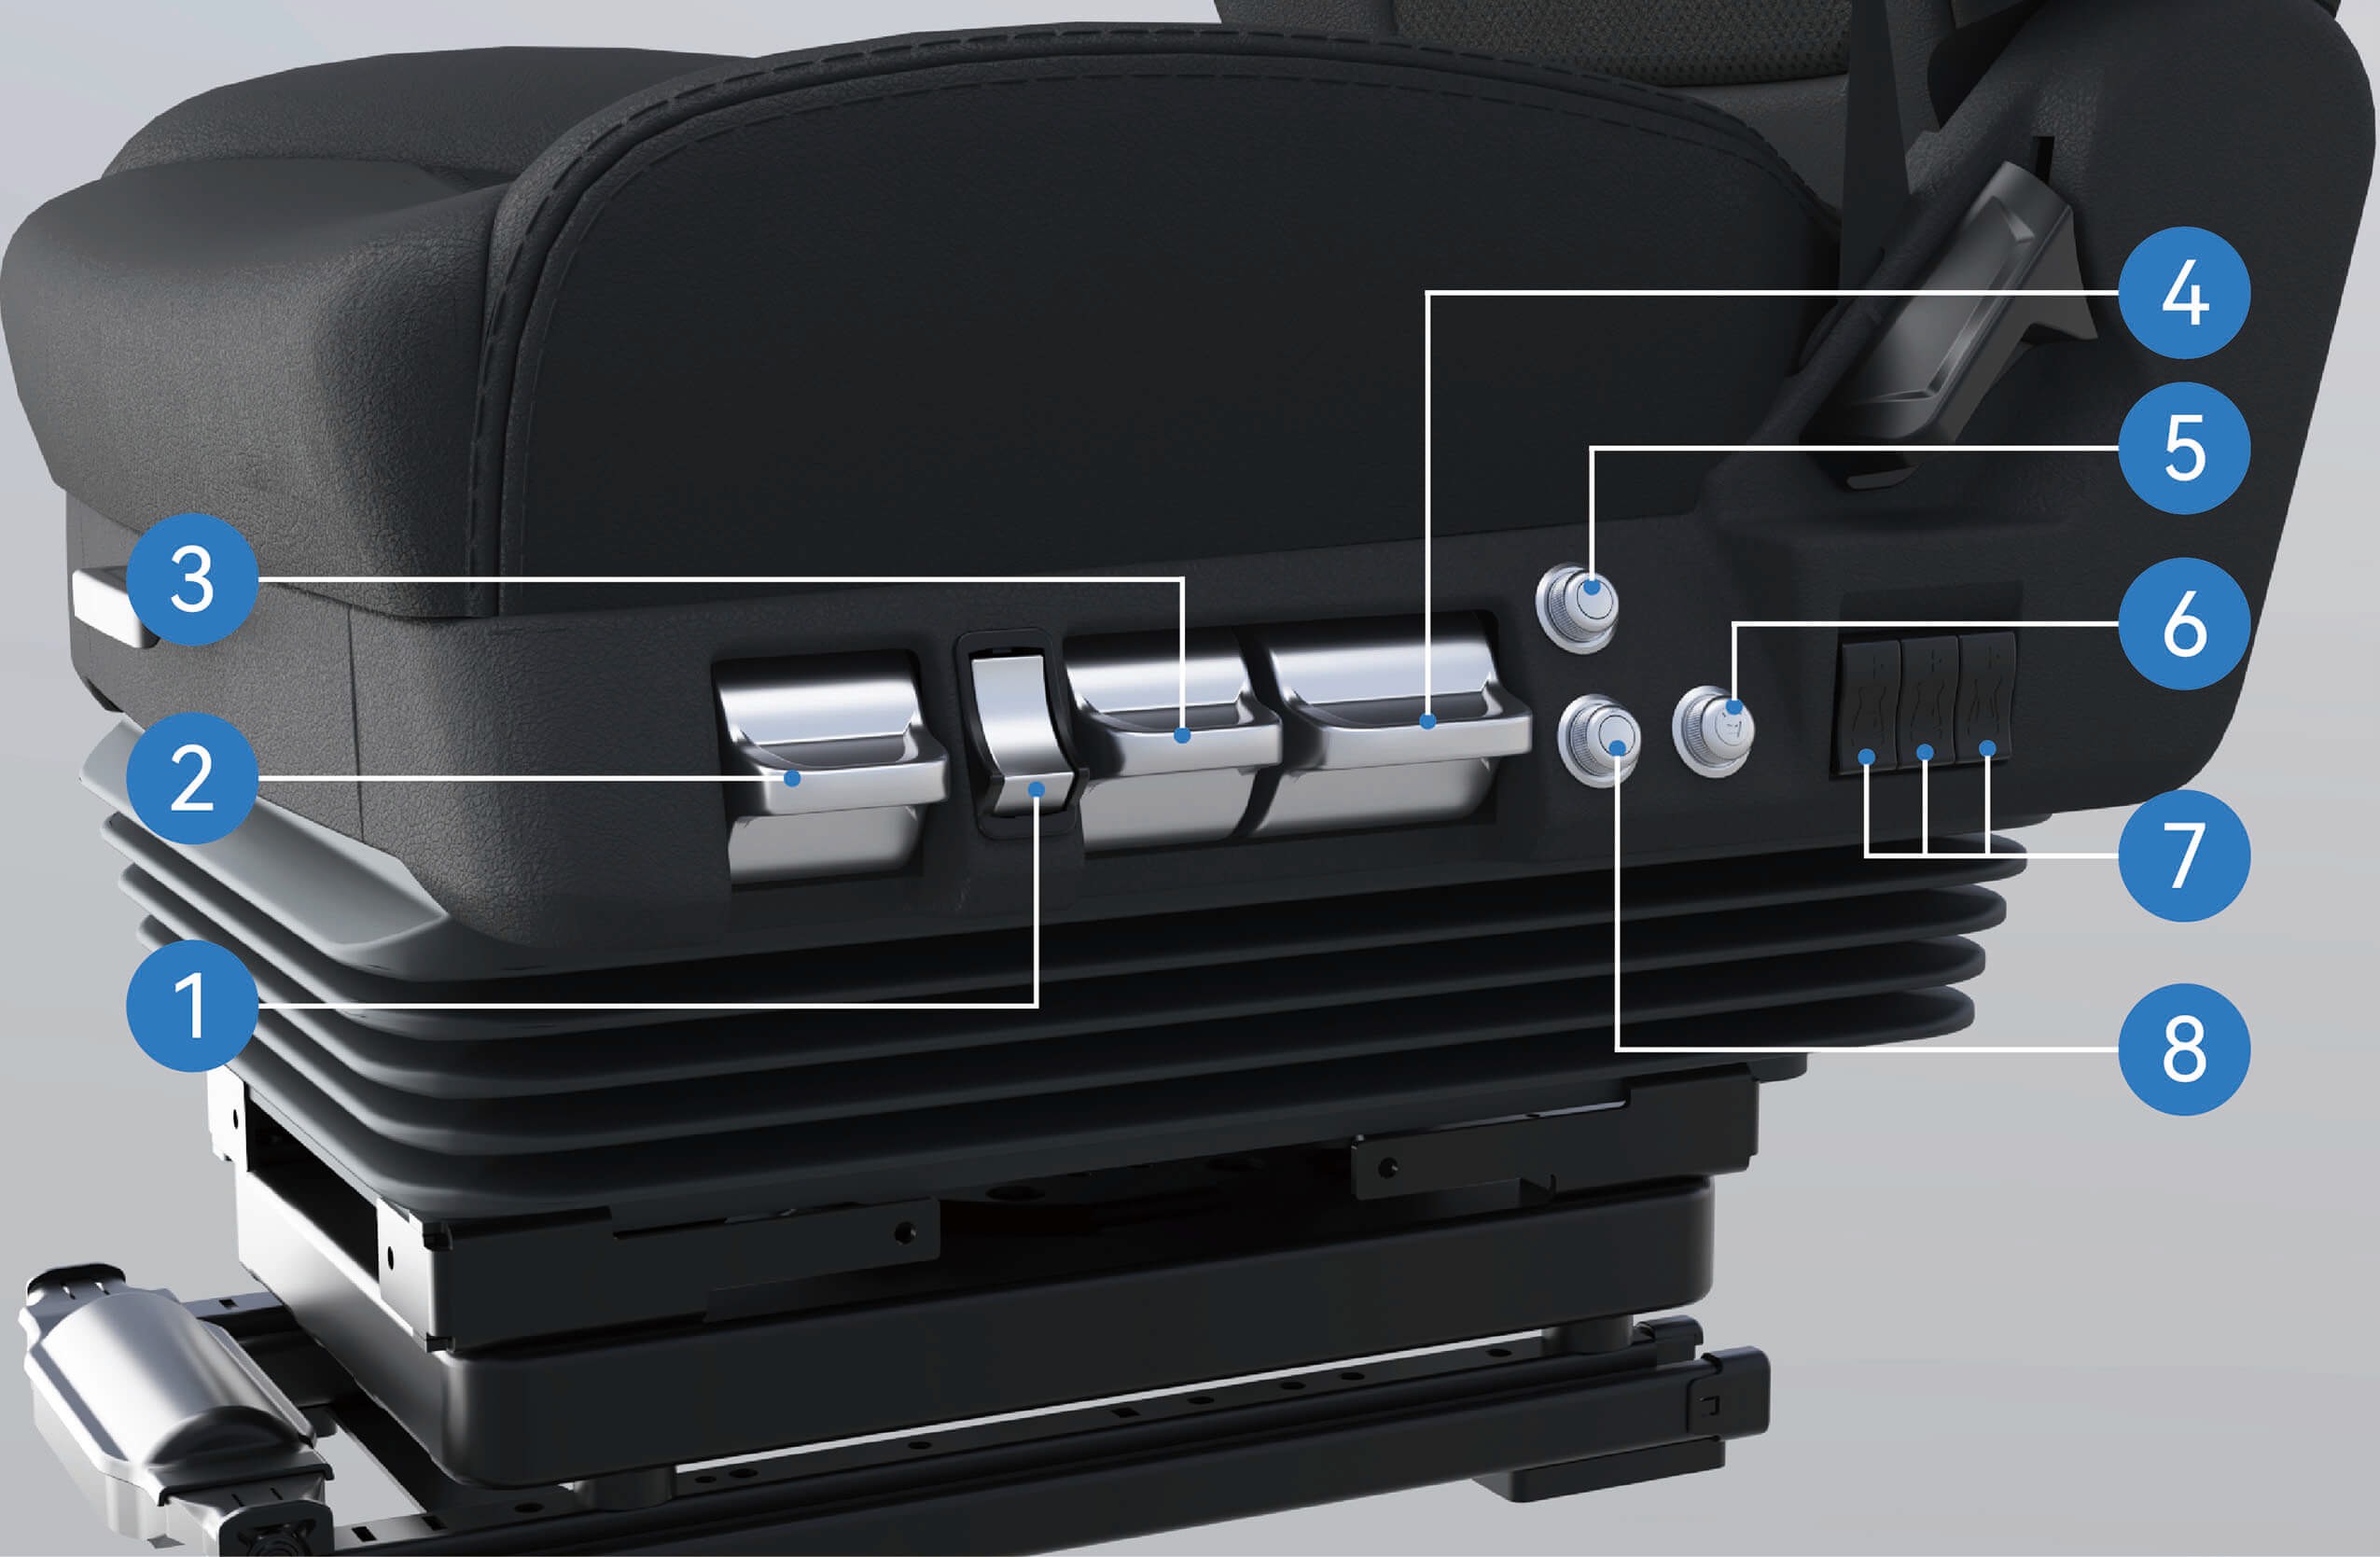
Snabbtömningsknapp för förarsätet Pressthelowerpartofthequickdeflationbuttonandtheseatwilllow- er rapidly; tryck på den övre delen och the sewithout following proper procedures fylls snabbt med luft och höjs till normal användarställning.
Handtag för lutningsjustering av förarsätet
Vrid lutningshandtaget upp eller ned för att ändra sittdynans vertikala lutningsvinkel, och släpp handtaget för att låsa sittdynan när du har hittat en bekväm ställning.
Handtag för dämpningsjustering av förarsätet
Vrid dämpningshandtaget upp eller ned för att justera sätets fasthet.
Handtag för höjdjustering av förarsätet
Toggletheseatheightadjustmenthandleuptoraisetheseat; vrid det ned för att sänka sätet.
Värmebrytare för förarsätet
Vrid sätesvärmebrytaren för att slå på eller av värmefunktionen; brytaren kan ställas in på tre värmenivåer: hög, medel och låg.
Massagebrytare för förarsätet
Vrid sätesmassagebrytaren för att slå på eller av massagefunktionen; brytaren kan ställas in på tre massagelägen: Nivå 1: Zonvis massage nedifrån och upp
Nivå 2: Zonvis massage i nedre området Nivå 3: Zonvis massage i övre området
Knappar för justering av svankstöd på förarsätet
Tryck på den övre delen av knappen för att höja svankstödet; tryck på den nedre delen för att sänka svankstödet.
Ventilationsbrytare för förarsätet
↑ Till toppenVrid sätesventilationsbrytaren för att slå på eller av ventilationsfunktionen; brytaren kan ställas in på tre luftmängdsnivåer: hög, medel och låg.
Försiktighetsåtgärder
Varning
Justera inte sätet medan fordonet är i rörelse, annars kan fordonet förlora kontrollen och olyckor kan uppstå.
Luta inte ryggstödet för långt bakåt, annars ger inte säkerhetsbältet tillräckligt skydd. Till exempel kan personen som använder bältet i ett för långt tillbakalutat säte glida ned under bältet och skadas vid en olycka eller tvärbromsning.
Sätet ska justeras korrekt för att säkerställa att bromspedalen kan tryckas ned på rätt sätt.
Innan körning, skaka förarsätet fram och tillbaka för att kontrollera att det är låst på plats, annars kan skada uppstå vid en olycka eller tvärbromsning.
Innan sätet flyttas, kontrollera att sätets rörelseområde är fritt från hinder, för att undvika skada på föremål eller klämskada på personer.
Anmärkning
Kontrollera att inga andra föremål sitter fast i sätet i förarhytten. Annars kan sätet skadas.
Passagerarsäte fram
↑ Till toppenFörberedelse innan körning
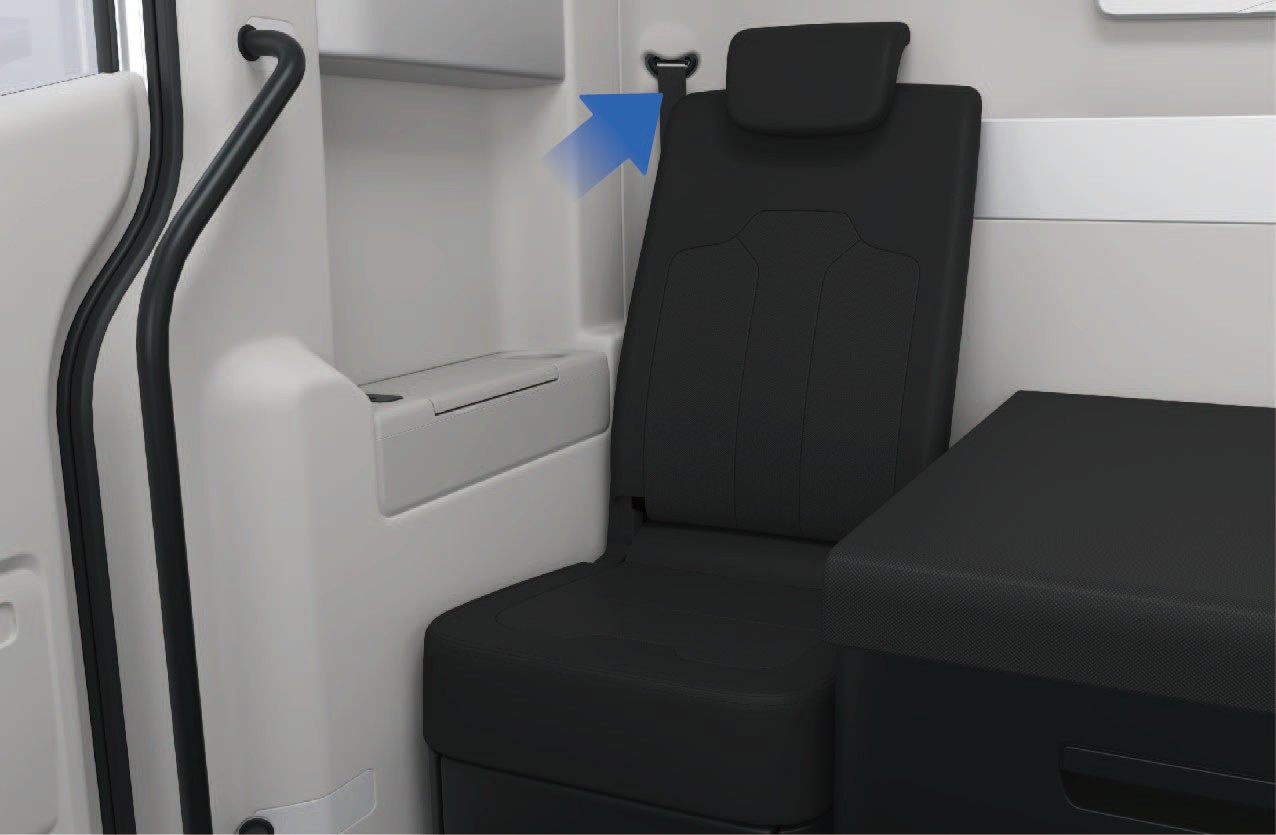
Passagerarsätet fram är placerat på höger sida av britsen i fordonet. Du kan ta av britsens nackstöd och ställa ryggstödet på passagerarsätet fram i lodrät position för att sitta i passagerarsätet fram.
Bruksanvisning
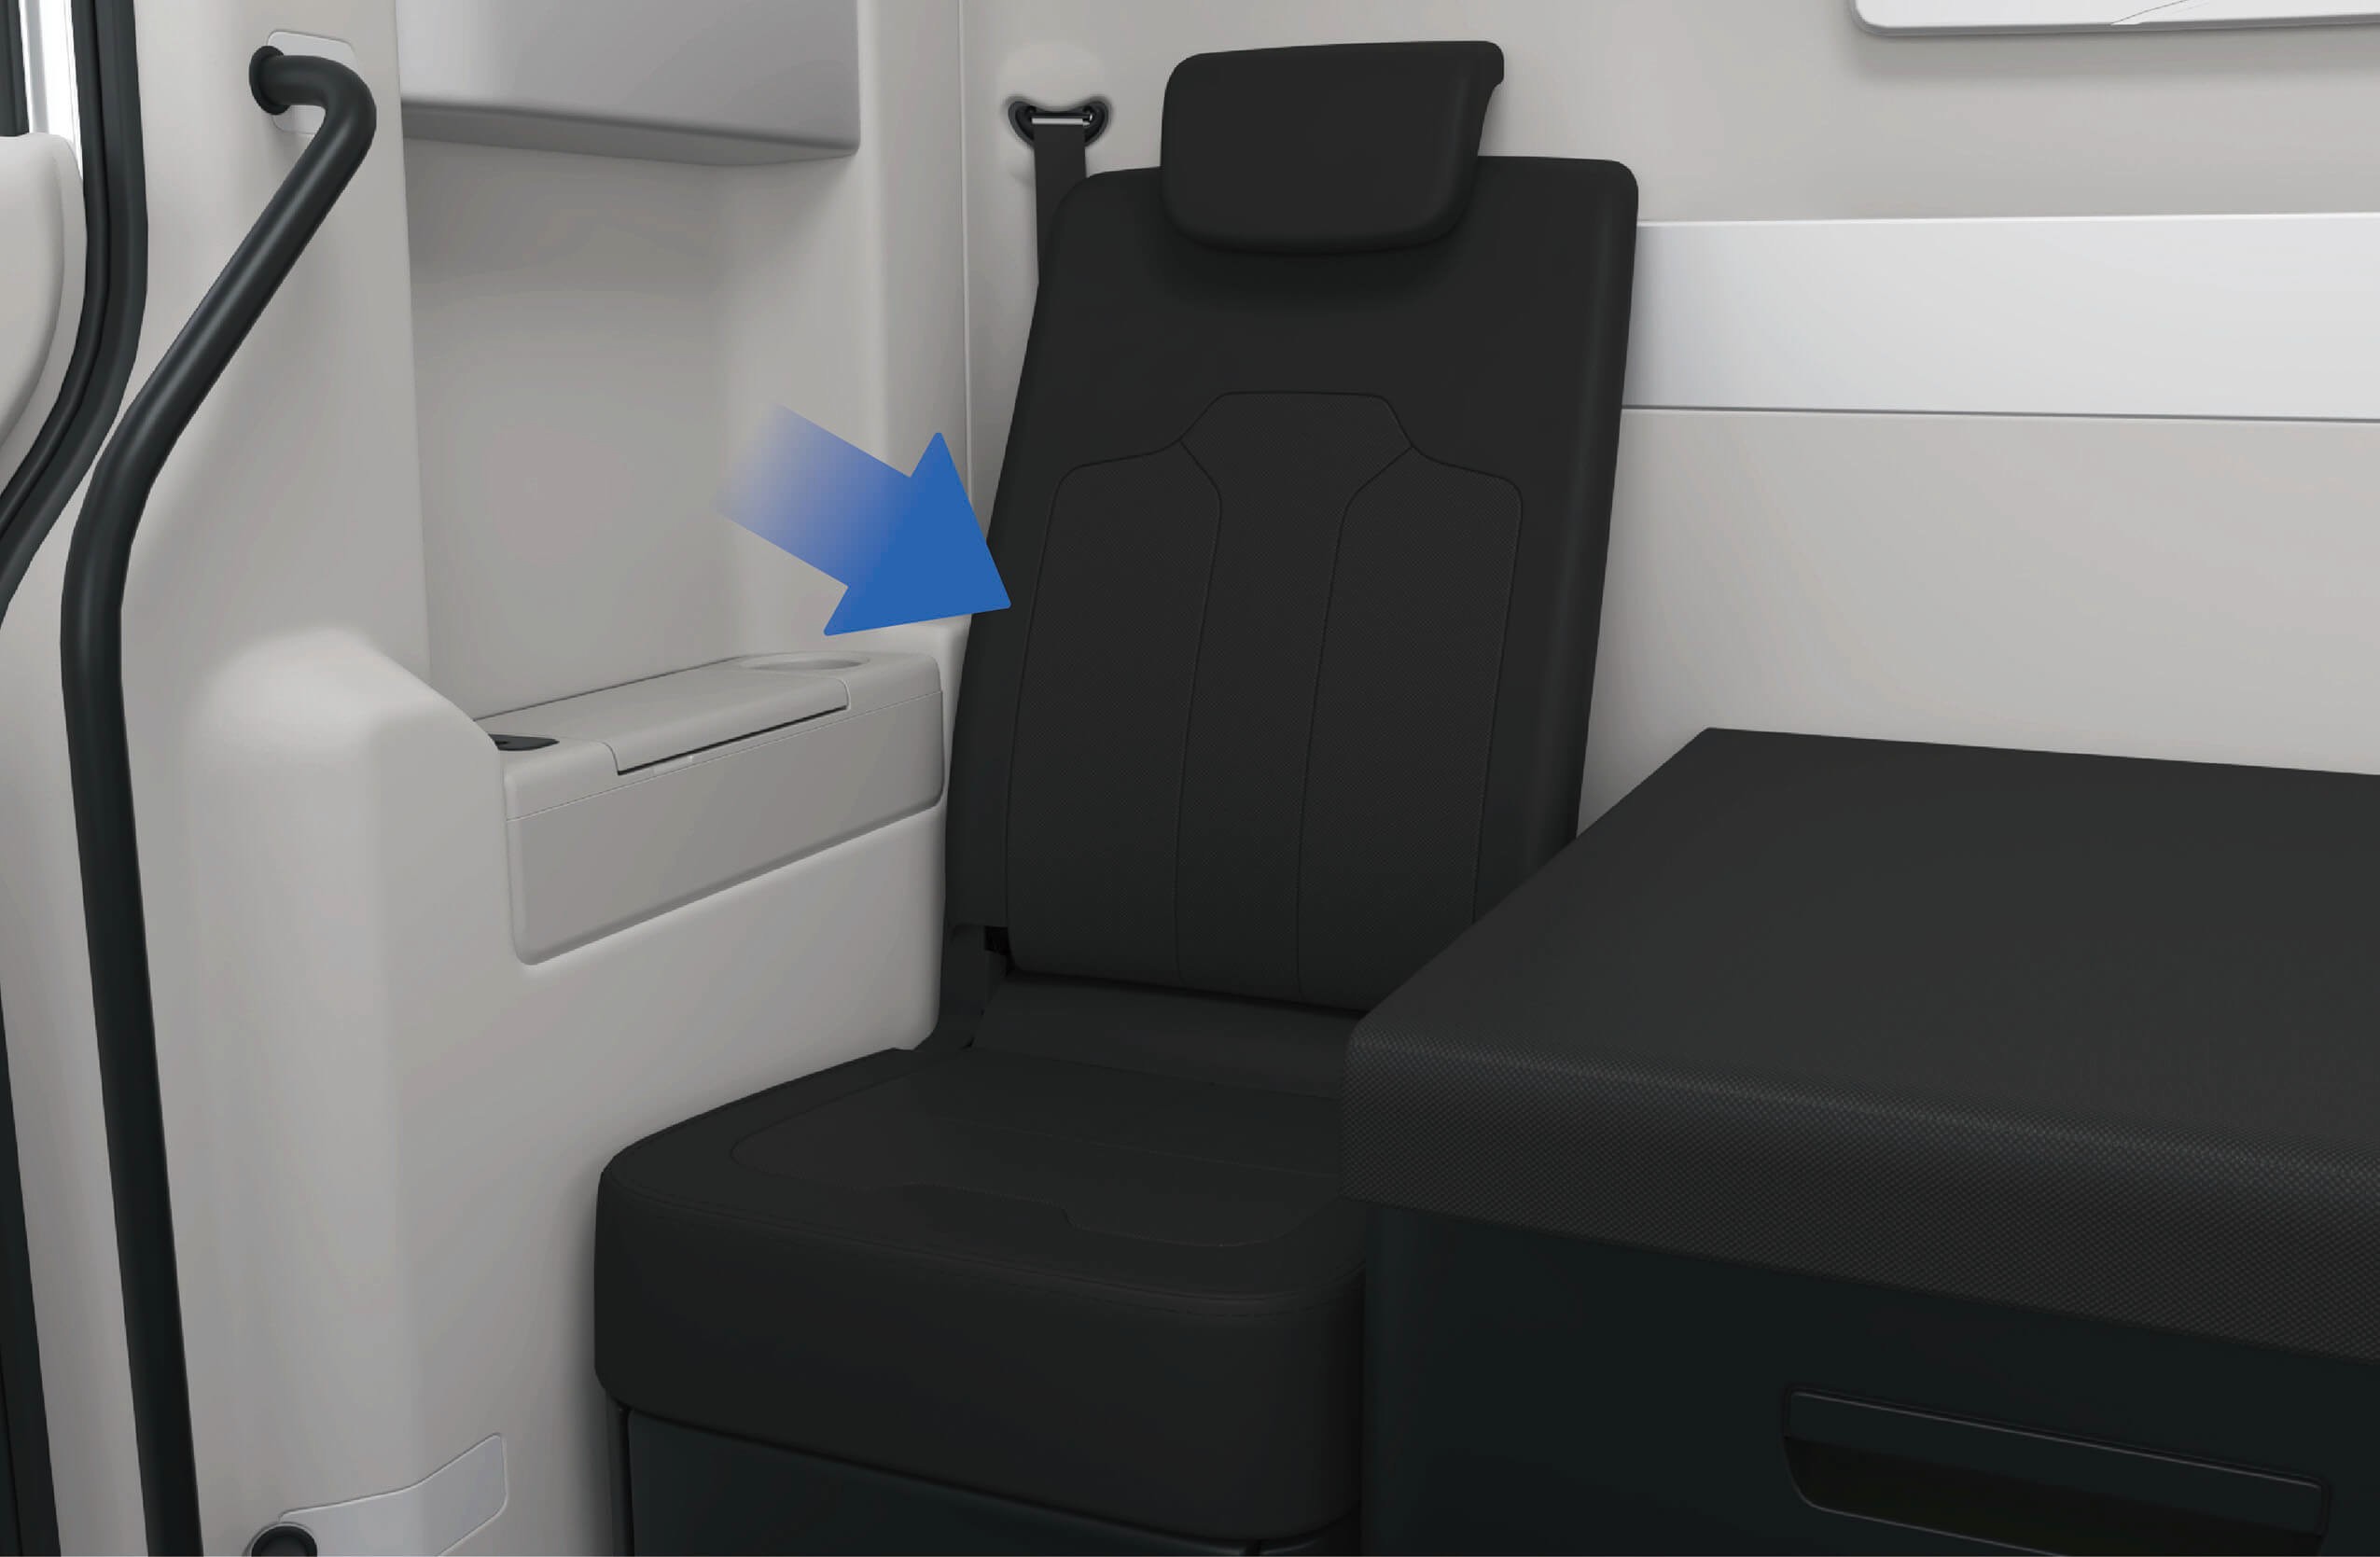
↑ Till toppenFör att använda nackstödet på passagerarsätet fram, lyft nackstödet upp till högsta läget. När du inte behöver nackstödet, tryck ned det. Nackstödet kan endast användas i högsta läget.
För att fälla samman passagerarsätet fram kan du dra i upplåsningsremmen bakom ryggstödet för att låsa upp ryggstödet, och fälla ned det.
Försiktighetsåtgärder
Anmärkning
Vid justering av nackstödet på passagerarsätet fram uppåt, sluta lyfta med kraft om du märker att nackstödet inte kan röra sig mer, för att inte skada nackstödsmekanismen.
Vid fällning av ryggstödet på passagerarsätet fram, kontrollera att det inte ligger föremål på sätet, för att undvika skada på sätesmekanismen när ryggstödet fälls.
↑ Till toppenObservera
NFC-kort
↑ Till toppenFörberedelse innan körning
Fordonet är utrustat med ett NFC-kort som låter dig låsa upp, låsa, slå på och stänga av fordonet.
Bruksanvisning
↑ Till toppenHåll NFC-kortet mitt på ytan av det infällda dörrhandtaget, så tänds lampan i dörrhandtaget och fordonets blinkers blinkar en gång samtidigt för att visa att upplåsningen lyckades. Håll NFC-kortet mot ytan av det
infällda dörrhandtaget på nytt, så släcks lampan i dörrhandtaget och fordonets blinkers blinkar två gånger samtidigt för att visa att låsningen lyckades.
Efter att fordonet har låsts upp, kan du hålla NFC-kortet mot den angivna avläsningspunkten på höger del av instrumentpanelen för att slå på fordonet.
För att stänga av fordonet kan du antingen klicka på «Power OFF» på fordonets informationsskärm eller hålla NFC-kortet mot den angivna avläsningspunkten på höger del av instrumentpanelen.
Försiktighetsåtgärder
Anmärkning
Böj, vrid eller klipp inte NFC-kortet.
Placera inte NFC-kortet på platser med hög temperatur, fukt eller starka vibrationer.
Lägg inte NFC-kortet på trådlösa laddare för hushållsbruk, för att undvika skada.
Lägg inte NFC-kortet i telefonfodralet, för att undvika att skada kortet när det kommer i kontakt med den trådlösa laddaren.
Lämna inte NFC-kortet exponerat i fordonet, för att undvika deformation och fel på kortet.
Använd inte samma korttyp (bankkort, resekort, ID-kort eller passerkort osv.) tillsammans med NFC-kortet (ovanpå varandra, avläsning samtidigt osv.).
Observera
Vid upplåsning/låsning av fordonet med NFC-kort bör fordonet stå stilla, och du håller NFC-kortet mot ytan av det infällda dörrhandtaget.
Efter avläsning bör du ta bort NFC-kortet från avläsningspunkten i tid för att förhindra att avläsningen utlöses upprepade gånger.
Om ytan av det infällda dörrhandtaget är nedsmutsad av smuts eller frost, kan avläsningen av NFC-kortet påverkas, så att upplåsning/låsning av fordonet misslyckas.
Om ett NFC-kort tappas bort eller fler brickor måste beställas, kontakta Windrose servicetelefon.
Mekanisk nyckel
↑ Till toppenFörberedelse innan körning
Om fordonet under vissa speciella omständigheter inte kan låsas upp med digital nyckel och NFC-kort, kan du använda den mekaniska nyckeln för att låsa upp fordonet i en nödsituation.
När du trycker på den främre änden av det infällda dörrhandtaget, fälls den bakre änden ut. Då kan du dra ut hela det infällda dörrhandtaget och hålla det med fingrarna.
2. Sätt in den mekaniska nyckeln i dörrlåset under det infällda dörrhandtaget och vrid nyckeln åt höger för att låsa upp fordonet.
Anmärkning
- När du drar ut det infällda dörrhandtaget, håll det vågrätt för att förhindra att den främre änden kommer i kontakt med dörren och skadar lacken.
Förvara den mekaniska nyckeln säkert för att undvika att tappa bort den, vilket skulle leda till att fordonet inte kan låsas upp i en nödsituation.
Justering av ratt
↑ Till toppenFörberedelse innan körning
Ratten kan justeras framåt, bakåt, upp och ned för att passa dina körbehov.
Justera aldrig ratten under körning, för att undvika olyckor.
Efter justering av rattpositionen, kontrollera att ratten är låst, annars kan det leda till personskada eller dödsfall och materiella skador.
Knappar på ratten
Förberedelse innan körning
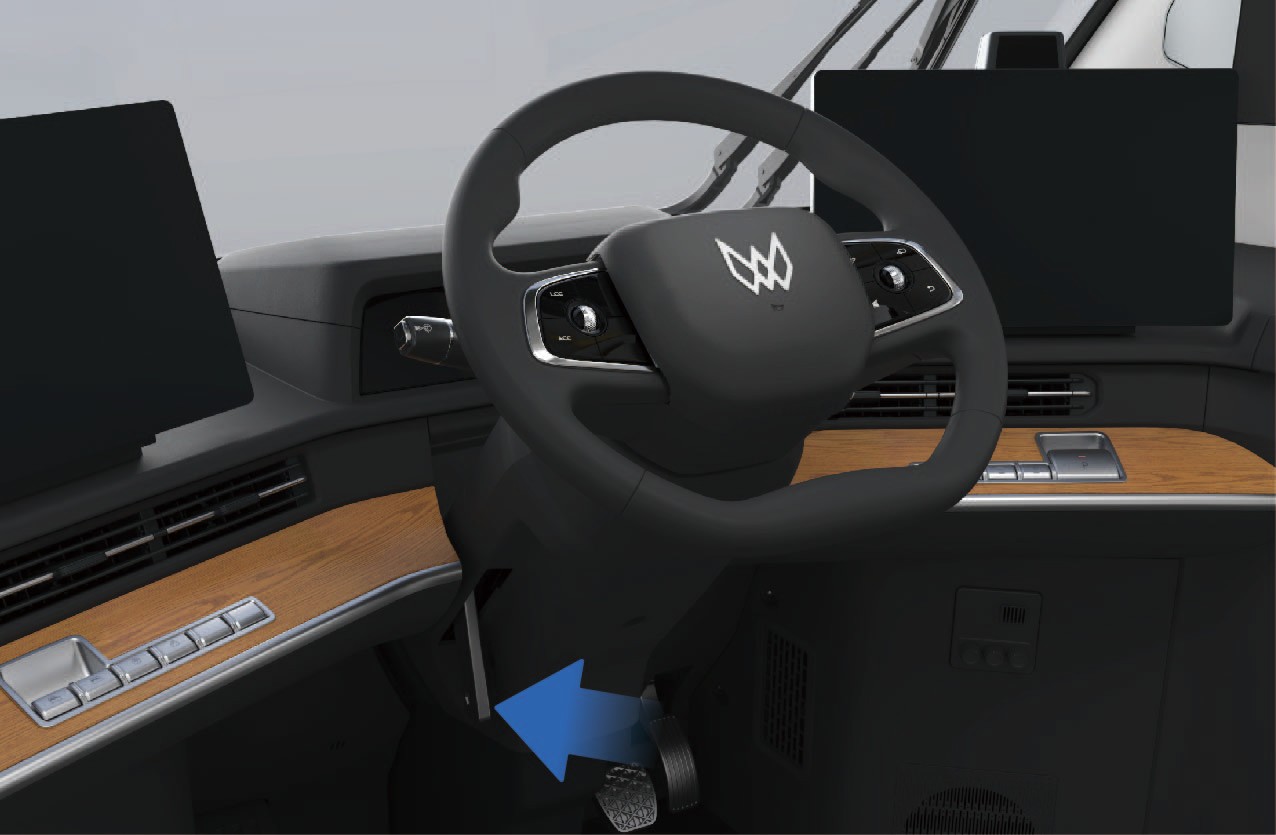
Dra upp justeringshandtaget för ratten för att låsa upp ratten.
Justera rattens höjd och avstånd till din kropp manuellt efter behov.
När justeringen är klar, tryck justeringshandtaget nedåt för att låsa ratten.
Funktionsbeskrivning
↑ Till toppenFordonet är utrustat med en multifunktionsratt som låter dig enkelt styra vissa funktioner i fordonet.
Bruksanvisning
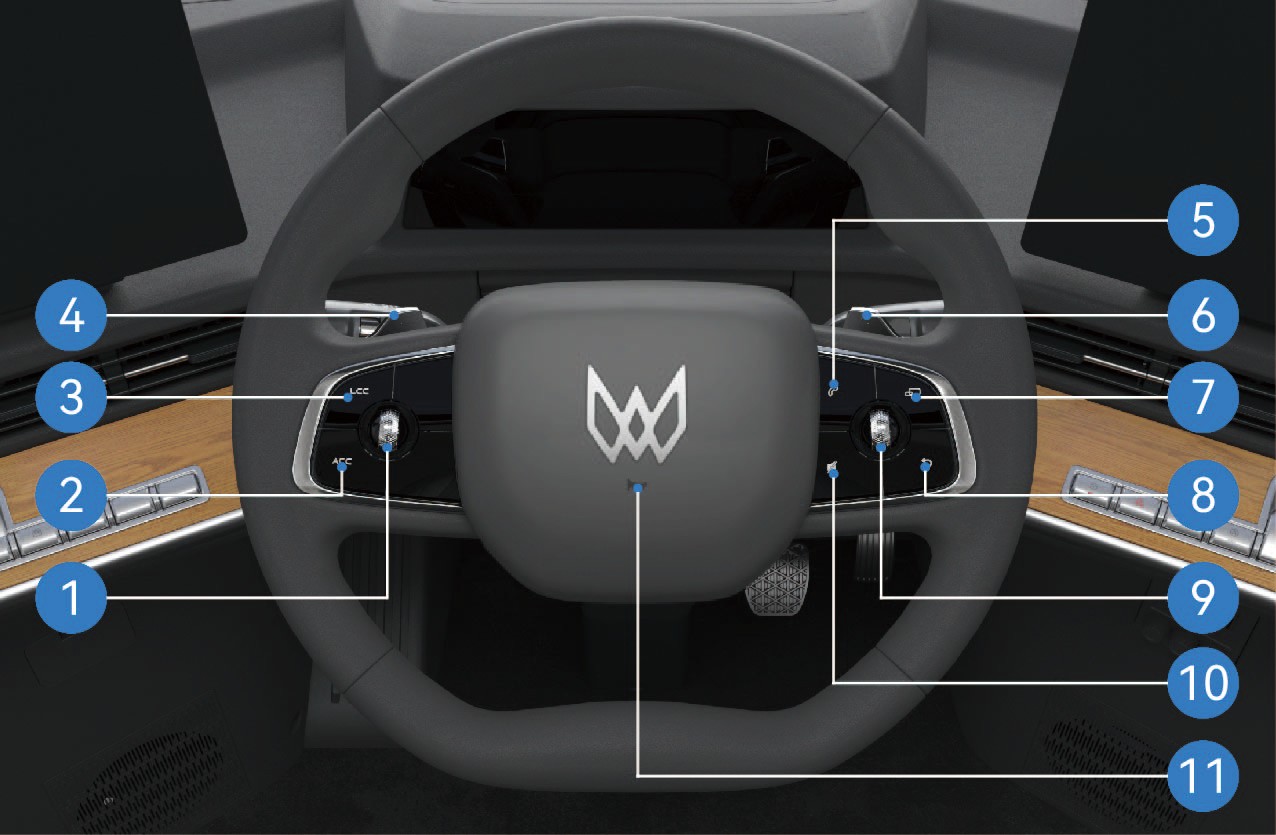
Knapp för bekräftelse samt avstånds- och hastighetsjustering
Vrid rullhjulet åt vänster för att minska följeavståndet i cruise-läge. Vrid rullhjulet åt höger för att öka följeavståndet i cruise-läge.
Vrid rullhjulet uppåt för att öka hastigheten i cruise-läge. Vrid rullhjulet nedåt för att minska hastigheten i cruise-läge.
Tryck mitt på rullhjulet för att bekräfta det valda målet.
Aktivering av adaptiv farthållare (ACC)
Tryck en gång för att aktivera ACC-funktionen. Tryck igen för att stänga av ACC-funktionen.
Aktivering av filcentreringsstyrning (LCC)*
Tryck en gång för att aktivera LCC-funktionen. Tryck igen för att stänga av LCC-funktionen.
Paddel för regenerativ bromsning (vänster)
Vrid vänster paddel för det kinetiska regenerativa bromssystemet (KERS) för att minska fordonets regenerativa bromsstyrka.
Bluetooth-telefon
Tryck en gång för att svara på ett Bluetooth-samtal.
Tryck och håll för att lägga på eller ringa.
Paddel för regenerativ bromsning (höger)
Vrid höger paddel för det kinetiska regenerativa bromssystemet (KERS) för att öka fordonets regenerativa bromsstyrka.
MODE-funktion
Tryck på denna knapp för att växla mellan radio, musik och video.
Tillbaka
Tryck på denna knapp för att gå tillbaka till föregående gränssnitt på den senast använda informationsskärmen. För att byta till
en annan informationsskärm, vidrör den aktuella informationsskärmen manuellt.
Multimediastyrning
Vrid rullhjulet åt vänster för att gå till föregående multimediafunktion. Vrid rullhjulet åt höger för att gå till nästa multimediafunktion.
Vrid rullhjulet uppåt för att öka volymen för den valda multimediafunktionen. Vrid rullhjulet nedåt för att minska volymen.
Tryck mitt på rullhjulet för att bekräfta det valda i den aktuella medielistan.
Ljud av
Tryck en gång för att slå på ljudlöst. Tryck igen för att slå på ljudet igen.
Signalhorn
↑ Till toppenTryck mitt på ratten för att använda signalhornet.
Du kan klicka på «Inside» i «Control Center»-gränssnittet på fordonets informationsskärm för att välja signalhornstyp.

Försiktighetsåtgärder
↑ Till toppenObserveraPlacera fingrarna i en lämplig position för att undvika att knappen blir svår att nå eller använda.
Översikt över instrumentpanelen
Förberedelse innan körning

Varvräknare 5. Körläge 9. Aktuell växel 13.Momentan strömförbrukning per 100 km
Beräknad räckvidd 6. Högspänningsbatteriets kapacitet 10. Nivåer för energiåtervinning
Vägmätare (total sträcka) 7. Aktuell hastighet 11. Andel momentan
drivkraft
Utetemperatur 8. Fordonet är klart 12.Genomsnittlig strömförbrukning
per 100 km
Du kan välja «Windrose» i «Control Center»-gränssnittet på fordonets informationsskärm för att välja dag-, natt- eller autoläge.
Dagläge: Grundfärgen i kombiinstrumentet är vit.
Nattläge: Grundfärgen i kombiinstrumentet är svart.
Autoläge: Systemet växlar automatiskt mellan dag- och nattläge baserat på ljuset utomhus.
↑ Till toppenAnmärkningBilderna i kombiinstrumentets gränssnitt är endast schematiska och avsedda som referens. Se det faktiska fordonet.
Indikatorer och varningslampor
Förberedelse innan körning
|
|
|
|---|---|---|
|
|
|
|
|
|
|
|
|
|
|
|
|
|
|
|
|
|
|
|
|
|
|
|
|
|


|
|
|
|---|---|---|
|
|
|
|
|
|
|
|
|
|
|
|
|
|
|
|
|
|
|
|
|
|
|
|
|
|
|
|
|


|
|
|
|---|---|---|
|
|
|
|
|
|
|
|
|
|
|
|
|
|
|
|
|
|
|
|
|
|
|
|
|
|
|
|
|


|
|
|
|---|---|---|
|
|
|
|
|
|
|
|
|
|
|
|
|
|
|
|
|
|
|
|
|
|
|
|
|
|
|
|
|


|
|
|
|---|---|---|
|
|
|
|
|
|
|
|
|
|
|
|
|
|
|
|
|
|
|
|
|
|
|
|
|
|
|
|
|


|
|
|
|---|---|---|
|
|
|
|
|
|
|
|
|
|
|
|
|
|
|
|
|
|
|
|
|
|
|
|
|
|
|
|
|


|
|
|
|---|---|---|
|
|
|
|
|
|
|
|
|
|
|
|
|
|
|
|
|
|
|
|
|
|
|
|
|
|
|
|
|


|
|
|
|---|---|---|
|
|
|
|
|
|
|
|
|
|
|
|
|
|
|
|
|
|
|
/ | |
|
/ | |
|
/ | |
|
/ |


|
|
|
|---|---|---|
|
/ | |
|
/ |

When the vehicle is powered on, some warning lamps will be illuminated for self-test and go out after a few seconds. If the warning lamp remains illuminated or gets illuminated during driving due to a fault, you should attach importance to this phenomenon and contact a Windrose authorised service centre as soon as possible to avoid accidents which may lead to personal injury or property damage.
If the warning lamp remains illuminated after the vehicle is powered on, or gets illuminated during driving, it indicates that the vehicle may be subject to a serious fault. In this case, contact a Windrose authorised service centre immediately.
↑ Till toppenThe black icons in the table will change between black and white according to the background in the instrument cluster display.
Manövrering av vindrutetorkare
↑ Till toppenFörberedelse innan körning
When you release the windscreen washing button, the water spraying will stop immediately, and the wiper will reset after three wipes. When you press and release the windscreen washing button, the washer does not spray water, and the
You control the functions of wipers on the vehicle through the
combination switch handle on the left side of the steering wheel.
Bruksanvisning
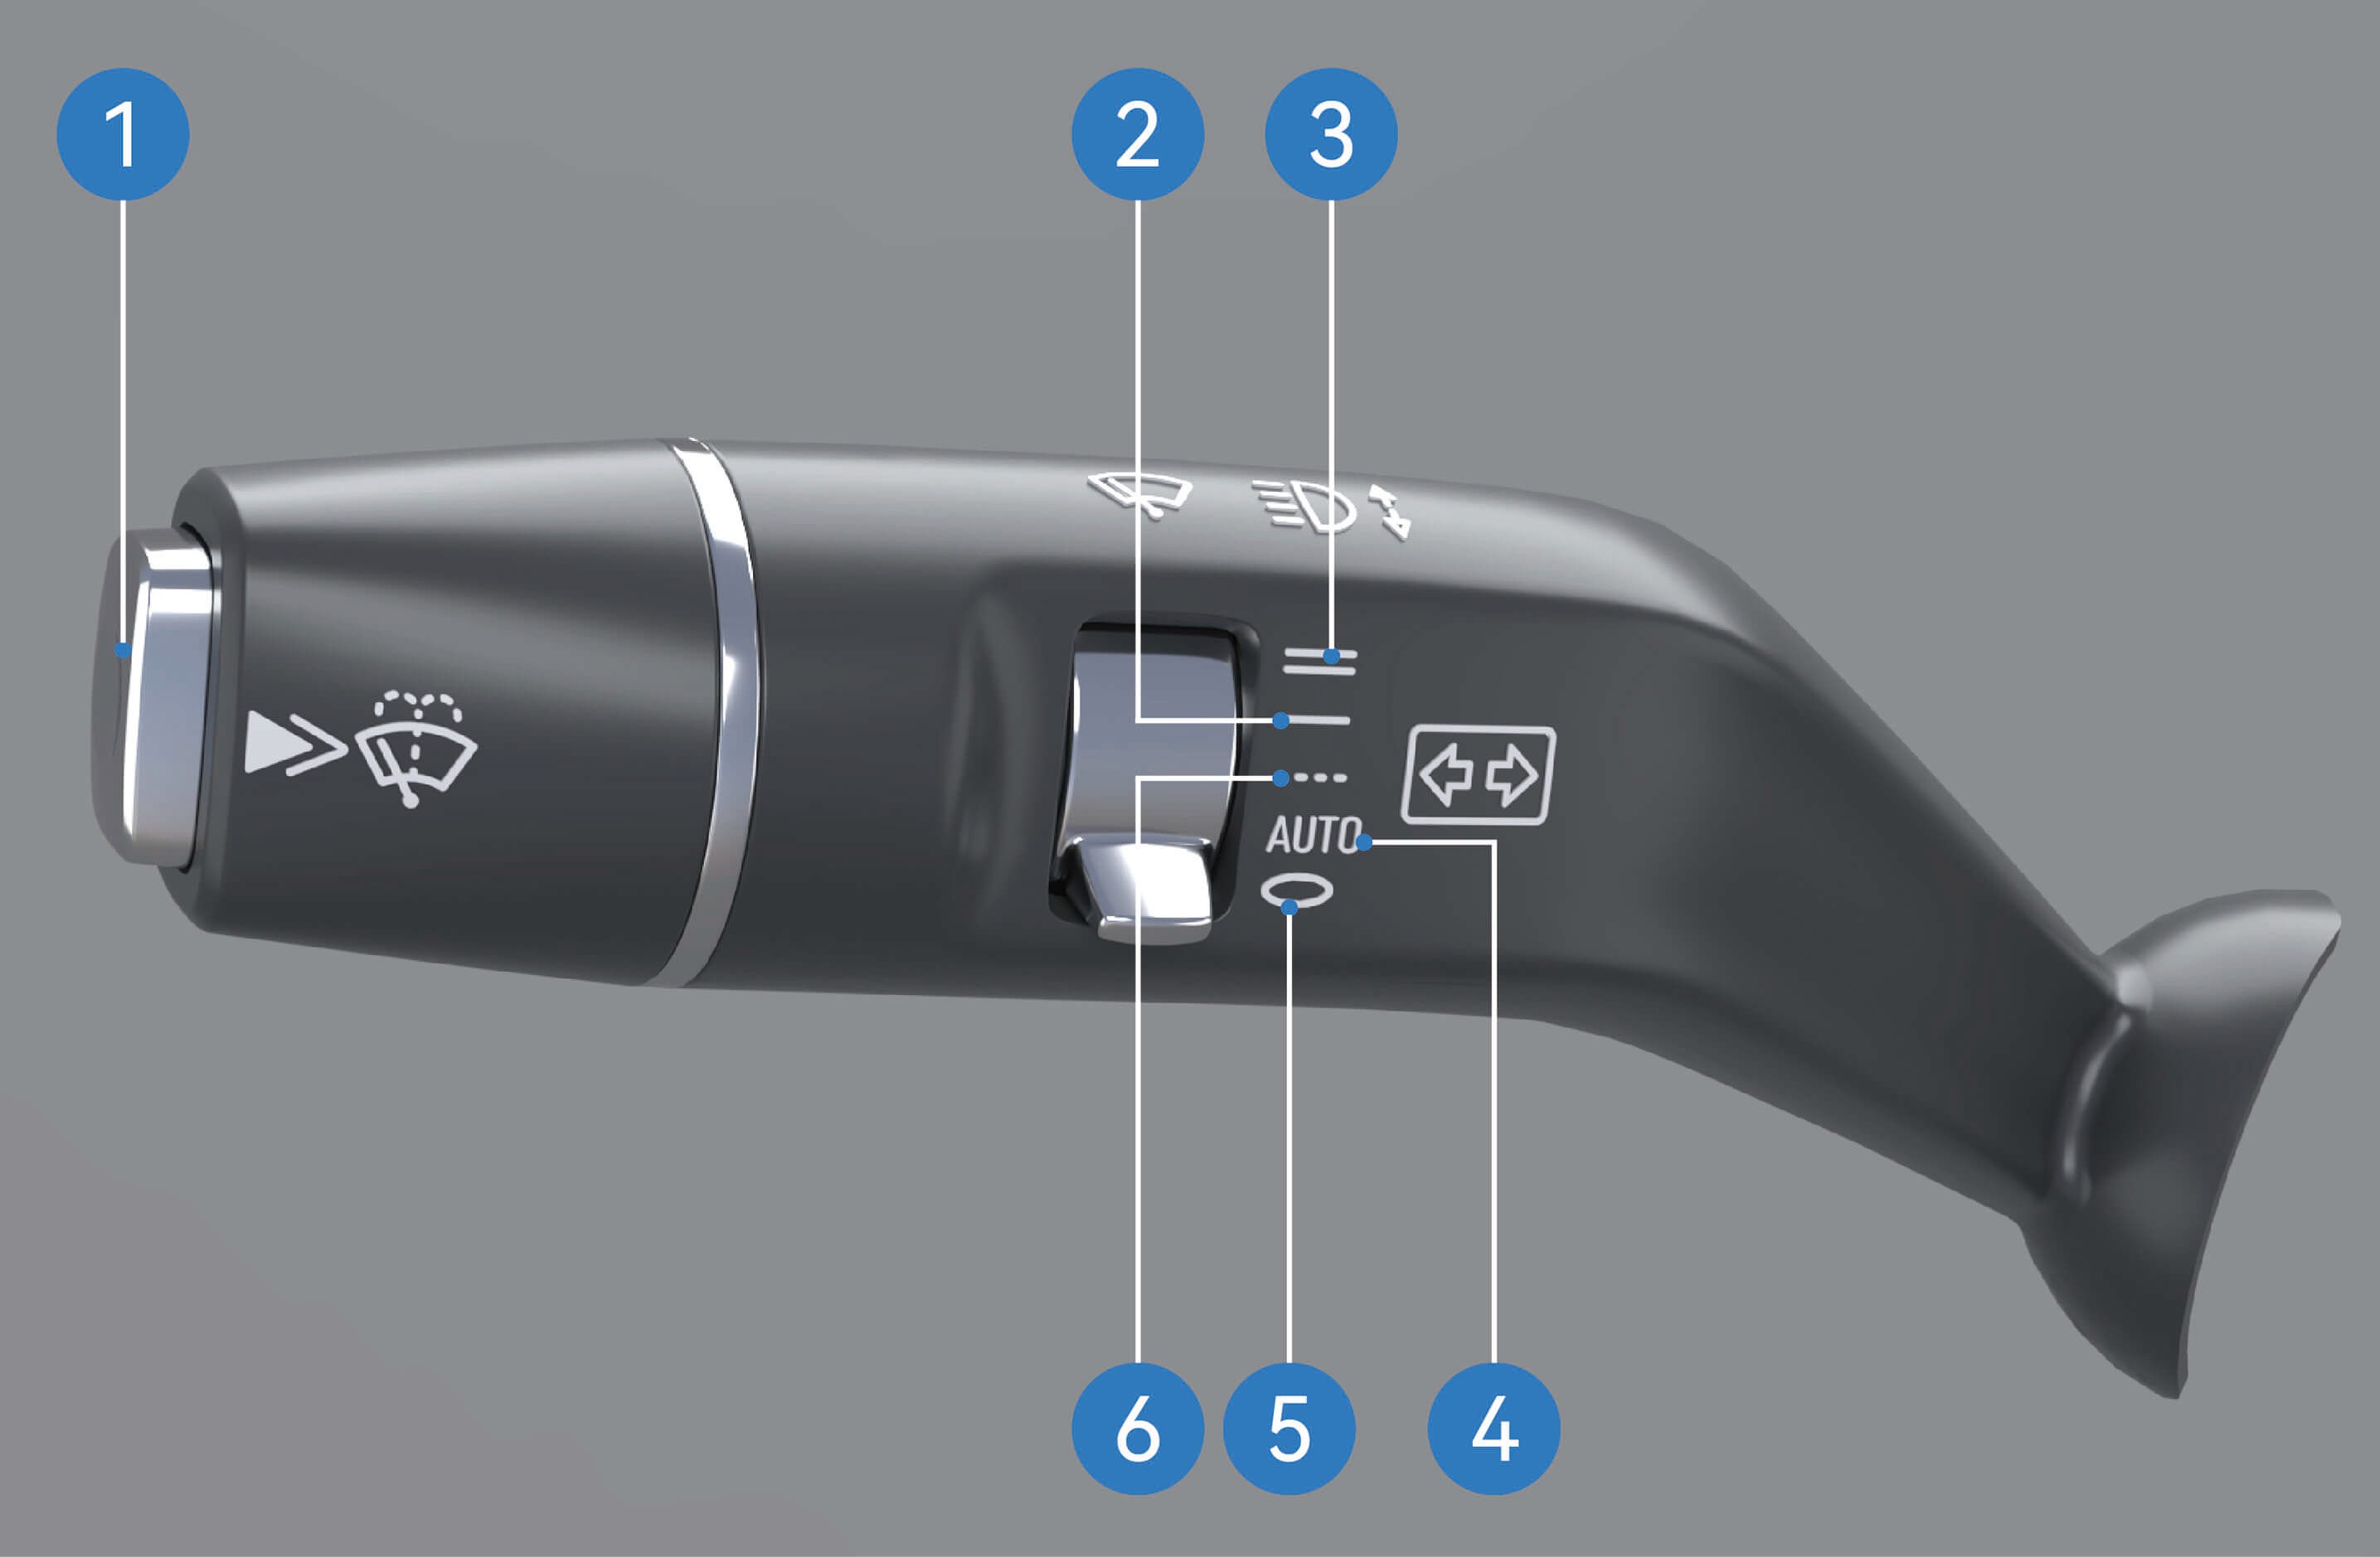
Windscreen washing: Press and hold the windscreen washing button to enter the washing mode. In this mode, the washer will keep spraying water, and the wiper will wipe continuously.
wiper will be reset after one wipe.
Low-speed continuous wiping: Move the wiper blade to this position, and the wiper will enter low-speed continuous wiping mode.
High-speed continuous wiping: Move the wiper blade to this position, and the wiper will enter high-speed continuous wiping mode.
Auto wiping: Move the wiper blade to this position, and the wiper will enter auto wiping mode.
Wiper OFF: Move the wiper blade to this position, and the wiper will be in off mode.
Intermittent wiping: Move the wiper blade to this position, and the wiper will enter intermittent wiping mode, in which you can adjust the intermittent wiping frequency of the wiper in the vehicle information screen.
↑ Till toppen
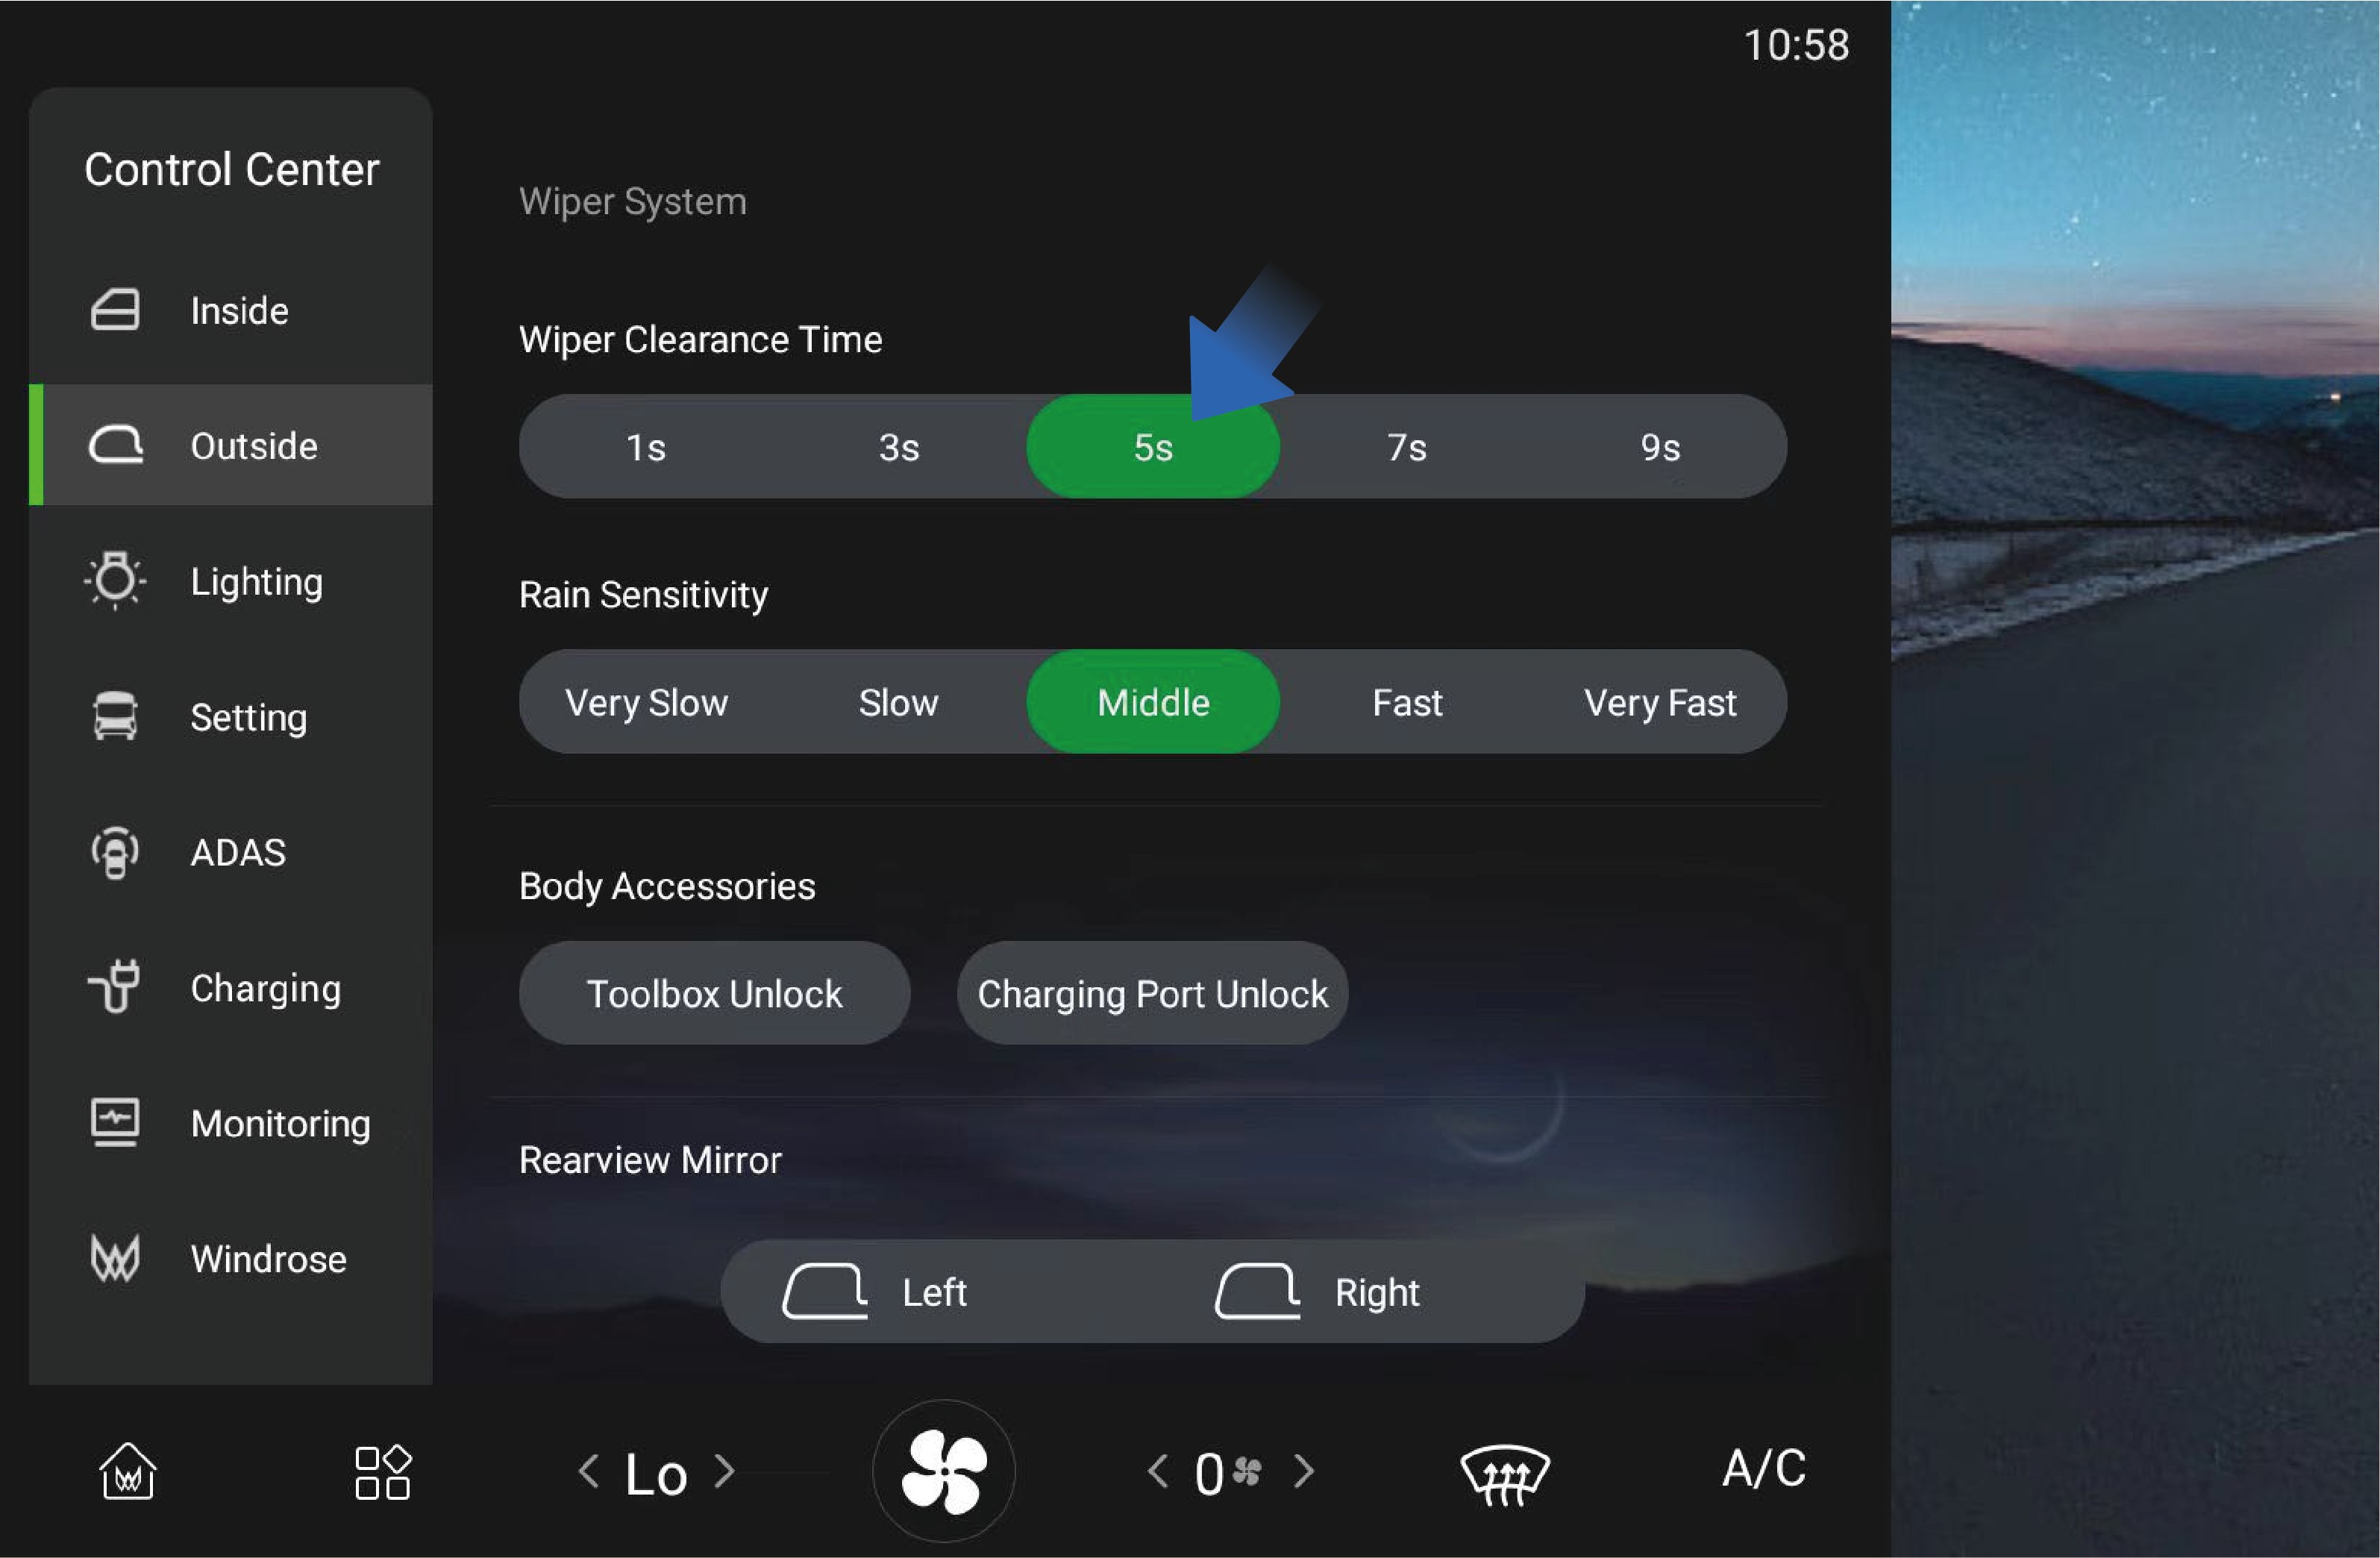
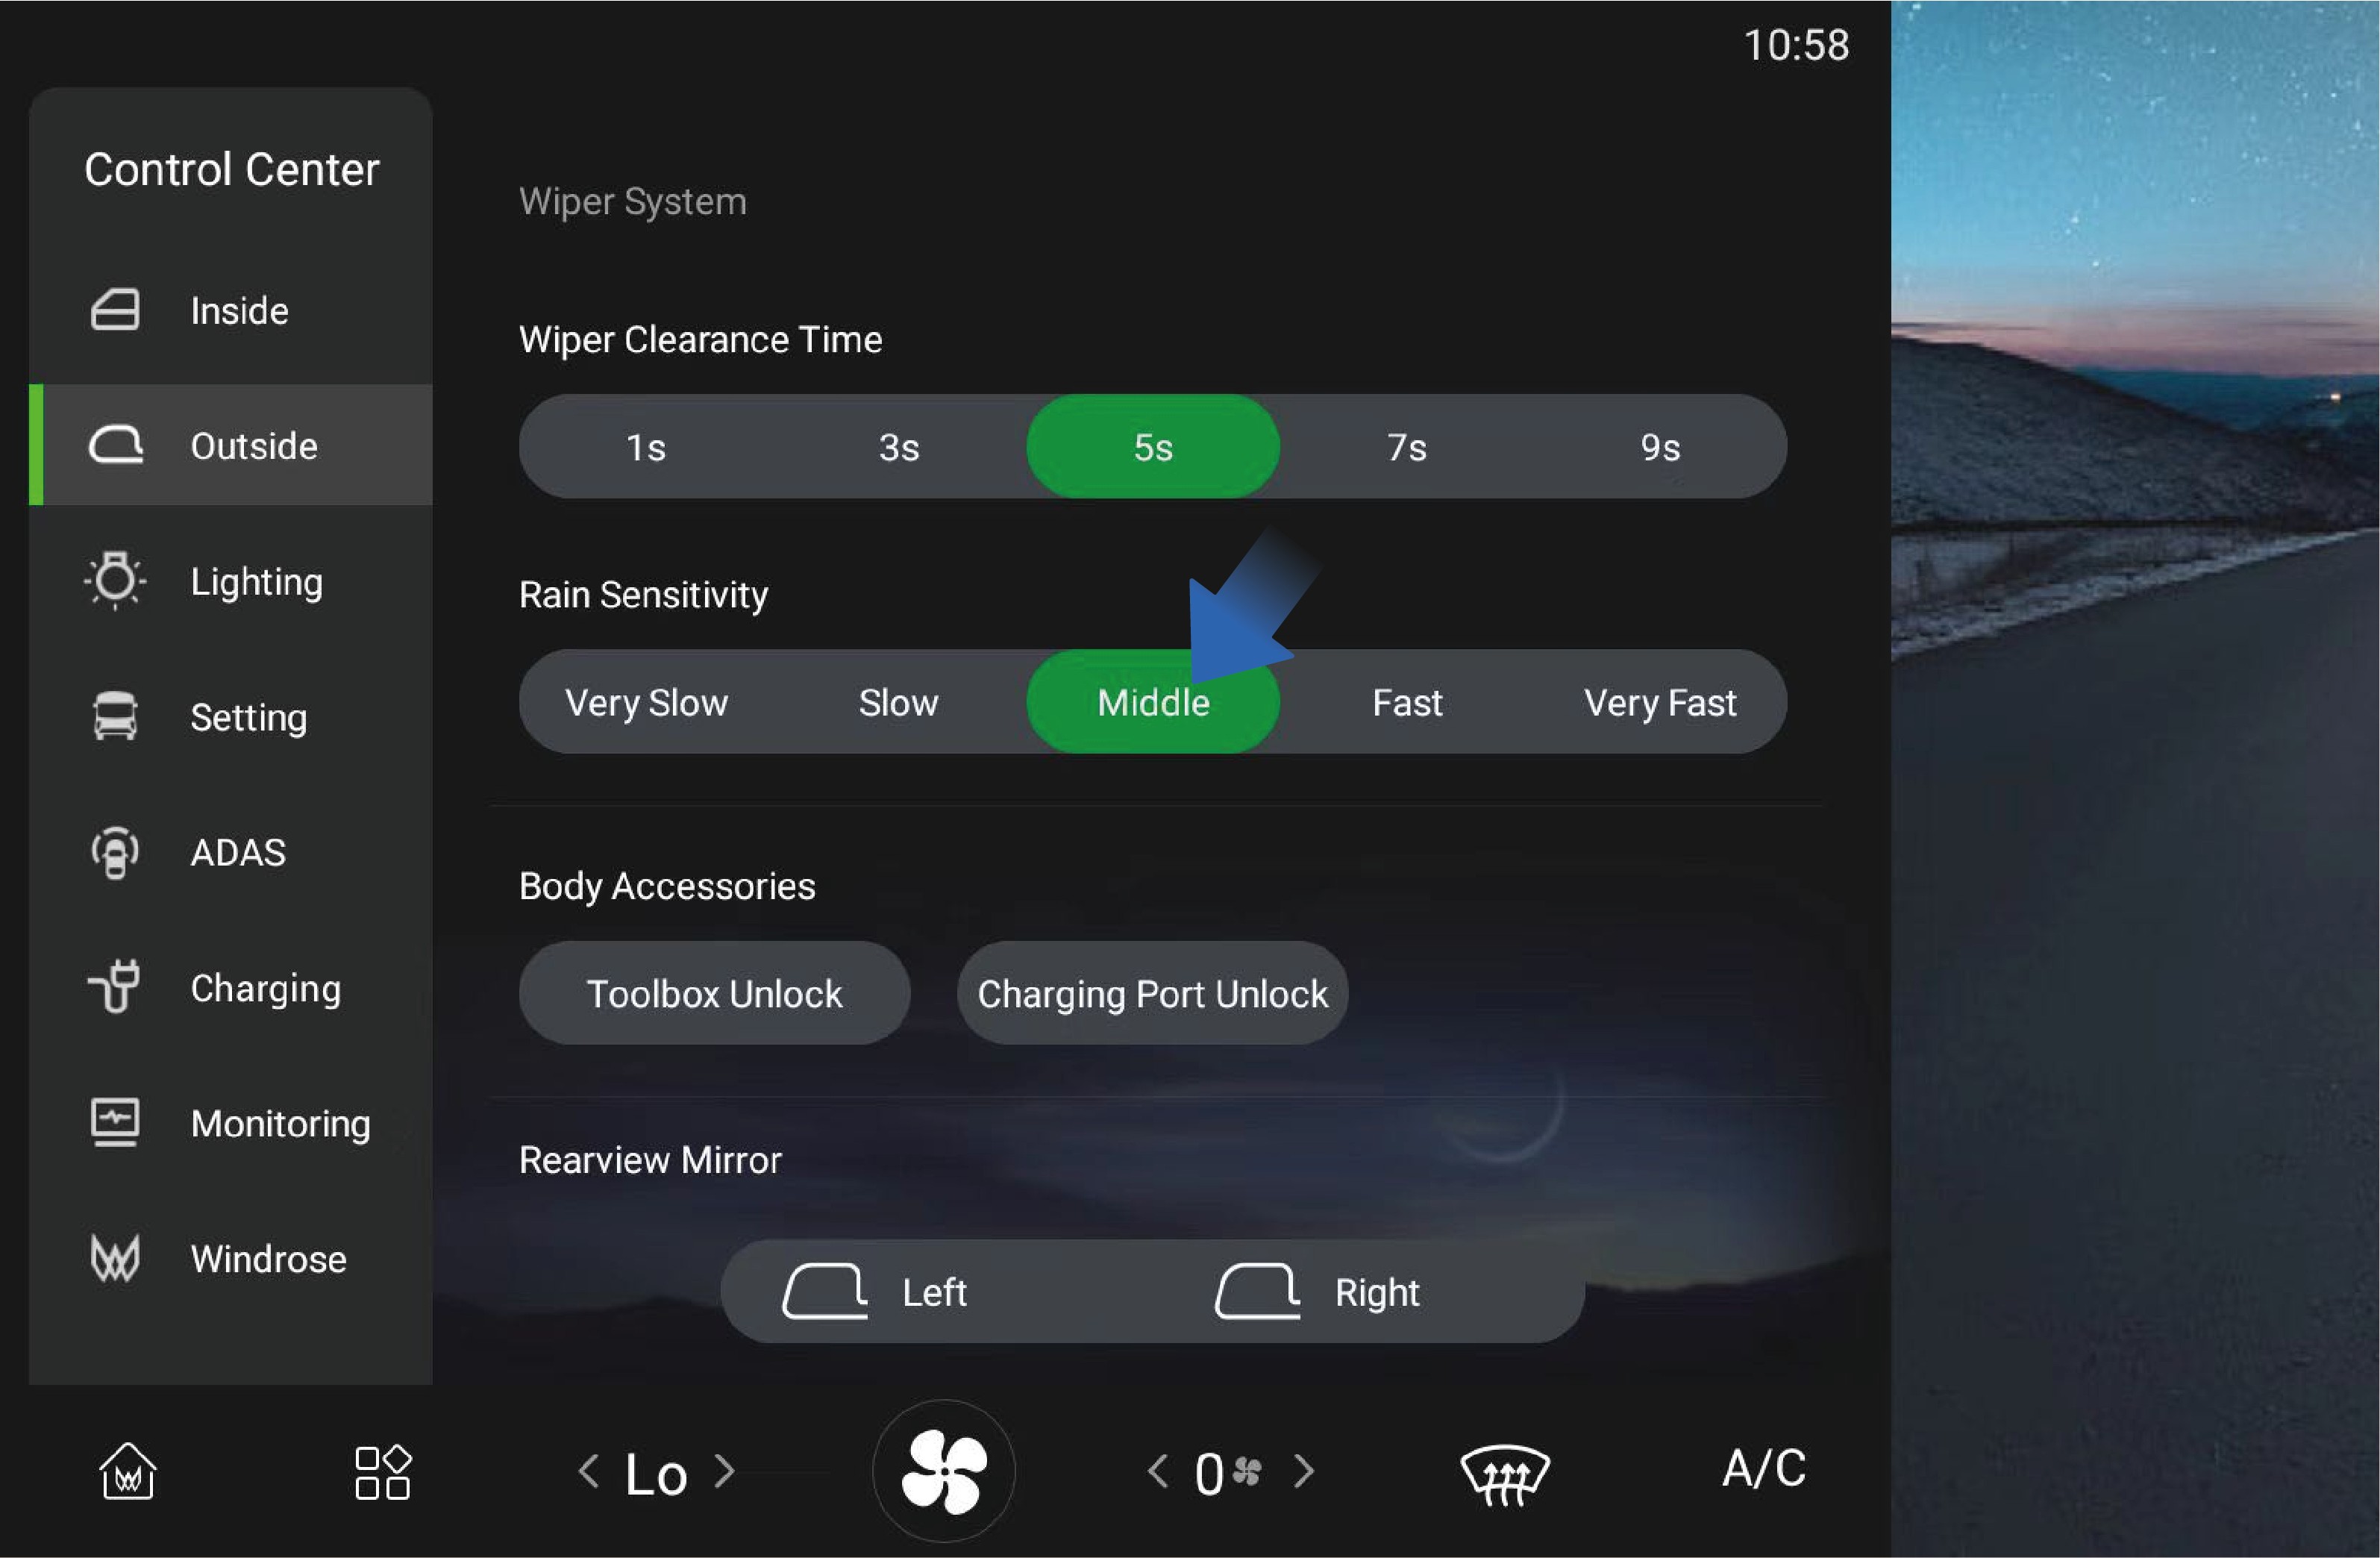
You can click "Outside" in the "Control Center" interface of the vehicle information screen to select the wiper intermittent wiping interval according to your needs.
When the wiper blade is moved to auto wiping position, you can also select the rain sensitivity in this interface, and the system will adjust the auto wiping frequency according to the sensitivity you selected.
Försiktighetsåtgärder
VarningIn cold season, if the washer fluid freezes on the windscreen, do not use the wipers, as this may obstruct the view and cause traffic accidents or casualties.
Anmärkning
Before using the wipers in winter, be sure to remove the ice and snow from the windscreen to ensure that the wiper blades are not frozen at fixed positions.
Light Switch
↑ Till toppen
Förberedelse innan körning
Do not rely solely on the automatic wipers. Always adjust the wiping manually according to the actual situation.
Observera
When there are foreign objects such as dust, bird droppings, insects, and tree pulp on the windscreen, please clean the windscreen first, otherwise the wiper blades may be damaged.
Wipers should be used to clean the windscreen with washer liquid. Otherwise, both the wiper and the windscreen may be damaged.
Check the wiper blades on a regular basis. If scheduled maintenance is not carried out properly, the service life of the wiper blades will be shortened.
Please use acceptable detergent, as non-conforming detergent products may cause damage to the washer or corrosion to the glass.
After tuning on the automatic headlamps or light switch in the
vehicle information screen, you can switch between low and high beams through the light stalk on the left side of the steering wheel. Proper use of exterior lights can effectively improve the driving safety of a vehicle.
 Bruksanvisning
Click "Lighting" icon in the "Control Center" interface of the vehicle information screen to enter the vehicle light control interface, where you can click the position lamp (outline marker lamp), low beam or AUTO icon to activate the external lights of the vehicle.
Once the exterior lights are activated, you can switch between low and high beams through the light stalk on the left side of the steering wheel.
Move the light stalk forward to turn on the high beam.
Move the light stalk backward to turn off the high beam.
With the high beam not turned on, move the light stalk backwards and release, then the light stalk will automatically reset and the overtaking lamp will flash once.
Move the light stalk downward to turn on the left indicator lamp.
Move the light stalk upward to turn on the right indicator lamp.
Daytime running lamp
After the vehicle is started, the daytime running lamp will be automatically turned on when the low beam is turned off; When the low beam is turned on, the daytime running lamp will turn off automatically.
Sidomarkeringsljus (kombinationslykta)
Side marker combination lamps are designed on both sides of the vehicle, which will be automatically turned on when the "AUTO", "Low beam" or "Position lamp" is turned on in the light control interface of the vehicle.
Rear working lamp
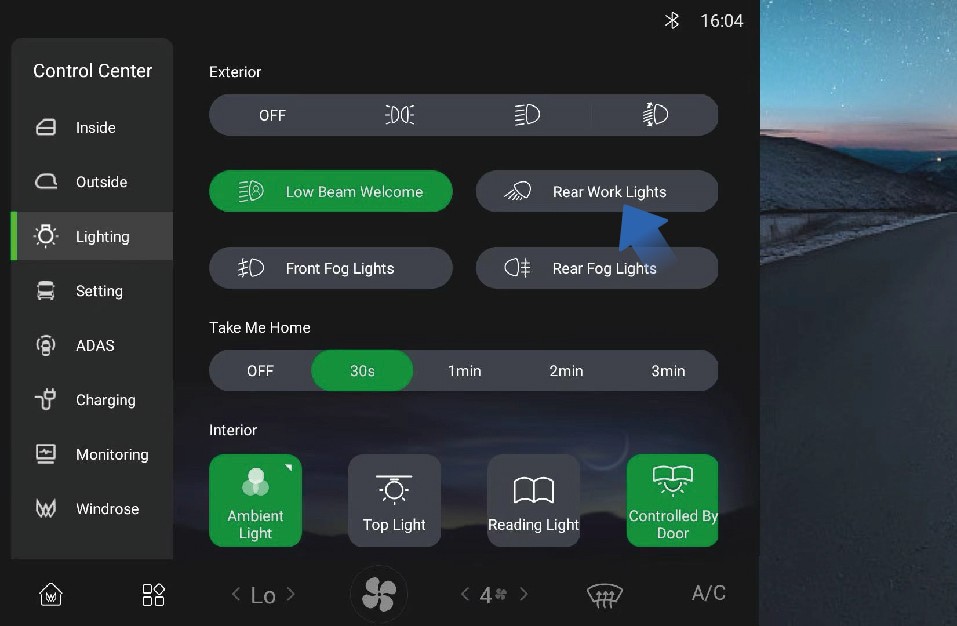
↑ Till toppenIf it is necessary to turn on the rear working lamp of the vehicle in a specific situation, you can click "Rear Work Lights" switch in "Lighting" interface.
Försiktighetsåtgärder
↑ Till toppenObserveraWhen operating the indicator lamps, there is no need to activate the exterior lights in advance in the vehicle information screen.
Brytare för varningsblinkers
Förberedelse innan körning
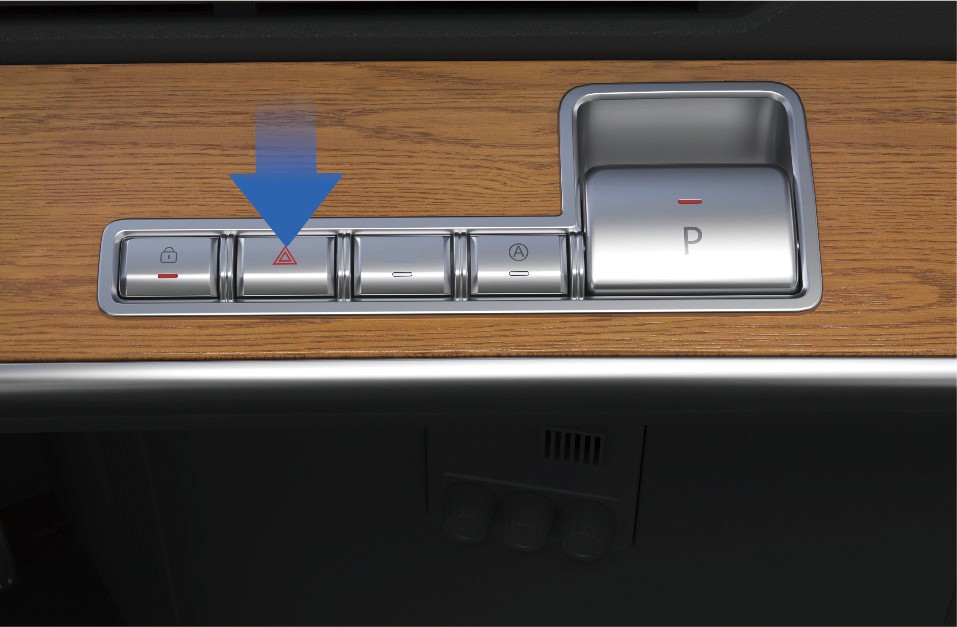
↑ Till toppenIn the case of an emergency while driving, immediately turn on the hazard warning lamp to alert the vehicle behind, thereby avoiding accidents.
 Bruksanvisning
↑ Till toppenWhen pressing the hazard warning lamp switch on the right side of the instrument panel in the vehicle, if the indicator on the switch flashes, it indicates that the hazard warning lamp has been activated.
Försiktighetsåtgärder
↑ Till toppenVarningThe hazard warning lamp switch is used under conditions that the vehicle may cause traffic accidents or other special situations to alert passing vehicles to avoid accidents.
Av/på (ström)
↑ Till toppenDriving
After the vehicle is unlocked, open the door and swipe the NFC Card at the designated swiping position of the right instrument panel to power ON the vehicle, and the instrument cluster and center display will be illuminated.
If you are in the vehicle, you can power ON or off the vehicle
through the NFC Card. Operating instructions Power on
Power off
Before powering off the vehicle, make sure the vehicle is safe and stably parked. When parking on a ramp or special locations, fix the wheels using the parking wedges that come with the vehicle to avoid slipping.
When the above conditions are met, you can power OFF the vehicle as follows.
Method 1:
With the EPB turned on, swipe the NFC Card at the designated swiping position of the right instrument panel to power of the vehicle.
Method 2:
 Försiktighetsåtgärder
↑ Till toppenObserveraDuring the vehicle power-off, you will hear a sound, which is a normal phenomenon caused by the self-test of braking system.
Färdbroms
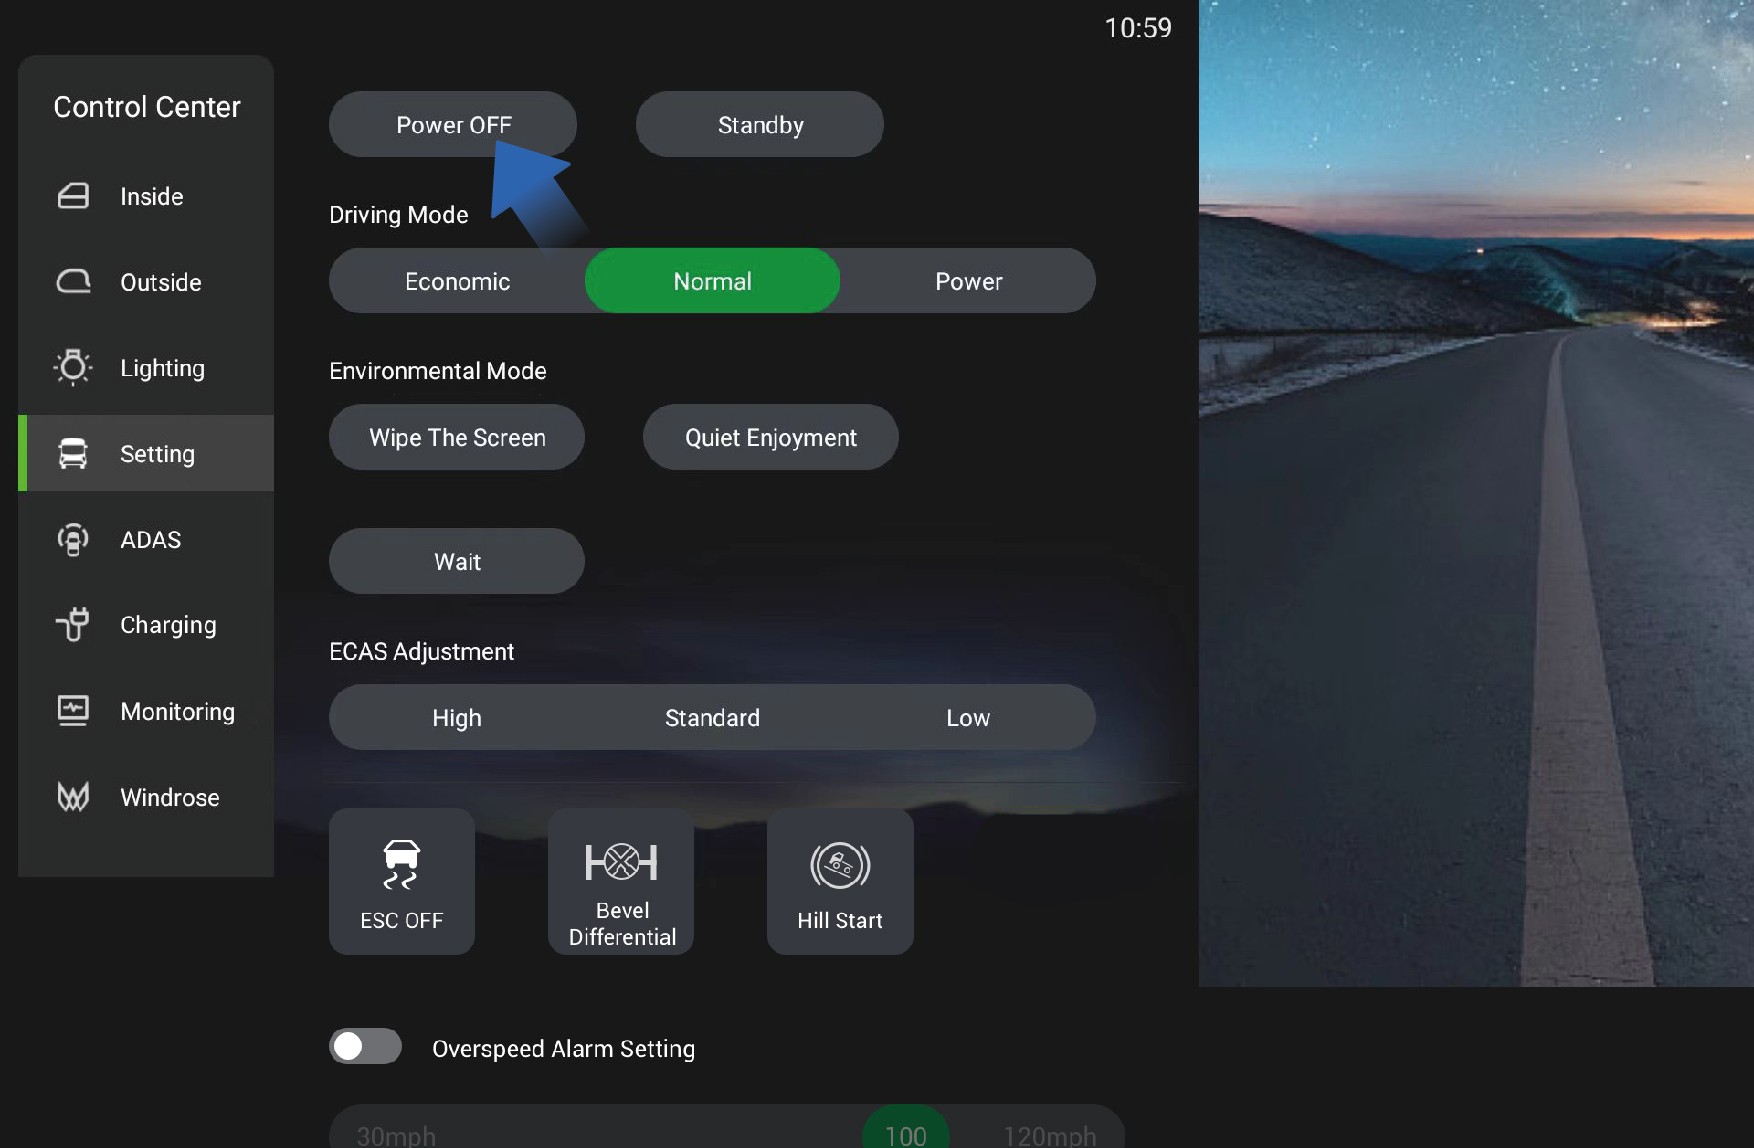
↑ Till toppenDriving
With the EPB turned on, you can power OFF the vehicle by selecting "Control Center", switching to "Setting" interface, and clicking "Power OFF" button in the right IVI screen.
After powering off the vehicle from inside the vehicle, the electric switch of the electric sliding door inside or outside the vehicle can still be used to open or close the electric sliding door. When the electric sliding door is locked from outside the vehicle, it means the vehicle has been successfully powered off.
To slow down or stop the vehicle during driving, you can depress the brake pedal to reduce the vehicle speed or slow down until the vehicle comes to a complete stop.
Bruksanvisning
To stop the vehicle smoothly during service braking, it is recommended to operate the brake pedal as follows in three situations:
Deceleration: In case it is necessary to slow down during high- speed driving, first completely release the accelerator pedal to reduce the vehicle speed by the drive motor, and if the
deceleration is not as expected, depress the brake pedal appropriately;
Stop: Gradually depress the brake pedal to reduce the vehicle speed, fully depress the brake pedal when arriving at the parking position, switch to N (neutral) gear, and turn on EPB to power OFF the vehicle and complete the parking operation.
Emergency braking: In case of an emergency, depress the brake pedal with great force quickly to stop the vehicle immediately.
Försiktighetsåtgärder
Varning
When entering a curve, brake in advance to reduce the vehicle speed below the safe speed, and drive cautiously when braking at the curve to avoid vehicle sideslip.
The service brake is not suitable for prolonged braking (e. g., long-term downhill driving) as this can cause safety hazards for service brake. In case continuous braking is required when driving down on a long slope, turn on the auxiliary braking for electric regenerative braking.
In rainy and snowy weather, increase the following distance appropriately to ensure driving safety.
Elektronisk parkeringsbroms (EPB)
Driving
↑ Till toppen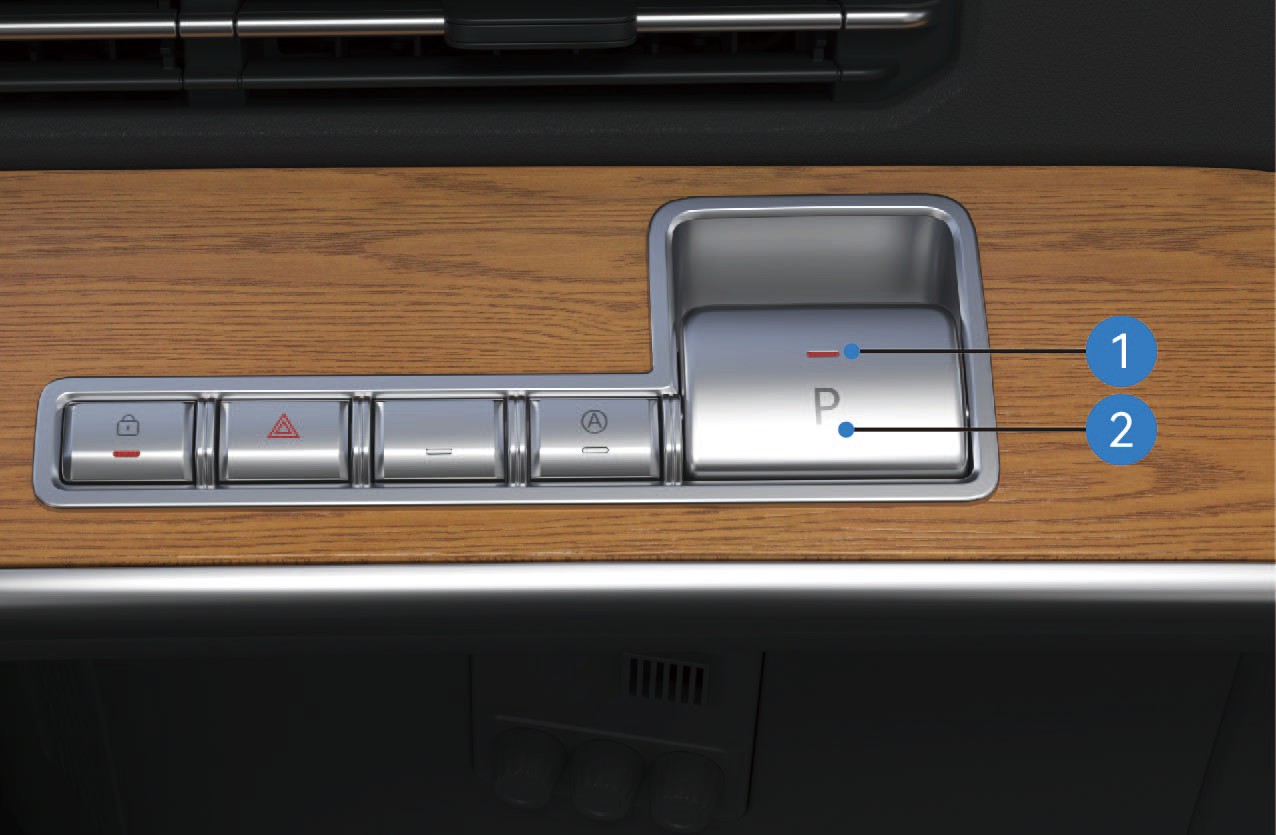
EPB Parking Brake Switch Status Indicator
EPB Parking Brake Switch
Bruksanvisning
Parking Brake Release
Manual Release
When the vehicle is in the parking brake state with normal system self-check and air reservoir pressure, depress the brake pedal and press the EPB Parking Brake Switch to release the parking brake; the parking brake indicator light on the combination instrument will go out.
Automatic Release on Start-up
When the vehicle door is closed, the vehicle is in the parking brake state (on flat roads or ramps) with normal system self- check and air reservoir pressure, the parking brake will be automatically released when the vehicle starts normally; the parking brake indicator light on the combination instrument will go out.
ObserveraThe system cannot automatically release the parking brake when shifting to reverse gear (R). Please release the parking brake manually before shifting to R.
Low-pressure Release Restriction
The parking brake cannot be released when the air reservoir pressure is too low. The parking brake indicator light on the combination instrument will stay on, and a corresponding text prompt will be displayed.
Forced Low-pressure Parking Brake Release
If the parking brake cannot be released due to excessively low air reservoir pressure, depress the brake pedal and press and hold the EPB Parking Brake Switch for more than 5 seconds to release the parking brake; the parking brake indicator light on the combination instrument will go out.
Child Lock Function
The parking brake cannot be released if you press the EPB Parking Brake Switch without depressing the brake pedal first, and a corresponding text prompt will be displayed on the combination instrument.
Emergency Parking Brake Release
When the vehicle is in the parking brake state with normal system self-check and air reservoir pressure, power ON the vehicle and press the EPB Parking Brake Switch quickly 5 times within 10 seconds after power-on to release the parking brake; the parking brake indicator light on the combination instrument will go out.
Towing Mode
When the vehicle is in the parking brake state with normal system self-check and air reservoir pressure: Press and hold the EPB Parking Brake Switch; Tap the Power OFF button on the vehicle infotainment screen (do not power OFF via card swiping); Release the EPB Parking Brake Switch after holding for more than 5 seconds. After the vehicle is powered off, the EPB system will not activate the parking brake and remain in the released state. The parking brake indicator light on the combination instrument will go out, and the EPB Parking Brake Switch Status Indicator will flash until the system enters dormancy.
Parking Brake Activation
Manual Activation
When the vehicle is stationary and in the parking brake released state with normal system self-check and air reservoir pressure, pull up the EPB Parking Brake Switch to activate the parking brake; the parking brake indicator light on the combination instrument will turn on.
Activation on Vehicle Power-off
When the vehicle is stationary and in the parking brake released state with normal system self-check, tap the Power OFF button on the right vehicle control screen (do not power OFF via card swiping) to activate the parking brake; the parking brake indicator light on the combination instrument will turn on and go out 10 seconds after power-off.
Emergency Braking
When the vehicle is in driving state with a failure of the service brake system (and normal system self-check and air reservoir pressure): Slowly pull up the EPB Parking Brake Switch to activate the EPB emergency braking; If the vehicle speed is below 5 km/h when the switch is pulled up to the maximum travel, the system will fully activate the parking brake. The travel of the EPB Parking Brake Switch is proportional to the braking force. The brake light will turn on when emergency braking is activated during driving; the parking light will not turn on if the emergency braking does not trigger the parking brake function.
Dormancy and Wake-up
When the EPB system is in dormancy (the switch status indicator is off), pull up the EPB Parking Brake Switch to wake
up the system, and the EPB Parking Brake Switch Status Indicator will turn on.
Temporary Parking
The Temporary Parking Switch is located on the right side of the instrument panel.
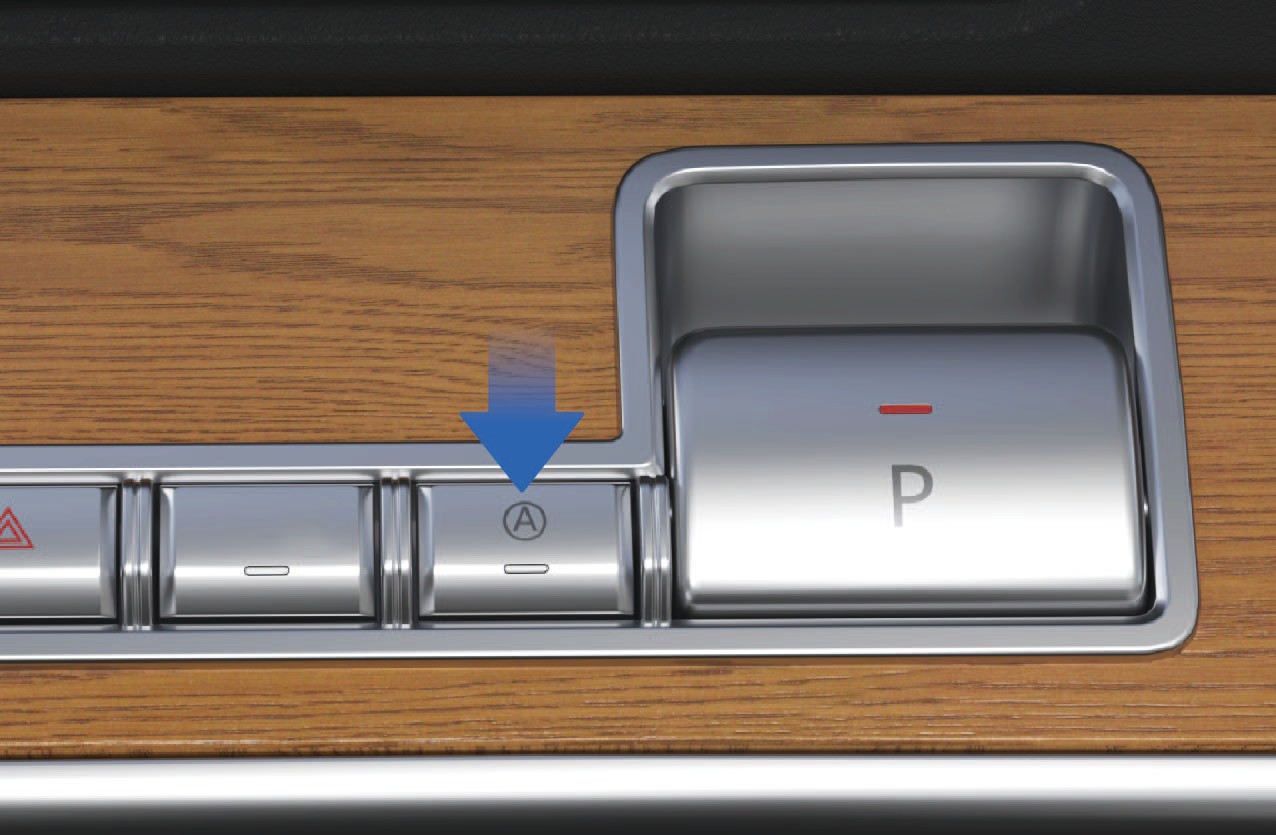
Activation and Deactivation of Temporary Parking
When the vehicle is stationary with normal system self-check, press the Temporary Parking Switch to activate the function (press the switch again to deactivate it).
Activated state: The AUTO HOLD indicator light on the combination instrument and the Temporary Parking Switch Status Indicator turn on; Deactivated state: The AUTO HOLD indicator light on the combination instrument and the Temporary Parking Switch Status Indicator turn off.
Temporary Parking Activation via Service Brake
When the vehicle is stationary with normal system self-check and air reservoir pressure, depress the brake pedal to a certain depth and hold for more than 3 seconds to activate temporary parking. The AUTO HOLD indicator light on the combination instrument and the Temporary Parking Switch Status Indicator will flash.
Temporary Parking Brake Release
When the vehicle door is closed, the vehicle is in the temporary parking state (on flat roads or ramps) with normal system self-check and air reservoir pressure, the temporary parking brake will be released when the vehicle starts normally. The AUTO HOLD indicator light on the combination instrument and the Temporary Parking Switch Status Indicator will cease flashing and remain on.
ObserveraThe system cannot automatically release the temporary parking brake when shifting to reverse gear (R). Please release the temporary parking brake manually before shifting to R.
Fault Alerts
Fault Alert During Parking: The parking brake indicator light on the combination instrument and the EPB Parking Brake Switch Status Indicator flash simultaneously.
Fault Alert During Parking Brake Release: The parking brake indicator light on the combination instrument turns yellow, and the EPB Parking Brake Switch Status Indicator flashes.
Försiktighetsåtgärder
Varning
When the air reservoir pressure is too low, try to release the parking brake only after the pressure is restored to normal.
When parking on a slope, choose a hardened road surface with a high friction coefficient to prevent vehicle rollback caused by loose pavement or insufficient static friction.
Use a parking chock when parking on a slope; add auxiliary objects such as stones according to the actual slope gradient to avoid accidental rollback.
The parking brake can be used temporarily as the service brake in an emergency, but long-term replacement of the service brake is prohibited.
Anmärkning
Release the EPB via normal operation unless necessary (i. e., when air reservoir pressure is sufficient).
During forced parking brake release, observe the surrounding road conditions to ensure the safety of the vehicle, pedestrians and other road users before operation.
Nödbromsning – under körning
Driving
↑ Till toppenThe parking brake can be used as an emergency brake when the vehicle's service brake system malfunctions.
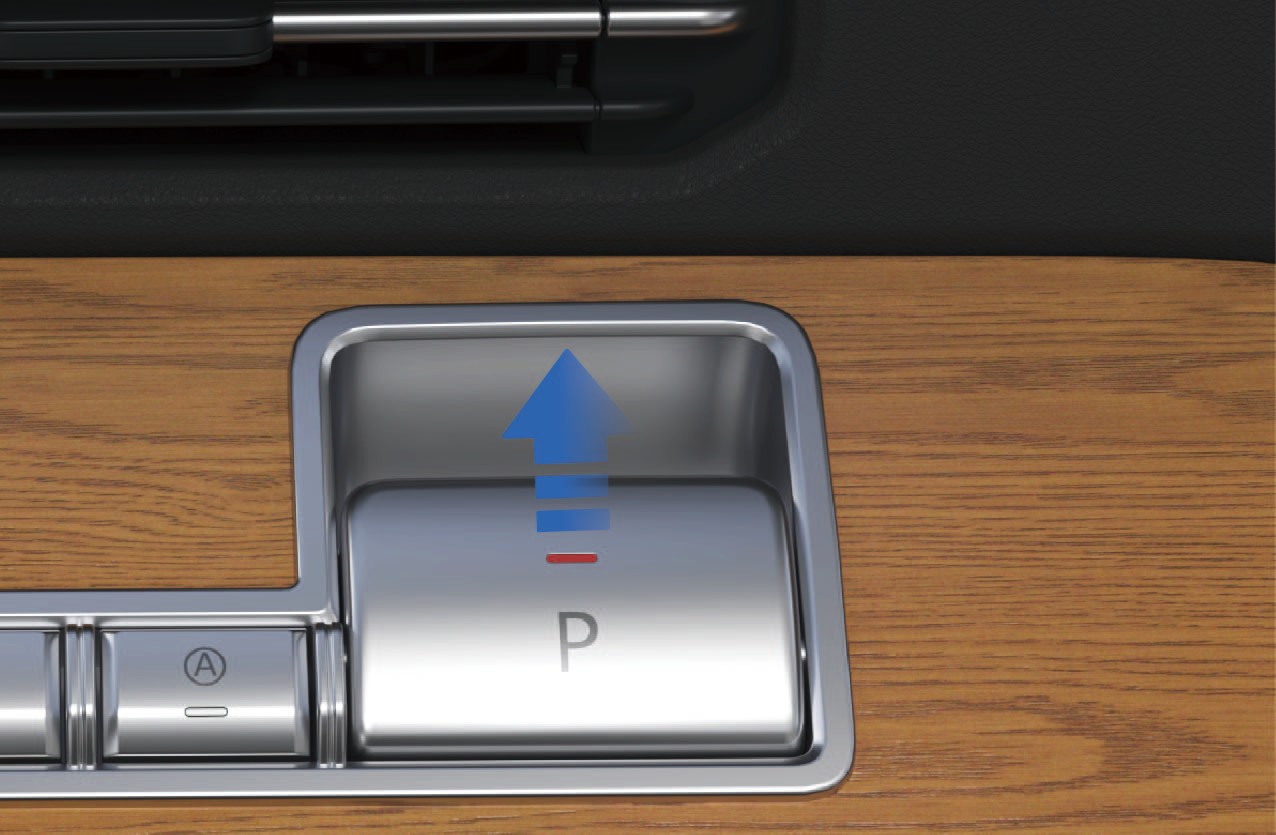 Bruksanvisning
For EPB electronic parking, it can be used as an emergency braking operation when the service brake fails. When EPB applies emergency braking, when the vehicle speed drops to 5 km/h, the system will directly activate the parking brake and maintain the parking state. Moreover, the parking brake cannot be automatically released when the vehicle starts, and can only be released manually by operating the EPB parking brake switch.
↑ Till toppenWhen you need emergency braking, pulling up the EPB parking brake switch can achieve emergency braking. The greater the
Shift Operation
↑ Till toppen
Driving
opening of the pull up switch, the greater the braking force applied.
Försiktighetsåtgärder
Varning
If the vehicle speed is high, the parking handle should be pulled in a similar way as a "spot brake". Do not tighten or lock it all at once to avoid damage to the brake and other related components and loss of braking efficiency.
↑ Till toppenYou can shift gears by using the shift lever on the right side of the steering wheel.
Bruksanvisning
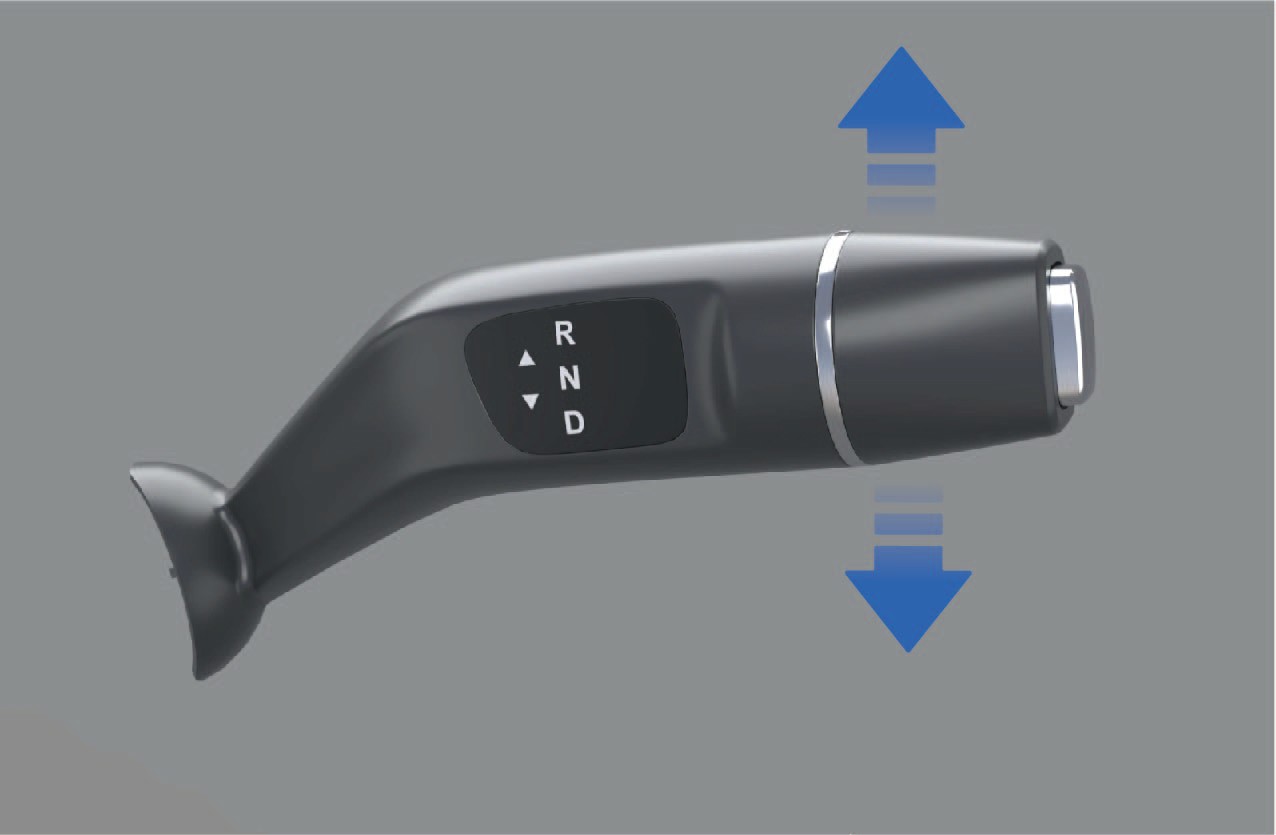
R (reverse) gear
When the vehicle is stationary, depress the brake pedal and push up the shift lever, then the instrument cluster will display "R" gear, indicating that the vehicle has been put into R gear.
N (neutral) gear
When the shift lever is in "R" gear, push the shift lever down by 1 gear and hold for 1 second.
When the vehicle is in EPB mode, depress the brake pedal and release the EPB.
D (drive) gear
↑ Till toppenWhen the vehicle is stationary, depress the brake pedal and push down the shift lever simultaneously, and the instrument cluster will display "D" gear, indicating that the vehicle has been put into D gear.
If the gear shift fails, the instrument panel will prompt the reason for the gear shift failure, and the text prompt includes: please press the brake to shift, please READY before shifting, or please stop and shift; If the gear shift is successful, there will be no text prompt.
Försiktighetsåtgärder
↑ Till toppenAnmärkningThe vehicle must be powered off in N gear, and it is forbidden to directly power OFF and stop the vehicle in D or R gear.
The vehicle can be engaged in N gear with "N" gear indicator
highlighted in the instrument cluster through the following operations:
When the shift lever is in "D" gear, push the shift lever up by 1
gear and hold for 1 second.
Regenerativ bromsning
↑ Till toppenDriving
Turn the left paddle of kinetic regenerative braking system (KERS) to reduce the kinetic regenerative braking intensity of the vehicle during coasting.
2. Kinetic regenerative braking paddle (right)
During driving, you can improve the driving experience by adjusting
the regenerative braking level, which can reduce the loss of brake heat, thereby improving energy consumption.
Bruksanvisning
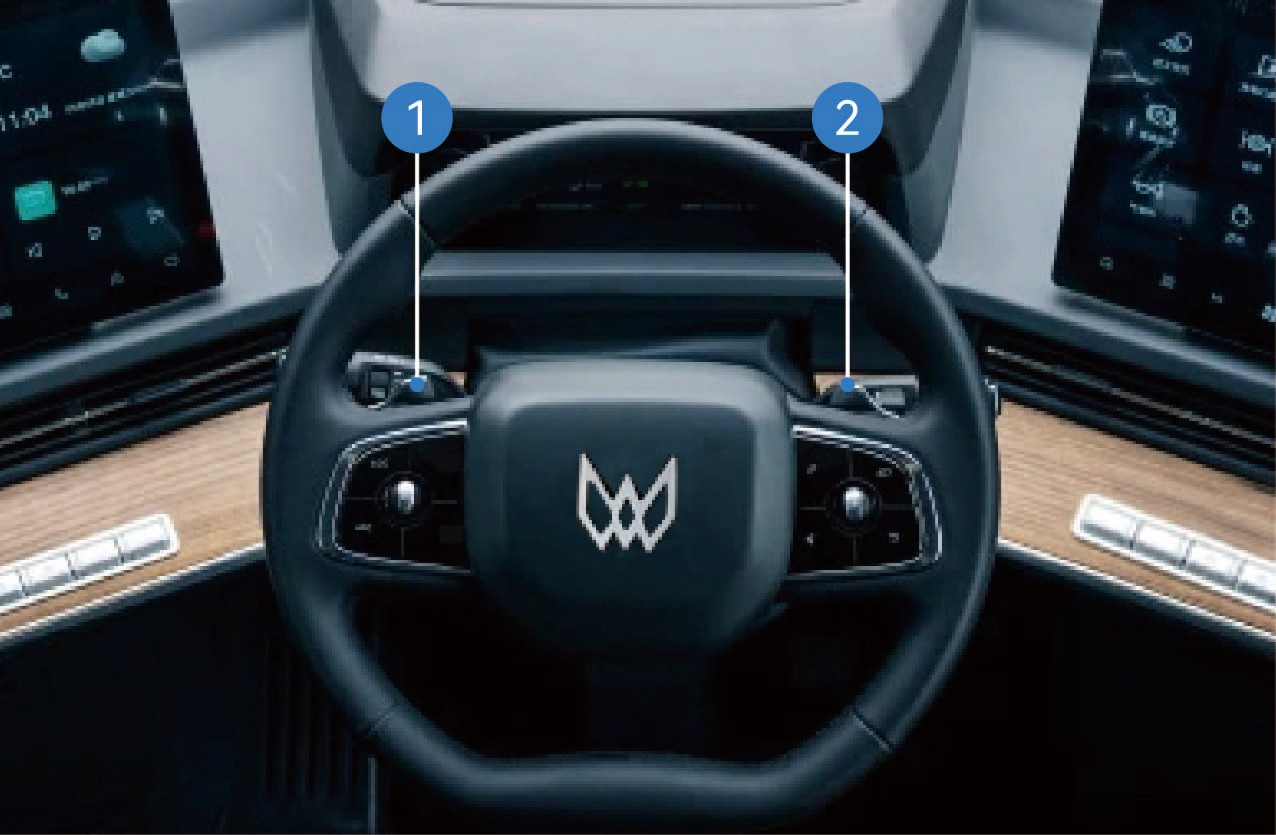
Paddelspak för regenerativ bromsning (vänster)
↑ Till toppenTurn the right paddle of kinetic regenerative braking system (KERS) to increase the kinetic regenerative braking intensity of the vehicle during coasting.
During driving, the coasting energy is recovered when the accelerator pedal and the brake pedal are released. The braking energy will also be recovered when the brake pedal is depressed. You can adjust the regenerative braking intensity during coasting through the KERS paddles on the left and right sides of the steering wheel.
The lower right corner of the instrument cluster will show the current regenerative braking level (level-1, level-2, level-3, level-4 and level-5). When the regenerative braking level is set to 0, the regenerative braking function of the vehicle will be turned off.

Försiktighetsåtgärder
Anmärkning
The regenerative braking with regenerative braking is not a substitute for braking to ensure safety. You should apply the brakes in time according to the actual situation.
Avoid using the regenerative braking function in rainy or snowy weather or on slippery roads.
↑ Till toppenObserveraWhen the battery level of the vehicle drops below 95%, you can turn on and apply the regenerative braking function.
AR-HUD*
↑ Till toppenDriving
The AR-HUD can project vehicle-related information onto the front windscreen so that it is easier for you to obtain legible information rapidly while driving, thus improving driving safety.

Lane departure line prompt
Navigation arrow
Driving speed + driving mode
Instrument cluster warning icon
ACC status icon + cruise speed
Bruksanvisning
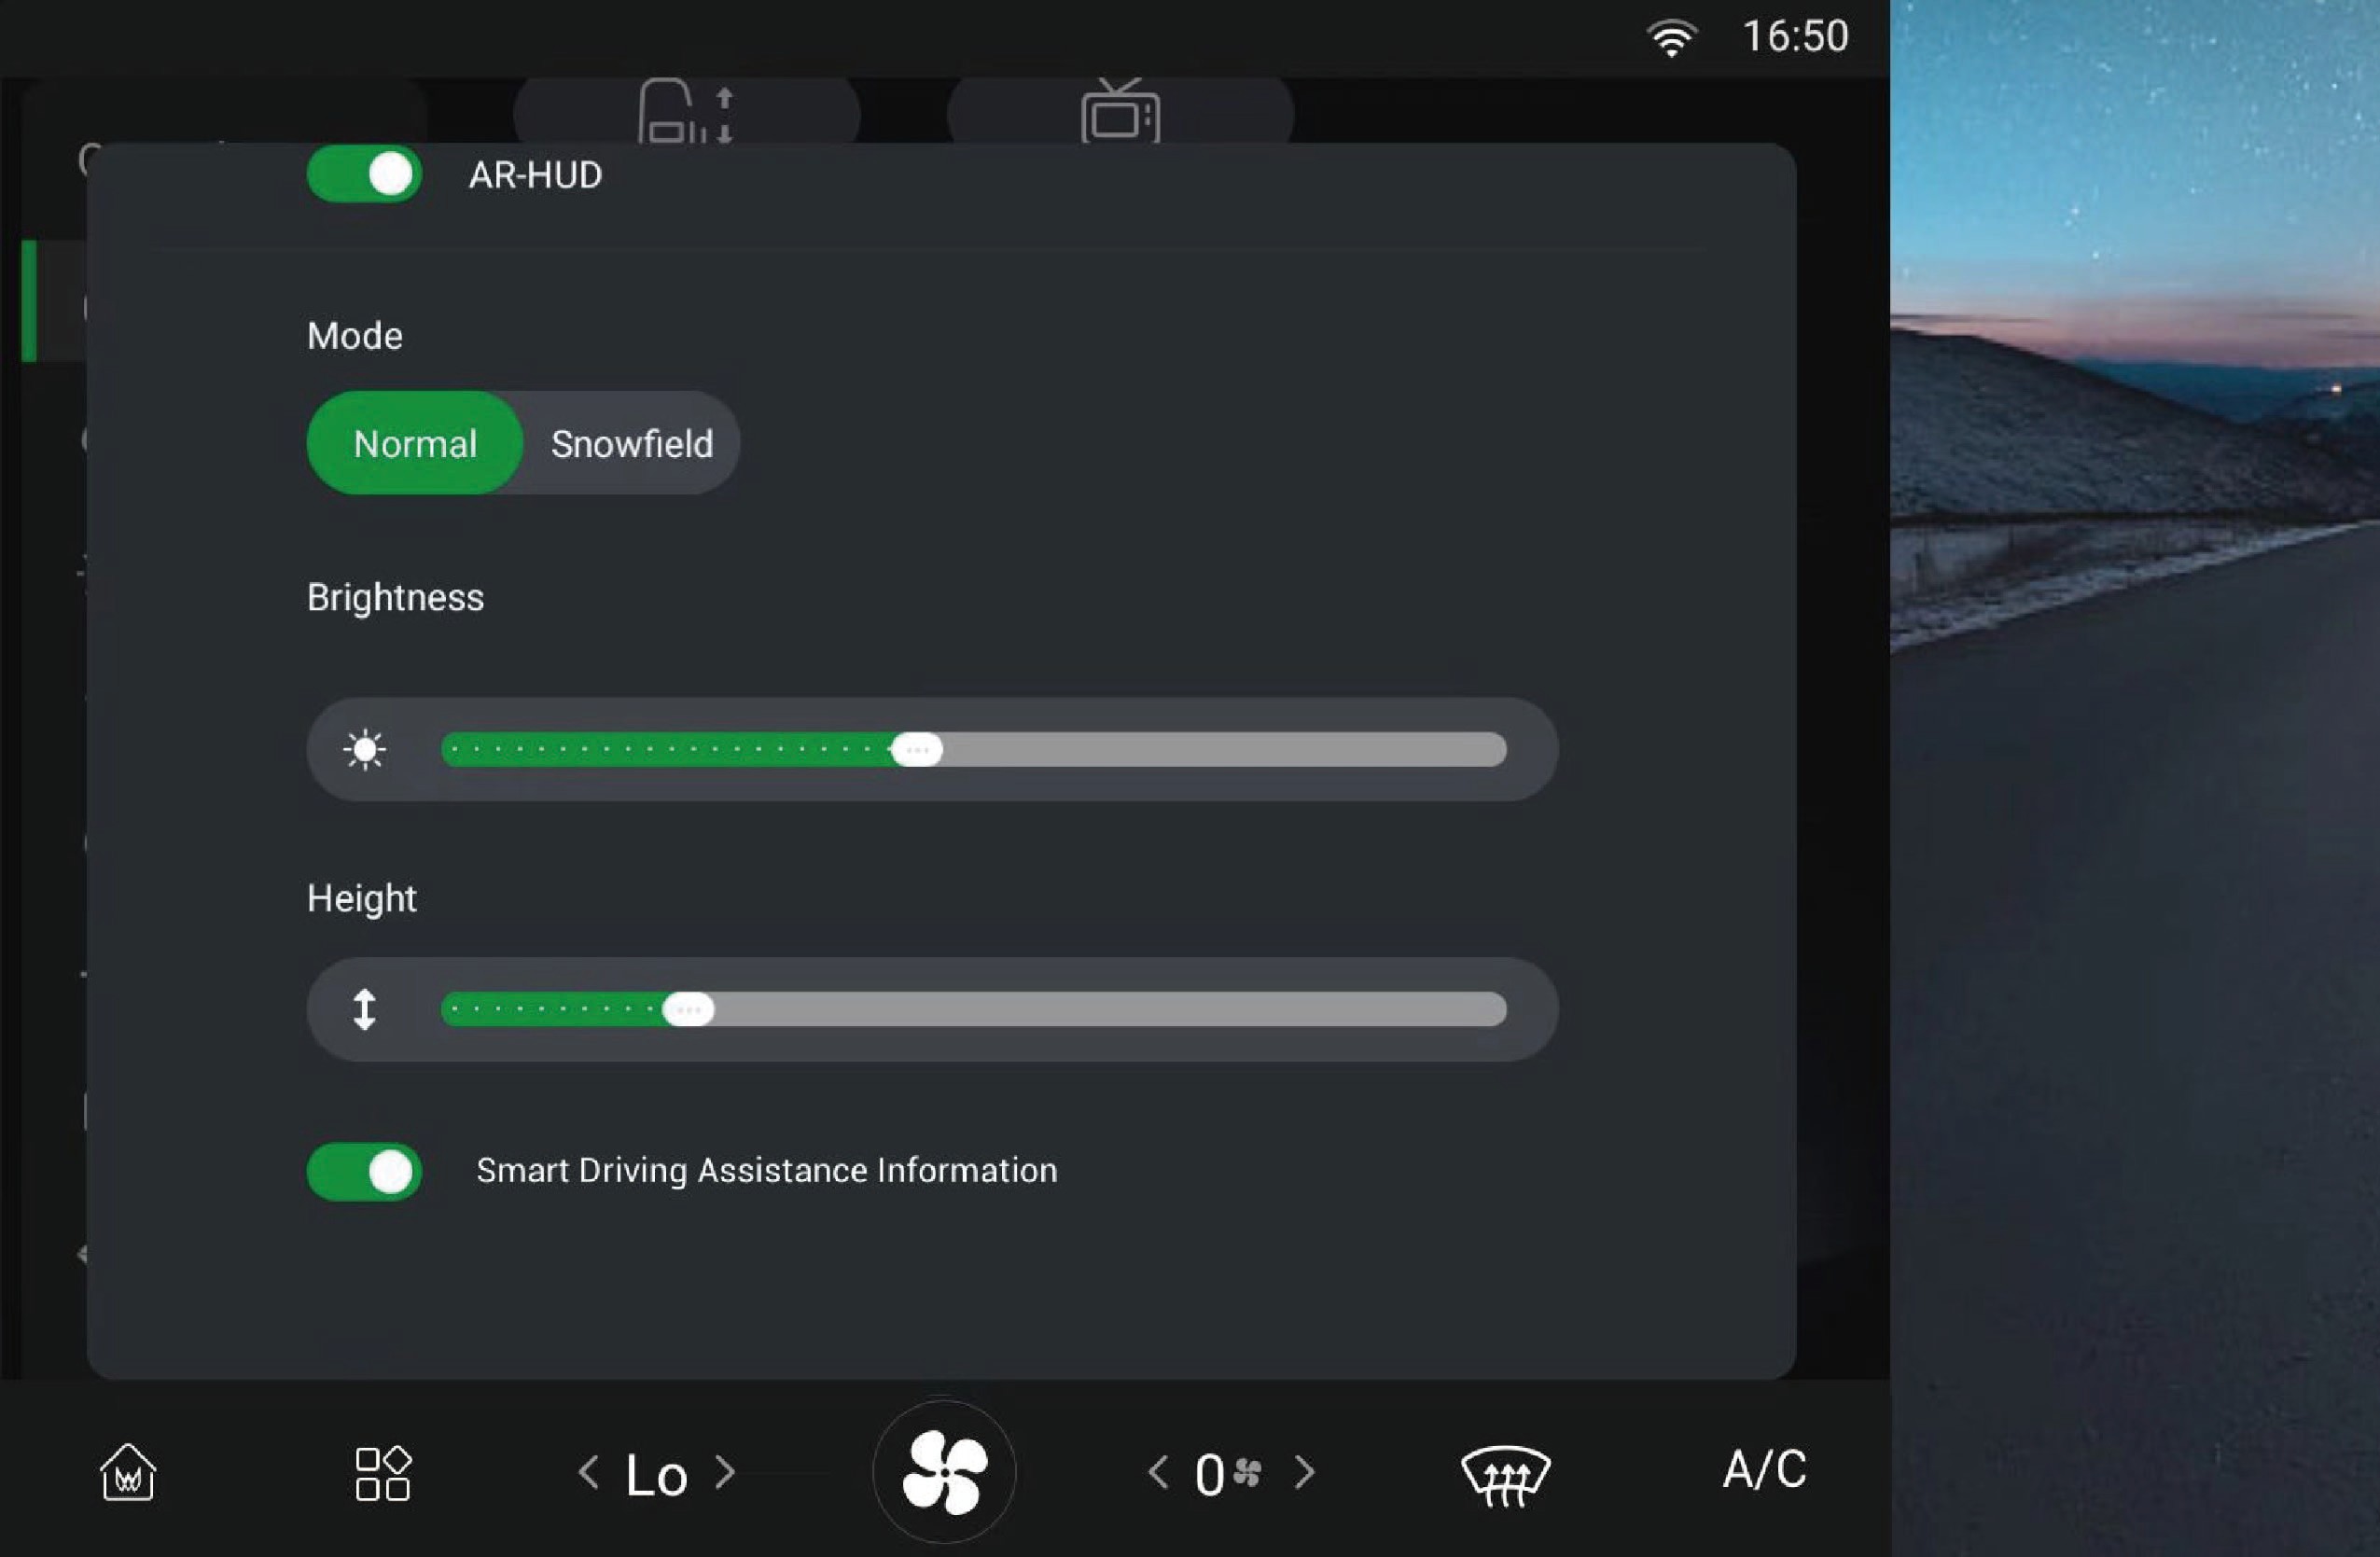
↑ Till toppenYou can select "Control Center", switch to "Inside" interface, and click "AR-HUD" button on the vehicle information screen to enter the interface where you can turn on/off the function, and adjust the display mode, brightness, height and display information according to your personal preferences.
Försiktighetsåtgärder
Varning
Before driving, make sure to check that the position and brightness of the AR-HUD will not interfere with safe driving. Improper adjustment of the image position or brightness may obstruct the your field of vision and cause an accident, resulting in personal injury.
Do not keep looking at the AR-HUD while driving, otherwise you may not be able to notice pedestrians and objects on the road in front of the vehicle.
Anmärkning
Do not allow liquids entering into the projector area as this may cause AR-HUD failure.
Do not place any objects and stickers on the projector or the projection area of the windscreen, otherwise the AR-HUD may not function properly to display.
If the seat is high, your head will be in a high position and you will not be able to see the display. You can lower the AR-HUD to a suitable height.
Differentiallås
Driving
↑ Till toppenWhen driving on muddy and slippery roads or when climbing under heavy loads, the driving wheels may slip or it may be difficult for the vehicle to drive. In this case, you can use the vehicle differential lock to improve the passability of the vehicle.
Observera
When driving on snowy roads, adjust to snow mode to prevent the AR-HUD image from interfering with the driving vision.
Bruksanvisning

↑ Till toppenYou can select "Control Center", switch to "Setting" interface, and click "Bevel Differential" button on the vehicle information screen, then the switch will be highlighted and the differential function will
be turned off; When the switch is highlighted, click the "Bevel Differential" button again, then the switch will turn gray and the differential function will be turned on.
Försiktighetsåtgärder
Varning
The differential lock is only applicable to situations where the wheels are slipping or the vehicle is trying to get out of trouble. Do not run for a long time with the lock in locked state.
The vehicle should not make turns after the differential lock is engaged. Otherwise it will cause damage to the differential and other parts.
After the vehicle passes through poor roads, release the differential lock immediately. When the vehicle speed is ≥ 5 km/h, it is strictly forbidden to use the differential lock.
Körläge
↑ Till toppenDriving
You can select the drive mode by selecting "Control Center" and switching to the "Setting" interface on the vehicle information screen of the instrument panel to tailor your needs.
ECO mode
This vehicle has three driving modes, which offer you the chance
to choose how you want to drive. Each mode provides a different driving experience.
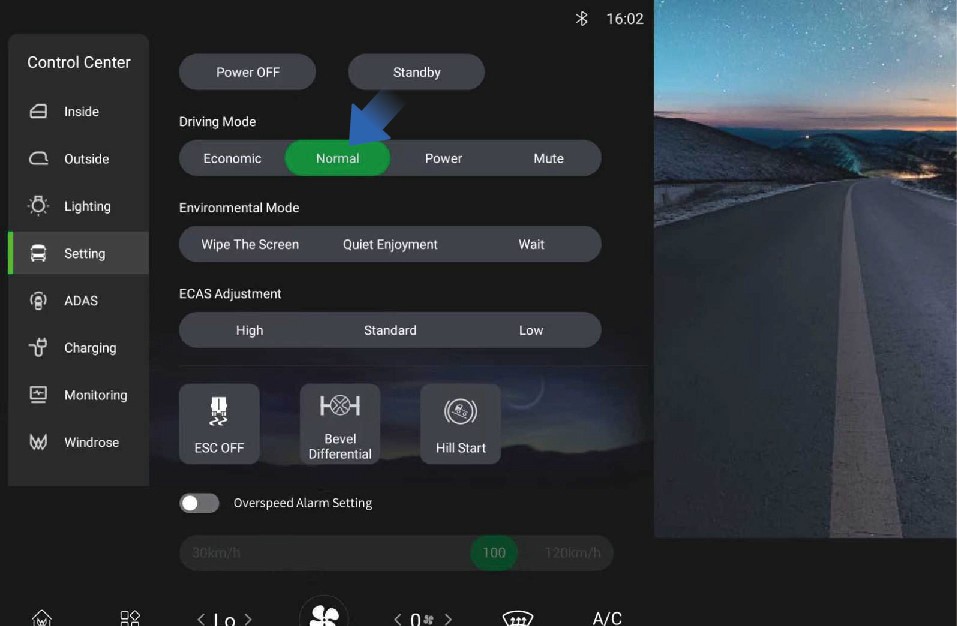 Bruksanvisning
It can effectively reduce the energy demand for high-voltage battery to achieve the economical driving; When the battery SOC is lower than 10%, the vehicle automatically enters the ECO mode.
Normal mode
It can offer a good balance of power and economy, which can meet the daily needs of most drivers.
Power mode
↑ Till toppenIt can provide the designed maximum power output of the vehicle and require the drive motor to respond as quickly as possible to achieve optimal output torque and strong power performance with higher energy consumption.
Runtomkamera (AVM)
Driving Assistance
↑ Till toppenThe around view monitor (AVM) uses cameras installed around the vehicle to capture images, and the AVM module stitches and synthesizes the high-definition image signals collected by the camera to achieve 2D/3D panoramic view. The part not contained by the panoramic view can be filled with the image of the rear camera.
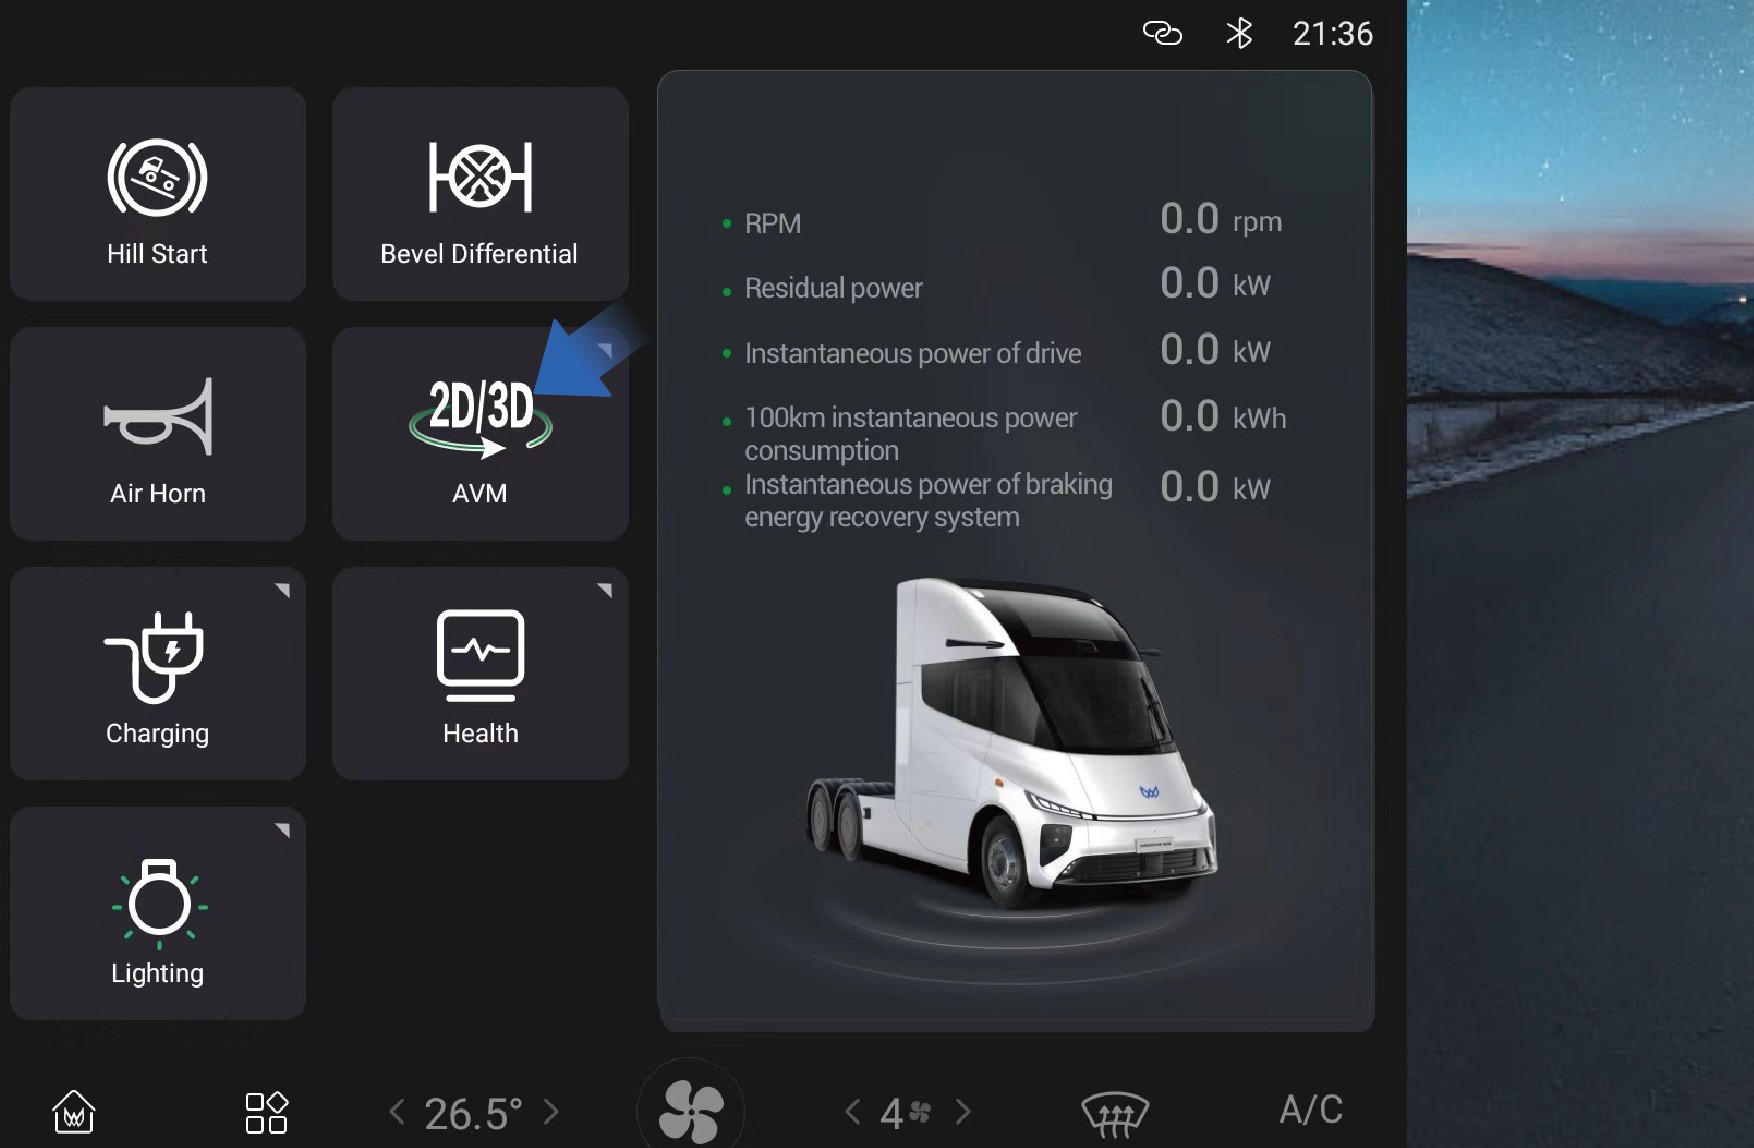 Bruksanvisning
You can set and adjust the AVM function by selecting "Home" and clicking the "AVM" button on the vehicle information screen of the instrument panel.
Parking assist (PA)
Parking assist can monitor the surrounding conditions of the vehicle when the vehicle is reversing at low speed to ensure the driving safety. During parking, the vehicle will remind you by warning sounds and images based on the distance between the obstacle and the front or rear of the vehicle.
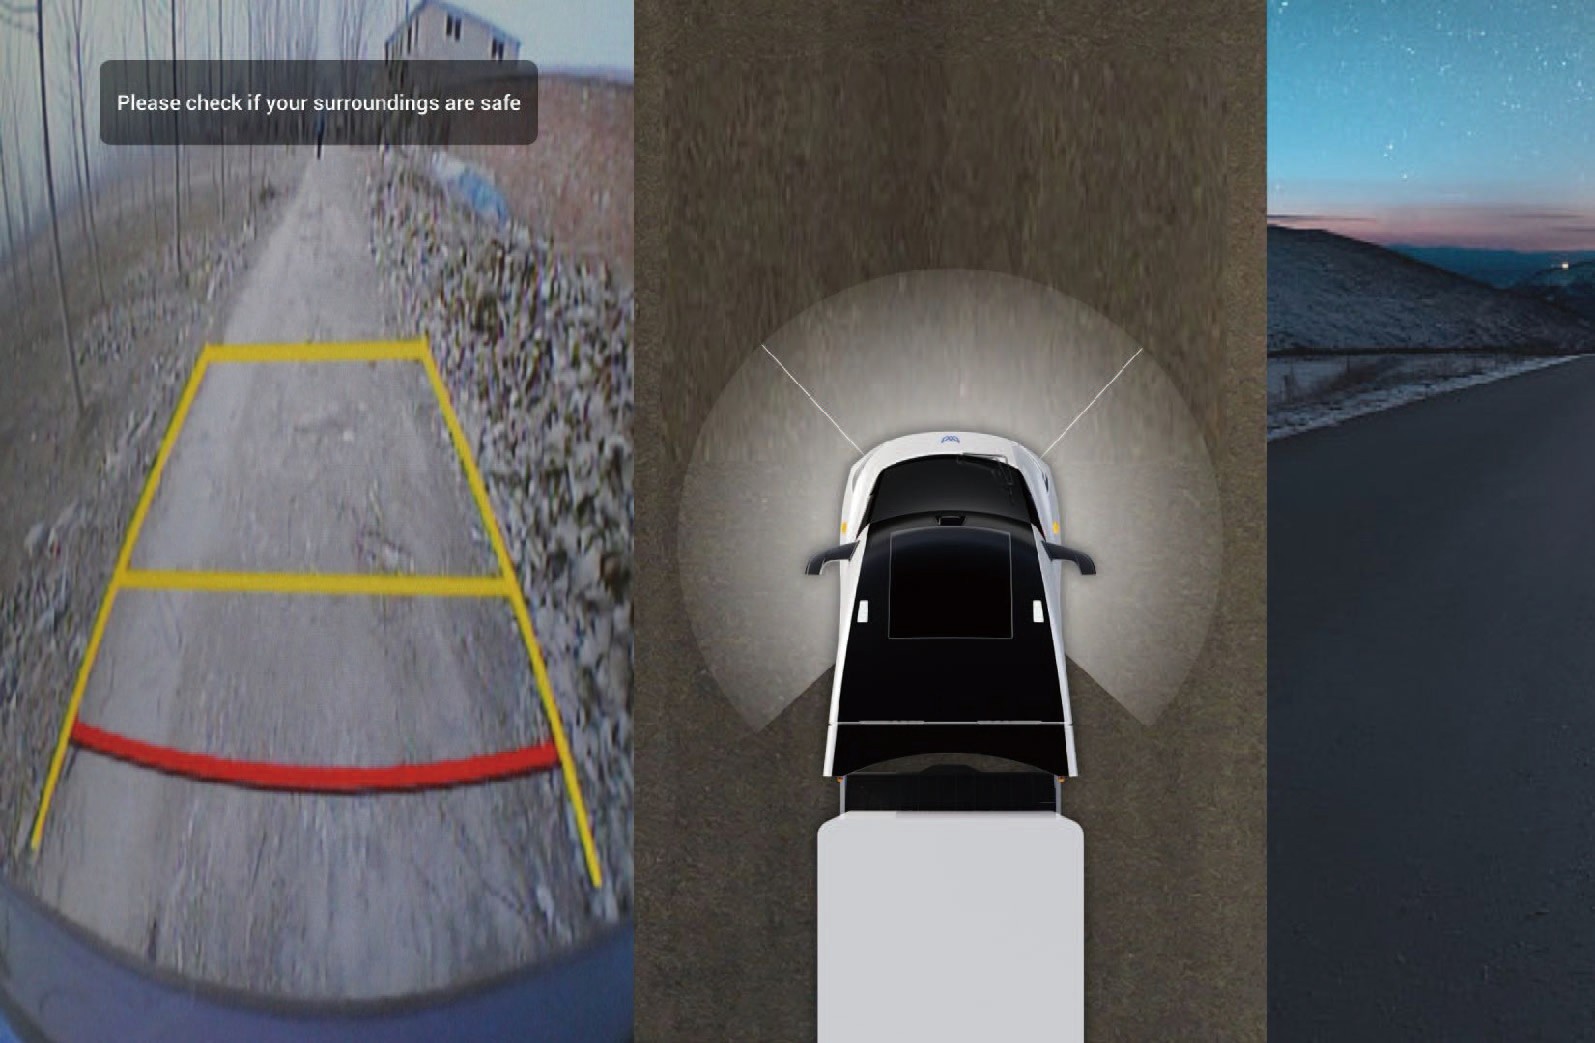
You can activate the parking assist image in the following ways:
On the home page of the vehicle information screen, click AVM to turn on the 270° panoramic image;
When the vehicle is engaged in R gear, the memory view (270° panoramic image) will be turned on.
↑ Till toppenReverse camera vision system(RCVS)
The RCVS system provides the driver with a rear view during vehicle reversing, improving safety during the reversing process.
Shifting to reverse gear will enter the interface.
Försiktighetsåtgärder
AnmärkningThe reverse image relies on the rearview camera sensor to operate normally. The following situations may cause the sensor to be limited and the camera function to be restricted:
• Camera installation position change, obstruction or dirt, defocusing or malfunction, etc.
The surrounding environment is dim, such as dawn, dusk, night, tunnels, buildings, and large vehicles casting large shadows.
Sudden changes in ambient brightness, such as at tunnel entrances or exits.
Adverse weather conditions such as rain, snow, fog, and haze.
Informationssystem vid igångsättning (MOIS)
↑ Till toppenDriving Assistance
The MOIS system can monitor pedestrians/bicycles in blind spots ahead of the vehicle and operate effectively at low speeds to prevent collisions with pedestrians or cyclists. When the MOIS system detects the presence of pedestrians or cyclists in front of the vehicle, it can inform the driver through a combination of optical and acoustic signals to ensure that the driver can take timely measures.
When the vehicle is stationary, the instrument panel will trigger an optical alarm if a pedestrian enters the front danger zone. If the vehicle is moving forward and a pedestrian enters the front danger zone, the instrument panel will activate both audible and visual alarms until the pedestrian leaves the danger zone.
When the sun is slanting or directly shining on the camera.
Bruksanvisning
You can switch to the "ADAS" interface by selecting "Control Center" from the car infotainment screen on the right side of the dashboard, clicking the "MOIS" button to turn on/off the MOIS function, and synchronizing by selecting "MOIS Alarm Sound" to turn on and off the MOIS alarm sound.
MOIS system fault alarm
If there is an error/malfunction in the system, a fault warning signal will be displayed on the dashboard, which may cause the following faults:

After being completely covered by ice, snow, mud, soil or similar substances, the obstruction can be detected and the function will be automatically turned off, and a fault signal will be sent to the driver to indicate the obstruction status. When the obstruction is removed, the function should be able to return to normal.
Detect the ambient light intensity, automatically shut down the system when the ambient light intensity is below 15lux, and notify the driver of this status with a fault signal. After the ambient light returns to normal, the function returns to normal.
When the MOIS system malfunctions due to hardware, software, or interactive component failures, relevant signals are used to alert the driver of the system's fault status.
Adaptiv farthållare (ACC)
↑ Till toppenDriving Assistance
The adaptive cruise control (ACC) is a driver assistance function to improve the driver’s comfort. If the road ahead is clear, the ACC will maintain the set maximum cruising speed and allow the
vehicle to drive forward. If a vehicle is detected ahead, the ACC will reduce the speed of the subject vehicle as needed to maintain the set following distance from the vehicle ahead until the appropriate cruising speed is reached.
With ACC activated, you still need to observe the road conditions ahead and control the vehicle when necessary. The ACC is mainly used for driving on dry straight roads such as highways. It is not recommended to activate the ACC when driving on city streets.
Bruksanvisning
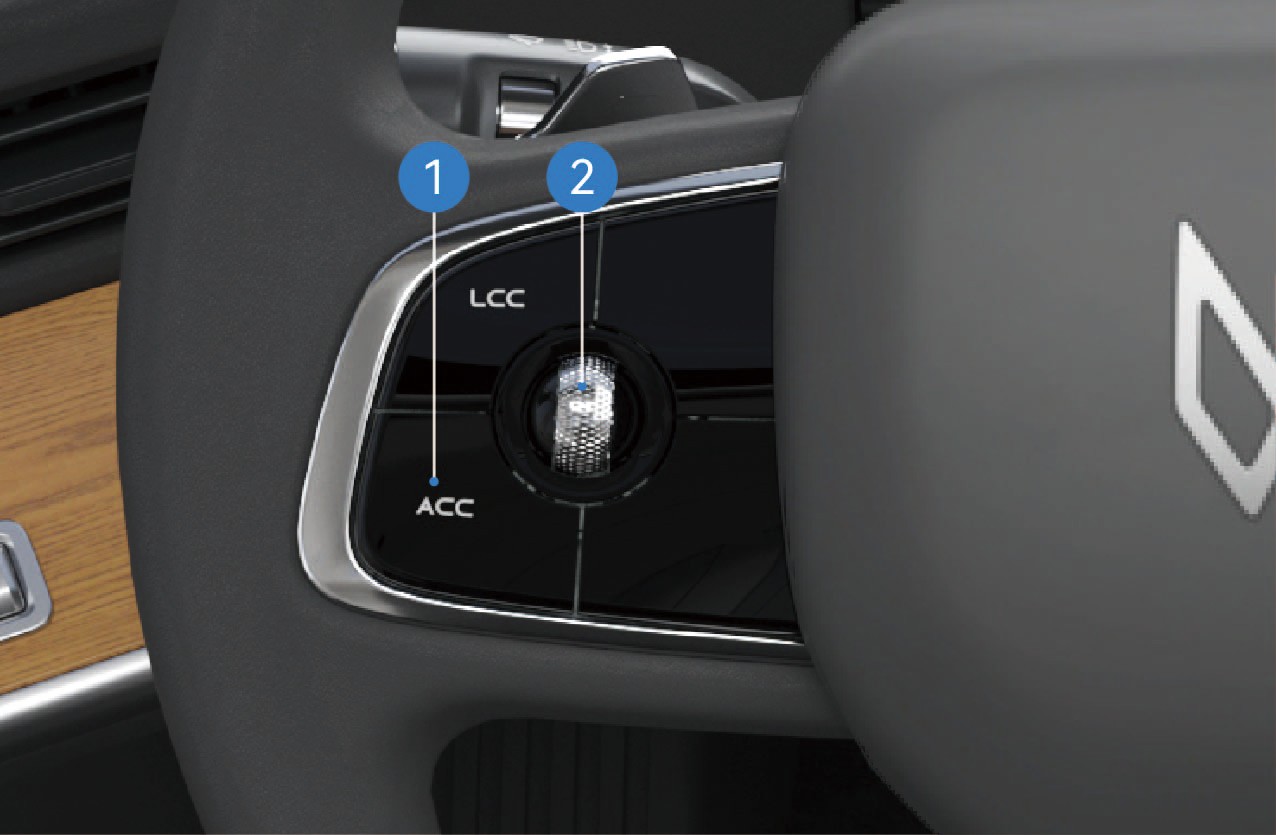
ACC ON/OFF
Click the button to turn on the ACC, and the ACC ON indicator will be illuminated in gray on the instrument cluster. When the ACC working conditions are met, the indicator will be illuminated in green, the ACC function will be activated, and text prompt and numerical information such as cruising speed will be displayed.
In cruise mode, click the button to turn off the ACC, the indicator will turn gray and text prompt will be displayed on the instrument cluster.
Cruise control scroll wheel
Right: Increase the following distance.
Left: Decrease the following distance.
Up: Increase the vehicle speed.
Down: Decrease the vehicle speed.
Slide the cruise control scroll wheel up or down and release it to gradually increase or decrease the target speed by ±1 km/h; Slide the cruise control scroll wheel up or down and hold it to gradually increase or decrease the target speed by ±5 km/h. Operate the distance button to change the following distance (five levels in total).
With ACC on, if you slide the cruise control scroll wheel down,
the system will set the current vehicle speed as the cruising
speed; If the brake pedal is depressed or the cruise switch is pressed during ACC activation or the vehicle speed does not meet the ACC activation conditions , causing ACC to deactivate, the system will memorize the previously set cruising speed when the ACC is successfully activated again and the cruise control scroll wheel is moved up.
When the vehicle is powered on for the first time, the following distance defaults to level 3. In the same power-on cycle, the last set following distance level will be memorized at the time of reactivating ACC, and the default level (level 3) will be maintained when the vehicle is powered on again.
Description of ACC function status
Cruise control
When there is no target vehicle ahead or the target vehicle speed is greater than the target cruising speed, the cruise control will keep the vehicle driving at the target cruising speed.
Following control
The following control function allows the vehicle to follow the vehicle ahead at the following distance set by the driver.
Overtaking mode
With ACC activated, when the driver depresses the accelerator pedal, the ACC will enter the overtaking mode; If the driver releases the accelerator pedal within 15 minutes, the vehicle will return to the target speed.
Driver takeover request
In certain scenarios, the ACC is unable to keep the vehicle driving at a safe distance and it will send a signal to prompt the driver to take over the vehicle. In this case, the icon on the instrument cluster will be illuminated, and an audible alarm will be given, reminding the driver to take over the vehicle.
Curve speed control
The curve control logic is that when the vehicle follows the vehicle ahead or cruises at a constant speed in a curve, the ACC will control the vehicle speed based on the curve radius to keep the lateral acceleration within a comfortable range.
Camera and radar recognition failure
In the following situations, the camera recognition failure may occur, affecting ACC performance, and even causing the function deactivation with the text prompts displayed in the instrument cluster, including but not limited to:
The camera mounting position is changed.
The camera is obscured or dirty.
The vehicle is driving at night.
The surroundings are dim, such as at dawn, dusk, and night or in the tunnel.
The brightness of the surrounding environment changes suddenly, such as entrance or exit of a tunnel.
Large shadows caused by buildings, landscapes or large vehicles.
The camera is exposed to direct light.
In bad weather such as rain, snow, fog, haze, etc.
Exhaust fumes, splashes of water, snowflakes or dust raised by the vehicles in front falling on the subject vehicle.
The windscreen in front of the camera is contaminated by water, dust, micro-scratches, oil, dirt, wiper, freezing, snow, etc.
The vehicle is driving on a wet road.
In the following situations, the radar recognition failure may occur, affecting ACC performance, and even causing the function deactivation, including but not limited to:
The radar is misaligned or blocked, or covered with mud, snow, metal plate, tape, label, leaves, etc.
The radar or the surrounding area is impacted due to vehicle collision or scratching.
Adverse weather conditions such as heavy rain, heavy snow, and heavy fog may affect the performance of radar.
Limited by characteristics of the object identified, the sensor may issue false alarms with regard to some metal fences, green belts, cement walls, etc., in few cases.
ACC can only identify qualified vehicles. The following targets may fail to be identified and may be responded to, including but not limited to:
Side passing vehicles.
Oncoming vehicles.
Bicycles, motorcycles, tricycles, etc.
The ACC cannot identify the following targets, including but not limited to:
Person.
Animal.
Traffic light.
Walls.
Barricades
Other non-vehicle objects.
The ACC may work or respond too late in the following situations where the target is not directly located in front, including but not limited to:
The ACC cannot identify targets in the blind spot of the sensor. For example, the ACC cannot identify the objects in the corner and side blind spots of the vehicle. When approaching or passing a curve, it may select a wrong target or miss the target, causing the vehicle to accelerate or decelerate.
When the vehicle is on a slope, the target may get lost or the distance from the vehicle ahead may be misjudged. When the vehicle going downhill, the ACC may increase the vehicle speed, resulting in exceeding the cruising speed.
The ACC may not be able to recognise in time if the vehicles (especially large vehicles such as buses and trucks) in the adjacent lane cut from the front of your vehicle with only part of the vehicle body. At this time, you shall override the vehicle in time.
The ACC may not be able to recognise the target in time if your vehicle suddenly cuts behind the vehicle in front, or if another vehicle suddenly cuts into or out of front of your vehicle. At this time, you shall override the vehicle in time.
In special or complex road conditions, it is not recommended to use ACC, as it may be affected or even deactivated, including but not limited to:
Waterlogged, muddy, potholes, ice and snow roads, or roads with speed bumps or obstacles.
Traffic conditions with pedestrians, bicycles, or many animals.
Complex and changeable traffic conditions, such as busy intersections, highway ramps, and congested roads.
Winding roads, sharp turns.
Uphill and downhill roads.
Bumpy roads.
Narrow roads.
Tunnel entrances and exits.
Non-standard roads.
Roads without median strips.
In the following situations, if the relative speed of the vehicle ahead is too high, the ACC may have limited controllability, resulting in failure to keep the distance in time: Including but not limited to:
The status of the vehicle ahead changes suddenly (such as sudden turning, acceleration, deceleration, etc.).
Other vehicles suddenly cut in or out of the subject vehicle.
The subject vehicle suddenly cuts in behind the vehicle ahead.
The subject vehicle is moving at high speed to a stationary or slow-moving target in front.
Sufficient braking force may not be obtained in the following situations. Including but not limited to:
The braking function cannot work normally (such as brake parts are too cold, too hot, wet, etc.).
The vehicle is maintained improperly (such as excessive wear of brakes or tyres, abnormal tyre pressure, etc.).
The vehicle is driving on special roads (such as uphill and downhill, water flooded roads, mud, potholes, icy and snowy roads, etc.).
Exit conditions of ACC
In any of the following situations, the ACC will be deactivated immediately:
Any door is open;
The driver seat belt is unfastened;
The vehicle is not in D gear;
The brake pedal is depressed;
The EPB is applied;
The vehicle is not powered on;
The ESC is deactivated;
The wheel speed signal is invalid;
The vehicle speed is not within the specified speed range;
The AEB works;
The radar/camera is blocked;
Other system errors have occurred.
In any of the following situations, the ACC will be gradually deactivated:
The ESC is activated;
The ABS activation time is greater than 2 seconds;
The ASR is activated;
The ACC off button is pressed.
Försiktighetsåtgärder
Varning
If you are aware of a danger while using the ACC, please take over the vehicle immediately instead of waiting for the system warning prompt.
For stationary vehicles or objects, especially those appeared after the vehicle ahead drives away your lane, the ACC will not be able to recognise them and apply brakes or slow down. You should always pay attention to the road conditions ahead
and be ready to take over the vehicle at any time. Relying
solely on ACC may cause personal injury or even death. In addition, the ACC may react to vehicles or objects that do not exist or are not in the lane you are driving, causing unnecessary or inappropriate deceleration of the vehicle.
The ACC may not control the vehicle speed properly due to limited braking capacity and being on a slope. It may also misjudge the distance between the subject vehicle and the vehicle ahead. When the vehicle is going downhill, the ACC may increase the vehicle speed, resulting in exceeding the cruising speed (or limit speed).
Do not rely solely on ACC to slow down the vehicle and avoid a collision, otherwise, serious personal injury or death may occur. Always observe the road conditions while driving and be ready to take over the vehicle at any time.
The ACC is only a driver assistance function, which can not prevent all collisions. The ACC has a limited deceleration capability and cannot replace the driver in driving. It is always your responsibility to drive your car safely and to obey current laws and traffic regulations.
The ACC can adjust the vehicle speed smoothly based on vehicle conditions and traffic conditions ahead. However, due
to the limitations of the monitoring system, the system may fail
to apply brake in an emergency. When necessary, you should take the initiative to take braking actions.
The ACC cannot be applied in all driving scenarios and traffic, weather and road conditions.
You must intervene when the ACC fails to maintain a proper speed or distance from the vehicle ahead. It is your responsibility to determine and maintain a safe following distance at all times. Do not rely solely on ACC to maintain the distance between vehicles.
The ACC may not respond to animals, pedestrians, specially- shaped vehicles, vehicles loaded with irregularly shaped cargo, or small vehicles (such as bicycles, tricycles, and motorcycles) or traffic signs (such as traffic cones, water-filled barriers, signboards). ACC may also not respond to slow- moving, stopped or approaching vehicles, or other stationary objects.
The ACC may cause abnormalities such as excessive deceleration and deceleration shock due to the asynchronous response of the electronic brake system (EBS) between the trailer and the prime mover. In this case, please deactivate ACC.
Do not use the ACC in environments with poor driving
conditions, such as: in the city or other heavily congested
traffic, roads with water or slush, heavy rain and snow, poor visibility, windy conditions, or driving on slopes.
Loading too many items may cause a change in vehicle attitude, which may degrade or disable the target identification of ACC.
When another vehicle changes lanes to the front of your vehicle, ACC may not have time to respond, requiring you to apply braking in time.
When driving downhill on steep slopes, it may be difficult for ACC to maintain proper distance from the vehicle ahead. In these situations, be extra careful and always be ready to apply braking.
When you are driving into and out of curves, the selection of a target may be delayed or interfered, which may cause ACC to brake unexpectedly or brake too late.
On a sharp turning road, such as a serpentine road, the ACC may not be able to detect the vehicle ahead normally due to the limited field of view of the windscreen and front radar, in which case, the vehicle may accelerate, which requires you to take over the vehicle according to the actual situation.
At night with insufficient lighting or in a city with complex lighting, the camera may misidentify, miss, or inaccurately
identify the target, causing ACC to brake incorrectly or brake too late. You need to use the ACC function with caution, stay focused, and be ready to take over the vehicle at any time.
If you need to cut out of the current lane or the vehicle ahead cuts out while following the vehicle ahead, the ACC may be limited in acceleration for a period of time to ensure safety. You can actively depress the accelerator pedal to take over the vehicle.
AnmärkningAfter the ACC is deactivated, you must override the vehicle to ensure the driving safety.
Observera
When the following target is changed or lost (especially during turns or lane changes), the ACC may accelerate unexpectedly.
When the vehicles, objects or stationary targets in adjacent lanes are changed or lost (especially during turns or lane changes), the ACC may brake unexpectedly.
The ACC is mainly suitable for driving on smooth roads. When
ACC is used for driving downhill on steep slopes or with heavy
loads, it may be difficult to maintain the correct following distance from the vehicle ahead.
The ACC can control your vehicle to accelerate and decelerate. When the vehicle is decelerating, the brake system starts to work and may make a sound, which is normal.
When the ACC fails, a text prompt will be displayed on the instrument cluster to remind the driver that ACC is faulty.
When the vehicle speed is 0, the system will automatically turn off the prompt sound.
If the vehicle speed gradually increases, the prompt sound volume will gradually decrease until it is automatically turned off; If the vehicle speed gradually decreases, the prompt sound volume will gradually increase.
When the vehicle is in reverse gear (R gear), the reverse prompt sound is activated, and the prompt sound is "beep beep beep".
Low Speed Alarm And Reverse
↑ Till toppenReminder Device
Driving Assistance
This car is equipped with a low-speed alarm and reverse reminder device, which will alert surrounding personnel and vehicles when you are driving at low speed or reversing.
Reversing status
When the vehicle speed is reduced to the specified range, the vehi- cle turning sound alert device will be activated.
When the vehicle is driving at low speed, the prompt
↑ Till toppensound is "ding-ding-ding".
Automatic Emergency Braking (AEB)
↑ Till toppenDriving Assistance
The automatic emergency braking (AEB) system can detect target vehicles or obstacles, predict a risk of potential forward collision, and send a warning signal and display the image on the vehicle information screen in case of a danger to remind the driver and activate the brake system of the subject vehicle to avoid or
mitigate collisions by reducing speed.
AEB function
Safe distance alarm
In non-emergency situations, the system will remind the driver that the distance between the subject vehicle and the vehicle ahead is too small, sound the buzzer at a low frequency, and highlight the prompts in green on the simulated reality system.
Level 1 warning
When a dangerous situation occurs, the system will remind the driver that actions should be taken to respond to the level 1 warning, sound the buzzer at a low frequency, and highlight the prompts in yellow on the simulated reality system.
Level 2 warning
In the case of an emergency, the system will remind the driver that actions should be taken to respond to the level 2 warning, sound the buzzer at a high frequency, and highlight the prompts in red on the simulated reality system.
Emergency brake
After the collision alarm is issued, if the driver still does not take measures, AEB will actively apply the brake braking force, increasing the driver's reaction time and reducing the relative speed.
System fault
When the system fails, a text prompt will be popped out, the AEB switch in the vehicle information screen will be in the off position and the icon will be grayed out, indicating that the function is unavailable.
Bruksanvisning
AEB activation
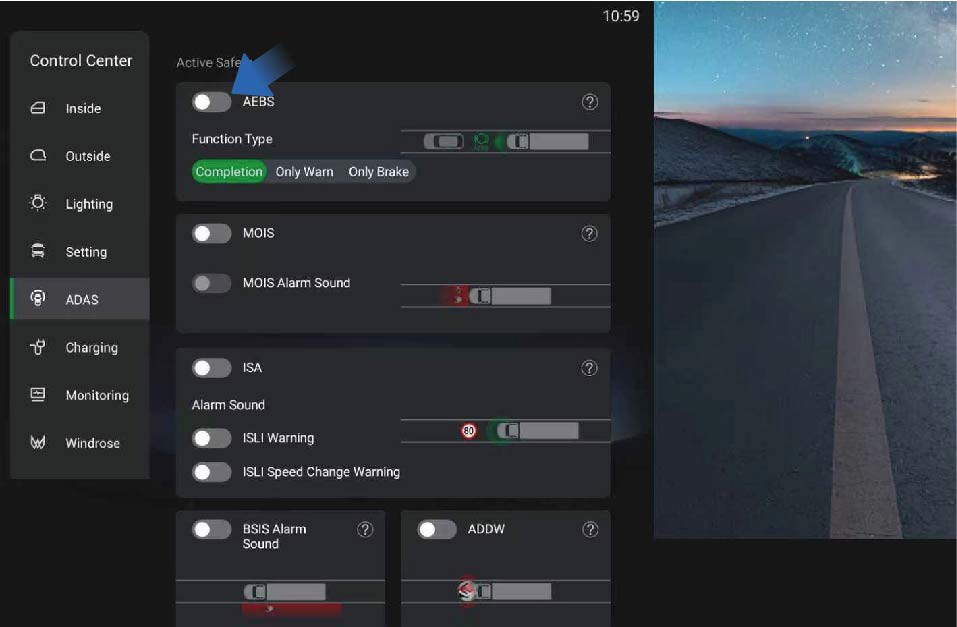
You can activate/deactivate this function by selecting "Control Center", switching to "ADAS" interface, and clicking the "AEBS" button on the vehicle information screen of the instrument panel.
The AEB is activated by default after the vehicle is powered on. When this function is deactivated manually, the system will display the corresponding text prompt on the vehicle information screen. When the AEB fails, the system will display the corresponding text prompt on the vehicle information screen, and the AEB icon will be grayed out, indicating that the function is unavailable.
Applicable scenarios of AEB
The AEB can detect the pedestrians, two-wheeled vehicles, passenger cars, trucks, and etc., except for oncoming vehicles and crossing vehicles. If the visual detection capability is limited, the AEB will give a warning for moving targets, but will not apply brakes. (Note: When the vehicle is driving through curves, the AEB will give a warning but not apply brakes to the detected pedestrians and two-wheeled vehicles).
Limitations of AEB
The function will be limited in the following situations:
The AEB can assist the driver in dangerous situations, but the driver should not solely rely on the system.
In adverse weather conditions, such as heavy rain, snow, etc., the function will be degraded, and cannot detect the target or
detect the target too late.
The AEB is running in the background under normal conditions and will not be noticed by the driver. Therefore, if the relevant targets are detected by the system, they will not be displayed.
The AEB may be triggered by mistake due to its limitations.
Please note that the sensor cannot detect dangerous obstacles ahead in all situations.
Certain targets can weaken and block radar detection, such as highway guardrails, tunnel entrances, heavy rain or snowy weather, thus affecting the AEB.
In some scenarios, only radars or cameras detect objects, and the system cannot achieve optimal performance, and such system performance degradation will not be perceived by the driver.
The AEB is designed to detect moving targets in the same lane and direction in normal traffic conditions. When certain conditions and speed ranges are met, the AEB system can also detect stationary targets in the lane where the subject vehicle is driving.
The system will not respond to animals, oncoming and crossing vehicles.
For safety reasons, the implementation of the AEB function requires the support of the ESC system.
The AEB can only respond to a target that is in the detection range of the radar sensor and has been identified. For cut-in targets, targets that are detected after the subject vehicle changes lanes, and those on sharp turns, the performance of AEB will be greatly limited.
If the radar is affected by strong vibration or slight impact during calibration, the system performance will be reduced and the false trigger rate will be increased. Therefore, the radar needs to be checked for the installation position or to be re- calibrated.
The radar system requires special performance to detect relevant targets. When affected by the environment such as under electromagnetic interference or by the target itself, the detection will be disturbed and the system performance will be reduced.
The radar system is installed in front of the vehicle, and no other obstacles are allowed in the field of view of the radar sensor. In the installation position, the radar will be affected by dust and snow. When the radar is completely covered by snow, the system may be turned off. In this case, the driver will be informed of relevant information through the IVI interface.
The target will not be detected until it appears in the detection range of the sensor; When the target changes lanes or cuts in too close, the system may not detect the target in front.
Targets that cannot be clearly identified, such as motorcycles or bicycles, and vehicles with high driving positions are often detected too late or cannot be detected.
Försiktighetsåtgärder
Varning
The driver is responsible for safe driving without dangerous situations.
AEB is only a driver assistance system and cannot exempt the responsibility of the driver to drive the vehicle safely. The driver must be fully responsible for all traffic scenarios.
Even if the traffic conditions are not very dangerous, AEB may still give alarms and apply brakes, such as power loss of vehicle ahead, overtaking, or passing through curves, so the driver must be ready to take over the vehicle at all times.
AEB cannot avoid all accidents in all traffic scenarios.
AEB cannot respond to oncoming vehicles, animals, and crossing vehicles.
When the AEB system fails or the system cannot work properly, please go to a Windrose authorised service centre for repair immediately. Do not modify it without authorization.
The braking performance of AEB depends on the braking system of the vehicle.
When the ESC/EBS MIL is on, the AEB system will not work properly. Check and troubleshoot related faults in time.
Do not use AEB when the vehicle is being towed, the vehicle is placed on a drum bench, the vehicle is driving on a sloped curve, or the radar camera is blocked or obscured by the deformed components.
Elektroniskt bromssystem (EBS)
↑ Till toppenDriving Assistance
The electronic braking system (EBS), as a control system upgraded from the ABS and ESC, can reduce the response time and pressure building time of the braking system, realize the
electronic brake force distribution of the vehicle and the consistency control of the prime mover and trailer, shorten the braking distance and improve the overall braking performance of the vehicle. The EBS integrates functions such as ASR, HSA, and ESC.
Försiktighetsåtgärder
↑ Till toppenVarningWhen the EBS fails, the yellow EBS MIL will be illuminated on the instrument cluster. Contact the Windrose authorised service centre as soon as possible to inspect and repair the system.
Elektronisk bromskraftfördelning (EBD)
↑ Till toppenDriving Assistance
Funktionsbeskrivning
↑ Till toppenElectronic Brakeforce Distribution (EBD) ensures good braking performance and stability of the vehicle under different load conditions by regulating the distribution of braking forces between front and rear wheels and controlling the slip of rear wheels.
Antispinnreglering (ASR)
↑ Till toppenDriving Assistance
The acceleration slip regulation (ASR) is an electronic system that monitors and controls the driving force of the driving wheels during driving on the basis of ABS. If the system detects vehicle slipping when accelerating or starting, the ASR will be activated to brake the slipping wheels so as to maintain the stability in driving direction and the starting ability of the vehicle.
Filbytesvarning (LDW)
↑ Till toppenDriving Assistance
When the vehicle deviates from the current lane unconsciously, the lane departure warning (LDW) will alert the driver with visual and audible alarm sounds.
Activation conditions of LDW
LDW may be restricted or not work normally under the following circumstances, including but not limited to:
The operating speed is outside the normal operating speed range (60-120 km/h).
The vehicle is affected by crosswinds.
The vehicle is driving on a slope.
The vehicle is driving through a road with sharp curves.
The vehicle is extremely inclined under heavy loads or abnormal tyre pressure.
The vehicle is driving on roads that can result in great amplitude of oscillatory motion in the vehicle, or on road surfaces with a large number of road joints.
The vehicle is driving on roads without lane lines, or with unclear lane lines or disordered lane lines due to construction.
The following distance is too close to detect the lane lines.
The imaging capability of the camera is affected. Including but not limited to the following situations:
Poor visibility at night.
Poor visibility due to bad weather, such as heavy rain, heavy snow, fog, dust.
Bright light, backlight, water reflection, or extreme light
contrast.
The camera is blocked by dirt, ice, snow, etc.
The performance of the camera deteriorates under high temperatures, extreme cold weather and other extreme weather.
Bruksanvisning
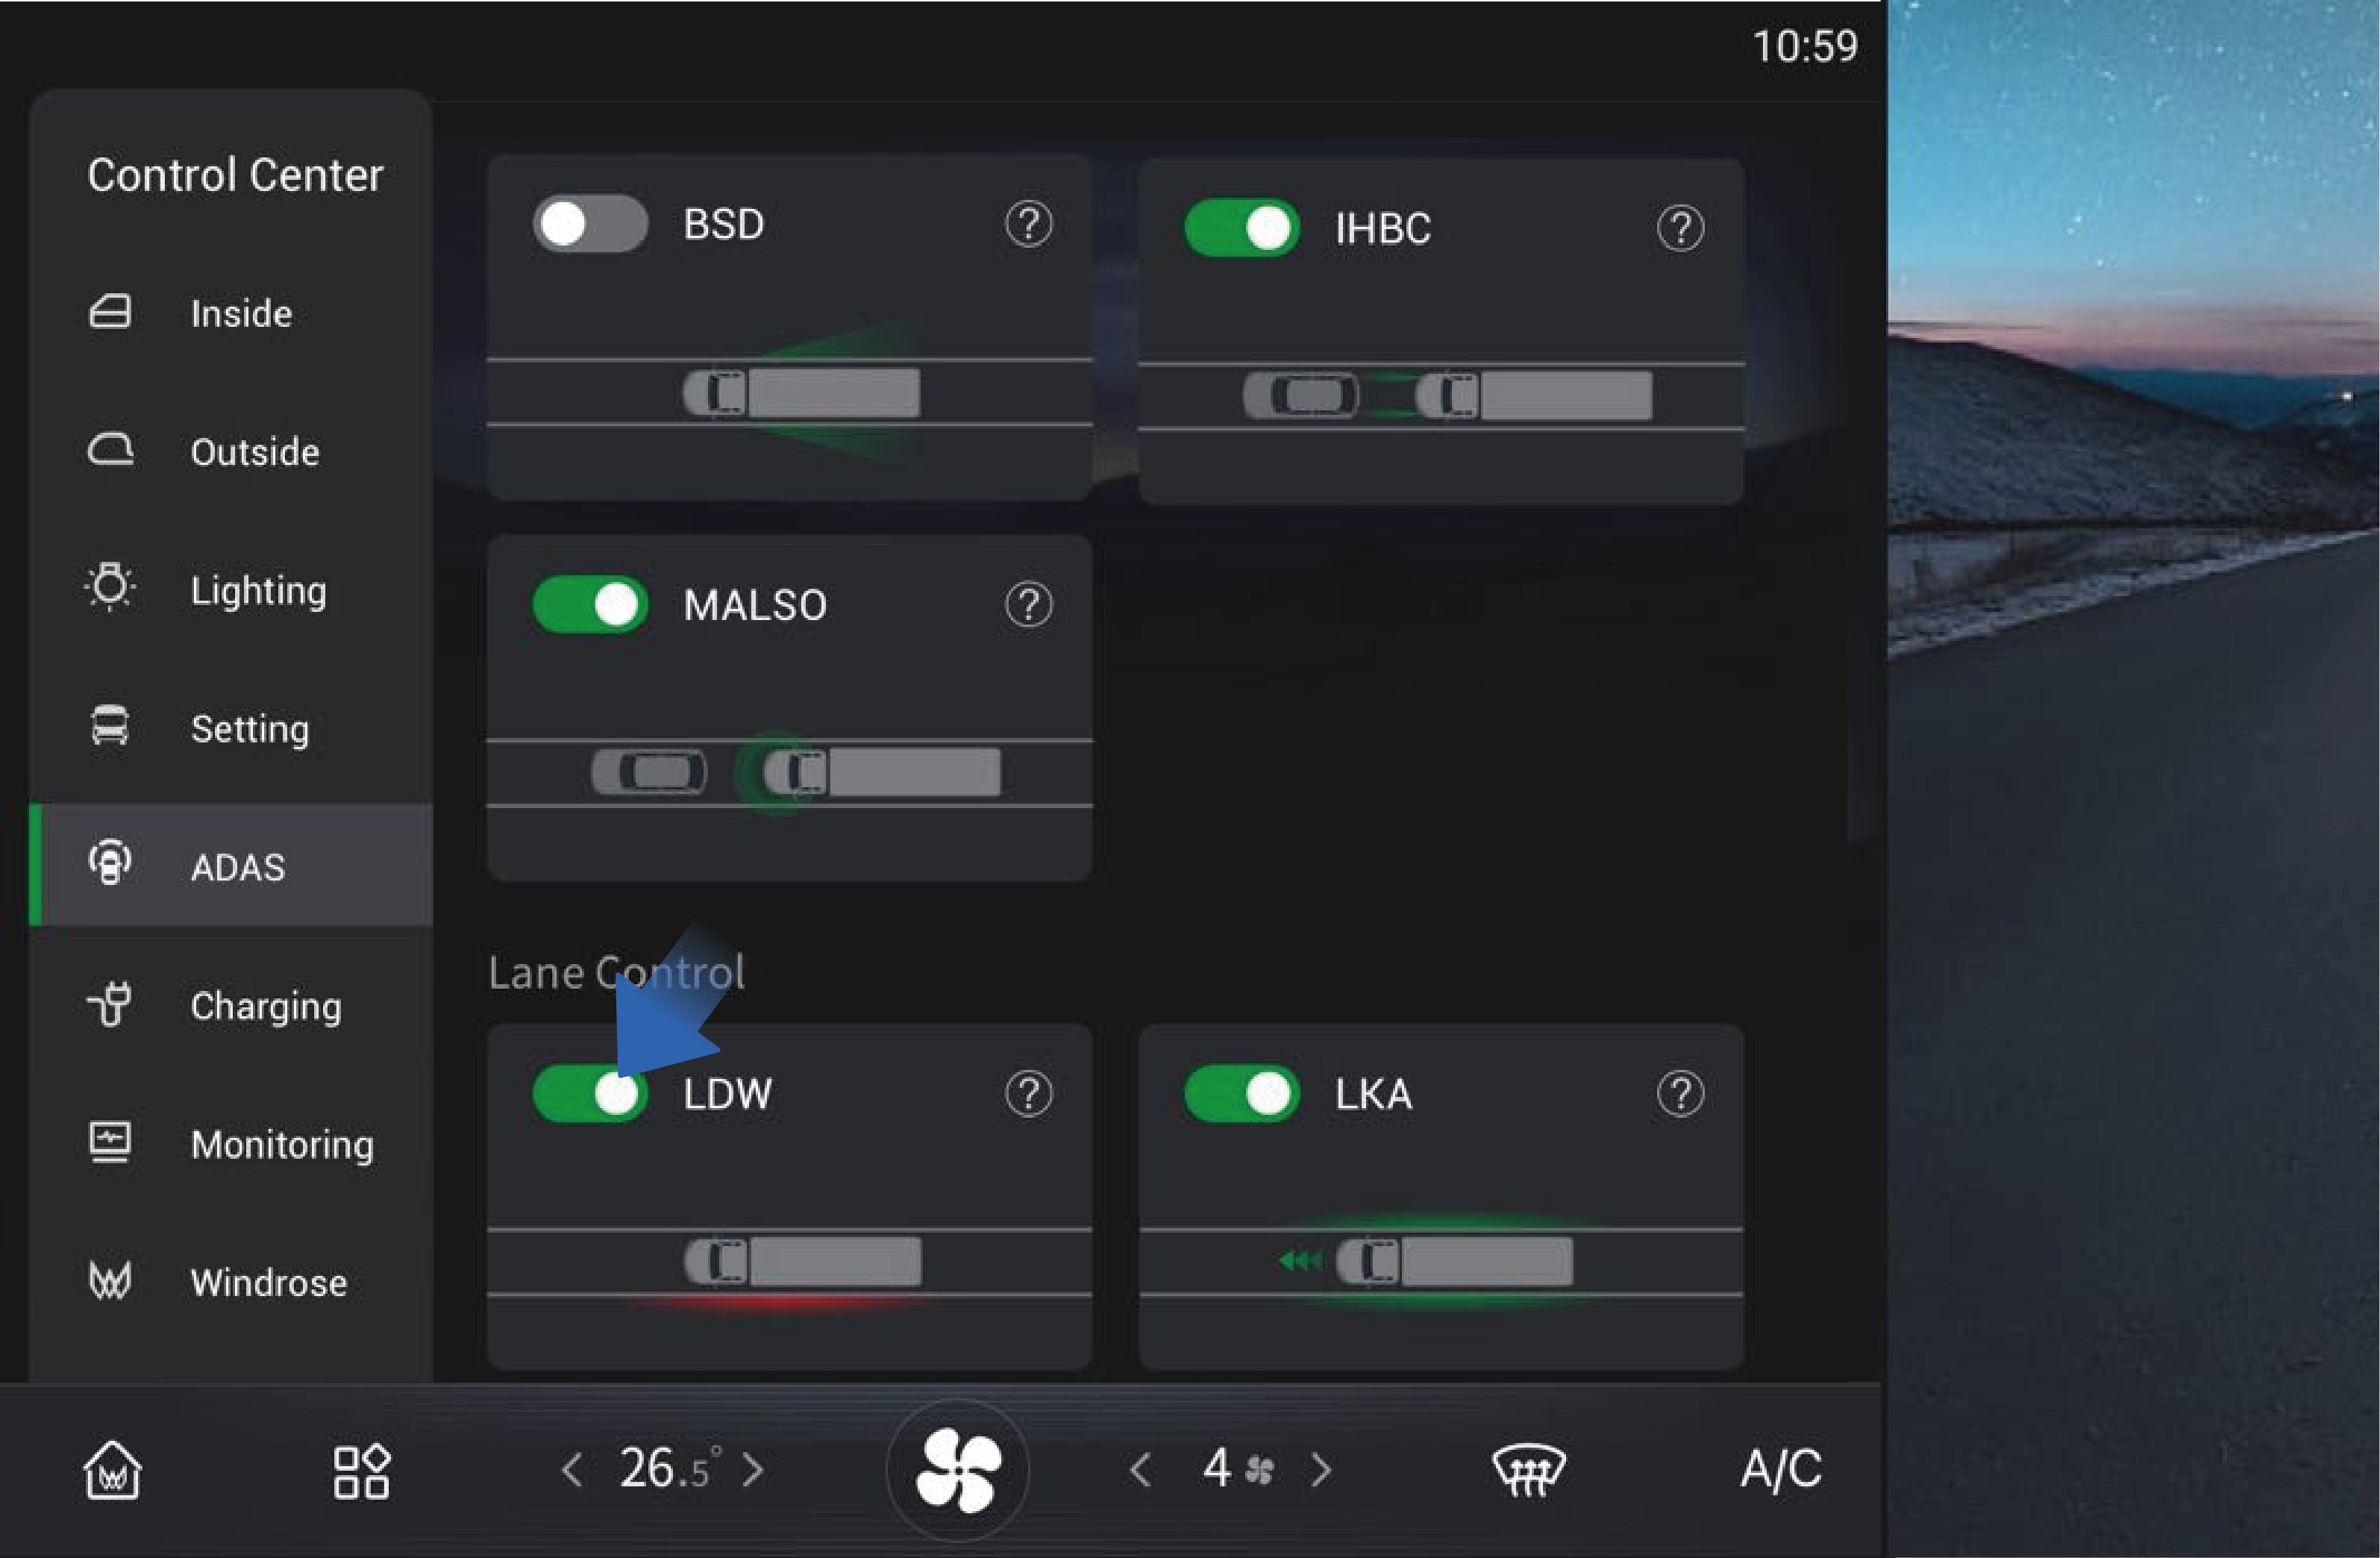
↑ Till toppenYou can activate/deactivate the function by selecting "Control Center", switching to "ADAS" interface, and clicking "LDW" button on the vehicle information screen of the instrument panel.
LDW is enabled by default when powered on, and you can
manually disable it as needed.
Försiktighetsåtgärder
Varning
LDW is a driving assistance function, and it cannot replace your observation and judgment of traffic conditions and the driver's responsibility for safe driving.
Do not use LDW at road forks, conjunctions, etc.
Do not use LDW when snow chains are used in the vehicle.
Do not use LDW when the tyres are excessively worn or the tyre pressure is too low.
Do not use LDW when mixing tyres of different constructions, or brands or from various manufacturers, or having diverse tread patterns.
Do not use LDW when the vehicle is driving on construction roads (with construction signs, cone barrels, etc.).
Do not use the LDW in poor driving conditions, such as sharp
turns, steep slopes, icy and slippery roads, or in bad weather such as rain, snow, fog.
You should maintain attention and judgment at all times, ensure that the vehicle is in its own lane, and comply with current laws and traffic regulations.
LDW may not work properly on roads without lane lines, with multiple lane lines, worn or unclear lane lines or where the lane lines are covered by other objects.
LDW cannot prevent collision. It is always your responsibility to drive the vehicle safely.
Elektronisk stabilitetskontroll (ESC)
driving direction of the vehicle and ensure the stability of the direction.
Anti-rollover: When the vehicle is at risk of rollover, the ESC will reduce the motor torque or brake the vehicle to slow down the vehicle and prevent the vehicle from rolling over.
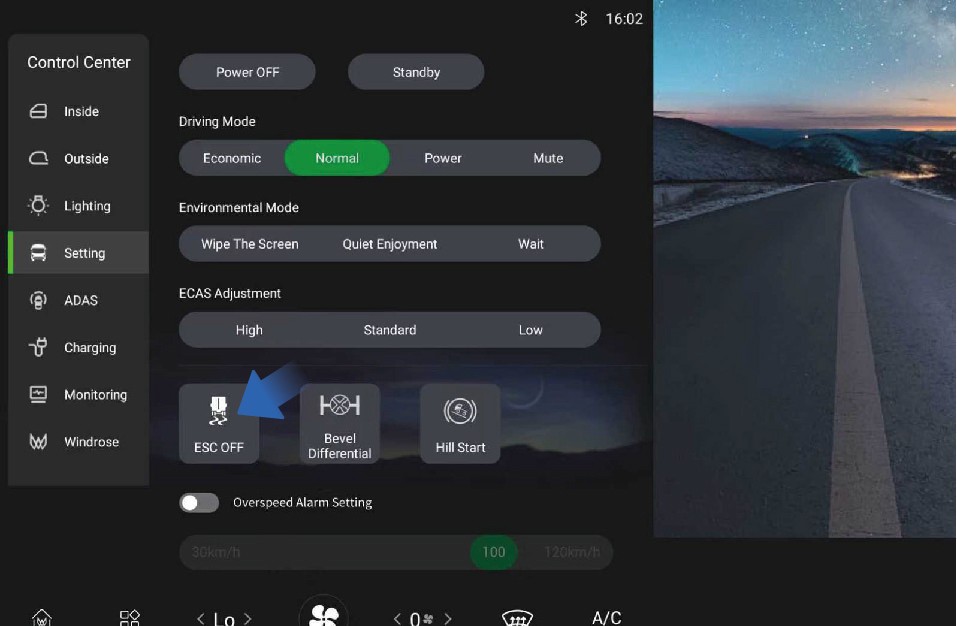 Bruksanvisning
Function introduction
Driving Assistance
The electronic stability control (ESC) is a system integrating numbers of comprehensive strategies for stability control of the vehicle. It is intended to improve the handling performance of the vehicle and prevent the vehicle from losing control when it reaches its dynamic limits. The ESC improves the safety and controllability of the vehicle.
The ESC mainly has two sub-functions:
Direction control: When the vehicle is oversteered or understeered, the ESC brakes a single wheel to correct the
↑ Till toppenYou can manually turn off the ESC by selecting "Control Center", switching to "Setting" interface, and clicking "ESC OFF" button on the vehicle information screen of the instrument panel.
After the ESC is turned off, the corresponding ESC OFF indicator will be displayed on the instrument cluster.
Försiktighetsåtgärder
AnmärkningWhen the ESC is faulty, the yellow ESC MIL on the instrument cluster will be illuminated. You should contact a Windrose authorised service centre as soon as possible to have the system repaired.
Observera
ESC is turned on by default when the vehicle is started. When the vehicle restarts, ESC will also be turned on automatically.
The ESC OFF switch controls activation and deactivation of both ESC and ASR. When ESC is turned off, the ASR will also be turned off.
Blind spot information system (BSIS)
↑ Till toppenDriving Assistance
The BSIS system detects pedestrians and cyclists in the vehicle's blind spots. When the vehicle is stationary and detects an object entering the danger zone, the BSIS alarm screen immediately triggers an alert, with the dashboard indicator lights activating simultaneously. If the corresponding indicator is on and the vehicle is moving forward, the dashboard will sound and flash the alarm until the pedestrian completely exits the danger zone.
BSIS warning
Level 1 warning
When the vehicle's BSIS sensor detects the presence of a bicycle rider with a speed of 5-20 km/h entering its detection area, the BSIS system displays a yellow warning light on the instrument panel and BSIS alarm screen through optical signals, alerting the driver until the target leaves the alarm area.
Level 2 warning
On the basis of the first level alarm, when the vehicle is in forward gear and the indicator on the side with the target object is synchronously activated, the BSIS system displays a red warning light on the instrument panel and BSIS alarm screen through optical signals, synchronously emitting an alarm sound to inform the driver that the target has left the alarm area.
BSIS fault warning
When the system fails, a pop-up window will appear once, and the function switch in the setting interface of the IHU control screen will be tuned off and grayed out, prompting the operator that the function is unavailable.
Bruksanvisning
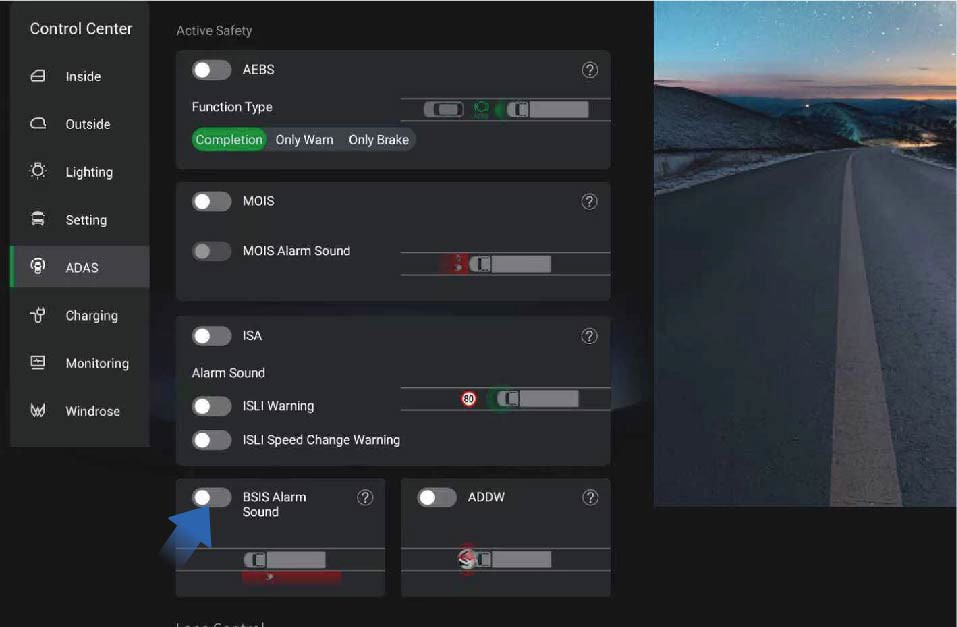
You can switch to the control centre by selecting "Control Center" from the car's infotainment screen on the right side of the dashboard. On the "ADAS" interface, click the "BSIS Alarm Sound" button to turn on/off the BSIS function alarm sound.
Limitations of BSIS
In any of the following situations, BSIS may not be able to detect targets or work well. We recommend that you do not rely too much on BSIS:
Adverse weather conditions such as snow and fog, as well as low light environments, prevent the system from detecting targets.
Changing lanes directly without turning on the indicator.
The target is relatively small or moves slowly and is in a stationary state.
The vehicle is making a sharp turn or in an open area.
When there is a system malfunction (such as camera, controller, alarm, brake, steering, etc.).
Försiktighetsåtgärder
Varning
BSIS is a driving assistance function, and it cannot replace your observation and judgment of traffic conditions and the driver’s responsibility for safe driving.
ADDW

Driving Assistance
Do not rely too much on the BSIS, and it is forbidden to test the triggering of the function intentionally or wait for the function to be triggered intentionally. Due to the inherent limitations of system performance, false triggering and missed triggering cannot be completely avoided.
ADDW is the Driver Distraction Warning System, which issues a
warning when the driver is distracted; When the ADDW switch is turned off, the distraction reminder function can be turned off during the current power-on period
Intelligent hastighetsanpassning (ISA)
↑ Till toppenFunction introduction
Driving Assistance
The ISA system combines forward facing camera recognition and offline maps to detect speed limits. When the system detects the perceived speed limit, the dashboard will display the perceived speed limit of the current road. If the vehicle speed exceeds the perceived speed displayed on the dashboard, the system will emit a flashing light signal and an audible signal warning. Releasing the accelerator or stepping on the brake can terminate the audible warning.
The ISA function can be completely turned off until it is turned on again or the vehicle is restarted.
You can switch to the control centre by selecting "Control Center" from the car's infotainment screen on the right side of the dashboard. On the "ADAS" interface, click the "ISA" button to turn on/off the ISA function.
Drivers can turn on or off the overspeed warning sound through the settings option; Drivers can set the recognition speed limit change reminder sound to be turned on or off through the settings.
Identification and detection of vehicle speed limit sign by ISA
The ISA perception system can detect and recognise speed limit signs within 50 meters ahead.
The ISA perception system can detect speed limit signs within a height of no more than 7 meters.
The ISA system can recognise speed limit signs that comply with national standards.
The ISA system can detect multiple speed limit signs within a visible range.
The ISA system is capable of detecting and identifying embedded speed limit signs.
ISA function failure
When the system detects a sensor malfunction that the system function depends on, excluding sensor obstruction, the driver should be informed of the system malfunction status through a fault signal.
When the system detects a malfunction in the associated electronic components, it should inform the driver of the system's fault status through a fault signal.
As long as there is a malfunction, it should continue to be displayed after the vehicle is powered on.
Försiktighetsåtgärder
Varning
The speed limit information and speed measurement information are for reference only. Please refer to the information on the actual road and drive the vehicle safely.
Affected by driving environment, the camera may send false alarms when it detects a sign similar to the speed limit sign. For this reason, the driver should not rely solely on the system for judgment at any time.
Hill Start Assist (HSA)
↑ Till toppenDriving Assistance
The hill start assist (HSA) helps you prevent the vehicle from moving backward when starting on a slope. The HSA will keep the vehicle stationary on a slope for a short time after the brake pedal is released.
Bruksanvisning
↑ Till toppenYou can activate/deactivate the function by selecting "Control Center", switching to "Setting" interface, and clicking "Hill Start"
button on the vehicle information screen of the instrument panel. When the vehicle is going to start on the ramp, first depress the brake pedal, release the parking brake, and then press the HSA button in the IHU control screen to activate the HSA function. At this time, the HSA indicator on the instrument cluster will be illuminated, and the driver should start the vehicle within 3S. Before the HSA is deactivated, the HSA indicator on the instrument cluster
Försiktighetsåtgärder
Varning
The HSA is not a substitute for EPB. When you are going to leave the vehicle, be sure to depress the brake pedal and enable the EPB.
If the vehicle starts to slip backward, the brake pedal should be depressed immediately. The HSA cannot prevent the vehicle from rolling backwards on a steep slope under full load or on special roads.
It is forbidden to depress the brake pedal and the accelerator pedal simultaneously when starting on a slope.
Observera
It is recommended to turn off the HSA immediately after the vehicle starts; If continuous start is required, turn off the HSA after continuous hill start is completed.
It is recommended to turn off the HSA when driving on level roads.
The HSA is turned off by default when the vehicle is started.
↑ Till toppenwill flash rapidly.
Nödsäkerhetsanordning för däck (TESD)
Driving Assistance
When replacing tyres, the operator need to remove the tyre emergency safety device first, next remove the tyre, install the new tyre, and then refit the tyre emergency safety device.
Funktionsbeskrivning
↑ Till toppenThe tyre emergency safety device is a passive safety device that can effectively prevent the wheel hub from contacting the ground at the moment of a tyre blowout, so that the steering force and braking force of the vehicle can still be controlled to ensure the safety of personnel and vehicles at the first time.
Försiktighetsåtgärder
Observera
When the removed tyre emergency safety device is refitted, it is necessary to check whether the device is damaged. Only when it is confirmed that there is no damage can the device be used again, but the bolts and nuts must be replaced with new ones. If damaged, a new tyre emergency safety device needs to be installed.
Elektrohydraulisk servostyrning (EHPS)
↑ Till toppenDriving Assistance
Funktionsbeskrivning
The electro-hydraulic power steering (EHPS) realizes steering assistance and intelligent driving assistance by controlling the hydraulic power output of power motor.
For steering, the system will provide steering assistance to enhance the controllability and stability of the vehicle and make steering easier.
Active steering alignment
After steering, the EHPS will calculate the angle and speed of active steering alignment according to the steering angle and the vehicle speed at that time, to realize the active alignment of steering wheel.
Speed-dependent power assist
When the vehicle turns at high speed, the opposite direction force is appropriately increased linearly; When the vehicle turns at low speed, the same direction force is appropriately increased linearly to adjust your steering feel and provide speed-dependent assistance.
Hands-off detection (HOD)
↑ Till toppenThe EHPS system can determine whether you have taken your hands off the steering wheel based on the steering wheel torque.
Försiktighetsåtgärder
Varning
When the EHPS system fails, contact a Windrose authorised service centre in time to check and repair the system.
EHPS is only a driver assistance function and cannot replace your steering wheel control. During driving, you are always responsible for controlling the steering wheel to steer.
Electronic-Controlled Air Suspension (ECAS)
↑ Till toppenDriving Assistance
Funktionsbeskrivning
The electronically controlled air suspension (ECAS) drives the solenoid valve in the control mechanism by collecting the height of the frame and the axle, airbag pressure, vehicle speed signal, braking signal and operation switch signal, to realize the inflation and deflation of the airbag, thereby achieving the raising and lowering of the suspension.
Instructions for operation of remote control The remote control is indispensable to ECAS on the truck. It integrates commonly used raising and lowering buttons of ECAS
for manual raising and lowering of the front and rear axles,
restoration of normal height, and memory height control.
The remote control is fixed in the storage cabinet under the right instrument panel and it can be taken out for use.
The remote control button is a self-resetting, inching button, and when using the button, you should select the target position (front/ rear axle), then the corresponding indicator will be illuminated, and the target airbag will be lifted and lowered.
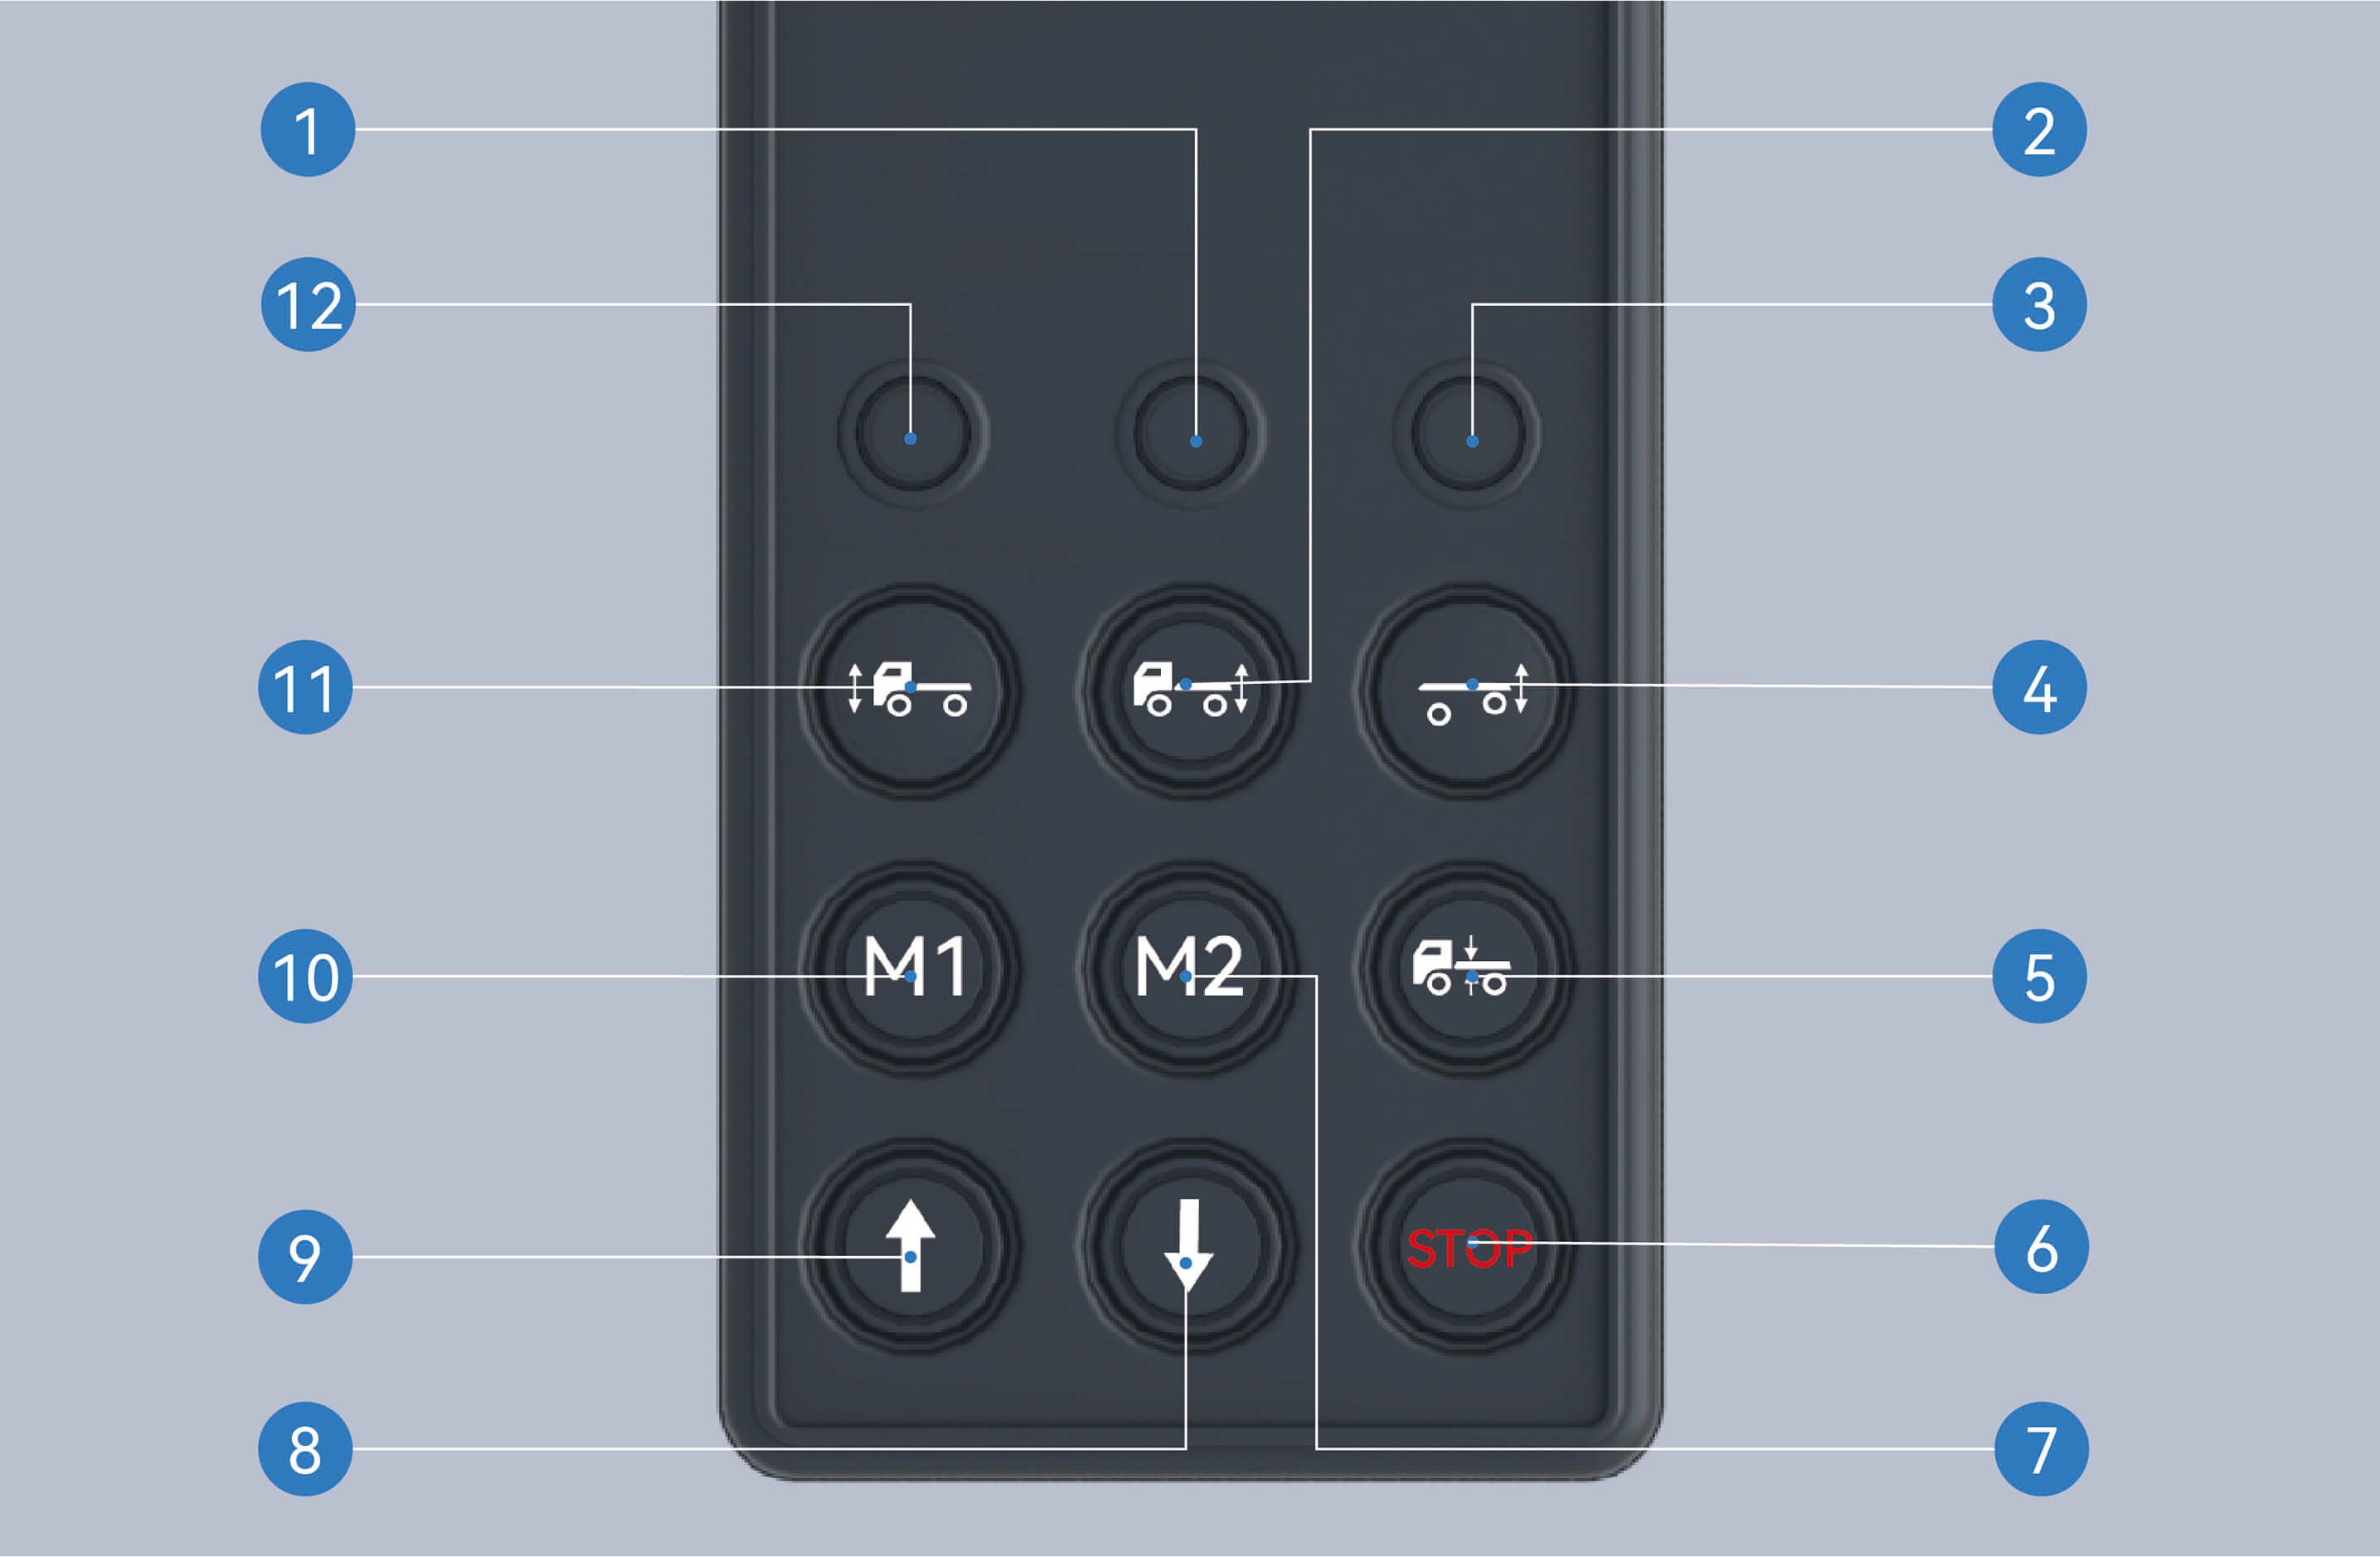
Rear axle indicator
When the rear axle is selected, the rear axle indicator will be illuminated and you can operate the rear axle.
Rear axle selection button
After pressing this button and selecting the rear axle, the rear axle indicator will be illuminated.
Lifting axle indicator
When the lifting axle is selected, the lifting axle indicator will be illuminated and you can operate the lifting axle.
Lifting axle selection button
After pressing this button and selecting the lifting axle, the lifting axle indicator will be illuminated.
Reset button
When selecting the axle, the indicator will be illuminated. When you press the button at this time, the selected axle will return to normal height.
Stop button
After pressing this button, any raising and lowering of the vehicle that is in progress will be stopped.
Memory height M2
Activation of memory height M2: After selecting the front/ rear axle, press this button to automatically adjust the current axle height to memory height M2.
Storage of memory height M2: Select the front/rear axle, adjust the axle position to the height to be memorized, press and hold the stop button without releasing it, press this button simultaneously, hold it and release after 2 seconds.
Lowering button
Press this button to lower the axle.
Raising button
Press this button to raise the axle.
Memory height M1
Activation of memory height M1: After selecting the front/ rear axle, press this button to automatically adjust the current axle height to memory height M1.
Storage of memory height M1: Select the front/rear axle, adjust the axle position to the height to be memorized, press and hold the stop button without releasing it, press this button simultaneously, hold it and release after 2 seconds.
Front axle selection button
After pressing this button and selecting the front axle, the front axle indicator will be illuminated.
Front axle indicator
When the front axle is selected, the front axle indicator will be illuminated and you can operate the front axle.
Instructions for operation of vehicle information screen
You can select the appropriate driving height by selecting "Control Center", switching to "Setting" interface, and clicking "ECAS Adjustment" button on the vehicle information screen of the instrument panel.
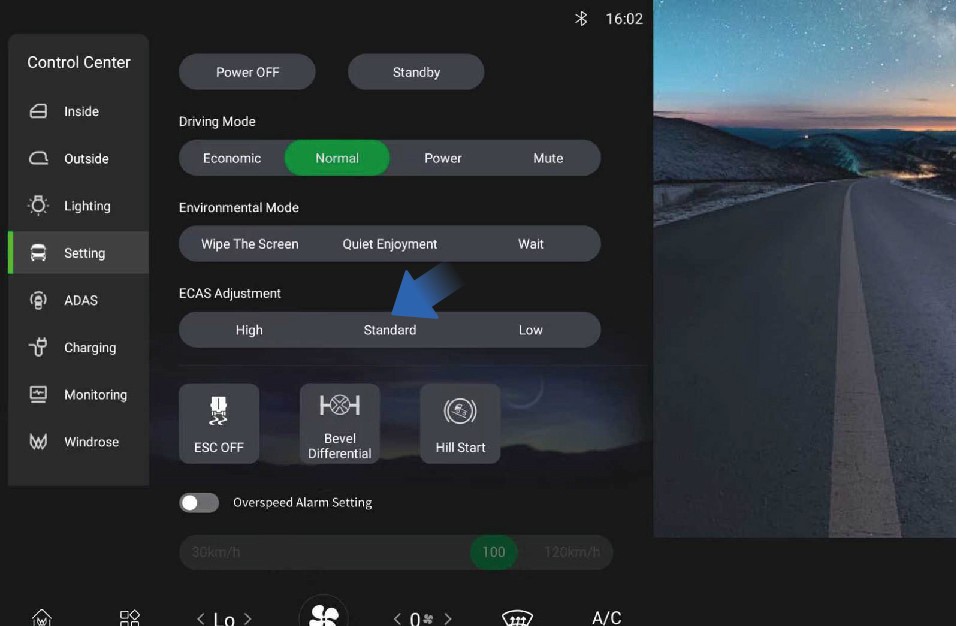
High
When driving on bumpy roads or wading roads, you can select a larger driving height to prevent the wheel from jumping and contacting the frame, etc.
The height of the high-level airbag is increased by 50 mm relative to the standard height.
Standard
The standard height controlled by the vehicle information screen and the standard height controlled by the remote control are the same.
If the airbag is not in the standard position, the non-normal height warning icon will be illuminated on the instrument cluster.
Low
At high speeds, a smaller driving height can be selected to improve the ride comfort of the vehicle and reduce energy consumption to a certain extent.
The height of the low-level airbag is reduced by 35 mm compared to the standard height.
Försiktighetsåtgärder
VarningWhen the ECAS is faulty, the red ECAS MIL on the instrument cluster will be illuminated. You should contact a Windrose
authorised service centre as soon as possible for inspection and repair of the system.
Anmärkning
The airbag cannot be raised or lowered when the pressure in the air reservoir is insufficient.
When the vehicle speed exceeds 10 km/h, the manual button control function of ECAS will be disabled.
When the vehicle is just powered on, if the airbag is not in the normal position, ECAS will automatically return to and maintain at the standard height immediately.
If the airbag is not in the normal position, when the vehicle accelerates from standstill state to above 10 km/h, it will automatically return to the standard height and maintain at the normal height.
The front/rear airbag can be raised by up to 85 mm and lowered by up to 50 mm.
If the airbag is not at the standard position, the non-normal height warning icon will be illuminated on the instrument cluster.
Observera
- The vehicle can be driven for a long time at the height you have selected on the vehicle information screen.
Däcktrycksövervakningssystem (TPMS)
Driving Assistance
↑ Till toppenFunktionsbeskrivning
↑ Till toppenThis vehicle is equipped with a tyre pressure monitoring system (TPMS), which allows you to check the tyre pressure status of the vehicle at any time.
Bruksanvisning
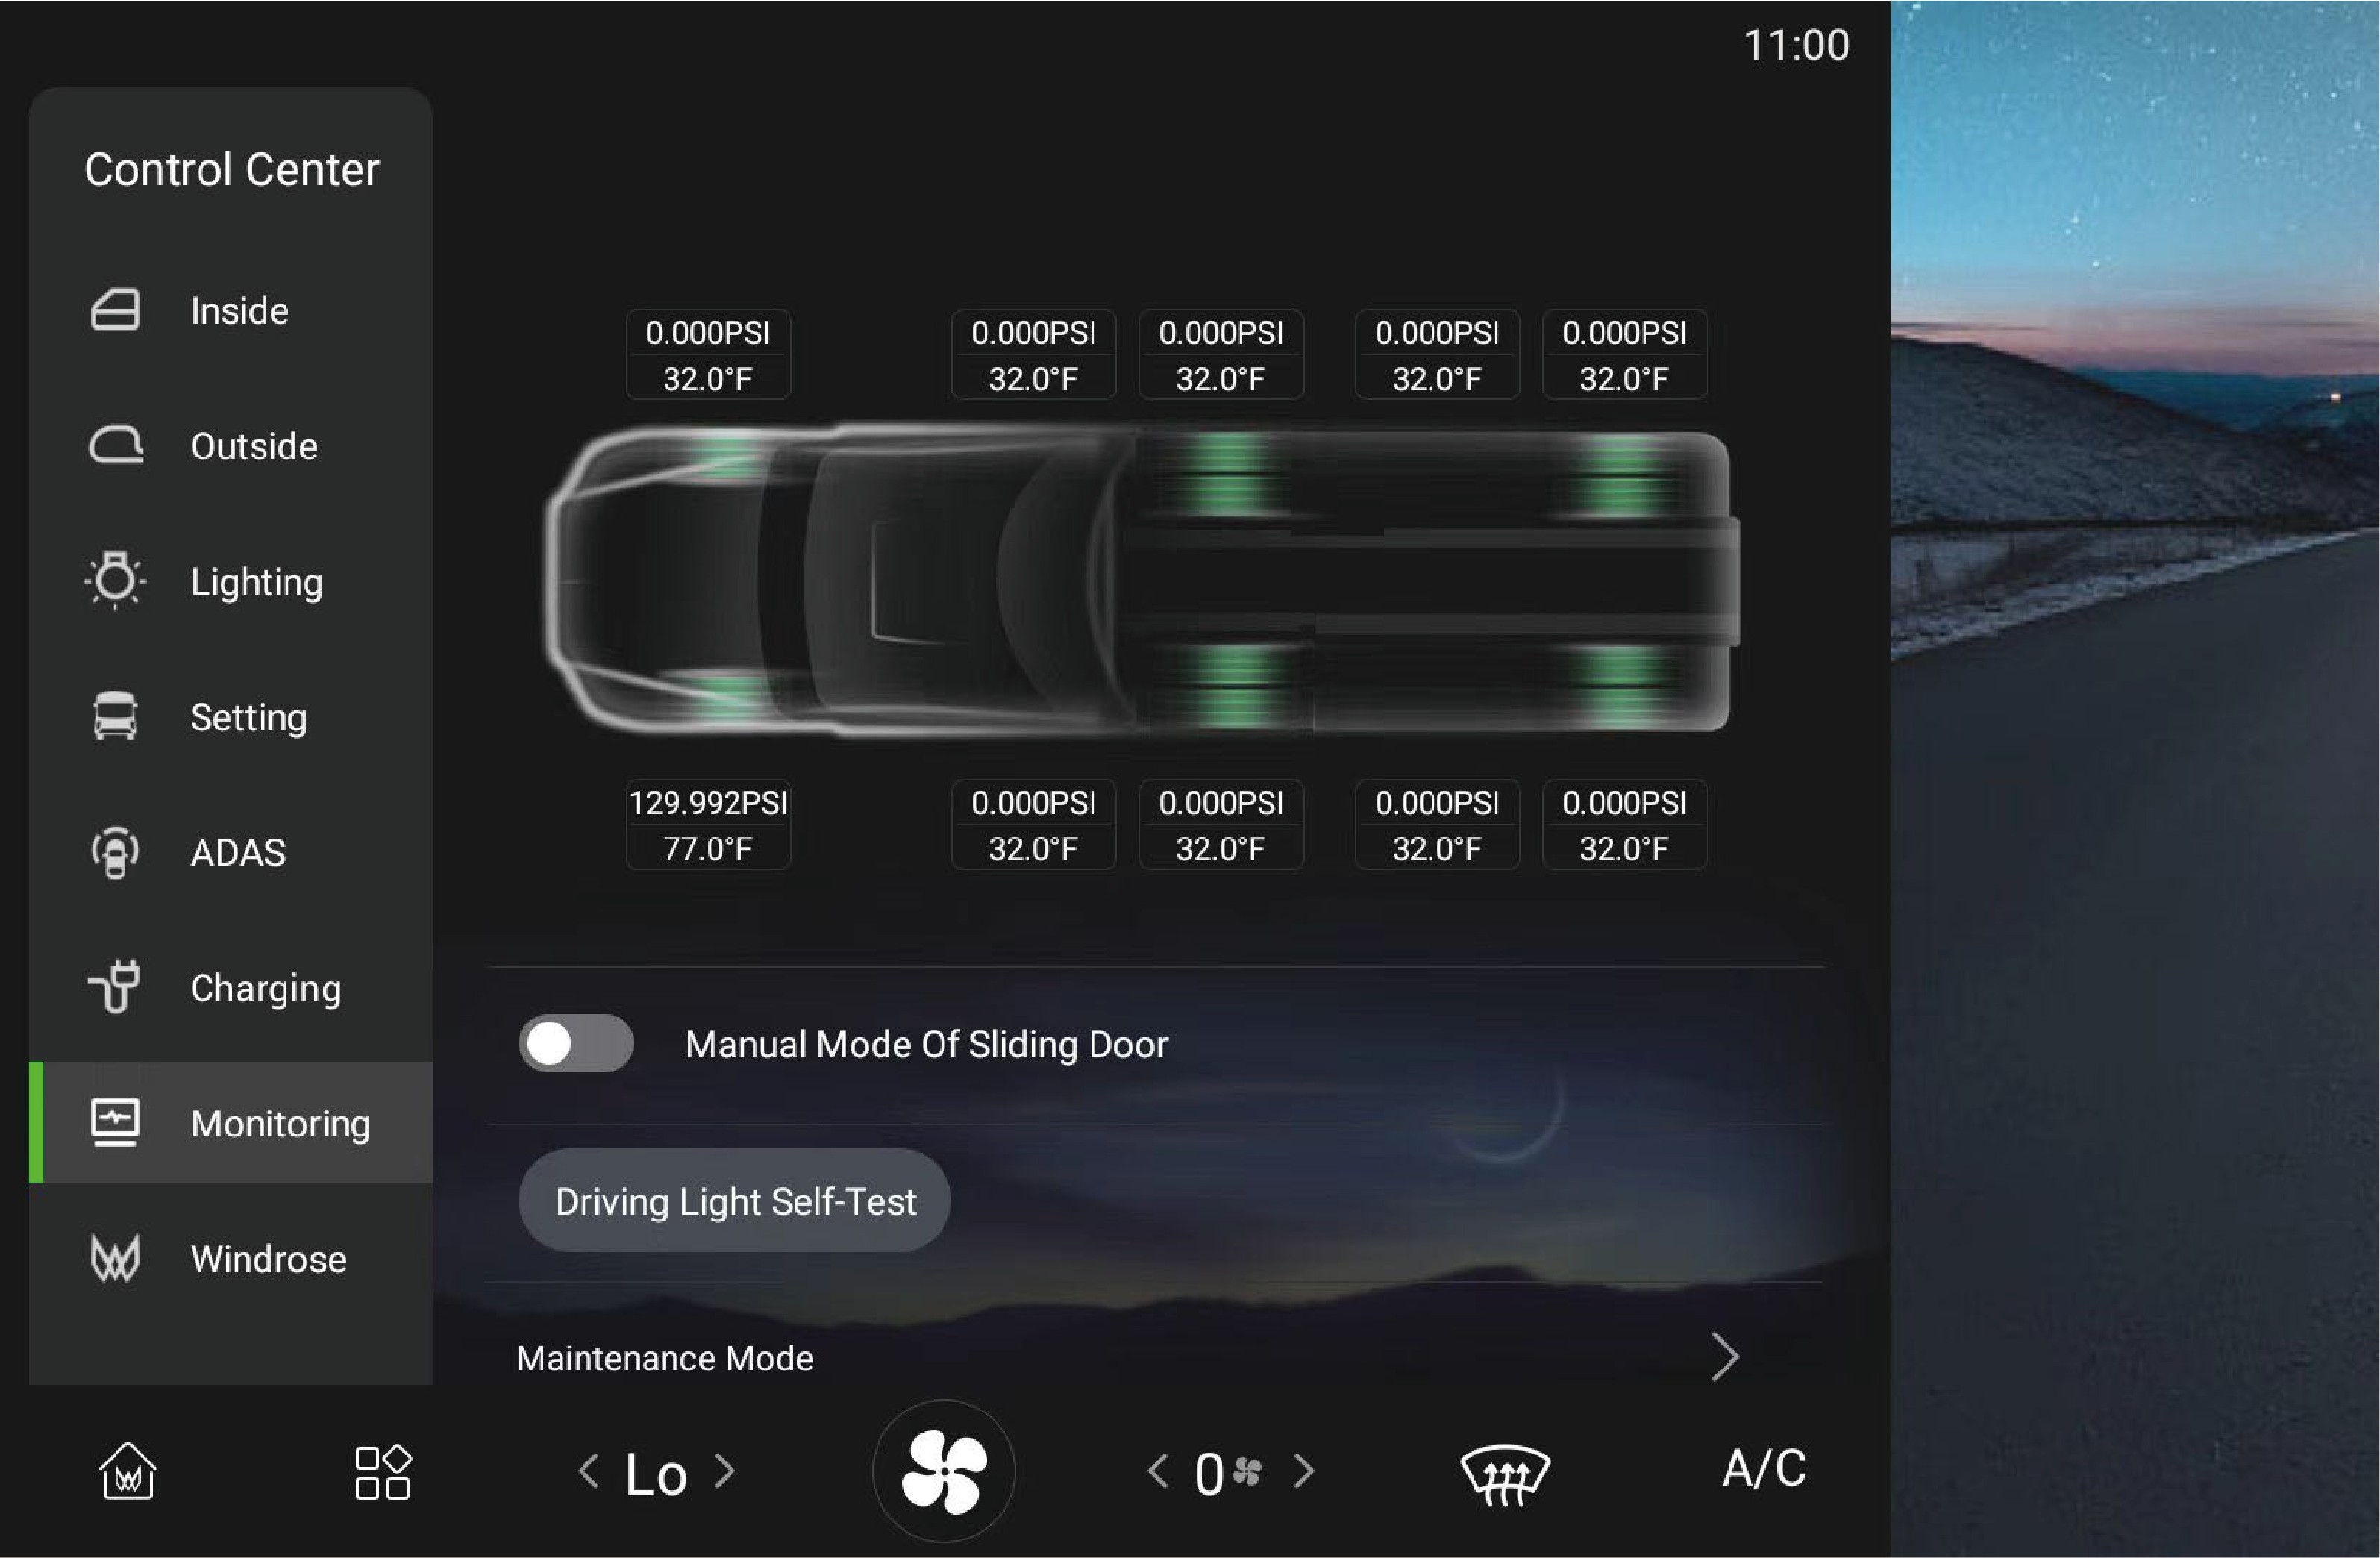
↑ Till toppenYou can check the current tyre pressure and temperature monitored by TPMS by selecting "Control Center" and switching to "Monitoring" interface on the vehicle information screen of the instrument panel. If the current tyre pressure and temperature cannot be displayed, contact a Windrose authorised service centre.
If the pressure or temperature of one or more tyres is abnormal, the sensor is lost, or the tyre is leaking rapidly, the tyre pressure warning lamp will be illuminated on the instrument cluster, and a pop-up window will appear to describe the cause of the fault and the location of the faulty tyre, accompanied by a period of "beeping" sound to prompt you to stop as soon as possible, check the tyres, and contact a Windrose authorised service centre for checking and repair of the system.
Försiktighetsåtgärder
↑ Till toppenObserveraThe TPMS is based on tyre temperature and atmospheric temperature. In the areas with high altitude or low temperature, it may be necessary to inflate the tyres to a slightly higher pressure to clear the low tyre pressure alarm.
Översikt över multimedia
Multimedia System
You can click here to turn off the in-vehicle infotainment screen.
Application Centre
You can click here to view or use related applications.
Radio
You can click here to switch to the radio interface and listen to local radio stations.
Local music
You can view or play music files stored in the IHU system here.
Home page
You can click here to return to the home page.
Music player
You can pause and switch music here.
Mobile phone interconnection
You can click here to connect your phone to the IHU.
Bluetooth-telefon
After the on-board Bluetooth is connected to the phone, you can use it to answer/make calls in the vehicle.
In-vehicle infotainment screen switch
Funktionsbeskrivning
Multimedia System
cleaning, just press and hold the vehicle information screen for a while to illuminate the screen.
Quiet enjoyment: After clicking "Quiet Enjoyment", you can
↑ Till toppenThe vehicle information screen is equipped with three environment
modes to choose from, depending on your usage.
Bruksanvisning
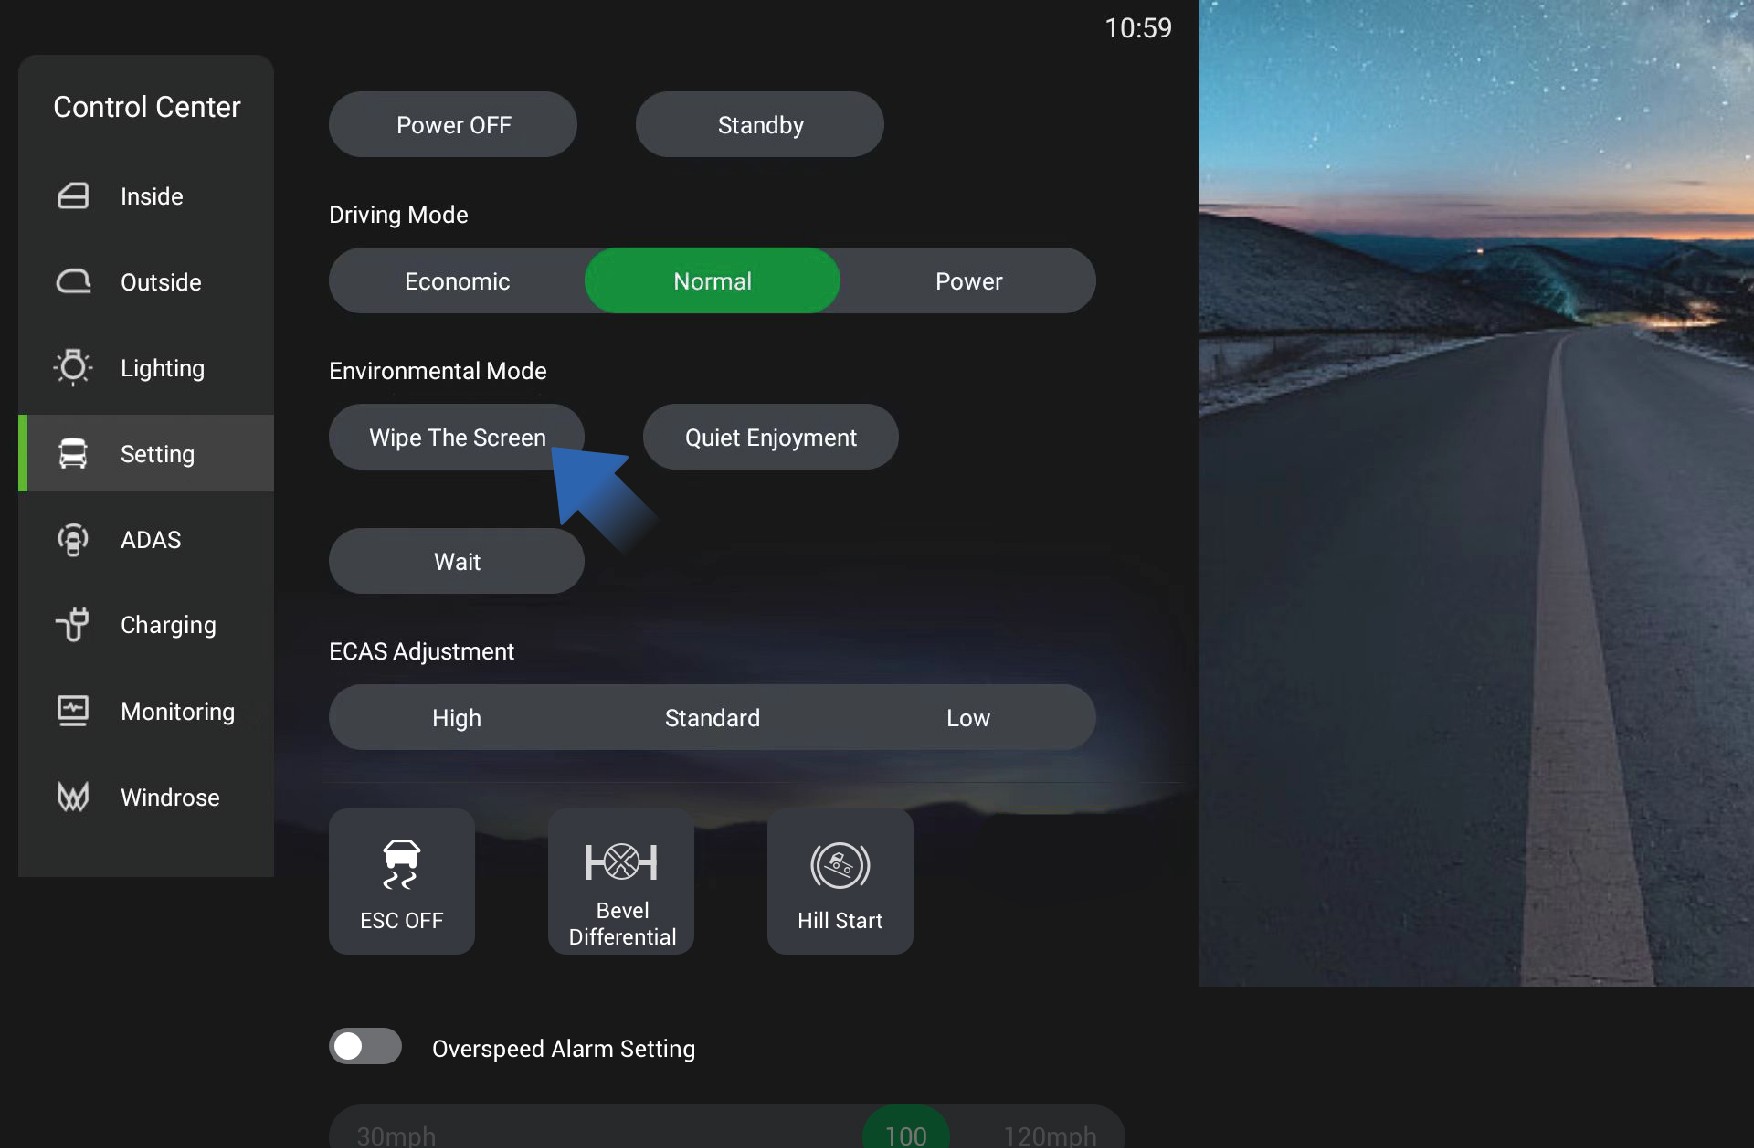
You can click "Setting" in the system settings interface on the vehicle information screen to select the environment mode:
Screen cleaning: After clicking "Wipe The Screen", the vehicle information screen will immediately go black to facilitate the
choose and play the desired ambient sound, and the vehicle information screen will immediately go black. When you need to illuminate the screen, just double-click the vehicle information screen.
Wait: After clicking "Wait", the vehicle information screen will immediately go black. When you need to illuminate the screen, just double-click the vehicle information screen.
Förarens verktyg
Emergency Handling
weather, the sign must be positioned 200 meters away from the vehicle.
This vehicle is equipped with driver's tools when it leaves the factory. The driver's tools are stored in the tool box on the left side of the vehicle for emergency use in specific situations, including:
Towing hook
Warning triangle
Safety Hammer
↑ Till toppen
Emergency Handling
Towing hook
When towing this vehicle, you need to install the towing hook in place first and ensure the stability of the vehicle on the towing vehicle.
Triangular Warning Sign
When an emergency renders the vehicle immobile, turn on the hazard warning lights first, then place the triangular warning sign at a sufficient distance from the rear of the vehicle. The required placement distance of the sign varies depending on the environment and road type. On regular roads, it should be placed 50 to 100 meters away from the vehicle; on expressways, the distance should be 150 meters; and in rainy, foggy or snowy
In the event of an emergency or disaster, the doors may not be
able to open, including but not limited to the following situations:
Vehicle fire
When a vehicle catches fire, the fire may cause the doors to deform and fail to open.
Vehicle falling into water
When a vehicle accidentally falls into water, the doors will be difficult to open due to the pressure difference between the inside and outside.
Traffic accident
↑ Till toppenIn a major traffic accident, the collision may cause the doors to deform and fail to open.
In this case, you can use the safety hammer equipped with this
vehicle to break the window and escape.
Bruksanvisning
1. Take out the safety hammer
The safety hammer is located on the right side of the electric sliding door and can be directly removed for use.
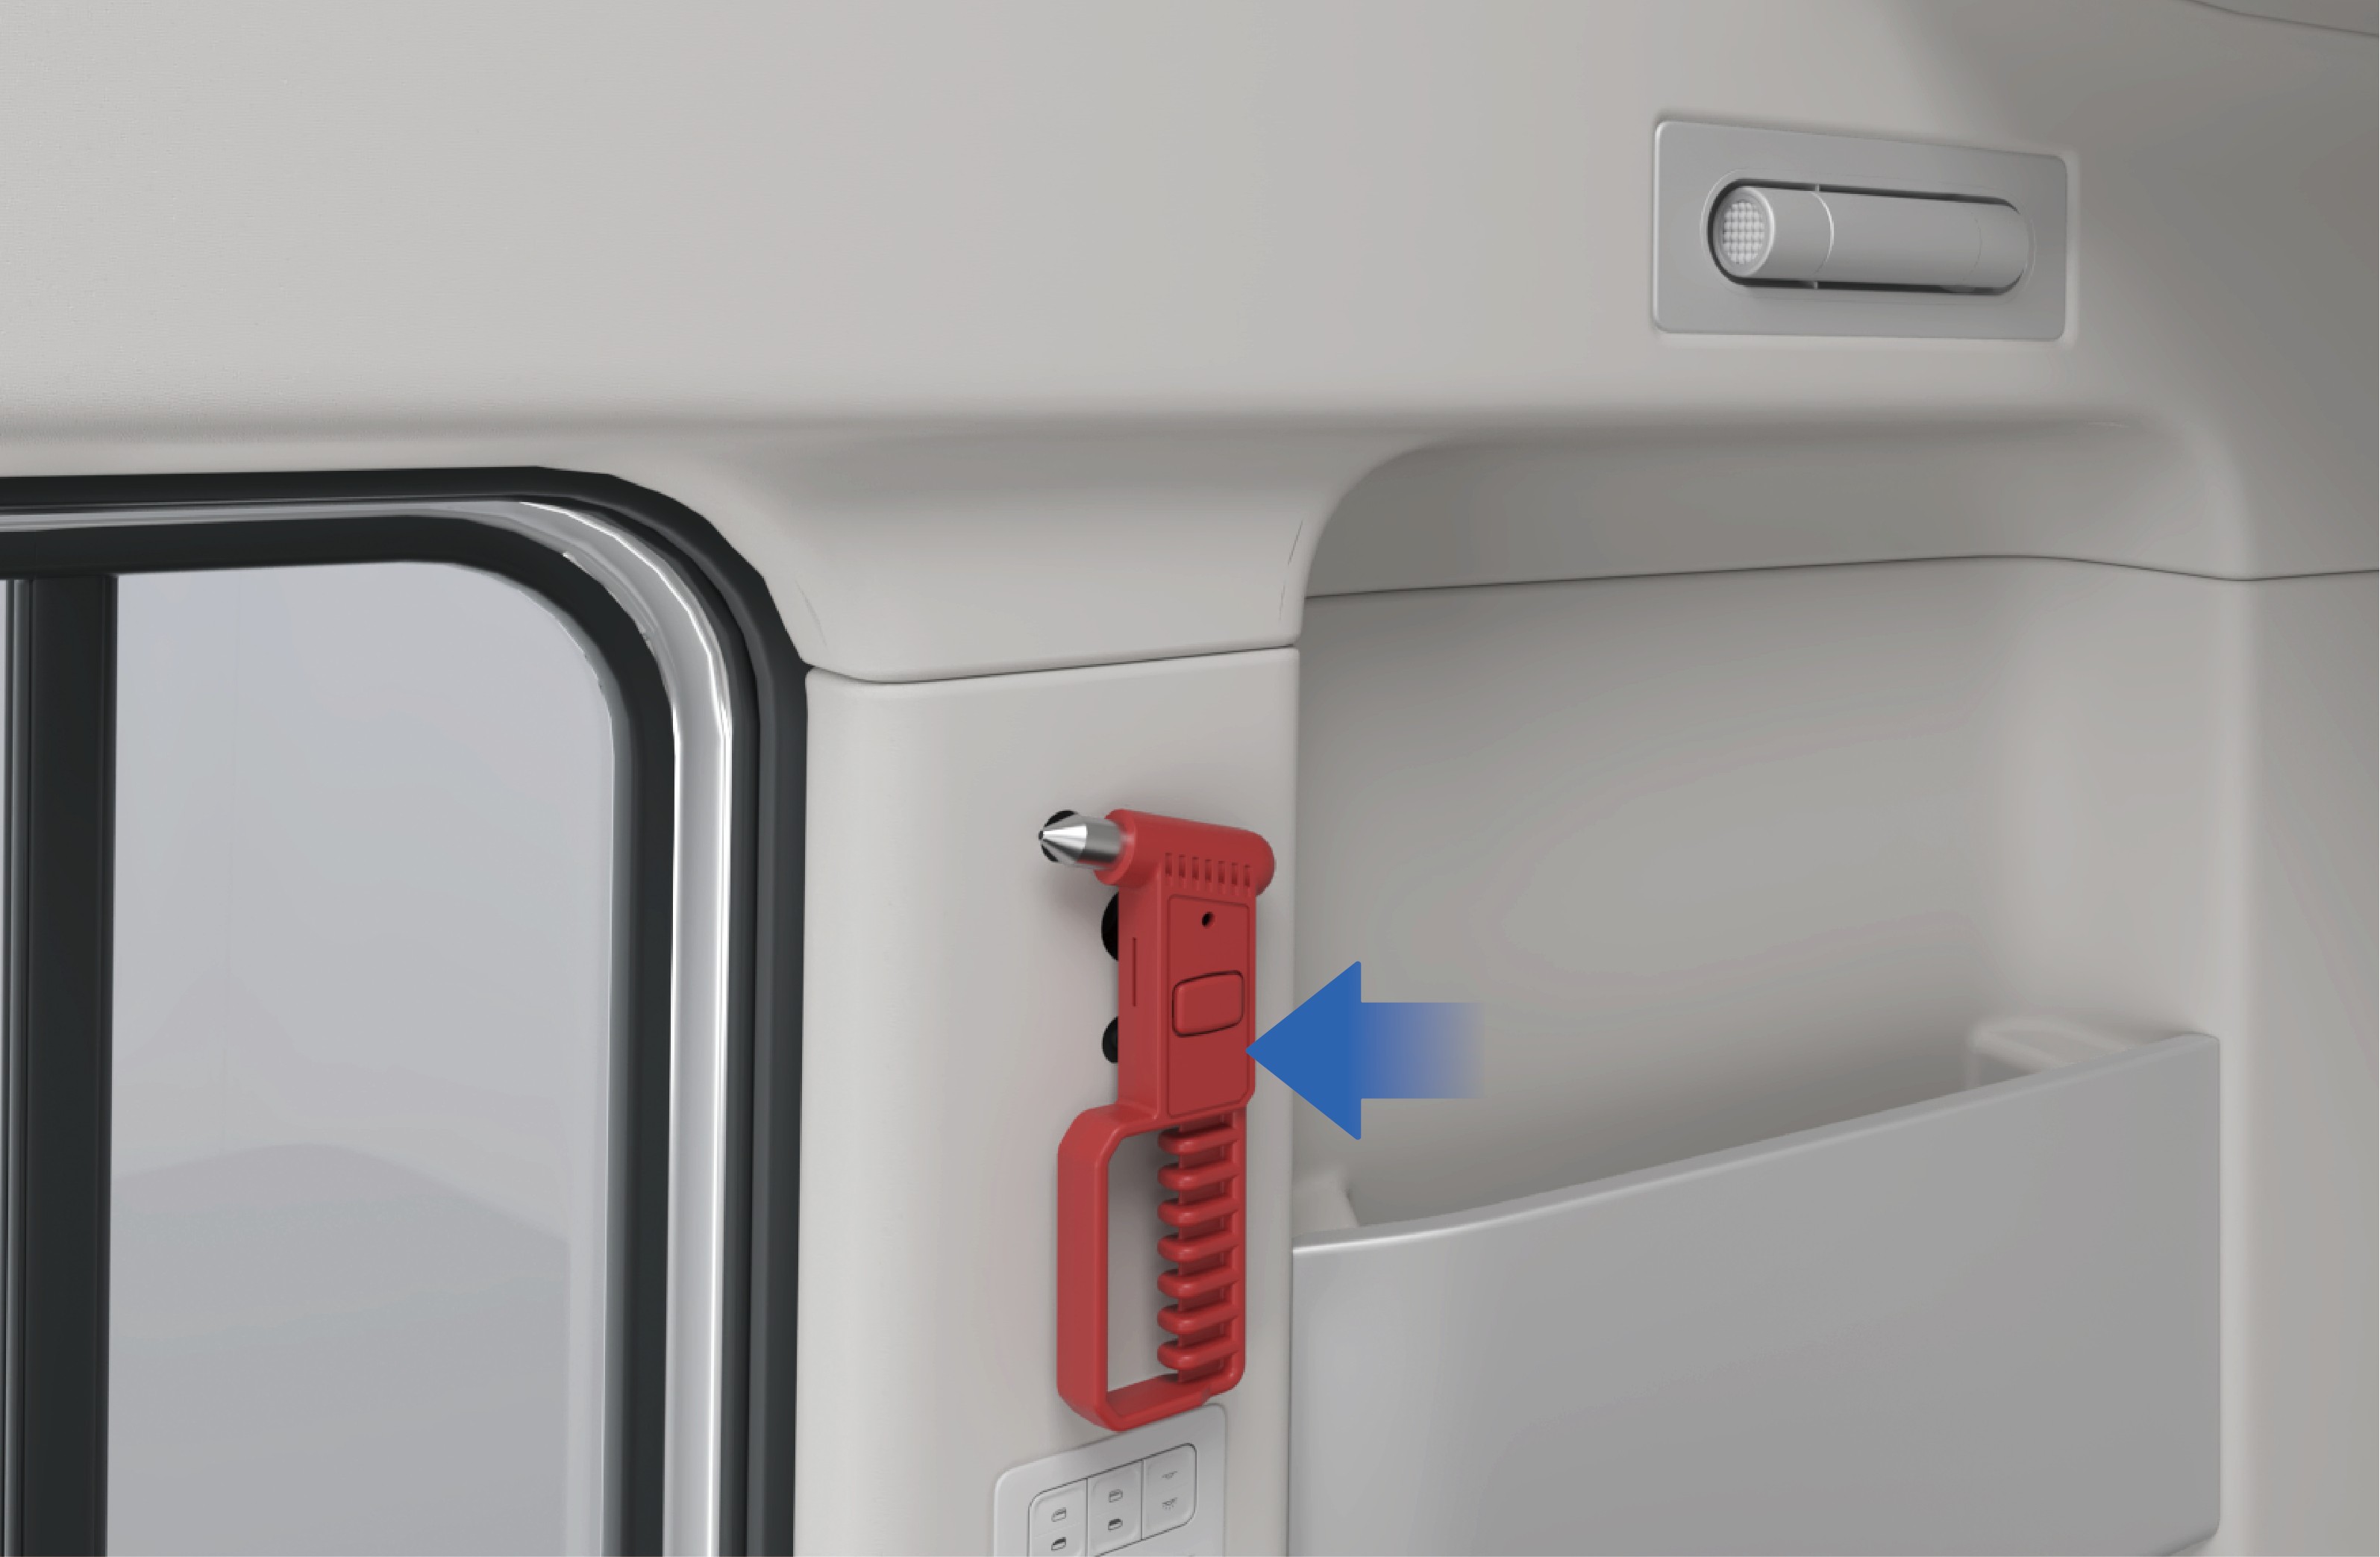
Break the window
Aim the sharp end of the safety hammer at the four corners or edges of the window, and strike hard until the window is broken.
Escape from the vehicle
↑ Till toppenEscape from the inside of the vehicle and stay away from the vehicle in a safe place. Call the police and wait for rescue.
Försiktighetsåtgärder
Varning
The corners and edges of tempered glass are relatively weak, making it easier to break for evacuation.
Glass may not immediately come off after being shattered due to film or other reasons. In this case, the glass can be forcefully impacted to come off.
Regularly check the safety hammer to ensure that it is in good working condition.
Brandsläckare
↑ Till toppenEmergency Handling
Towing a Trailer
Vehicle Recovery and Towing
↑ Till toppenEmergency Handling
When the vehicle cannot be driven due to breakdown or accident, contact a Windrose authorised service centre immediately for professional recovery and towing service. Do not attempt to tow the vehicle without following proper procedures. Incorrect towing may cause serious vehicle damage, loss of braking, or a road traffic incident.
AnmärkningBefore towing, verify that the vehicle has adequate brake air pressure. If brake pressure is insufficient, the rear axle spring brake actuators must be released mechanically or pneumatically to prevent the brakes from locking.
The fire extinguisher is placed at the lower left of the sleeper, which can be used to suppress a fire in an emergency.
VarningIn an emergency, please extinguish the fire and contact the fire department for disposal only if it is safe to do so.
Towing
When your vehicle needs to be towed out of trouble, follow the steps below:
Take out the towing hook from the tool box on the left side of the vehicle.
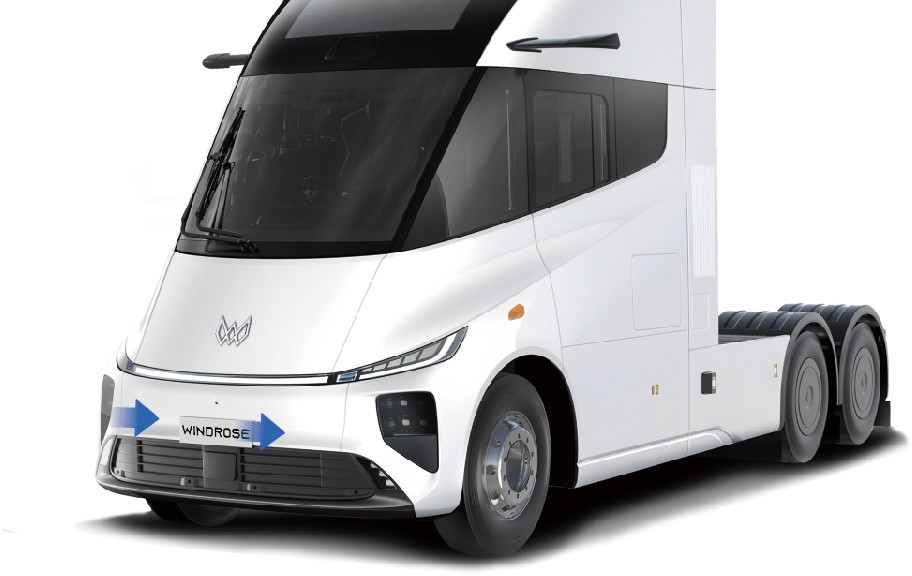
Open the cover plate of the towing hook mounting holes, which are located on the front left and right sides of the vehicle.
Screw the towing hook into left or right towing hook mounting hole according to the actual conditions, and make sure that the hook is completely screwed in without shaking. If there are impurities or oil stains in the towing hook thread, please clean it before screwing in the towing hook. Before installing the towing hook, make sure that the vehicle is stationary.
Connect the towing device on the towing vehicle to the towing
hook.
Keep the vehicle powered on to ensure that the steering and braking systems can operate normally.
Turn on the hazard warning lamps.
Start the towing vehicle to help the faulty vehicle get out of trouble.
VarningThe original towing hook is made of special materials and has high strength. If you use a towing hook that is not factory-fitted, the towing hook may be broken. If you need to buy a new towing hook, contact a Windrose authorised service centre.
Anmärkning
If this vehicle is connected to a trailer, disconnect the trailer before towing.
If this vehicle is stuck in mud or soft dirt, do not suddenly tow the vehicle outward. Also avoid oblique or lateral traction to prevent the vehicle chassis form damage.
When starting the towing vehicle, pay attention to controlling the vehicle speed and avoiding towing the faulty vehicle too fast or too hard to prevent vehicle form damage and endangering other road users.
When towing this vehicle, the towing vehicle speed must not exceed 15 km/h to avoid damage to the vehicle drive motor.
When arriving at the destination, be sure to slow down and stop towing the vehicle. After completing the towing operations, please clean up the site in time, remove the towing hook and put it back in place, and close the towing hook protective cover.
The towing hook can be used to get the vehicle out of trouble, and do not tow the vehicle for long distances.
Towing is allowed only when there is no safety risk to the vehicle. In case the battery pack is deformed, leaks, smokes, etc., you should eliminate safety risks immediately.
Bromsfel
Emergency Handling
↑ Till toppenEmergency operation
If the brake fails suddenly while driving, please turn on the hazard warning lamps immediately, hold the steering wheel firmly, and pay attention to avoid and alert passing vehicles by visual and acoustic alarms.
Slowly turn on the electronic parking brake, observe the driving conditions and use ramps or the runaway truck lane to assist parking if necessary.
For special road conditions such as winding mountain roads, bridges, cliffs, etc., you should also hold the steering wheel firmly to avoid getting into a dangerous situation such as falling off.
Follow-up procedures
↑ Till toppenAfter parking the vehicle, place warning signs around the vehicle and block the wheels with wedges to prevent the vehicle from slipping, and contact a Windrose authorised service centre for inspection and repair of the vehicle.
Prevention measures
Regularly maintain the brake system.
Check the free travel of brake pedal regularly.
↑ Till toppenObserveraIt is strictly forbidden to immediately apply emergency brakes when the brakes fail, otherwise it may cause the vehicle slipping and even roll-over.
Styrning utom kontroll eller styrfel
↑ Till toppenEmergency Handling
Emergency operation
When you lose control of steering wheel suddenly while driving on common roads (straight driving), release the accelerator pedal first, turn on the hazard warning lamps as soon as possible, and depress the brake pedal evenly.
Before driving, check whether the steering wheel rotation meets the standard requirements.
Before driving, check whether the steering pitman arm, ball joint, tie rod, etc. are loose.
When braking, try to avoid wheel locking.
AnmärkningDo not perform emergency braking immediately when you lose control of steering wheel suddenly on common roads, otherwise it will cause the vehicle slipping and even roll-over.
When you lose control of steering wheel suddenly while driving
↑ Till toppenon special roads (curves, mountain roads), release the accelerator pedal should be released immediately, apply the
brakes quickly to stop the vehicle in time to prevent the vehicle from running off the road or colliding with other vehicles.
Follow-up procedures
Tyre Burst
↑ Till toppen
Emergency operation
Emergency Handling
After parking the vehicle, place the warning signs around the
vehicle and block the wheels with wedges to prevent the vehicle from slipping, and call the Windrose service hotline.
Prevention measures
Regularly maintain the steering system.
In the case of tyre blowout, follow the steps below:
Hold the steering wheel firmly with both hands, control the driving direction, and turn on the hazard warning lamps.
Release the accelerator pedal completely, repeatedly and
lightly depress the brake pedal, and try to control the vehicle to drive in a straight line.
After slowing down, make sure that there are no vehicles or pedestrians behind and on the right side of the vehicle, and slowly pull over to the side of the road.
Vehicle Sideslip
↑ Till toppen
Emergency operation
Emergency Handling
Follow-up procedures
After parking the vehicle, place the warning signs around the vehicle and block the wheels with wedges to prevent the vehicle from slipping.
After the vehicle stops completely, contact a towing truck for rescue.
Prevention measures
Before driving, check the tyre tread and tyre pressure for bulges, cracks, cuts, nails, and abnormal tread wear.
Anmärkning
In the case of tyre blowout, do not turn the steering wheel sharply, otherwise, vehicle drifting will occur.
Besides, it is forbidden to perform emergency braking operations or brake hardly (especially on highways) to avoid roll-over.
In the case of vehicle slipping, the driver should:
Release the accelerator pedal, and turn the steering wheel slightly to the side of the slipping, and turn the steering wheel back in time.
Hold the steering wheel to prevent it from turning.
Prevention measures
Before driving, check whether the tyre pattern, pressure and other items meet the safety standards.
After the vehicle is started, check the braking effect of the vehicle at low speed. If there is any brake deviation, stop the vehicle immediately, check the braking system and troubleshoot the fault before driving.
Overloading and overweight will reduce the anti-rollover capacity and driving stability. Therefore, please load the vehicle properly.
When driving on slippery or icy roads, it is recommended to use the snow chains, drive at low speed, depress the brake
pedal carefully for braking, and avoid emergency braking.
When going down a long steep hill, the centre of gravity shifts forward, making the vehicle more prone to tipping, so please slow down the speed, hold the steering wheel firmly,
and apply the brakes intermittently to control the vehicle speed with the help of the motor drag force.
Do not use the brakes while steering, accelerating or decelerating to ensure the optimal coordination of braking.
Before turning, be sure to slow down the vehicle in advance and turn the steering wheel properly.
It is forbidden to coast in neutral, especially when going downhill, to avoid sudden braking of the vehicle due to excessive inertia forces.
Varning
When the vehicle is slipping on wet or icy roads, do not brake and steer at the same time to avoid aggravating the slipping hazard.
If slipping is caused by braking (vehicle drifting), release the brake immediately. When it is necessary to slow down, auxiliary braking can be used.
When the vehicle slips on a curve, stabilise the vehicle first and then apply the brake intermittently.
Accidental Removal of High Voltage
↑ Till toppenEmergency Handling
Emergency operation
When the vehicle is powered off with high voltage accidentally while driving, the driver should:
Press the hazard warning lamp switch and try to start the vehicle again.
After the motor is working, be sure to pull over the vehicle for inspection and eliminate the potential risks before driving.
If the vehicle cannot be powered on with high voltage, pull over the vehicle with the help of inertia force.
Follow-up procedures
↑ Till toppenAfter parking the vehicle, place the warning signs around the vehicle and call the Windrose service hotline immediately.
Prevention measures
↑ Till toppenGo to a Windrose authorised service centre regularly to maintain and inspect the vehicle to ensure the stable operation of vehicle systems.
Nödevakuering
Emergency Handling
↑ Till toppenEmergency operation
When an emergency situation occurs and the car door cannot be opened, you can follow the following steps for emergency evacuation.
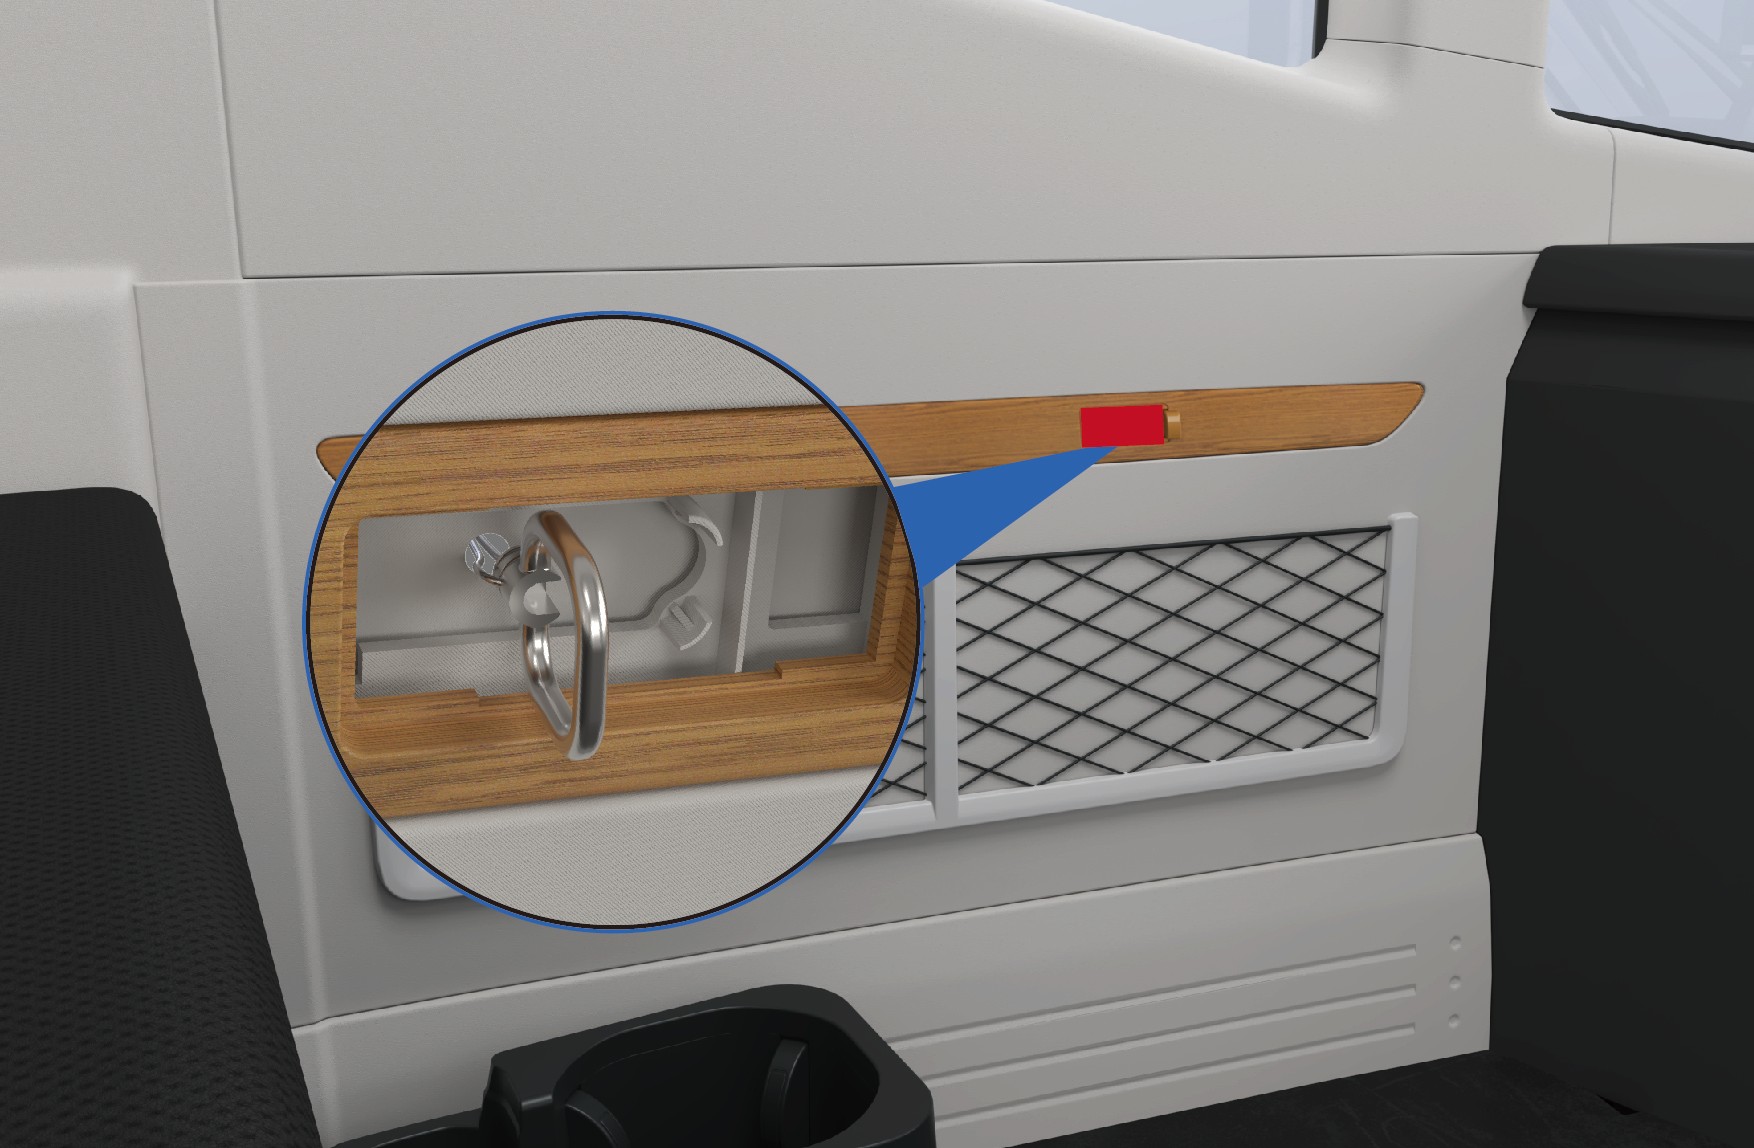 Follow-up procedures
Locate the emergency pull ring cover above the left net bag. Open the cover, and then pull the ring firmly outward to break the left window glass.
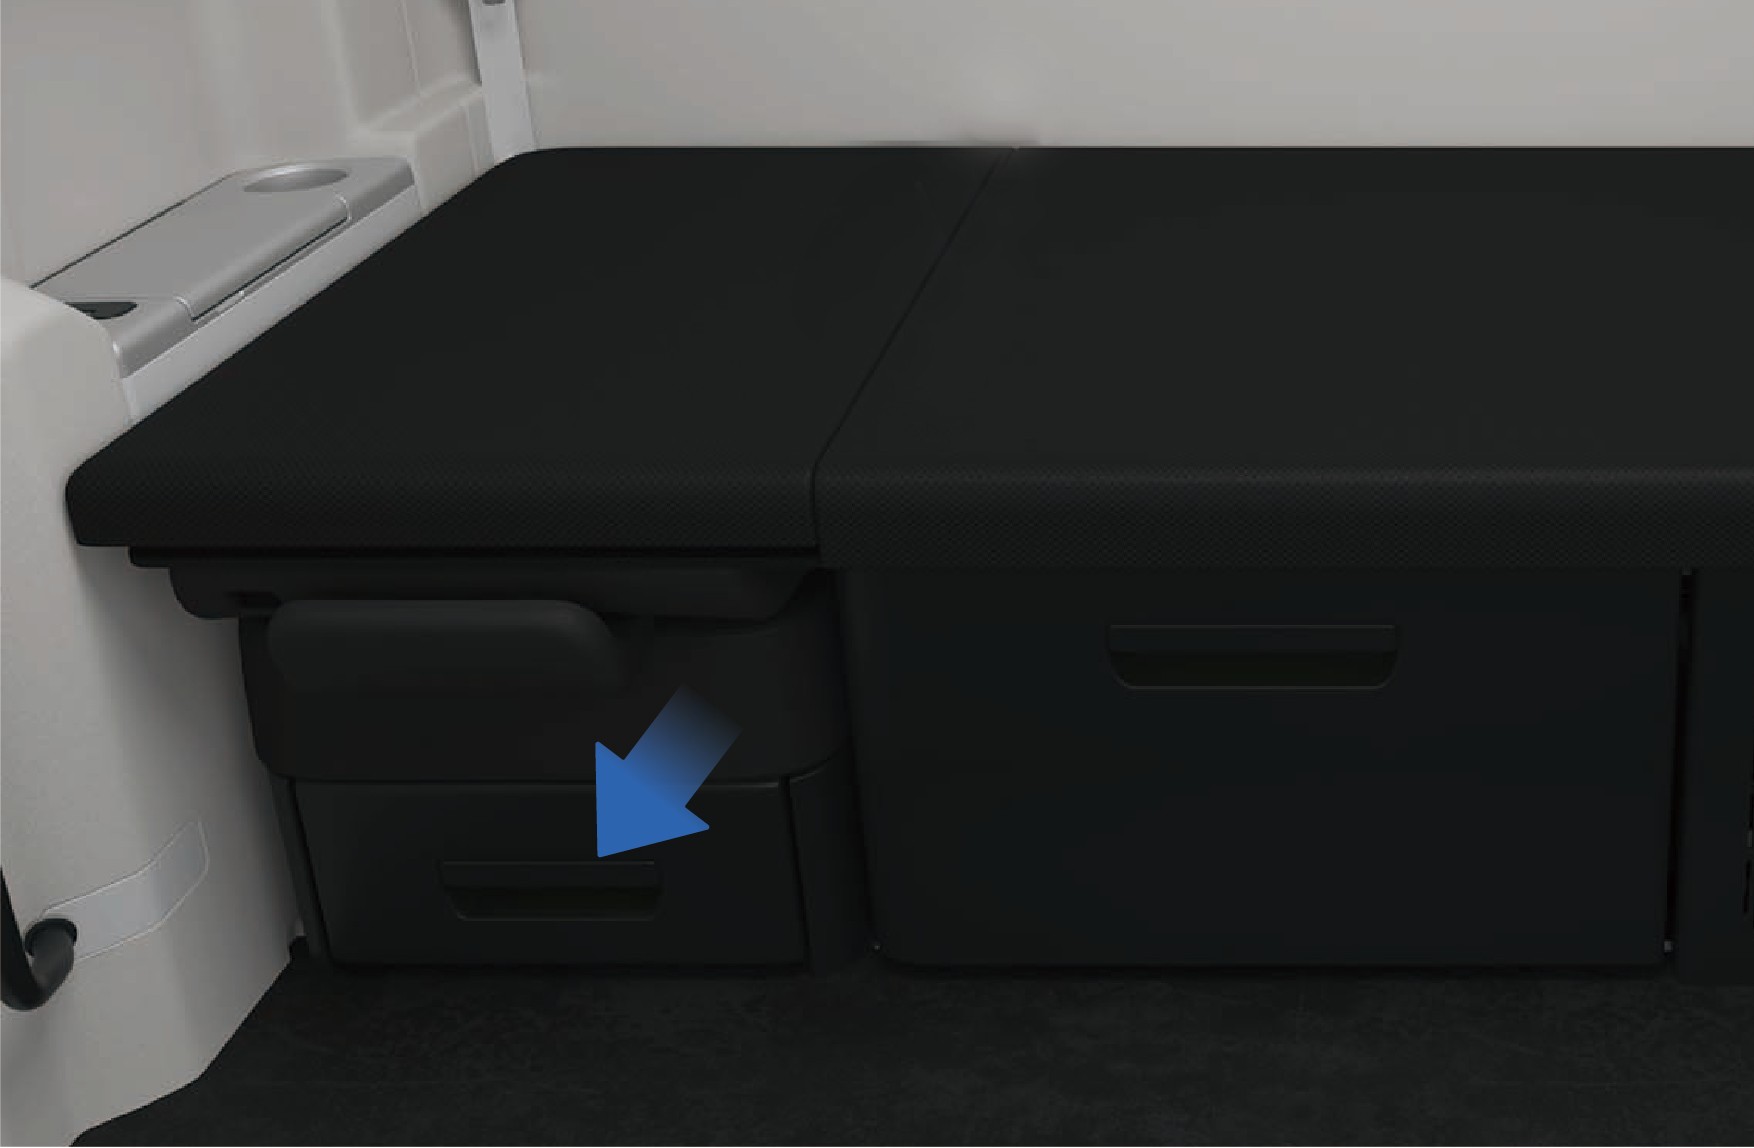
Take out the sleeper protection net from the storage box under the front passenger seat, and connect the socket at one end of the sleeper protection net to the fixed point on the left side wall.
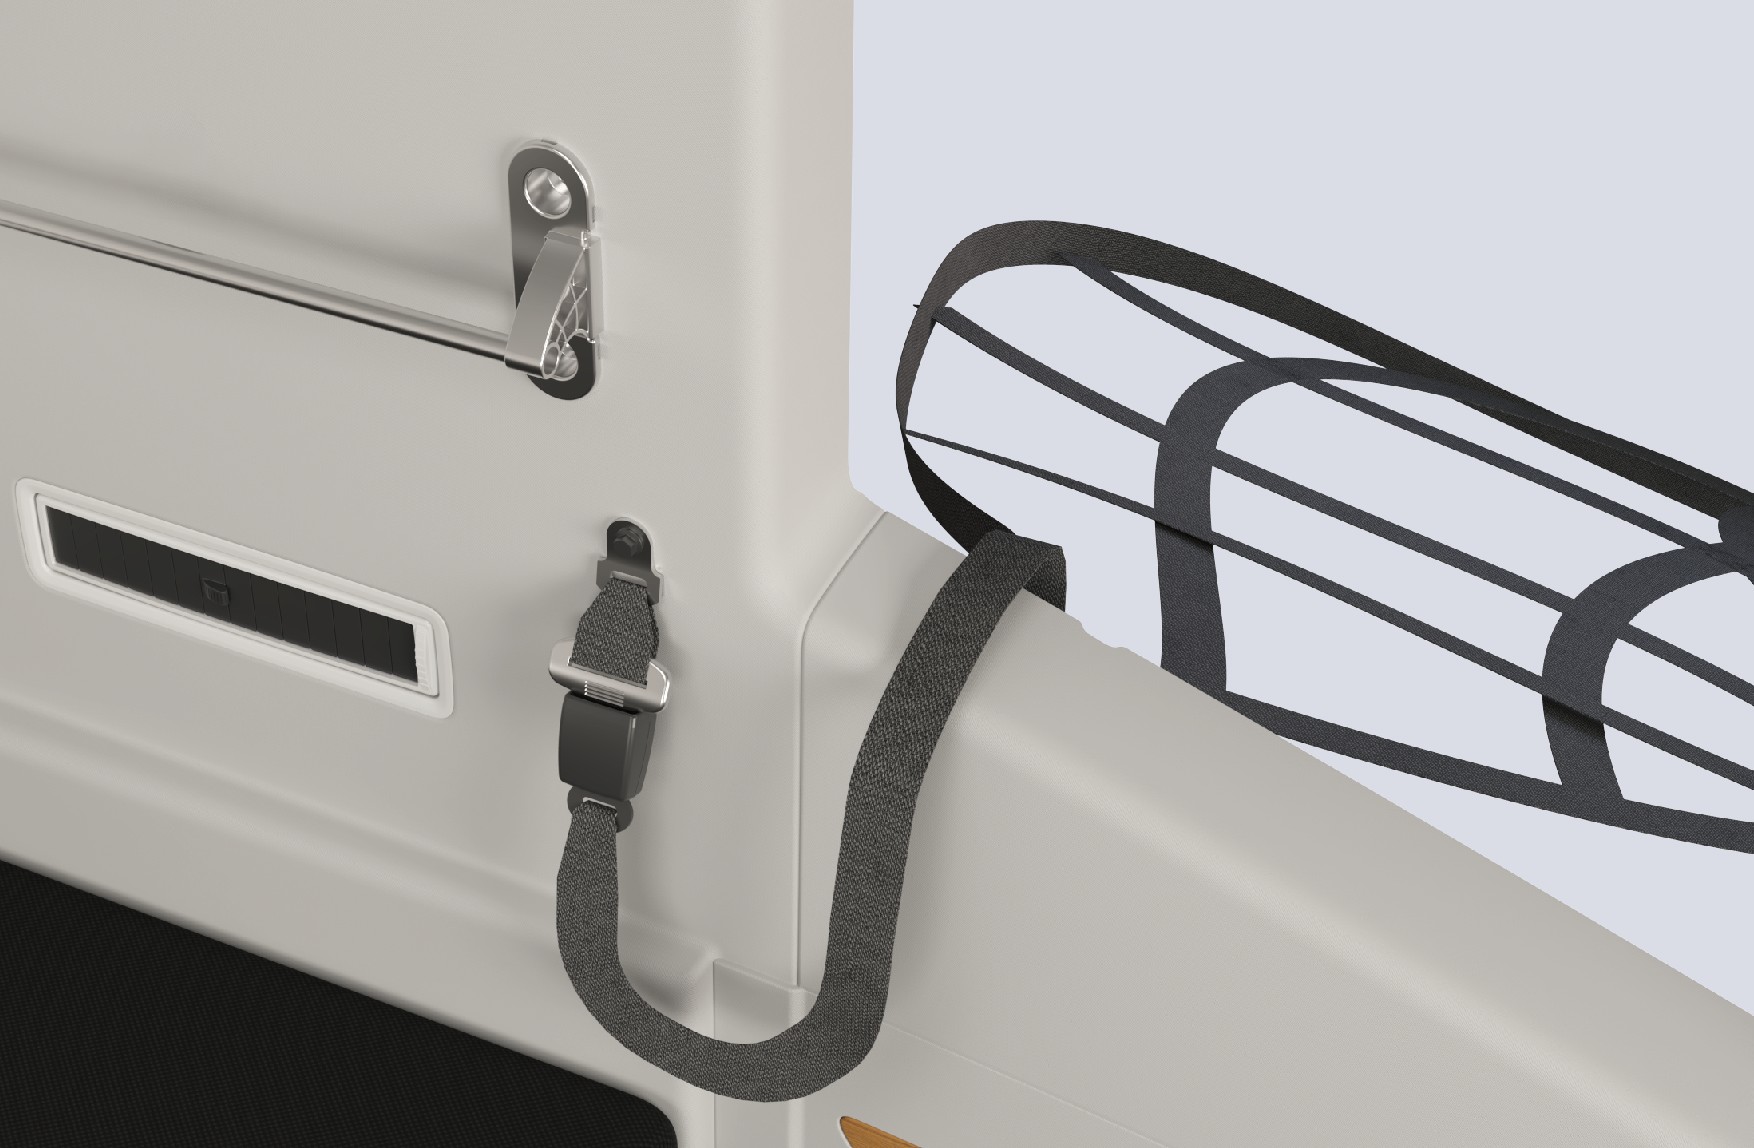
Pull the sleeper protection net out of the window, and use it as an auxiliary escape rope to quickly exit the cab.
Varning
When activating the window breaker, the broken window glass may cause glass splinters to fly. Please protect yourself by using your arm to shield your eyes.
Do not disassemble or modify the window breaker without authorization. Any product damage or other consequences resulting from unauthorised disassembly, modification, or use not in accordance with our specified requirements shall be
borne by the operator.
The window breaker can be activated underwater, but prolonged immersion in water is strictly prohibited.
Regularly check whether the fasteners of the window breaker are loose, and whether the pull ring and sleeper protective net are damaged.
During daily vehicle maintenance, prevent all components of the window breaker from coming into contact with water sources or corrosive substances, so as to avoid product corrosion and subsequent failure.
Keep away from fire sources, and replace the window breaker promptly after use.
Do not operate the pull ring arbitrarily in non-emergency situations. All consequences caused by misoperation shall be borne by the operator.
Skyddsutrustning för räddningspersonal vid nödsituationer
Emergency Rescue
This vehicle is powered by a high-voltage battery system. In the event of a serious collision, hazardous conditions may occur, including high-voltage electrical leakage, battery pack damage, and chemical fluid leaks. Emergency responders must wear appropriate personal protective equipment (PPE) before approaching or working on the vehicle.
Wear impact-rated safety goggles when working on high-voltage systems.
Wear Class 0 (1,000 V rated) insulating gloves when handling any high-voltage component.
Use insulated tools rated for high-voltage work when working on high-voltage components.
Have insulating rescue hooks available.
Have a fire extinguisher rated for lithium battery fires available.
Anmärkning
A buddy system must be used when emergency responders is working on high-voltage components. One person must supervise while another performs the work. It is forbidden for two or more people
to work simultaneously. Do not make physical contact with the person performing the work.
Emergency responders must remove all metal jewellery when performing rescue operations.
Information om högspänningssystemet
Emergency Rescue
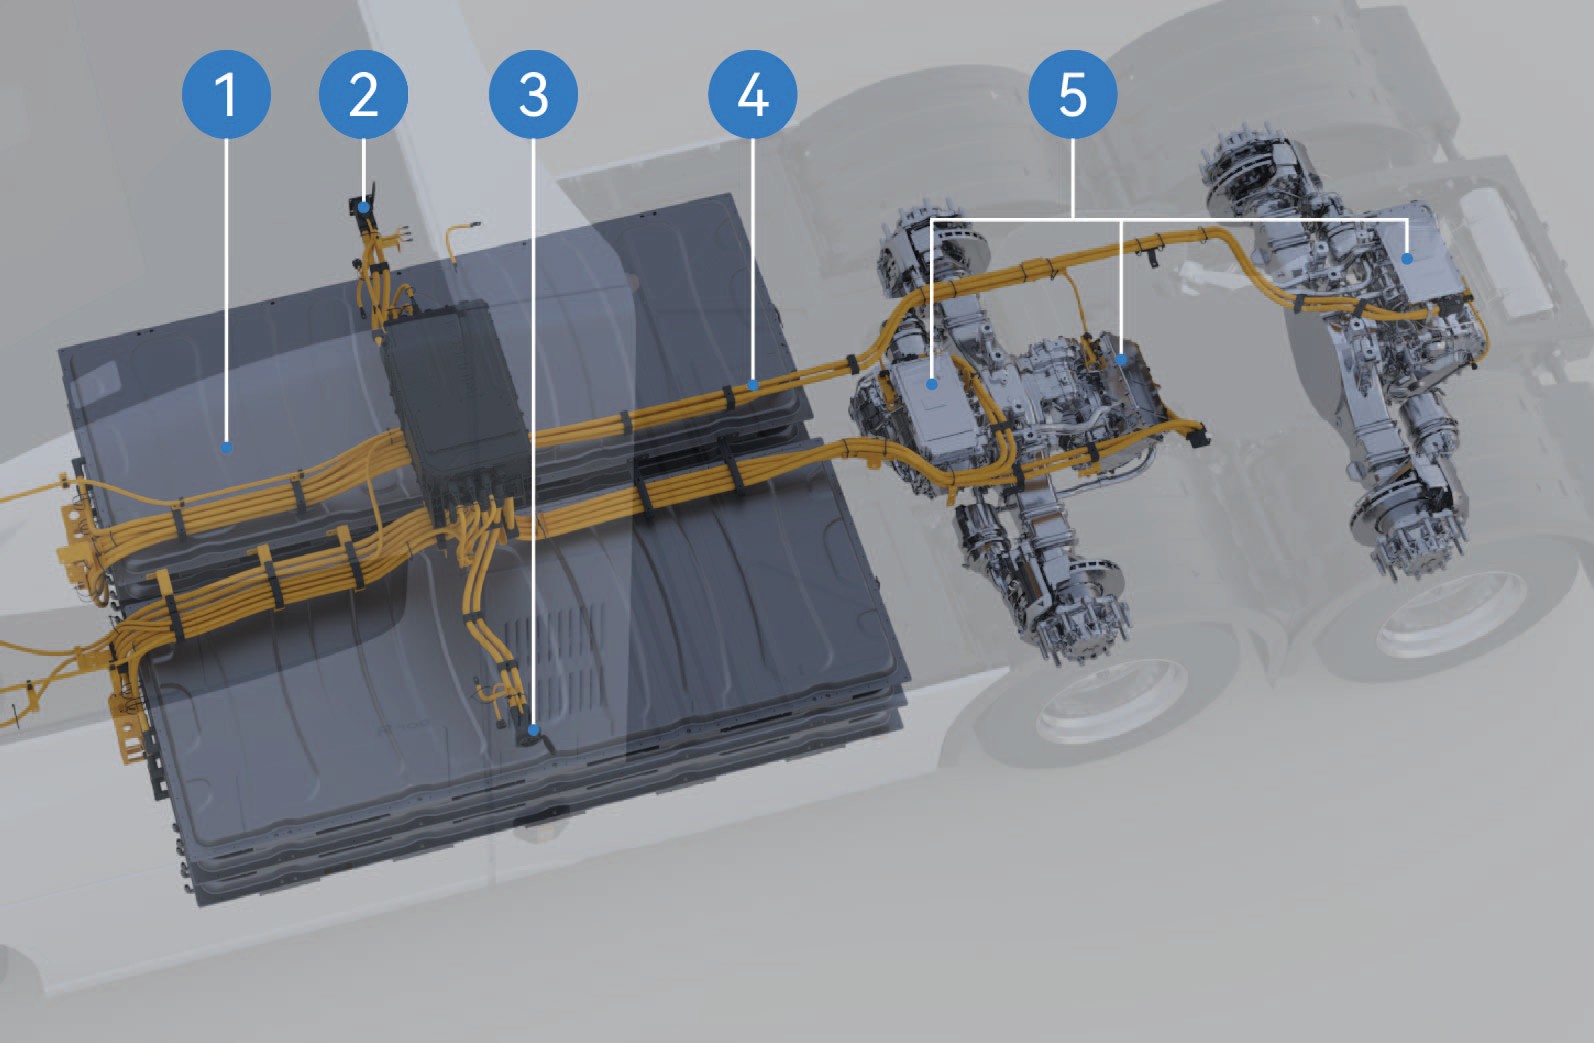
High voltage battery
Right CCS1 mode charging port
Left MCS mode charging port
High-voltage harness
Drive motor
Anmärkning
During startup and use, do not touch parts with "high voltage warning signs" or orange parts of the vehicle.
It is strictly forbidden to trample or bump the high-voltage battery of the vehicle.
Observera
When the high-voltage battery and motor MILs on the instrument cluster stay on, contact after-sales immediately and use a scan tool to read the DTC.
If the EIC system emits smoke, catches fire, or explodes, please evacuate from the vehicle immediately, call the police and take safety measures.
When working on the EIC system, please wear insulating gloves, insulating shoes, and insulate the tools. Do not make physical contact with the person performing the work.
Metod för att inaktivera högspänningssystemet
↑ Till toppenEmergency Rescue
High voltage cutoff from outside
Park the vehicle, apply the EPB.
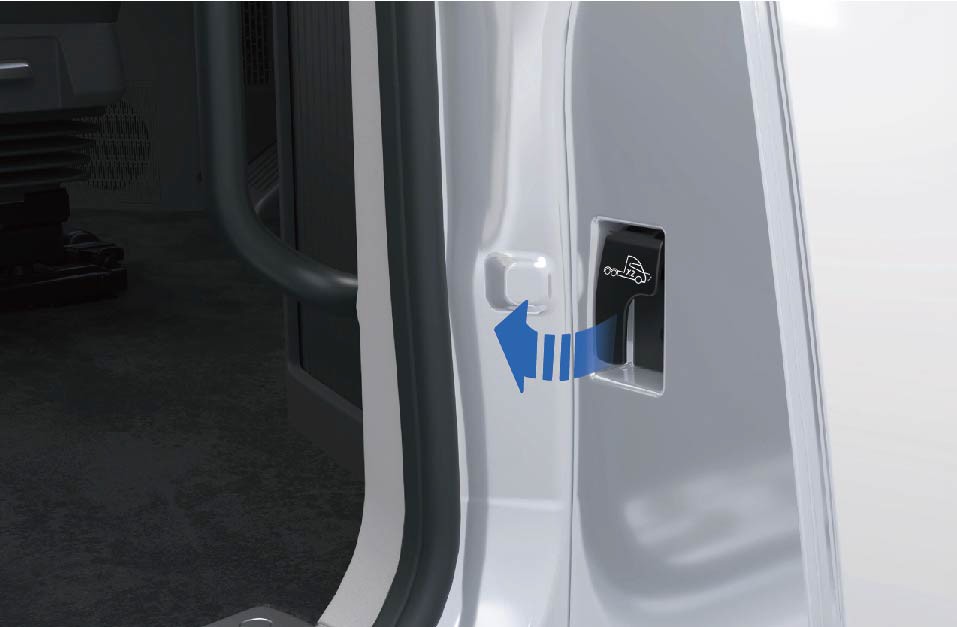
Pull the bonnet release handle twice in a row to release the bonnet.
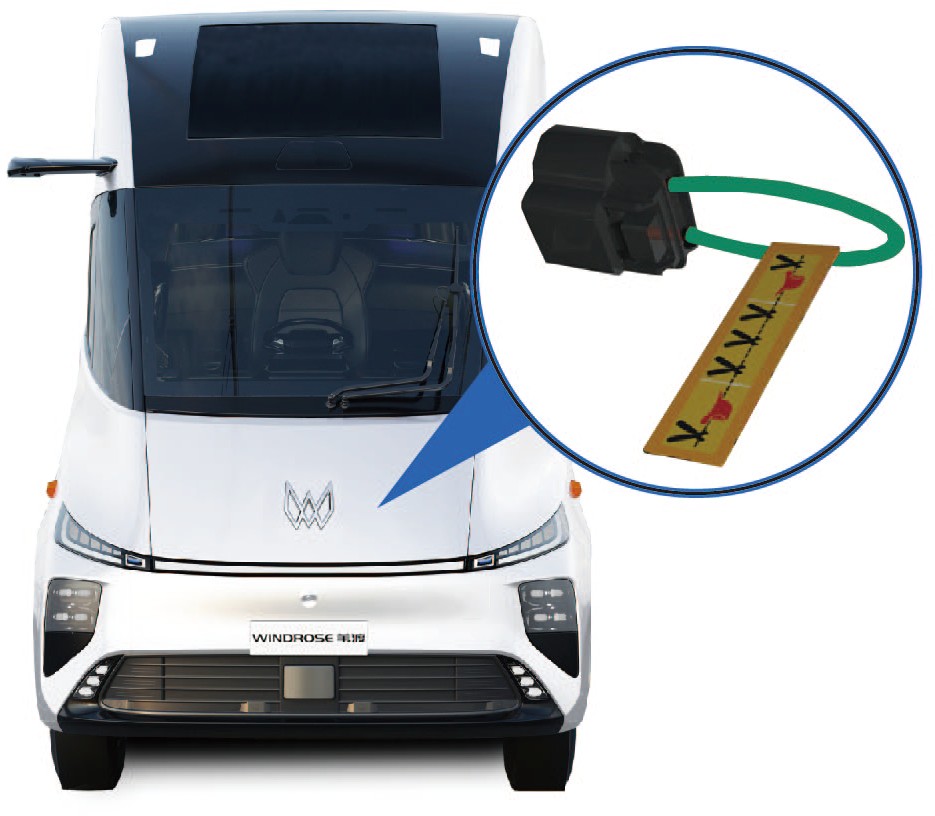
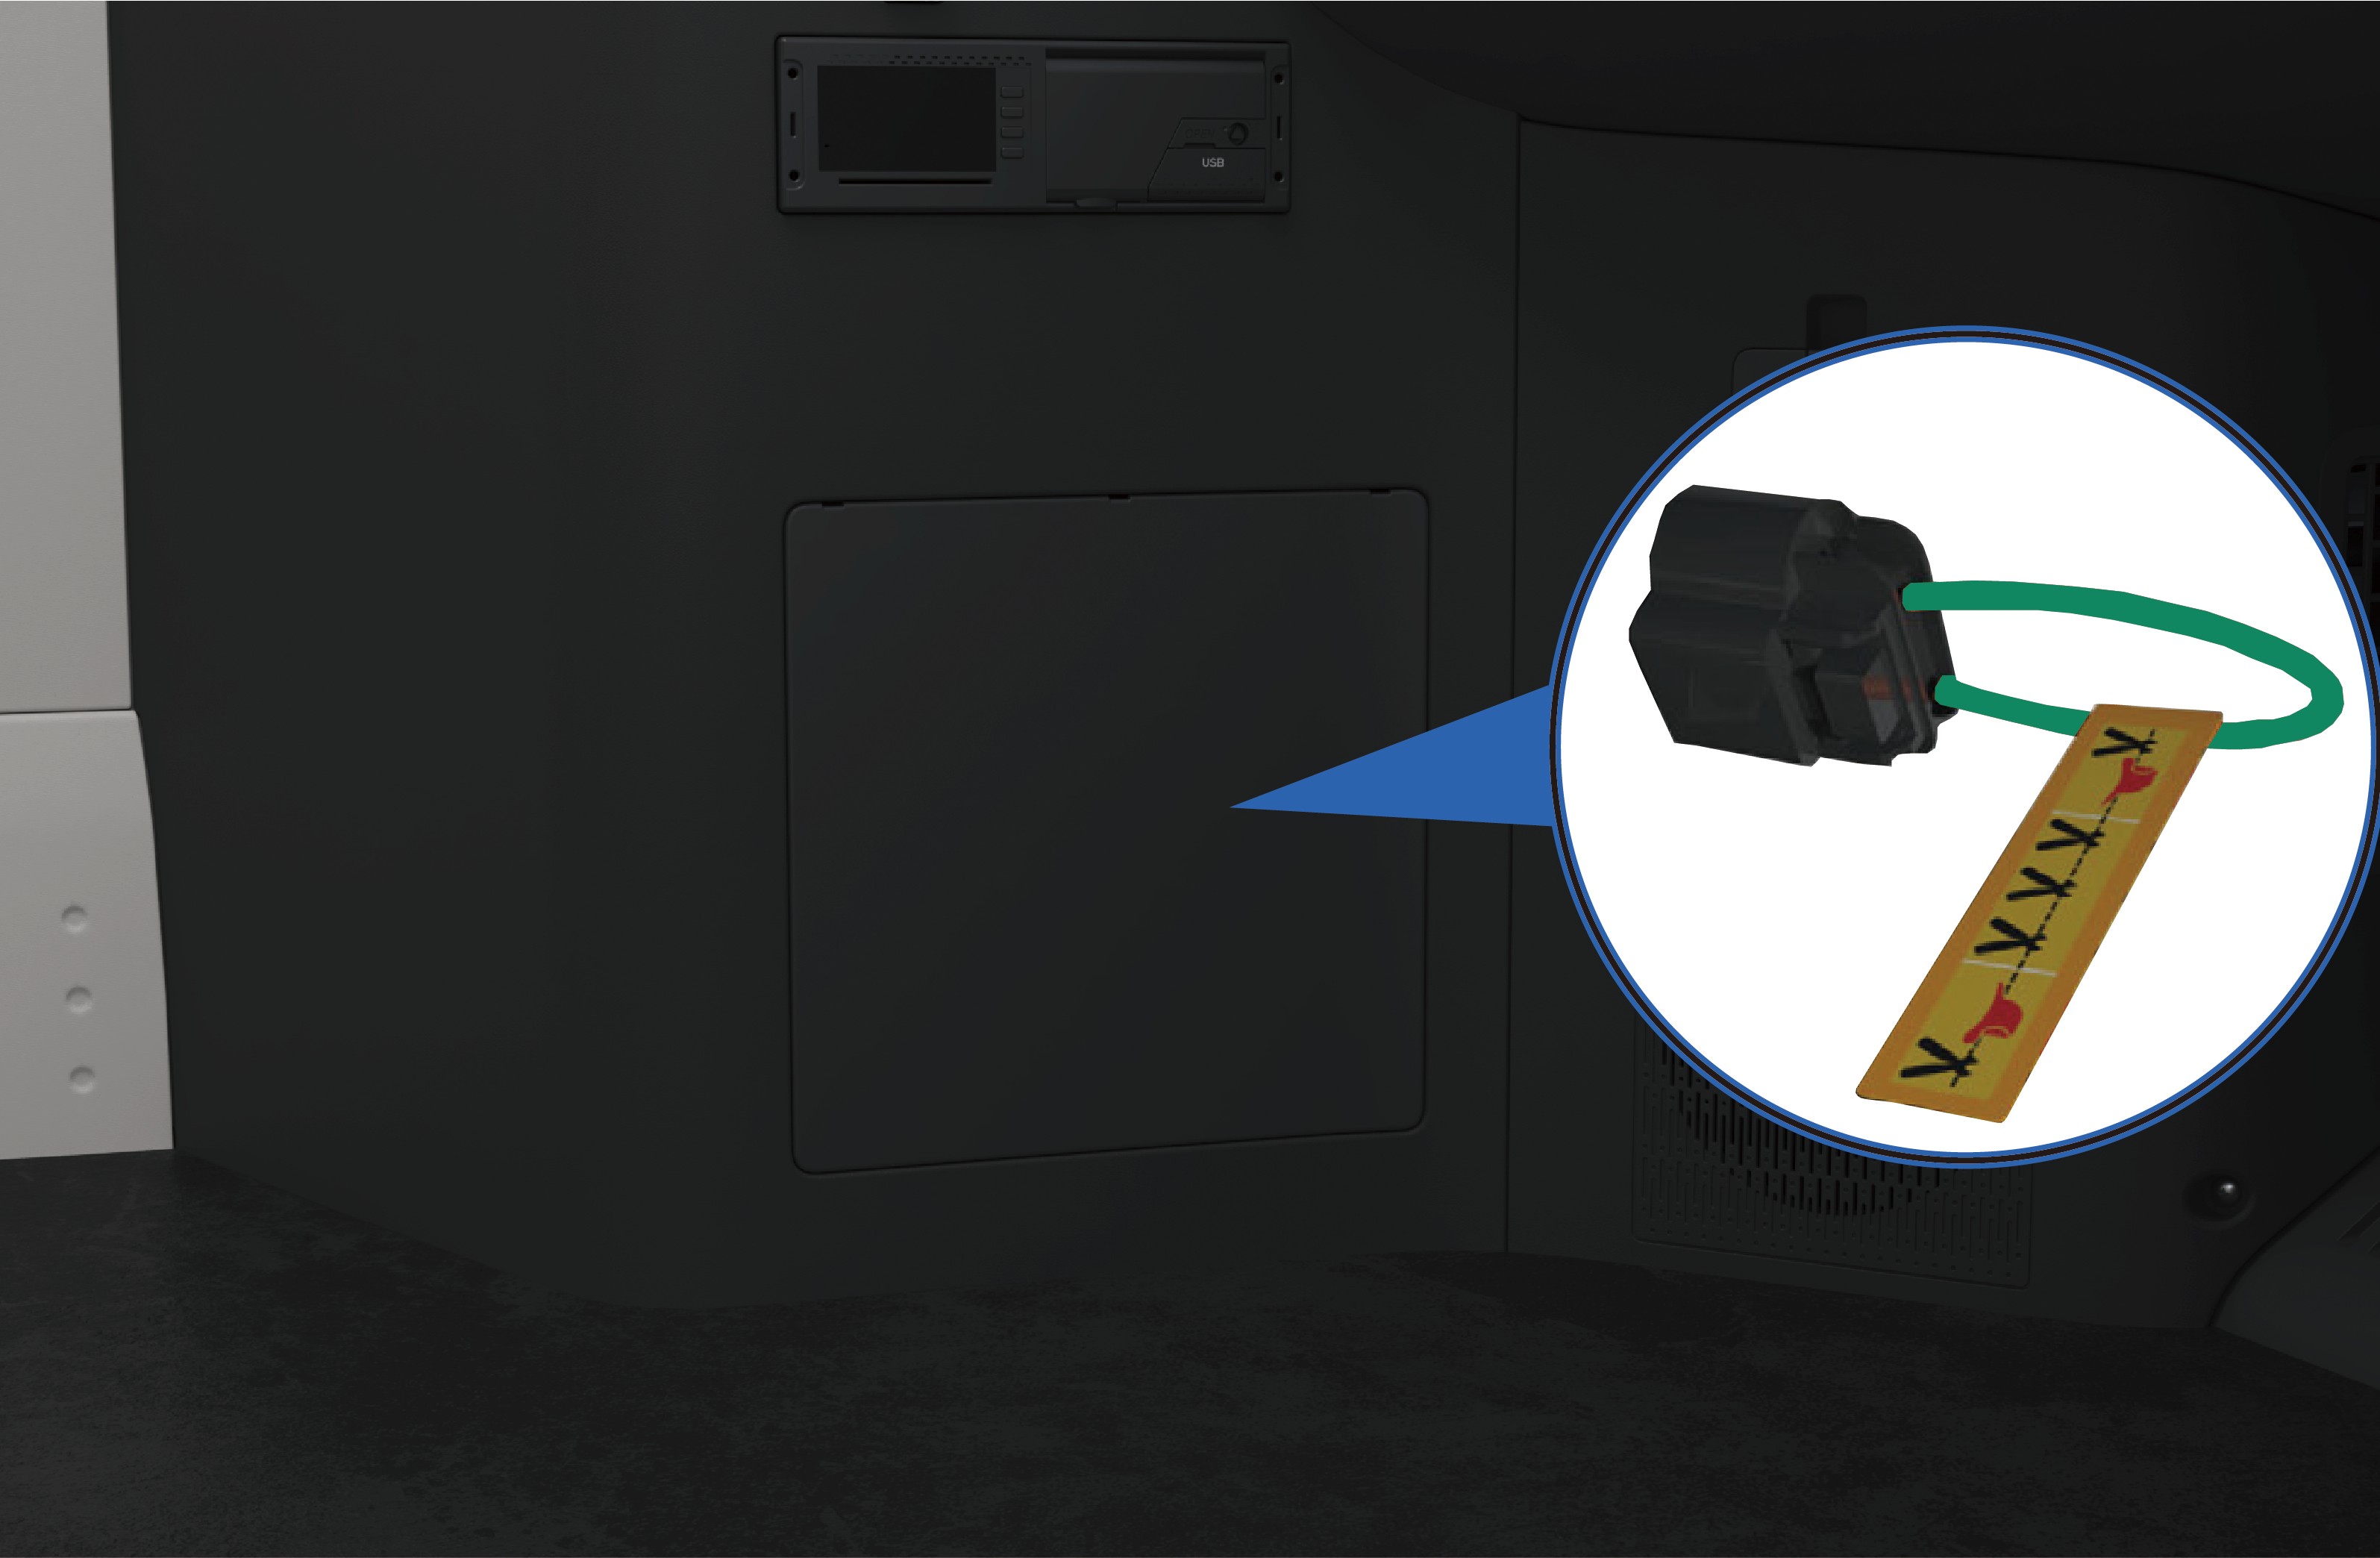
Find the low voltage MSD in the engine compartment and remove it, and the vehicle will deactivate the high-voltage system automatically.
High voltage cutoff from inside
Park the vehicle, apply the EPB.
Open the trim cover on the lower left of the instrument panel, find and disconnect the low voltage MSD, and the vehicle will automatically cut off the high-voltage system.
Varning
Be sure to wear appropriate personal protective equipment when touching any high-voltage components.
It is forbidden to touch the high-voltage battery components even though the high-voltage system has been deactivated. Be sure to wear appropriate personal protective equipment if it
is necessary to operate the high-voltage battery components.
If any damage is found in the high-voltage components, be sure to wrap the damaged parts with the insulation tapes.
Observera
In an emergency, the operator can cut the orange harness on the MSD to prevent the harness from being energized again and allow the vehicle to deactivate the high-voltage system automatically.
In case of a vehicle collision, the high-voltage system will be automatically deactivate.
Räddning av fordon i brand
Emergency Rescue
In the event of a vehicle fire, immediately assess the severity of the fire. If the fire is small and can be contained, emergency responders should use a suitable fire extinguisher such as a dry powder extinguisher, CO₂ extinguisher, or dry sand.
If the fire is large or the battery is found to be severely squeezed or bent, apply large volumes of water continuously to suppress the fire. Simultaneously, move all combustible materials away from the burning vehicle to prevent the fire from spreading.
Varning
If the vehicle catches fire, all occupants must evacuate immediately. Call the emergency services number according to the scene situation, and inform the emergency responders that the vehicle is a battery electric vehicle with a high-voltage battery system, which presents risks of electric shock, chemical exposure, and thermal runaway.
If the emergency responders find that there are occupants in the vehicle and the door cannot be opened during rescue, they may use a rescue tool to break the door window glass at its edge to assist trapped occupants in the vehicle break the window to escape.
↑ Till toppenAnmärkningFires in high-voltage components must be extinguished using a fire extinguisher suitable for lithium batteries.
Räddning av fordon vid vadning
Emergency Rescue
A vehicle that has been driven through floodwater may show no obvious external damage, but the high-voltage system may be compromised and at risk of electrical leakage. Therefore, when rescuing wading vehicles, the emergency responders must wear appropriate protective equipment to avoid the risk of electric shock, which may cause serious injury or death.
Varning
The emergency responders must wear appropriate protective equipment before touching high-voltage system components in water to prevent electric shock.
After the emergency responders remove the vehicle from the wading area, allow the vehicle to dry completely before performing any further work, to prevent electric shock.
Nödvändigheten av underhåll
Daily Maintenance
↑ Till toppenRegular routine and scheduled maintenance is essential to ensure safe operation, reliability, and optimal vehicle performance, and to help minimise long-term maintenance costs.
Routine maintenance tasks described in this manual may be performed by the operator following the relevant instructions.
Windrose recommends that all scheduled maintenance be performed at a Windrose authorised service centre.
AnmärkningThe operator is responsible for maintaining the vehicle and ensuring that all components comply with local regulatory requirements, including but not limited to tyres, side deflectors, roof deflectors, side skirts, bumpers, front covers, and the vehicle speed limiter. You must ensure that the performance of these components always meets or
exceeds the original-specification components that are replaced.
of this manual.
This manual provides the information needed to operate and maintain the vehicle and its components. More detailed information of vehicle maintenance is contained in the Windrose Product Warranty Manual.
This vehicle must be regularly inspected and maintained as indicated in the Windrose Product Warranty Manual, in order to ensure coverage of the vehicle under the manufacturer’s warranty The systems installed on the vehicle are sophisticated and there are strict after-sale service requirements for electric vehicles in accordance with national laws and regulations. Therefore,
ObserveraIf you have any questions about how to maintain your vehicle, contact a Windrose authorised service centre directly for help.
Serviceläge
↑ Till toppenDaily Maintenance
Inspection of Electric Drive System
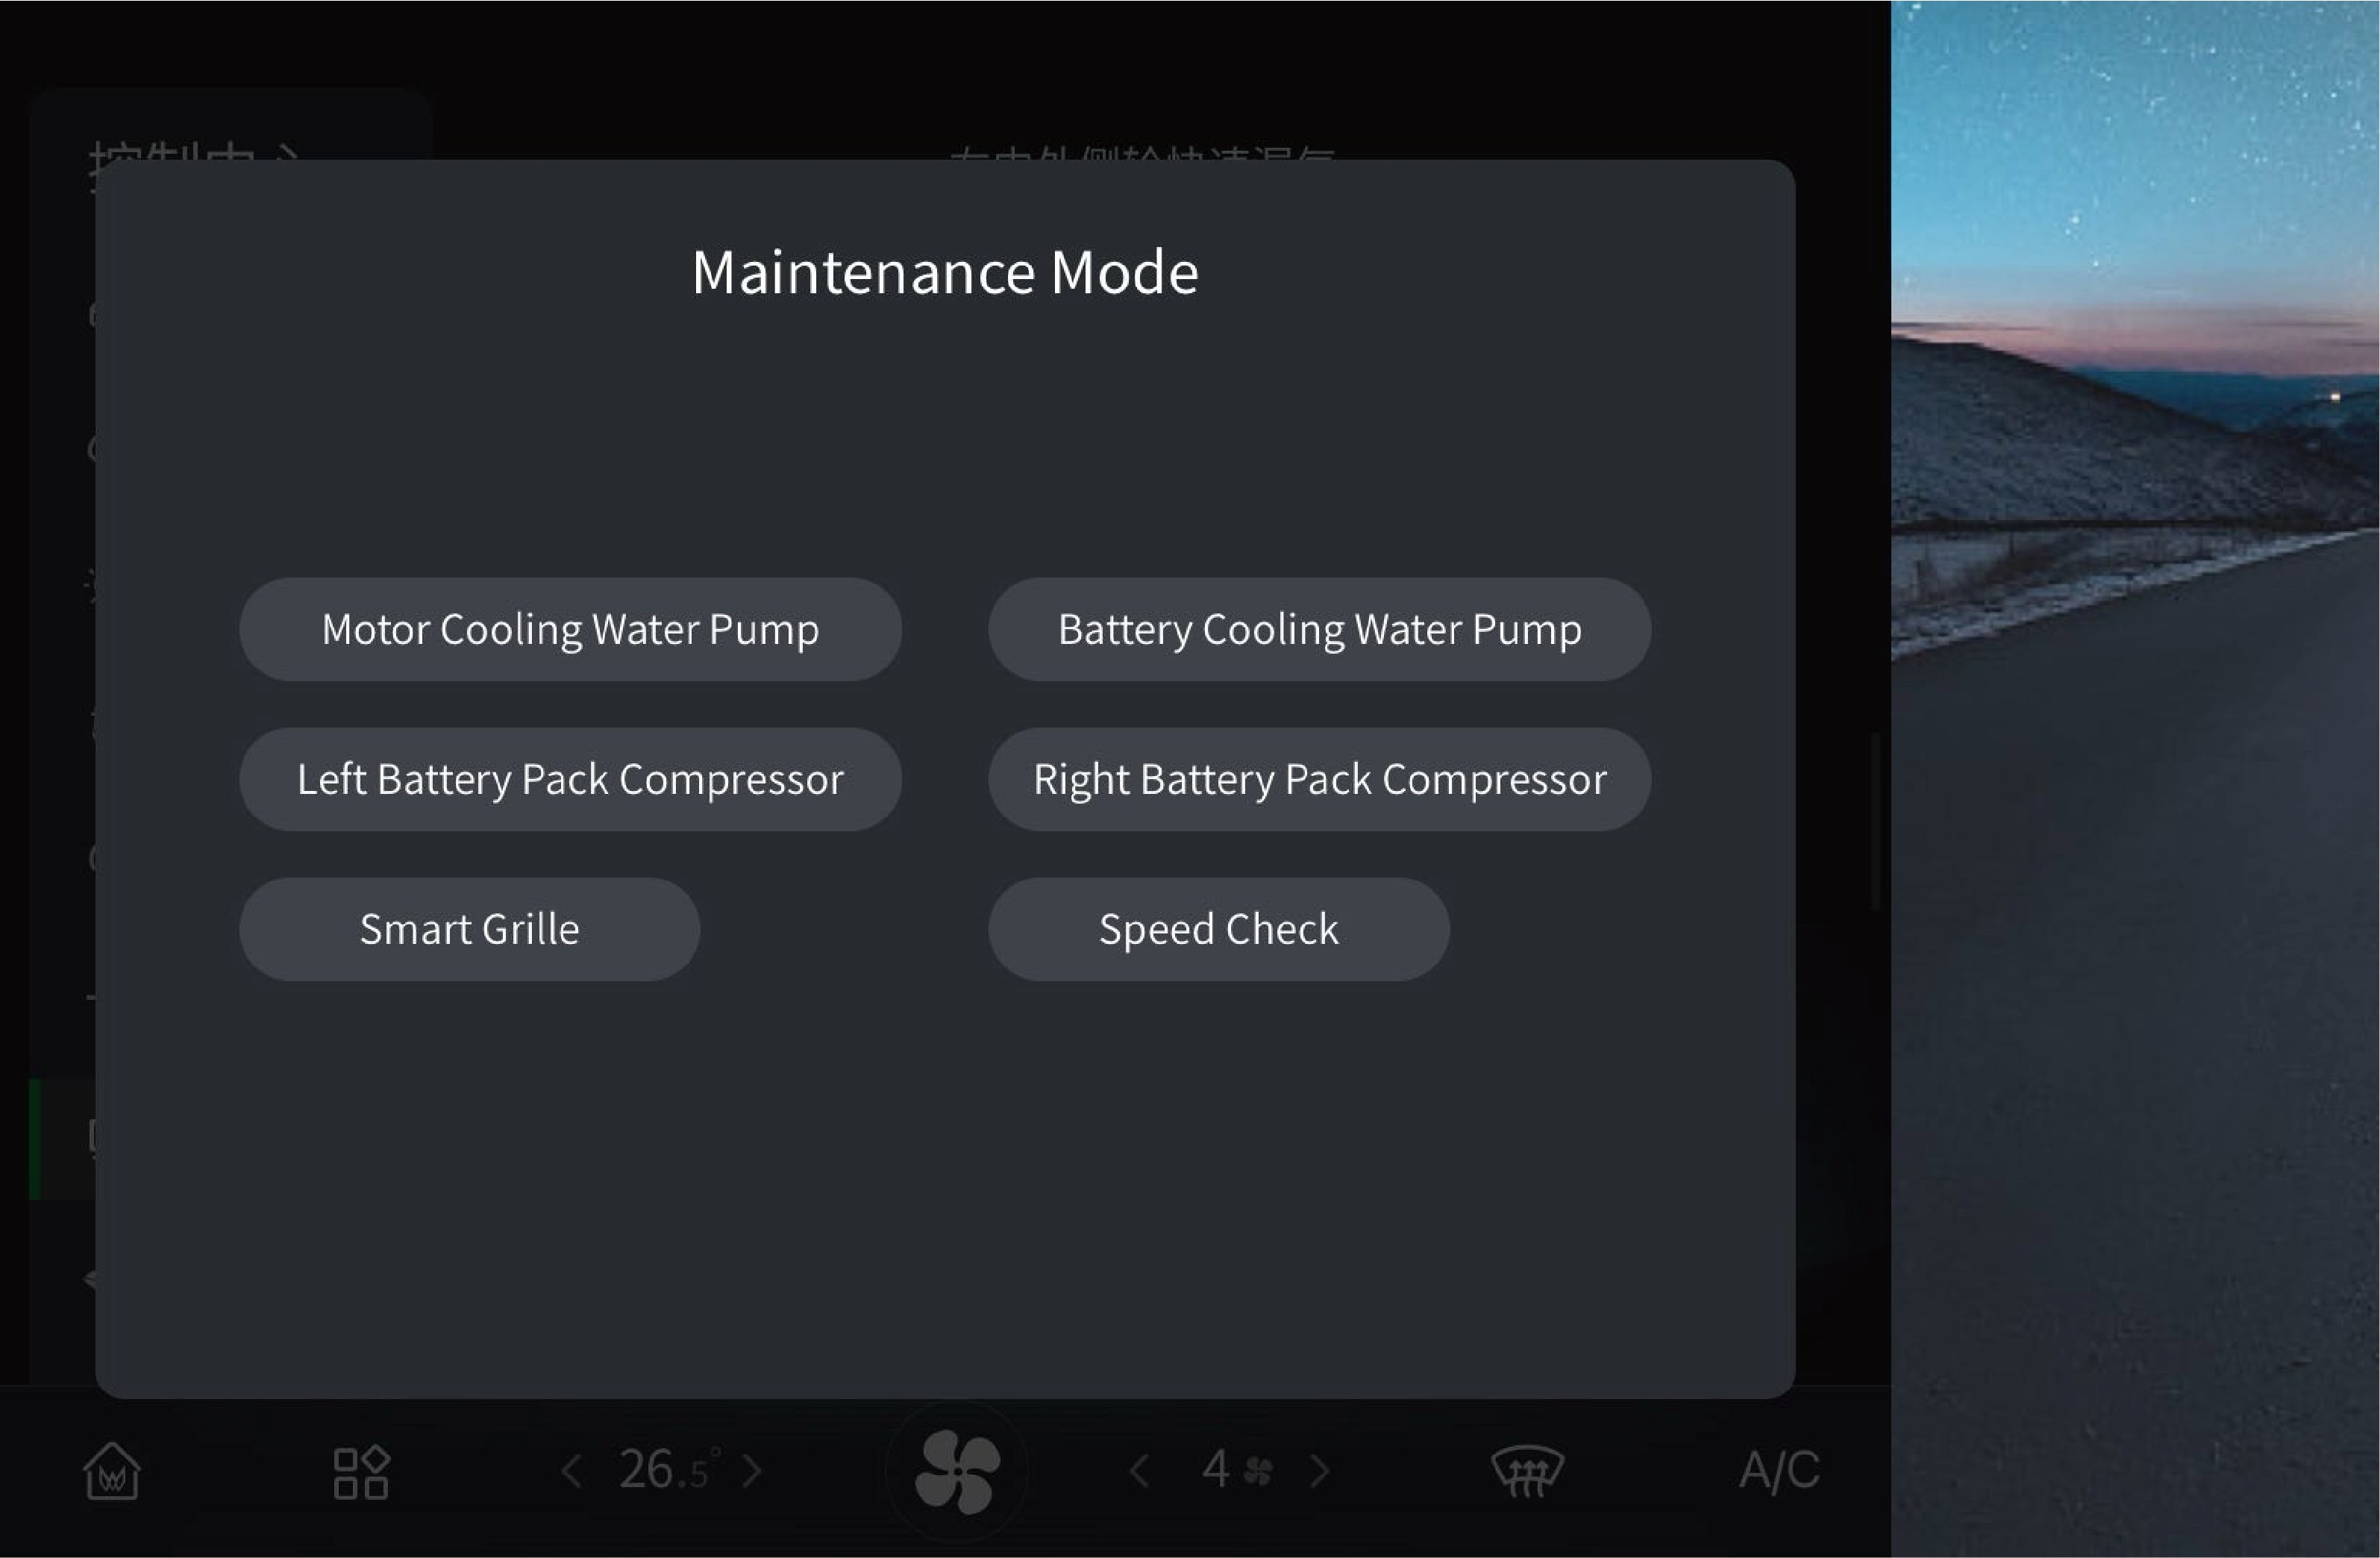 Daily Maintenance
Before starting the vehicle, check whether the relevant data displayed on the instrument cluster is normal. If the data is abnormal, do not drive the vehicle. Instead, record the system fault type and related data, and report the information to the Windrose authorised service centre.
AnmärkningIf the high-voltage battery or motor system fails, contact a Windrose authorised service centre for repair in time.
The speed limit test switch in the service mode is only used for inspection of vehicle speed limit. After activating this function, the switch will be highlighted. It must be kept closed during normal driving.
The motor coolant pump switch, battery coolant pump switch, left battery pack compressor switch, right battery pack compressor switch and active grille shutter switch in the service mode are only used for vehicle inspection and coolant filling. They must be kept
Övervakning av däcktryck
↑ Till toppenDaily Maintenance
This vehicle is equipped with a tyre pressure monitoring system, which will display the tyre pressure on the instrument cluster and the vehicle information screen. If the tyre pressure is abnormal,
closed during normal driving.
please do not continue to drive the vehicle for a long time and contact a Windrose authorised service centre in time.
Kontroll av ljus
Daily Maintenance
↑ Till toppenThis vehicle is equipped with a self-test function for verifying functionality of each driving lamp.
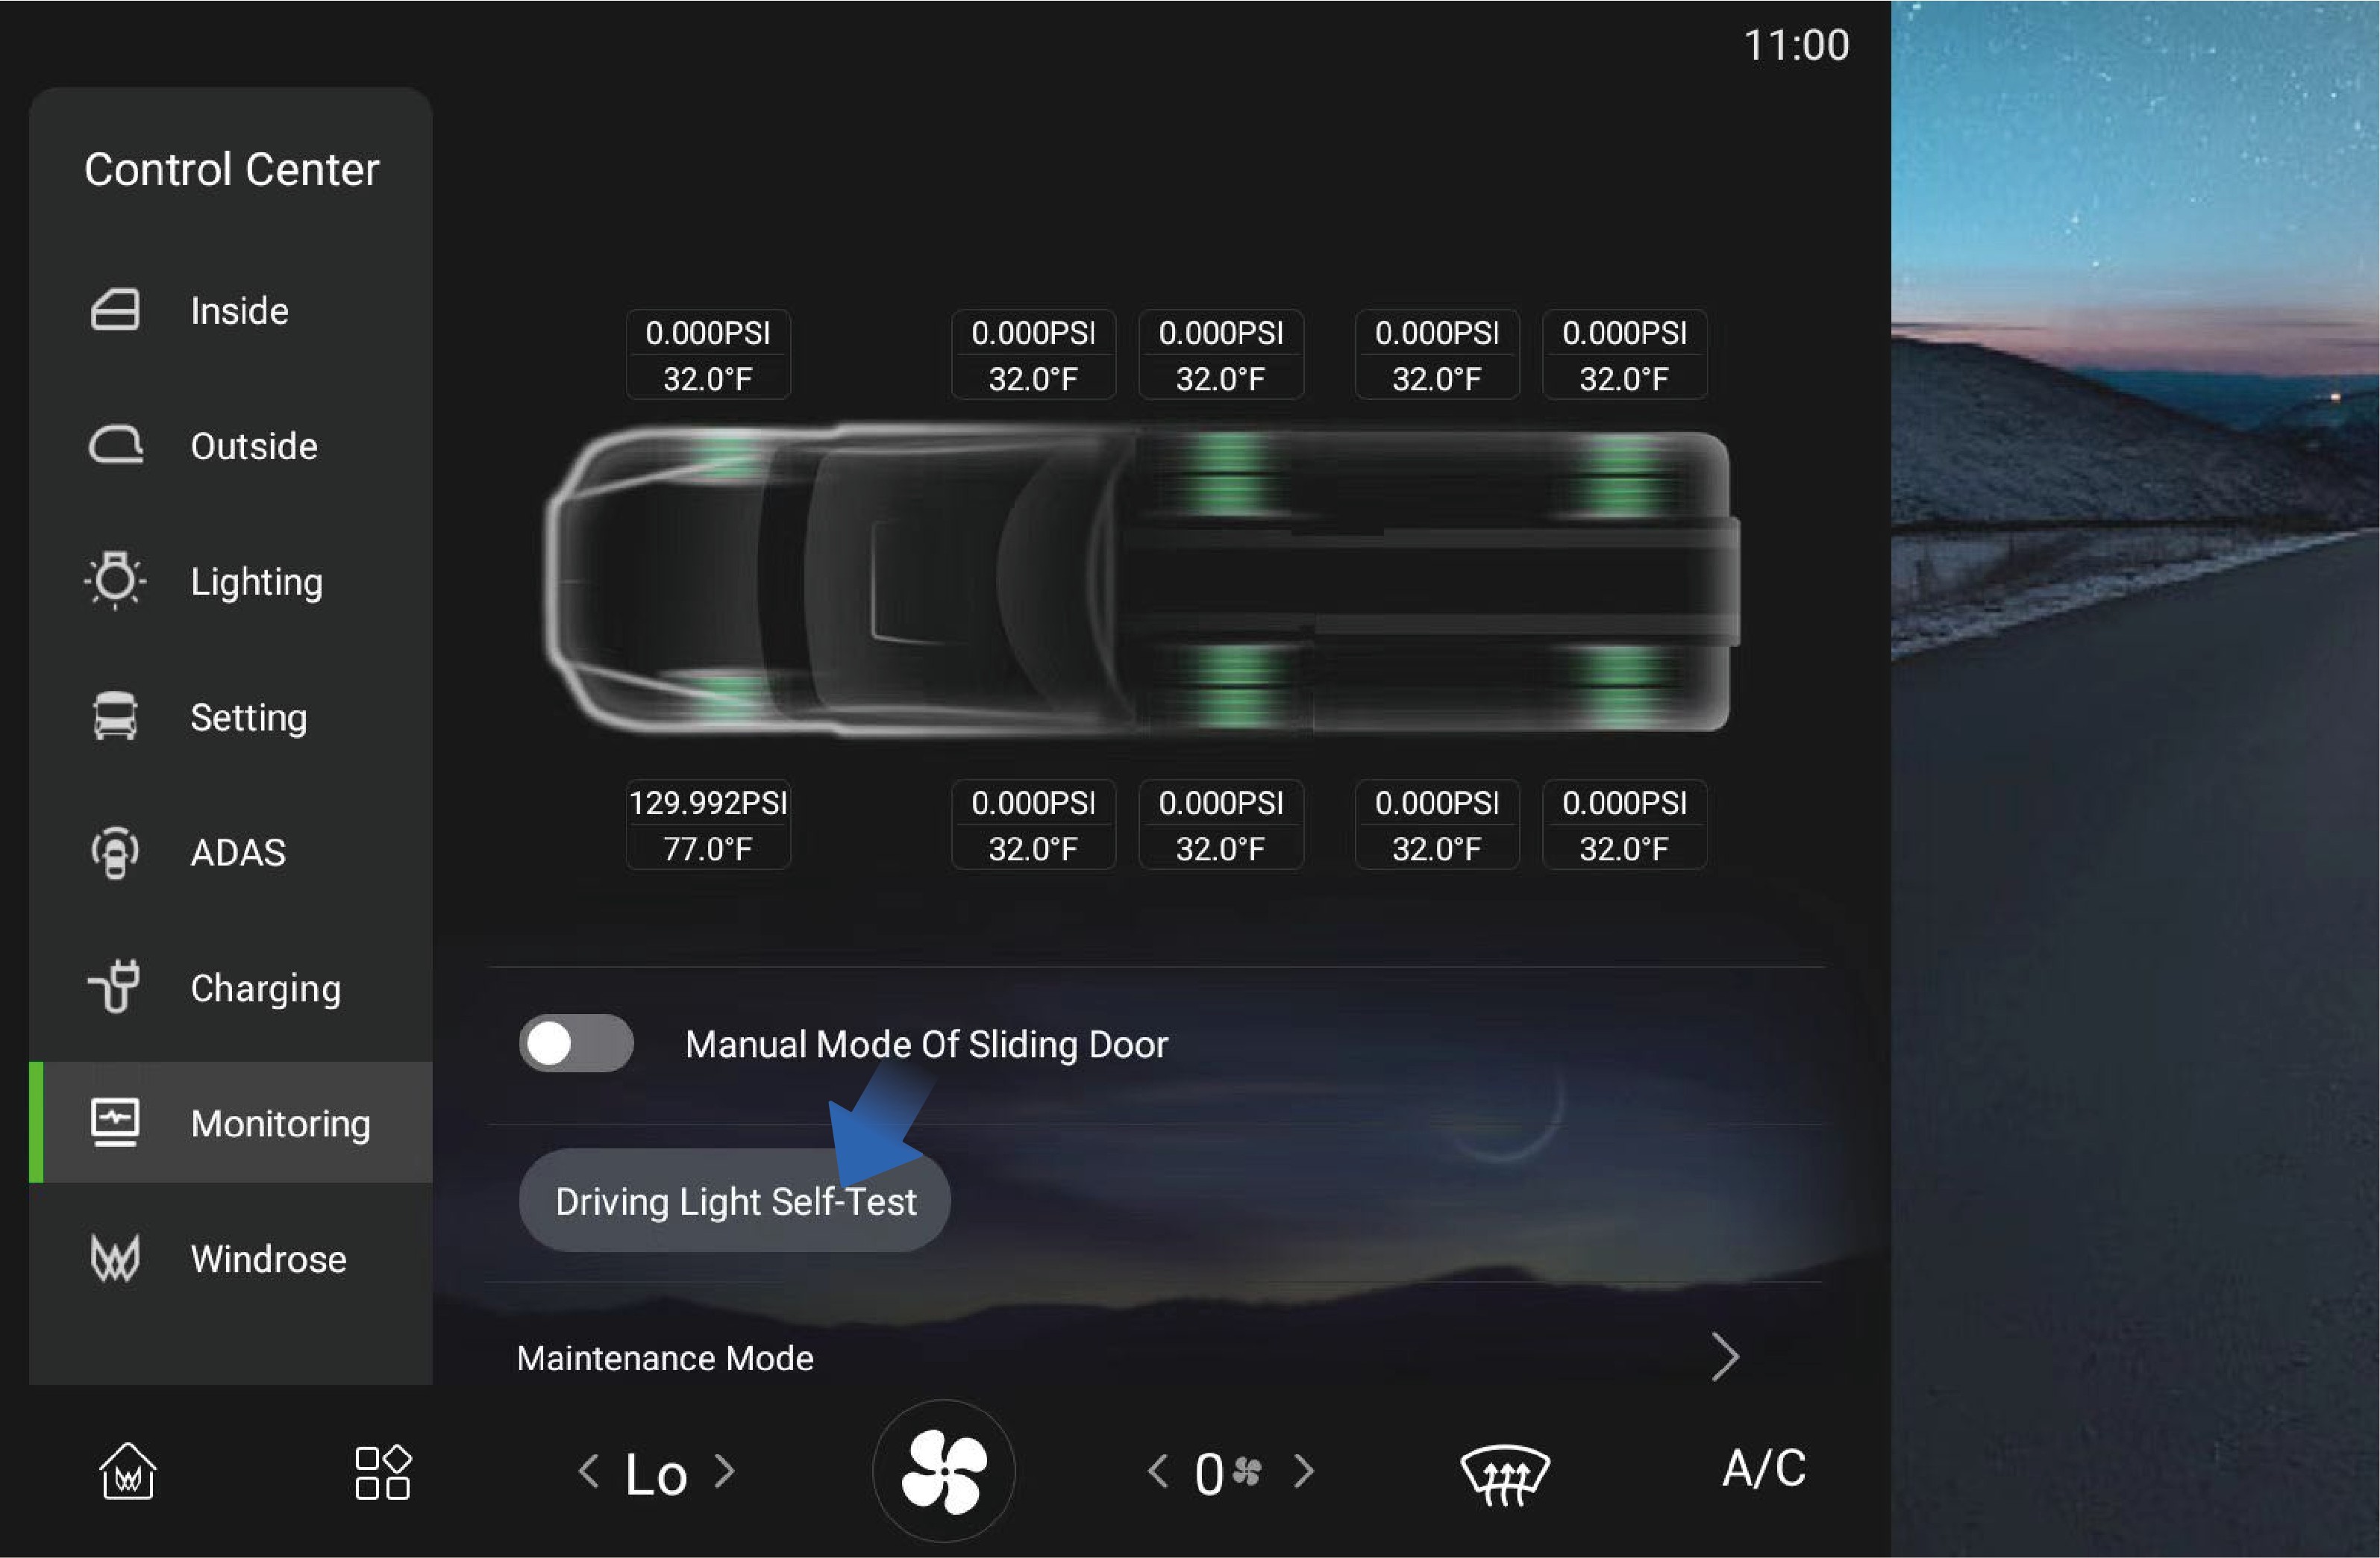 Bruksanvisning
↑ Till toppenYou can activate this function by selecting "Control Center", switching to the "Monitoring" interface and clicking "Driving Light Self-Test" button on the vehicle information screen of the instrument panel. After activation, all lamps of the vehicle will be illuminated at the same time. You can observe the lamps and indicators on the instrument cluster to determine whether there is a faulty lamp.
Försiktighetsåtgärder
↑ Till toppenVarningIf any, contact a Windrose authorised service centre in time to check and repair the vehicle lamps.
Kontroll av signalhorn och vindrutetorkare
Daily Maintenance
Check the electric/air horns as below:
Park the vehicle, press the horn button on the steering wheel to check whether the electric horn is working properly.
Press the electric/air horn change-over switch, press the horn switch repeatedly, and check whether the air horn is working properly.
Power on the vehicle, turn on the wiper switch, and check whether the wiper is working properly at each gear.
Högspänningsbatteri
↑ Till toppenRoutine Maintenance
Position of high-voltage battery
The high-voltage battery is located under the floor of the vehicle. When the vehicle is driving on bumpy or uneven roads, be careful to prevent collisions.
VarningWhen the high-voltage battery catches fire in a crash, pull over the vehicle immediately and evacuate the occupants from the vehicle and move them away from traffic. When the vehicle speed is below 20 km/h, the electric sliding door will automatically unlock; When the vehicle speed is below 6 km/h, the electric sliding door will automatically open. To ensure the life safety of the occupants in the vehicle, if the driver does not decelerate the vehicle within 4 minutes in the above situation, the system will decelerate and stop the vehicle automatically.
Maintenance of high-voltage battery
The high-voltage battery SOC needs to be calibrated:
once a month.
After the vehicle has been stored for more than 3 weeks, SOC calibration should be performed once at least.
Calibration method:
Use the high-voltage battery to 20% -25% SOC.
Charge the high-voltage battery fully.
Use the battery power to 40%-60% SOC.
Kylvätska
↑ Till toppenRoutine Maintenance
Coolant selection
Please select the coolant with the corresponding freezing point according to driving environment to ensure the normal operation of the vehicle cooling system.
Inspection of coolant
↑ Till toppenAfter the coolant temperature drops, check whether the coolant level in the reservoir is between the MIN to MAX marks; If the coolant is insufficient, the warning lamp on the instrument cluster will be illuminated to remind you to add coolant.
If the coolant has suspended matter, sediment or discoloration,
replace it with new coolant immediately.
Regularly check the freezing point of the coolant to ensure that it meets the requirements of the local environment and replace it regularly.
Replace the coolant
Drain the coolant as below:
Park the vehicle on the flat ground.
Turn on the EPB switch.
After the coolant temperature drops, unscrew the auxiliary water tank filler cap.
↑ Till toppen4. Loosen the drain plug at the bottom of the radiator to drain the coolant.
Filling of coolant

Fill the coolant as below:
Add the coolant slowly and evenly until it reaches the MAX level, and tighten the filler cap.
Power on the vehicle and run the water pump for about 10 minutes.
Power off the vehicle and add coolant to the MAX level.
Tighten the auxiliary water tank filler cap.
Varning
Use the coolant recommended by Windrose. Do not mix different types of coolant to avoid reactions that may corrode the motor and radiator or block the cooling system.
Never add liquids other than coolant to the cooling system to avoid damaging the motor and other components.
Do not step on the auxiliary water tank.
Anmärkning
Check, add and replace the coolant regularly.
Rinse the cooling system repeatedly with clean water for ≥3 times when adding or draining the motor coolant for the first time.
When adding the coolant, keep the motor and room temperature ≤45℃ to avoid burns.
Add the coolant slowly and evenly until it reaches the MAX level
After the vehicle is powered off, the motor, ECU, radiator and other components are still hot. In this case, do not open the auxiliary water tank filler cap. Otherwise, hot coolant or steam
will spray out, causing burn injuries. Perform the inspection,
replacement and filling of the coolant after the temperature of the motor system drops.
Only professionals can remove the pressure cap on the side of the auxiliary water tank.
Cleaning of radiator
↑ Till toppenAfter the radiator has been used for a period of time, insects, catkins, dirt or other residues in the radiator fins will reduce the cooling capacity of the cooling system. You need to check the outer surface of the radiator frequently and clean the foreign objects in time (do not flush it with high-pressure gas or water).
Maintenance of cooling system
Check the cooling system to ensure that the cooling system does not leak. Check whether the cooling system leaks before driving. There are 4 common reasons for water leakage:
The radiator welding part leaks, and the radiator should be replaced.
The aging and cracking of the hose and the rust of welding part of the pipe will cause coolant leakage. Please replace the pipe.
Using inferior coolant will cause electrolytic corrosion and leakage of the cooling system. Use a special cleaning agent to clean the cooling system, and add new coolant that meets the requirements after installation.
The cooling pipe clamp is loose. Use the corresponding tool to replace or tighten the clamp.
Däck
Routine Maintenance
Tyres are the connection to the road and affect driving safety. Check the following items of the tyres regularly or before driving:
Tyre pressure
When checking tyre pressure, note that the pressure will change with temperature.
Tread pattern
The tread pattern affects the grip and control of the tyre. The smaller the depth or the fewer the pattern, the worse the grip and control of the tyre.
Tyre conditions
Check the tyre conditions before driving:
External damage;
Foreign objects in the tread pattern;
Foreign objects in the tyre (dual tyres);
Cracks or dents;
One-sided shoulder tyre wear or irregular tread wear.
Tyre service life
When the tyre is used for more than 6 years, replace it with a new one.
Varning
After parking the vehicle, wait for the tyre to cool down before inflation or deflation.
The tyre pressure should be kept within a reasonable range. Too high or too low tyre pressure will accelerate tyre wear, increase power consumption, and lengthen the braking distance. In severe cases, tyre blowout may occur, resulting in traffic accidents and even personal injuries.
Before driving, you must check the integrity of the tread pattern. Excessive worn tread will cause serious slipping on wet roads (rainy days, snowy days) or when driving at high speed, resulting in loss of control of the vehicle and even personal injuries.
Cracks, dents or external damage will cause the tyre blowout. If any, the tyre should be repaired or replaced immediately to avoid accidents.
Anmärkning
Please follow local and national regulations for the wear standard of the tyre tread pattern. When the tread wear exceeds the specified value, the tyre should be replaced as soon as possible.
Avoid contact of tyres with oil, grease, fuel, etc., as this may accelerate tyre aging.
When parking the vehicle, avoid only part of the tyre in contact with the ground or parking on road with sharp stones.
↑ Till toppenObserveraThe correct tyre pressure is specified in the tyre pressure table section.
Steering System
↑ Till toppenRoutine Maintenance
Before driving, check the free travel and looseness of the steering wheel, shake the steering wheel to ensure that it is locked. During driving, check whether there is heavy steering, shaking steering or steering offset. In case of any of the situations above, please stop driving the vehicle and contact a Windrose authorised service centre immediately.
Säkerhetsunderhåll av högspänning
↑ Till toppenRoutine Maintenance
Principles of safe operation under high voltage
↑ Till toppenDo not modify and install accessories on the high-voltage system and body of the vehicle without following proper procedures. Please operate according to the regulations, otherwise it may cause fire; Considering that there is a risk of electric shock in the high-voltage system of the complete vehicle, the high-voltage system should be operated by workers
who have been subject to professional training and acquired the qualification for the employment in accordance with relevant safety regulations.
Personnel requirements
Drivers should not disassemble components attached with high-voltage warning sign without following proper procedures if they have not received any training; Do not touch high-voltage components, such as orange high-voltage cables or components that come into contact with high-voltage cables, after an accident. Failure to do so may result in a risk of high-voltage electric shock. When disassembling and repairing high-voltage electrical components, the operator should unplug the low-voltage maintenance power-off plug, disconnect the low-voltage battery power supply and cut off the high-voltage circuit simultaneously.
Operators should not wear metal ornaments, such as watches and rings, and should not have metal objects in the pockets of work clothes, such as keys, metal shell pens, mobile phones, and coins.
Operators should not bring tools unrelated to work into the work site, and must use metal tools with the handheld parts being insulated.
Before connecting the high-voltage power supply, the operator should check whether there is any debris around the high-voltage electrical appliances, and notify irrelevant personnel to stay away from the above-mentioned parts, and remind loudly when closing the switch.
Maintenance requirements
↑ Till toppenThe maintenance and repair of the vehicle can only be carried out by service stations or maintenance units with the corresponding maintenance qualifications, and by personnel who have received the corresponding training and obtained the qualifications. Otherwise, the high voltage in the high-voltage system may impose danger and even threaten your life.
Charging maintenance
↑ Till toppenIn case the vehicle has parked for a long time, the condition of the high-voltage battery should be checked every two weeks to prevent electric leakage in the high-voltage battery. The vehicle, if parked for a long time, should be charged and maintained
regularly to prevent the high-voltage battery that has not been
used over a long time from affecting the performance of the vehicle.
Batteri
Routine Maintenance
The low voltage battery is located in the engine compartment. The service life and function of the battery are affected by many factors, such as the number of starts, driving style, driving conditions, climatic conditions, etc.:
If the battery is completely discharged multiple times, its service life may be shortened. Keeping the battery charged enough helps extend its lifespan.
The starting capacity of the battery will be weakened over time. If the vehicle is parked for a long time, the battery may need to be recharged.
Varning
- Battery electrolyte is corrosive, and if it gets into the eyes or skin by accident, rinse immediately with plenty of water and seek medical care.
The maintenance and care of the battery should be handled by professionally trained personnel.
It is prohibited to touch the positive and negative terminals of the battery with both hands or a conductor simultaneously at any time.
If the low voltage battery catches fire, be sure to leave the vehicle quickly. If the smoke is inhaled accidentally, please go to an open area and seek medical attention as soon as possible.
It is forbidden to connect the battery cell to an external 12V electrical appliance.
It is forbidden to disassemble the battery without authorization to prevent acid leakage from corroding the human body, vehicle, etc.
AnmärkningIf you notice the following, be sure to stop using the vehicle and cut off the power immediately. Contact the Windrose authorised service centre for further guidance:
Power cords, plugs or communication lines cracked or damaged.
Signs of overheating, smokes and sparks.
Battery pack damage (e.g. cracking), battery leakage.
The dust in the battery cell will cause the battery to discharge automatically and be easily damaged.
Cleaning of battery
Keep the battery clamp and battery surface clean and dry.
Apply a small amount of acid-proof grease to the lower end of the battery clamp.
Please use commercial detergent to clean the corroded parts of the battery.
Varning
Please keep the surface of the battery terminal and the post clean, otherwise the service life of your battery will be shortened.
Do not use detergents containing flammable substances, which will corrode the battery case.
Fordonets utvändiga mått
Technical Data
|
|
|
|
|---|---|---|---|
|
|
|
|
Parametrar för kraftsystemet
Technical Data
|
|
|
|---|---|---|
|
|
|
|
|
|
|
|
|
|
|
|
|
|
|
|
|
|
|
|
|
|
|||
|---|---|---|---|
|
|
|
|
|
4 | 4 | |
|
|
|
|
|
|
|
|
|
|
|
|
|
|
|
|
|
|
|
|
|
|
|
|
|
|
|
|
|
|
|
|
|
|
||
|
|
|
|
|
|
||
|
|
|
|
|
|
||
|
|||
|---|---|---|---|
|
|
|
|
|
|
|
|
|
|
||
|
|
||
|
|
||
|
|
|
|
Åtdragningsmoment
Technical Data
|
|
|
|
|---|---|---|---|
|
|
|
|
|
|||
|
|
|
|
|
|
|
|
|
|
|
|---|---|---|---|
|
|
|
|
|
|
|
|
|
|
|
|
|
|
|
|
|
|
|
|
|
|
|
|
|
|
|
|
|
|
|
|
|
|
|
|
|
/ |
|
|
|
/ |
|
|
|
|
|
|
|
|
|
|
|
|
|
|
|
|
|
|---|---|---|---|
|
|
|
|
|
|
|
|
|
|
|
|
|
|
|
|
|
|
|
|
|
|||
|
|
|
|
|
|
|
|
|
|
|
|
|
|
|
|
|
|
|
|
|
|
|
|
|
|||
|
|
|
|
|
|
|
|---|---|---|---|
|
|
|
|
|
|
|
|
|
/ |
|
|
|
/ |
|
|
|
|
|
|
|
|
|
|
|
|
|
|
|
|
|
|
|
|
|
|
|
|
|
|
|
|
|
|
|
|
|
|---|---|---|---|
|
|
|
|
|
|
|
|
|
|
|
|
|
|
|
|
|
|
|
|
|
|
|
|
|
|
|
|
|
|
|
|
|
|
|
|
|
/ |
|
|
|
|
|
|
|
|
|
|---|---|---|---|
|
|
|
10±1 |
|
M8×1.25 (10.9) | 10±1 | |
|
M8×1.25 (10.9) | 25±2 | |
|
M8×1.25 (10.9) | 25±2 | |
|
|
M20×1.5 (10.9) | 568±28 |
|
M12×1.5 (10) | 55±5 | |
|
M18×1.5 (10.9) | 270±25 | |
|
/ | 90±10 | |
|
|
|
210±20 |
|
|
M12×1.5 (10) | 55±5 |
|
M18×1.5 (10) | 270±25 | |
|
M14×2 (10.9) |
|
|
|
|||
|
M22×1.5 (10.9) | 700±50 | |
|
M22×1.5 (10) | 700±50 |
|
|
|
|
|---|---|---|---|
|
|
|
|
|
|
|
|
|
|
|
|
|
|
|
|
|
|
|
|
|
|
|
|
|
|
|
|
|
|
|
|
|
|
|
|
|
|
|
|
|
|
|
|
|
|
|
|---|---|---|---|
|
|
M20×1.5 (10.9) | 550±50 |
|
M20×1.5 (10.9) | 550±50 | |
|
M20×1.5 (10) | 550±50 | |
|
|
|
|
|
|
M8×1.25 (8.8) |
|
|
|
23-30 | |
|
|
|
|
|
|
|
|
|
M14×2 (10.9) | 137±5 | |
|
|
|
|
|
|
M14×2 (10.9) | 200±10 |
|
M14×2 (10.9) | 200±10 |
|
|
|
|
|---|---|---|---|
|
|
|
|
|
|
|
|
|
|
|
|
|
|
|
|
|
|
|
|
|
|
|
|
|
|
|
|
|
|
|
|
|
|
|
|
|
|
|
|
|
|
|
|
|
|
|
|
|
|
|
|---|---|---|---|
|
|
M14×1.5 (10.9) |
|
|
M14×2 (10.9) |
|
|
|
M14×1.5 (10.9) |
|
|
|
|
M16×1.5 (10.9) |
|
|
|
|
|
|
M14×1.5 (10.9) |
|
|
|
M14×1.5 (10.9) |
|
|
|
M14×1.5 (10) |
|
Däcktrycksmätare
Technical Data
|
|
|
|
|
|
|
|---|---|---|---|---|---|---|
|
|
|
|
|
|
|
|
|
|
|
|
|
|
|
|
|
|
|
|
|
|
|
|
|
|
|
|
|
|
|
|
|
|
|
|
|
|
|
|---|---|---|---|
|
|
|
|
|
|
|
|
|
|
|
|
Parametrar för hjulinställning
Technical Data
|
|
|
|---|---|---|
|
|
|
Stigningsförmåga
Technical Data
| GVM | Transmission Gear | Gradeability | ||
|---|---|---|---|---|
| 46t | Gear D1 (Speed ≤12 km/h) | Three Motors | Continuous Gradeability | 15% |
| Maximum Gradeability | 30%(60s) | |||
| Four Motors | Continuous Gradeability | 17% | ||
| Maximum Gradeability | 33%(60s) | |||
| Gear D2 (Speed >12 km/h) | Three Motors | Continuous Gradeability | 5% | |
| Maximum Gradeability | 9%(60s) | |||
| Four Motors | Continuous Gradeability | 6% | ||
| Maximum Gradeability | 12%(60s) | |||
| 68t | Gear D1 (Speed ≤12 km/h) | Three Motors | Continuous Gradeability | 9% |
| Maximum Gradeability | 20%(60s) | |||
| Four Motors | Continuous Gradeability | 11% | ||
| Maximum Gradeability | 22%(60s) | |||
| Gear D2 (Speed >12 km/h) | Three Motors | Continuous Gradeability | 3% | |
| Maximum Gradeability | 6%(60s) | |||
| Four Motors | Continuous Gradeability | 4% | ||
| Maximum Gradeability | 8%(60s) | |||
| GVM | Transmission Gear | Maximum Gradeability of Downhill Motor Braking | ||
|---|---|---|---|---|
| 46t | Gear D2 (Speed >12 km/h) | Three Motors | Continuous Gradeability | 5% |
| Maximum Gradeability | 9% | |||
| Four Motors | Continuous Gradeability | 7% | ||
| Maximum Gradeability | 12% | |||
| 68t | Gear D2 (Speed >12 km/h) | Three Motors | Continuous Gradeability | 3% |
| Maximum Gradeability | 6% | |||
| Four Motors | Continuous Gradeability | 5% | ||
| Maximum Gradeability | 8% | |||
Arbetstryck för luftbehållare
Technical Data
|
|
|
|---|---|---|
|
|
|
Effekttabell för ljus
Technical Data
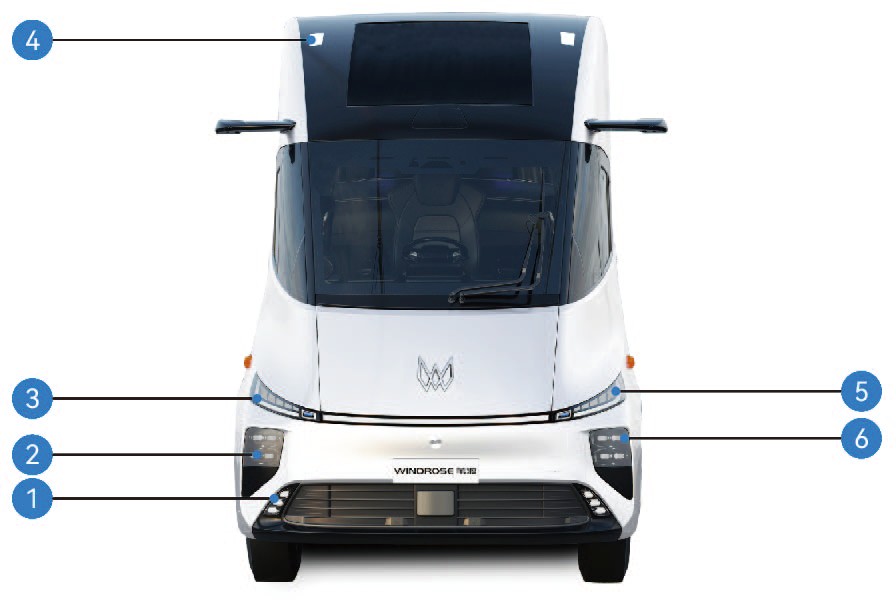
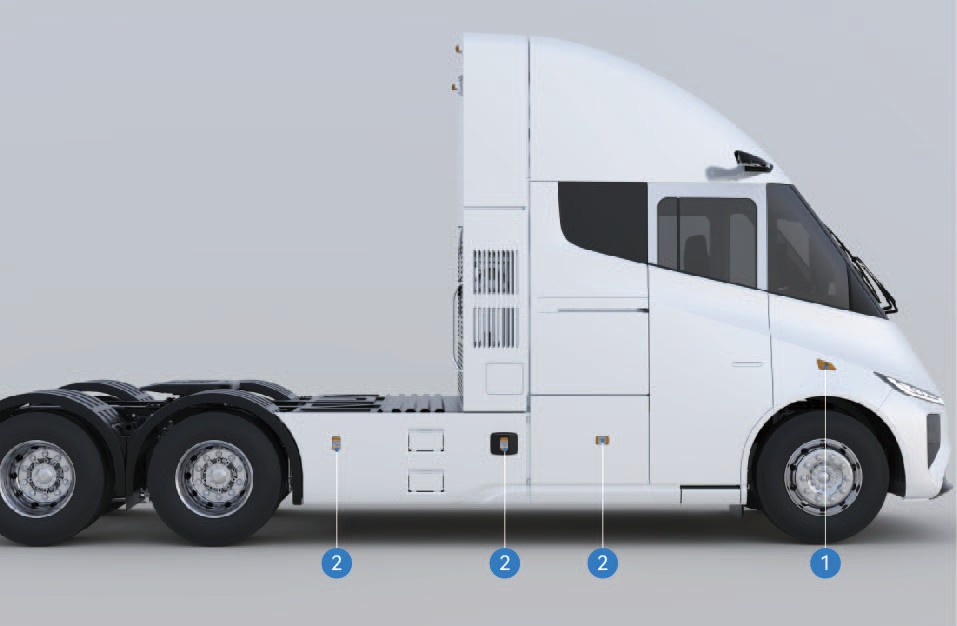
Front fog Lamp, Cornering lamp
Helljus
Front indicator lamp, daytime running lamp
Främre markeringsljus
Front parking lamp
Halvljus
Sidoblinkers
Sidomarkeringsljus (kombinationslykta)
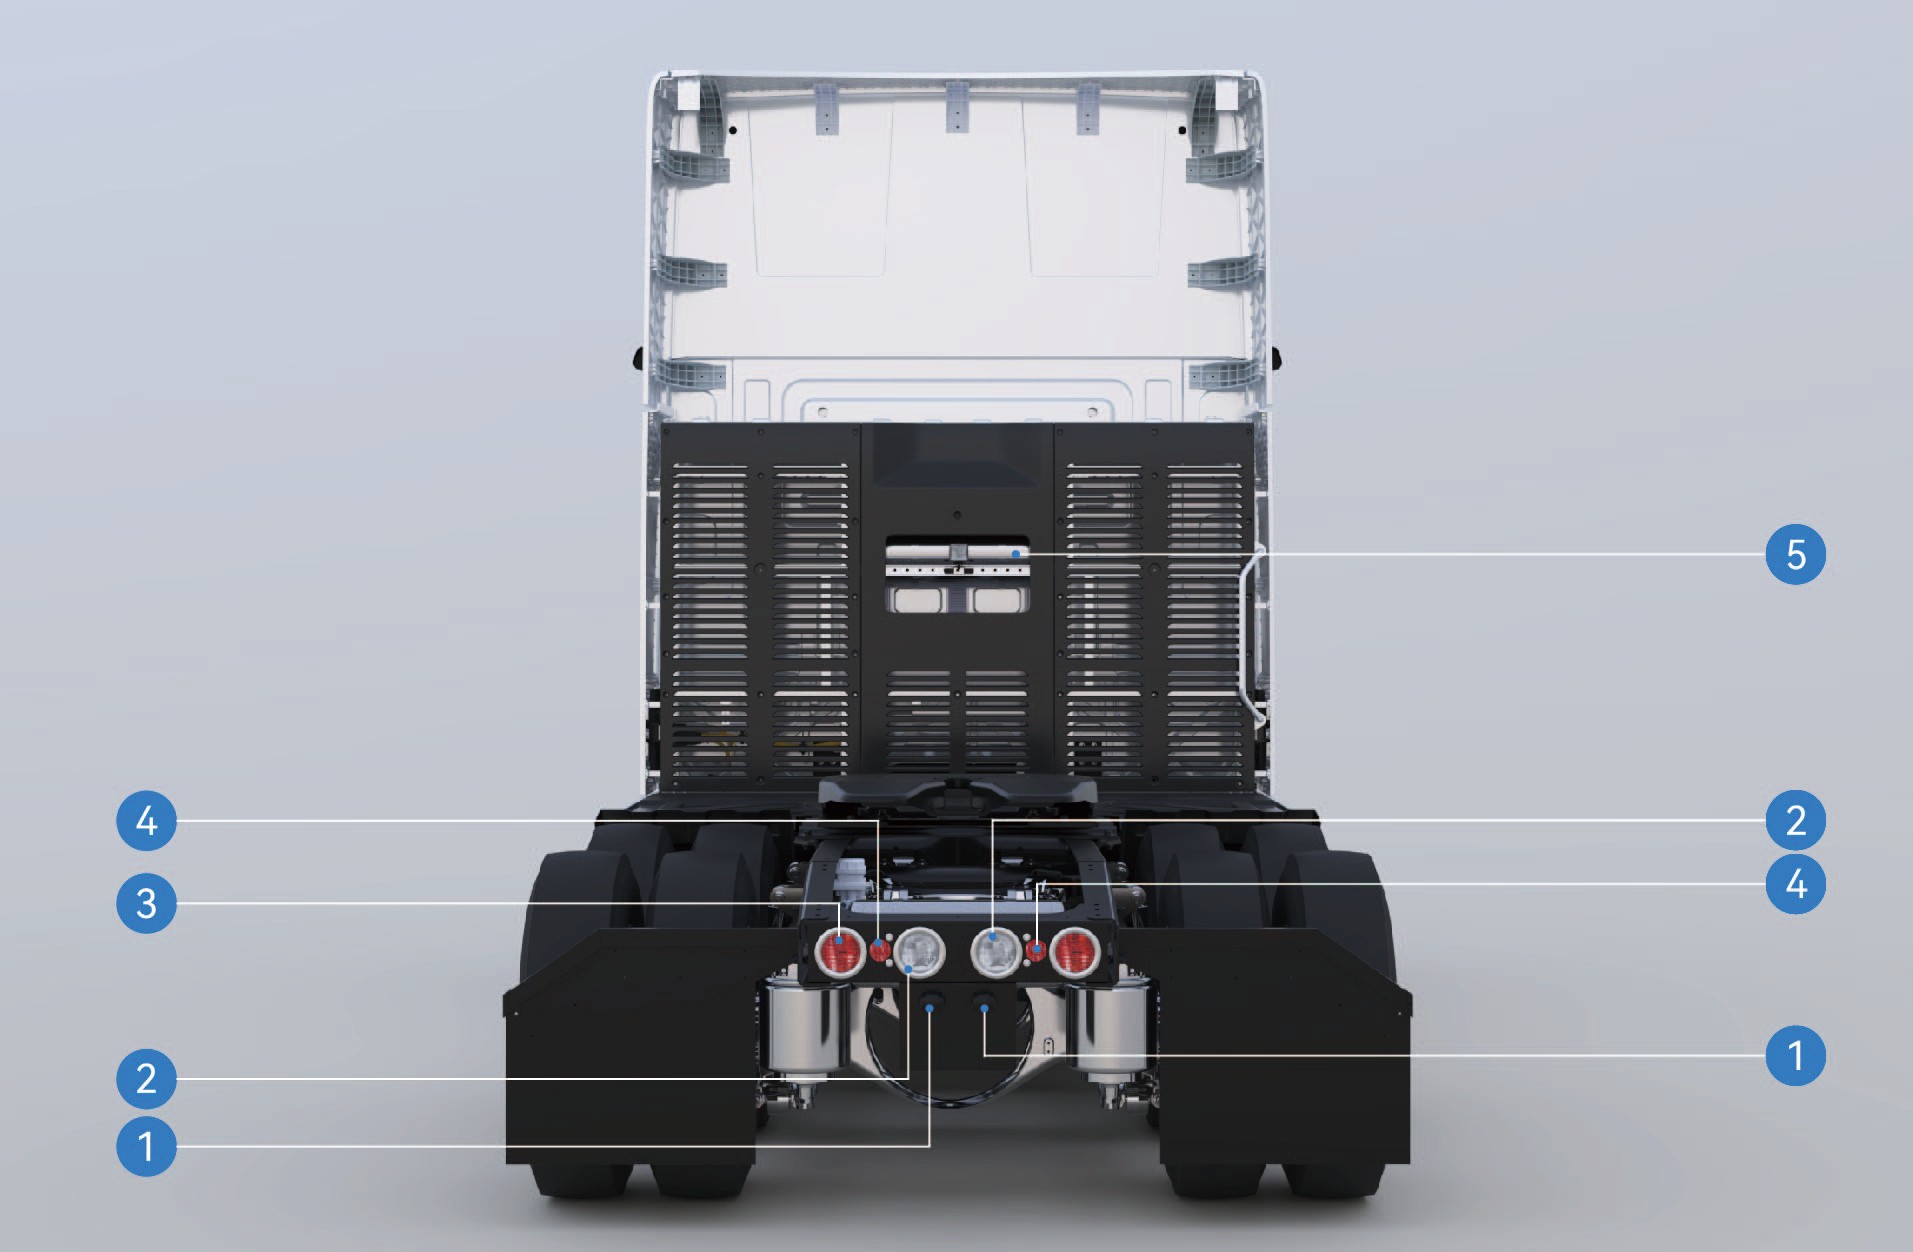
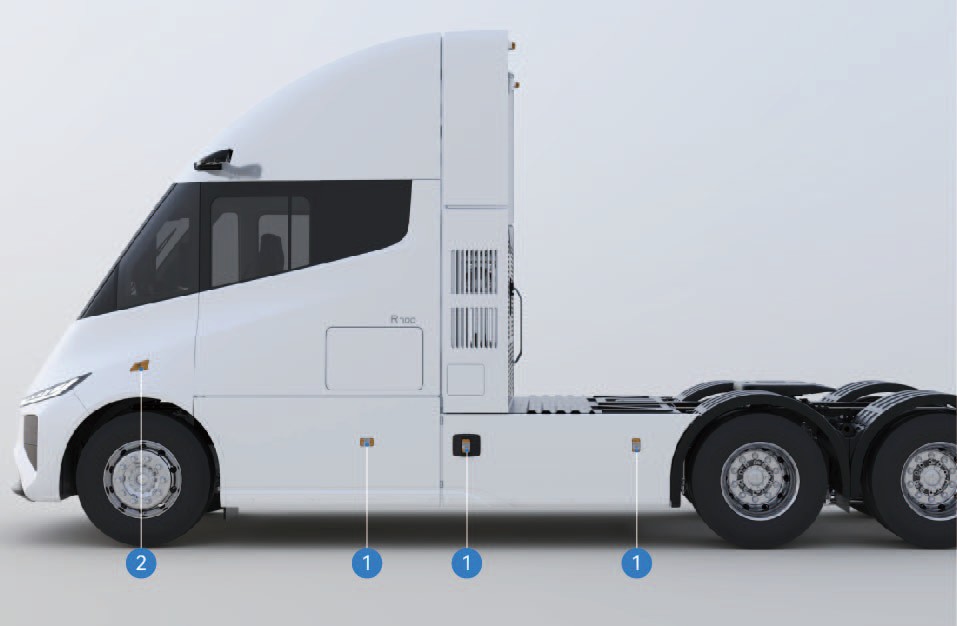
License plate lamp
Reversing lamp
Brake lamp/taillamp/indicator lamp
Rear retro-reflector
Rear working lamp
Sidomarkeringsljus (kombinationslykta)
Sidoblinkers
|
|
|
|
|
|---|---|---|---|---|
|
|
|
|
|
|
|
|
|
|
|
|
|
2 | |
|
|
|
|
2 |
|
|
|
|
2 |
|
|
|
|
2 |
|
|
|
2 | |
|
|
|
|
2 |
|
|
|
2 | |
|
|
|
2 | |
|
|
|
|
2 |
|
|
|
|
3 |
|
|
9 |
|
1 |
|
|
|
|
6 |
|
|
|
|
|
|---|---|---|---|---|
|
|
|
|
|
|
|
|
|
|
|
|
|
|
|
|
|
|
|
1 |
|
|
|
|
3 |
|
|
|
|
2 |
Data för säkringar och skydd
Technical Data
|
|
|
|
|
|---|---|---|---|---|
|
|
|
|
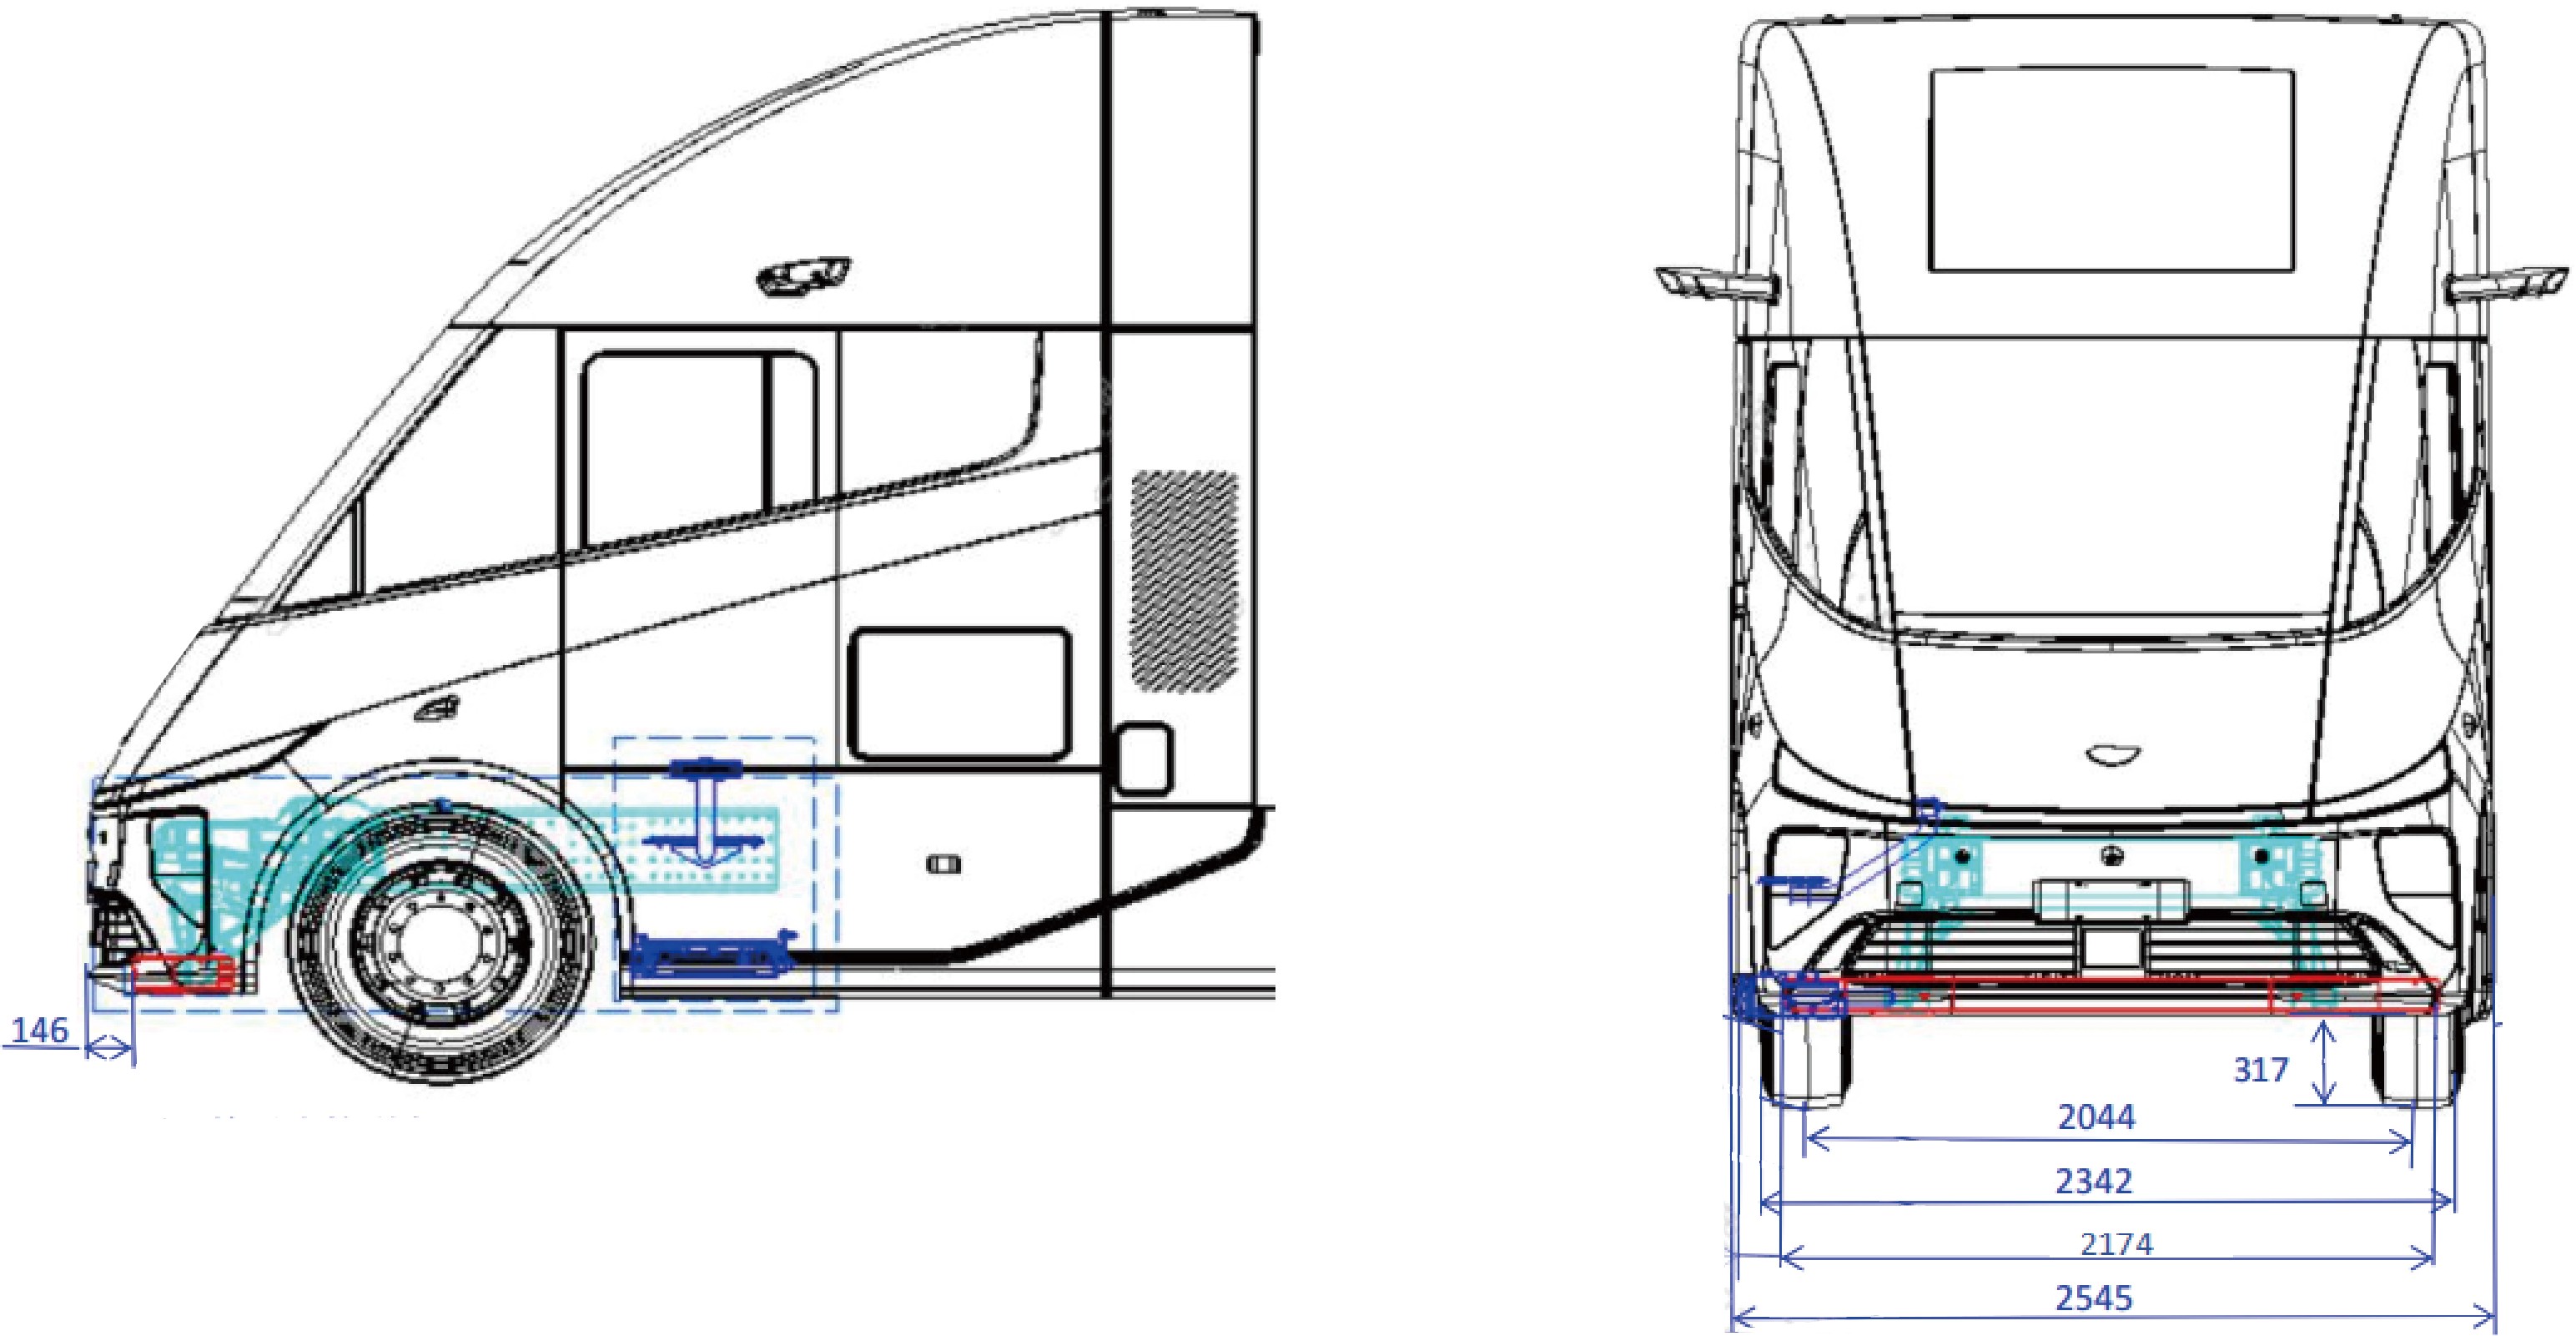
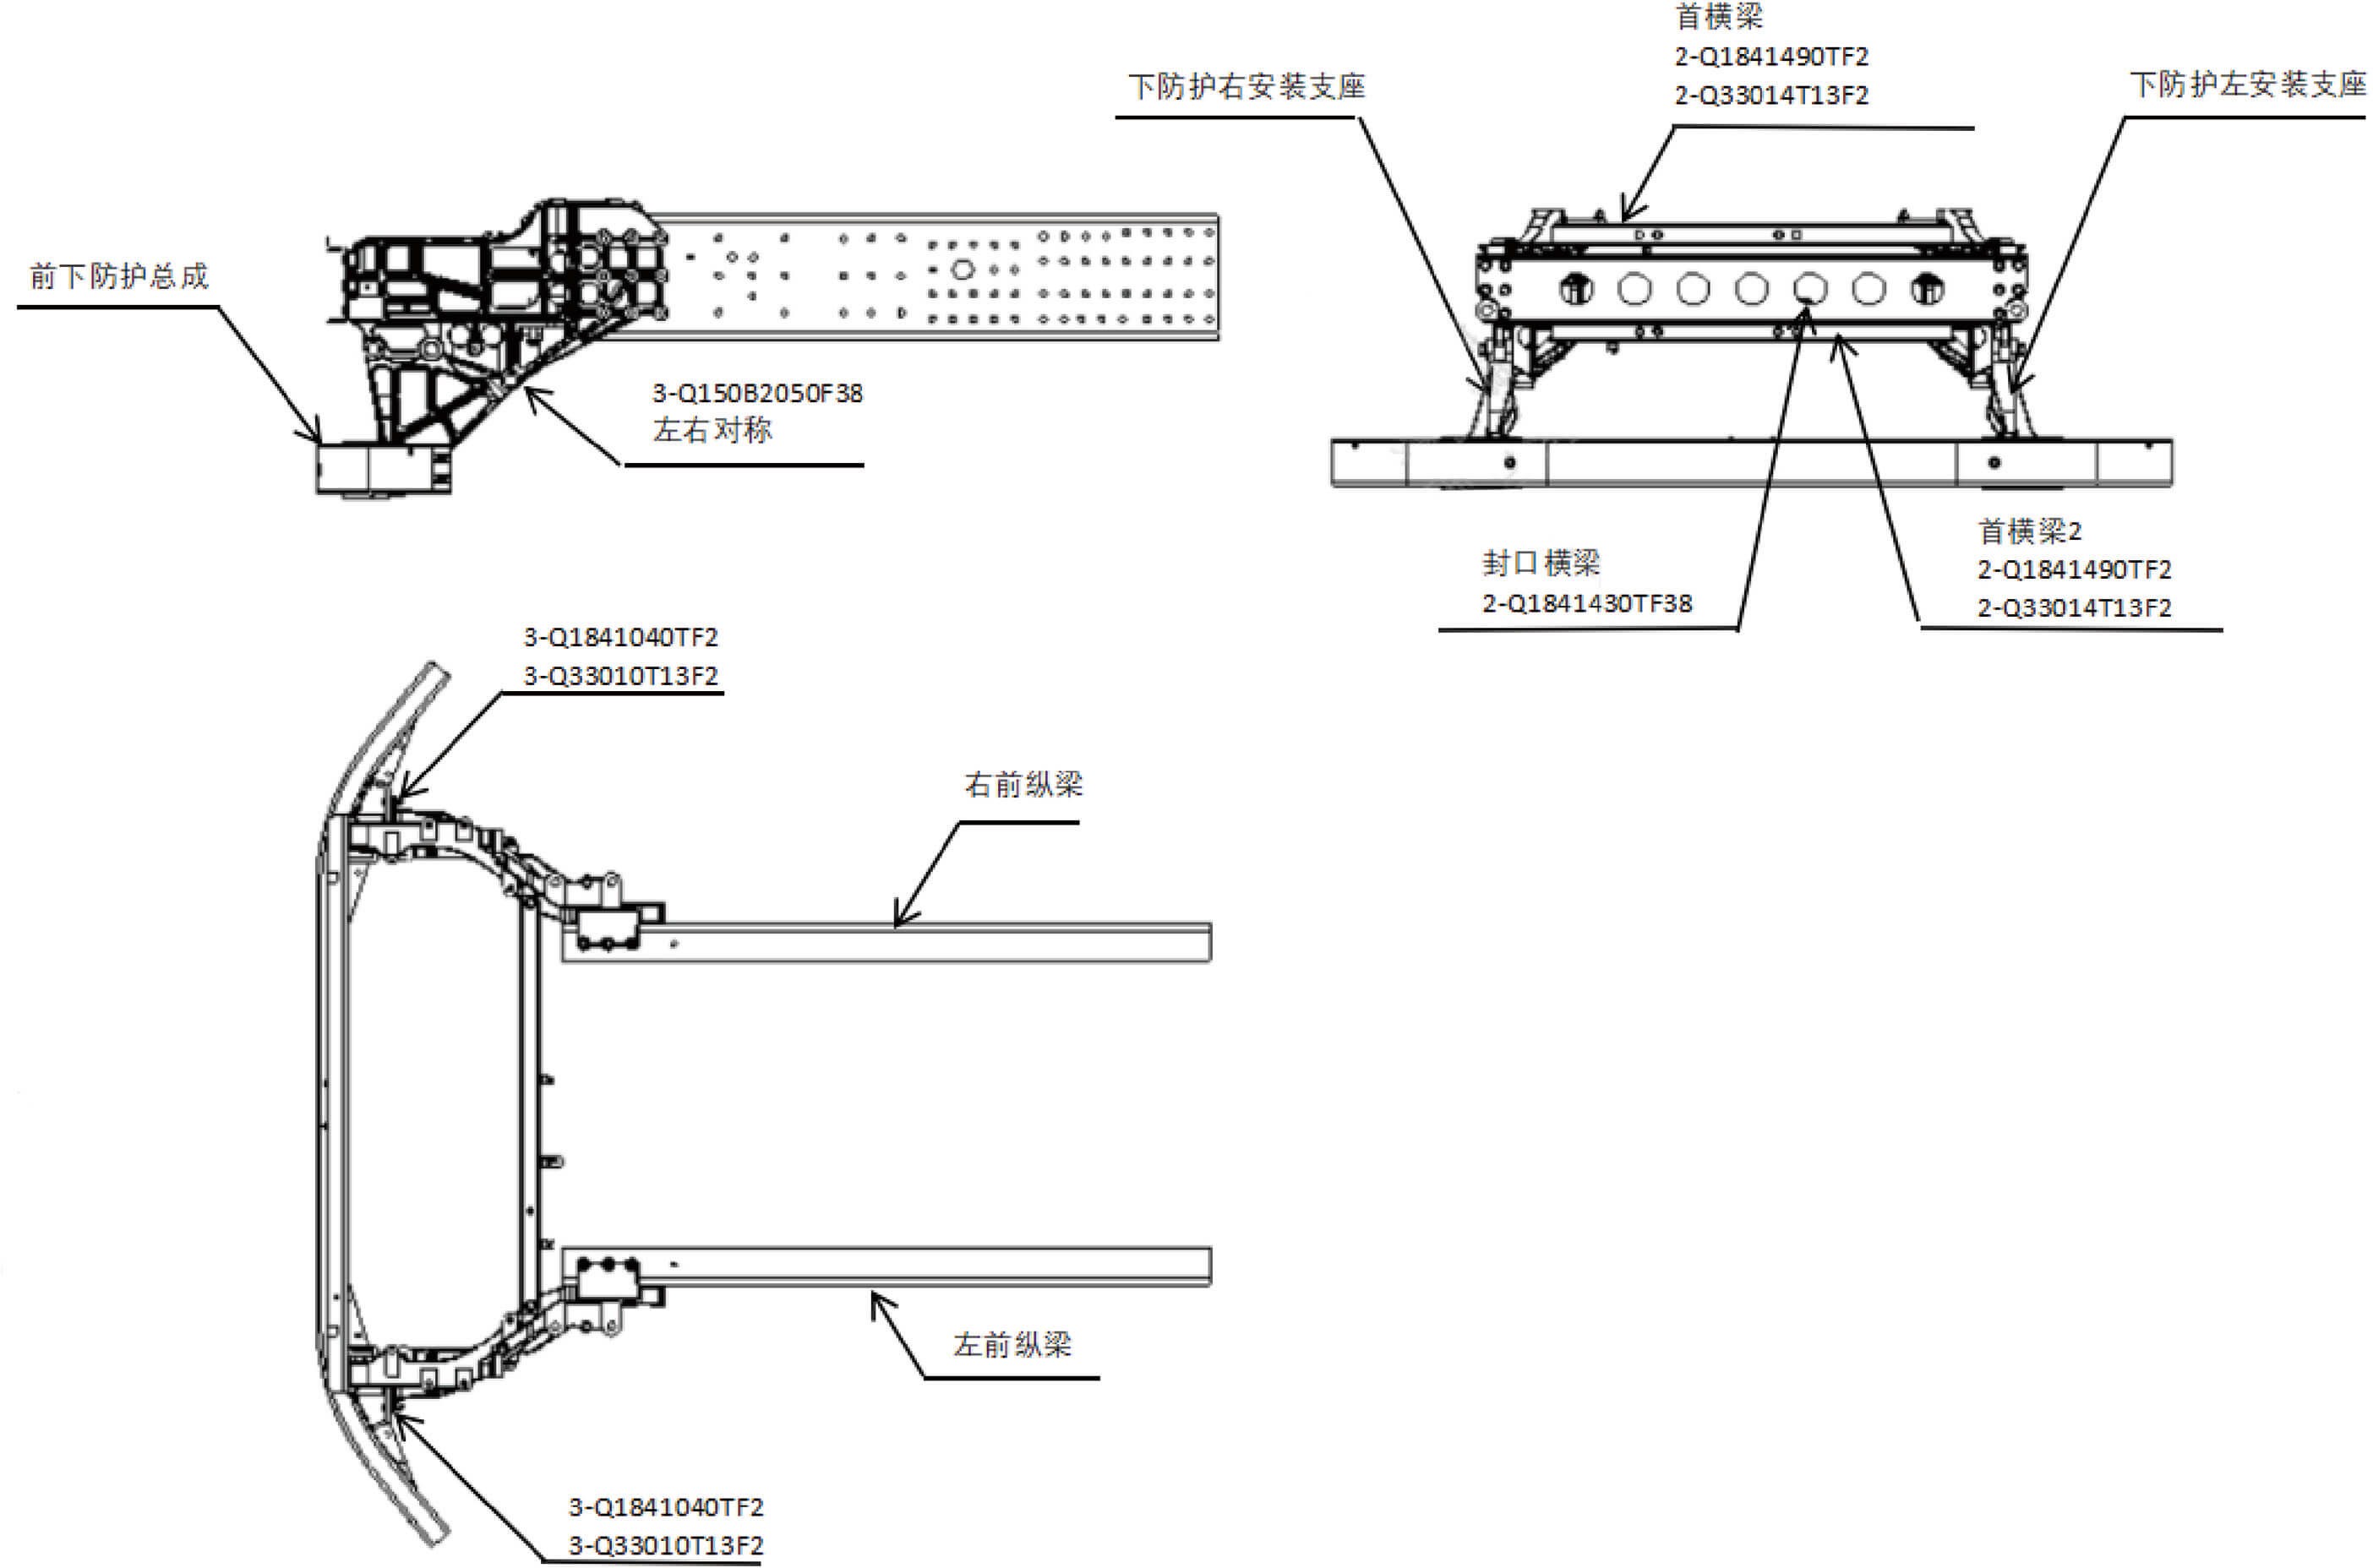
Egenvikt, totalvikt (GVM), axeltryck och drivläge
Technical Data
|
|
|
|
|
|
|---|---|---|---|---|---|
|
11225kg |
|
|
|
|
|
11375kg |
|
|
|
|
|
12075kg |
|
|
|
|
|
12225kg |
|
|
|
|
Data för barometriskt tryck
Technical Data
|
|
|
|
|---|---|---|---|
|
|
|
|