Kjære kunde,
Takk for at du valgte et Windrose-kjøretøy.
Les denne eierhåndboken nøye før du bruker kjøretøyet for første gang. Den inneholder viktig informasjon om kjøretøyets funksjoner, sikker bruk, vedlikeholdskrav og tekniske spesifikasjoner. Ved å gjøre deg kjent med denne informasjonen bidrar du til sikker kjøring og optimal ytelse for kjøretøyet.
På grunn av ulike kjøretøykonfigurasjoner og ekstrautstyr kan kjøretøyet du har fått levert, avvike noe fra beskrivelsene eller illustrasjonene i denne håndboken. Windrose forbeholder seg retten til å endre kjøretøyets konstruksjon, spesifikasjoner og utstyr uten forhåndsvarsel som ledd i kontinuerlig produktforbedring.
Informasjonen, illustrasjonene og de tekniske dataene i denne håndboken var korrekte på publiseringstidspunktet. De er kun ment som referanse og utgjør ingen kontraktsmessig forpliktelse.
Ingen del av denne eierhåndboken må reproduseres eller overføres i noen form uten skriftlig forhåndssamtykke fra Windrose.
Merk: Omslagsbildene og illustrasjonene i denne håndboken er kun ment som referanse. Kjøretøyets faktiske utseende og spesifikasjoner kan variere.
Innholdsfortegnelse
1. Sikkerhet & Samsvar
2. Kjøretøyoversikt
3. Interiør & Komfort
4. Lading & Forberedelse
5. Instrumentpanel
6. Kjørekontroller
7. Førerassistanse
8. Nødprosedyrer
9. Vedlikehold
10. Tekniske spesifikasjoner
1.AMerknader til brukere
↑ Til toppenFør du kjører
Dette kjøretøyet er en batterielektrisk trekkvogn.
Ved daglig bruk og vedlikehold må du følge alle advarsler og anvisninger i denne eierhåndboken (heretter kalt «denne håndboken») for å unngå skade på kjøretøyet eller personskade.
Før du bruker kjøretøyet for første gang, må du lese denne håndboken nøye for å bli kjent med funksjonene og kravene til bruk. Hvis det oppstår problemer under bruk, kontakt Windrose’ servicetelefon.
Opphavsretten til denne håndboken tilhører Windrose. Ingen del av denne håndboken må reproduseres, overføres eller distribueres uten skriftlig forhåndssamtykke fra Windrose.
Windrose forbeholder seg retten til å oppdatere innholdet i denne håndboken uten forhåndsvarsel som ledd i kontinuerlig produktforbedring. Se den elektroniske eierhåndboken i midtdisplayet eller i Windrose-appen for den nyeste informasjonen om kjøretøyet.
Windrose nettsted:
Windrose servicetelefon:Du kan søke etter «Windrose» i den offisielle appbutikken for å laste ned appen.
MerkForkortelser introduseres i formatet «fullt navn (forkortelse)» første gang de nevnes. Deretter brukes forkortelsen.
1.BBeskrivelse av advarsler
↑ Til toppenFør du kjører
Følgende signalord og symboler brukes i denne håndboken:
AdvarselAngir en farlig situasjon som, hvis den ikke unngås, kan føre til alvorlig personskade eller død.
1.B.1Merknad
↑ Til toppenMerknadAngir en situasjon som kan føre til skade på kjøretøyet eller dets komponenter.
1.B.2Merk
↑ Til toppenMerkGir ytterligere nyttig informasjon eller veiledning om bruk.
1.B.3Miljøvern
↑ Til toppenMiljøvernAngir informasjon knyttet til miljøvern eller energieffektivitet.
1.B.4Stjerne (*)
↑ Til toppenEn stjerne (*) etter et funksjonsnavn angir at funksjonen bare gjelder enkelte kjøretøymodeller eller ekstrautstyrskonfigurasjoner.
1.B.5
Illustrasjonsinformasjon
↑ Til toppen
Denne pilen angir den nøyaktige plasseringen av objektet som vist på bildet.
Denne pilen angir bevegelsesretningen til objektet som vist på bildet.
Denne pilen angir rotasjonsretningen til objektet som vist på bildet.
Denne pilen angir vipperetningen til objektet som vist på bildet.
1.CMiljøvern
↑ Til toppenFør du kjører
Windrose er forpliktet til bærekraftig utvikling og miljøvern. Dette kjøretøyet er konstruert for å forbedre energieffektiviteten og redusere utslipp. Du kan bidra til miljøvern ved å kjøre ansvarlig og bruke kjøretøyet på en energieffektiv måte.
1.DDriftssikkerhet
Før du kjører
Overhold til enhver tid største tillatte totalvekt og akseltrykk. Ikke overlast kjøretøyet, da overlasting kan føre til skade på kjøretøyet, tap av kontroll eller personskade.
Skift ut ethvert sikkerhetsbelte som har vært utsatt for støtkrefter i en kollisjon, selv om ingen synlig skade er
Advarseltil stede.
Advarsel
Frikjør aldri nedover i fri. Dette fjerner motorbremsingen fra drivmotoren og kan føre til tap av kontroll over kjøretøyet.
Juster setet til riktig stilling før du kjører. En feil sittestilling kan føre til tretthet, uventet setebevegelse eller tap av kontroll over kjøretøyet. Sørg for at setestillingen tillater riktig bruk av sikkerhetsbeltet.
Sikkerhetsbelter er livsviktig sikkerhetsutstyr. Alle i kjøretøyet må bruke sikkerhetsbelte korrekt når kjøretøyet er i bevegelse.
Ikke len seteryggen for langt bakover under kjøring. Ved en nødbremsing kan en feil sittestilling
redusere sikkerhetsbeltets effektivitet.
Ikke overskrid 30 km/t i noen av følgende situasjoner:
Ved kjøring inn på eller ut av felt for ikke-motoriserte kjøretøy, planoverganger, krappe svinger, smale veier eller broer.
Ved U-sving, sving eller kjøring ned en bratt stigning.
Når sikten er mindre enn 50 m på grunn av tåke, regn, snø, støv eller hagl.
Ved kjøring på isete, snødekte eller gjørmete veier.
Ved sleping av et havarert kjøretøy.
↑ Til toppen
MerknadHold sikker avstand ved kjøring i nærheten av et radioastronomisk observatorium. Kjøretøy med radar kan forårsake elektromagnetisk interferens med observatoriets utstyr.
1.EOriginaldeler
Før du kjører
Windrose gir ikke garantidekning for deler under følgende omstendigheter:
Uautoriserte endringer av kjøretøyet, særlig på systemer knyttet til kjøresikkerhet (f.eks. høyspenningssystemer, elektriske systemer, bremser, styring eller TBOX).
Inngrep i kjøretøyets OBD-system.
Bruk av ikke-godkjente deler eller væsker som medfører sikkerhetsrisiko eller skade på kjøretøyet.
Manglende dokumentasjon som bekrefter bruk av godkjente væsker i garantiperioden.
Manglende vedlikehold av kjøretøyet ved et autorisert Windrose-servicesenter i samsvar med vedlikeholdskravene.
1.FDatasikkerhet
↑ Til toppenFør du kjører
I samsvar med gjeldende lover og forskrifter samler Windrose inn og behandler kjøretøydata, inkludert posisjonsinformasjon, data om kjøreatferd, lyd- og videoopptak samt personopplysninger.
Windrose iverksetter egnede tekniske og organisatoriske tiltak for å beskytte slike data i samsvar med gjeldende personvernregelverk og bransjestandarder.
1.GEndring av kjøretøyet
Før du kjører
↑ Til toppen1.G.1Materialer som kreves før endring
Enhver endring av kjøretøyet må være i samsvar med gjeldende tekniske og forskriftsmessige krav. Før endring må relevant teknisk dokumentasjon sendes til Windrose.
Dokumentasjonen skal som et minimum omfatte:
Formål og driftsforhold for det endrede kjøretøyet.
Totalvekt og akseltrykk etter endring.
Totale mål for det endrede kjøretøyet (inkludert arbeidskonfigurasjon).
Påbyggets gulvhøyde over bakkenivå.
Monteringsmetode for påbygg.
Skjematisk tegning av hjelperamme.
1.HVraking av kjøretøyet
Før du kjører
↑ Til toppenKjøretøy som ikke lenger oppfyller kravene til trafikksikker stand, må kasseres i samsvar med gjeldende miljøforskrifter.
Vraking av kjøretøy og resirkulering av høyspenningsbatteri må utføres av Windrose eller autoriserte gjenvinningsvirksomheter.
AdvarselFeil håndtering av høyspenningsbatterier kan forårsake brann eller miljøskade. Ikke demonter eller kast høyspenningsbatterier uten godkjenning.
1.H.1Resirkulering av høyspenningsbatteri
Windrose tester høyspenningsbatteriets kapasitet og tilstand og resirkulerer høyspenningsbatteriet i samsvar med gjeldende lover, forskrifter og markedsforhold på det aktuelle tidspunktet.
Resirkulering av høyspenningsbatteri: Resirkulering og videre behandling skal utføres av Windrose eller en tredjeparts gjenvinningsvirksomhet utpekt av Windrose.
Transport av høyspenningsbatteri: Høyspenningsbatterier transporteres av et profesjonelt transportfirma. Kontakt det autoriserte Windrose-servicesenteret for å varsle en profesjonell gjenvinningsvirksomhet om behandling.
Advarsel
Ikke kast eller kvitt deg med brukte høyspenningsbatterier, for å unngå utilsiktet brann eller alvorlig forurensning av miljøet.
Ikke overlat kasserte høyspenningsbatterier til andre virksomheter eller privatpersoner. Du holdes ansvarlig for enhver miljøforurensning eller sikkerhetsulykke som skyldes demontering av høyspenningsbatterier uten tillatelse.
1.IØkonomisk kjøring
Før du kjører
Følgende tiltak bidrar til å maksimere rekkevidde og energieffektivitet:
Hold jevn hastighet og unngå kraftig akselerasjon eller bremsing.
Hold kjøretøyet i god stand gjennom regelmessig vedlikehold.
Frikjør aldri i fri, da dette gir utilstrekkelig smøring av E-akselen og fører til komponentskade.
1.JVinterkjøring
↑ Til toppenFør du kjører
1.J.1Forberedelse til vinterkjøring
Bruk kjølevæske av høy kvalitet tilpasset den laveste temperaturen, og kjølevæskens frysepunkt skal være lavere enn laveste lokale temperatur.
Sørg for at batteriet alltid er fulladet for å hindre at batteriet fryser ved lave temperaturer.
1.J.2Bruk av kjølevæske om vinteren
↑ Til toppenI den kalde årstiden, eller når kjøretøyet er parkert på et kaldt sted, må kjølevæskens frostbeskyttende egenskaper sikres. Bruk kjølevæsken som Windrose anbefaler.
1.J.3Forholdsregler ved vinterkjøring
Det anbefales å bruke snøkjettinger eller vinterdekk.
Unngå brå akselerasjon, brå bremsing og krappe svinger ved høy hastighet.
Ved kjøring på snø- og isdekte veier, hold lav hastighet for å sikre bedre driftsbremsing.
Hold rimelig avstand til andre kjøretøy (øk avstanden ved kjøring i regn og snø
Etter at snøkjettingene er montert, start kjøretøyet og kontroller om kjettingene er løse eller om dekkene ikke er riktig montert.
↑ Til toppenAdvarselVed bruk av snøkjettinger er det forbudt å overskride største effektive kjørehastighet, for å unngå ulykker.
dager eller på isete veier kan øke bremselengden for driftsbremsen).
1.KBruk av snøkjettinger
Før du kjører
Vær oppmerksom på følgende ved bruk av snøkjettinger:
Det anbefales å bruke snøkjettinger ved kjøring på veier dekket av tykke lag med snø eller is.
Snøkjettingene må være kompatible med dekkstørrelsen og dekktypen som er montert på kjøretøyet.
Monter snøkjettinger på de ytre dekkene på drivakselen (begge sider).
Pass på å ikke skade dekkene ved montering eller demontering av snøkjettinger.
Merknad
 Fjern snøkjettingene ved kjøring på lange strekninger uten snø og is.
Sørg for at snøkjettingene ikke berører eller kommer i konflikt med kjøretøykomponenter under kjøring.
Monter og demonter snøkjettinger bare når kjøretøyet er parkert på flatt underlag.
1.LKjøring i tropiske områder og områder med høy temperatur
Før du kjører
Kontroller kjøretøyets tilstand før kjøring:
Kontroller at kjølevæskenivået er innenfor normalområdet, og se etter lekkasjer.
Ikke la brennbare gjenstander (f.eks. lightere, aerosolprodukter, parfymer) ligge på instrumentpanelet eller i direkte sollys over lengre tid. Høye temperaturer kan få trykksatte beholdere til å sprekke og medføre brannfare.
Vær oppmerksom på følgende under kjøring:
lampene tennes, stans kjøringen umiddelbart og
kontakt et autorisert Windrose-servicesenter.
Følg med på dekktrykk og dekktemperatur. Hvis dekktrykket eller dekktemperaturen er unormal, stans kjøringen umiddelbart og la dekkene kjøles ned naturlig. Ikke senk trykket eller kjøl ned dekkene ved å sprute vann eller slippe ut luft, da dette lett akselererer aldring og slitasje på dekkene og i alvorlige tilfeller kan føre til dekkeksplosjon.
Hvis et dekk eksploderer under kjøring, trykk umiddelbart på bryteren for nødblink, hold rattet med hendene i posisjon klokken 9 og 3 uten å dreie, og trykk bremsepedalen ned i støt for gradvis å bremse ned kjøretøyet og varsle andre trafikanter.
Overvåk dekktrykk og dekktemperatur.
Hvis en av dem er unormal, stans kjøretøyet så snart det er trygt, og la dekkene kjøles ned naturlig. Ikke kjøl ned dekkene med vann eller ved å slippe ut luft, da dette kan akselerere aldring av dekkene og øke faren for dekkeksplosjon.
Hold øye med indikatorene og varsellampene i instrumentpanelet, og hvis kjøretøyets feillamper (MIL) eller varsel
Kjøring på humpete og glatte veier
Før du kjører
Vær oppmerksom på følgende ved kjøring på humpete og glatte veier:
På humpete veier, reduser hastigheten for å bedre komforten og minimere slitasje på fjæring og støtdempende komponenter.
På glatte veier, reduser hastigheten og brems forsiktig for å hindre tap av veigrep og sideskliing av kjøretøyet.
Hvis kjøretøyet begynner å skli sidelengs på vått eller glatt underlag, reduser hastigheten jevnt med driftsbremsen og unngå brå rattbevegelser.
1.MKjøring på ramper
↑ Til toppenFør du kjører
1.M.1Forholdsregler ved kjøring oppoverbakke
Hvis kjøretøyet ruller bakover ved start i en stigning, trykk umiddelbart ned bremsepedalen, aktiver den elektroniske parkeringsbremsen, og start deretter kjøreprosedyren på nytt.
Hold lav og jevn hastighet ved kjøring oppover. Bruk gasspedalen gradvis og unngå brå akselerasjon eller bremsing.
Forholdsregler ved kjøring nedoverbakke
Reduser hastigheten før nedkjøringen slik at kjøretøyet kommer inn i nedoverbakken med kontrollert hastighet.
Frikjør aldri nedover i fri. Dette fjerner motorbremsingen fra drivmotoren og kan føre til tap av kontroll over kjøretøyet.
Før nedkjøring, kontroller at bremsesystemet fungerer som det skal. Hvis det mistenkes en feil, må feilen rettes før du fortsetter.
Unngå brå rattbevegelser i nedoverbakker for å redusere faren for velt.
I lange utforkjøringer, unngå sammenhengende bremsing. Bruk egnet fartskontroll og bremseteknikk for å hindre overoppheting av bremsene og mulig bremsesvikt (brake fade).
1.NRapportering av sikkerhetsfeil
↑ Til toppenFør du kjører
Hvis du mistenker at kjøretøyet har en sikkerhetsrelatert feil, må du stanse kjøretøyet på et trygt sted så snart det er praktisk mulig og umiddelbart kontakte Windrose kundestøtte eller en autorisert Windrose-servicestasjon.
Windrose kan utstede sikkerhetsvarsler, servicekampanjer eller tilbakekallinger der gjeldende lover og forskrifter krever det. Følg alle sikkerhetsanvisninger og krav til servicekampanjer fra Windrose.
Windrose servicetelefon: [NORSK SERVICETELEFON – BEKREFTES]
Windrose servicenettsted: [SERVICENETTSTED – BEKREFTES]
Autorisert servicenettverk: [AUTORISERT SERVICENETTVERK – BEKREFTES]
2.AOversikt over kjøretøyets utside
Kjøretøyidentifikasjon
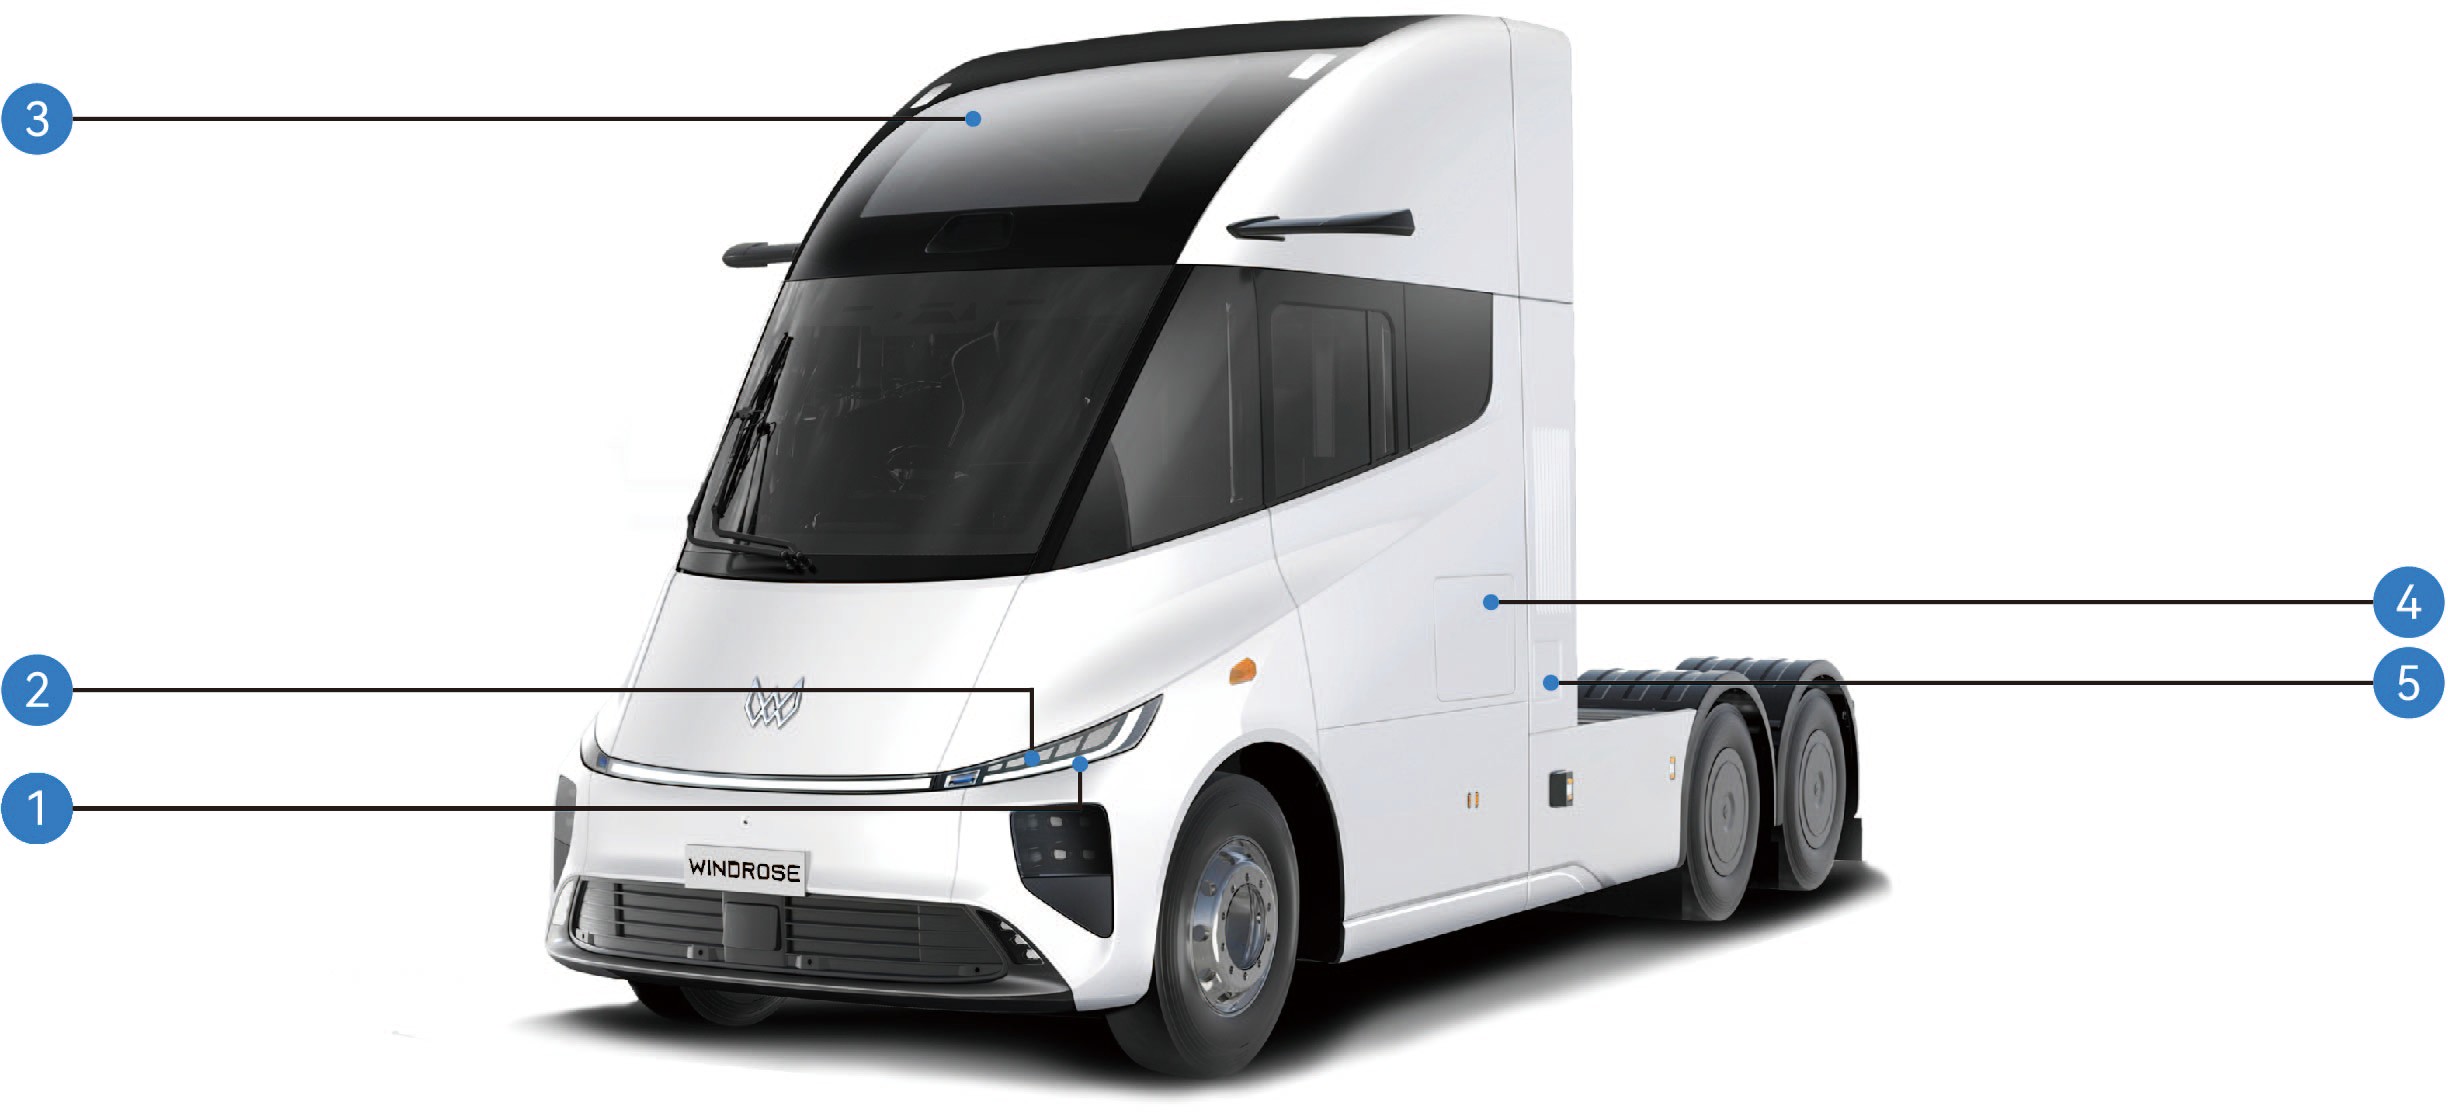
Fremre blinklys / kjørelys
Parkeringslys 3. Panorama-soltak
4. Verktøykasse på siden 5. Ladeport
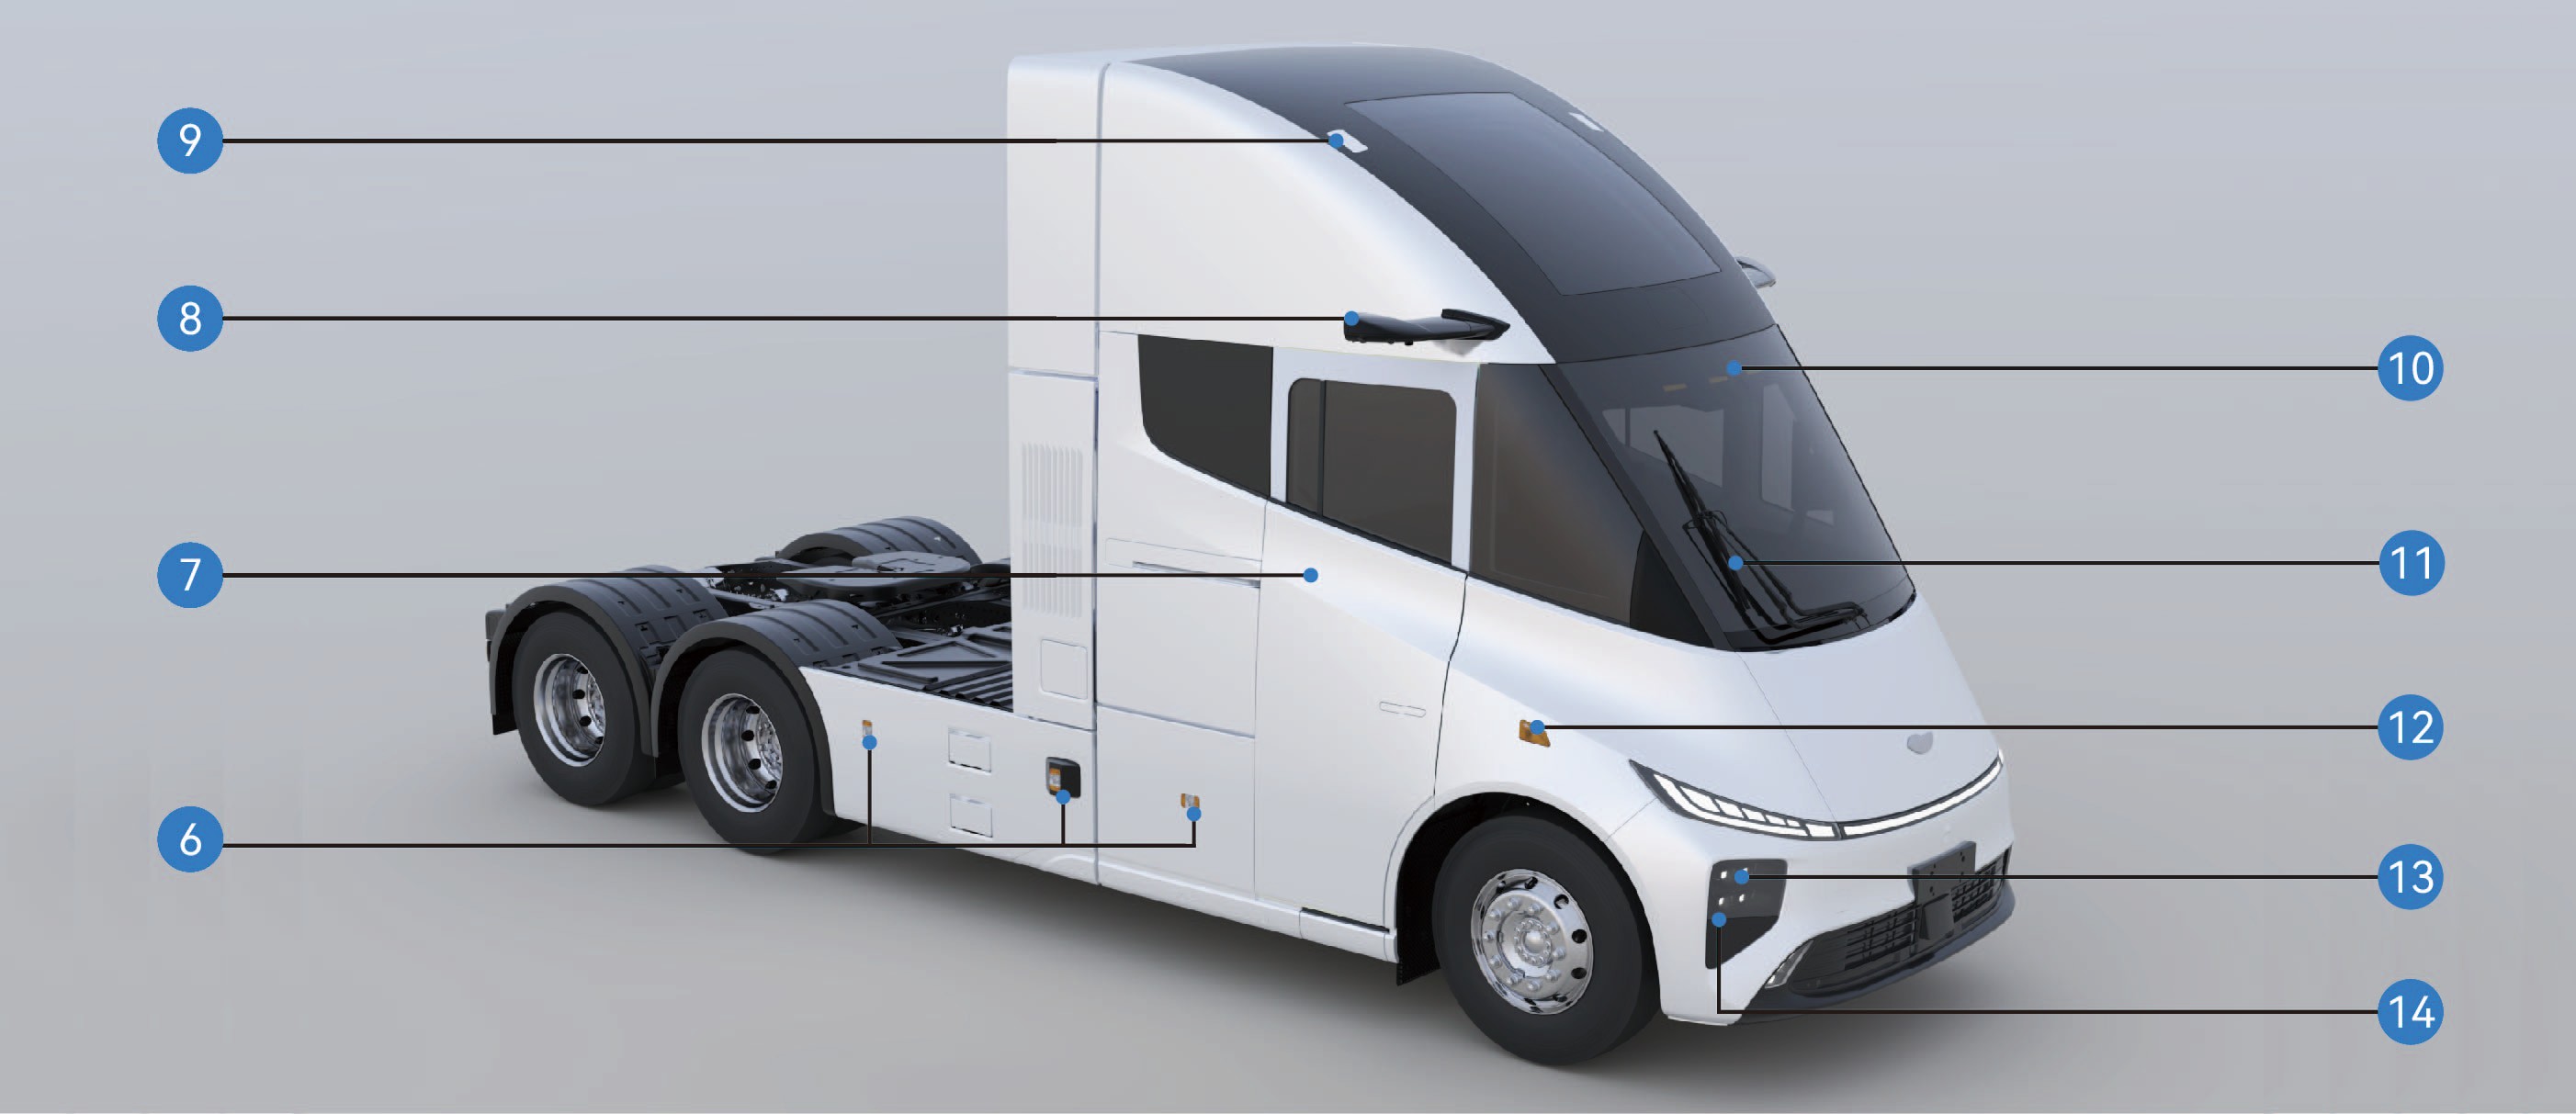
|
|
|
|
|
|
|---|---|---|---|---|---|
|
|
|
|
|
|
|
|
|
|
|
|
2.BOversikt over kjøretøyets innvendige rom
Kjøretøyidentifikasjon
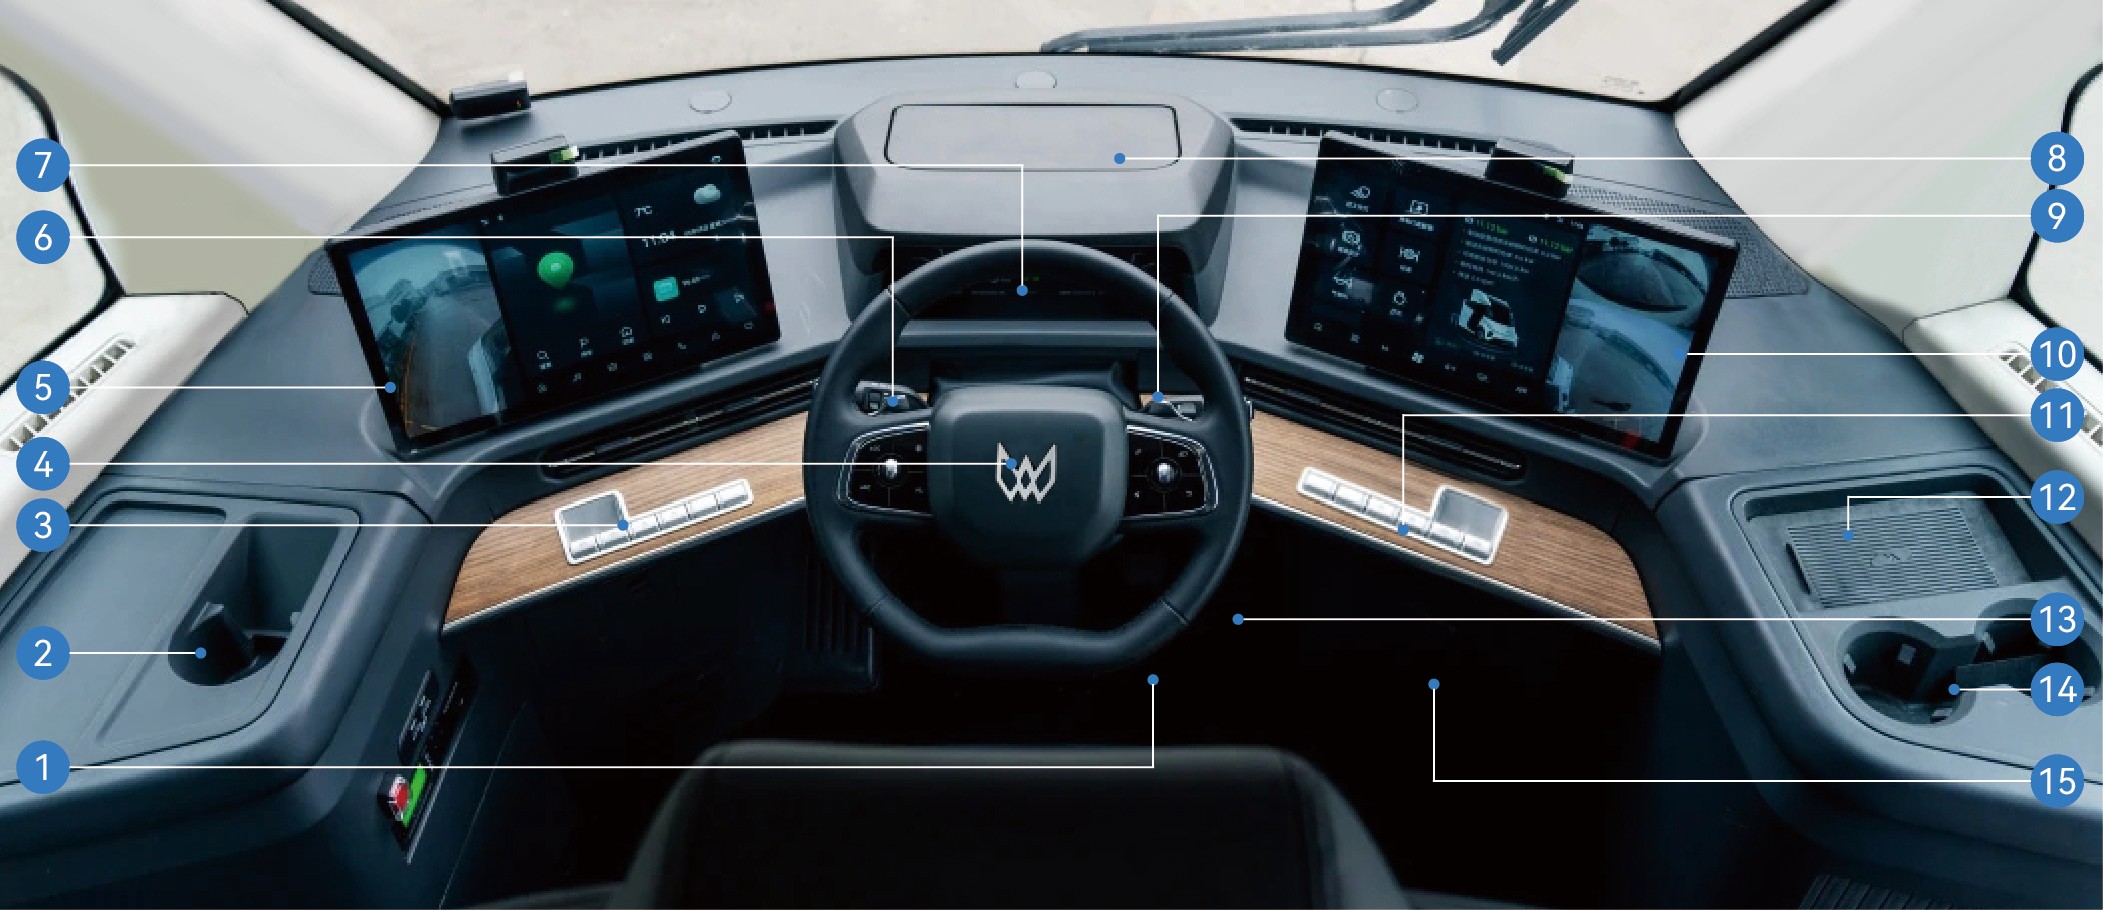
|
|
2. |
|
3. |
|
|---|---|---|---|---|---|
|
|
5. |
|
6. |
|
|
|
8. |
|
9. |
|
|
|
11. |
|
12. |
|
|---|---|---|---|---|---|
|
|
14. |
|
15. |
|
2.CKjøretøyets typeskilt og VIN
Kjøretøyidentifikasjon
Kjøretøyets typeskilt
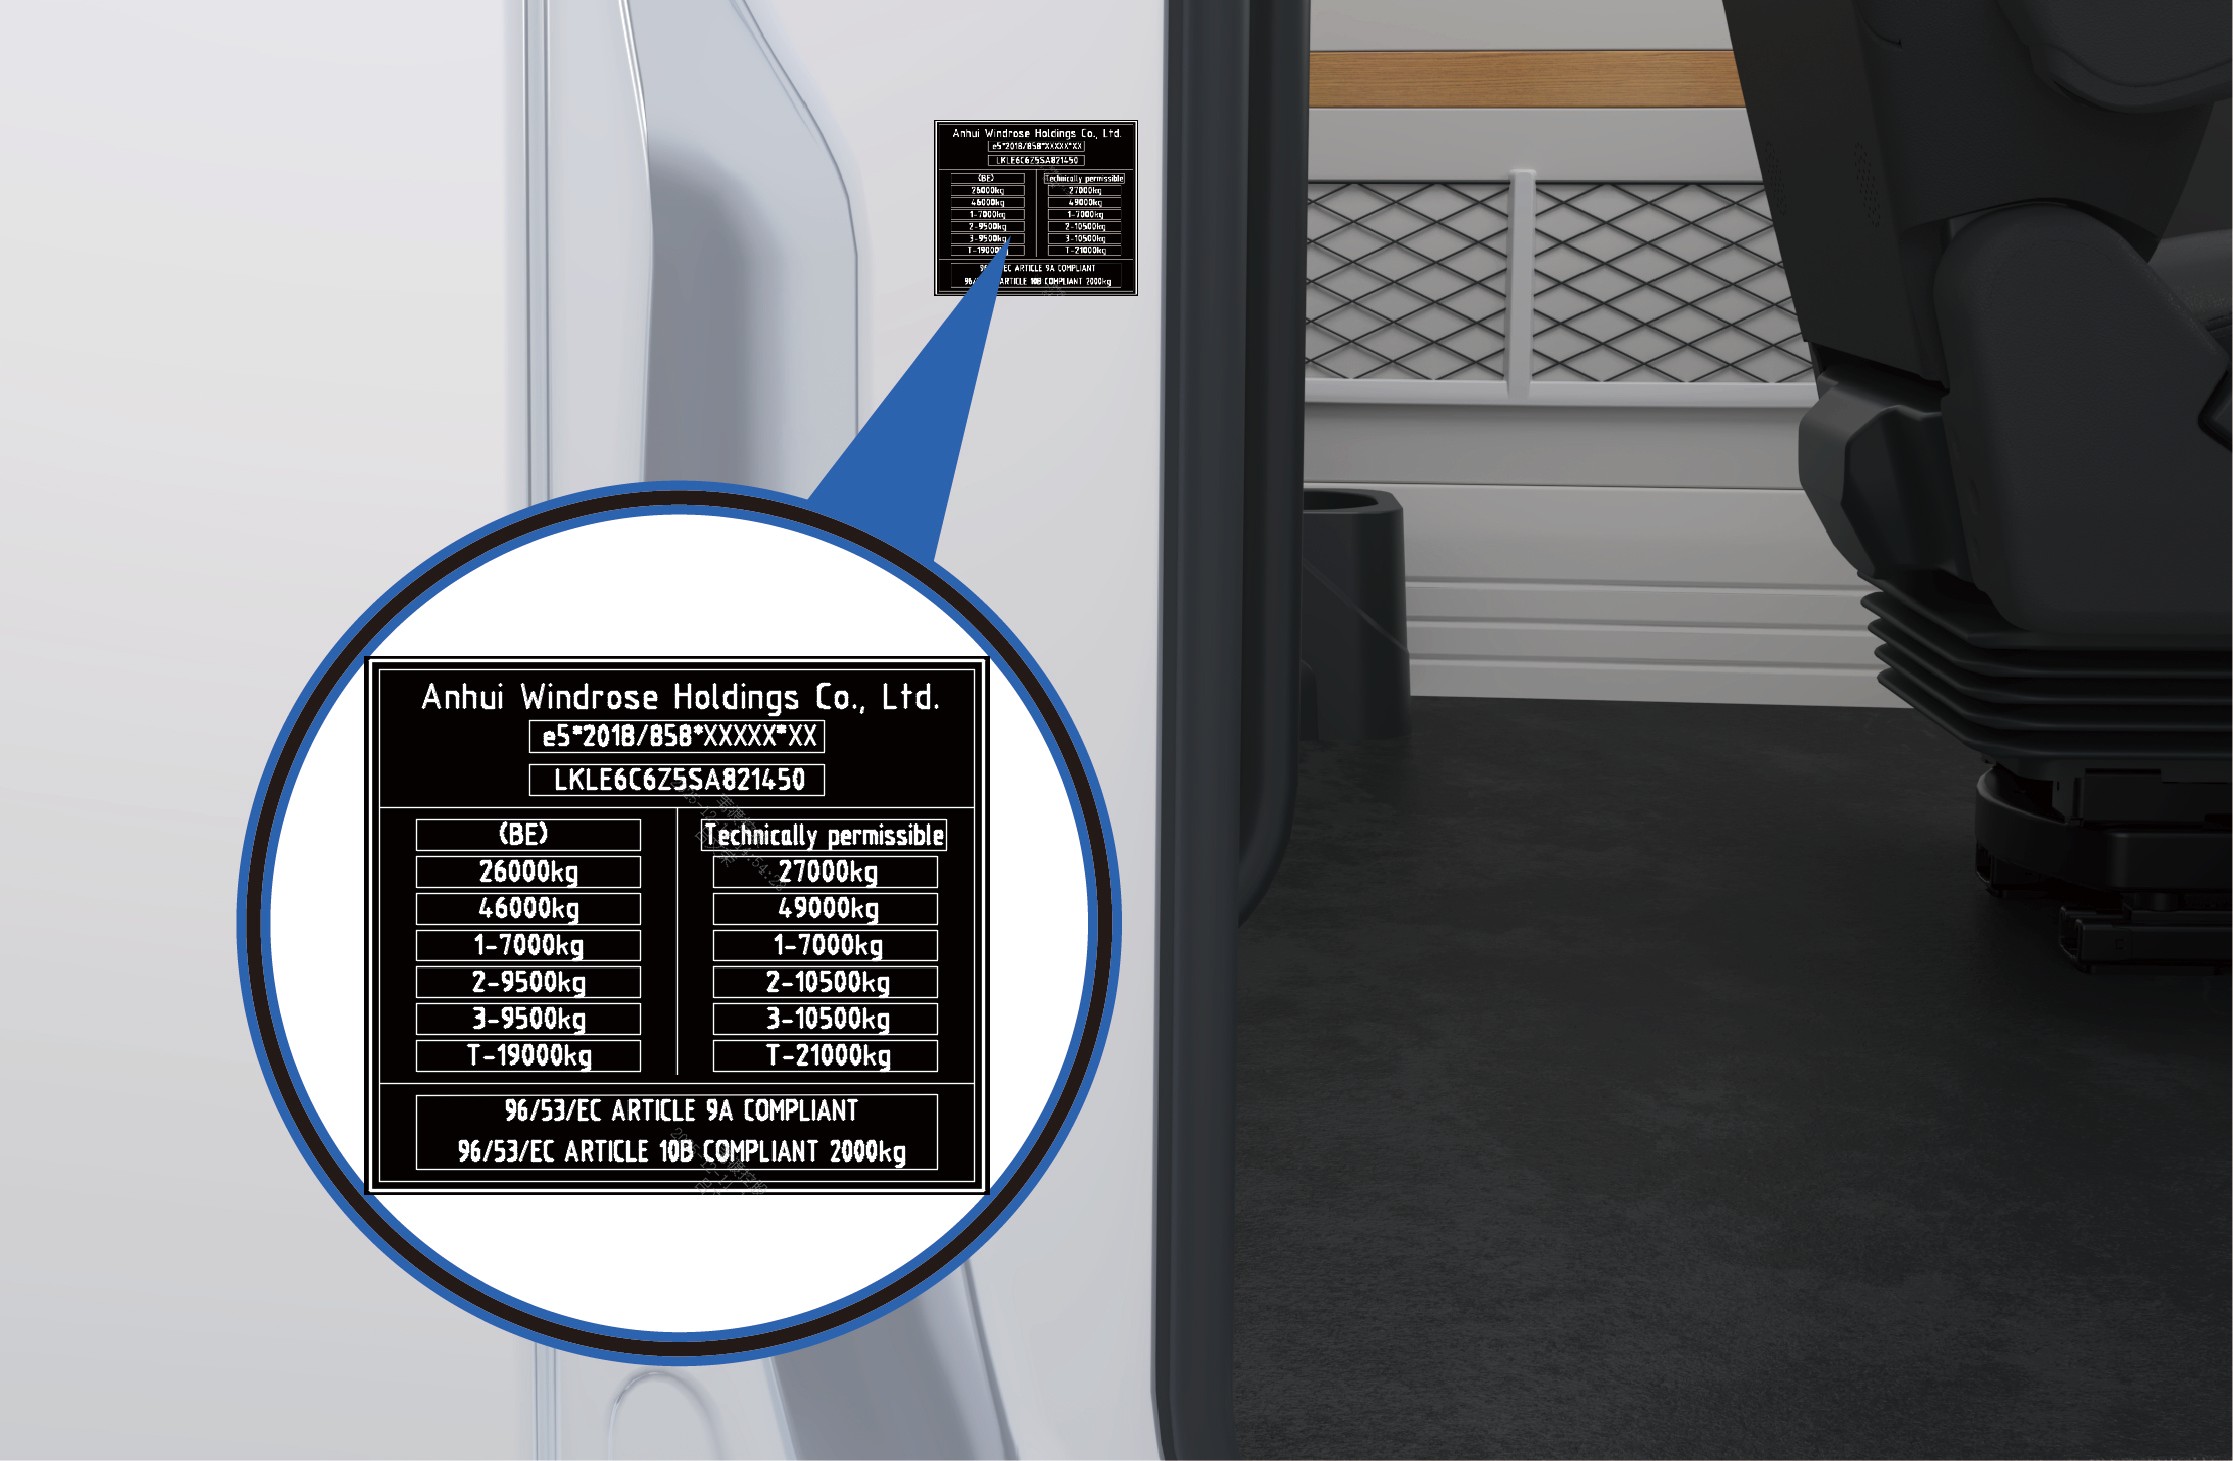
Kjøretøyets typeskilt er plassert på rammen til den høyre skyvedøren (C-stolpen).
Typeskiltet viser følgende informasjon:
Produsentens navn
Nummer for helkjøretøygodkjenning (WVTA)
Kjøretøyets identifikasjonsnummer (VIN)
Tillatt totalmasse ved registrering
Teknisk tillatt totalmasse
Annen forskriftsmessig informasjon som kreves av gjeldende regelverk
Kjøretøyets identifikasjonsnummer
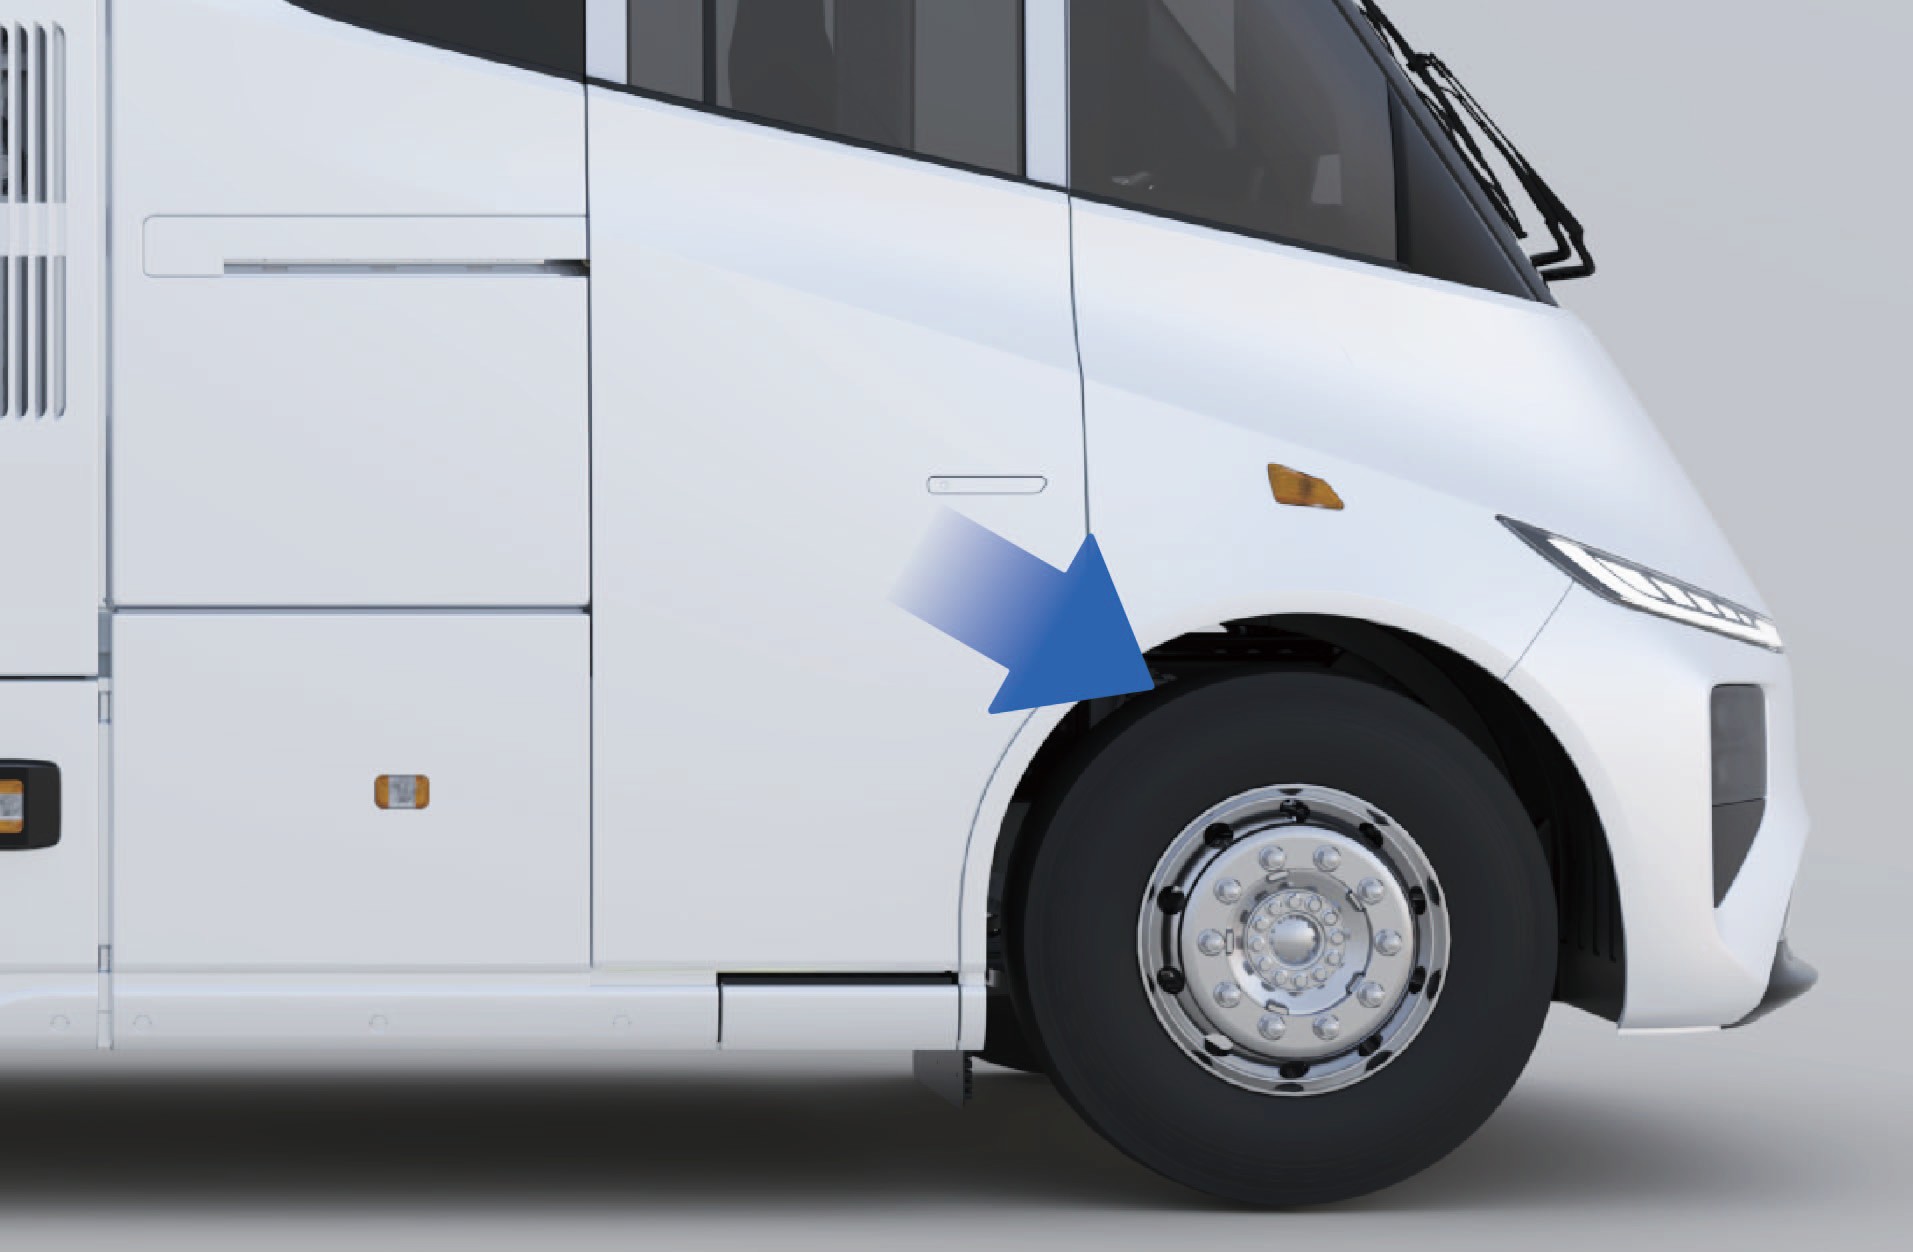
Kjøretøyets identifikasjonsnummer (VIN) er stemplet på den høyre rammevangen, nær senterlinjen til forakselen.
2.DPlassering av motorens typeskilt og kode
Kjøretøyidentifikasjon
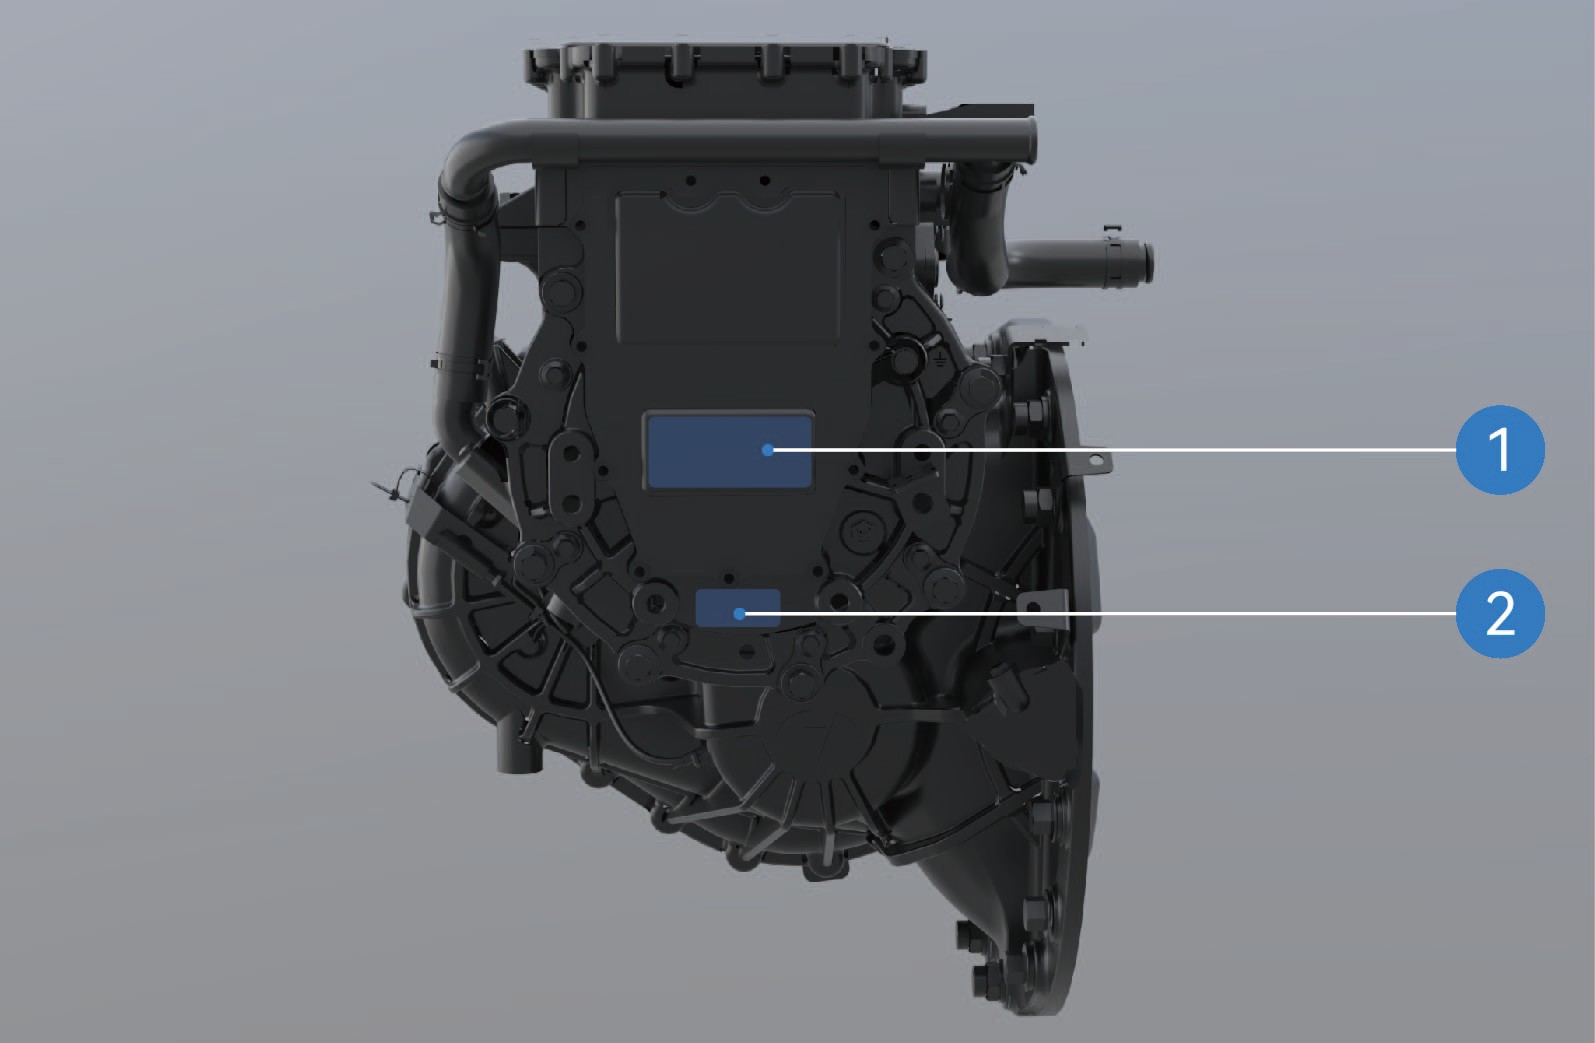
Plassering av motorens typeskilt
Plassering av motorens serienummer (SN)
Merknad
Avtrykket (gnidekopien) av motorens serienummer følger med motordokumentasjonen når kjøretøyet leveres fra fabrikken. Ta vare på dette dokumentet for fremtidig referanse.
Siden traksjonsmotorer fra ulike produsenter kan variere, kan informasjonen på motorens typeskilt og tilhørende dokumentasjon avvike. Se det faktiske produktet.
Mikrobølge-/RF-gjennomtrengelighet for frontrute Kjøretøyidentifikasjon
Frontruten på dette kjøretøyet inneholder ingen metalliske belegg som forstyrrer overføring av radiofrekvenssignaler (RF).
Utstyr for elektronisk bompengeinnkreving (ETC), bombrikker, telematikkutstyr eller andre RF-baserte enheter kan derfor monteres på frontruten i samsvar med monteringsanvisningene fra utstyrsprodusenten.
3.AElektrisk skyvedør
↑ Til toppenTilgang til kjøretøyet
En elektrisk skyvedør er montert på høyre side av kjøretøyet. Døren kan åpnes eller lukkes med flere betjeningsmåter.
3.A.1Bruksanvisning
Utvendig betjening
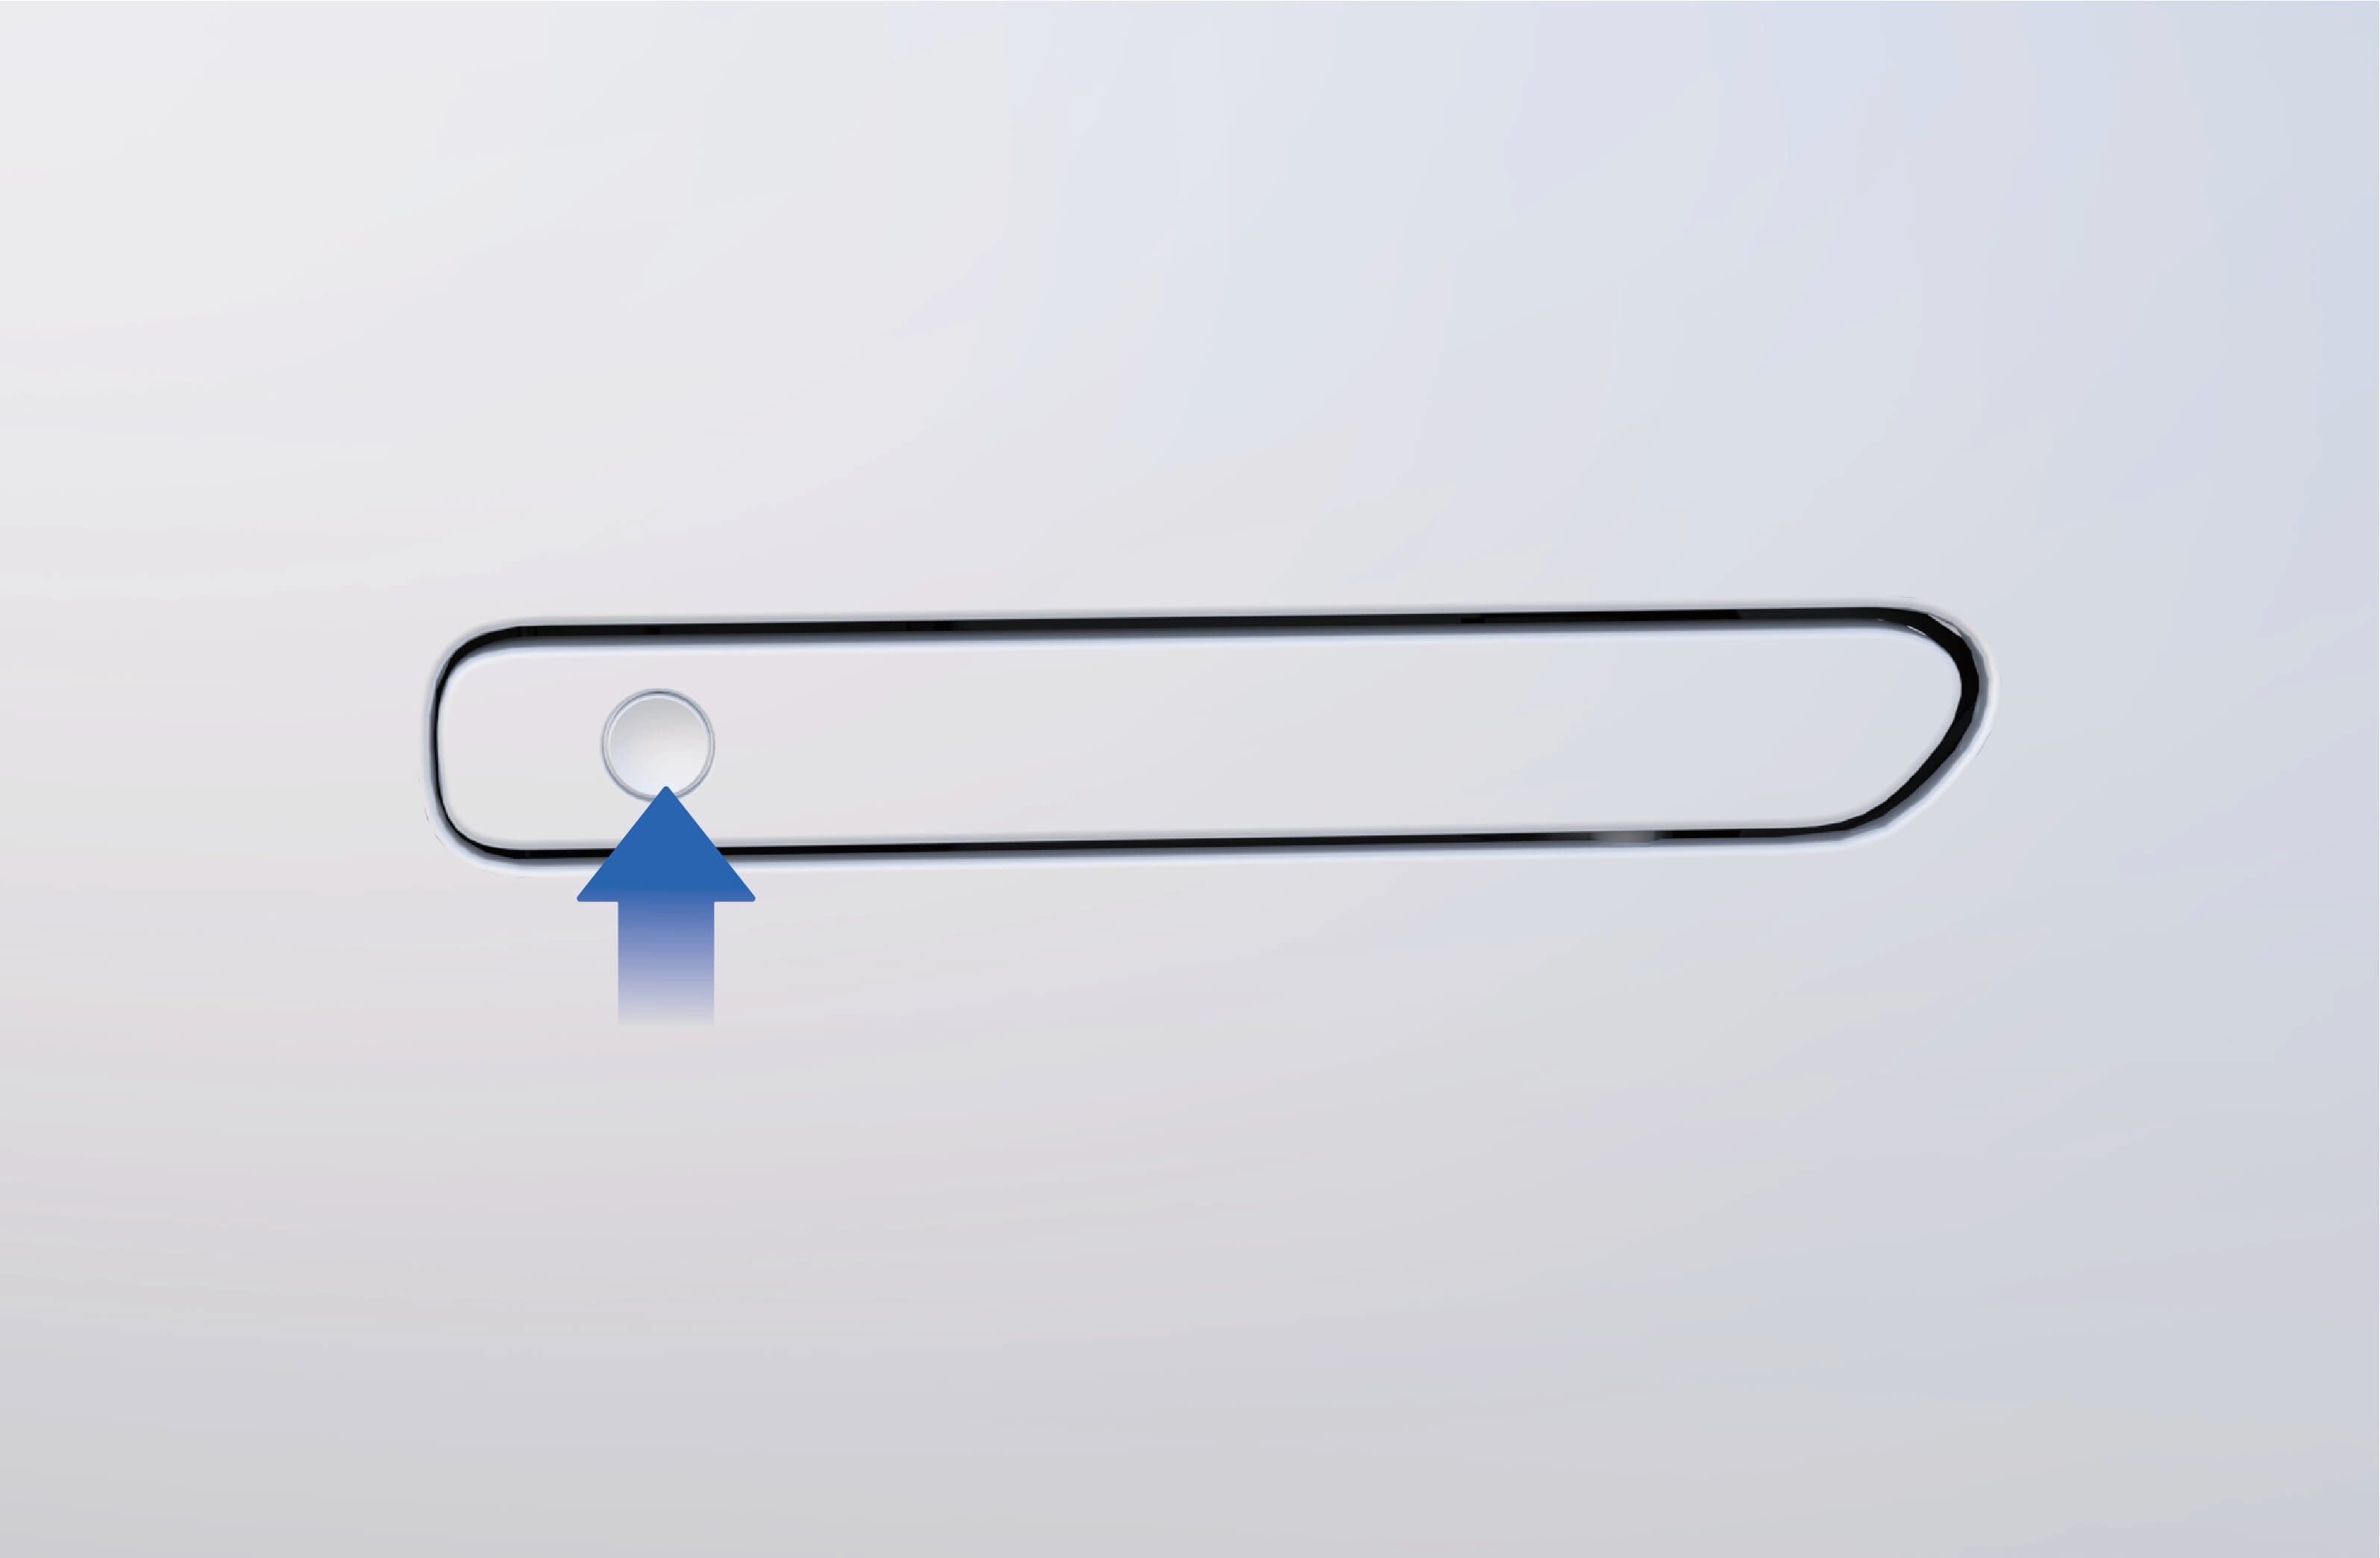
↑ Til toppenElektrisk: Når kjøretøyet er låst opp, trykk på bryteren i det innfelte dørhåndtaket. Den elektriske skyvedøren åpnes eller lukkes automatisk.
Manuelt: Når kjøretøyet er låst opp:
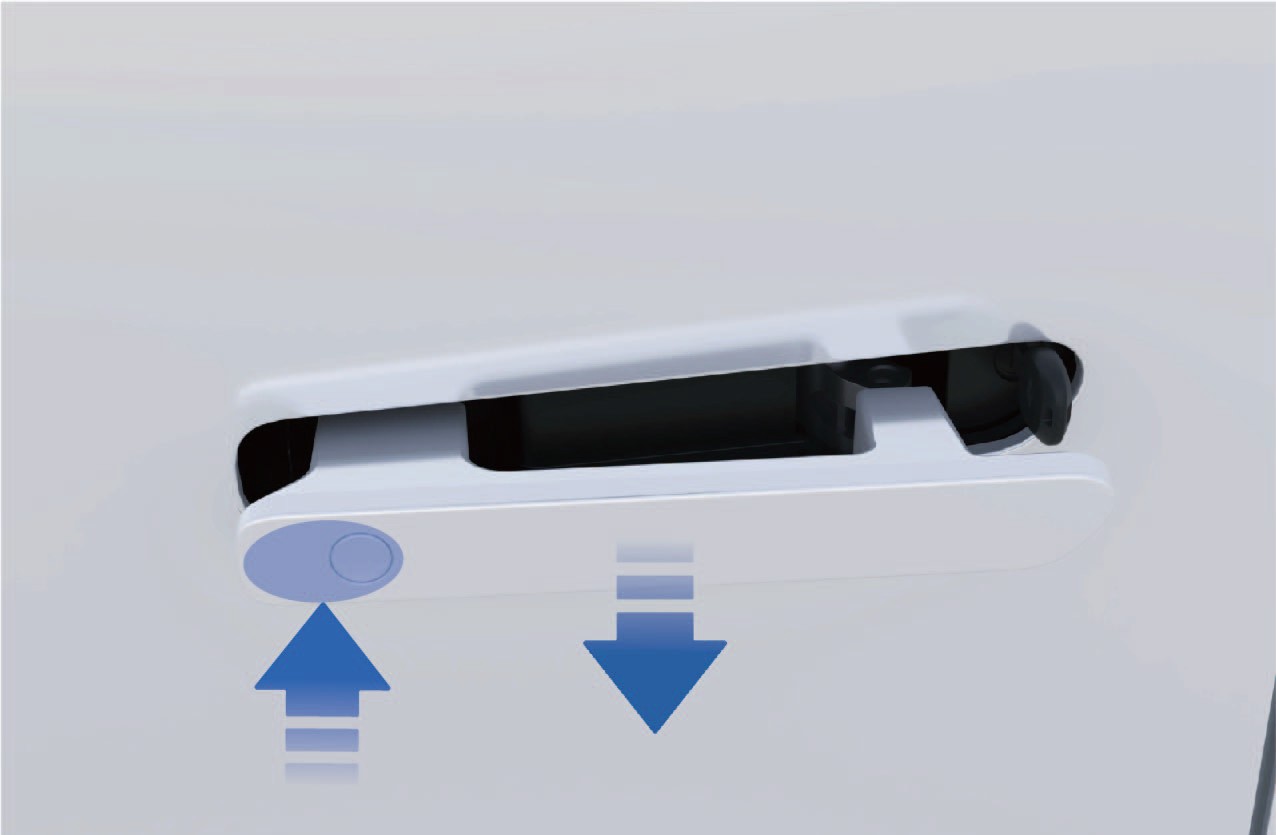
1. Trykk på den fremre enden av det innfelte dørhåndtaket for å løse det ut.
2. Trekk håndtaket utover for å låse opp skyvedøren.
3. Skyv døren opp manuelt.
3.A.2Stige inn i kjøretøyet
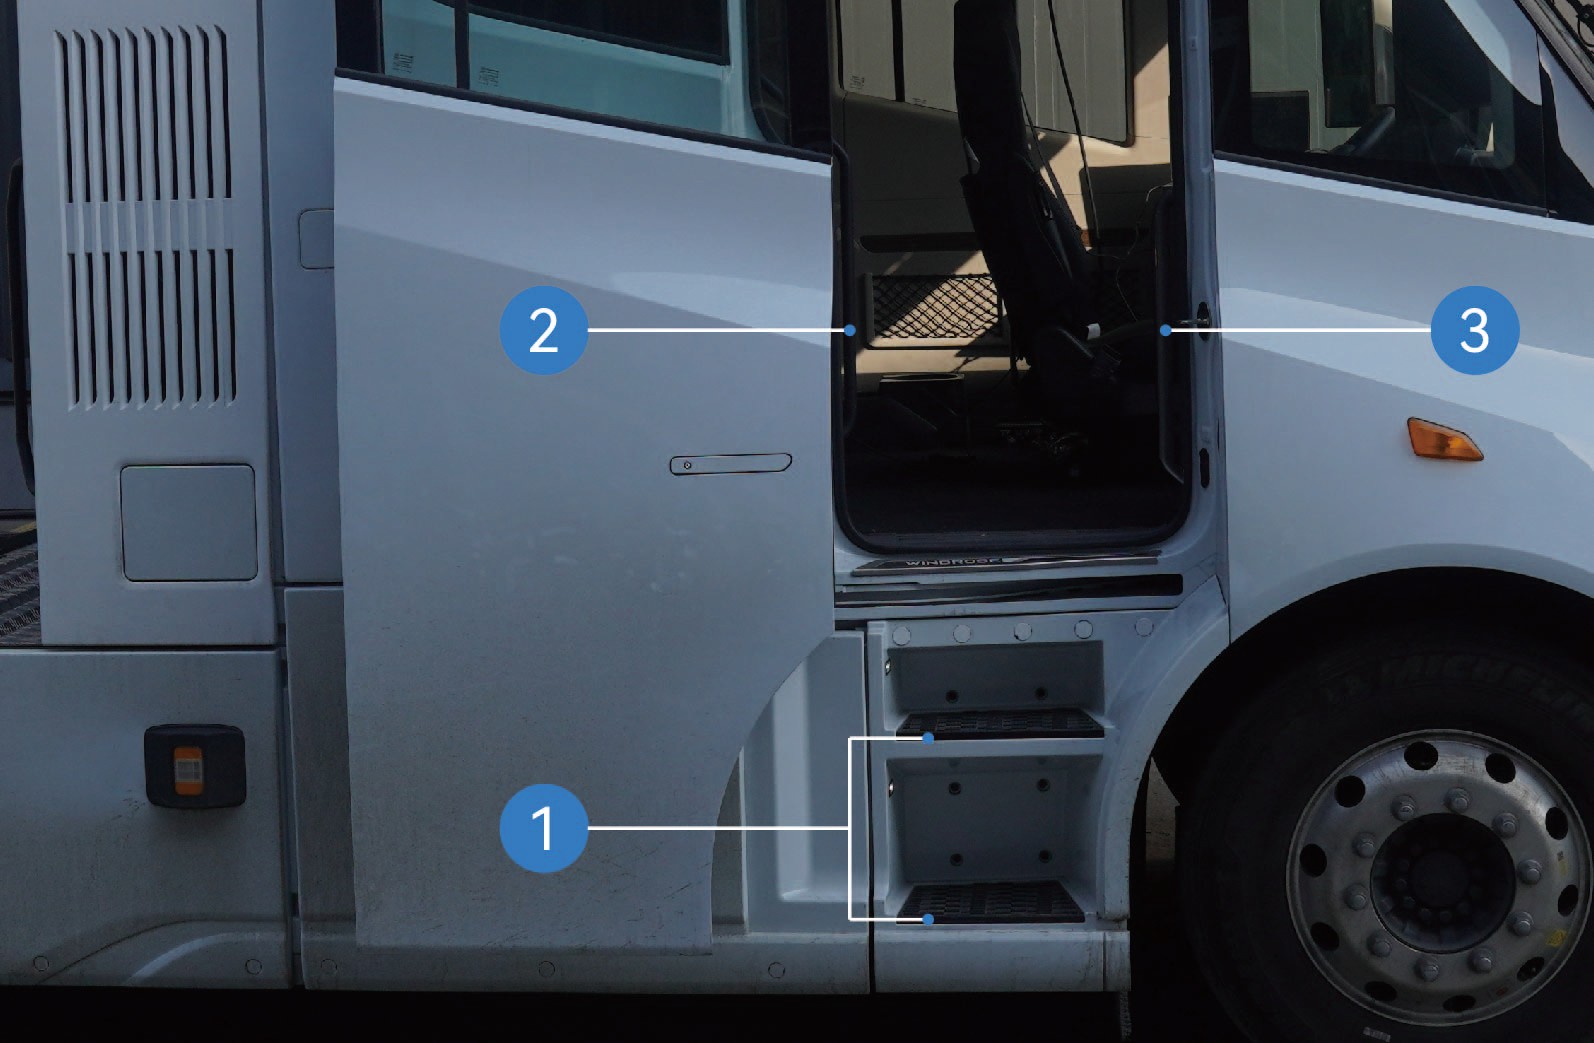
Etter at den elektriske skyvedøren er åpnet, stig inn i førerhuset slik:
Vend mot døren og grip venstre og høyre håndtak med begge hender.
Sett den ene foten på nederste trinn og trekk deg oppover.
Sett den andre foten på øverste trinn.
Flytt den nederste hånden til en høyere posisjon på håndtaket.
Stig inn i førerhuset.
Å skli eller falle ved inn- eller utstigning kan føre til personskade.
Vått eller skittent fottøy øker faren for å skli betydelig. Vis ekstra forsiktighet ved inn- og utstigning av førerhuset.
Ha alltid trepunktskontakt med kjøretøyet ved inn- og utstigning av førerhuset (to hender og én fot, eller to føtter og én hånd).
Hopp aldri ut av kjøretøyet.
Innvendig betjening
Når kjøretøyet er låst opp:
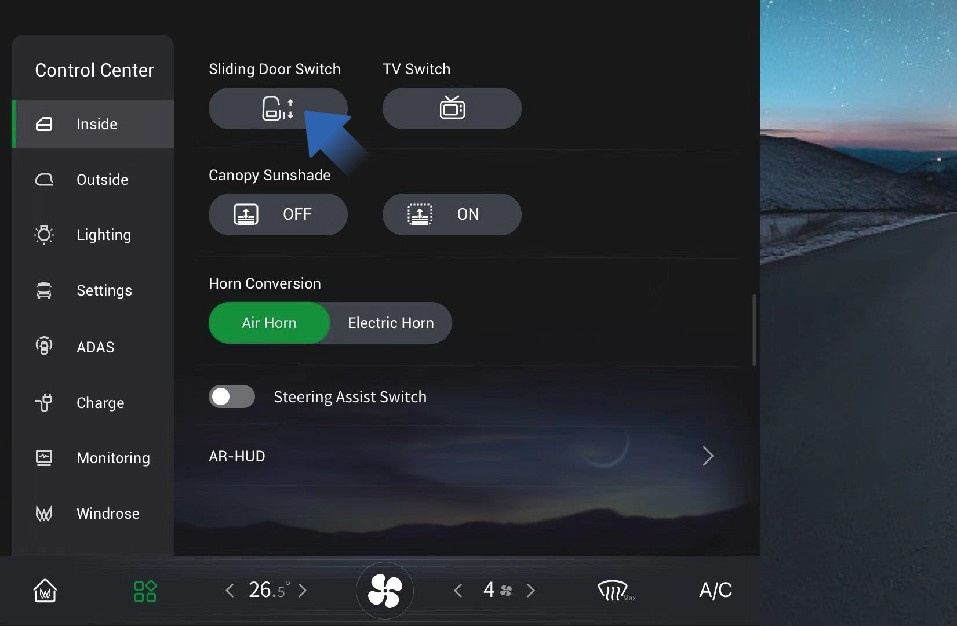
Velg «Control Center» på kjøretøyets informasjonsskjerm.
Bytt til grensesnittet «Inside».
Trykk på betjeningsknappen «Sliding Door» for å åpne eller lukke den elektriske skyvedøren
Elektrisk: Når kjøretøyet er låst opp, trykk på bryteren på B-stolpens trekkpanel foran skyvedøren for å åpne eller lukke døren.
Manuelt: Hvis skyvedøren er lukket, trekk det innvendige håndtaket bakover for å låse opp døren og skyv den opp manuelt.
Hvis skyvedøren er åpen, hold det innvendige håndtaket og skyv døren fremover for å lukke den.
Nødsituasjoner i kjøretøyet
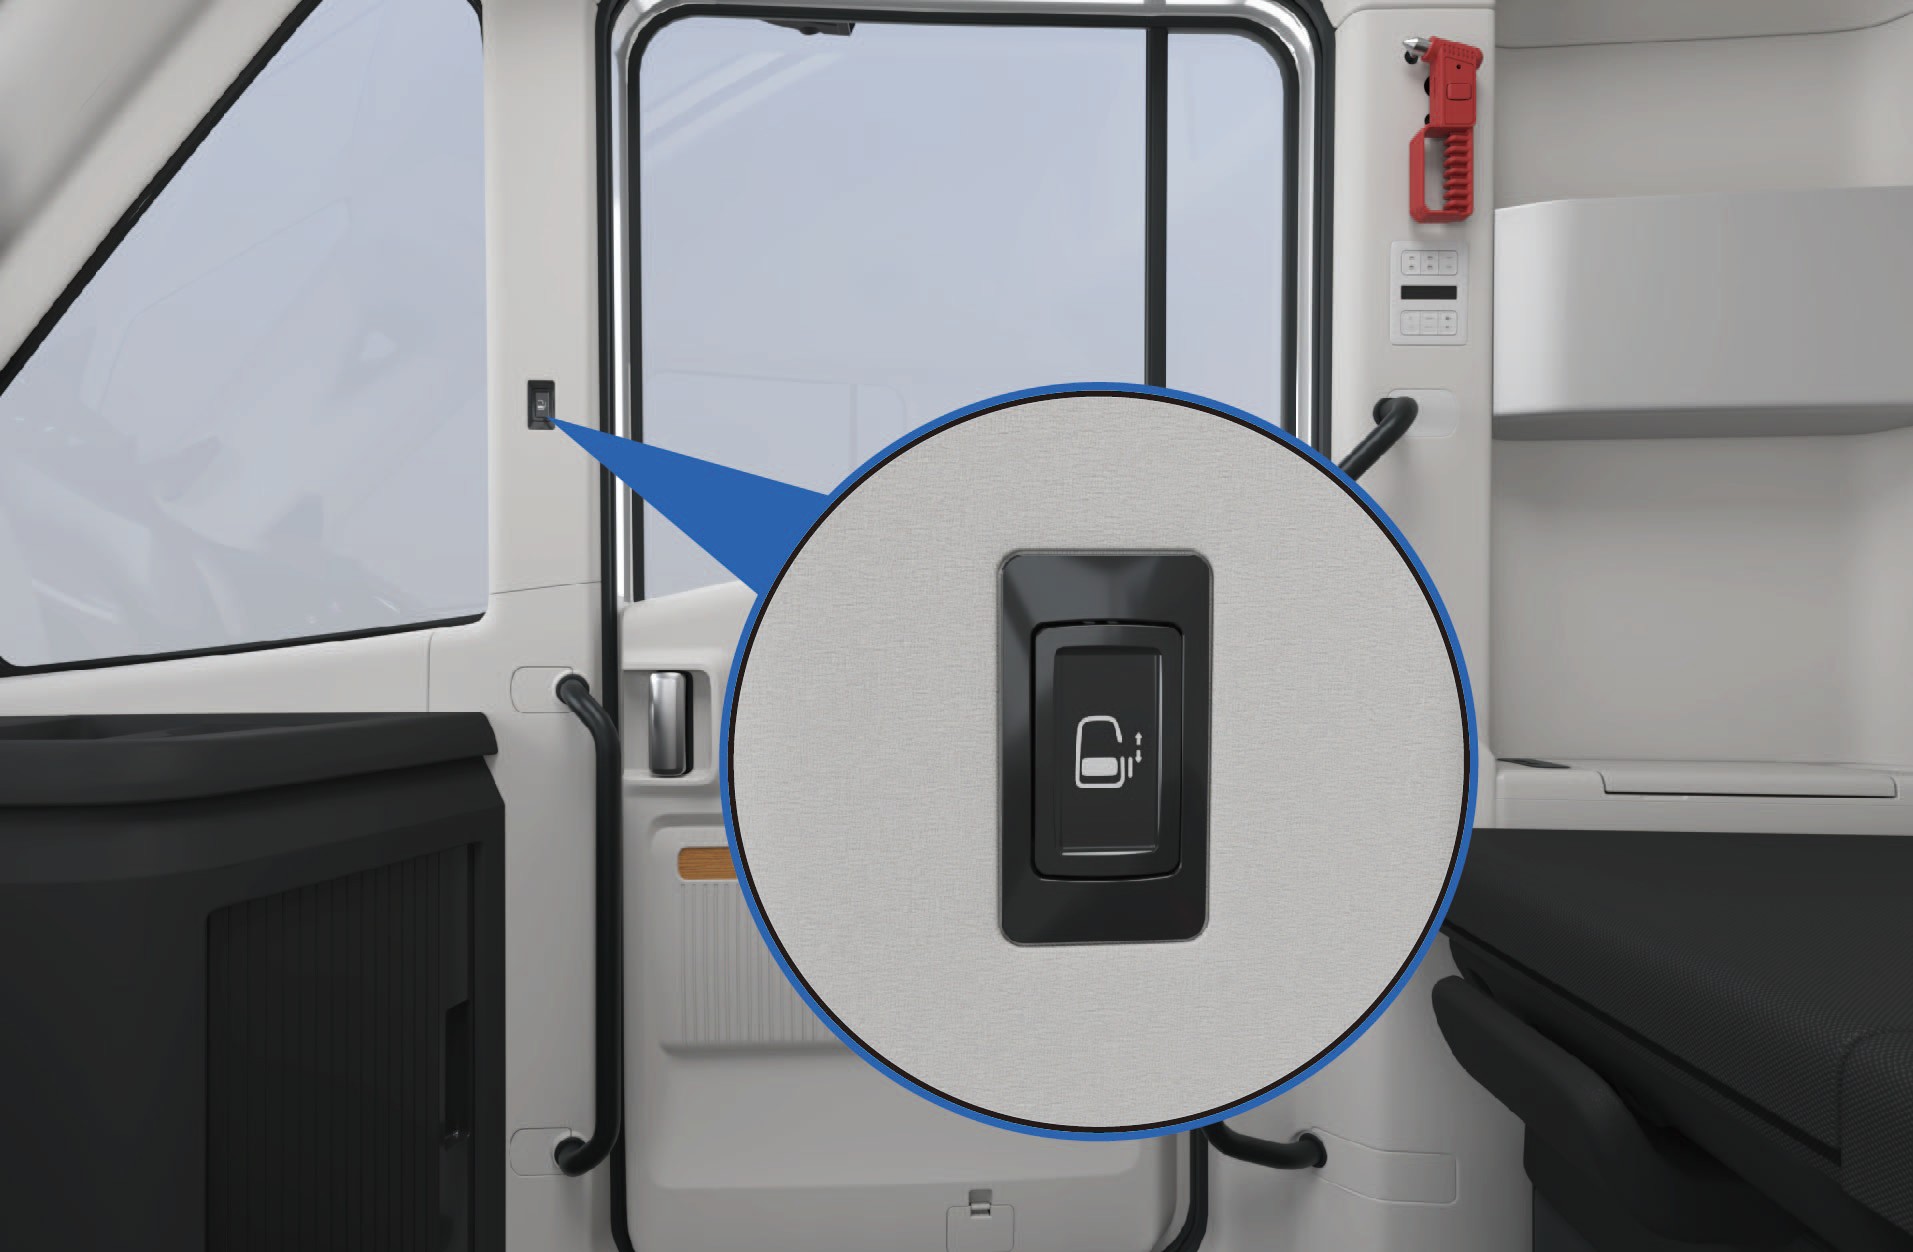
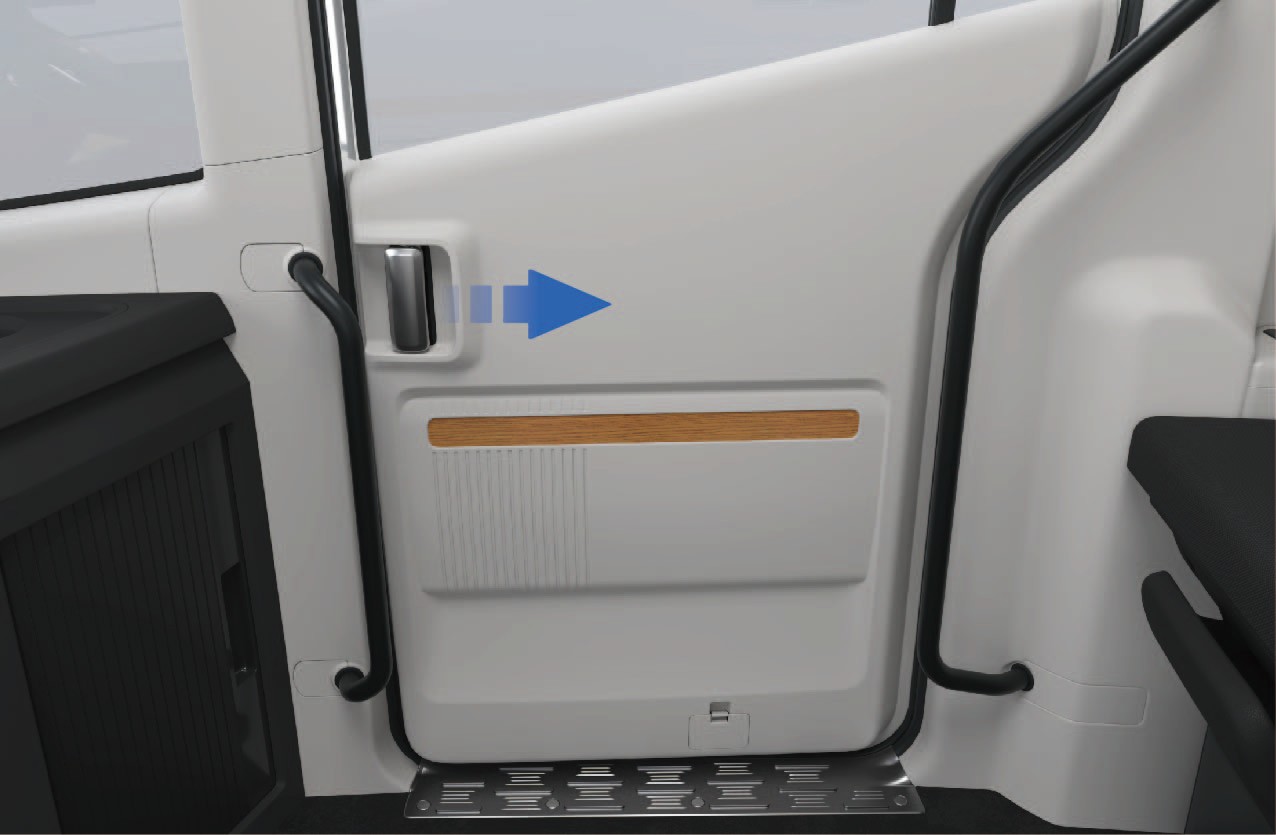
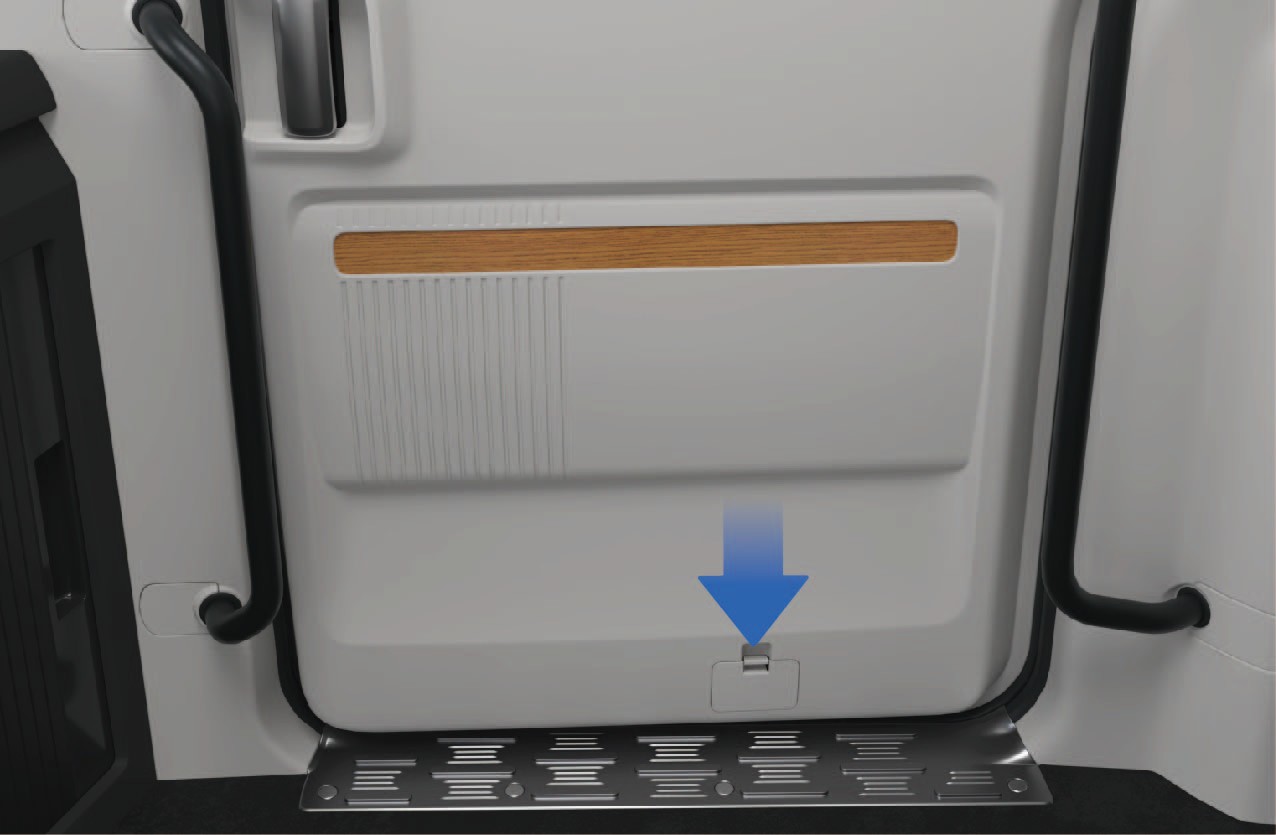
Hvis den elektriske bryteren eller det innvendige håndtaket svikter:
Ta av nedre dekkplate på skyvedørens beskyttelsespanel.
Trekk i nødutløserkabelen for å låse opp skyvedøren manuelt.
Sentrallåsbryter
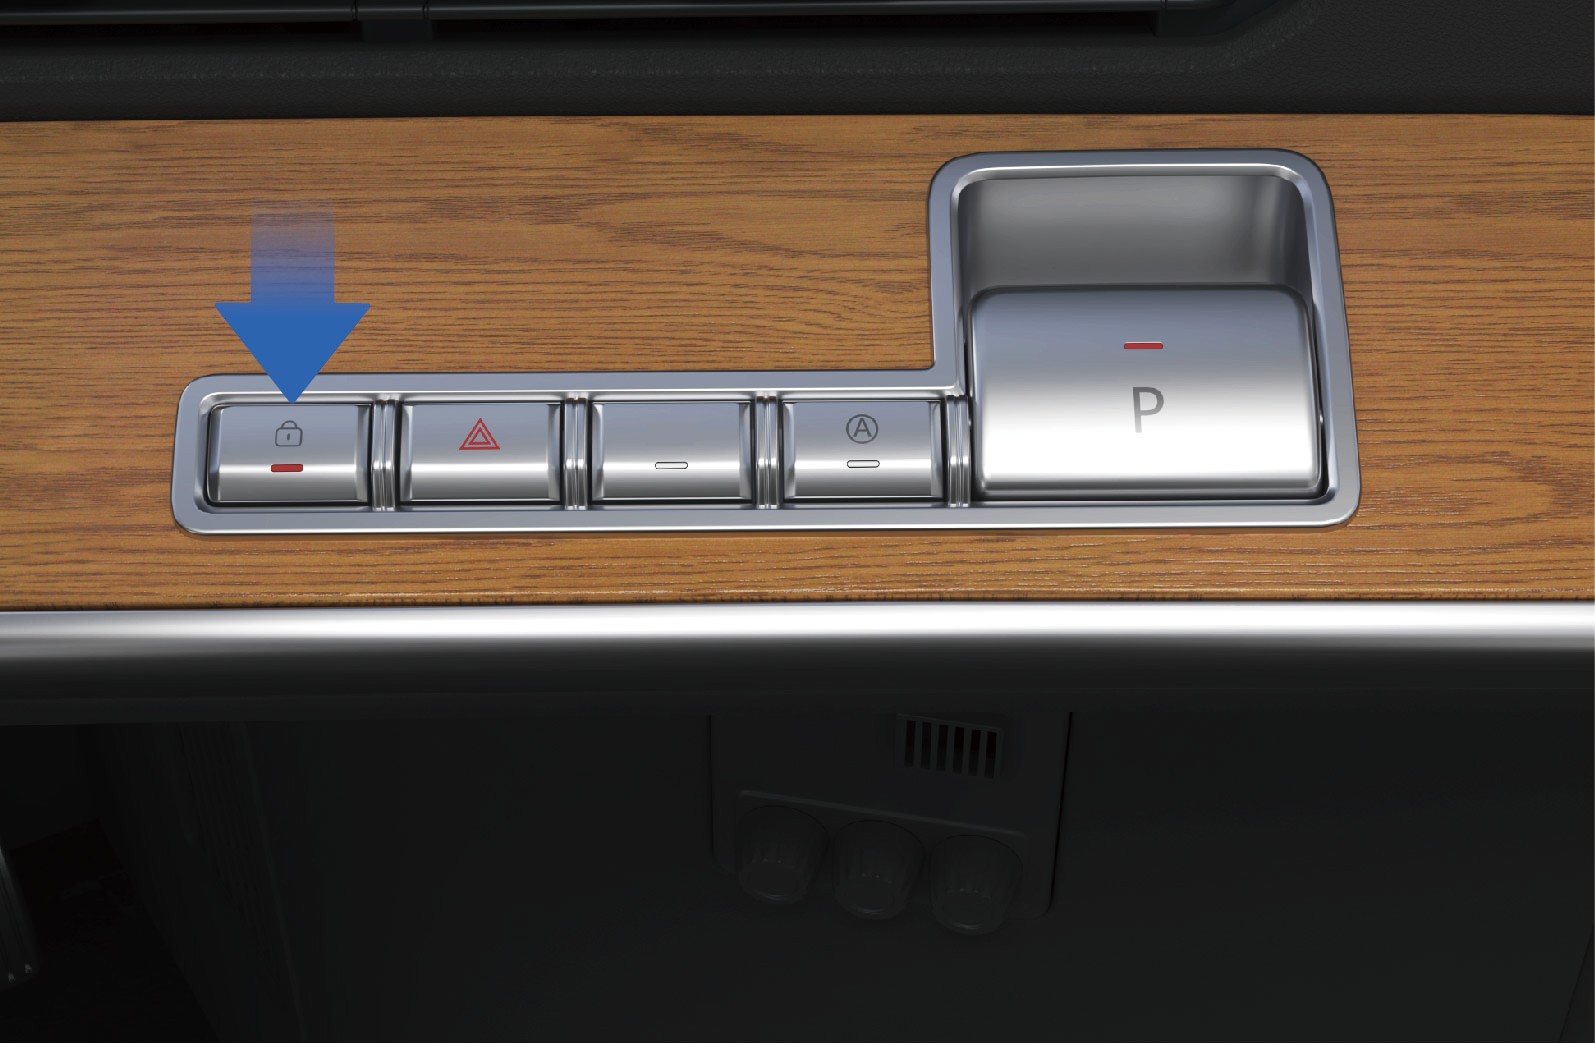
Etter at skyvedøren er lukket:
Trykk på sentrallåsbryteren i knappegruppen på høyre side av instrumentpanelet for å låse skyvedøren.
Statusindikatoren lyser når døren er låst.
Trykk på bryteren igjen for å låse opp døren.
Manuell modus for skyvedør
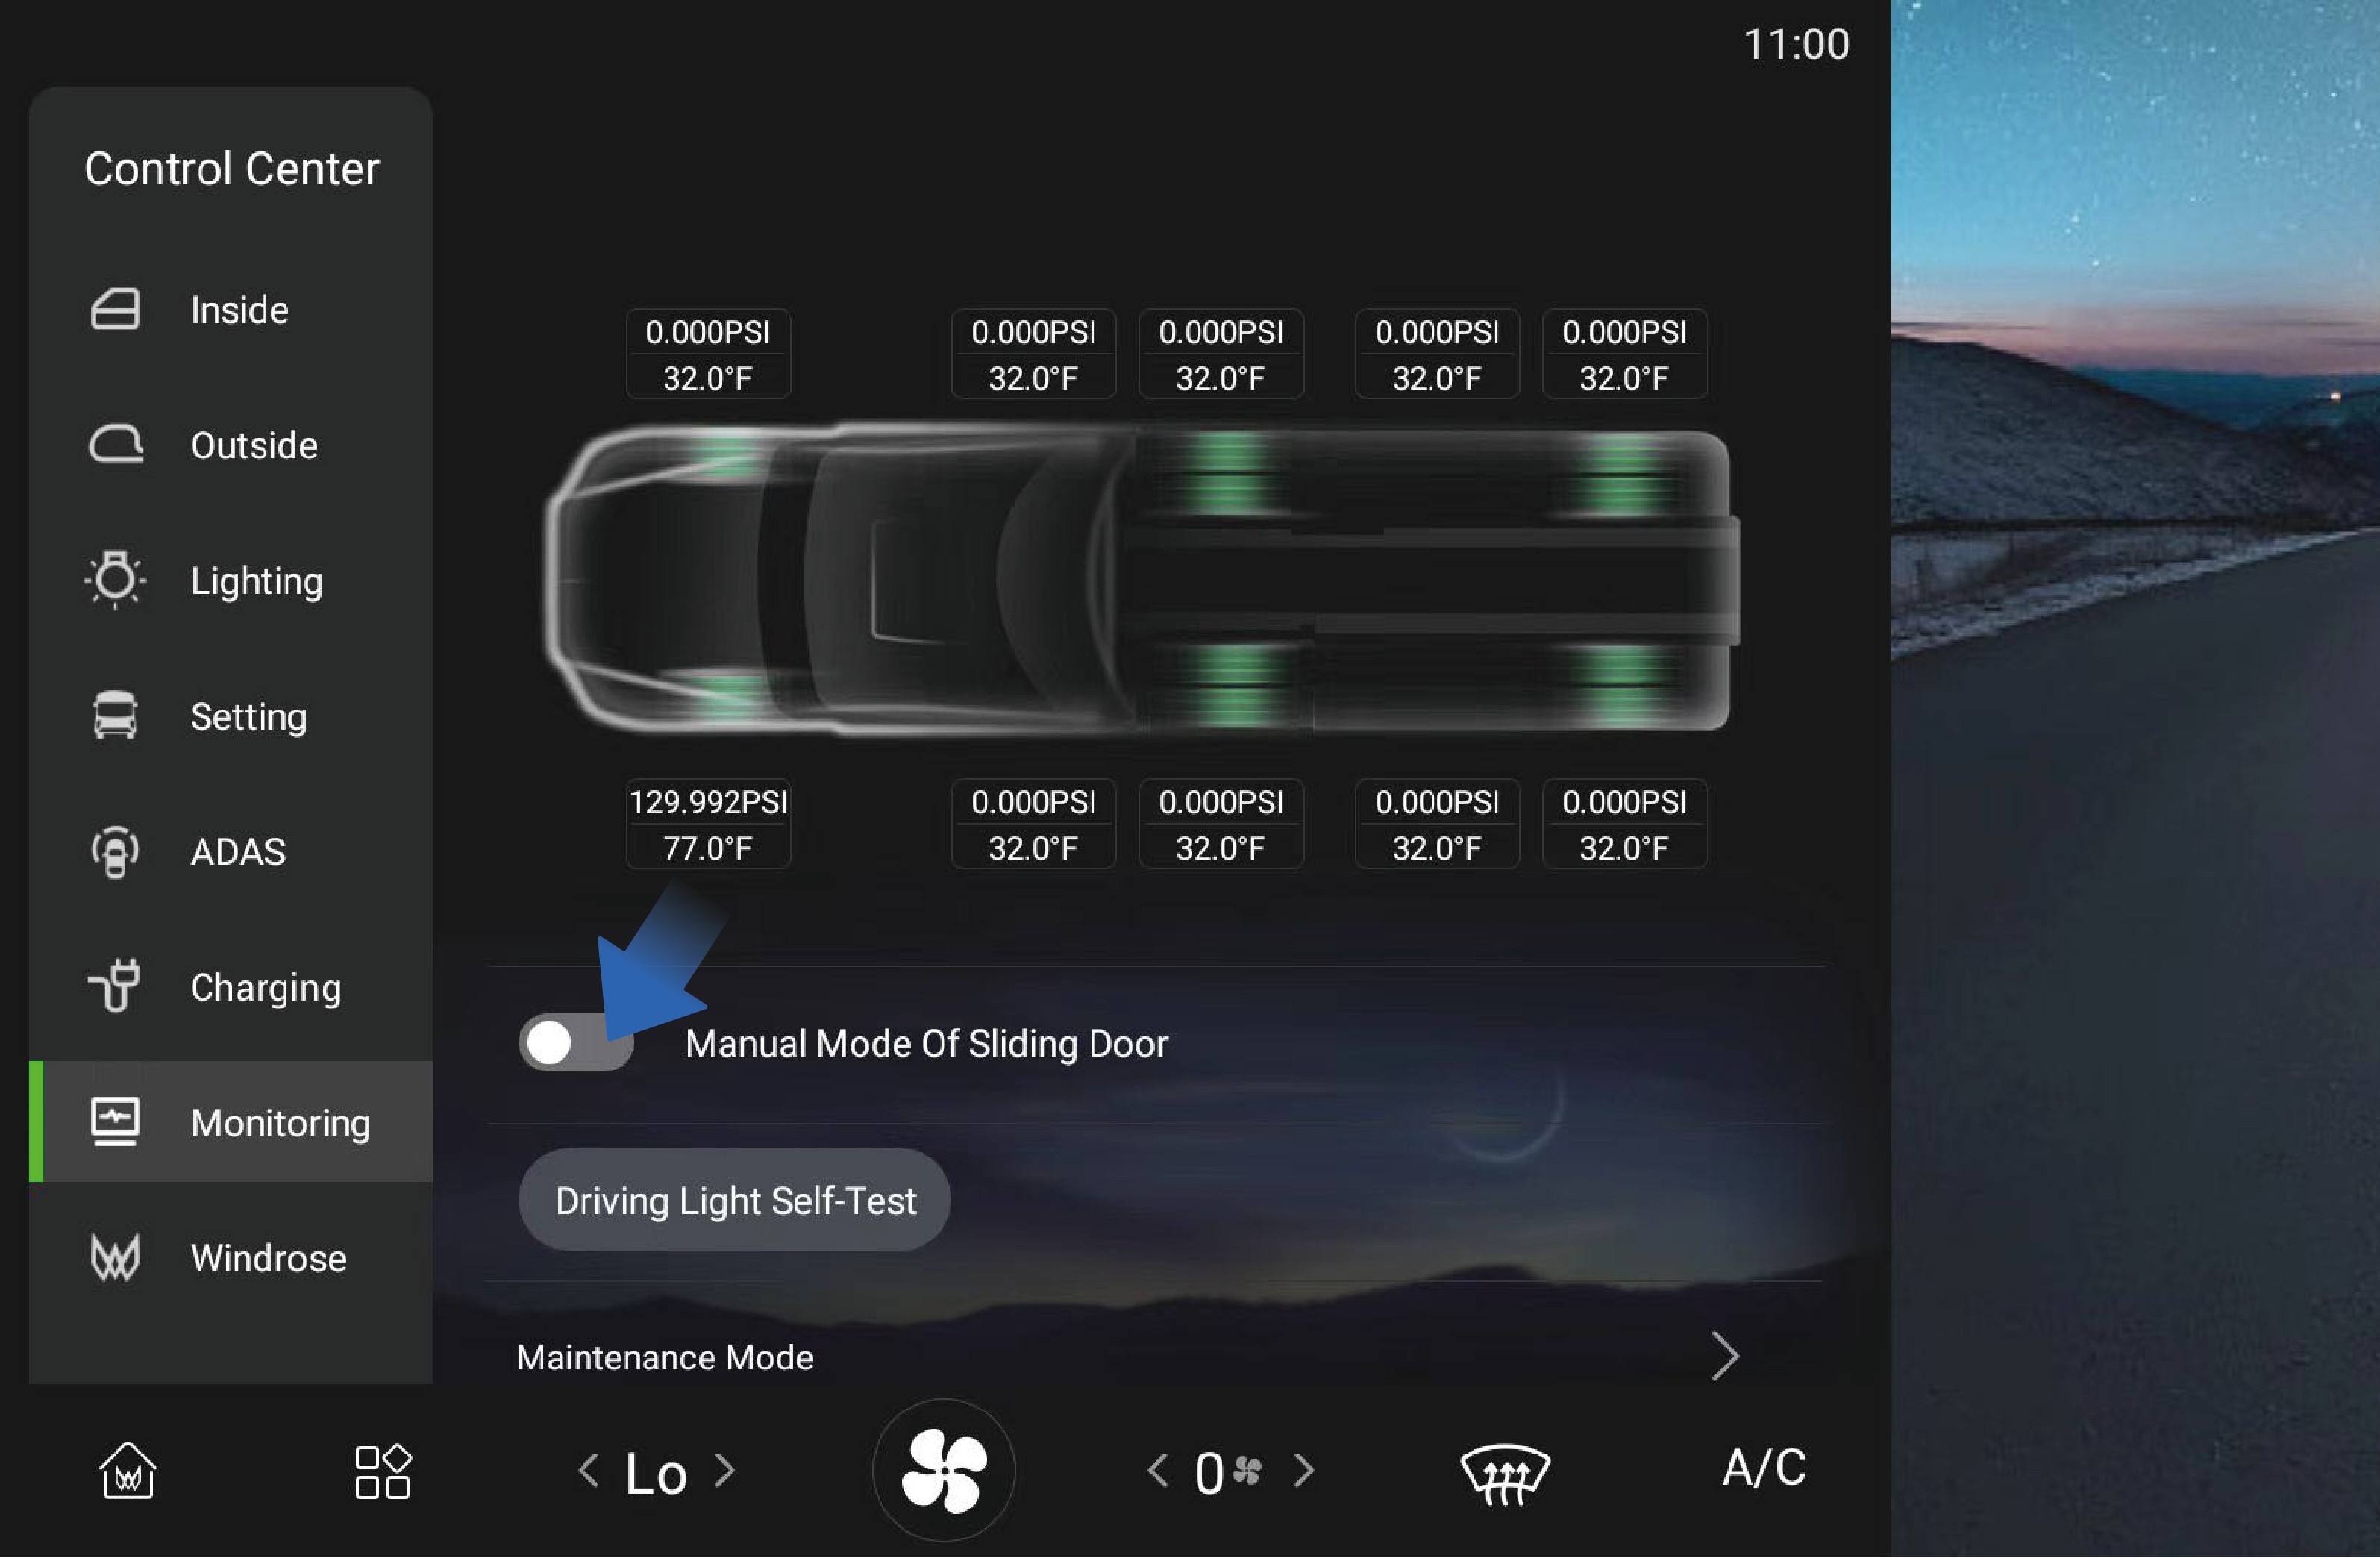
Den manuelle modusen kan aktiveres eller deaktiveres via kjøretøyets informasjonsskjerm:
Velg «Control Center».
Bytt til grensesnittet «Monitoring».
Velg «Sliding Door Manual Mode».
↑ Til toppenNår manuell modus er aktivert, kan skyvedøren bare betjenes manuelt.
Klembeskyttelse for skyvedør
Hvis skyvedøren registrerer en hindring under automatisk lukking, stopper den å lukke og går automatisk tilbake til åpen posisjon.
3.A.3Forholdsregler
↑ Til toppenAdvarselKlembeskyttelsen er bare aktiv under elektrisk lukking. Den er ikke aktiv når døren betjenes manuelt.
3.BSikkerhetsbelte
↑ Til toppenTilgang til kjøretøyet
Førersetet og passasjersetet foran er utstyrt med sikkerhetsbelter. Sikkerhetsbelter bidrar til å hindre eller redusere skade på personer i kjøretøyet ved nødbremsing eller kollisjon.
3.B.1Bruksanvisning
↑ Til toppenFørerens sikkerhetsbelte sitter på venstre side av førersetet og kan trekkes rett ut for å festes.
Passasjersetets sikkerhetsbelte sitter på høyre side av passasjersetet foran. Når passasjersetet er i bruk, minn passasjeren om å ta på sikkerhetsbeltet riktig før kjøretøyet settes i bevegelse.
Riktig bruk av sikkerhetsbelte
Følg disse retningslinjene ved bruk av sikkerhetsbelte:
• Hoftedelen av beltet skal ligge lavt over bekkenet (hoftene) og ikke over magen.
• Beltet skal ligge tett inntil kroppen uten vridninger.
• Skulderdelen skal gå over midten av skulderen.
• Plasser aldri beltet over halsen eller under armen.
• Etter at sikkerhetsbeltet er festet, trekk skulderdelen oppover for å sikre at hoftedelen ligger godt over hoftene.
• Kontroller alltid at sikkerhetsbeltet er riktig låst før kjøring.
Påminnelse om sikkerhetsbelte
Hvis førerens sikkerhetsbelte ikke er festet, lyser varsellampen for sikkerhetsbelte i kombiinstrumentet.
Når føreren fester sikkerhetsbeltet, slukkes varsellampen.
Rengjøring av sikkerhetsbelter
Hvis et sikkerhetsbelte blir skittent, rengjør det med mild såpe og vann.
1. Trekk sikkerhetsbeltet helt ut og fest det.
2. Påfør en mild såpeoppløsning på det tilsmussede området.
3. Rengjør beltet forsiktig med en myk børste eller klut.
4. Skyll med rent vann om nødvendig.
5. La sikkerhetsbeltet tørke helt før det trekkes inn igjen.
Ikke trekk et vått sikkerhetsbelte inn i opprullingsmekanismen.
3.B.2Forholdsregler
AdvarselAlle i kjøretøyet må bruke sikkerhetsbelte riktig mens kjøretøyet er i bevegelse. Riktig bruk av sikkerhetsbelte reduserer faren for skade betydelig ved nødbremsing eller kollisjon.
Manglende eller feil bruk av sikkerhetsbelte kan føre til alvorlig personskade eller død.
Ikke sitt på steder som ikke er utstyrt med sete og sikkerhetsbelte.
Ikke bruk et sikkerhetsbelte som er skadet eller ikke fungerer.
Hvert sikkerhetsbelte er beregnet for kun én person. Del aldri et sikkerhetsbelte med en annen person.
Plasser aldri skulderbeltet rundt halsen eller under armen.
Ikke fjern, endre eller gjør inngrep i sikkerhetsbeltesystemet.
Ikke bruk blekemiddel, fargestoffer eller kjemiske løsemidler til å rengjøre sikkerhetsbelter, da dette kan svekke beltematerialet.
3.CElektrisk vindusheis
↑ Til toppenTilgang til kjøretøyet
Sidevinduene kan betjenes med vindusbryterne på venstre side av instrumentpanelet eller på betjeningspanelet ved køyen.
Kjøretøyet har en funksjon for automatisk lukking av vinduer. Når kjøretøyet er slått av og låst, lukkes vinduene automatisk hvis de ikke allerede er helt lukket.
3.C.1
Bruksanvisning
Vindusjustering via kombinasjonsbryter
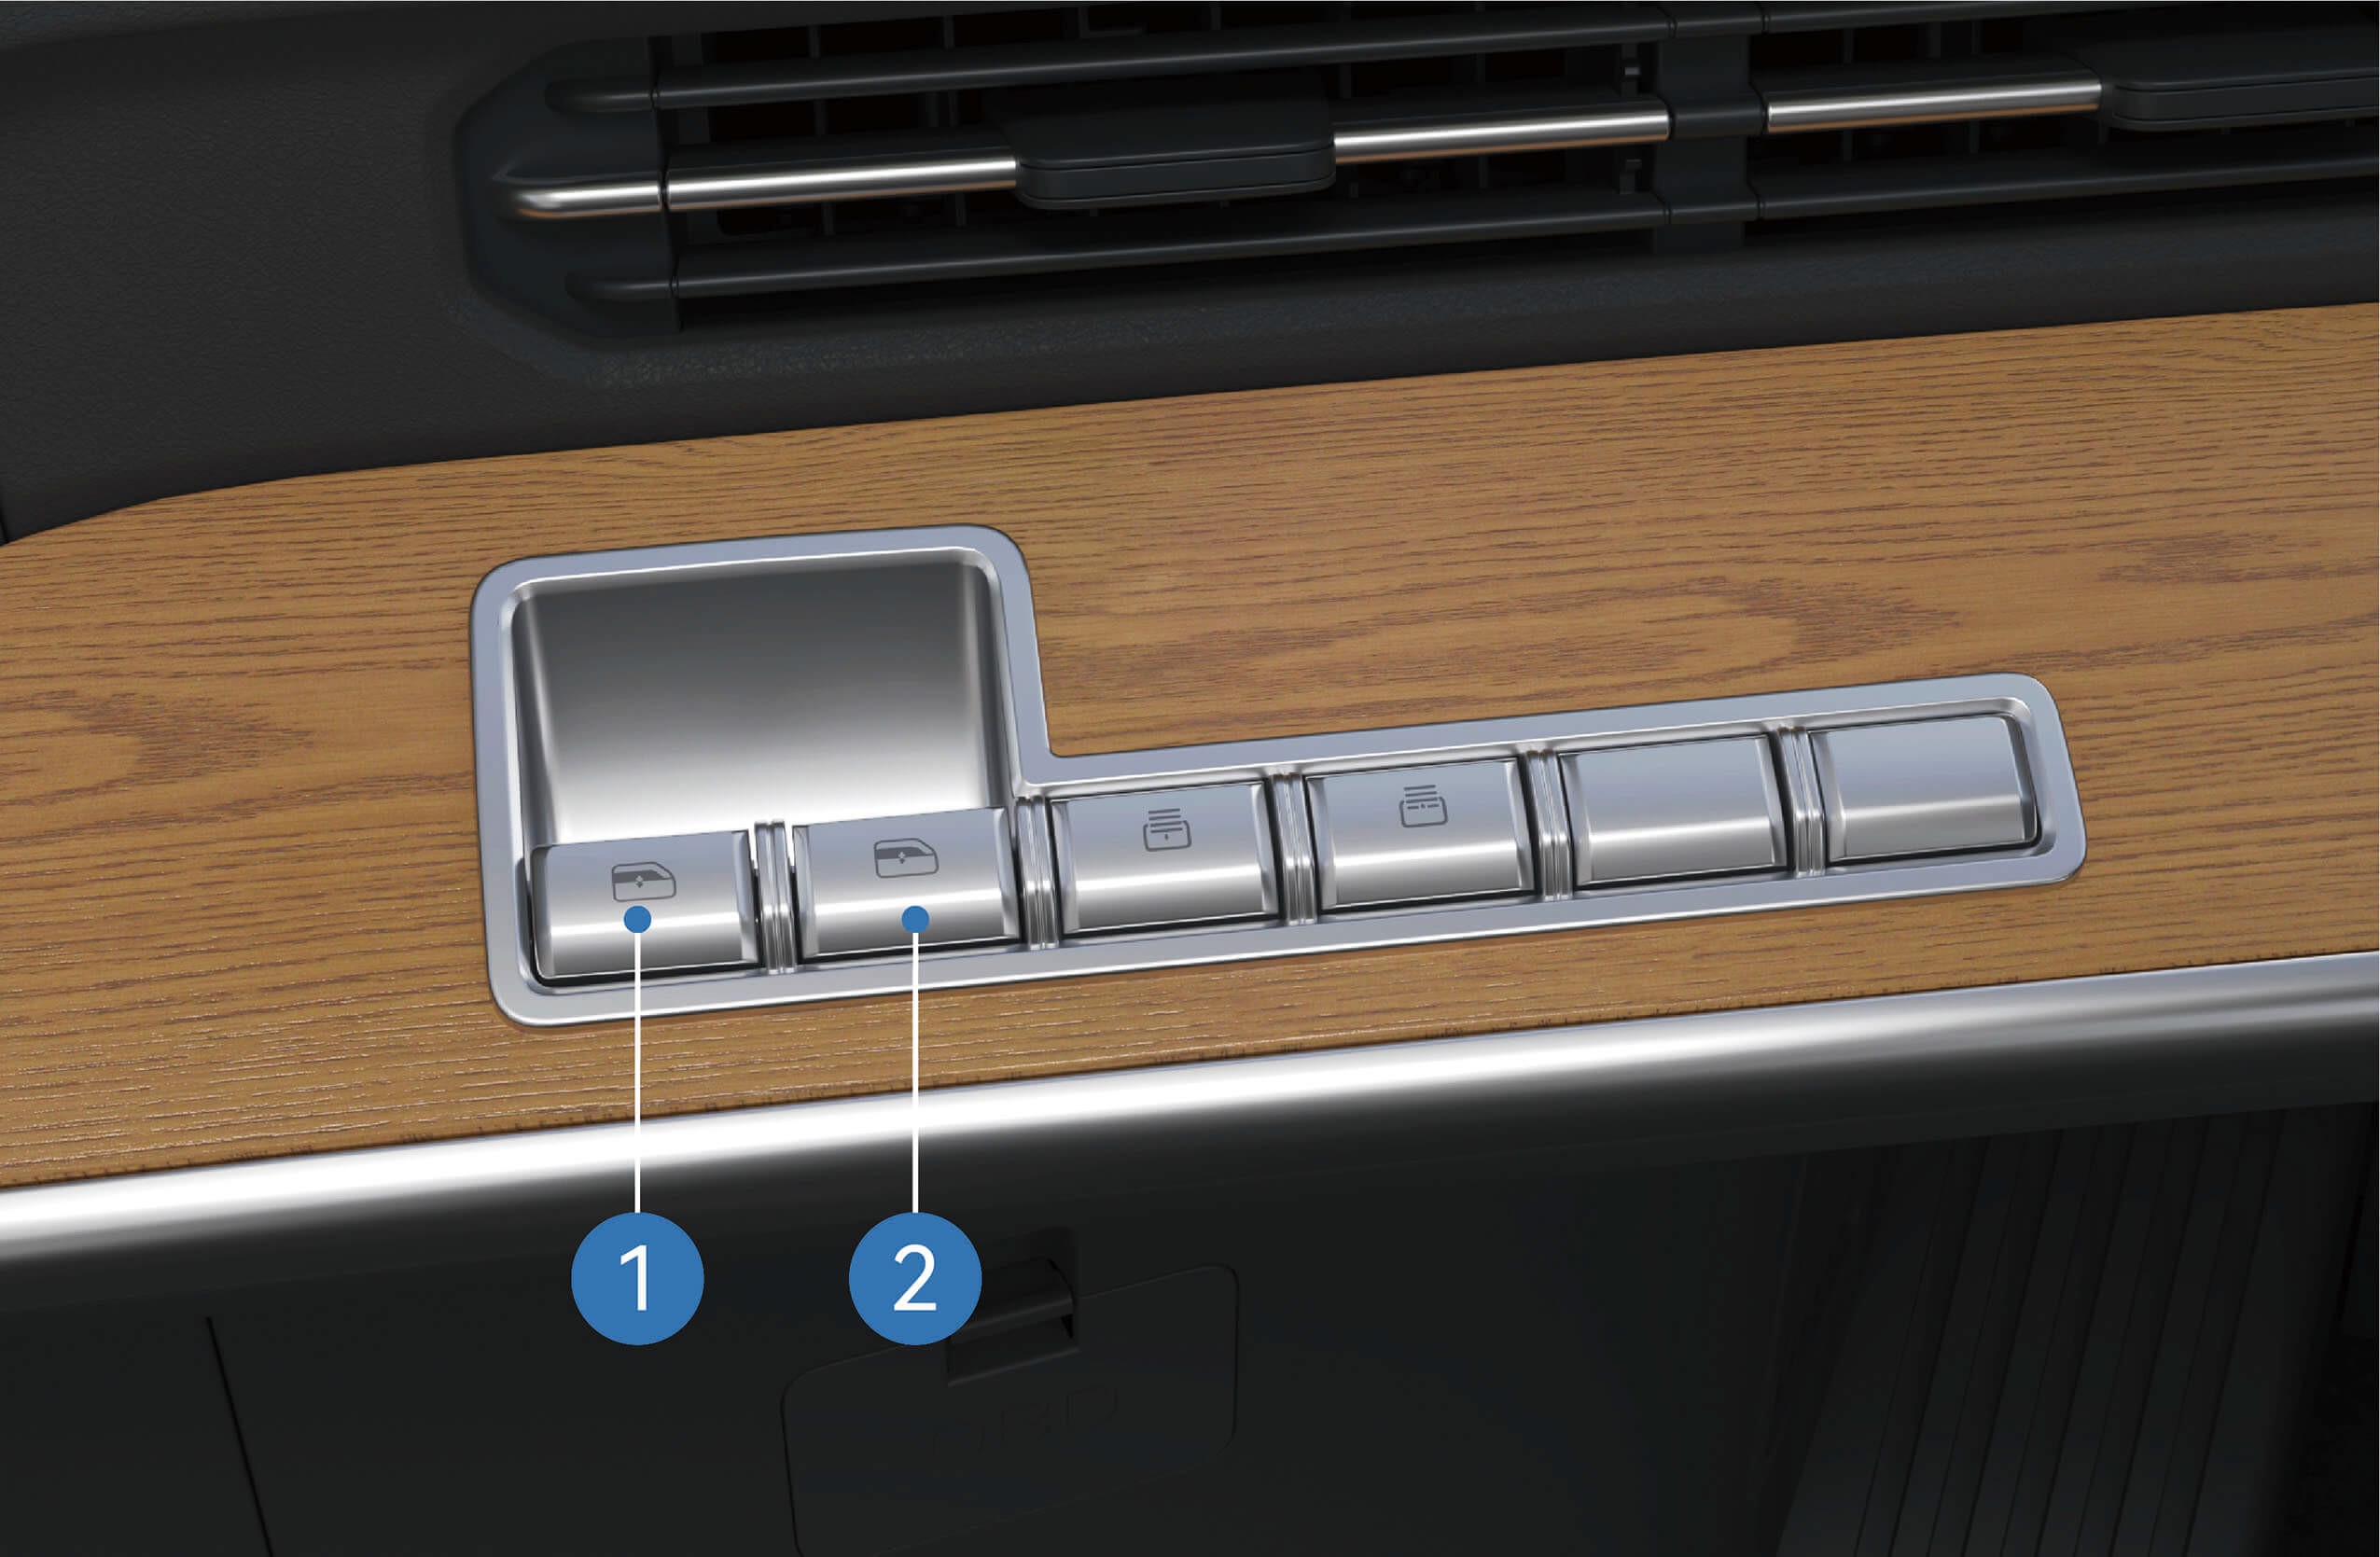
Venstre vindusbryter: Trykk og hold opp- og ned-knappene for å styre åpningen av venstre vindu. Trykk og slipp venstre vindusbryter opp eller ned for å heve eller senke venstre vindu med ett trykk.
Høyre vindusbryter: Trykk og hold opp- og ned-knappene for å styre åpningen av høyre vindu. Trykk og slipp høyre vindusbryter opp
eller ned for å heve eller senke høyre vindu med ett trykk.
Vindusjustering via køyebryter
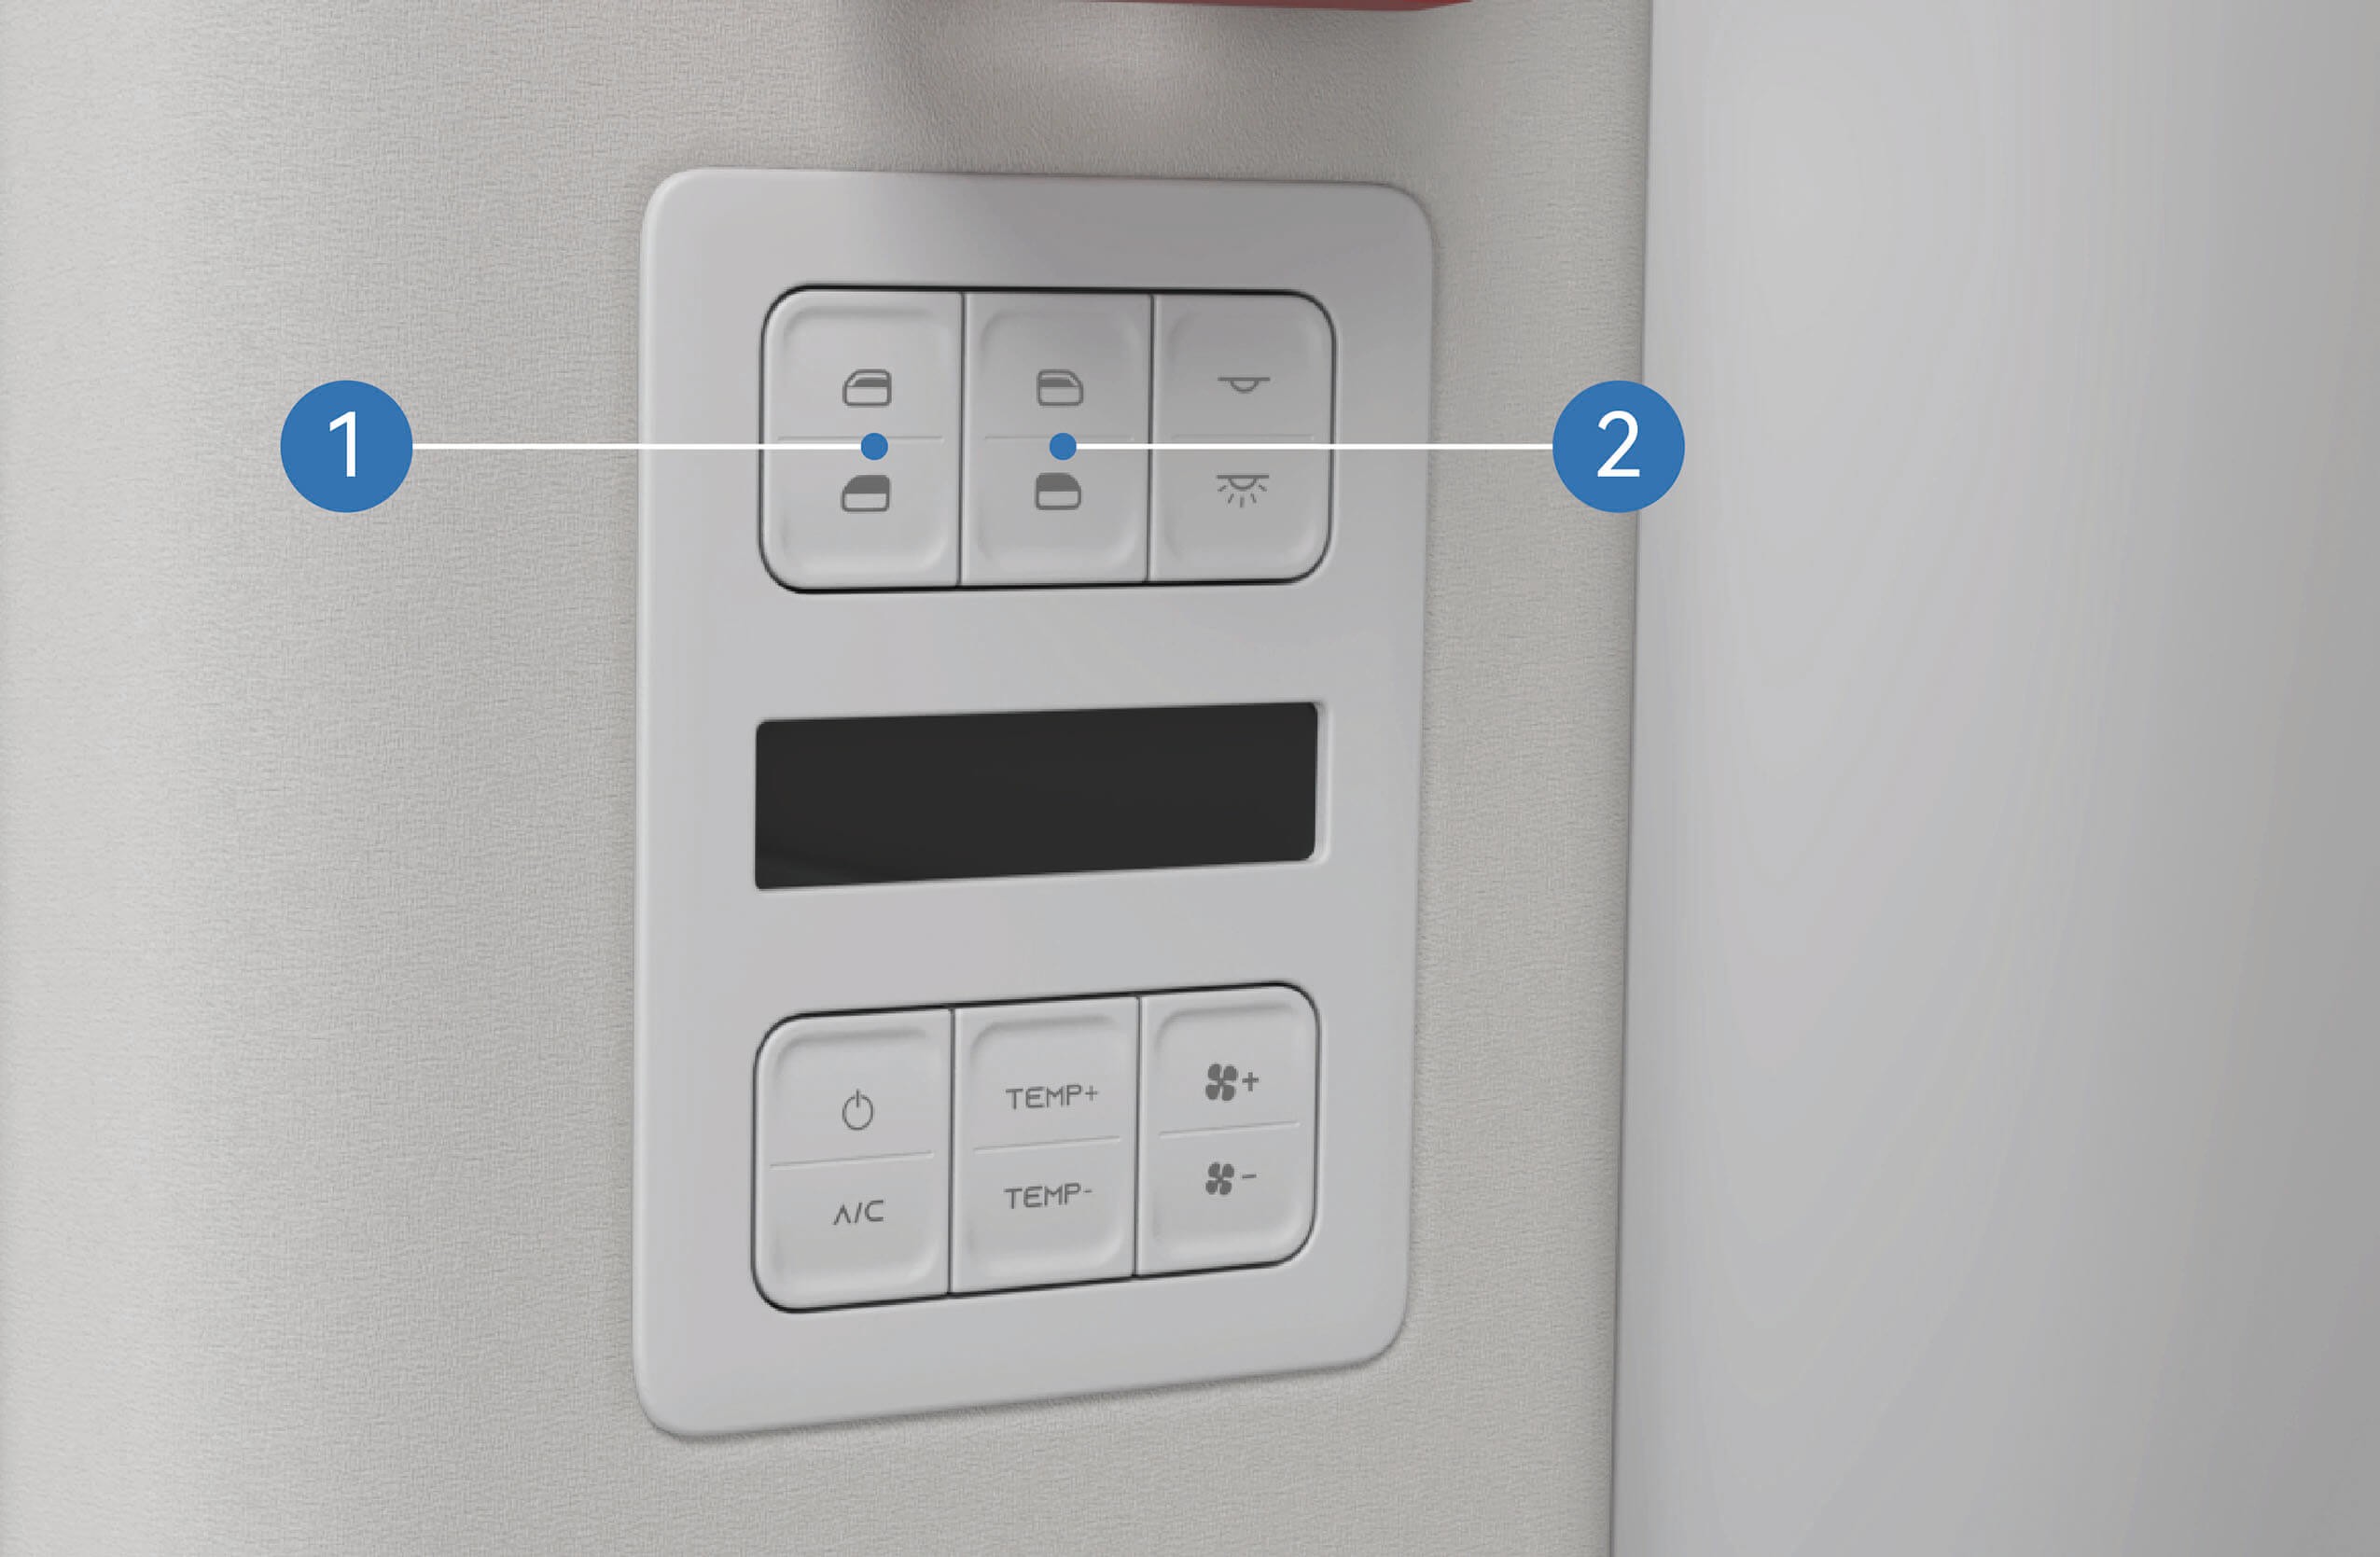
Venstre vindusbryter: Trykk og hold opp og ned
↑ Til toppenlukke eller åpne vinduet helt automatisk (ettrykksbetjening).
3.C.2Forholdsregler
Advarsel
Før vinduene lukkes, er det viktig å sikre at ingen i kjøretøyet stikker noen kroppsdel ut, ellers kan det oppstå alvorlig personskade.
Ikke betjen vinduene ved høy hastighet.
MerkFjern snø og is fra vindusflaten i tide for å unngå at vinduet setter seg fast under bevegelse, eller for å hindre at vinduet ikke kan åpnes og lukkes normalt.
bryterknapper for å styre åpningen av venstre vindu.
Trykk raskt og slipp de to knappene hver for seg for å lukke eller åpne vinduet helt automatisk (ettrykksbetjening).
Høyre vindusbryter: Trykk og hold opp- og ned-knappene for å styre åpningen av høyre vindu. Trykk raskt og slipp de to knappene hver for seg for å
3.DSkjermingsgardin for køye*
↑ Til toppenTilgang til kjøretøyet
Køyeområdet er utstyrt med skinner for skjermingsgardiner som gjør det mulig å montere skjermingsgardiner. Gardinene bidrar til skjerming og reduserer sollys i køyeområdet.
* Denne funksjonen er bare tilgjengelig på enkelte kjøretøymodeller.
3.D.1Bruksanvisning
Skinne for skjermingsgardin ved køye
Gardinskinnene er montert i taket over køyeområdet. Skjermingsgardiner kan festes til skinnene etter behov.
Skjermingsgardin for køye*
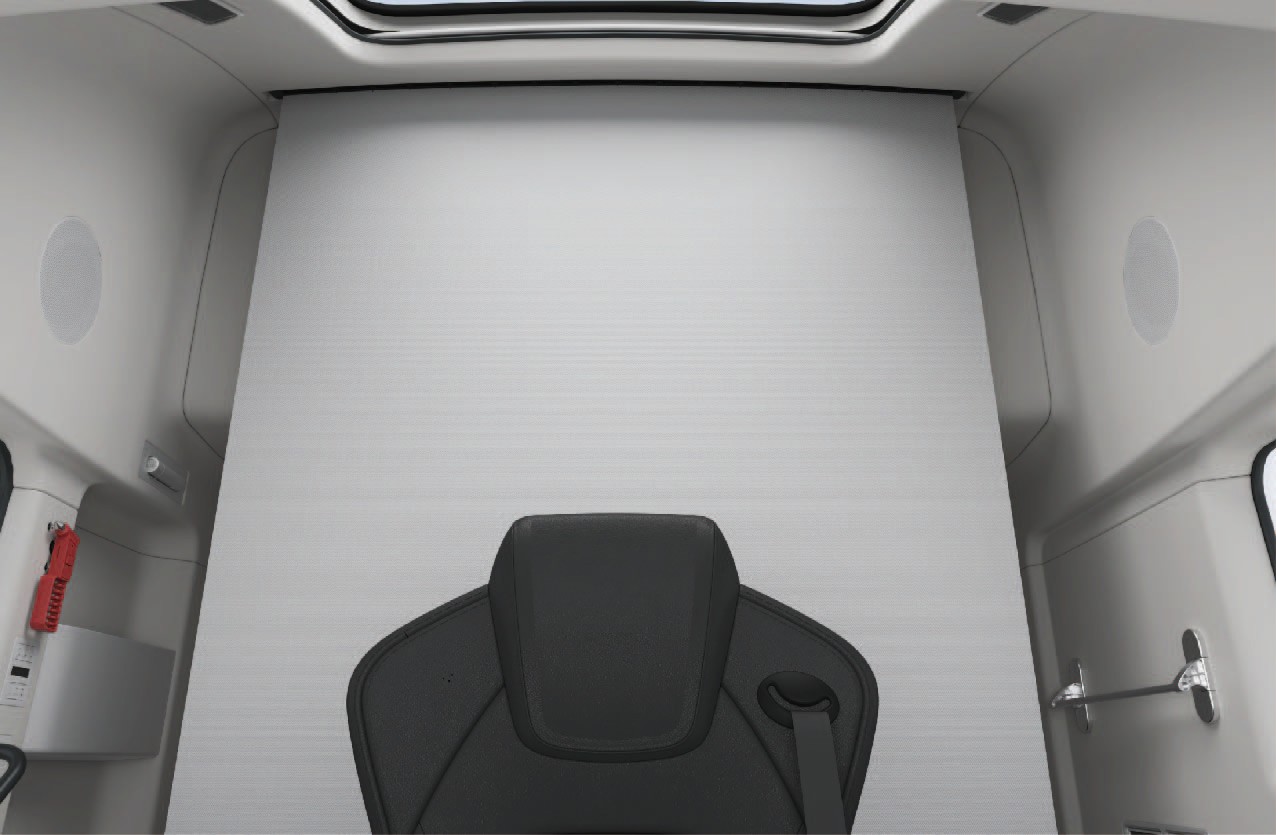
↑ Til toppenNår de er montert, kan skjermingsgardinene trekkes for køyeområdet for å gi skjerming og blokkere sollys under hvile.
3.D.2Forholdsregler
↑ Til toppenMerknadIkke trekk hardt i skjermingsgardinen, slik at den ikke faller ned.
3.EPanorama-soltak
↑ Til toppenTilgang til kjøretøyet
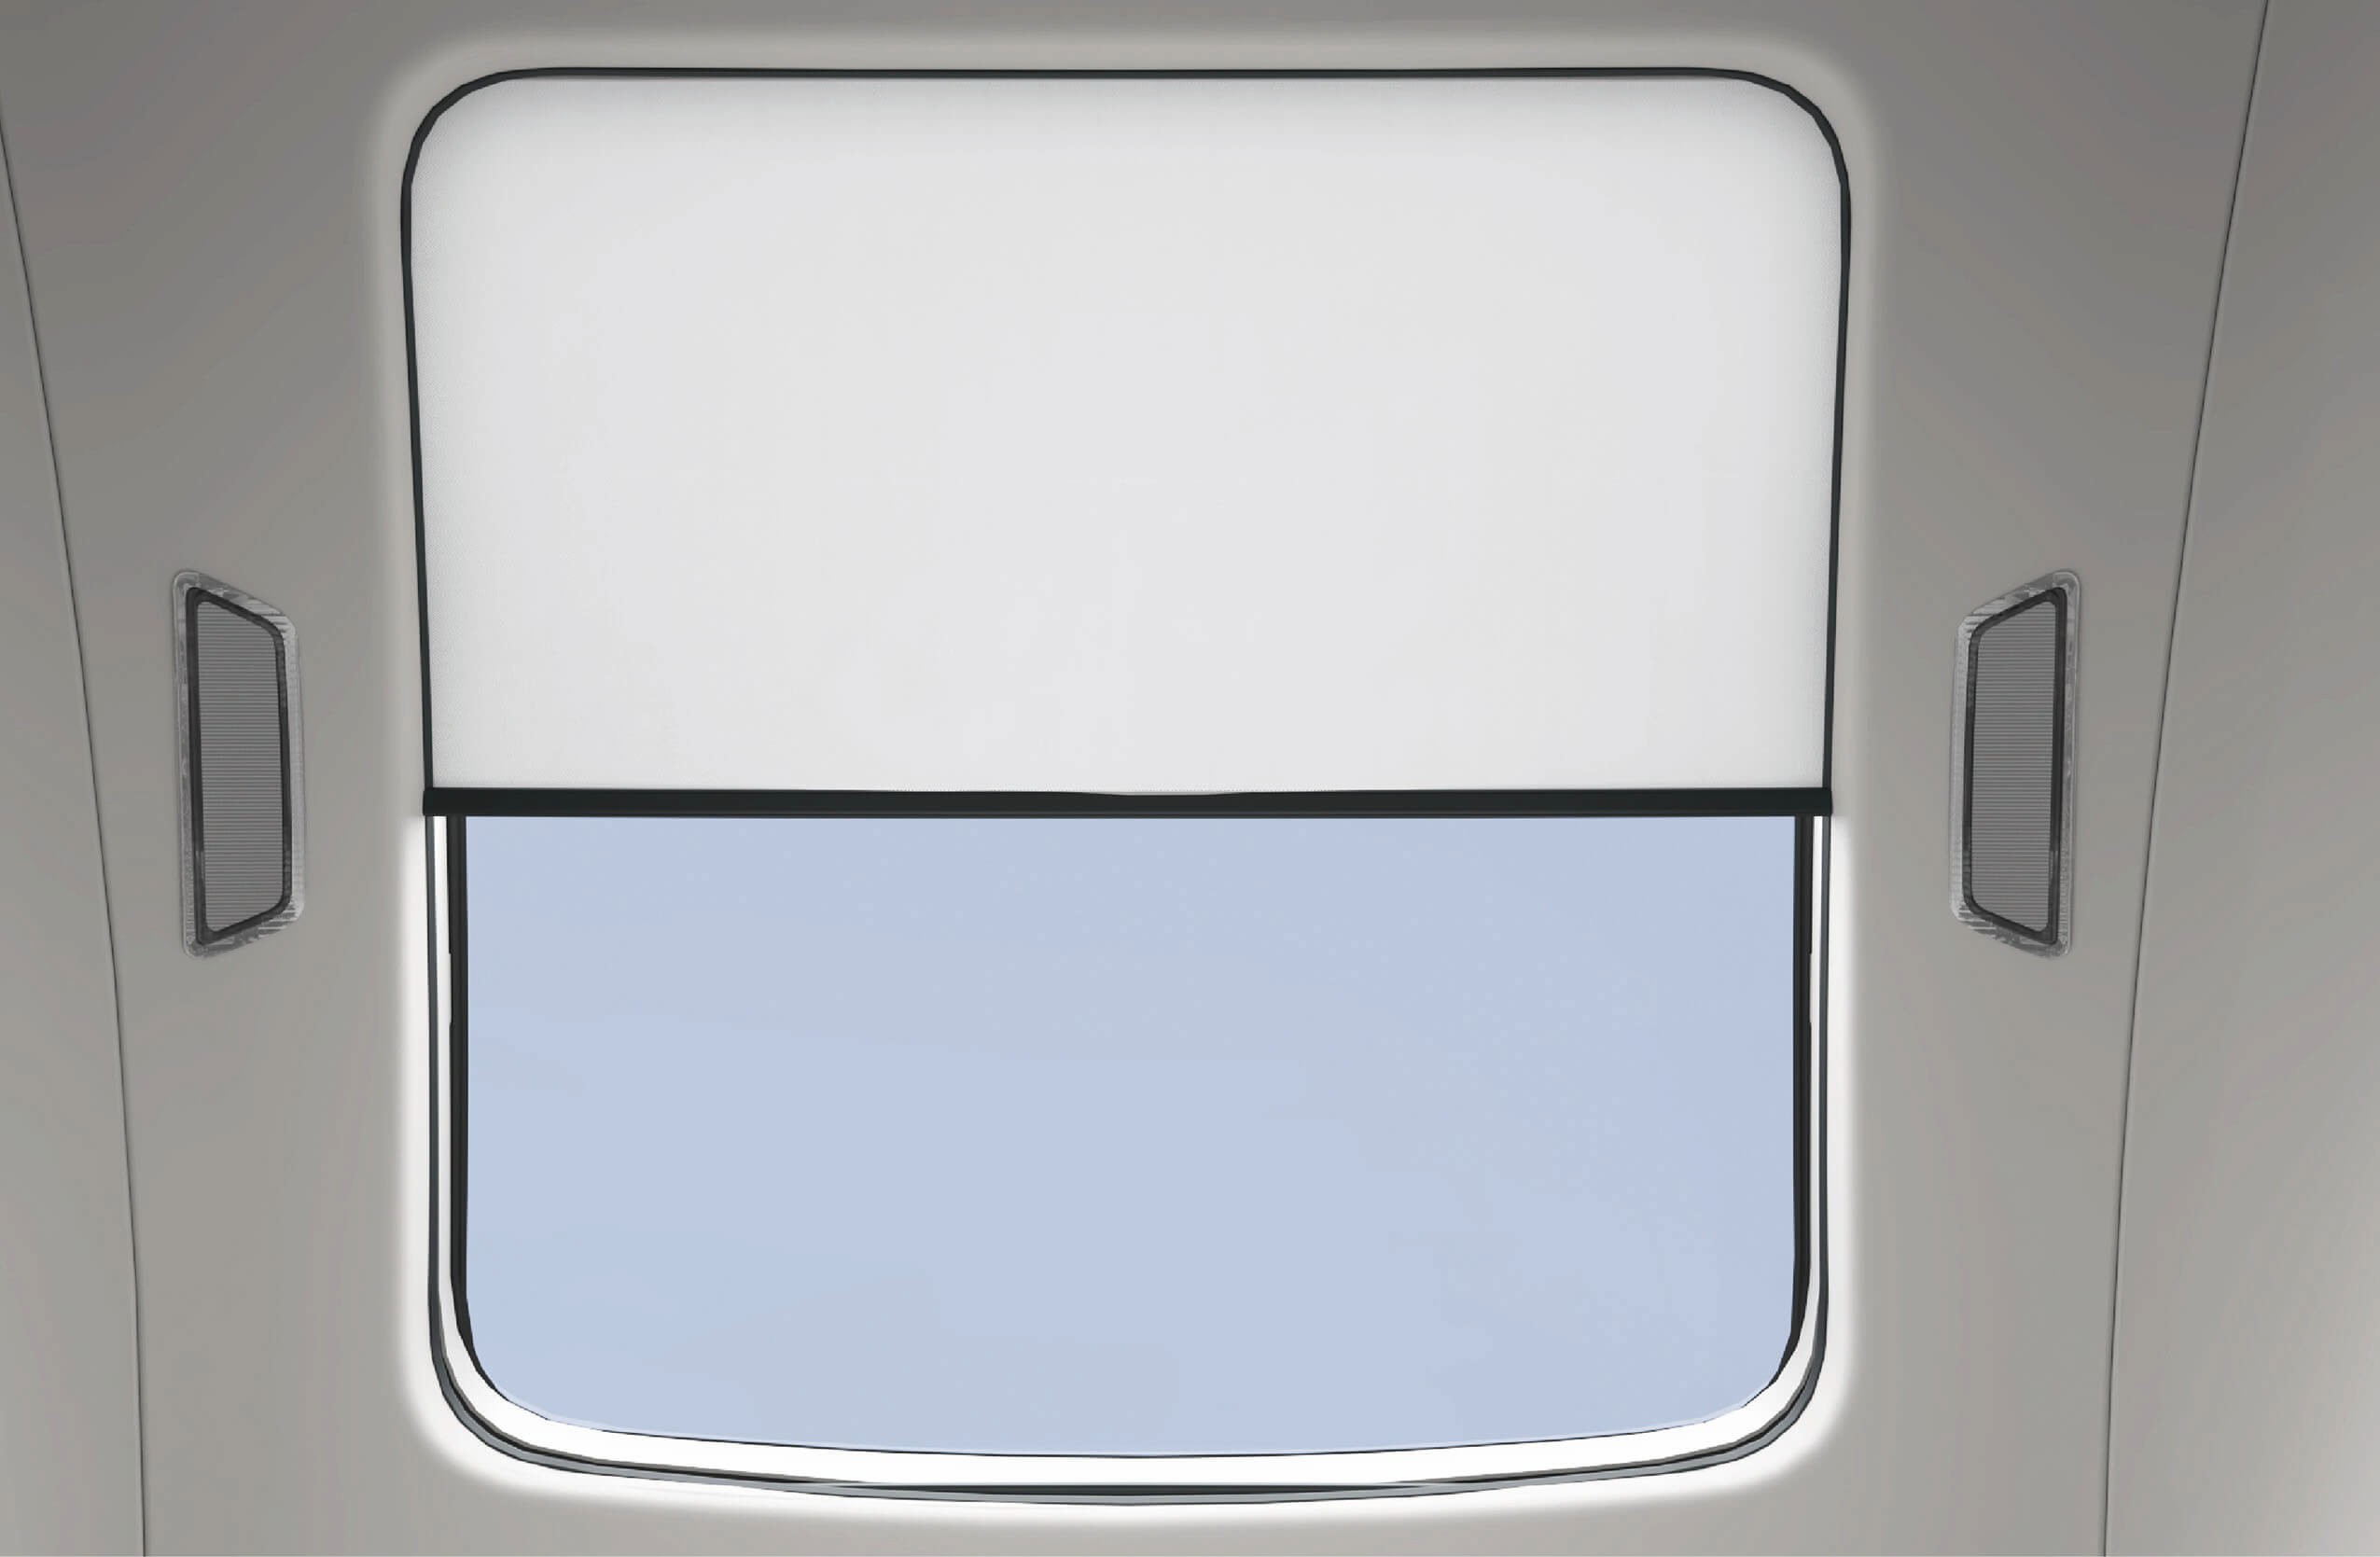
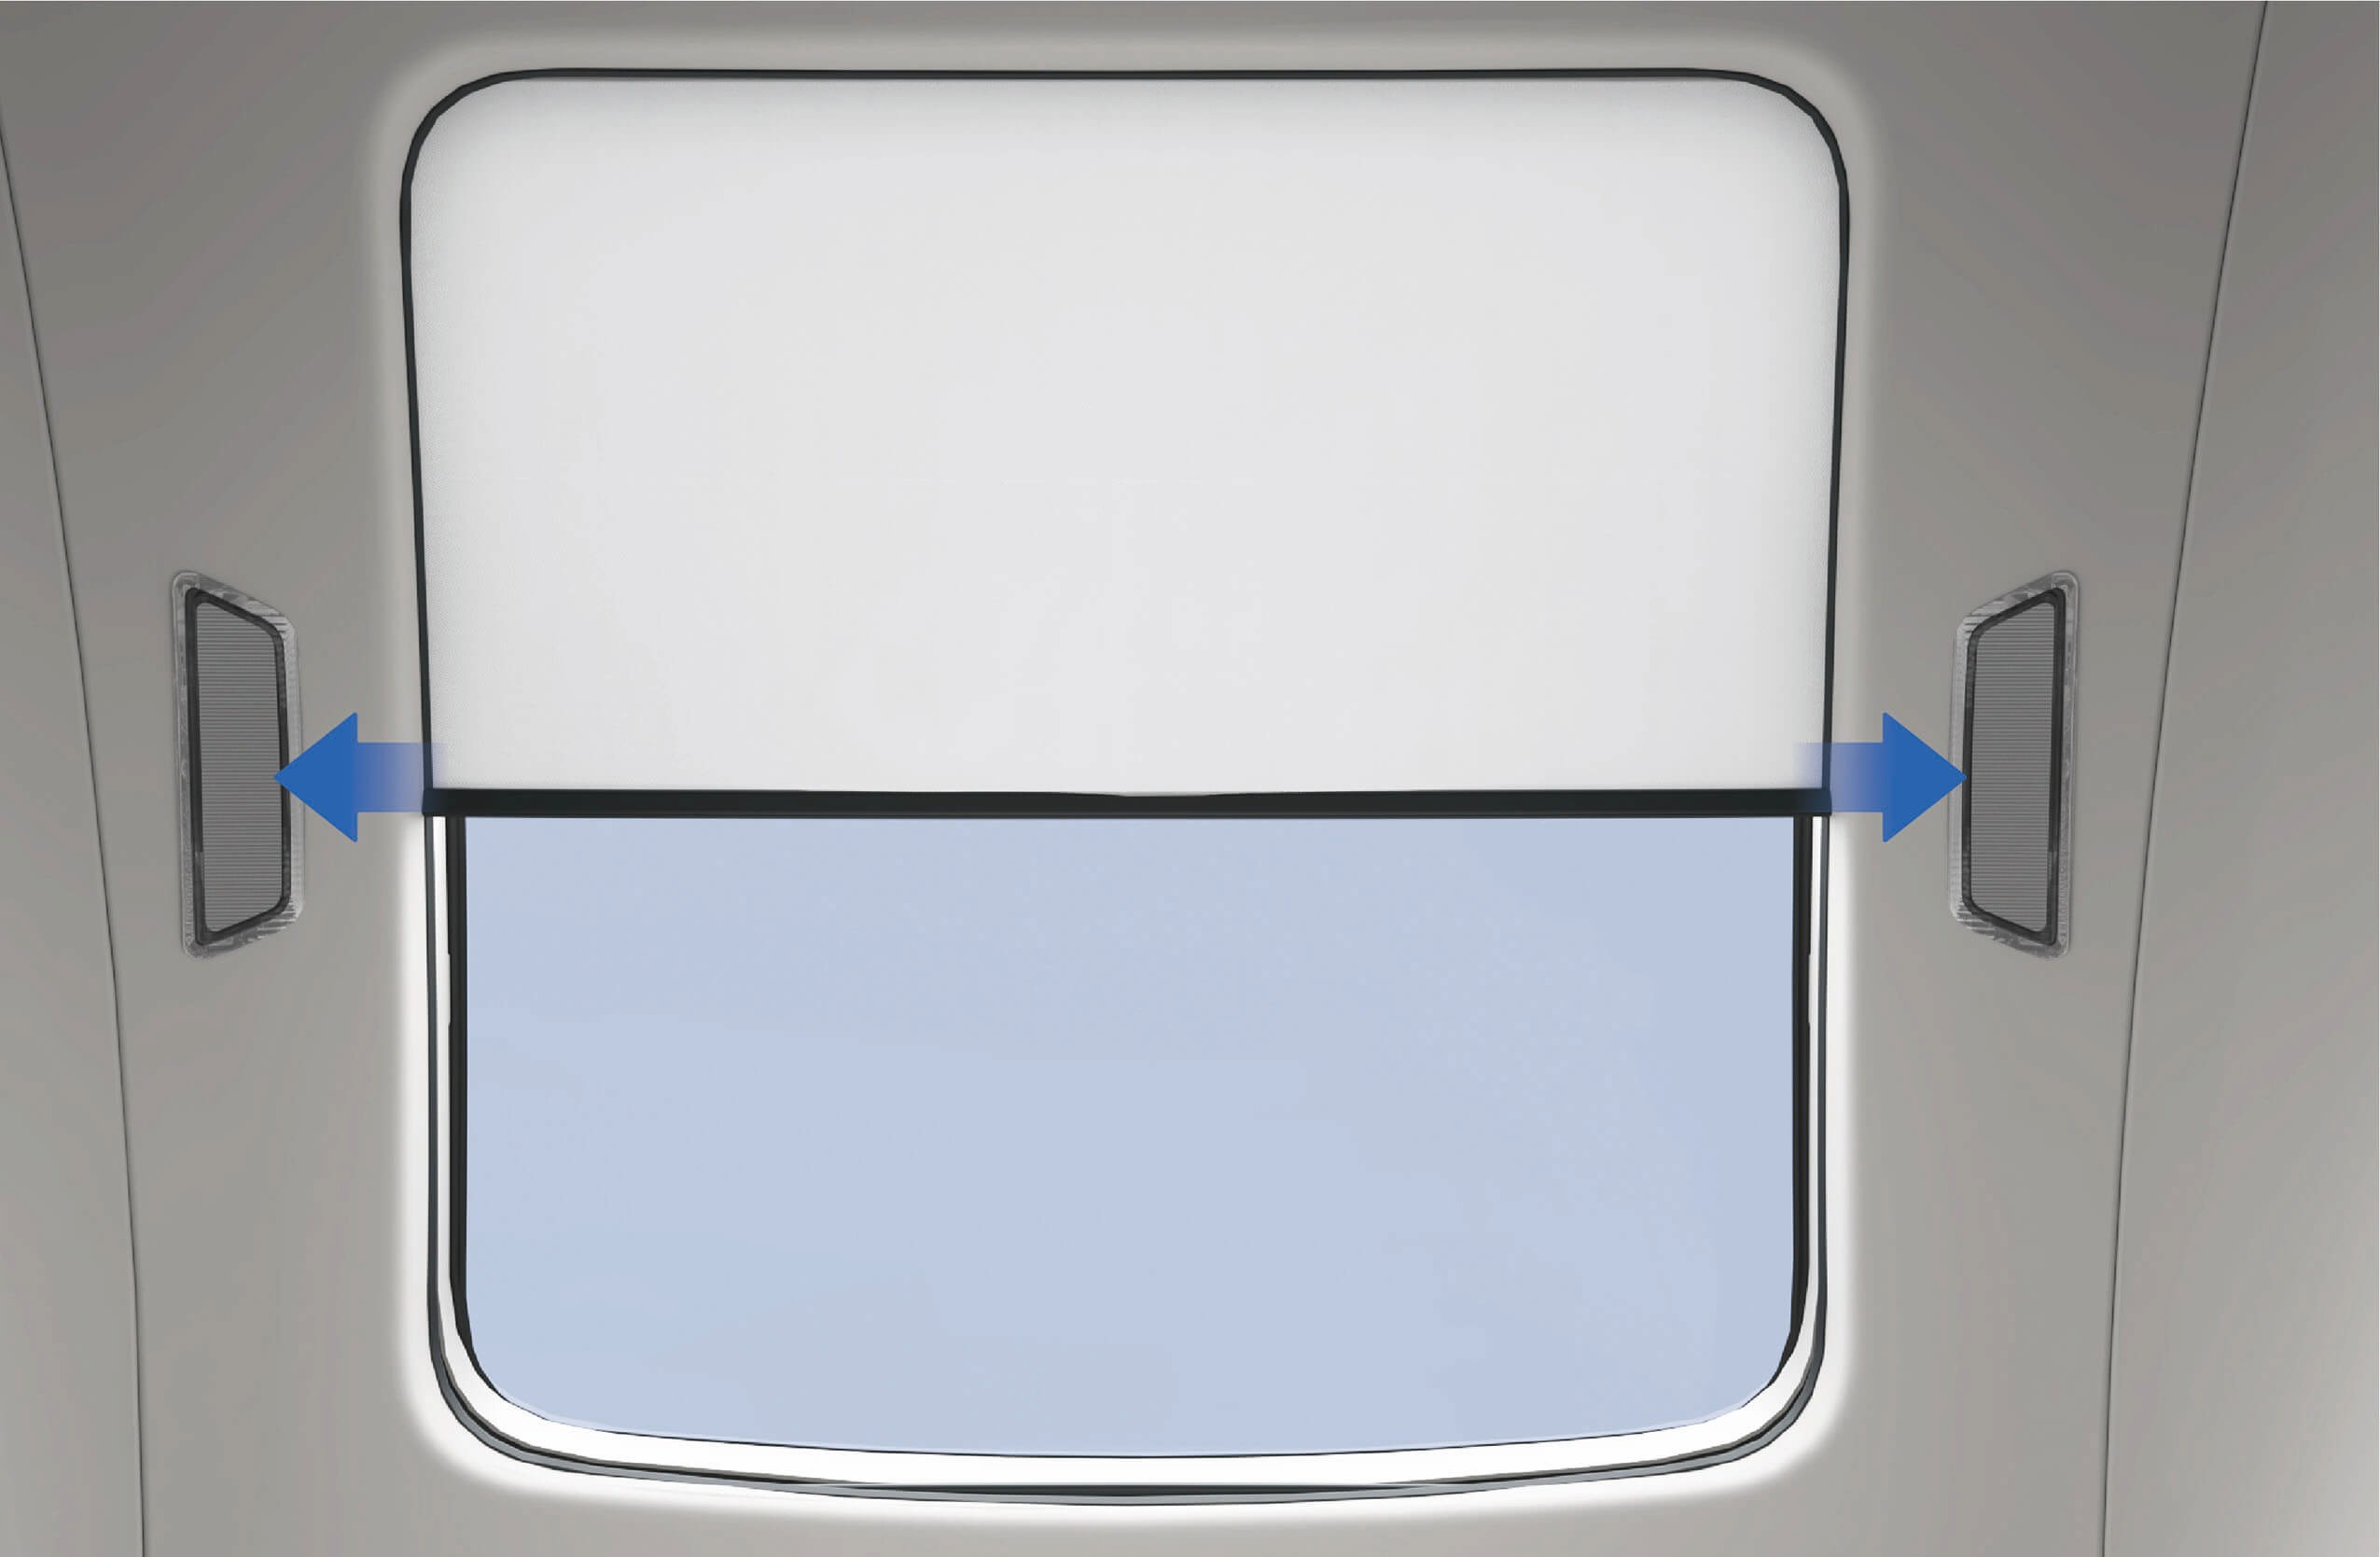
Kjøretøyet er utstyrt med et panoramatak og en elektrisk solskjerm. Panoramataket er fast og kan ikke betjenes. Det slipper naturlig lys inn i førerhuset og gir utsyn. Solskjermen kan åpnes eller lukkes for å blokkere sollys ved behov.
3.E.1Bruksanvisning
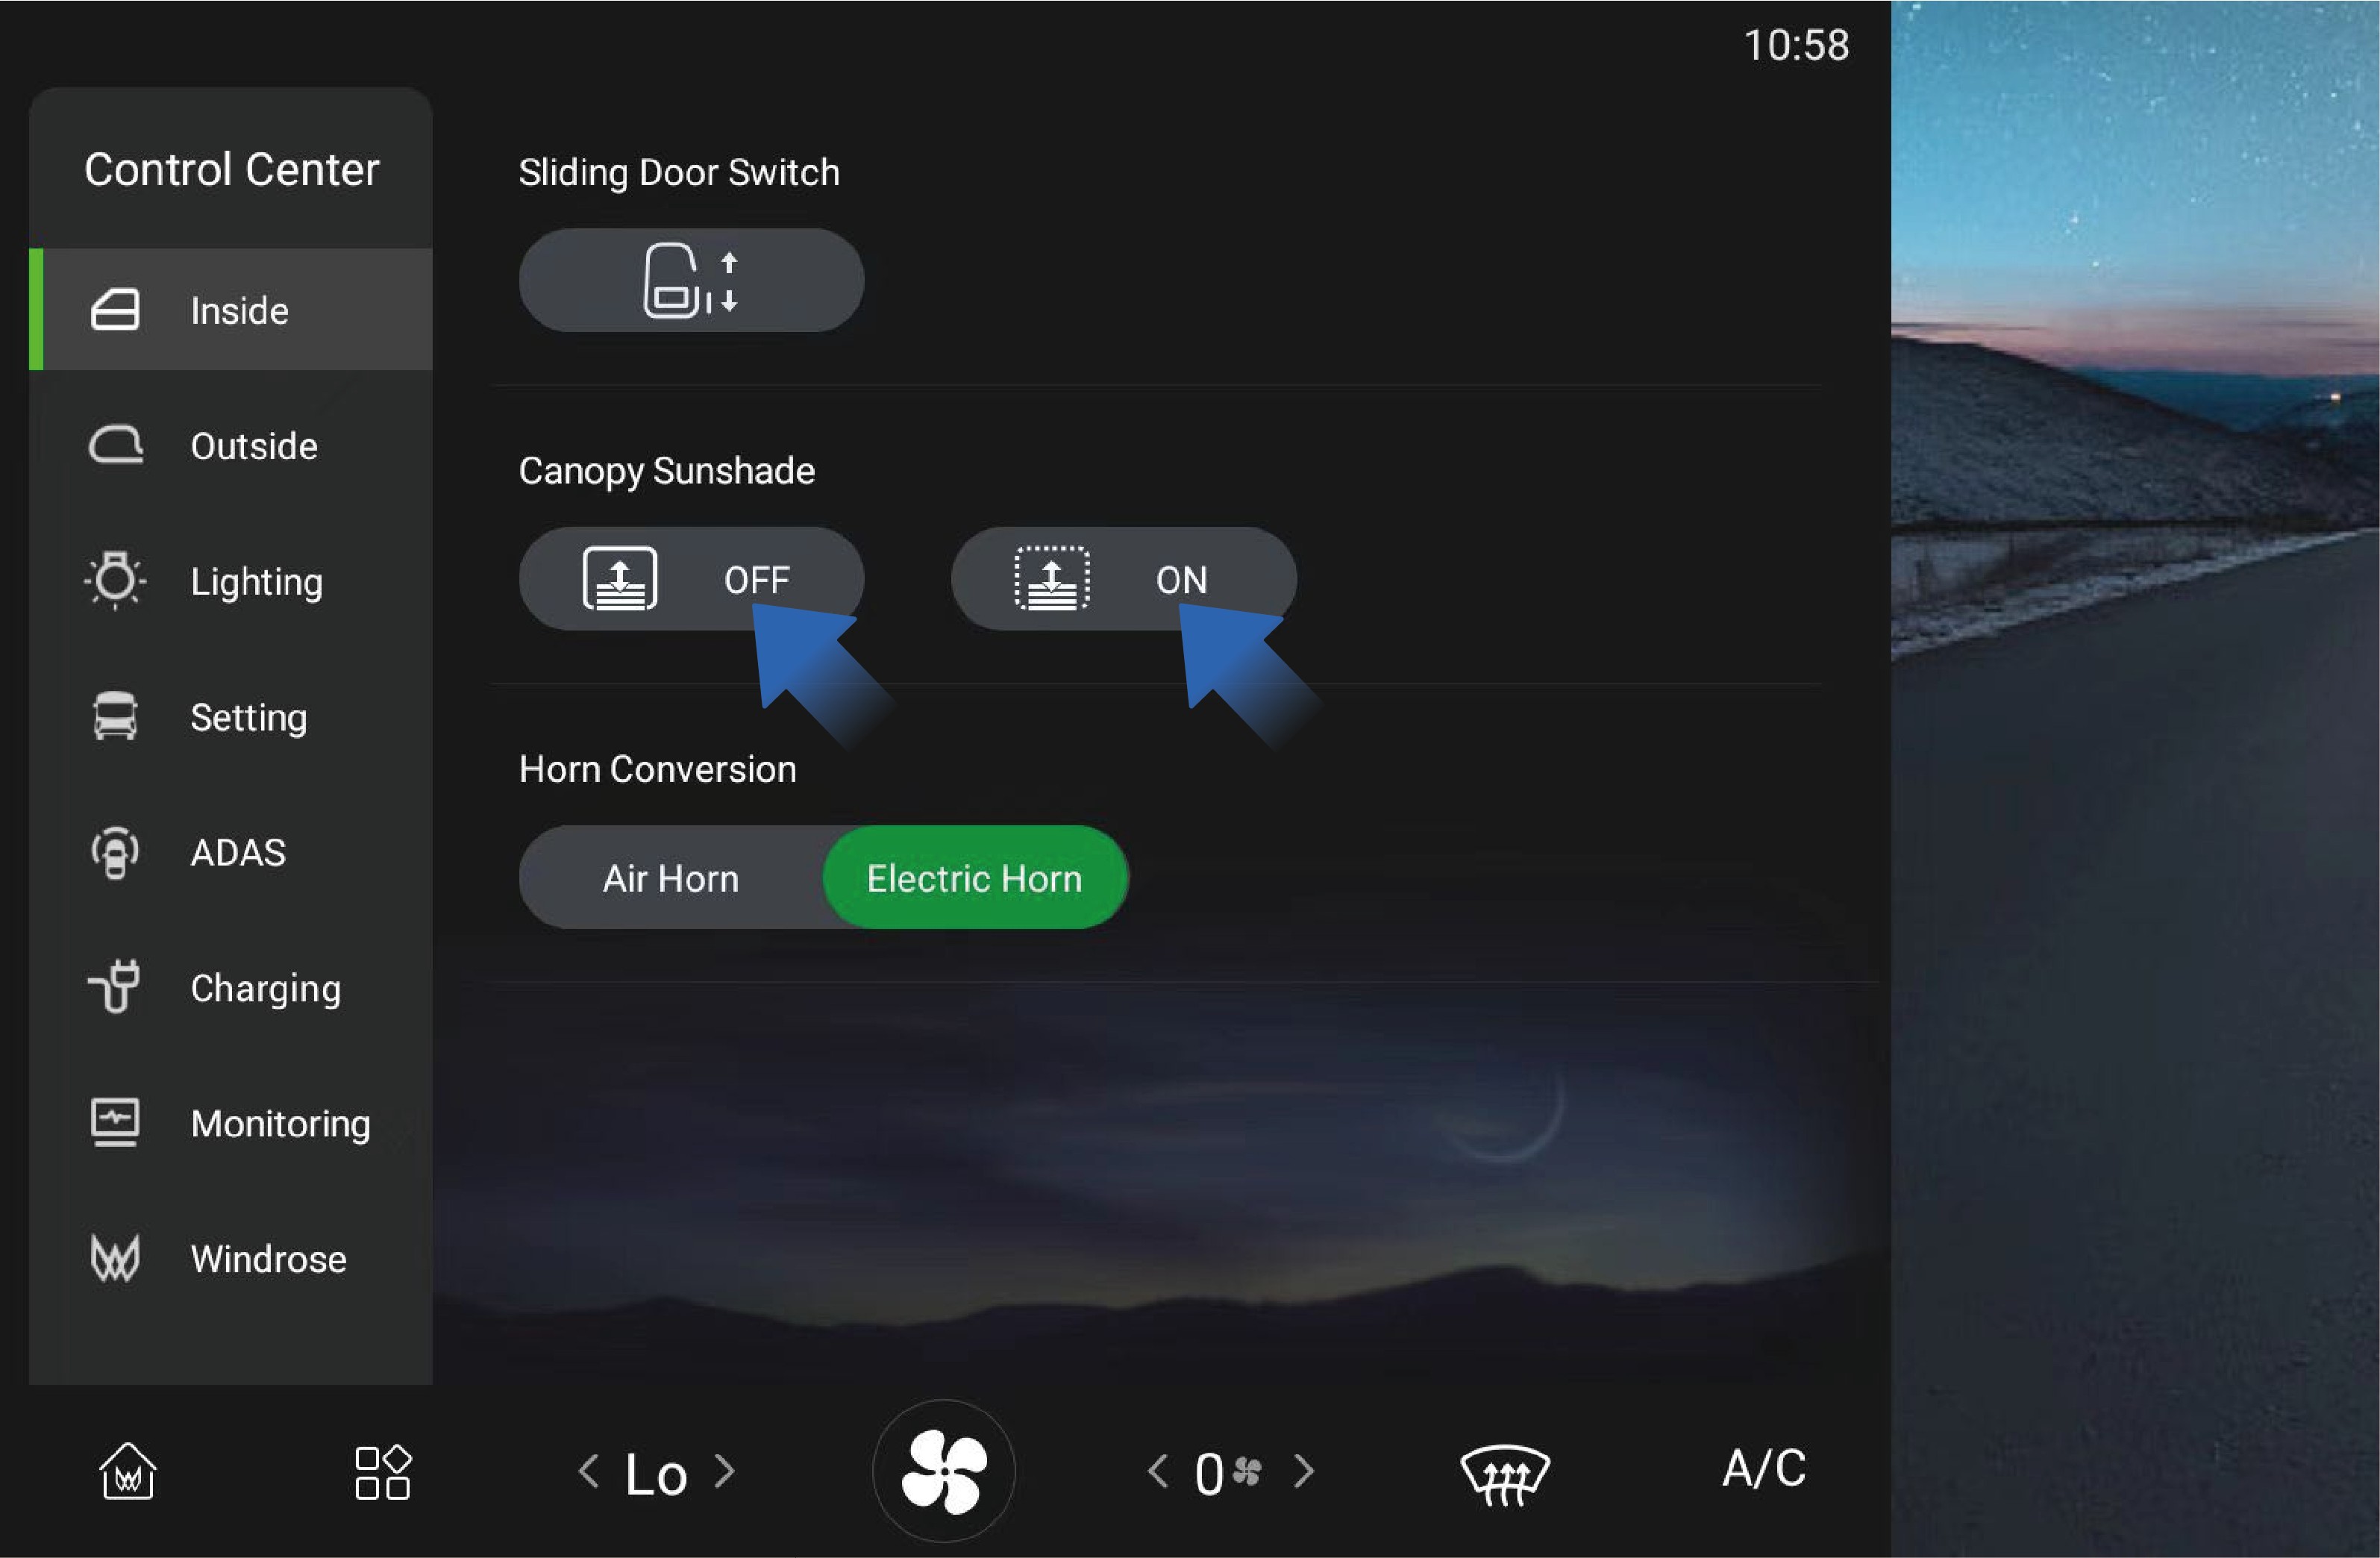
Panoramatakets solskjerm kan betjenes via kjøretøyets informasjonsskjerm.
Velg «Canopy Sunshade» i grensesnittet «Inside» på kjøretøyets informasjonsskjerm.
Trykk og hold ON/OFF-knappen for å åpne eller lukke solskjermen. Slipp knappen for å stoppe bevegelsen.
Trykk kort og slipp ON/OFF-knappen for å aktivere automatisk betjening, som åpner eller lukker solskjermen helt.
Forholdsregler
Merknad
Ikke trekk takvinduets solskjerm manuelt, for å unngå skade.
Ikke skrap takvinduets glass, takvinduets solskjerm eller limlistene rundt glasset med skarpe gjenstander.
3.FElektrisk solskjerm for frontrute
↑ Til toppenTilgang til kjøretøyet
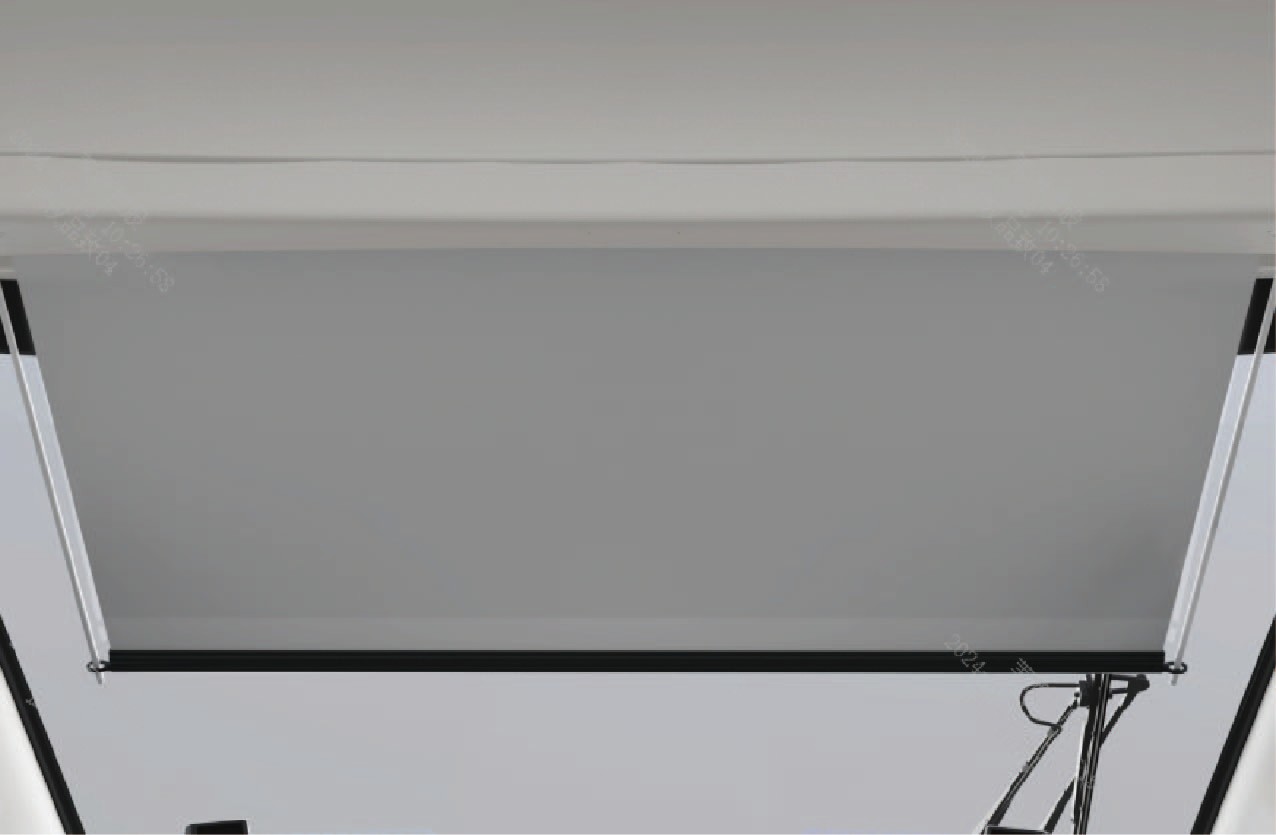
Ved kjøring mot sterkt sollys kan den elektriske solskjermen for frontruten brukes til å redusere blending og bedre kjørekomforten.
3.F.1Bruksanvisning
Den elektriske solskjermen for frontruten betjenes med bryterne på venstre side av instrumentpanelet.
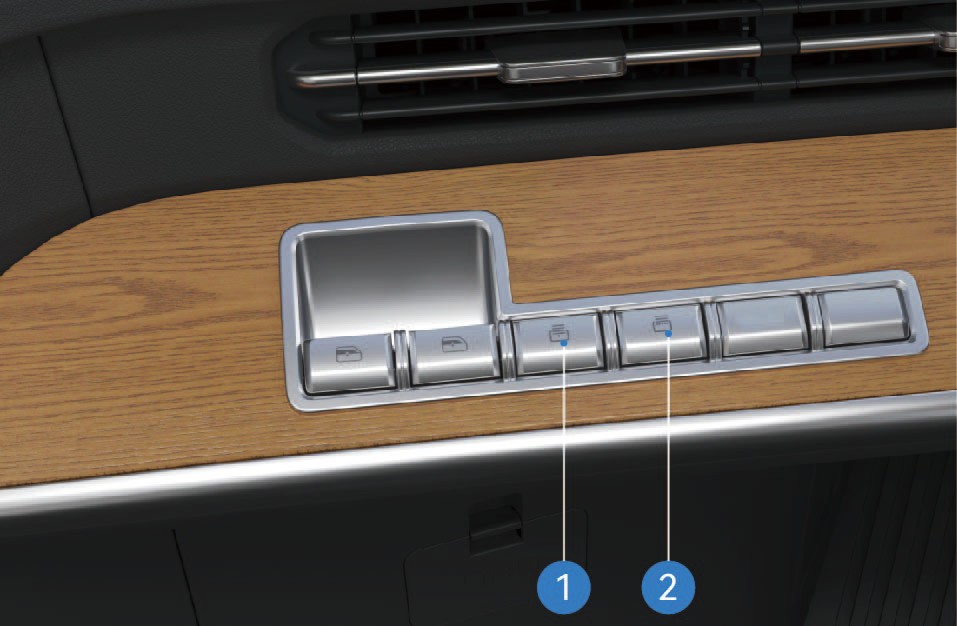
Bryter for å senke solskjerm
Trykk og hold denne bryteren for å senke solskjermen for frontruten. Slipp bryteren for å stoppe bevegelsen.
Bryter for å heve solskjerm
Trykk og hold denne bryteren for å heve solskjermen for frontruten. Slipp bryteren for å stoppe bevegelsen.
Forholdsregler
↑ Til toppenMerknadIkke trekk den elektriske solskjermen for frontruten manuelt, for å unngå skade.
MerkVed bruk av solskjermen, sørg for at den ikke hindrer god sikt.
3.GInnvendig køye
↑ Til toppenTilgang til kjøretøyet
I kjøretøyet finnes det køyer der føreren og passasjerene kan hvile.
3.G.1Bruksanvisning
Den øvre høyre puten på køyen kan vippes manuelt og felles mot venstre for å gi plass til passasjersetet foran. Hvis det er montert en høyderegulerbar køye på høyre side av kjøretøyet, kan den øvre puten på høyre køye heves manuelt og festes slik at den kan brukes som nakkestøtte for køyen i flere trinn. For å legge køyen ned kan du heve den øvre puten på høyre køye til høyeste stilling og deretter slippe.
Beskyttelsesnett for køye
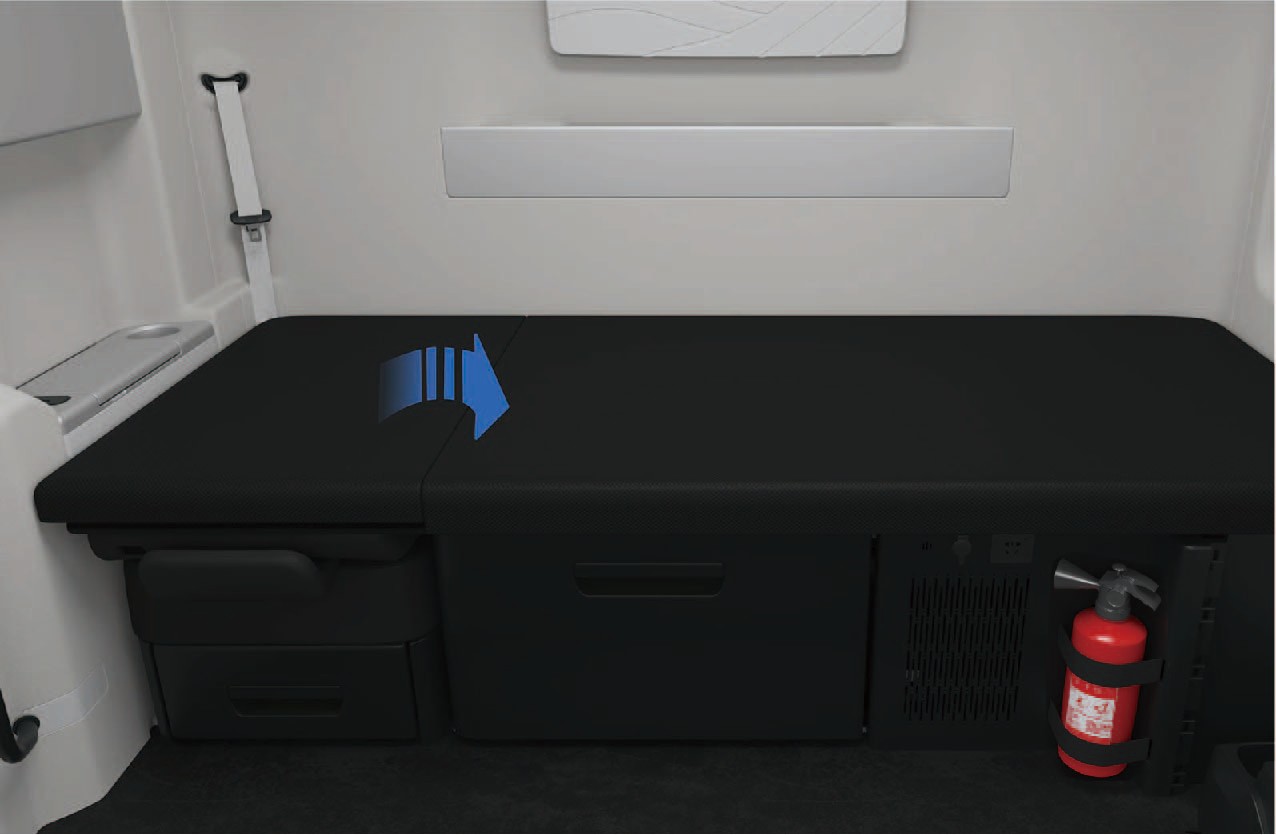
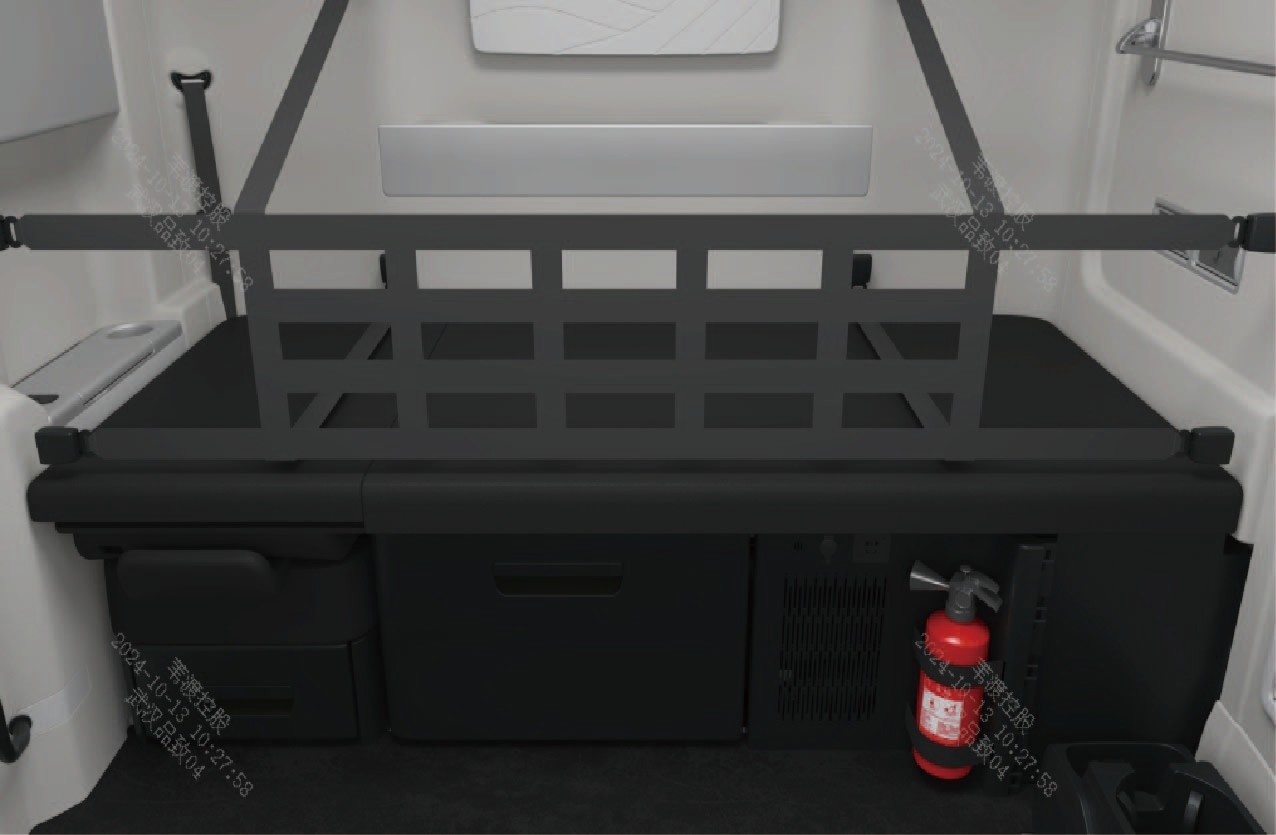
Kjøretøyet har et beskyttelsesnett for køyen. Før køyen tas i bruk, brett ut beskyttelsesnettet som vist på figuren, og sett deretter de 8 tungene i venstre, høyre og bakre vegg av køyen inn i de 8 spennene i henholdsvis venstre, høyre og bakre ende av nettet for å låse beskyttelsesnettet på plass.
Merknad
Pass på å ikke klemme fingrene når passasjersetet felles eller den øvre køyeputen løftes.
Monter beskyttelsesnettet riktig før køyen tas i bruk. Hvis beskyttelsesnettet ikke brukes, er det fare for at personer faller ut av køyen, noe som øker sannsynligheten for personskade og dødsfall ved ulykker.
3.HBakspeil
↑ Til toppenTilgang til kjøretøyet
Kjøretøyet er utstyrt med fysiske bakspeil som gir føreren god sikt under kjøring.
Du kan justere de fysiske bakspeilene ved å velge «Control Center» og bytte til grensesnittet «Outside» på kjøretøyets informasjonsskjerm i instrumentpanelet.
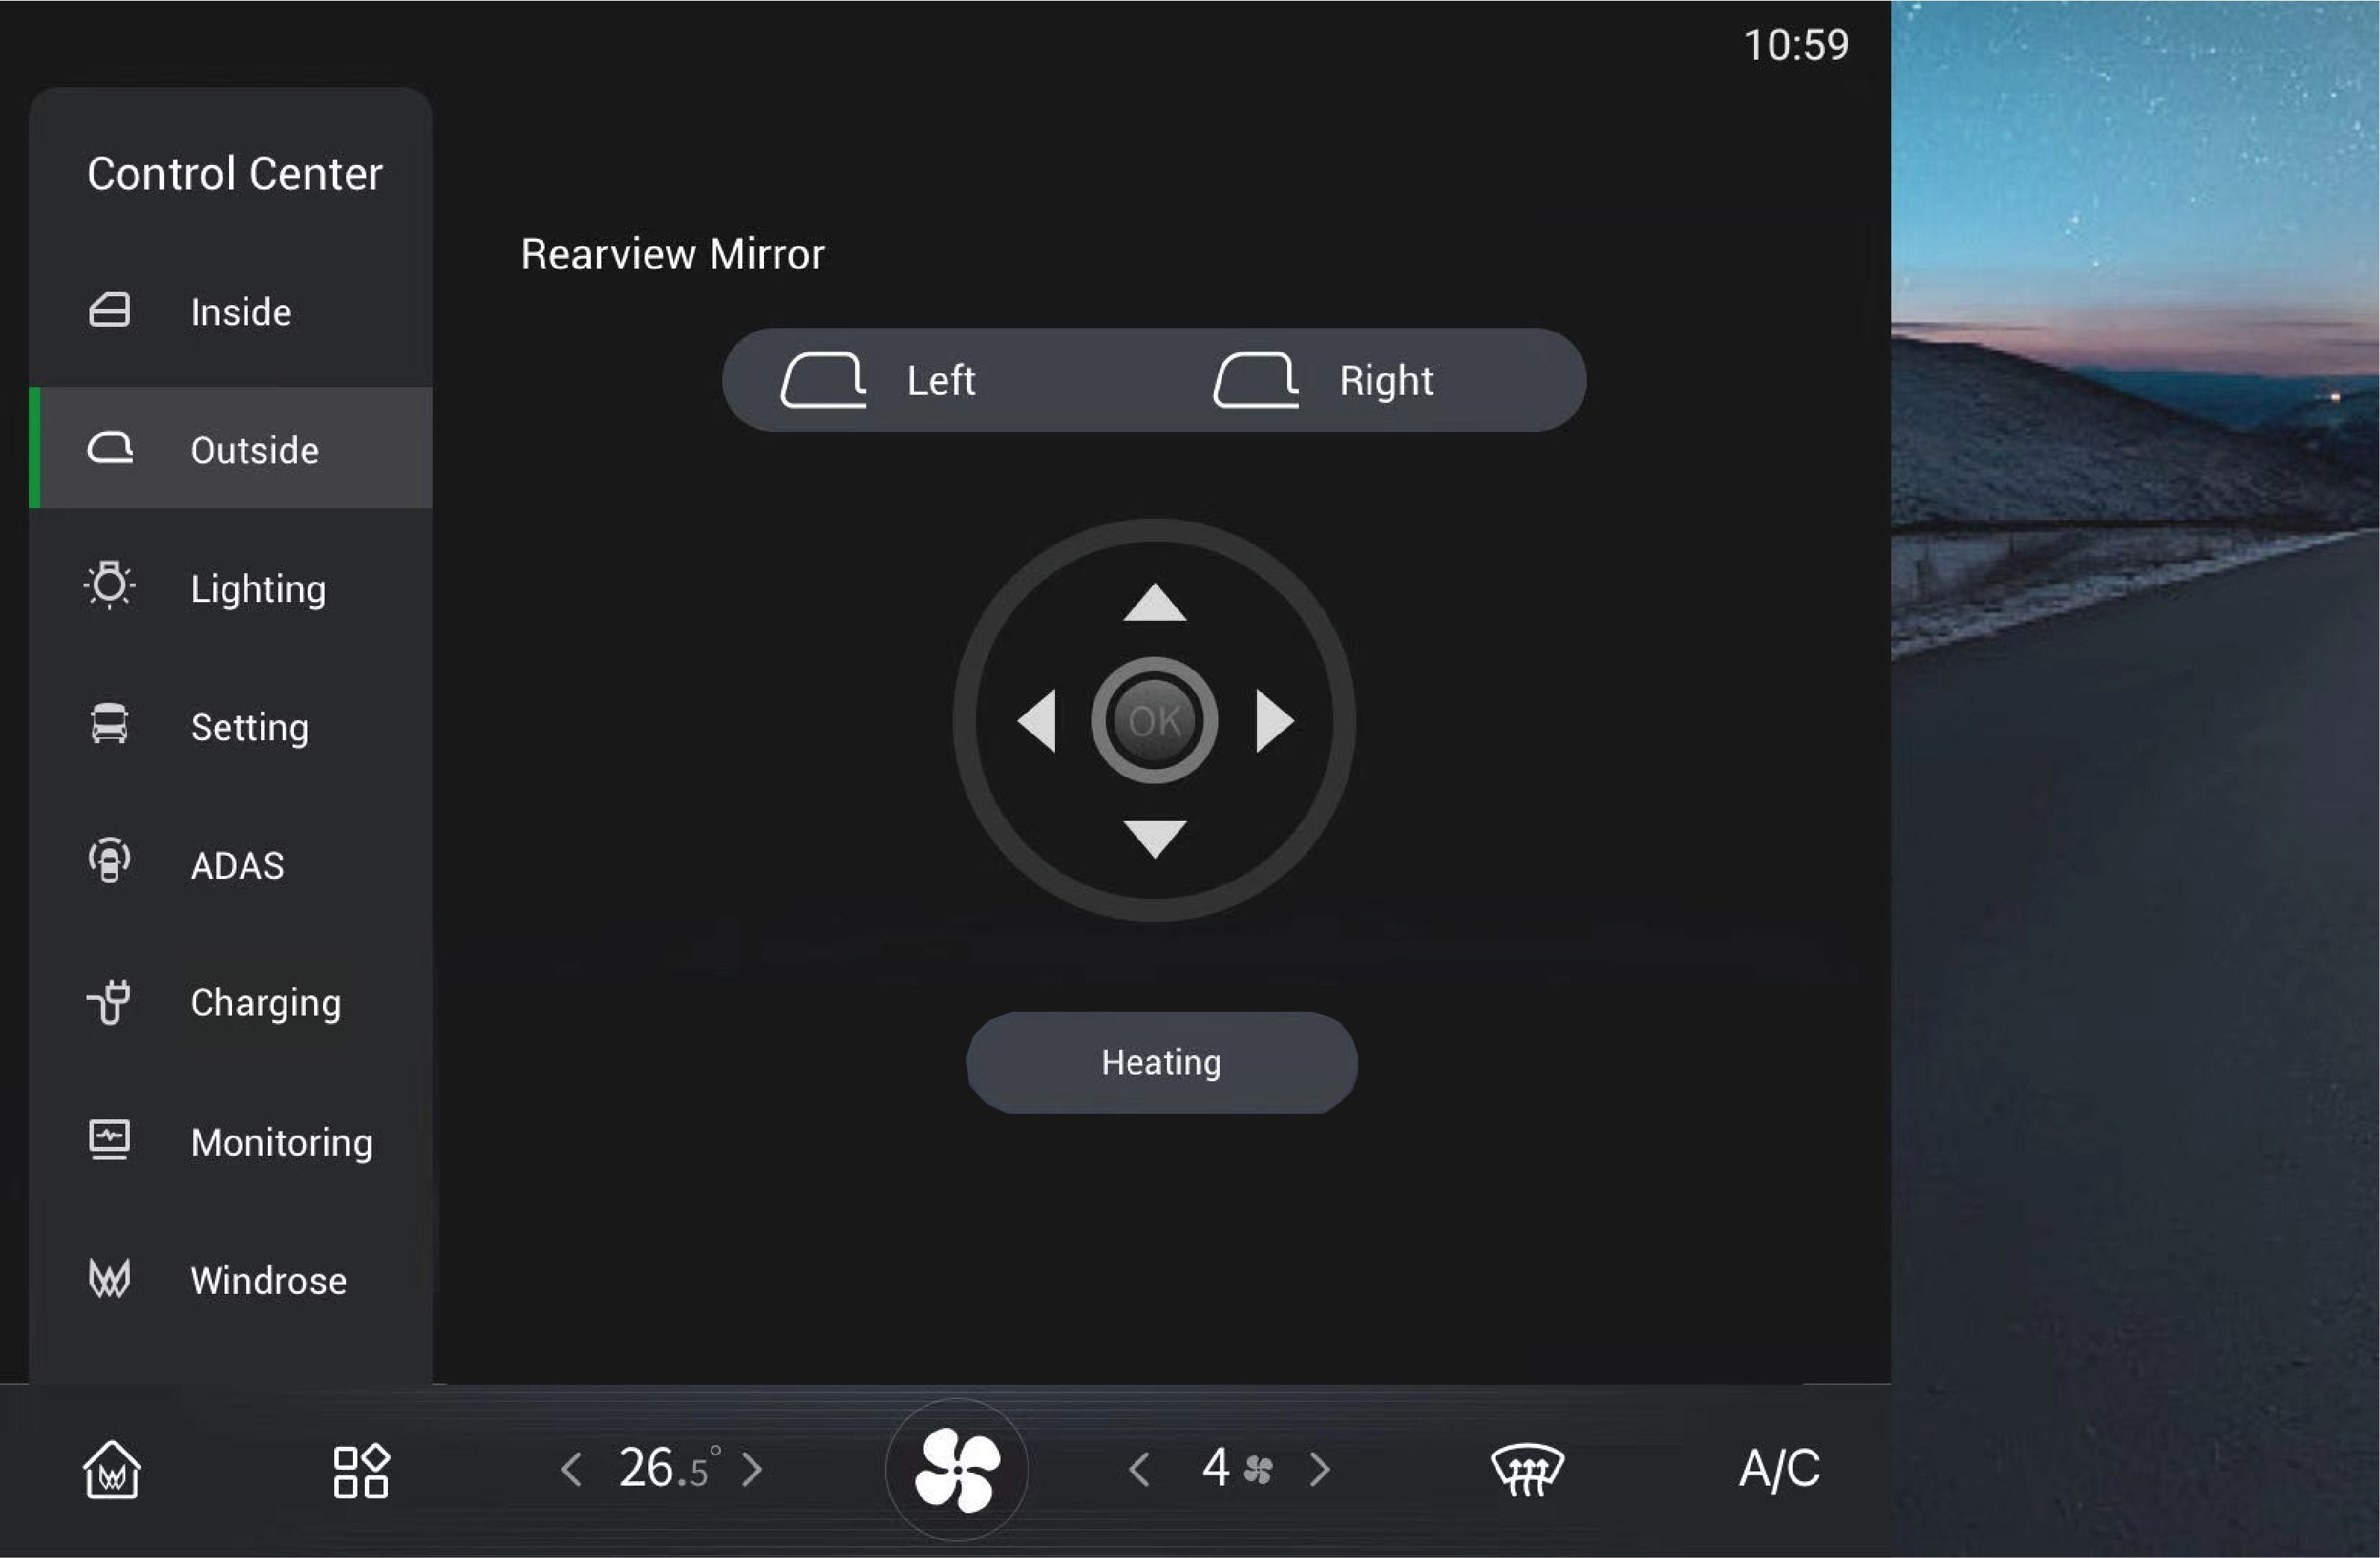
Justering venstre/høyre
Klikk for å velge og justere venstre/høyre fysiske bakspeil hver for seg.
Oppvarming av bakspeil
Klikk for å velge dette alternativet, så vil de fysiske bakspeilene
varmes opp for å fjerne is og dugg. Klikk igjen for å slå det av, ellers
slås det av automatisk når kjøretøyet slås av.
Advarsel
Sørg for å justere bakspeilene riktig før kjøring, da dette er strengt forbudt under kjøring. Manglende overholdelse av dette kravet kan føre til personskade eller død og materielle skader.
Ikke dekk til sensoren. Smuss, is og snø på kameraet kan svekke funksjonen og ytelsen. Hold alltid kameraet og området rundt rent for å unngå trafikkulykker.
3.IKoppholder
↑ Til toppenTilgang til kjøretøyet
Koppholdere er plassert på venstre og høyre side av instrumentpanelet hver for seg, samt på armlenet til passasjersetet foran, slik at du kan sette vannglass eller drikkebeholder i den aktuelle koppholderen.
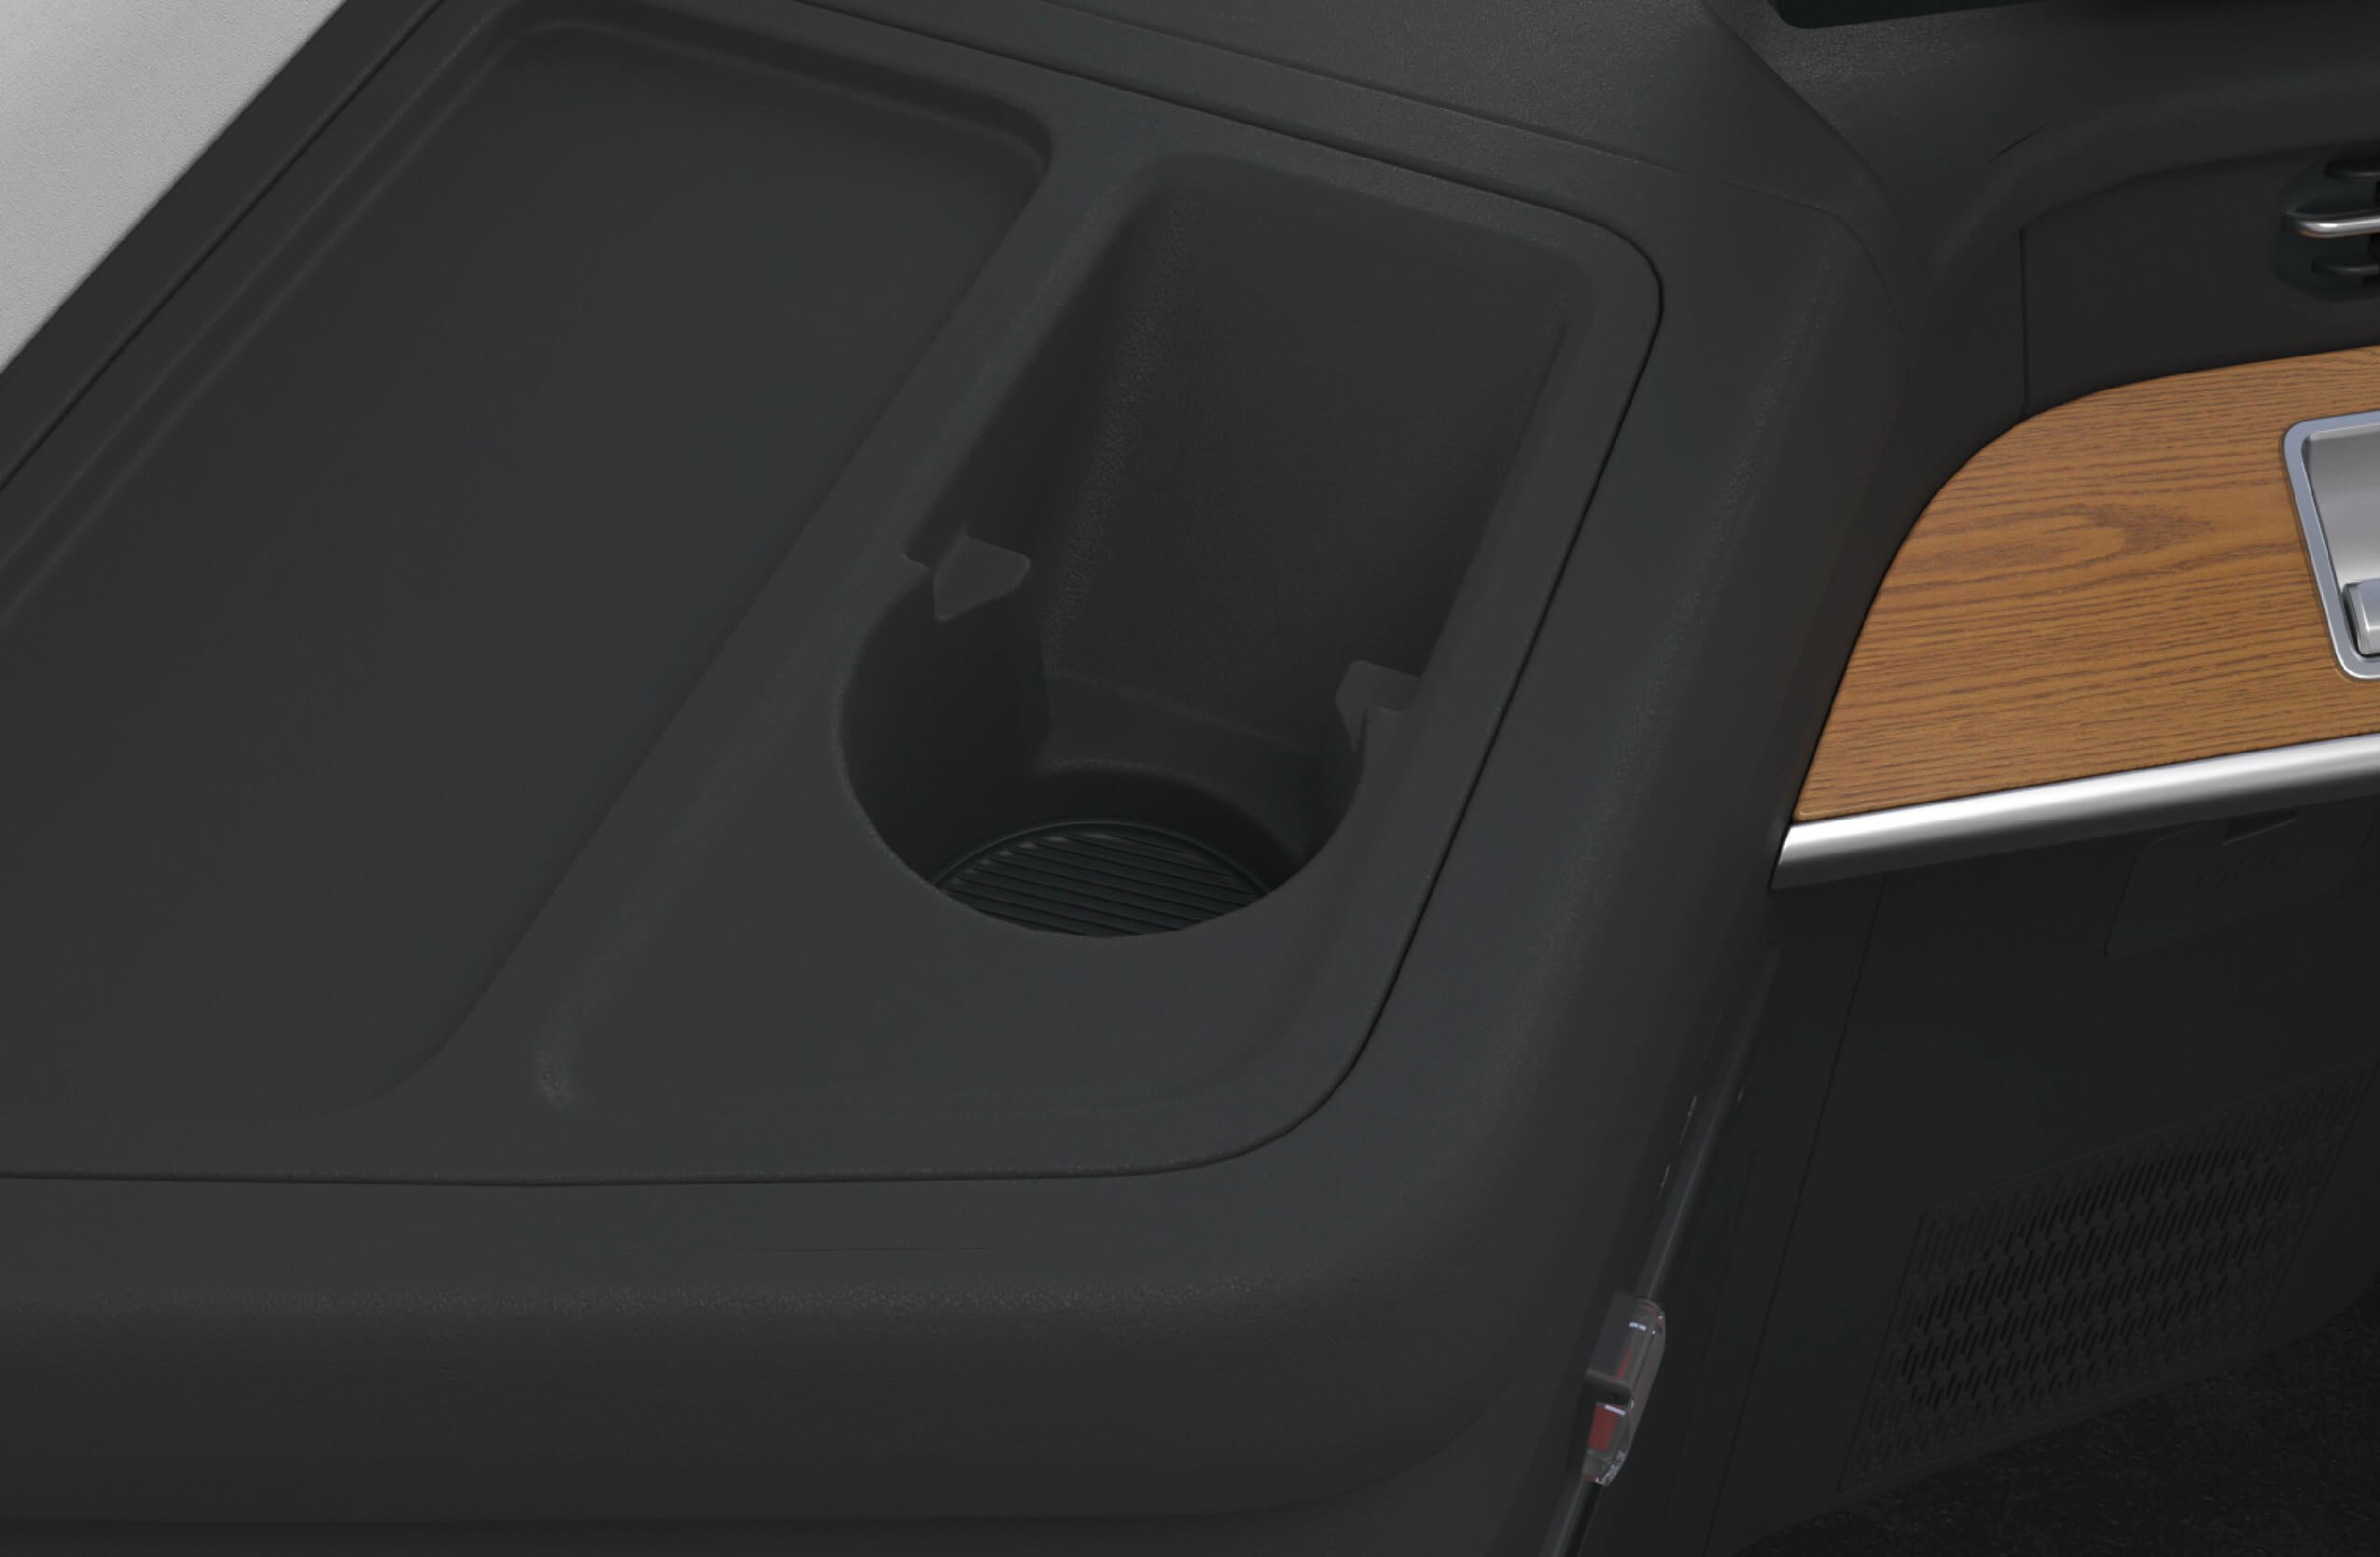
Koppholdere (venstre)
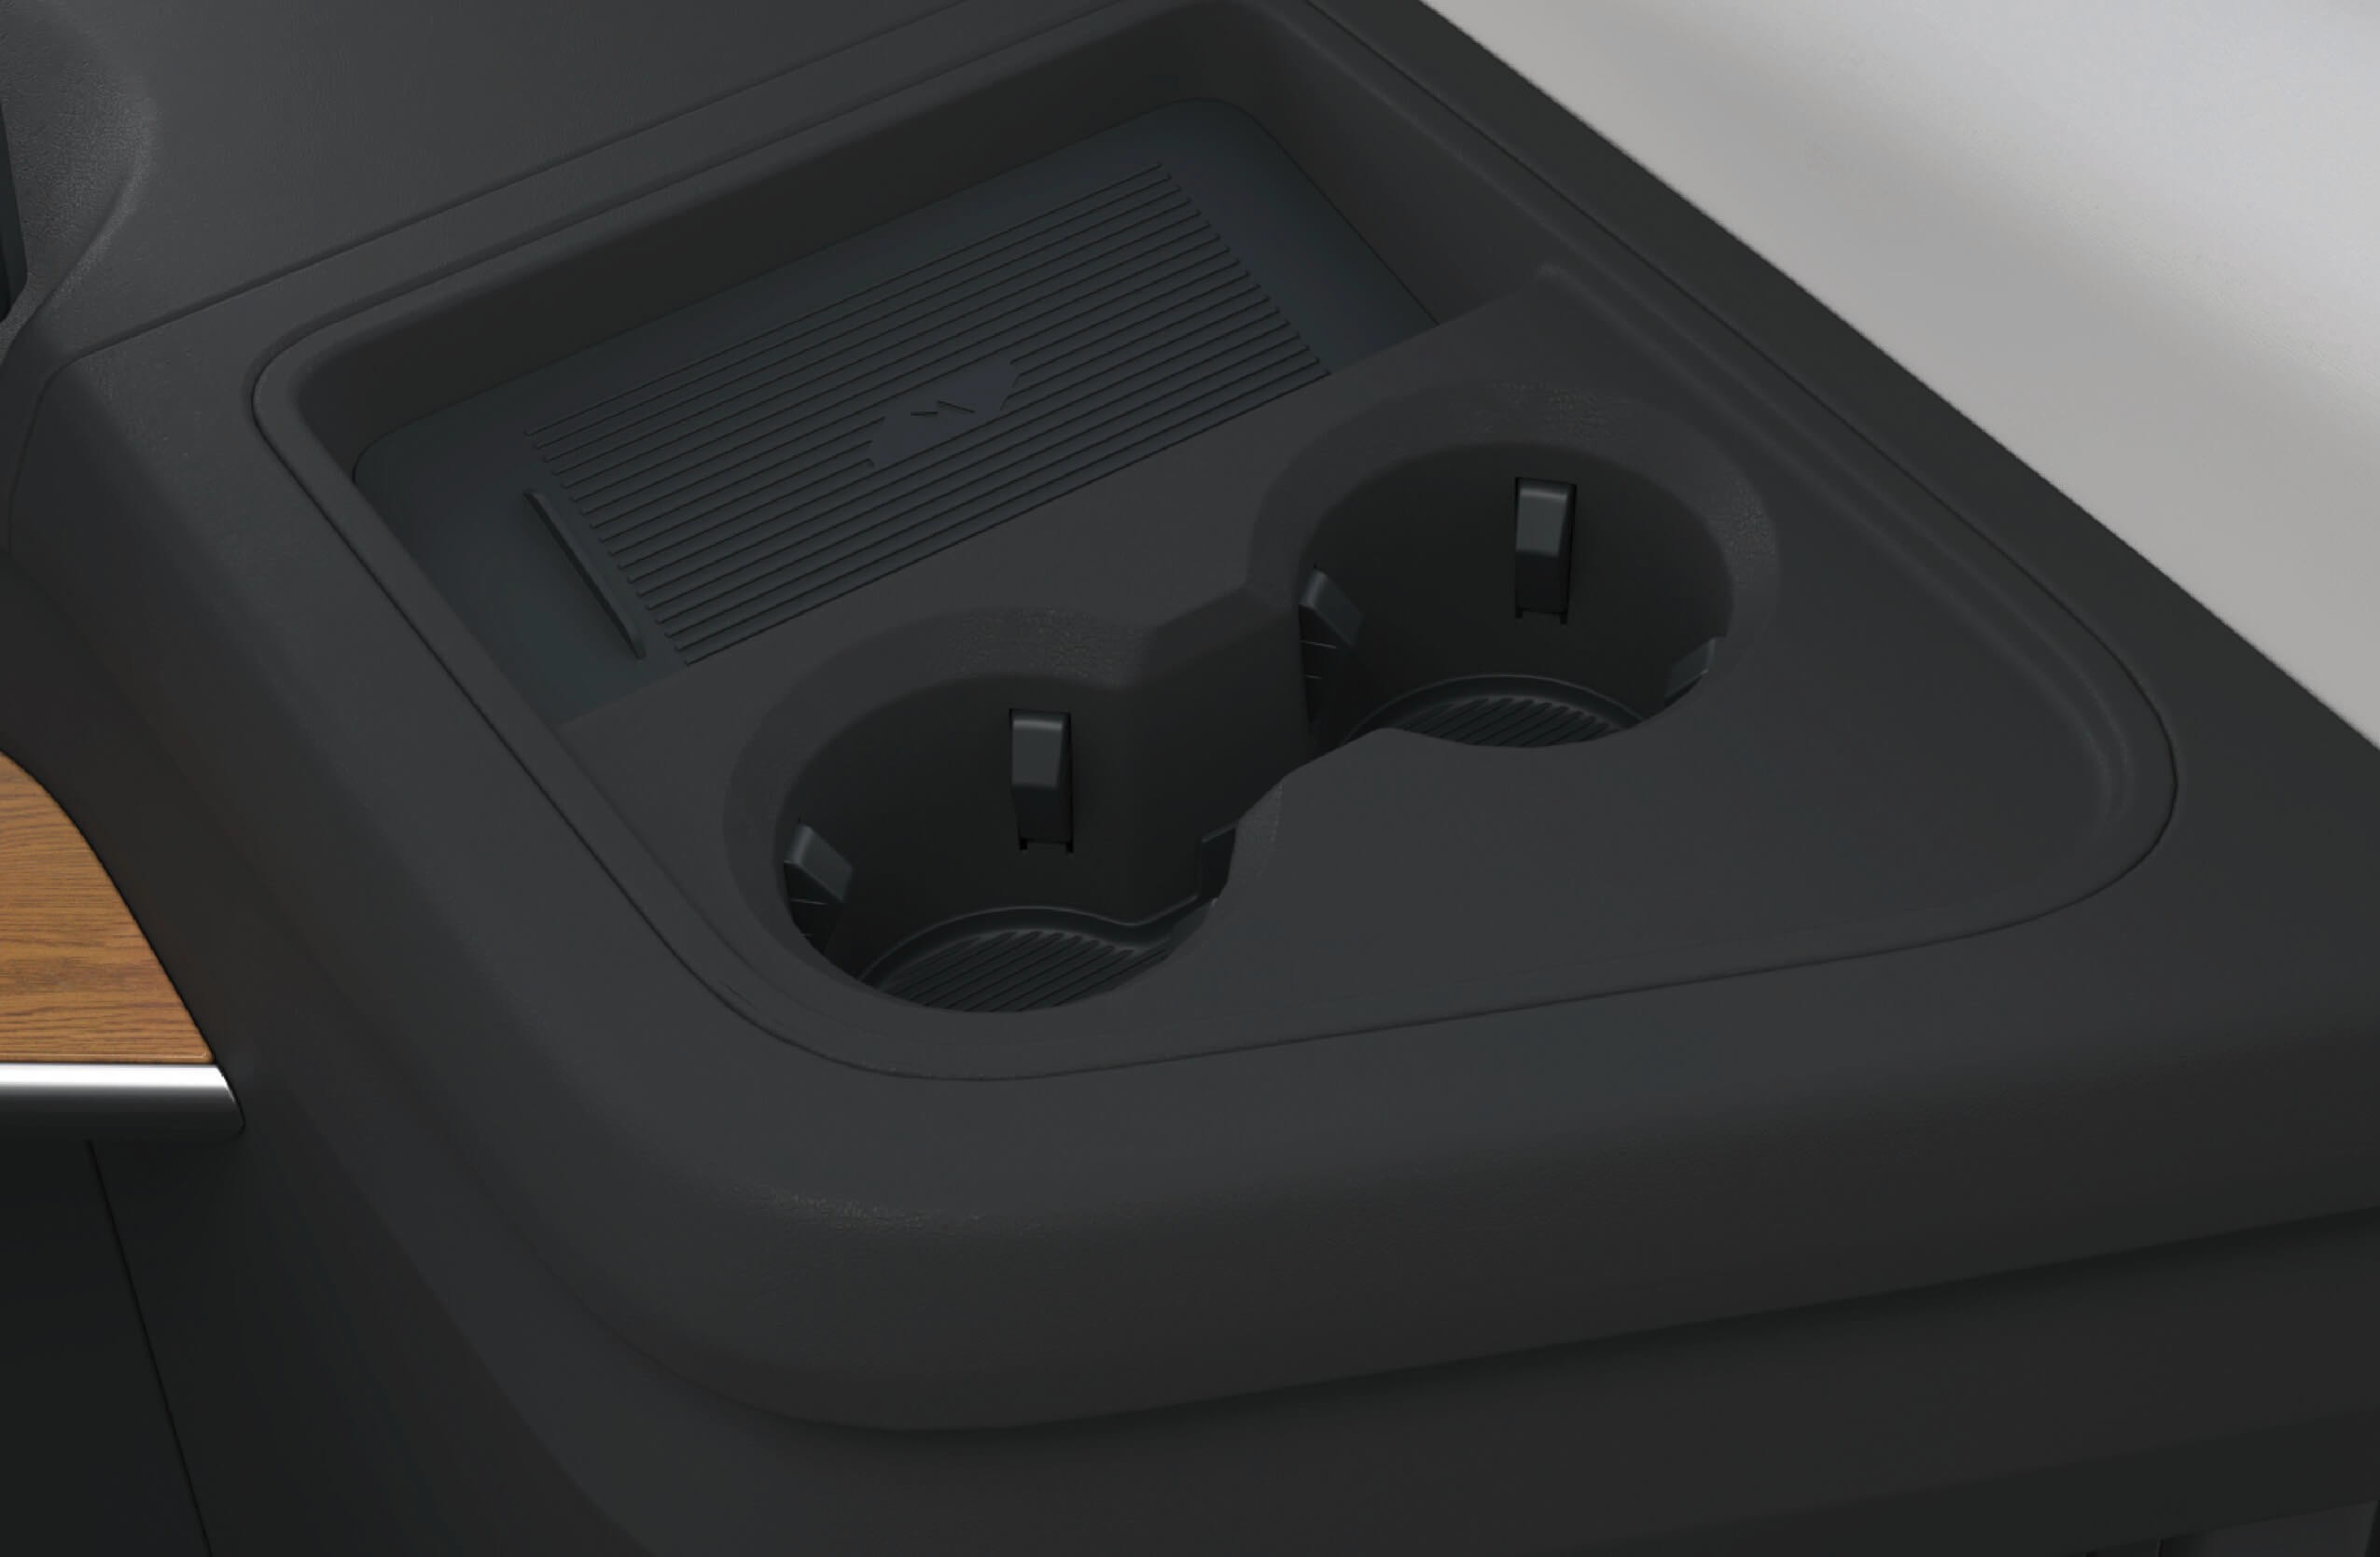
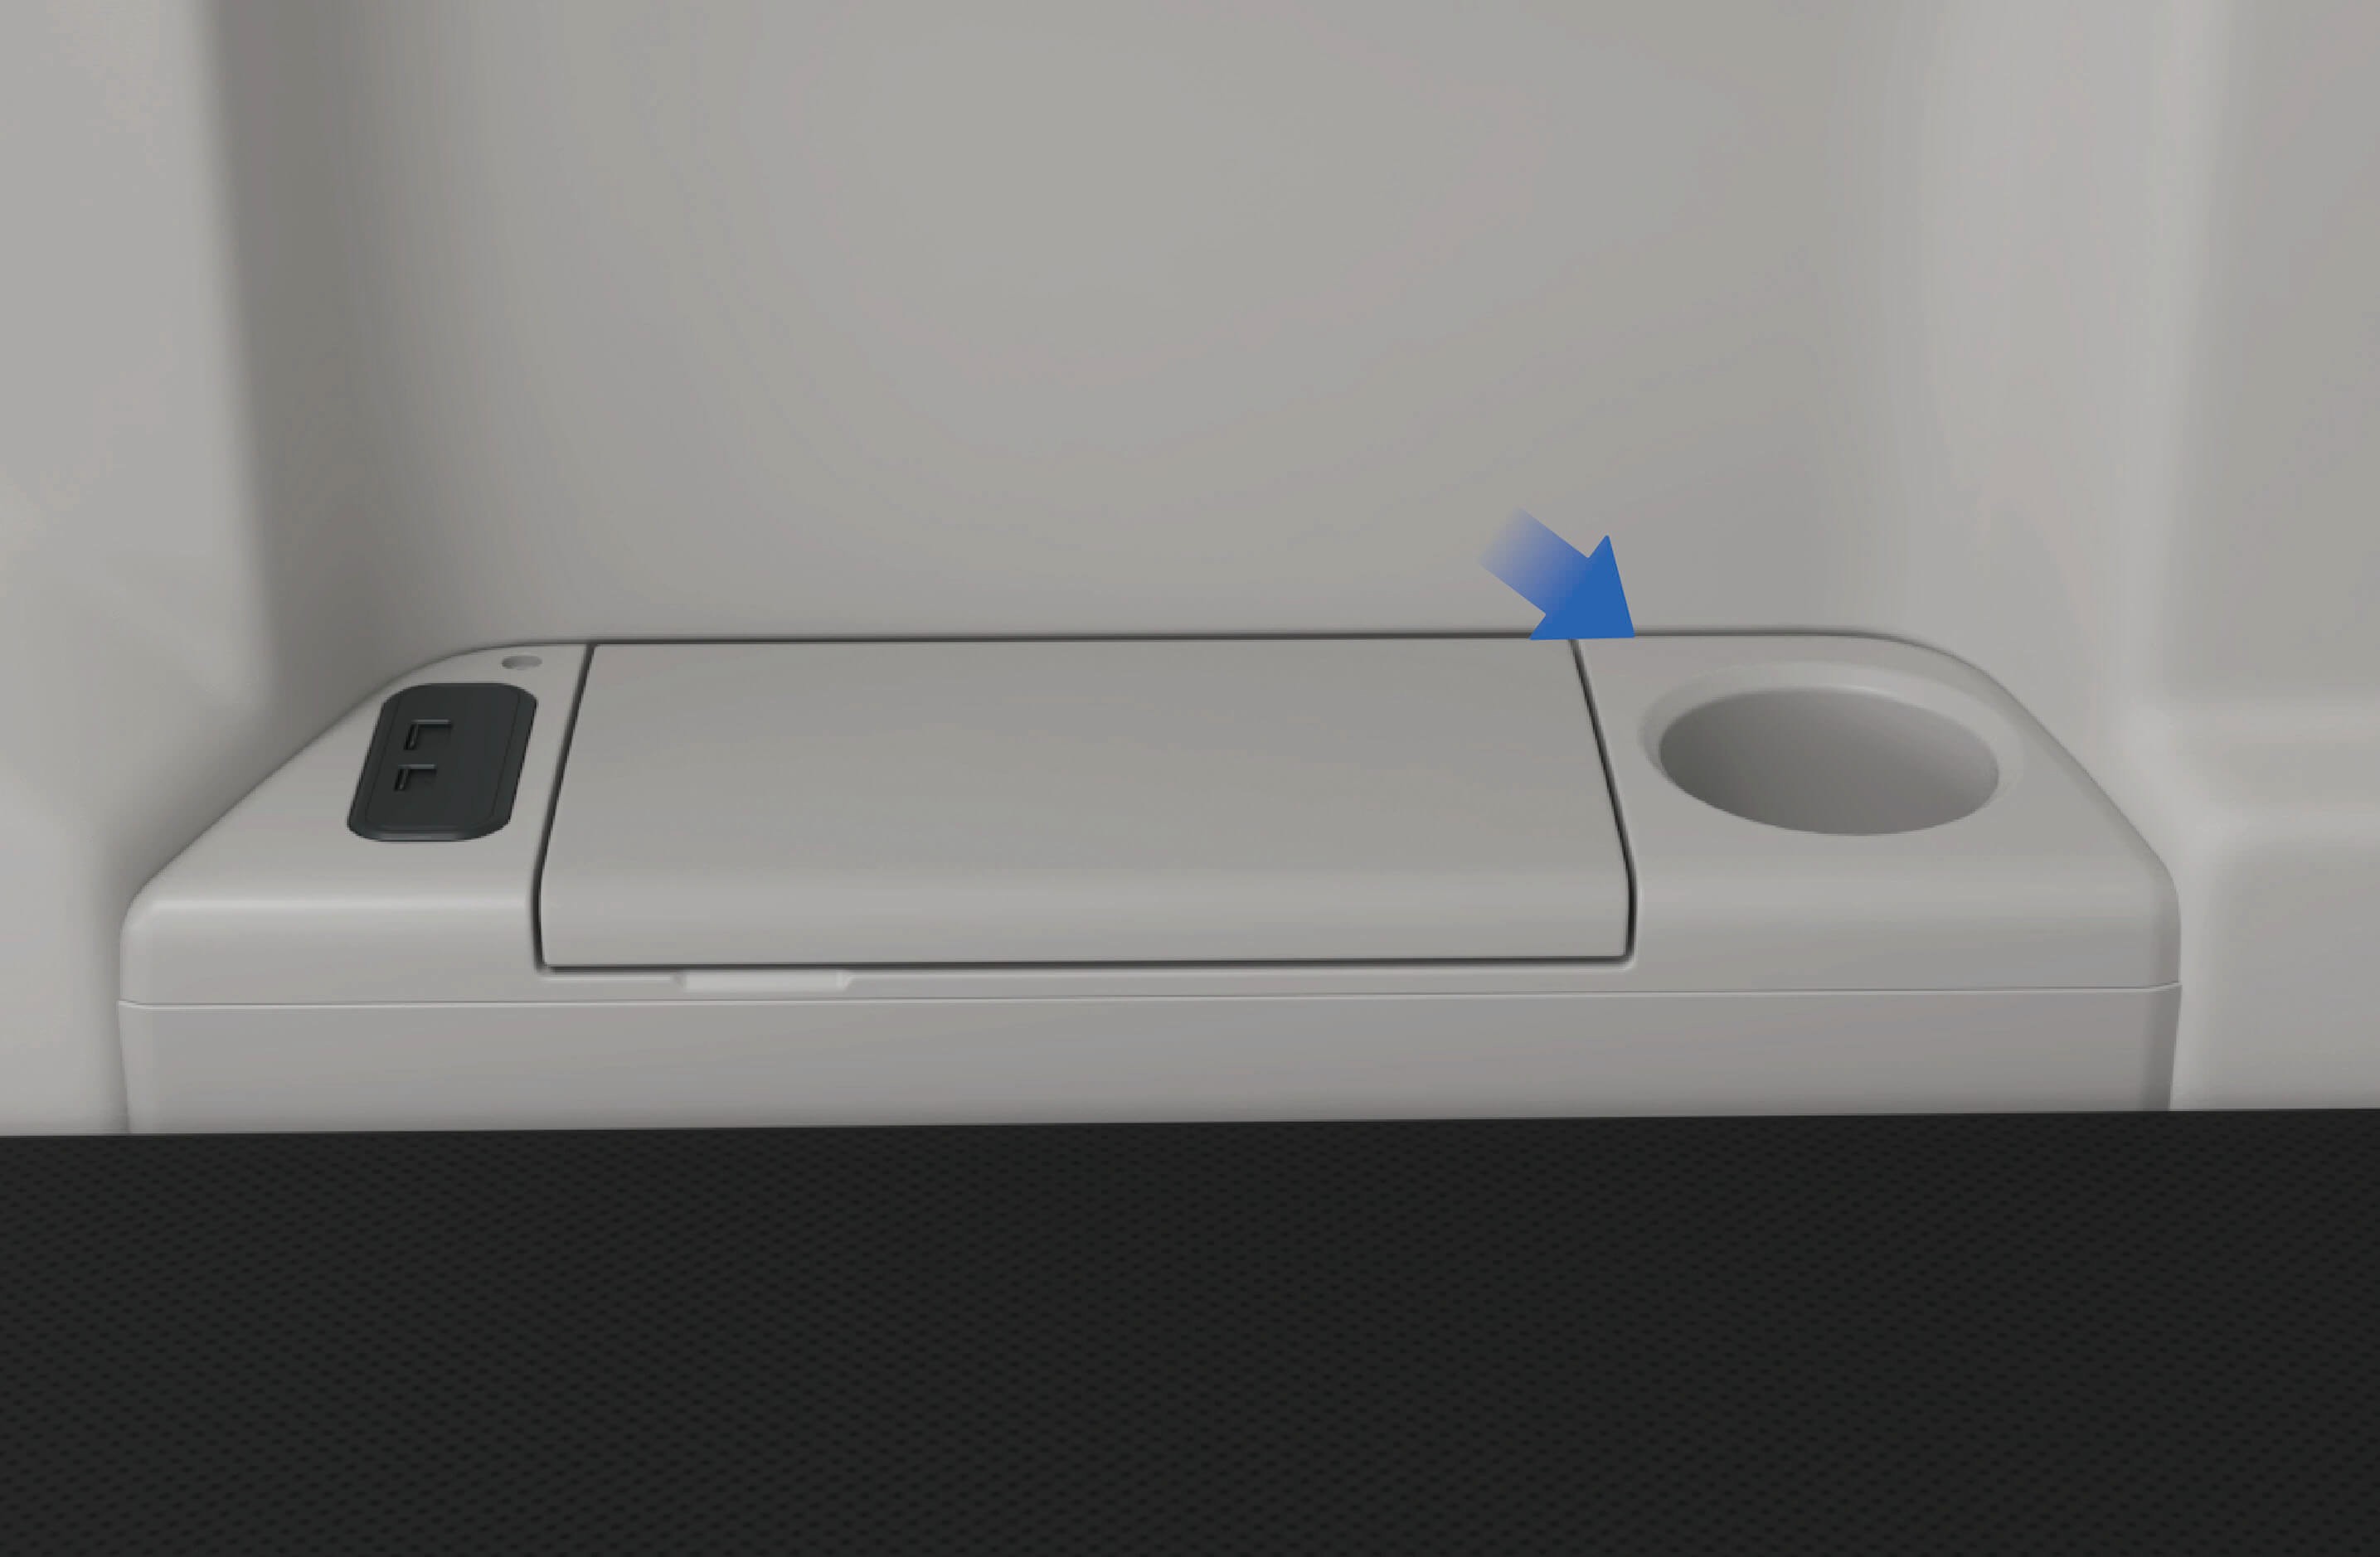
Koppholdere (høyre) • Koppholder på høyre side av passasjersetet foran
3.I.1Forholdsregler
AdvarselIkke sett varme drikker uten tett lokk i koppholderen. Ellers kan de søle når kjøretøyet rister, og forårsake personskade eller skade på kjøretøykomponenter.
Merk
Bare drikkebeholdere som kan lukkes og har riktig størrelse, kan settes i koppholderen for å hindre søl.
Ikke press en uegnet beholder ned i koppholderen, ellers kan beholderen eller kjøretøyet bli skadet.
3.JAskebeger
↑ Til toppenTilgang til kjøretøyet
Kjøretøyet har et askebeger for praktisk oppbevaring av sigarettsneiper og aske.
3.J.1
Bruksanvisning
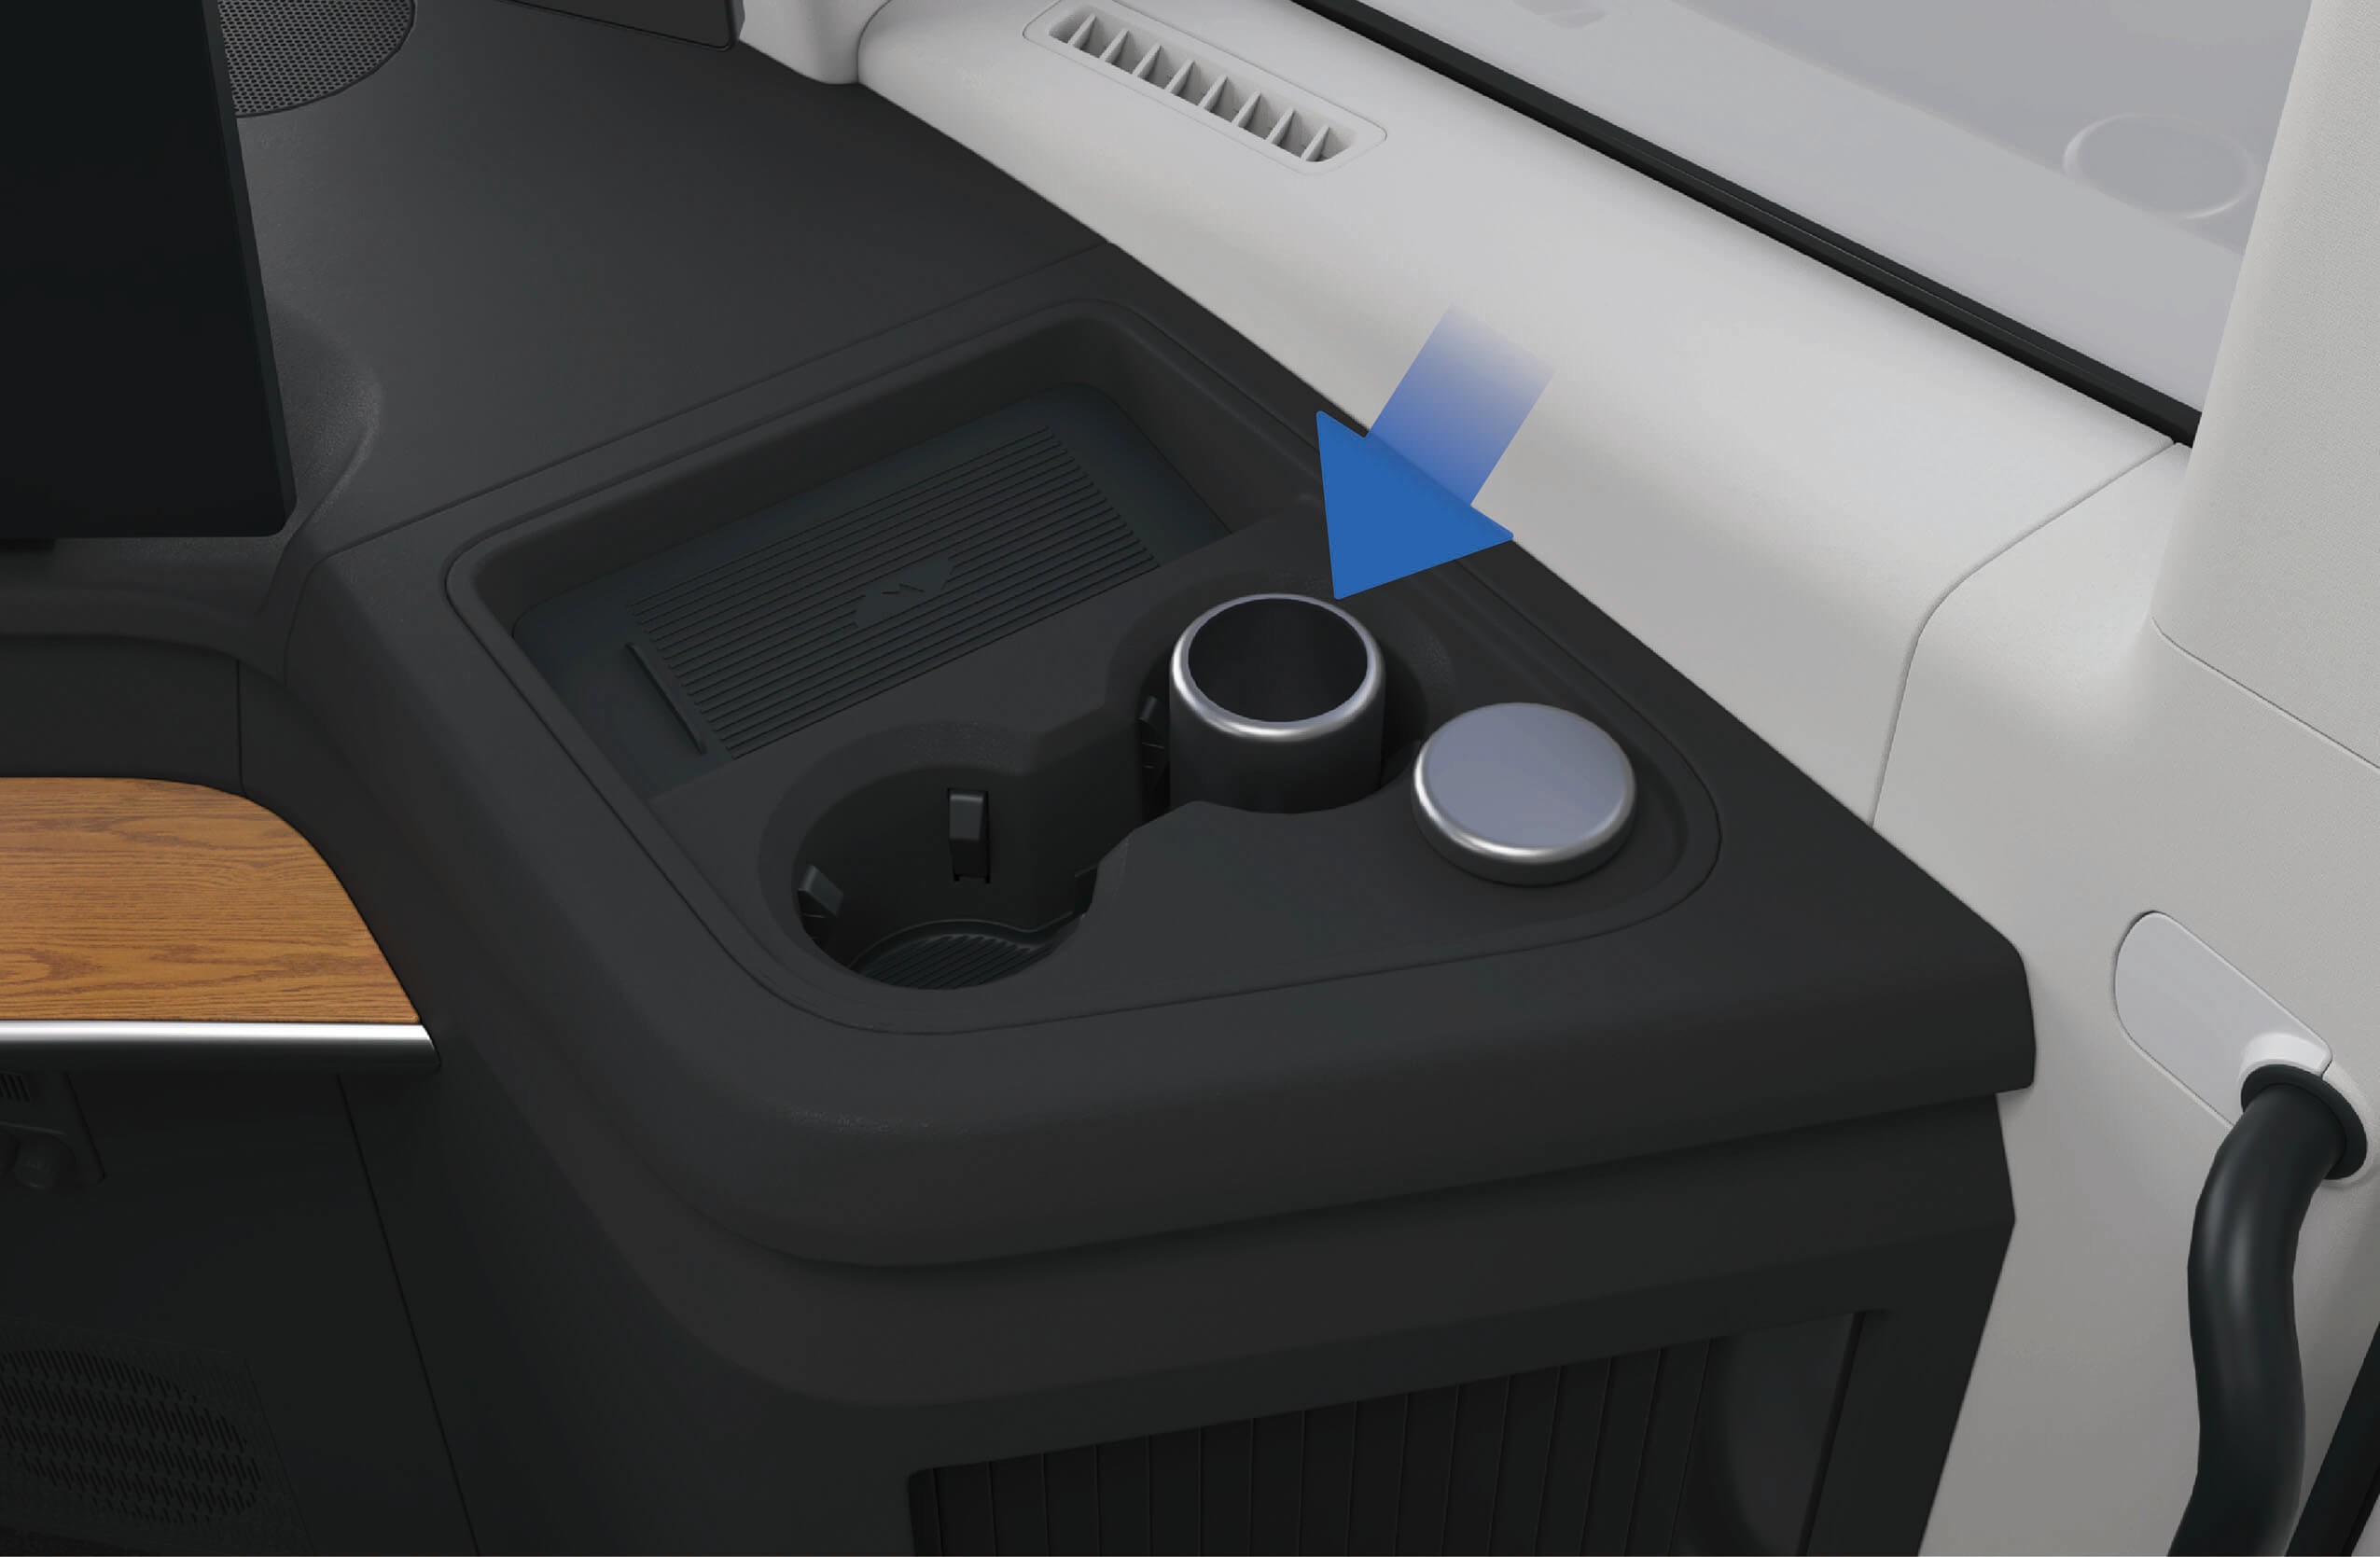
↑ Til toppenAskebegeret er montert i koppholderen på høyre side av instrumentpanelet. Du kan plassere askebegeret andre steder etter behov.
3.J.2Forholdsregler
Advarsel
Ikke røyk under kjøring, for å unngå ulykker eller brudd på gjeldende regelverk.
Før sigarettsneiper kastes i askebegeret, sørg for at de er slukket for å unngå brann forårsaket av glødende sneiper.
Ved montering av askebegeret, sørg for at det er forsvarlig montert og festet for å hindre at det rister i kjøretøyet eller løsner fra festeanordningen.
↑ Til toppenMerkNår askebegeret er ferdig brukt, sørg for å sette på lokket for å unngå at sneiper eller aske søles ut.
3.KVerktøykasse på siden
↑ Til toppenTilgang til kjøretøyet
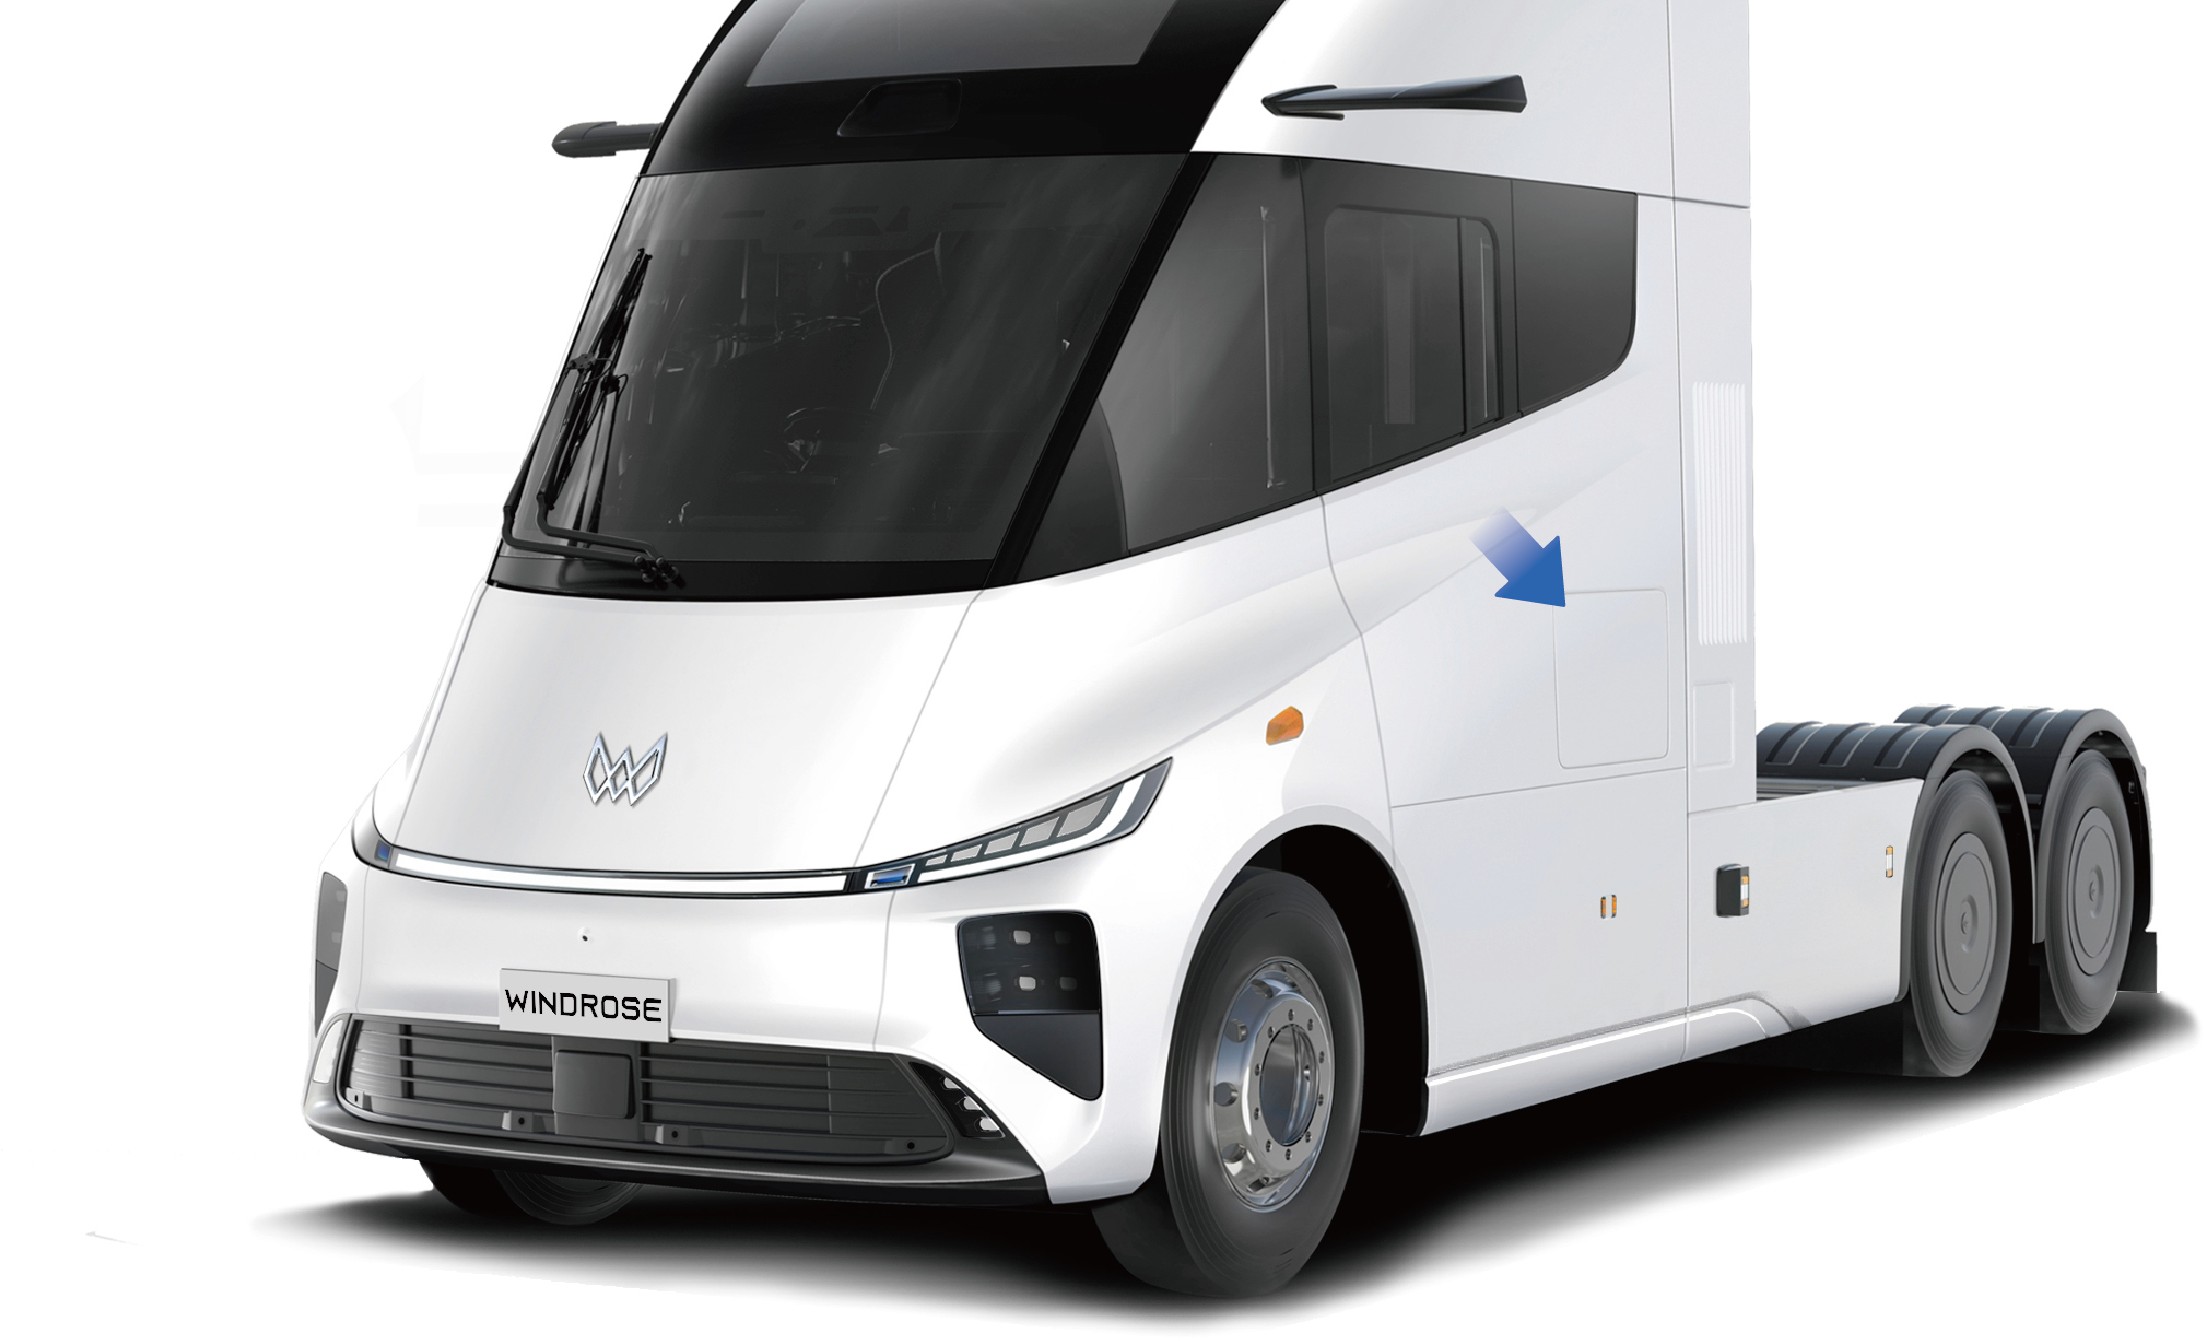
Kjøretøyets førerverktøy oppbevares i verktøykassen på venstre side av kjøretøyet for bruk i nødsituasjoner.
3.K.1Bruksanvisning
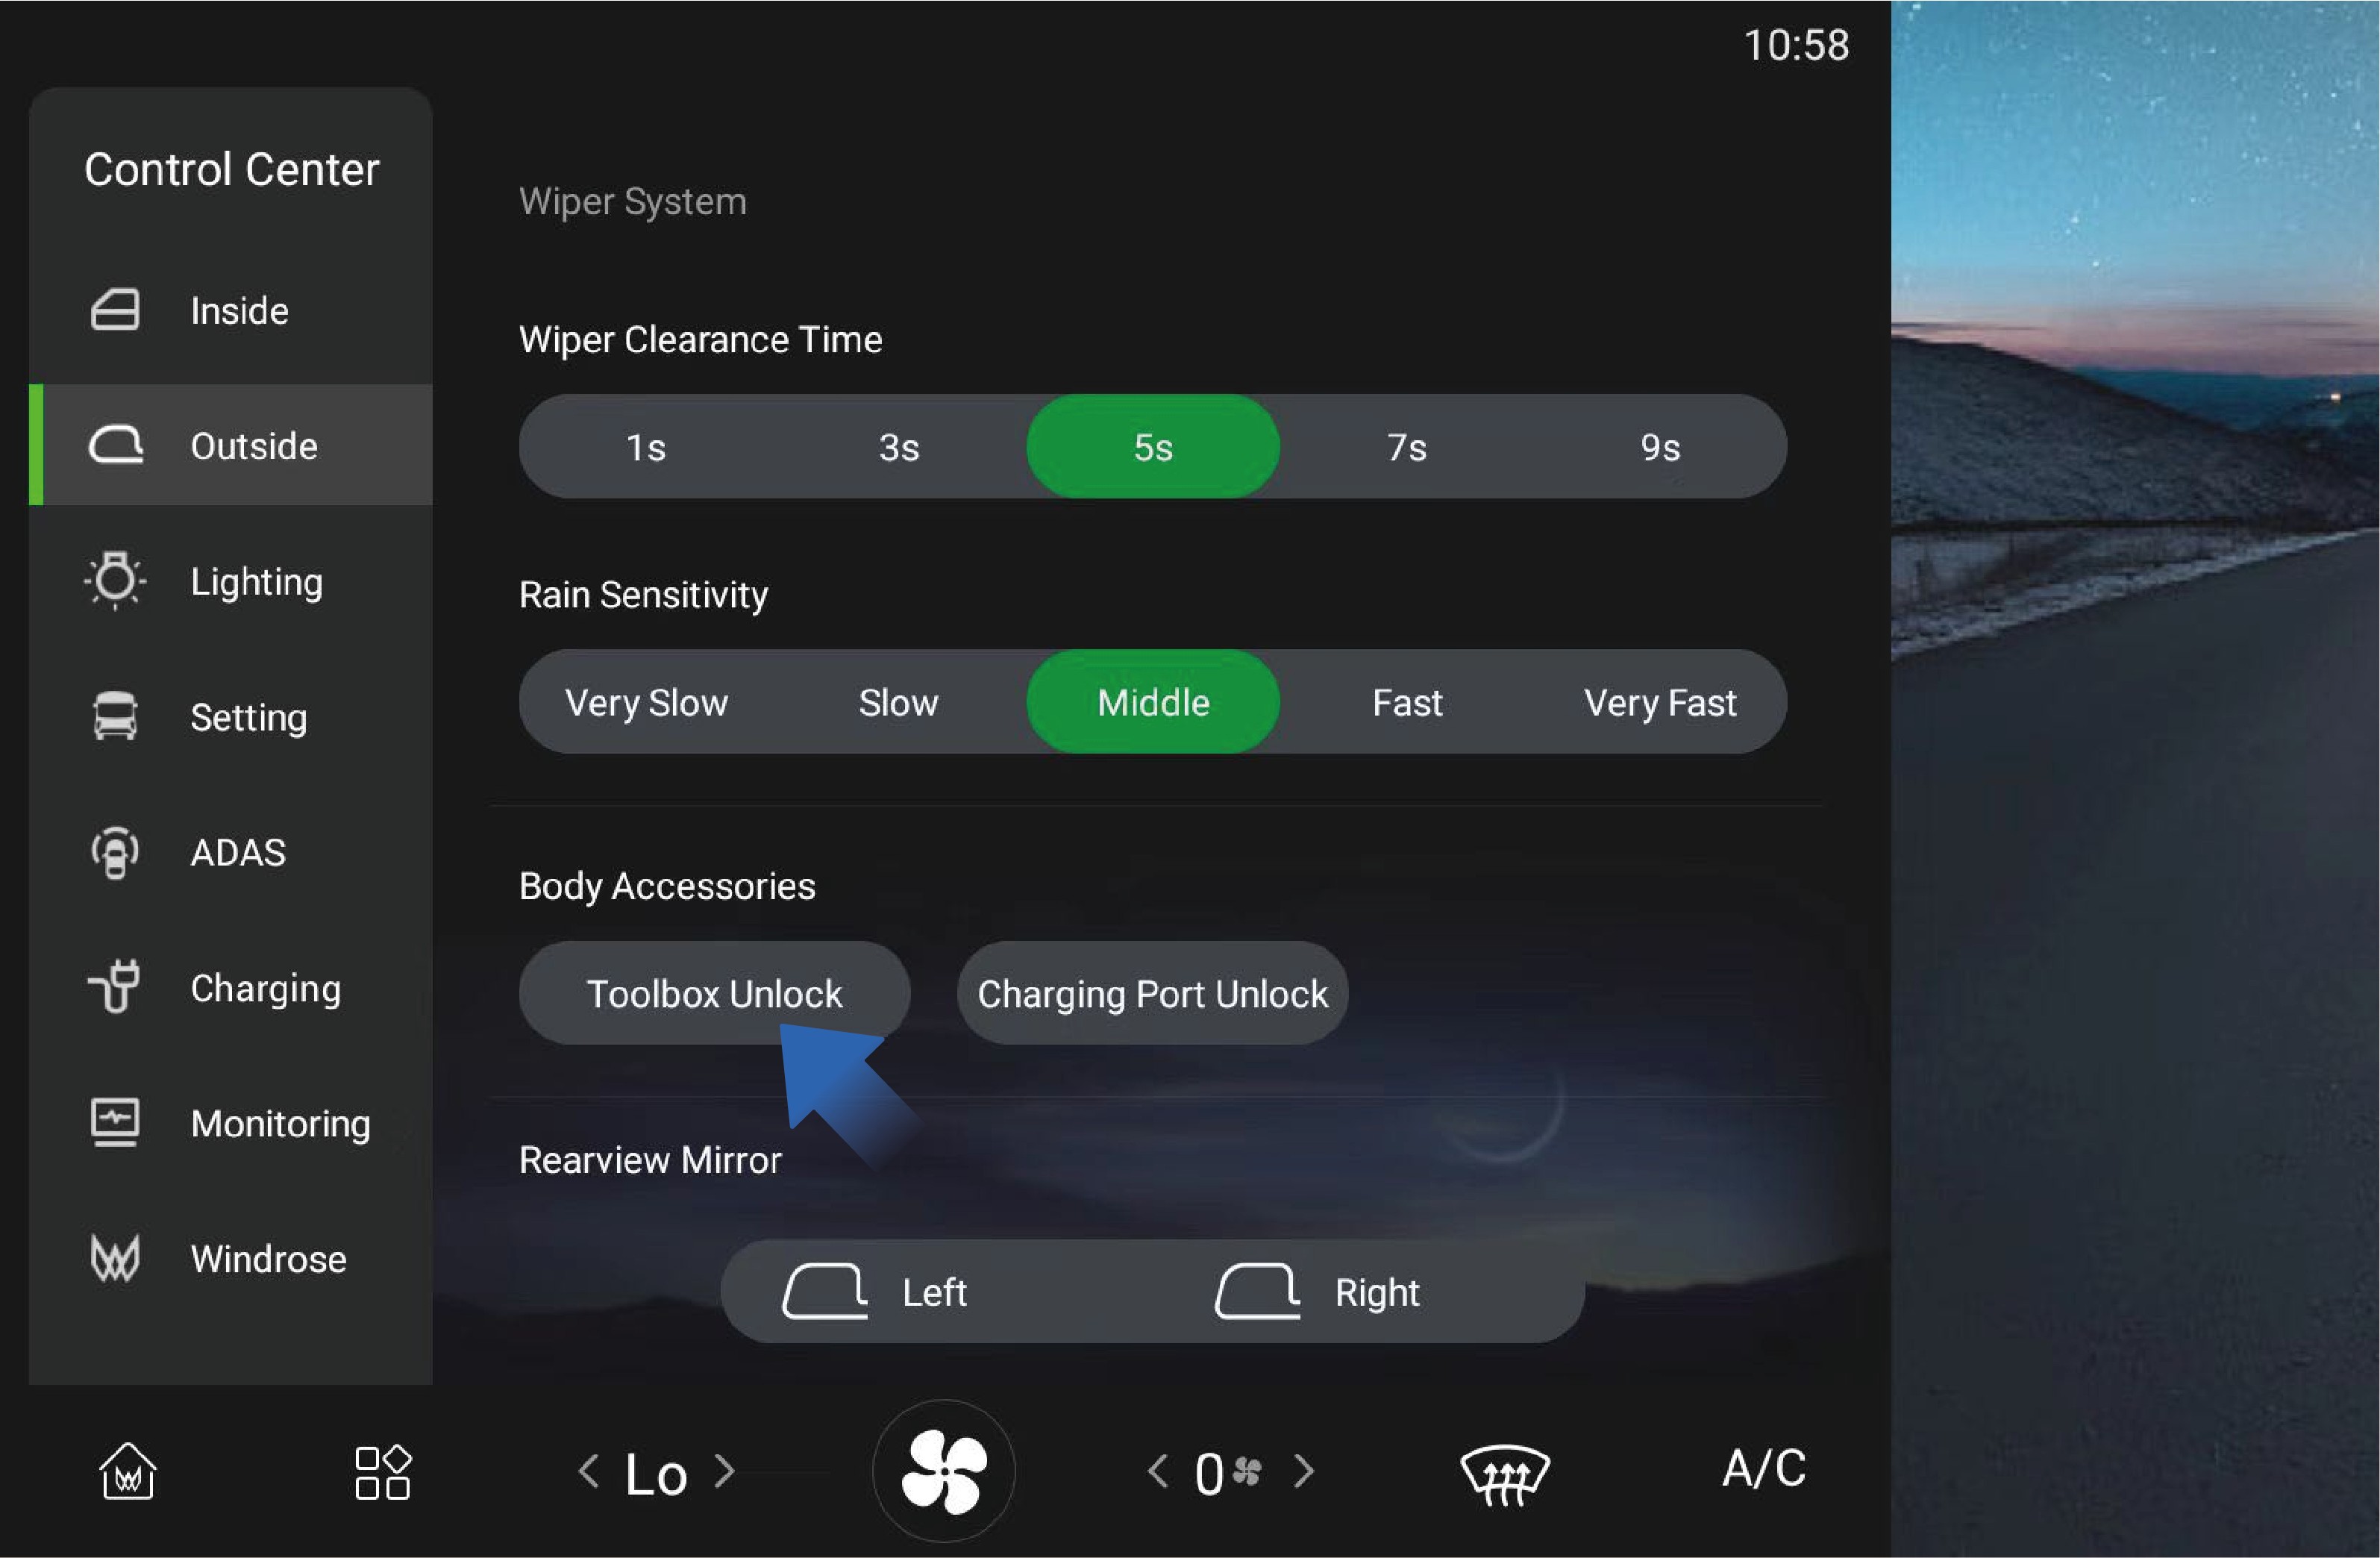
↑ Til toppenDu kan låse opp verktøykassen ved å velge «Control Center», bytte til grensesnittet «Outside» og klikke på «Toolbox Unlock»-knappen på kjøretøyets informasjonsskjerm i instrumentpanelet. Verktøykassen lukkes manuelt fra utsiden av kjøretøyet.
Det er en lampe i verktøykassen som tennes automatisk når kassen åpnes, og slukkes automatisk når kassen lukkes.
3.K.2
Forholdsregler
↑ Til toppenAdvarselHold verktøykassen lukket under kjøring for å unngå ulykker.
3.LInnvendig oppbevaring
↑ Til toppenTilgang til kjøretøyet
Det finnes flere oppbevaringsløsninger i kjøretøyet der du kan oppbevare gjenstander av ulik størrelse.
3.L.1Bruksanvisning
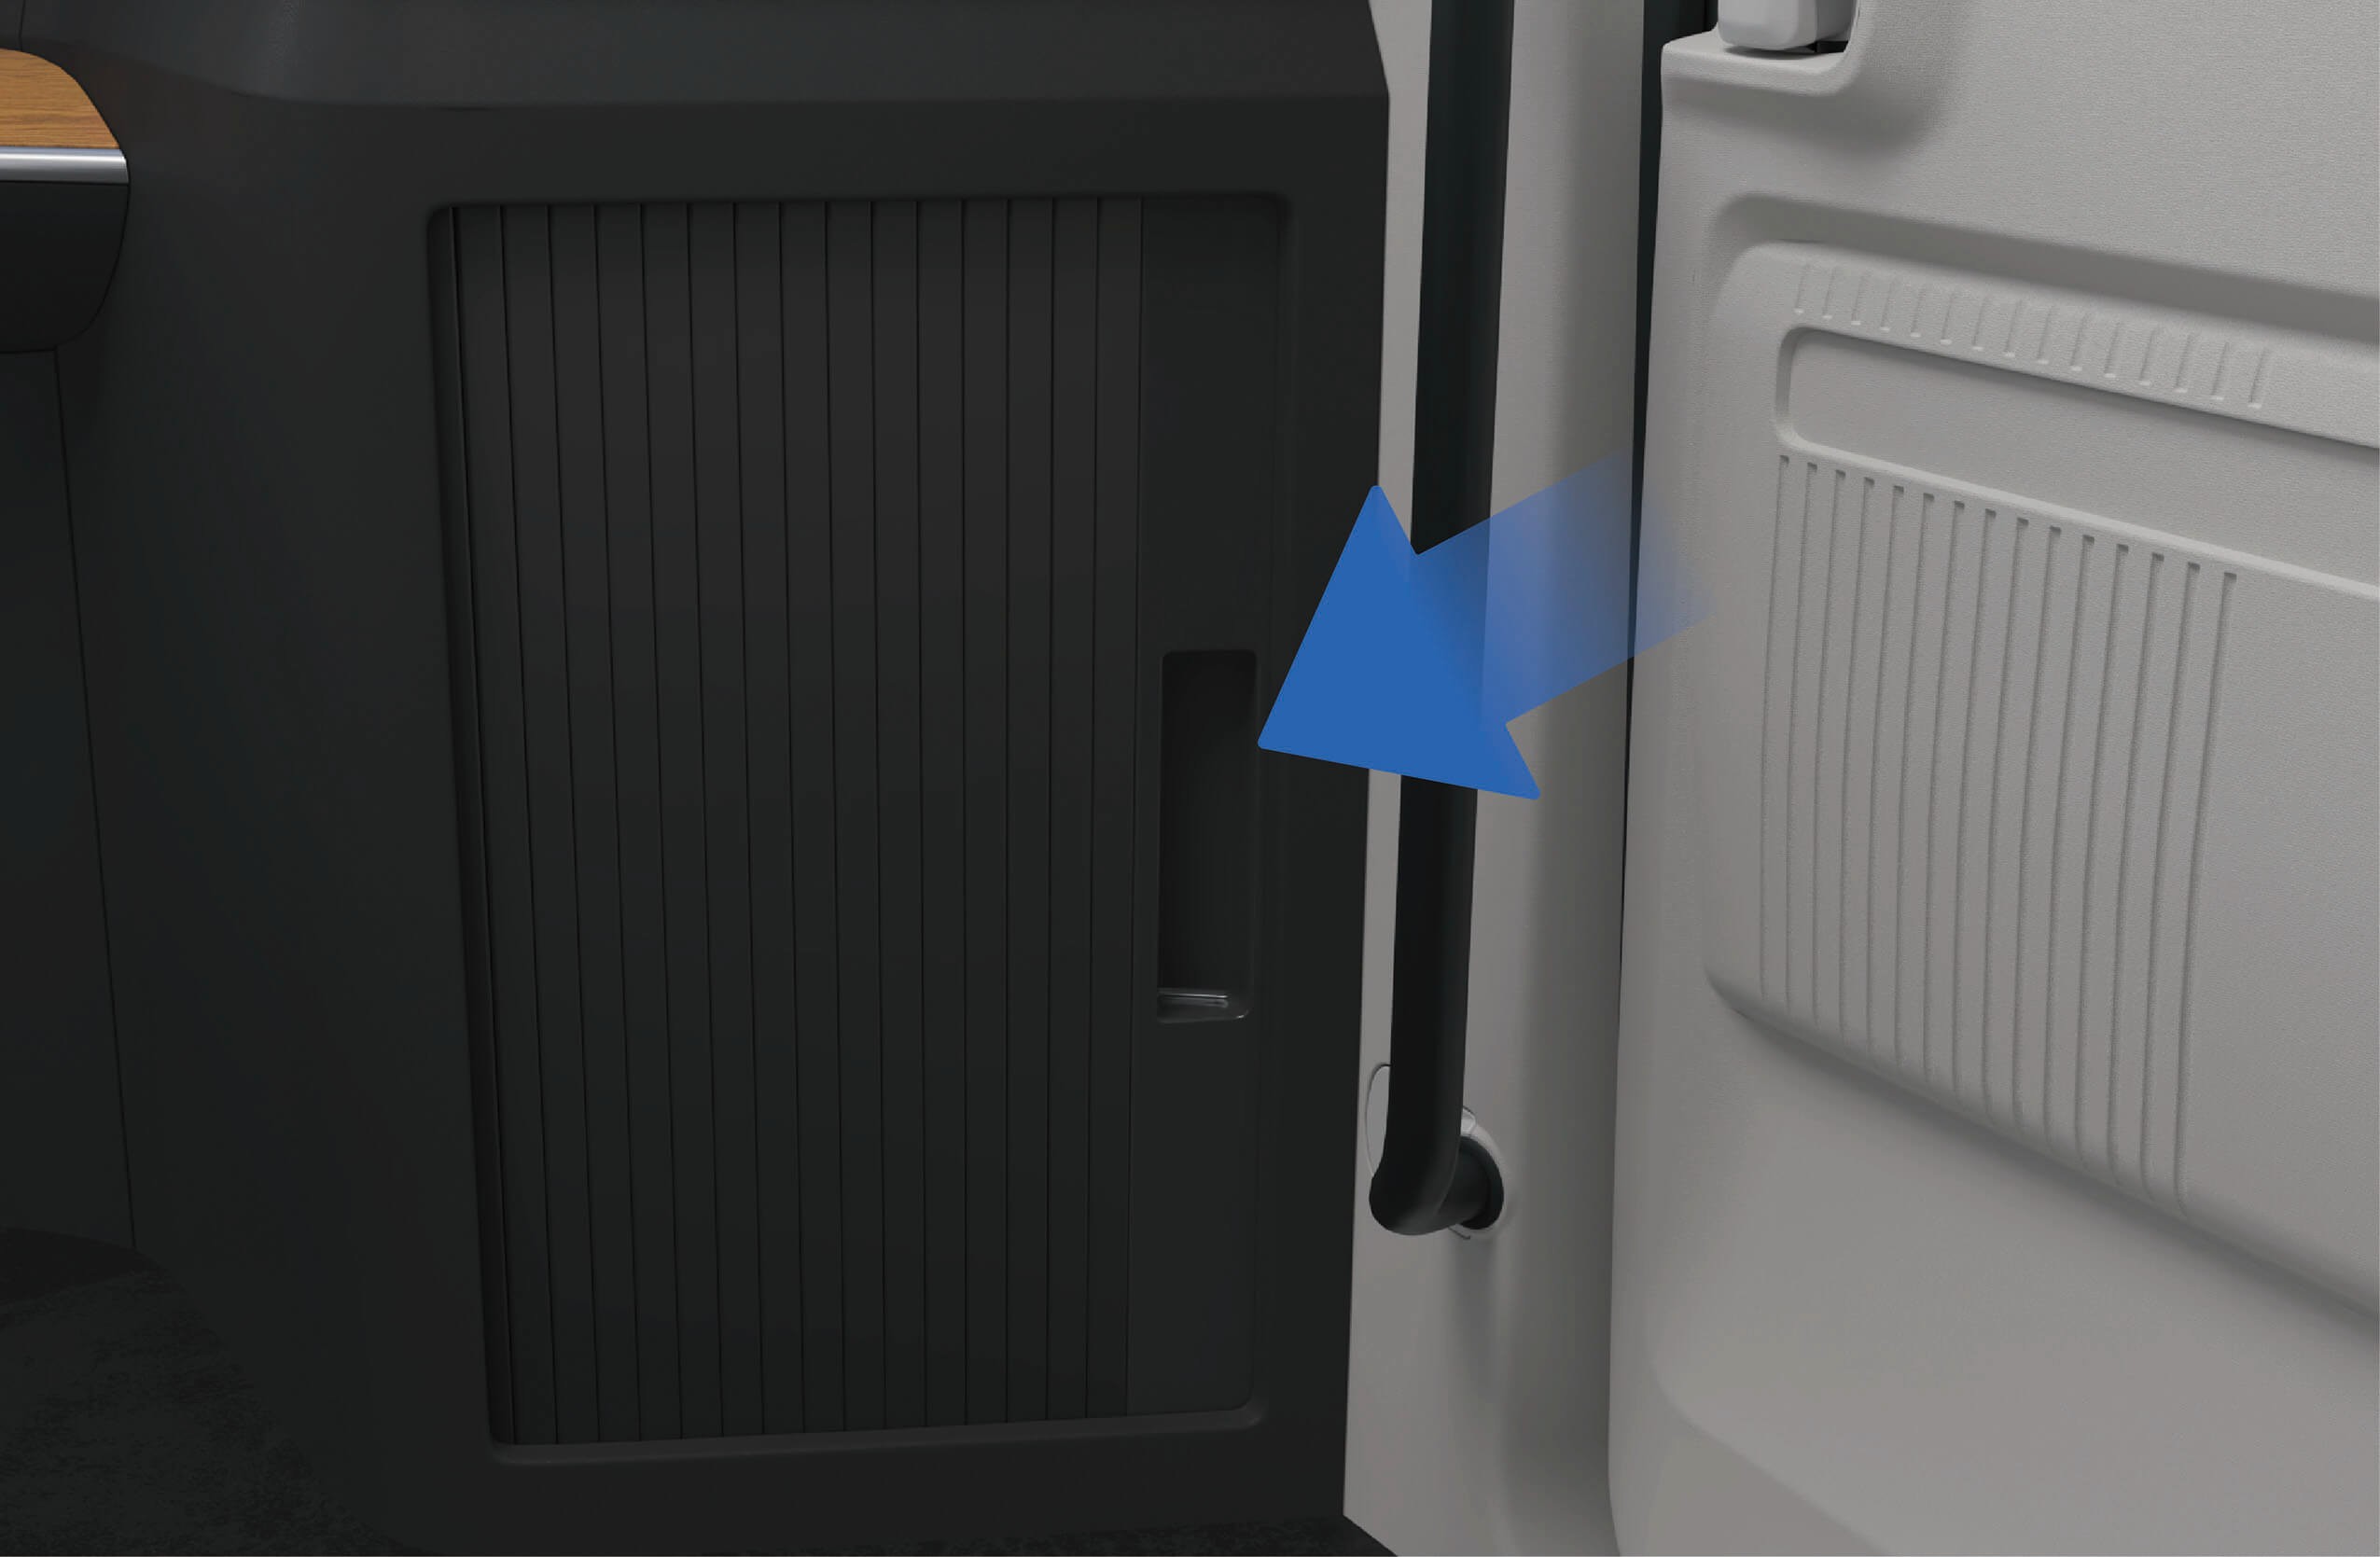
Det er et oppbevaringsrom nederst til høyre på instrumentpanelet der du kan oppbevare gjenstander.
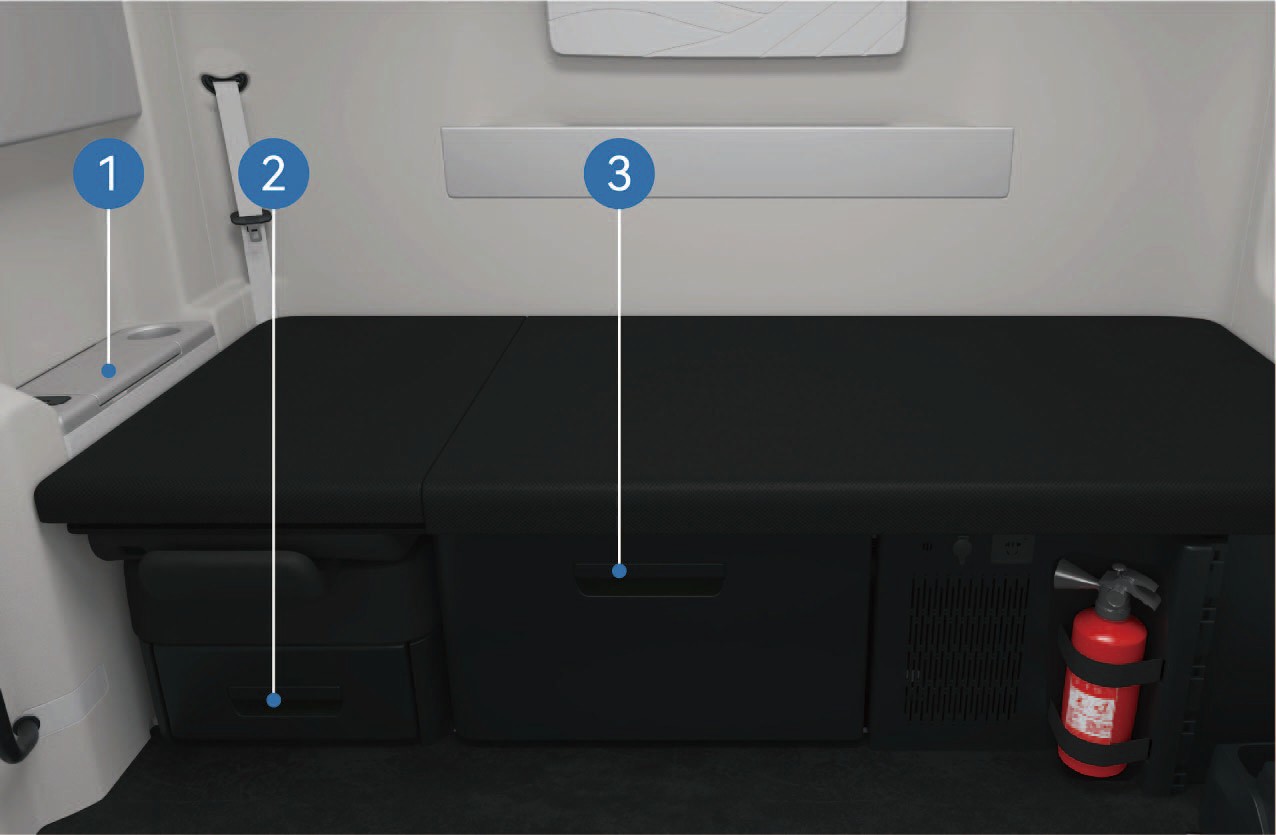
Oppbevaringsrom på høyre side av passasjersetet foran
Oppbevaringsrom under passasjersetet foran
Oppbevaringsrom under køyen
↑ Til toppenDet finnes oppbevaringsrom under køyen og passasjersetet foran. Du kan trekke det ut for å bruke det. Et oppbevaringsrom er plassert på høyre side av passasjersetet foran der du kan oppbevare mindre gjenstander.
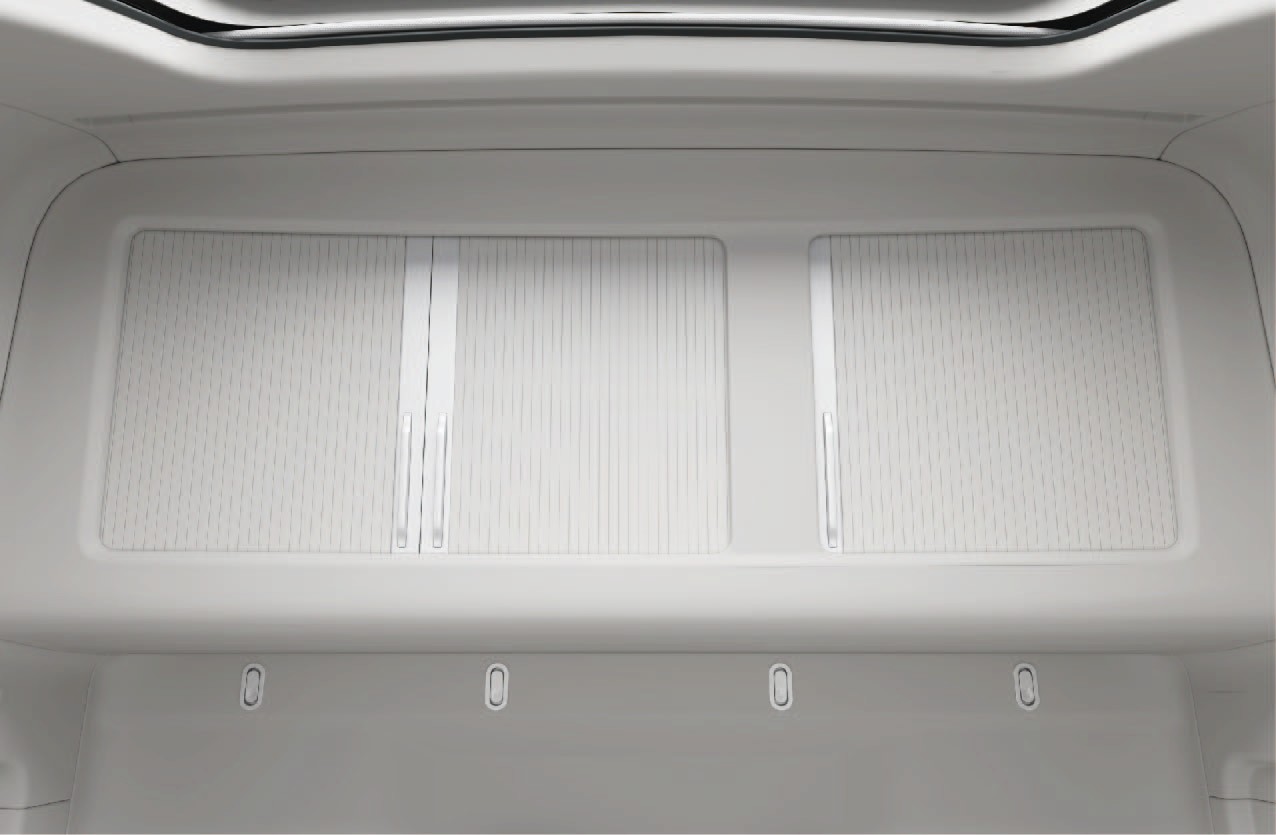
Det er et oppbevaringsrom over køyen. Lampen i oppbevaringsrommet tennes automatisk når rommet åpnes, og slukkes automatisk når rommet lukkes. Maksimal bæreevne for det store oppbevaringsrommet over køyen er 25kg, og for det lille oppbevaringsrommet 15kg.
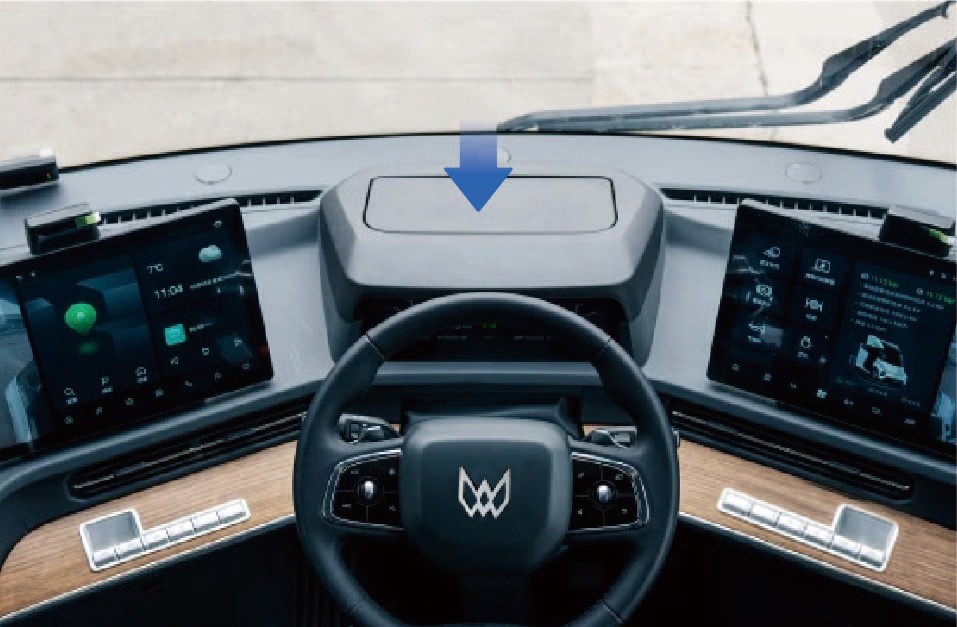
På kjøretøy uten AR-HUD er det plassert et oppbevaringsrom der AR-HUD ellers sitter, der du kan legge mindre gjenstander. Legg små og lette gjenstander i rommet, ikke skarpe gjenstander, for å unngå skade på rommets innvendige skinn.
3.L.2Forholdsregler
↑ Til toppenMerkSørg for at oppbevaringsrommene er lukket før kjøring, for å unngå skade på gjenstander eller personskade når gjenstander faller ned under kjøring.
3.MNettlomme
↑ Til toppenTilgang til kjøretøyet
Det er en nettlomme nederst til venstre i kjøretøyet til oppbevaring av mindre gjenstander.
3.M.1Bruksanvisning
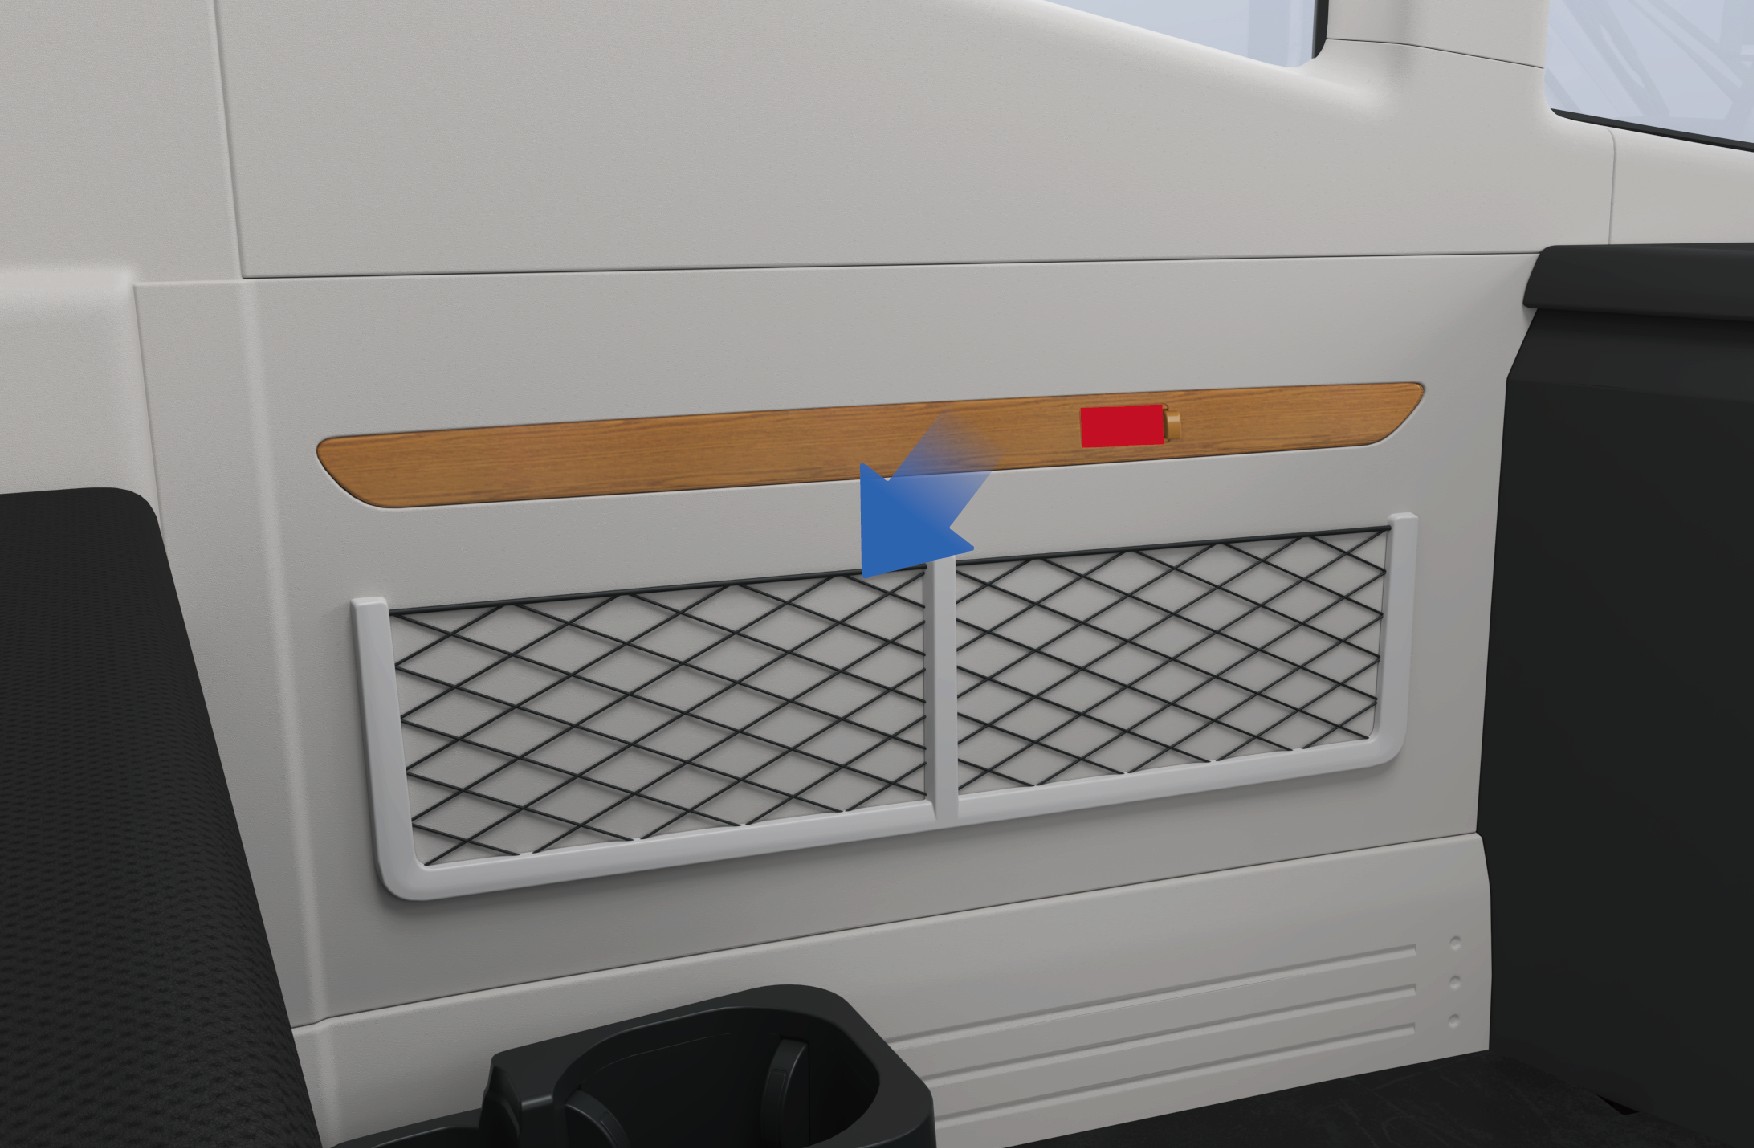
Nettlomme
3.M.2
Forholdsregler
MerkIkke legg skarpe gjenstander i nettlommen, for å unngå skade på nettlommen eller på føreren.
3.NHolder for aviser og blader
↑ Til toppenTilgang til kjøretøyet
Det er en lomme for aviser og blader på baksiden av førersetet, som kan brukes til å oppbevare små gjenstander som aviser og kart.
Ved siden av køyen er det en holder for aviser og blader der du kan oppbevare aviser, blader og andre gjenstander.
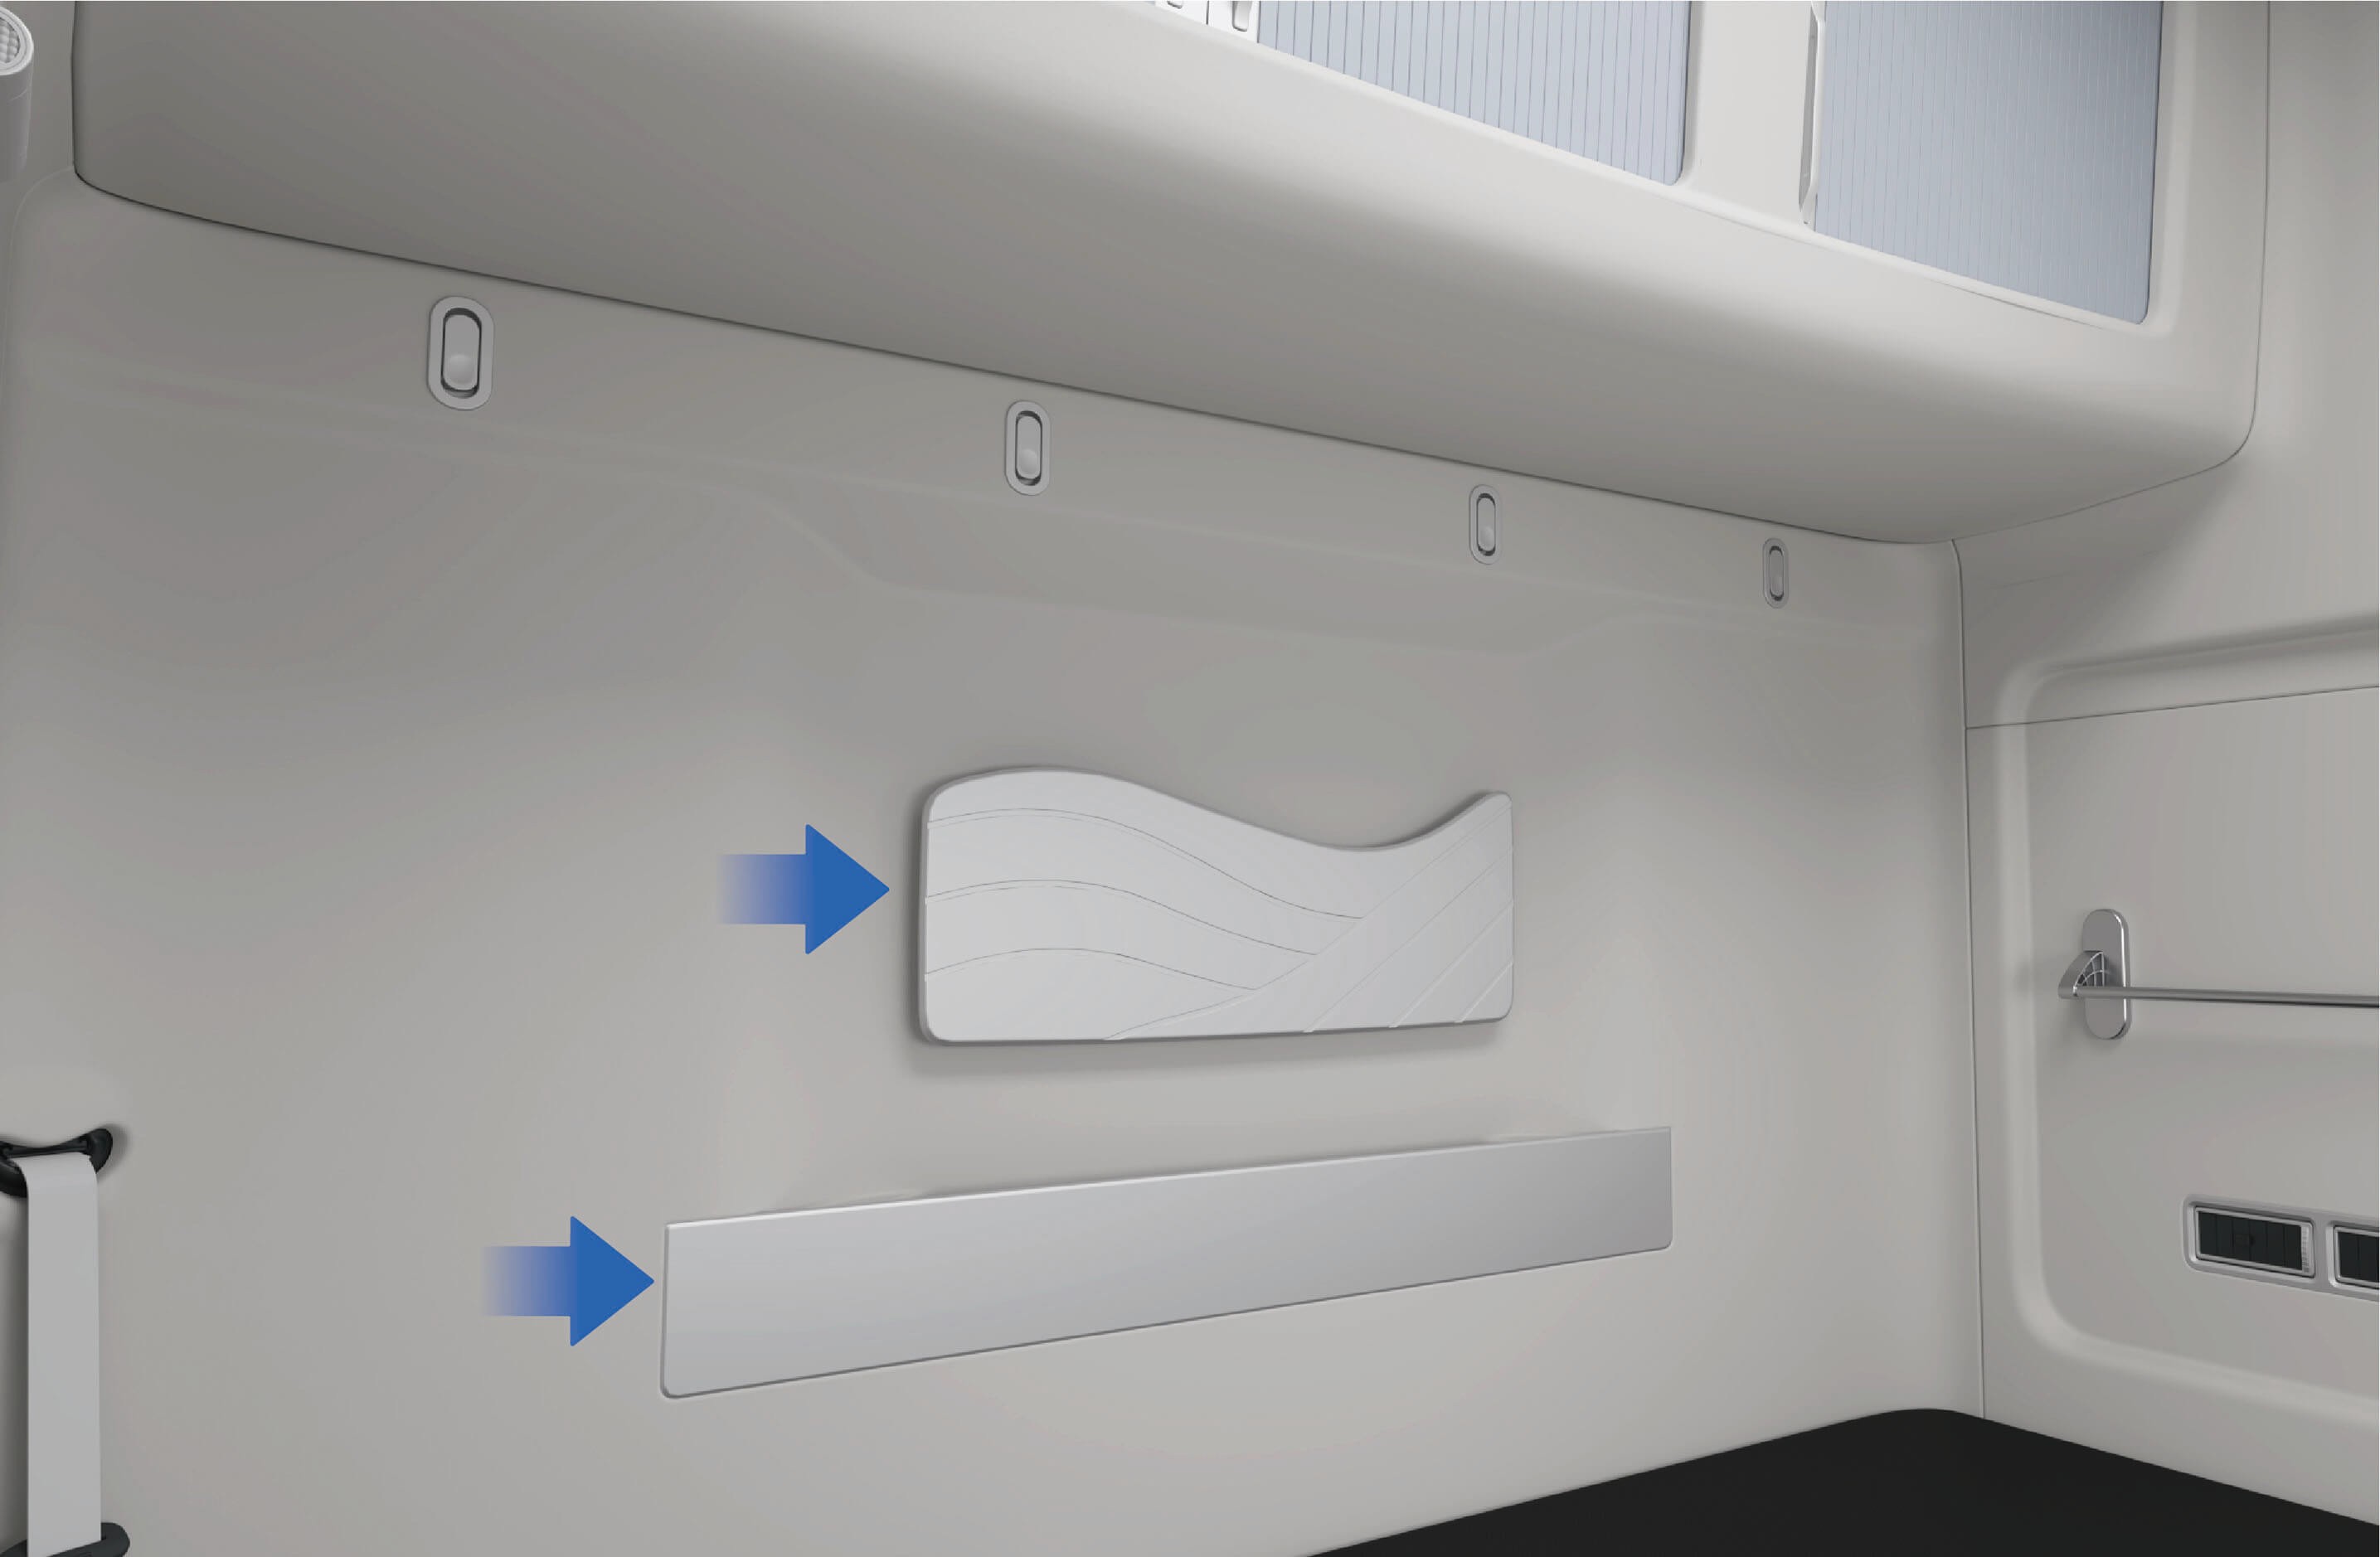
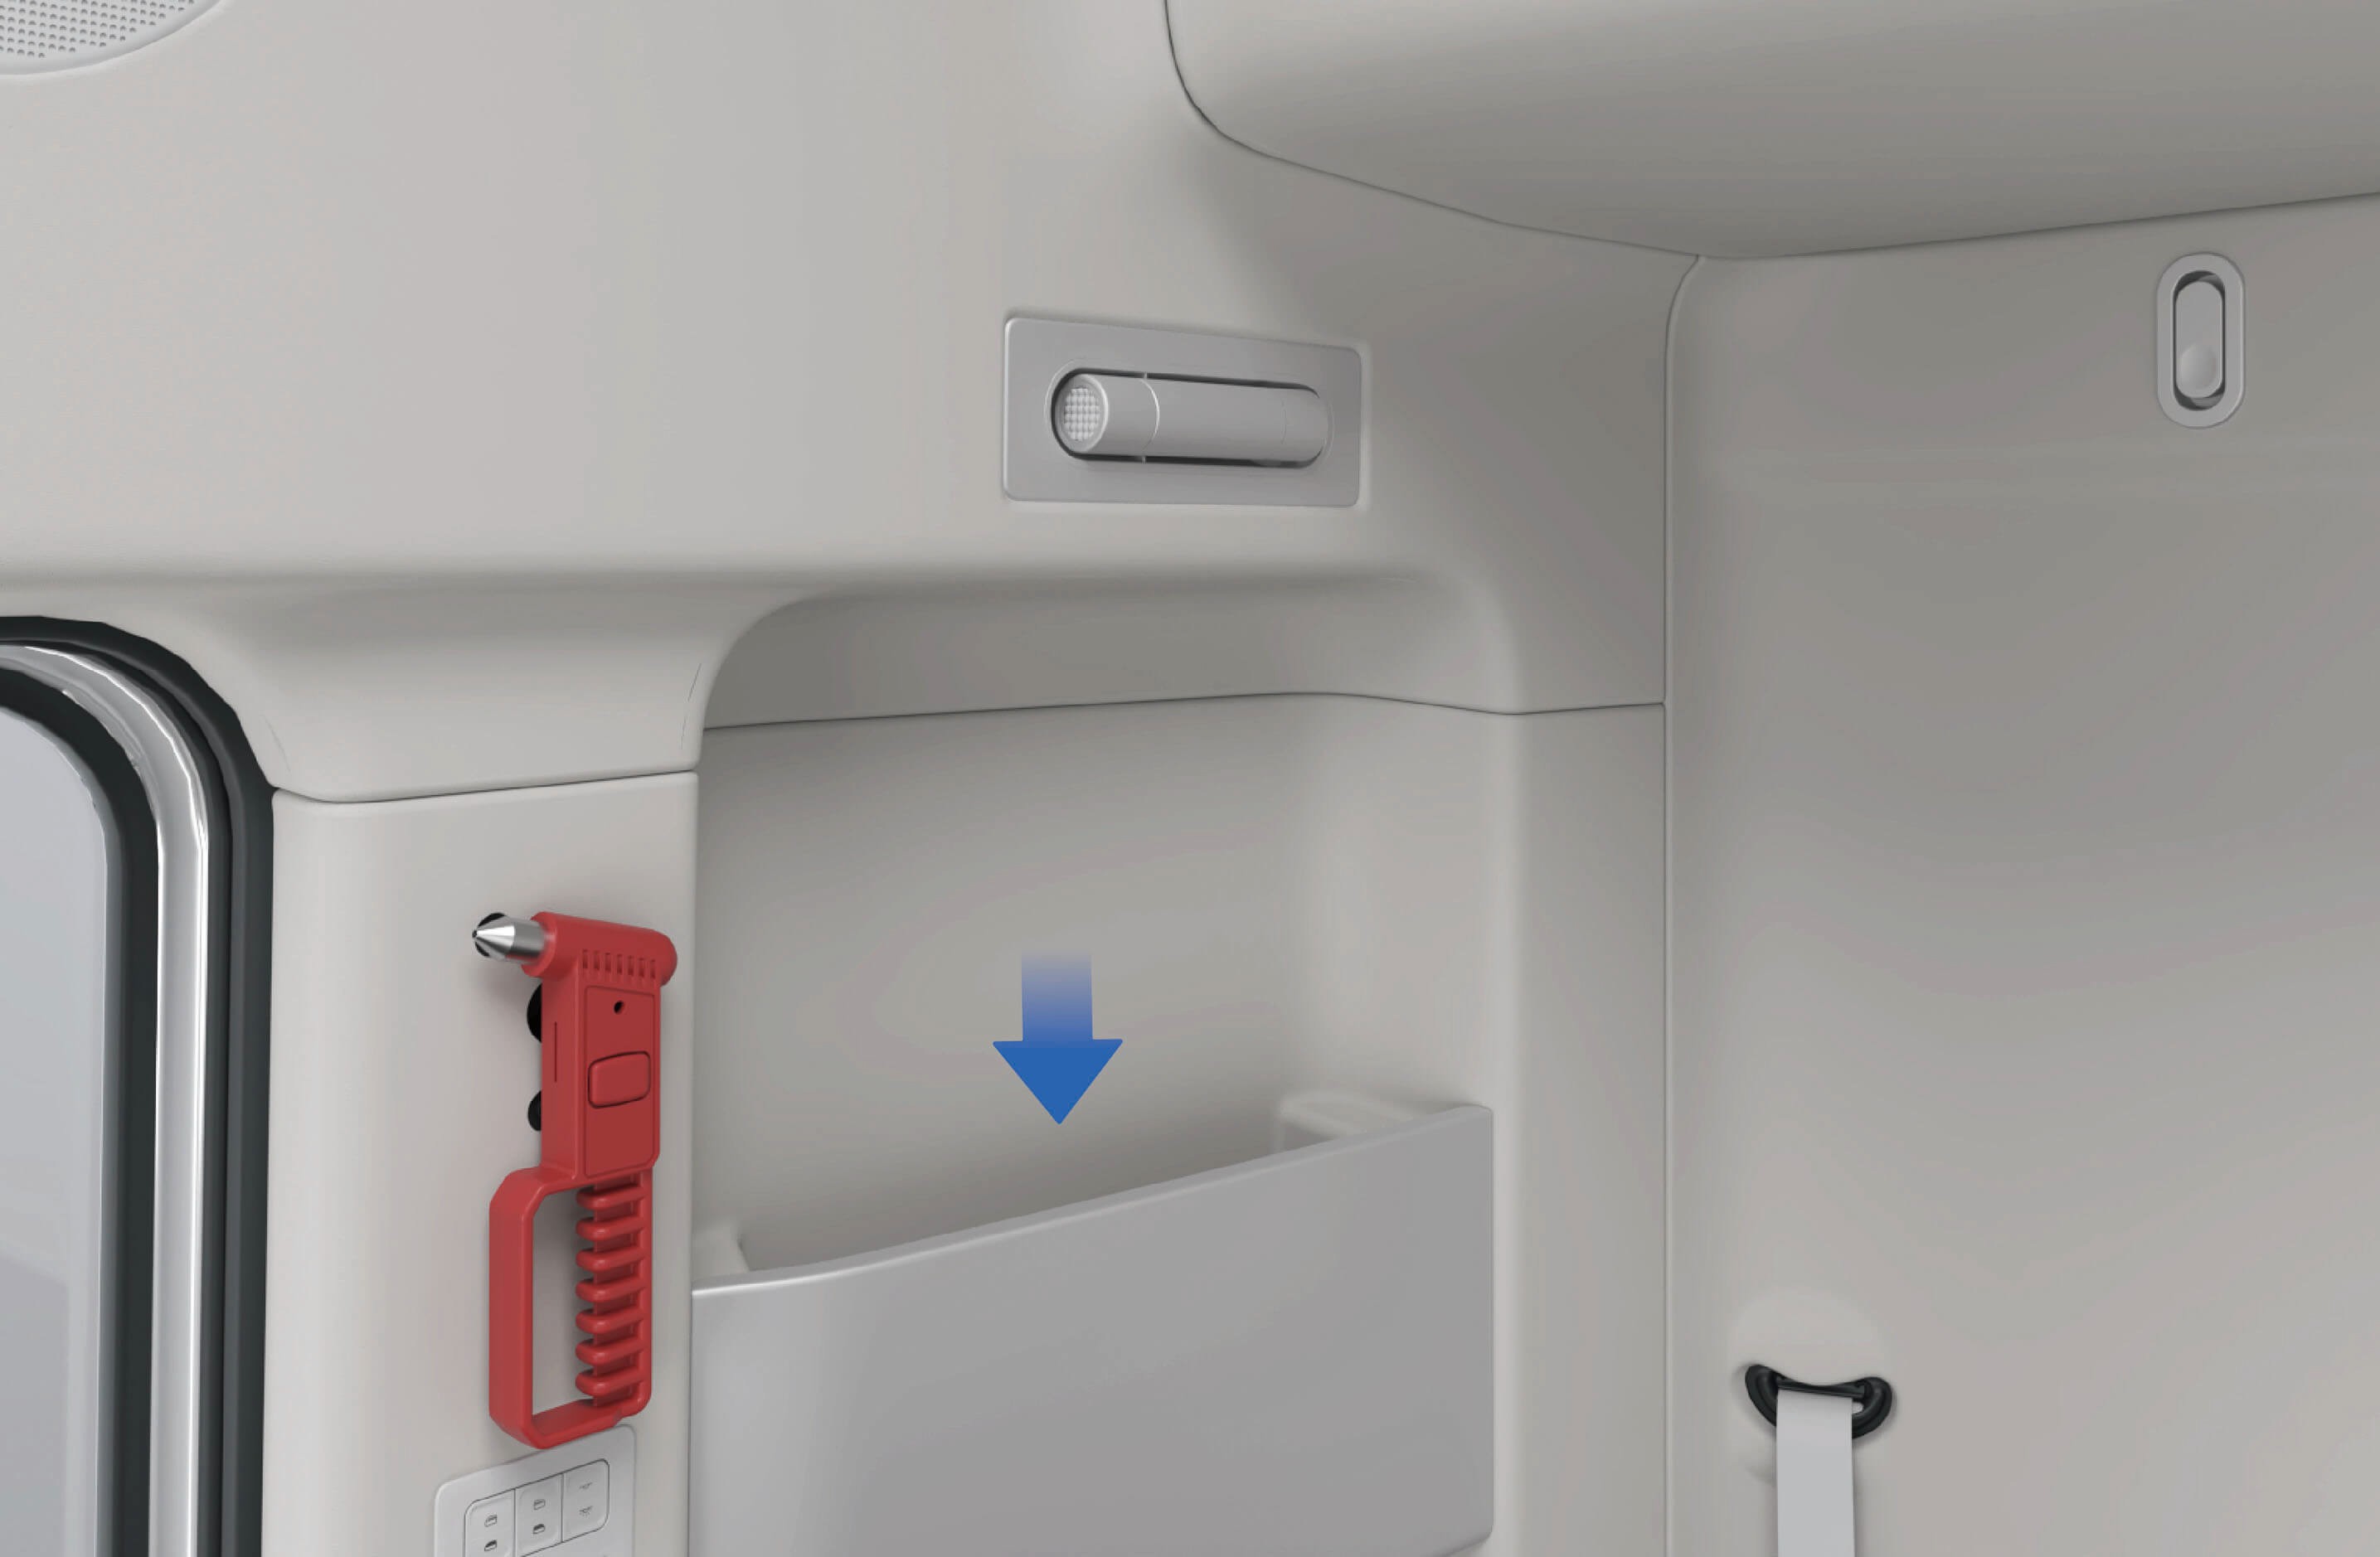
Lomme for aviser og blader over køyen • Lomme for aviser og blader på høyre side av
køyen
3.N.1Forholdsregler
↑ Til toppenMerkHolderen for aviser og blader som er festet til køyen, kan bare brukes til gjenstander som aviser og blader. Små gjenstander som legges i lommen, kan ikke tas ut igjen.
3.OKlesknagg
↑ Til toppenTilgang til kjøretøyet
Det er en klesknagg over køyen som brukes til å henge opp klær.
3.O.1Bruksanvisning
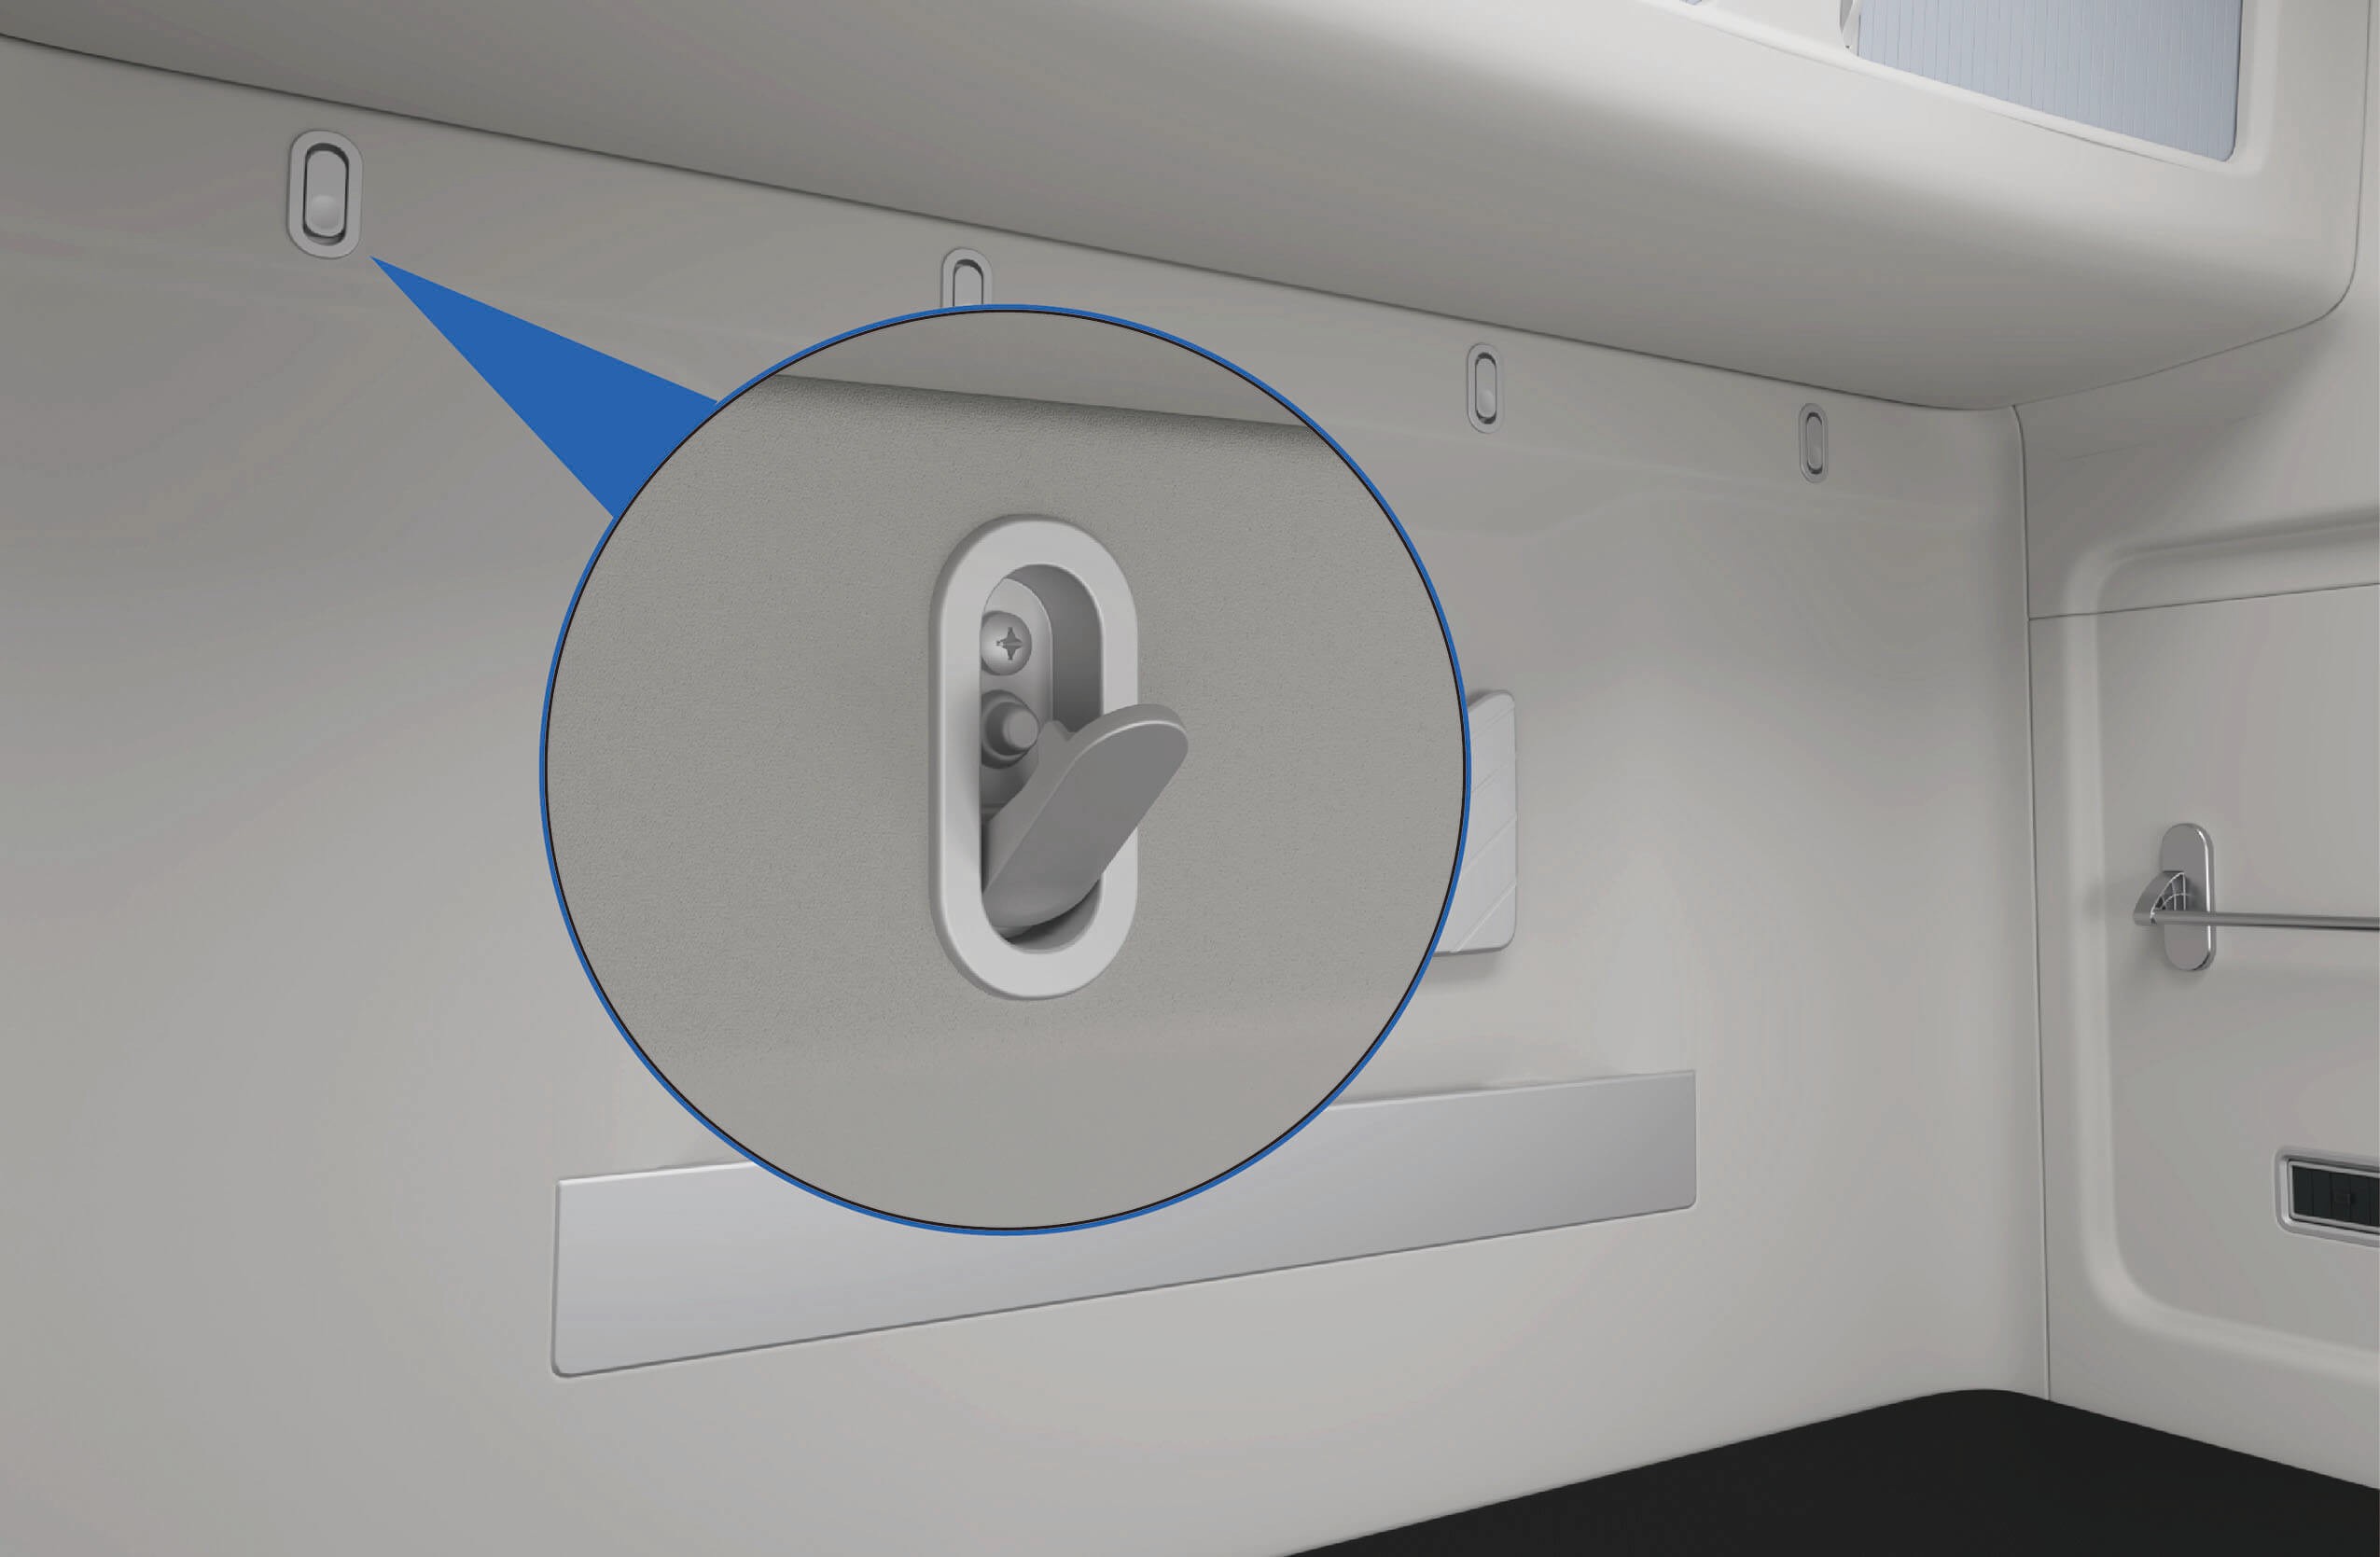
Klesknagg
3.O.2
Forholdsregler
MerkKlesknaggen tåler bare lette klær eller hatter o.l. Ikke heng opp tunge gjenstander.
3.POpphengskrok
↑ Til toppenTilgang til kjøretøyet
Det er en opphengskrok på siden av køyen som kan brukes til å henge opp håndklær eller små klesplagg.
3.P.1Bruksanvisning
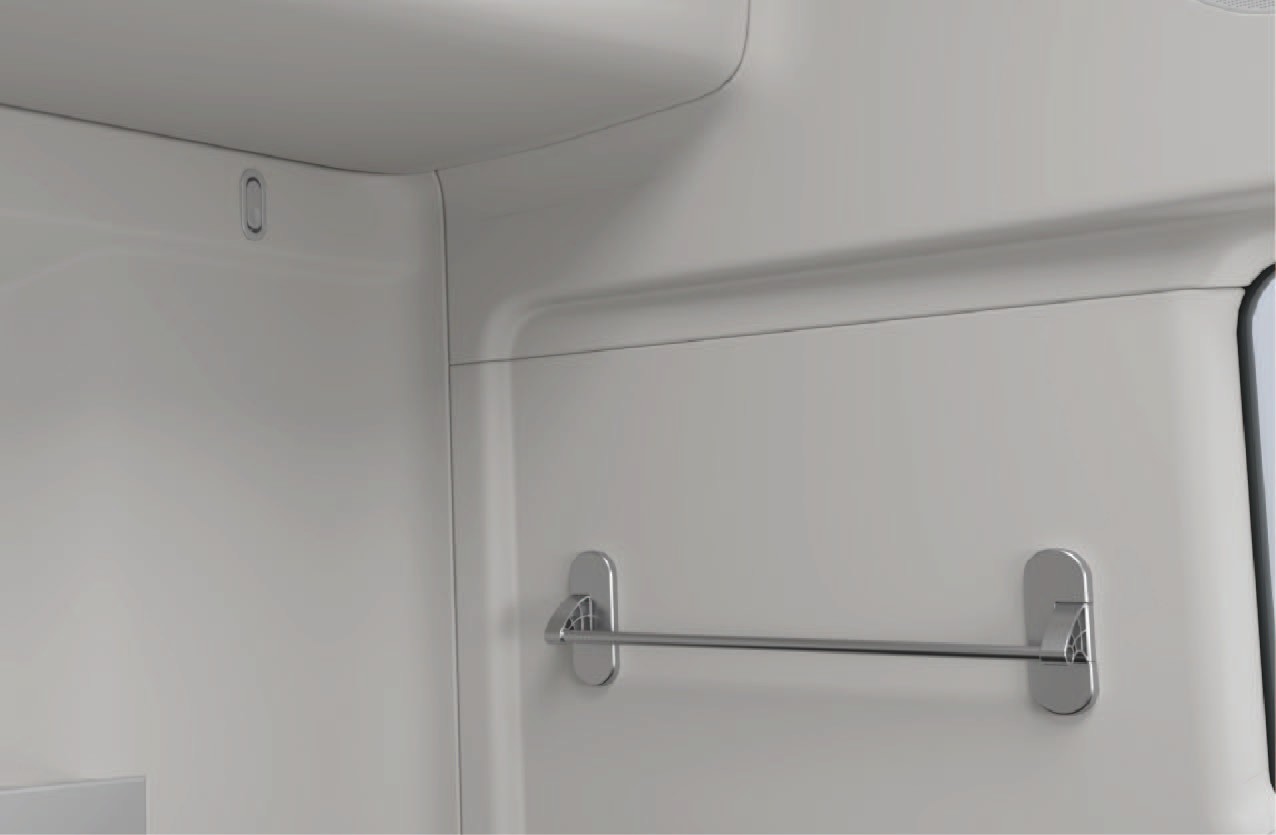
Opphengskrok
3.P.2
Forholdsregler
MerkOpphengskroken kan bare brukes til å henge opp tørre håndklær eller små klesplagg. Ikke heng opp tunge gjenstander, for å unngå skade på opphengskroken og ulykker.
3.QUSB-lading
↑ Til toppenTilgang til kjøretøyet
Kjøretøyet har USB-porter, plassert henholdsvis på venstre del av instrumentpanelet og på armlenet til passasjersetet foran. USB-portene kan brukes til å lade mobiltelefon med en ladeeffekt på 15W. Både type-C- og type-A-porter støttes.
3.Q.1Bruksanvisning
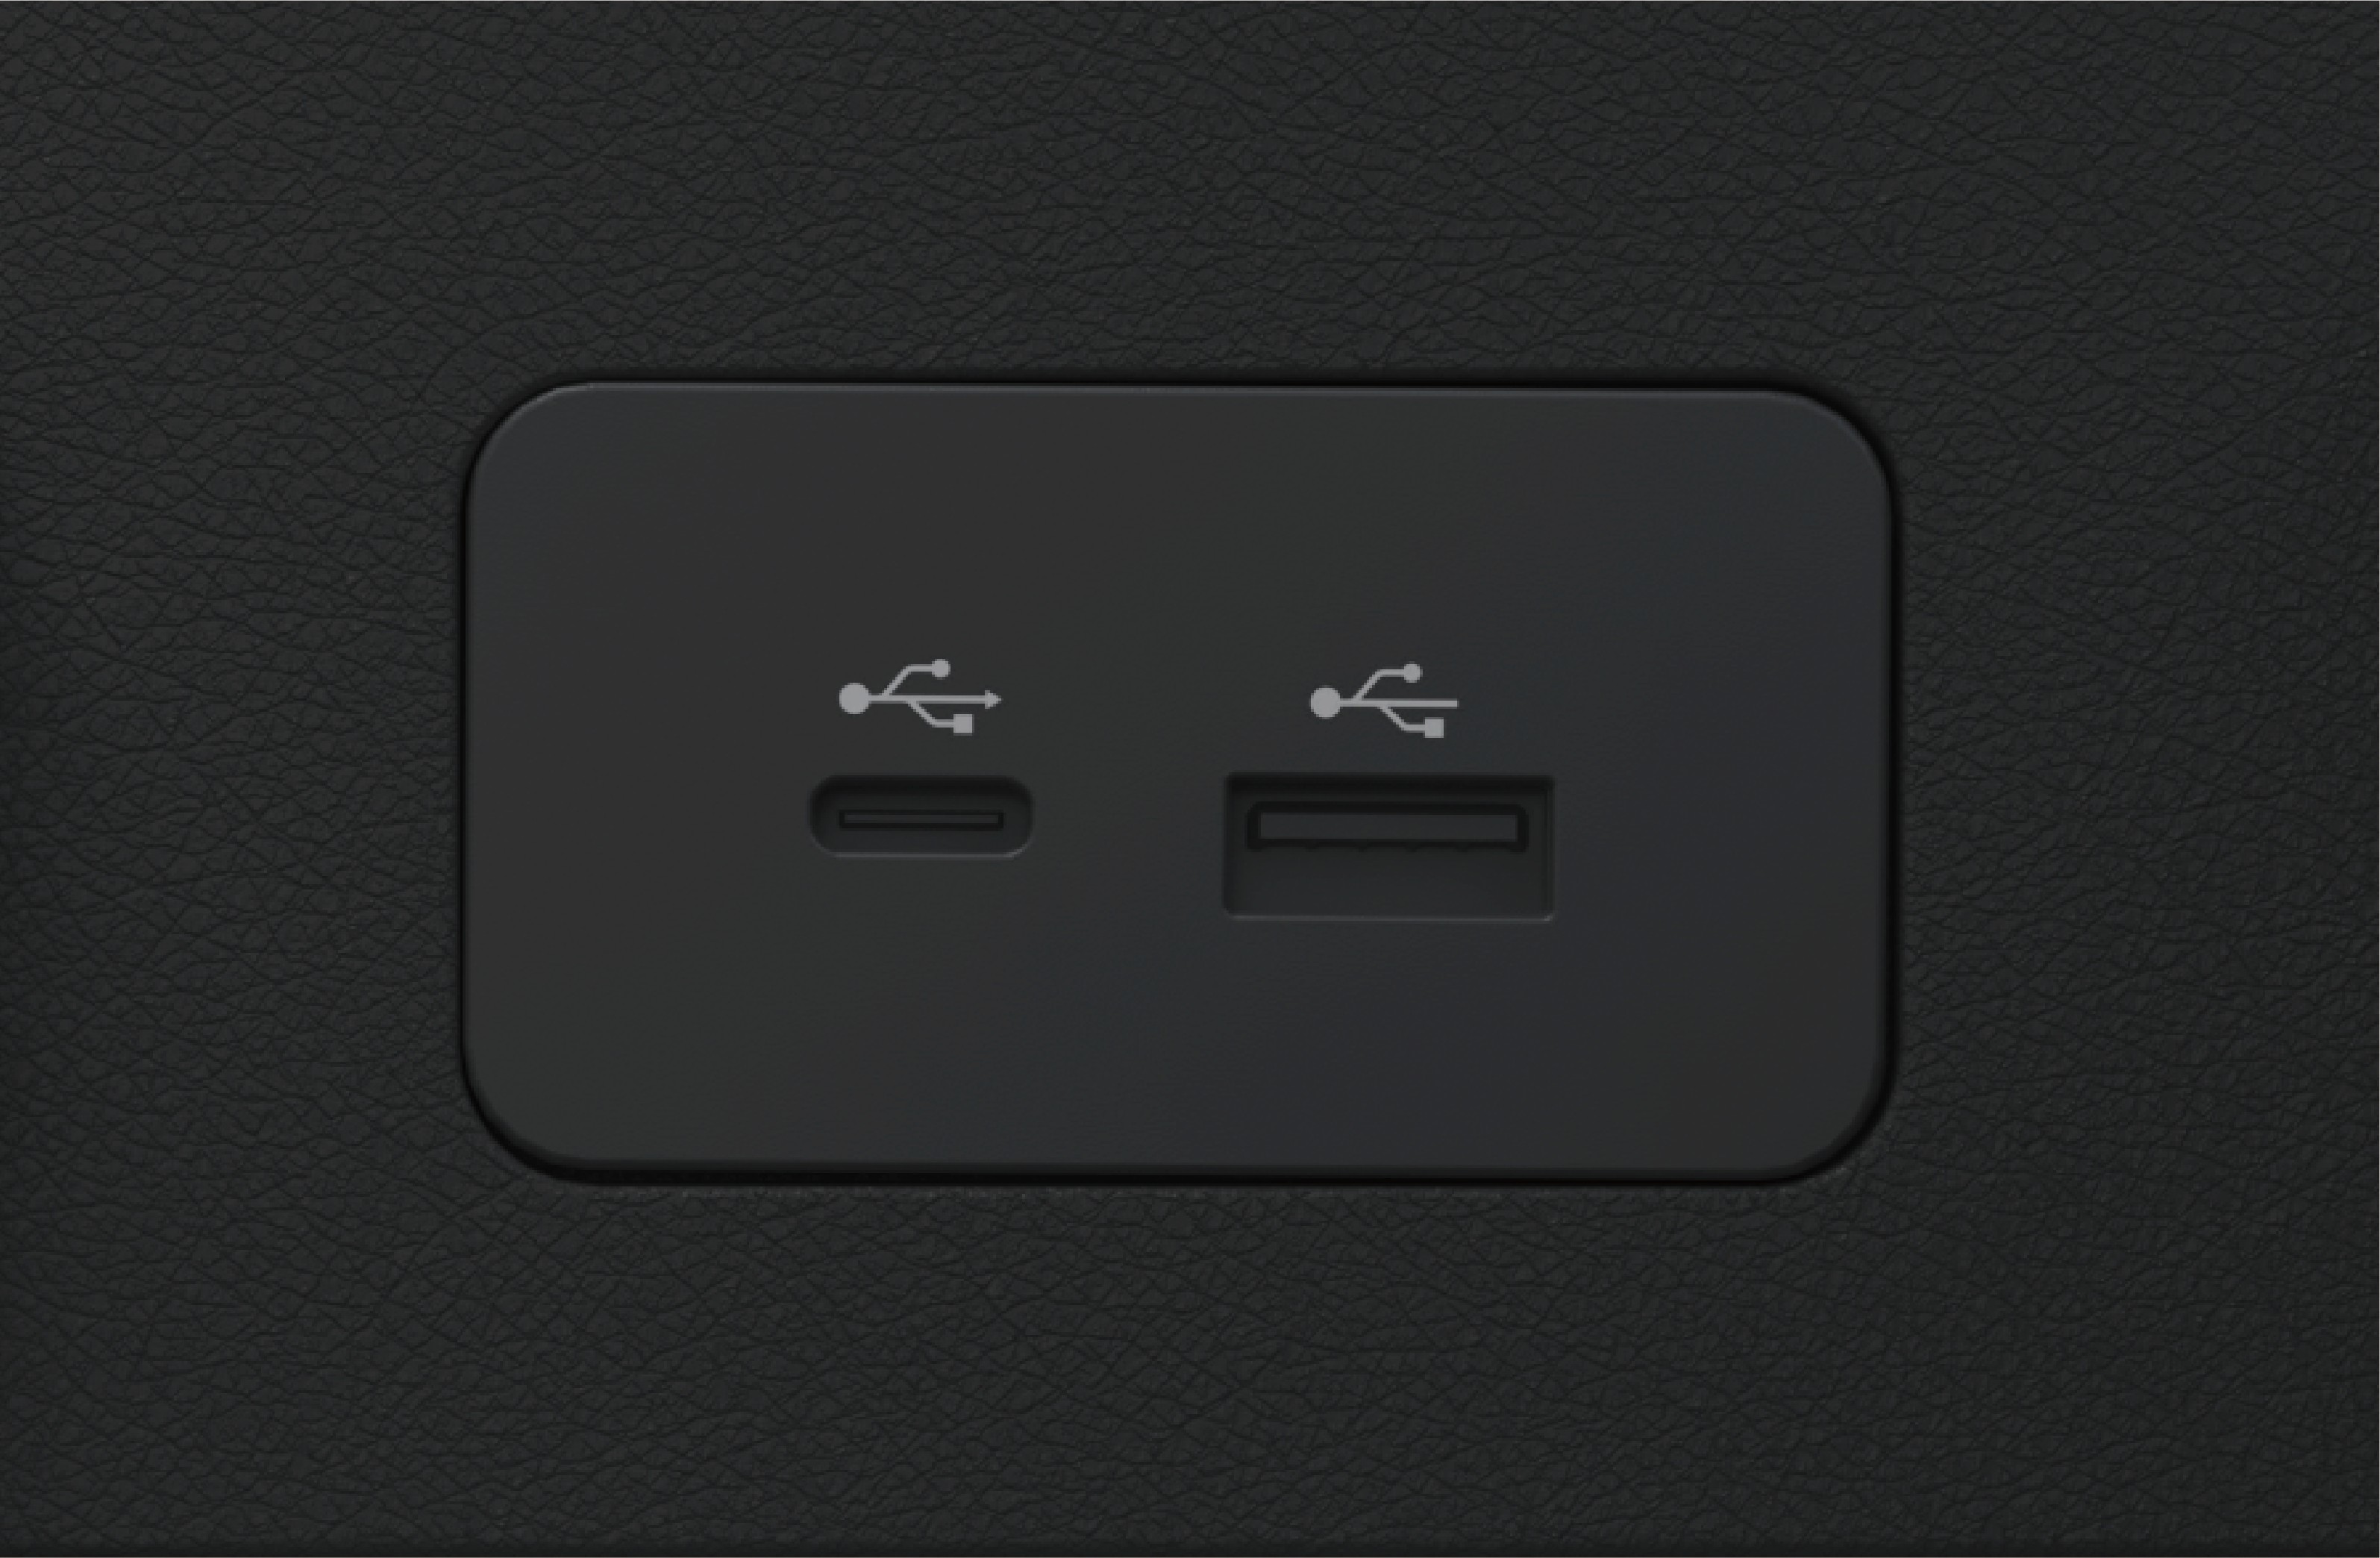
Venstre USB-port på instrumentpanelet
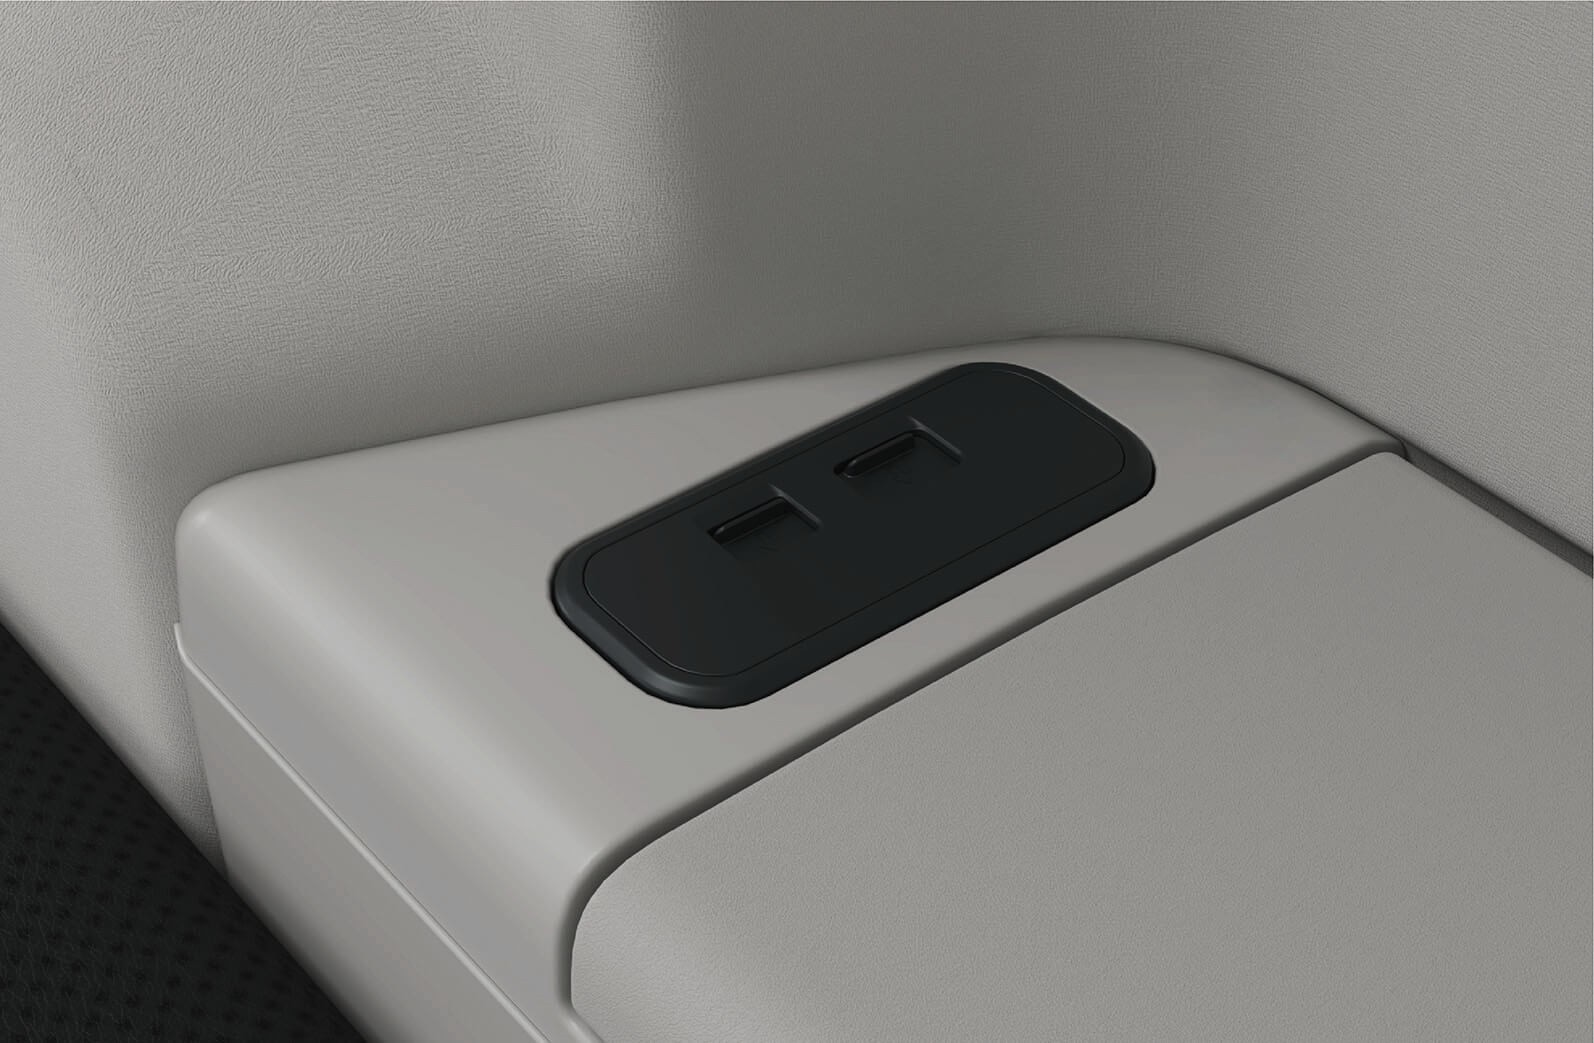
USB-port på armlenet til passasjersetet foran
3.Q.2Forholdsregler
↑ Til toppenAdvarselSøl aldri væske ved porten.
MerknadTilkoblede enheter kan bli varme under lading. Sørg for at varme enheter ikke utgjør en fare for personer eller fører til materielle skader.
3.RTrådløs telefonlading
↑ Til toppenHøyre del av instrumentpanelet er utstyrt med en trådløs lader som kan brukes til å lade mobiltelefoner trådløst med en ladeeffekt på 15W.
3.R.2
Forholdsregler
↑ Til toppenAdvarselIkke legg gjenstander med metalldeler i induksjonsområdet for trådløs lading sammen med mobiltelefonen, ellers kan gjenstandene med metalldeler bli varme eller skadet og forårsake en sikkerhetsulykke.
Ved lading, legg mobiltelefonen med skjermen opp innenfor
induksjonsområdet for trådløs lading.
3.R.1Bruksanvisning
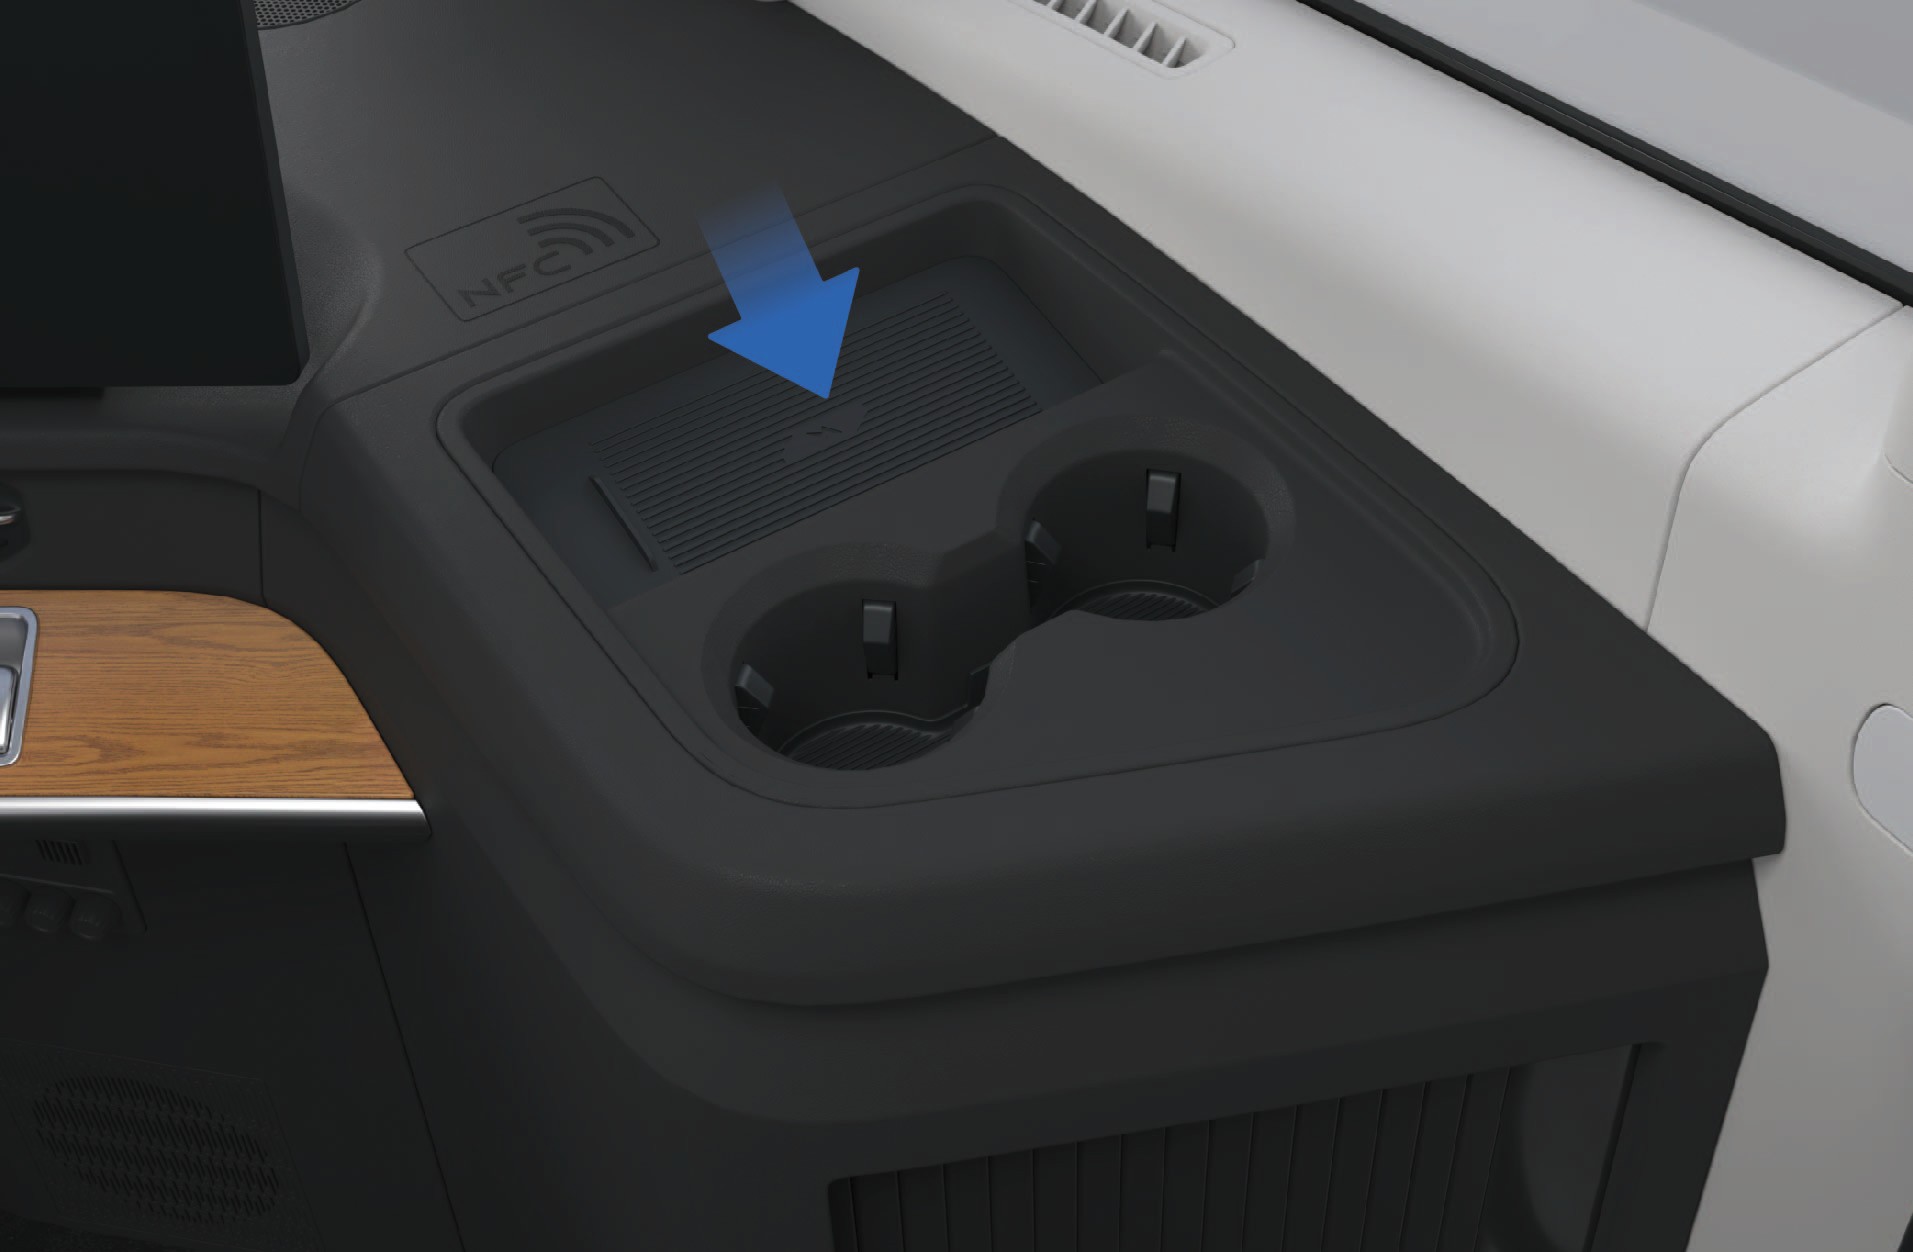
Område for trådløs telefonlading
Merknad
- Før den trådløse ladefunksjonen for telefonen aktiveres, sørg for at kortnøkkel, kredittkort eller andre magnetiske gjenstander holdes unna ladeområdet.
Ikke la mobiltelefonen lade uten tilsyn i kjøretøyet, for å unngå sikkerhetsrisiko.
Søl ikke væske i området for trådløs lading, for å unngå skade på de elektroniske komponentene.
Ikke legg tunge gjenstander i ladeområdet, for å unngå skade på mobiltelefonens trådløse lademodul.
Merk
Det er normalt at mobiltelefonen blir noe varmere under lading.
Når mobiltelefonen er varm, kan kjøretøyet stoppe ladingen for å beskytte telefonens batteri, og ladingen gjenopptas ikke før telefonen er avkjølt.
Den trådløse ladefunksjonen støtter bare mobiltelefoner, øretelefoner, høyttalere og andre enheter som oppfyller protokollen for trådløs lading.
Ved bruk av trådløs lading, plasser enheten midt i ladeområdet for å hindre at enheten ikke lades eller lades ineffektivt.
Bare 1 mobiltelefon kan lades om gangen.
Hvis telefondekselet er laget av et spesielt materiale (for eksempel et deksel med metallbrakett/metallmagnet) eller er for tykt, kan det føre til at ladingen mislykkes.
Når kjøretøyet kjører på humpete vei, kan den trådløse ladingen av mobiltelefonen stoppe periodevis.
Hvis mobiltelefonen ikke lades skikkelig, kontroller alltid at telefonen er plassert i området for trådløs lading uten fremmedlegemer, eller vent til induksjonsområdet for trådløs lading
↑ Til toppener avkjølt før du prøver igjen. Hvis lading fremdeles
er umulig, kontakt et autorisert Windrose-servicesenter i tide.
3.SStrømuttak
↑ Til toppenTilgang til kjøretøyet
Nederst i venstre hjørne av køyen er det montert 2 likestrømsuttak, med følgende konfigurasjon:
Nominell spenning: 24V
Maksimal strøm: 15A Nominell spenning: 12V
Maksimal strøm: 10A
Nederst i venstre hjørne av køyen er det montert én 230V vekselretter med stikkontakt, med følgende konfigurasjon:
Nominell effekt: 1000W
Nominell spenning: AC230V
Utgangsfrekvens: 50Hz ± 0.5Hz
3.S.1Bruksanvisning
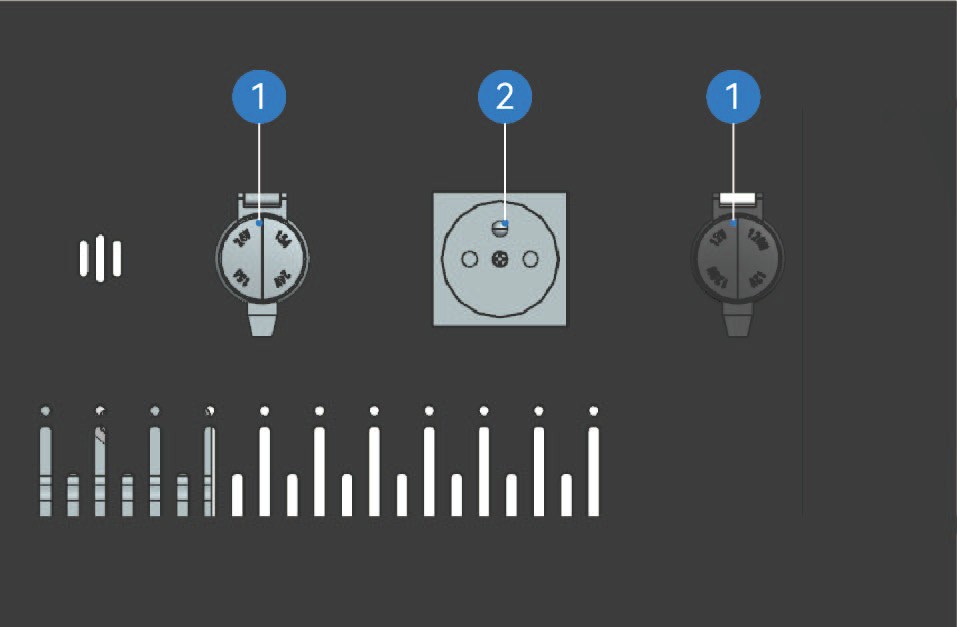
Likestrømsuttak
Vekselstrømsuttak
24V strømuttak for tilhenger: Maksimal sikker driftseffekt: 2 kW
3.S.2Forholdsregler
↑ Til toppenMerknad230V-vekselretteren kan bare brukes når kjøretøyet er koblet til høyspenning. Hvis kjøretøyet er slått av, er bare 12V- eller 24V-strømforsyningen tilgjengelig.
3.TTaklampe
Innvendig belysning
Taklampen kan slås på og av på to måter.
Bryter for å slå på taklampe
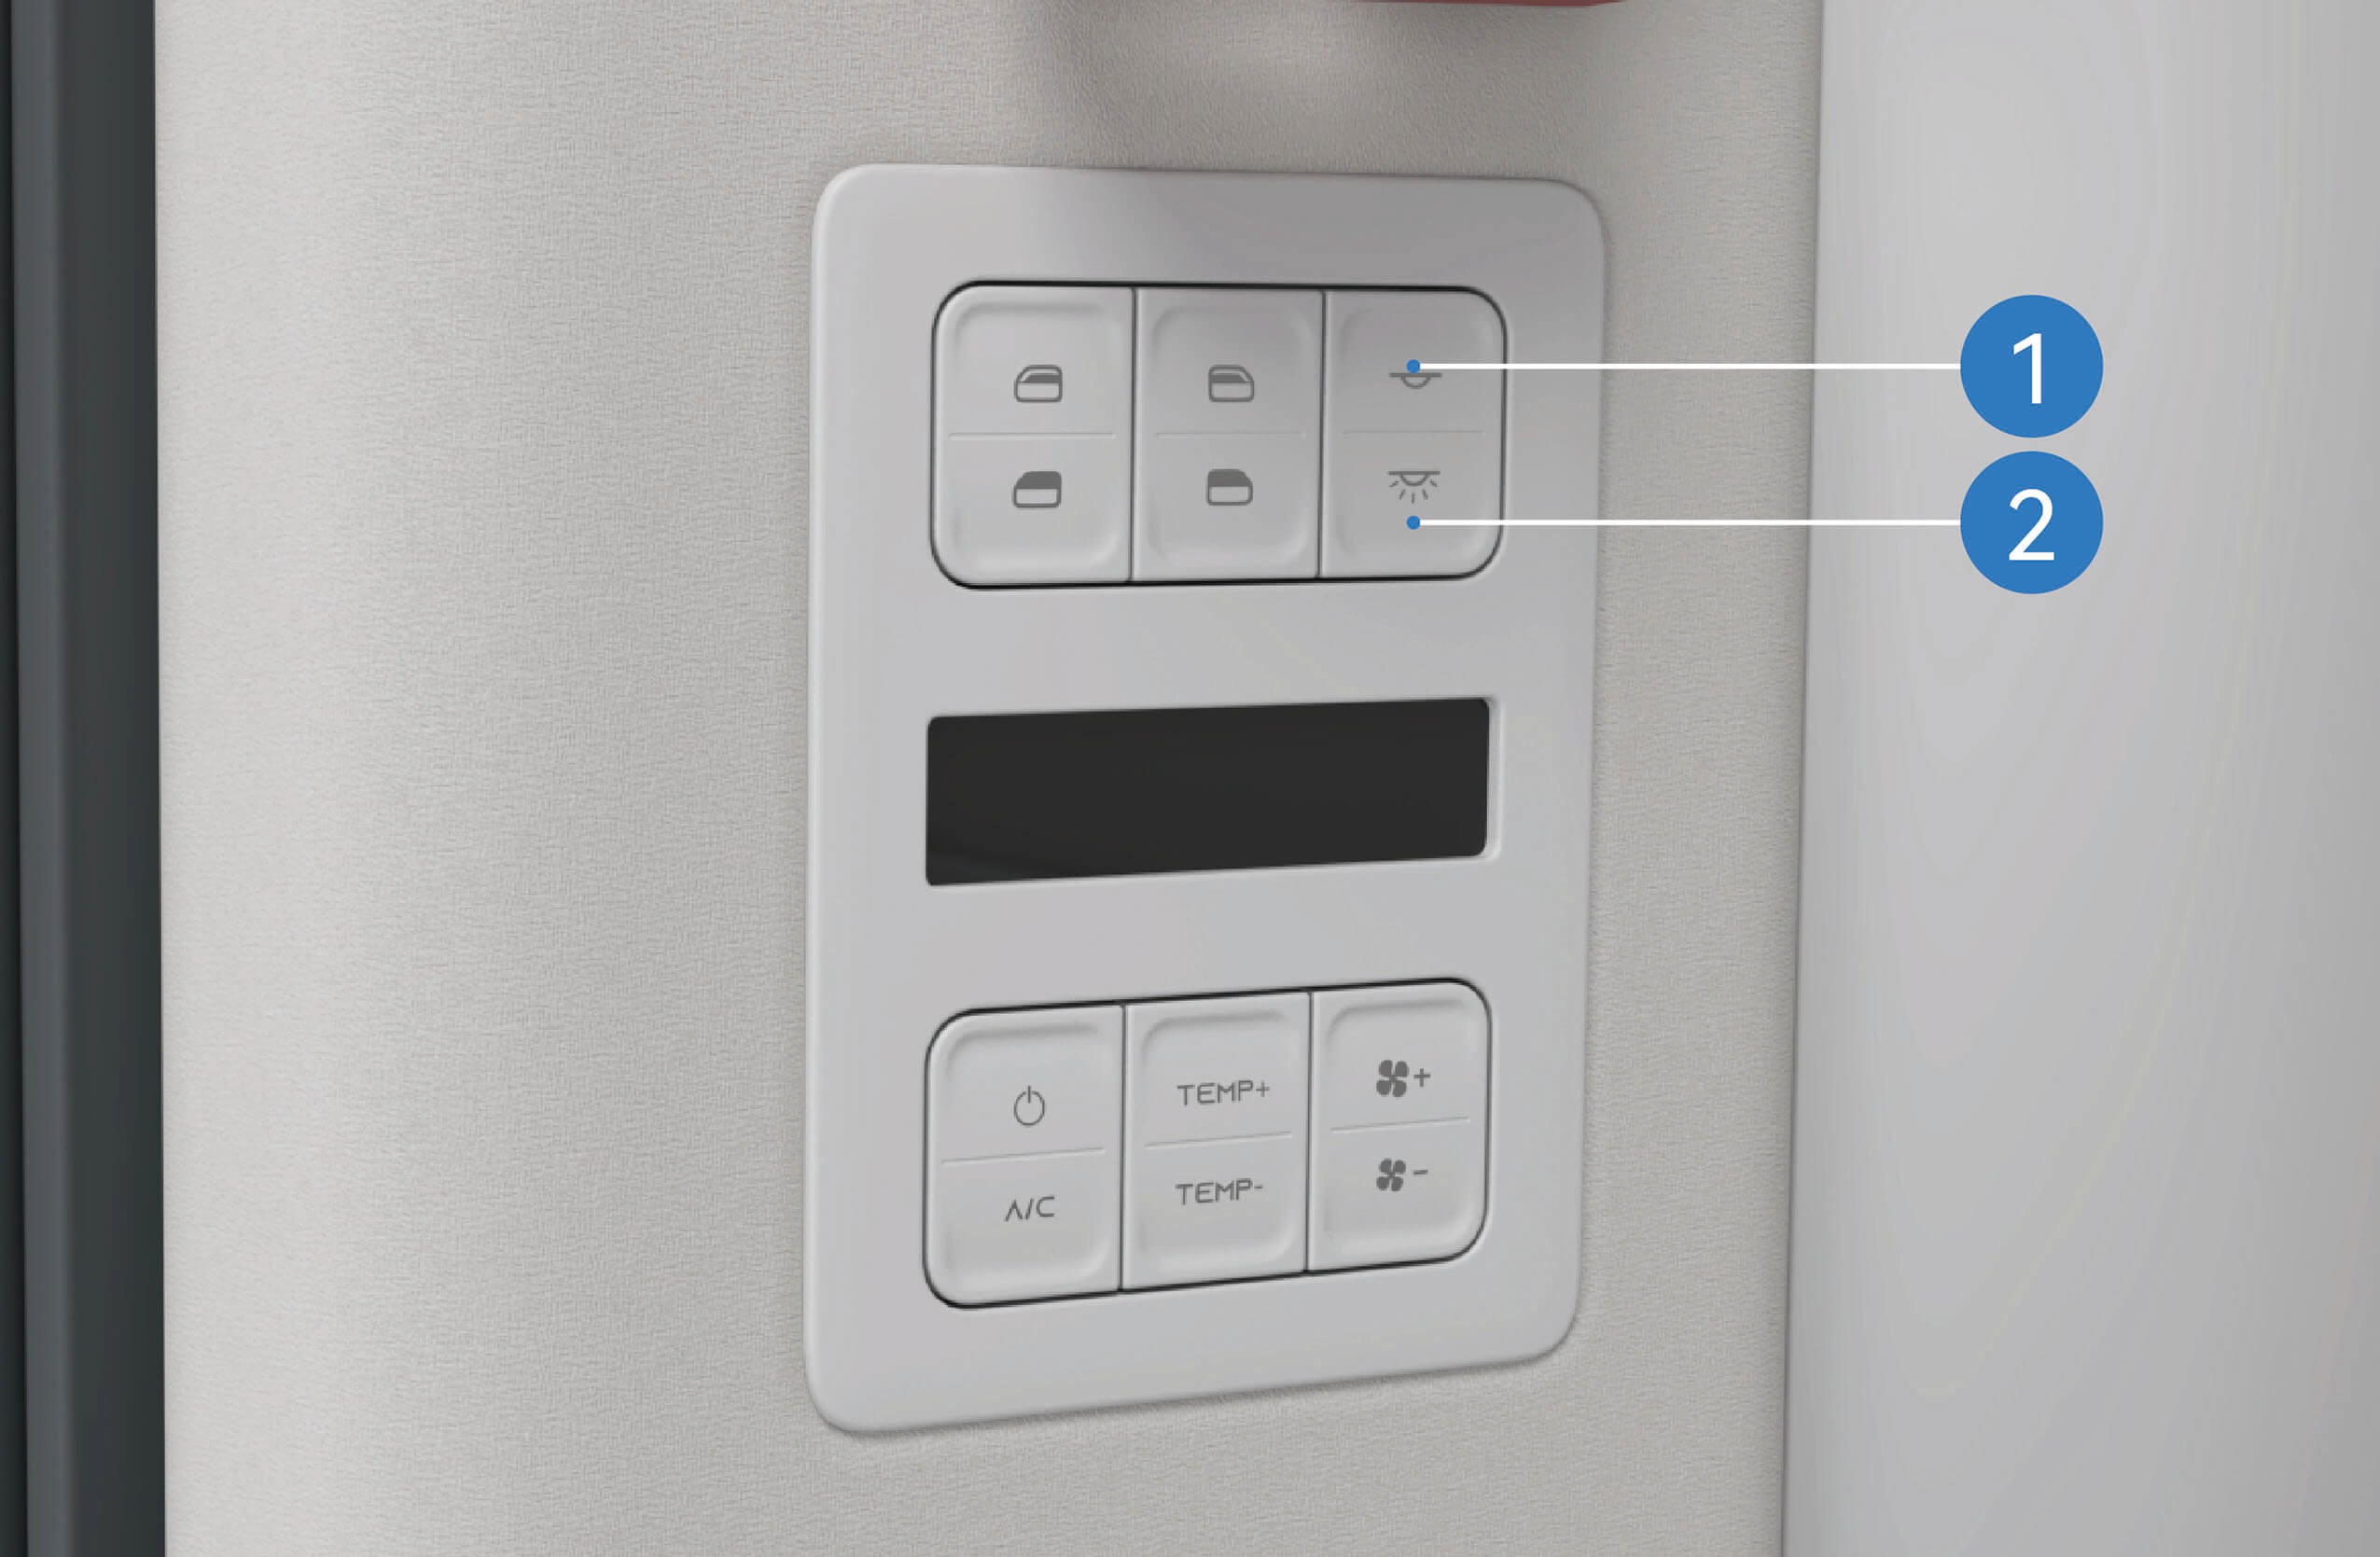 Bryter for å slå av taklampe/innvendig lampe
Trykk på den øvre på-bryteren for å slå på taklampen. Trykk og slipp den nedre av-bryteren for taklampe/innvendig lampe for å slå av taklampen, og trykk og hold den øvre av-bryteren for taklampe/innvendig lampe for å slå av taklampen.
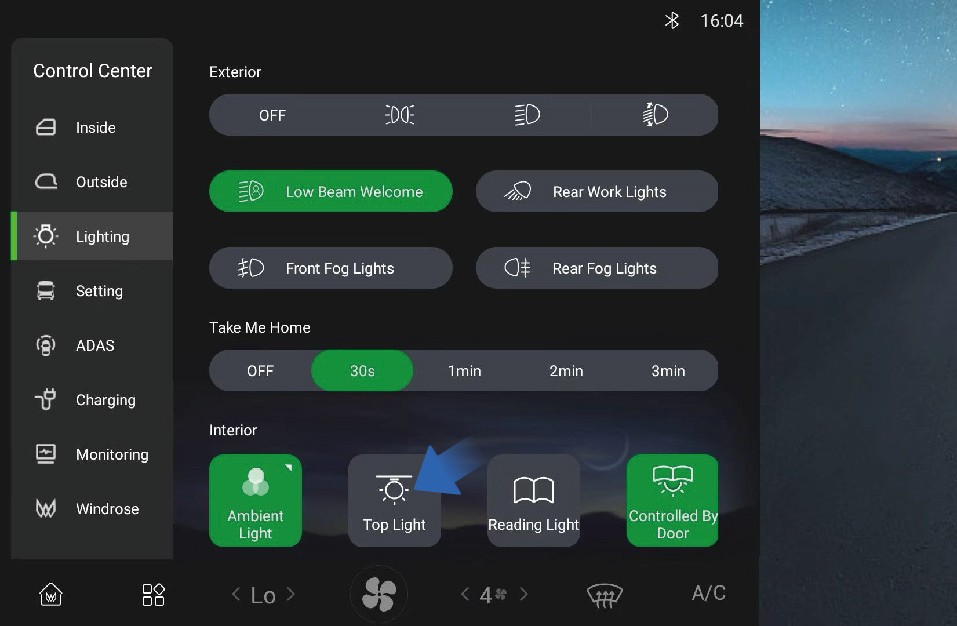
I tillegg kan du slå taklampen på/av ved å velge «Control Center», bytte til grensesnittet «Lighting» og klikke på «Top Light»-knappen på kjøretøyets informasjonsskjerm i instrumentpanelet.
På/av med dør åpne/lukke-funksjon
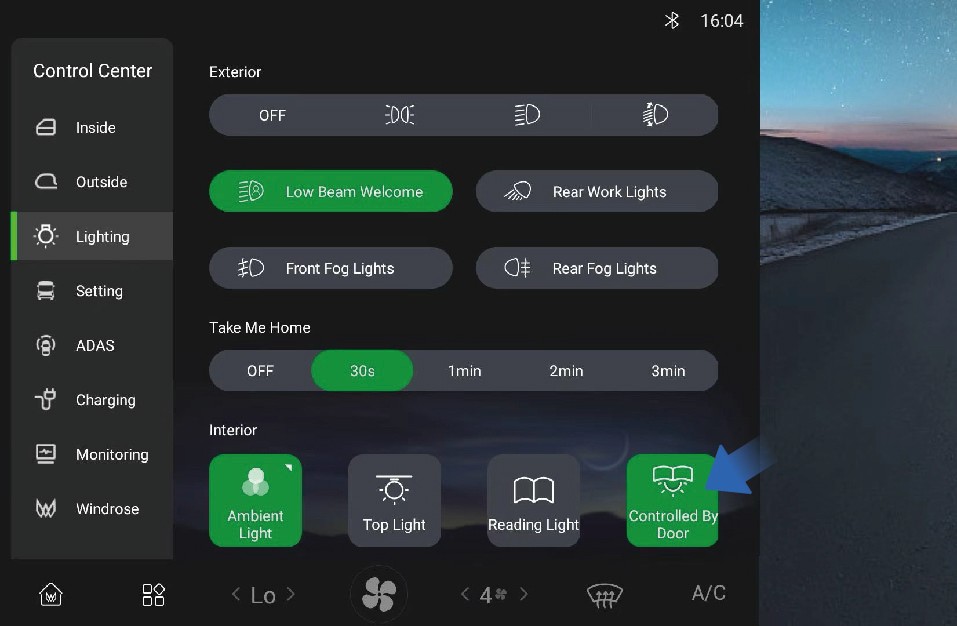
Du kan aktivere/deaktivere på/av med dør åpne/lukke-funksjonen ved å velge «Control Center», bytte til grensesnittet «Lighting» og klikke på «Controlled By Door»-knappen på kjøretøyets informasjonsskjerm i instrumentpanelet. Når denne funksjonen er aktivert, tennes eller slukkes taklampen når døren åpnes eller lukkes.
3.T.1Forholdsregler
↑ Til toppenAdvarselIkke bruk fremre innvendige lamper ved kjøring om natten. Sterkt lys inne i kjøretøyet kan redusere sikten ved nattkjøring og kan forårsake kollisjon.
Bruksanvisning
3.UInnstigningslys
↑ Til toppenKjøretøyet har en velkomstlysfunksjon.
Innvendig belysning
Du kan aktivere/deaktivere velkomstfunksjonen for nærlys ved å velge «Control Center», bytte til grensesnittet «Lighting» og klikke på «Low Beam Welcome»-knappen på kjøretøyets informasjonsskjerm i instrumentpanelet.
Følg-meg-hjem
3.VLeselys
↑ Til toppen
Innvendig belysning
Førerhuset og køyen er utstyrt med leselys som kan slås på når du trenger lys til lesing.
3.V.1Bruksanvisning
↑ Til toppenLeselys i førerhus
Du kan aktivere/deaktivere følg-meg-hjem-funksjonen ved å velge «Control Center» og bytte til grensesnittet «Lighting» på kjøretøyets informasjonsskjerm i instrumentpanelet.
3.V.2Forholdsregler
MerkDu kan stille inn varigheten for følg-meg-hjem etter behov.
Leselys i førerhus
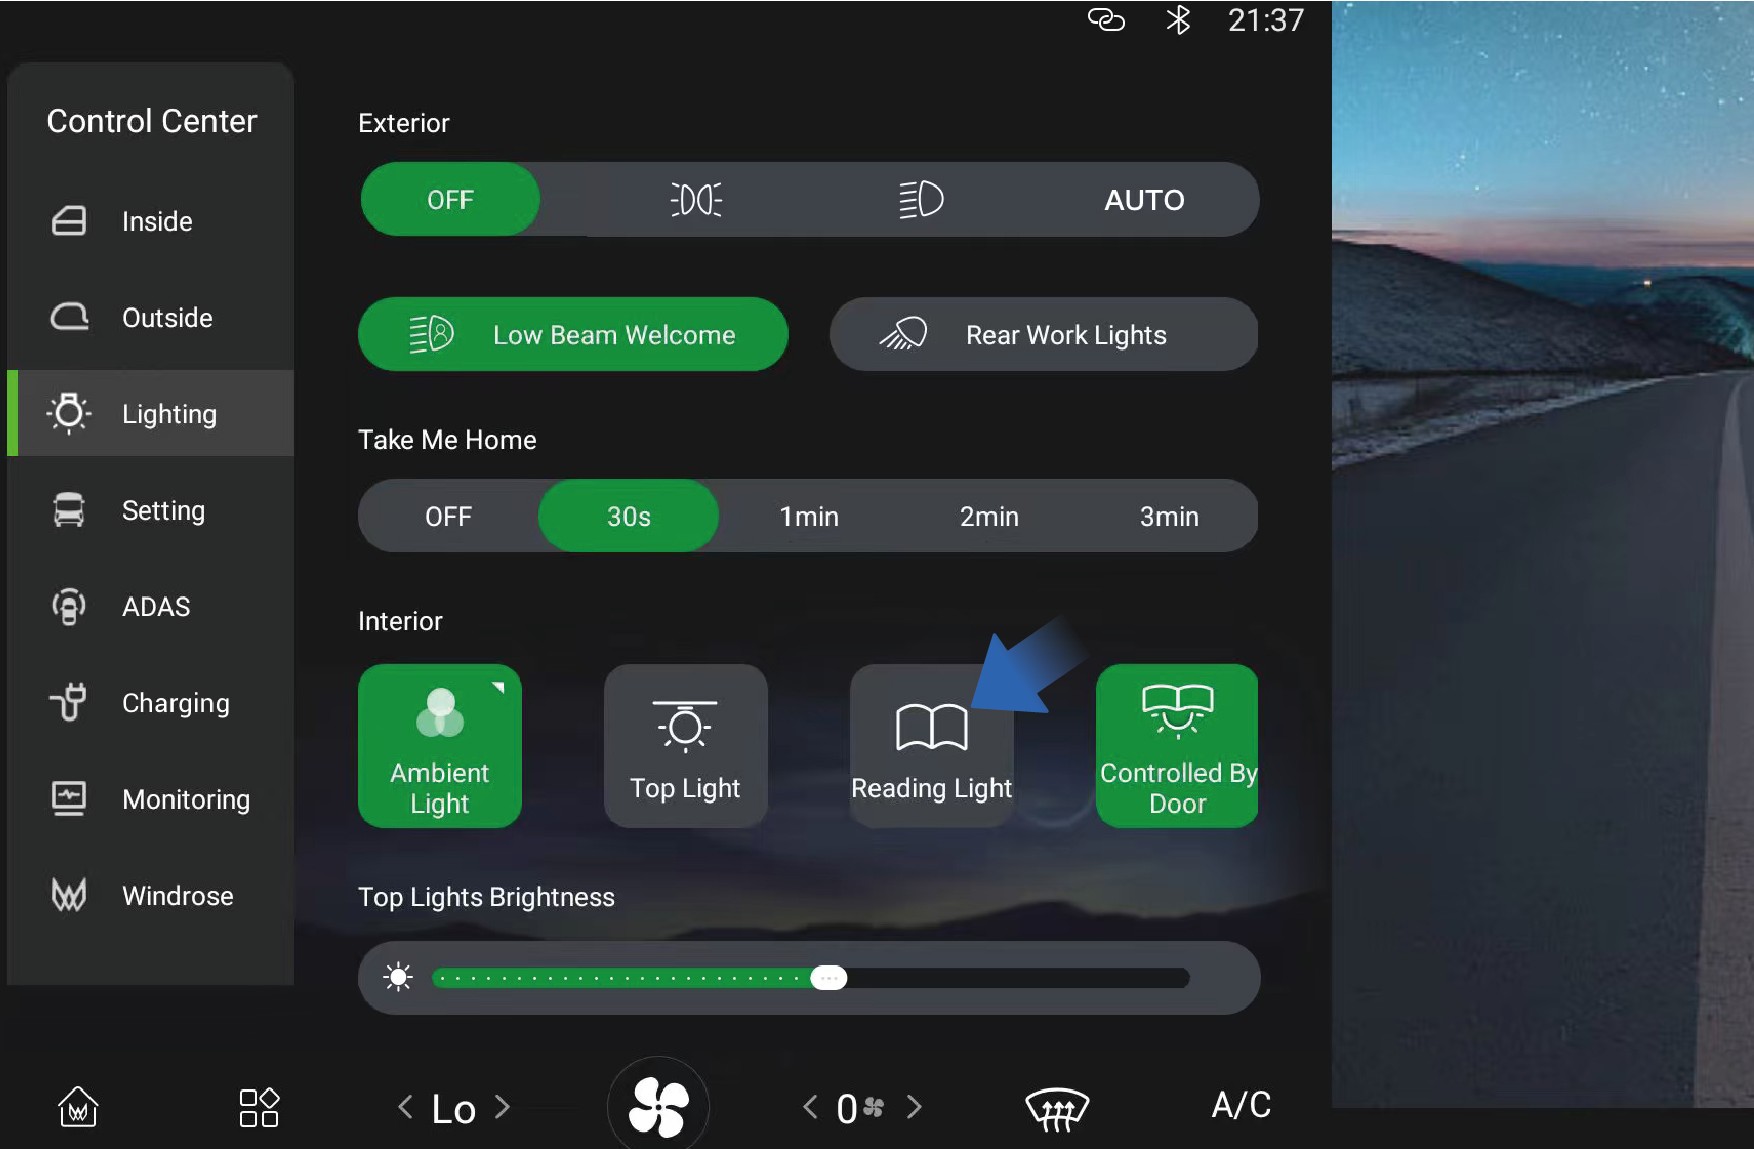
Du kan aktivere/deaktivere leselyset ved å velge «Control Center», bytte til grensesnittet «Lighting» og klikke på «Reading Light»-knappen på kjøretøyets informasjonsskjerm.
Leselys ved køye
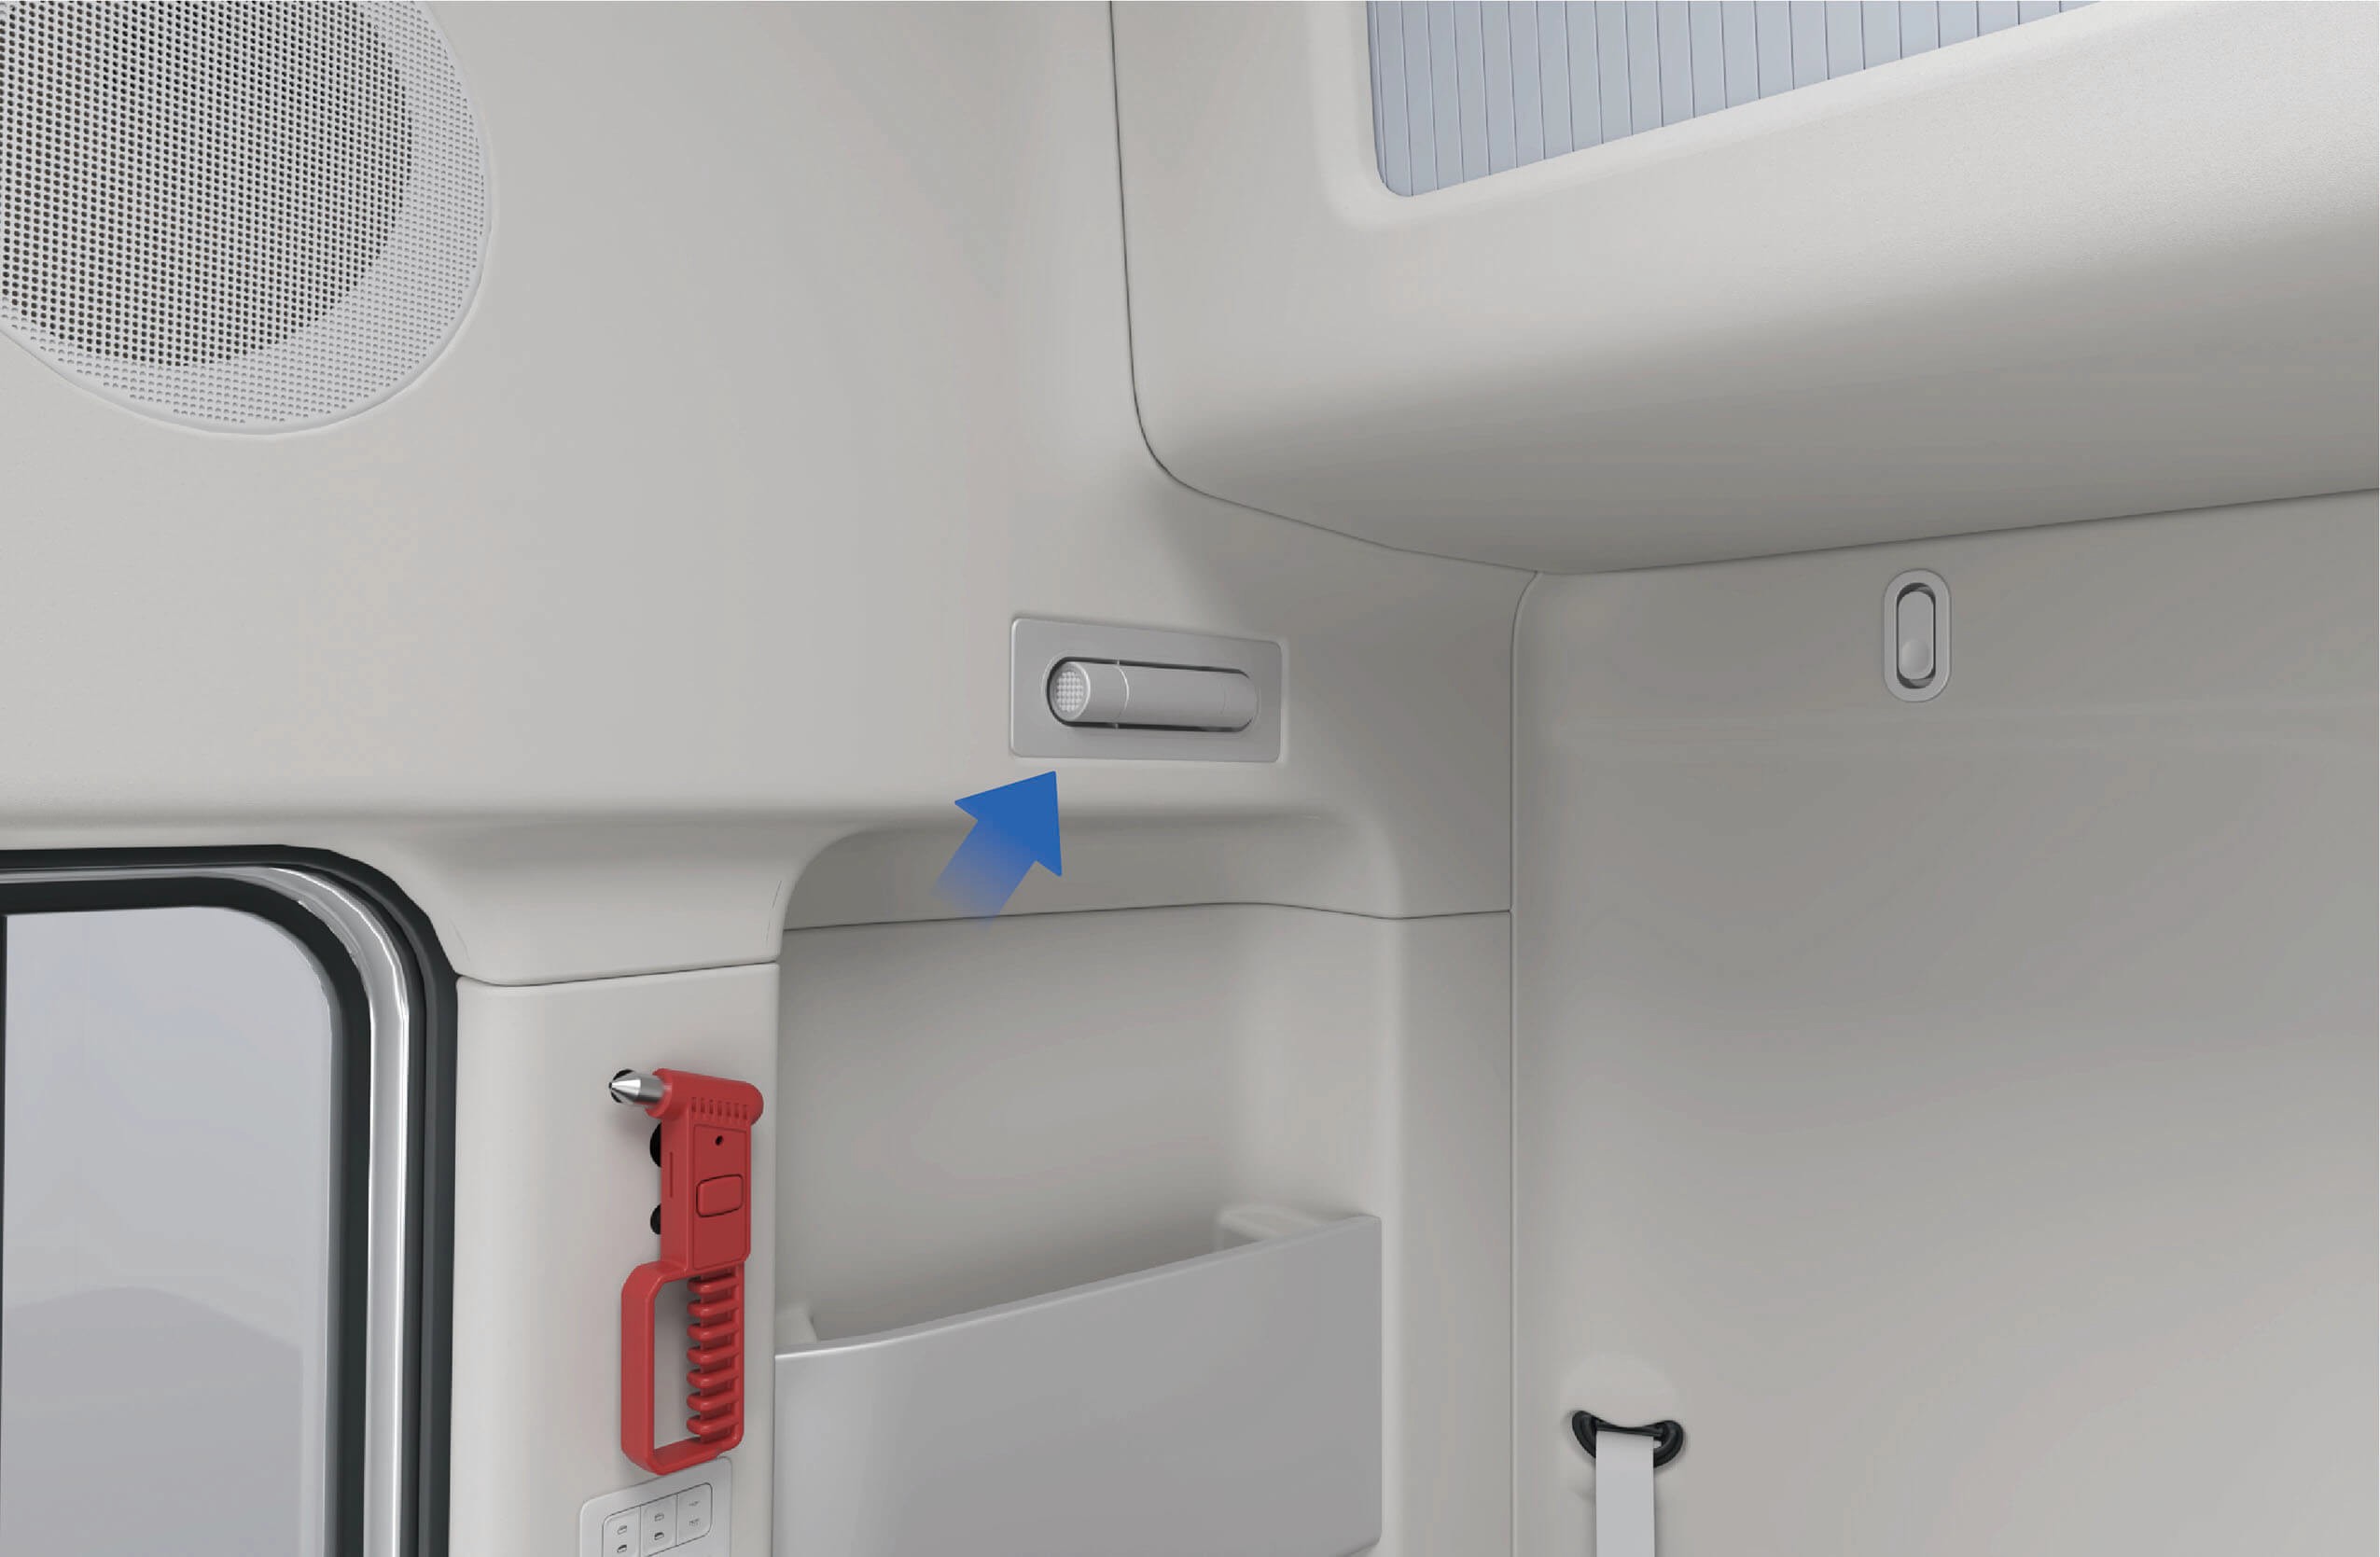
↑ Til toppenDet er et leselys over køyen som kan trekkes ut ved å trykke på den fremre enden for å slå på bryteren. Lampen tennes automatisk når den trekkes ut, og du kan justere lampevinkelen etter behov. Skyv leselyset tilbake, så slukkes det automatisk.
3.V.3Forholdsregler
↑ Til toppenMerkNår omgivelseslyset er svakt, ikke slå på leselysene
3.WStemningslys
↑ Til toppen
Innvendig belysning
under kjøring. Ellers kan frontruten få refleksjoner,
noe som gir uklar sikt til veien foran og videre kan føre til en sikkerhetsulykke.
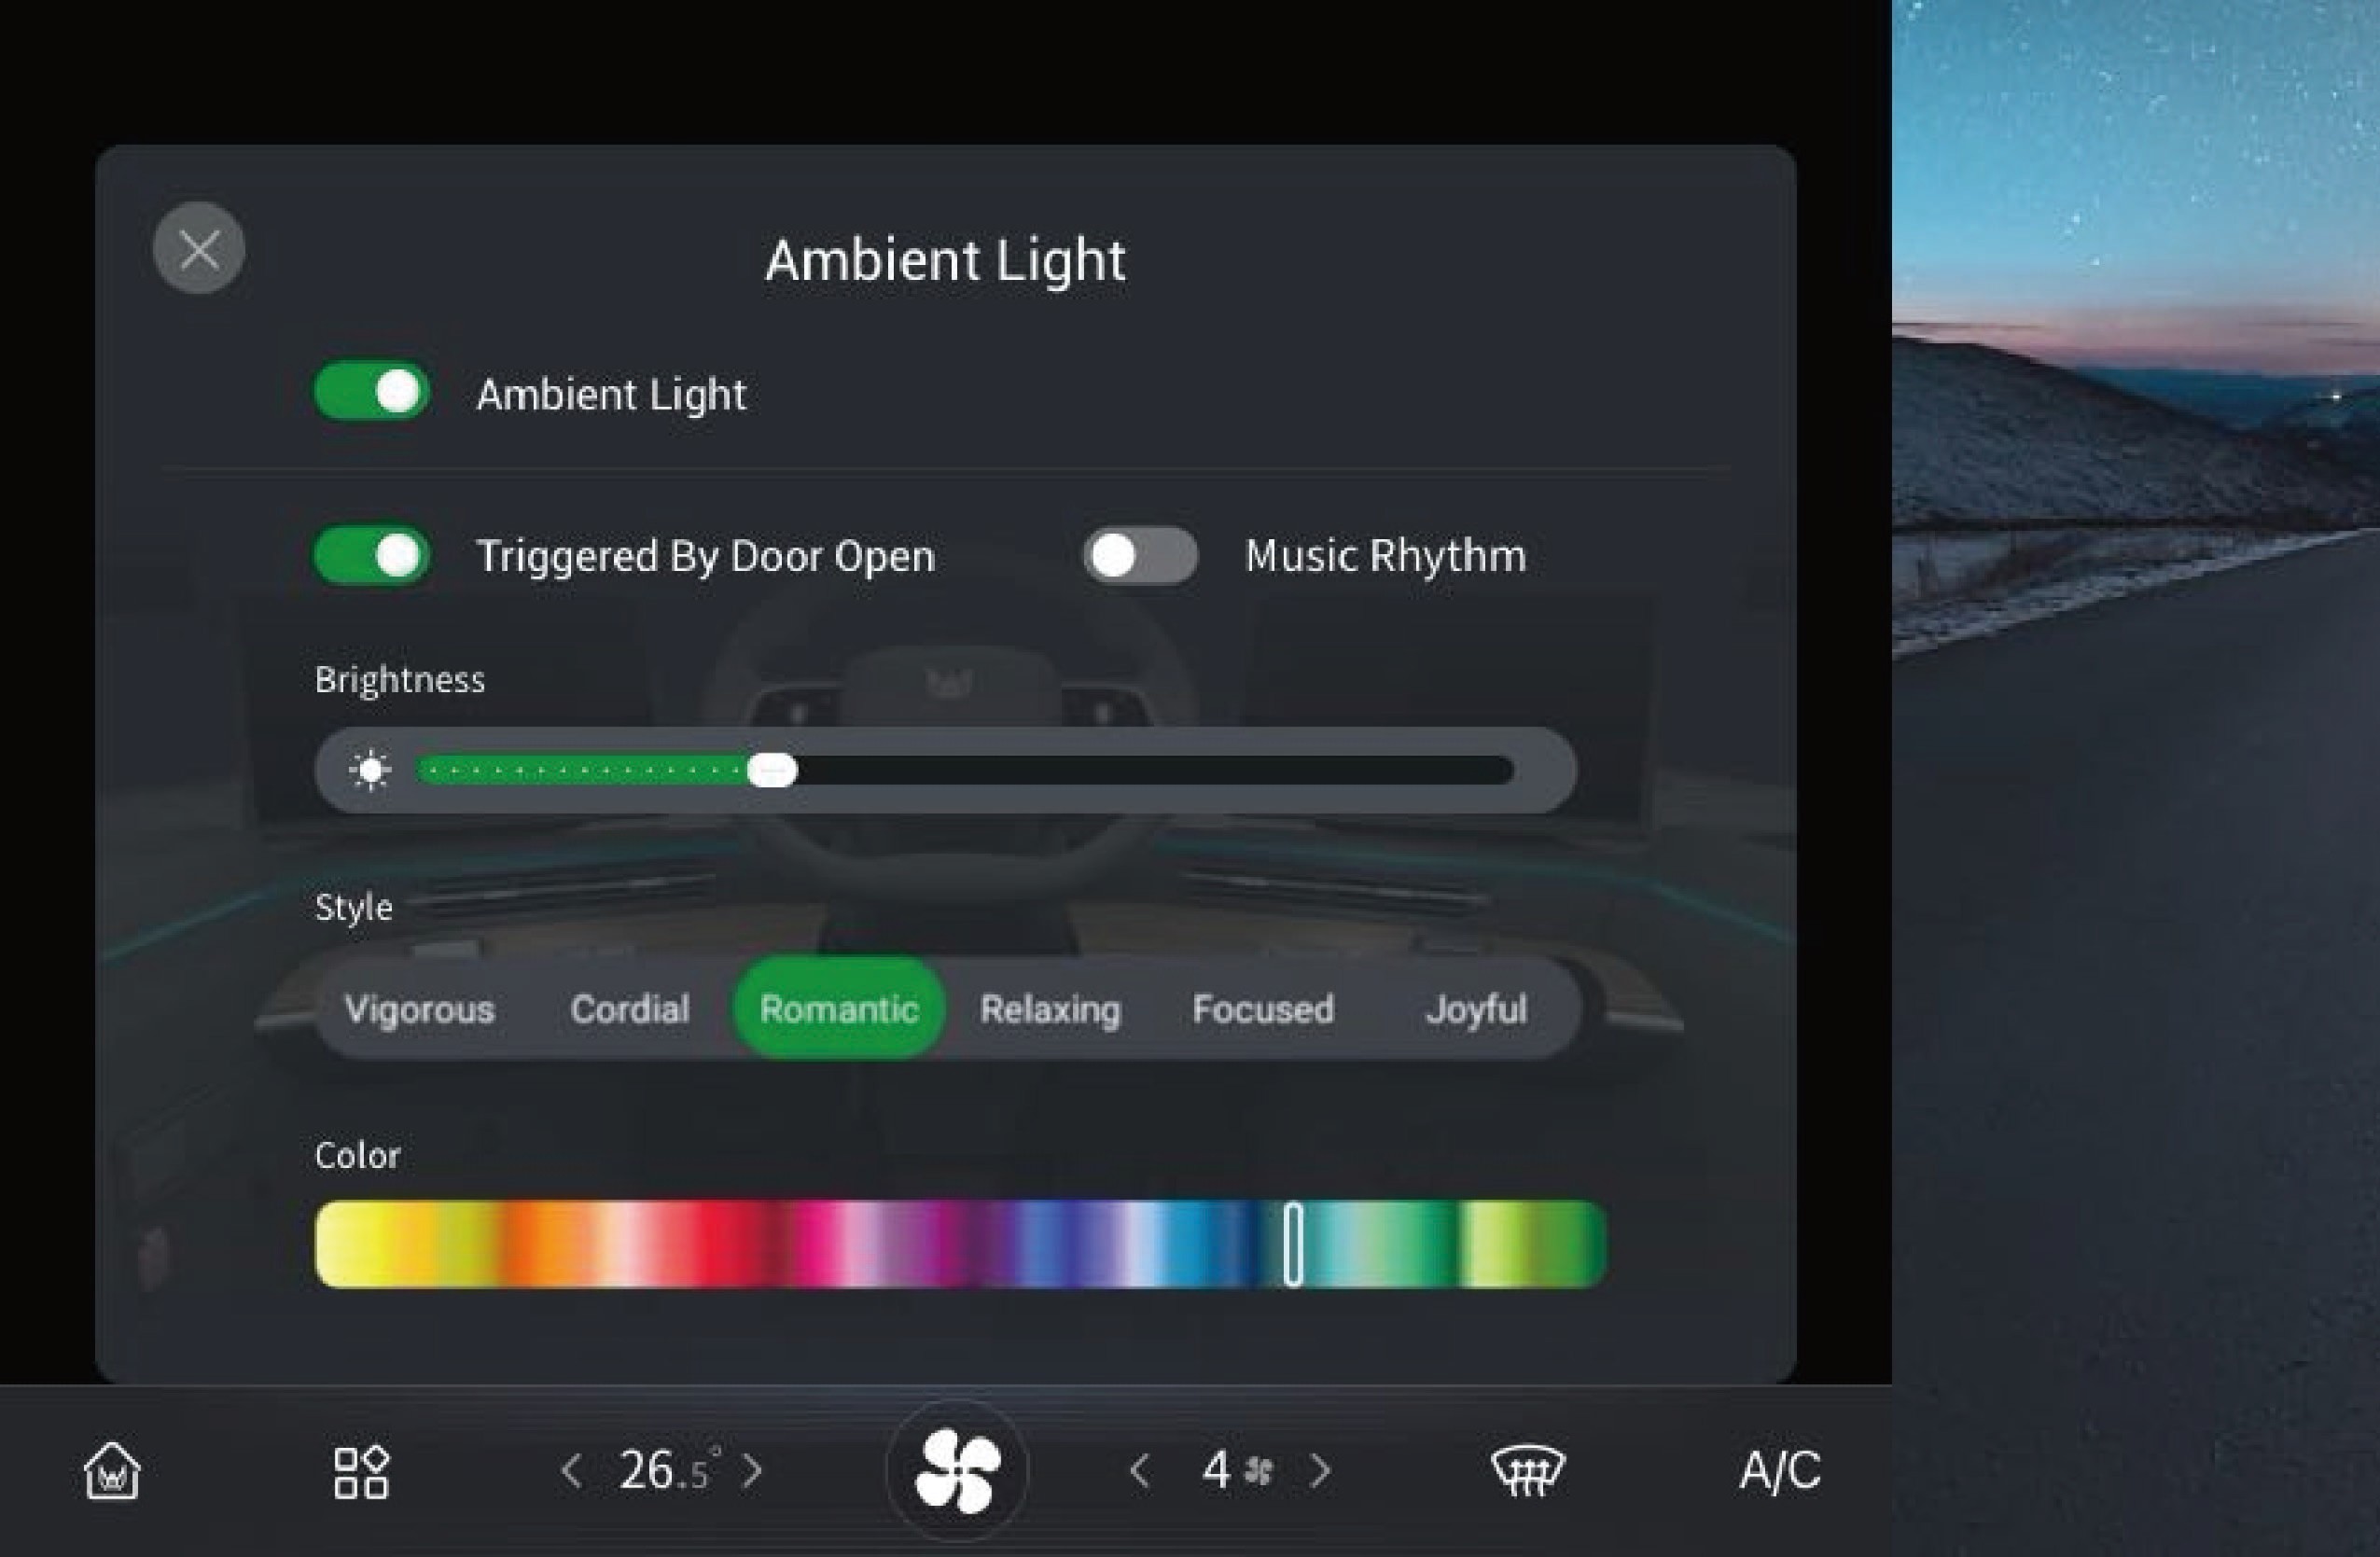
Kjøretøyet har stemningslys som kan veksle mellom en rekke farger og følge musikkrytme.
3.W.1Bruksanvisning
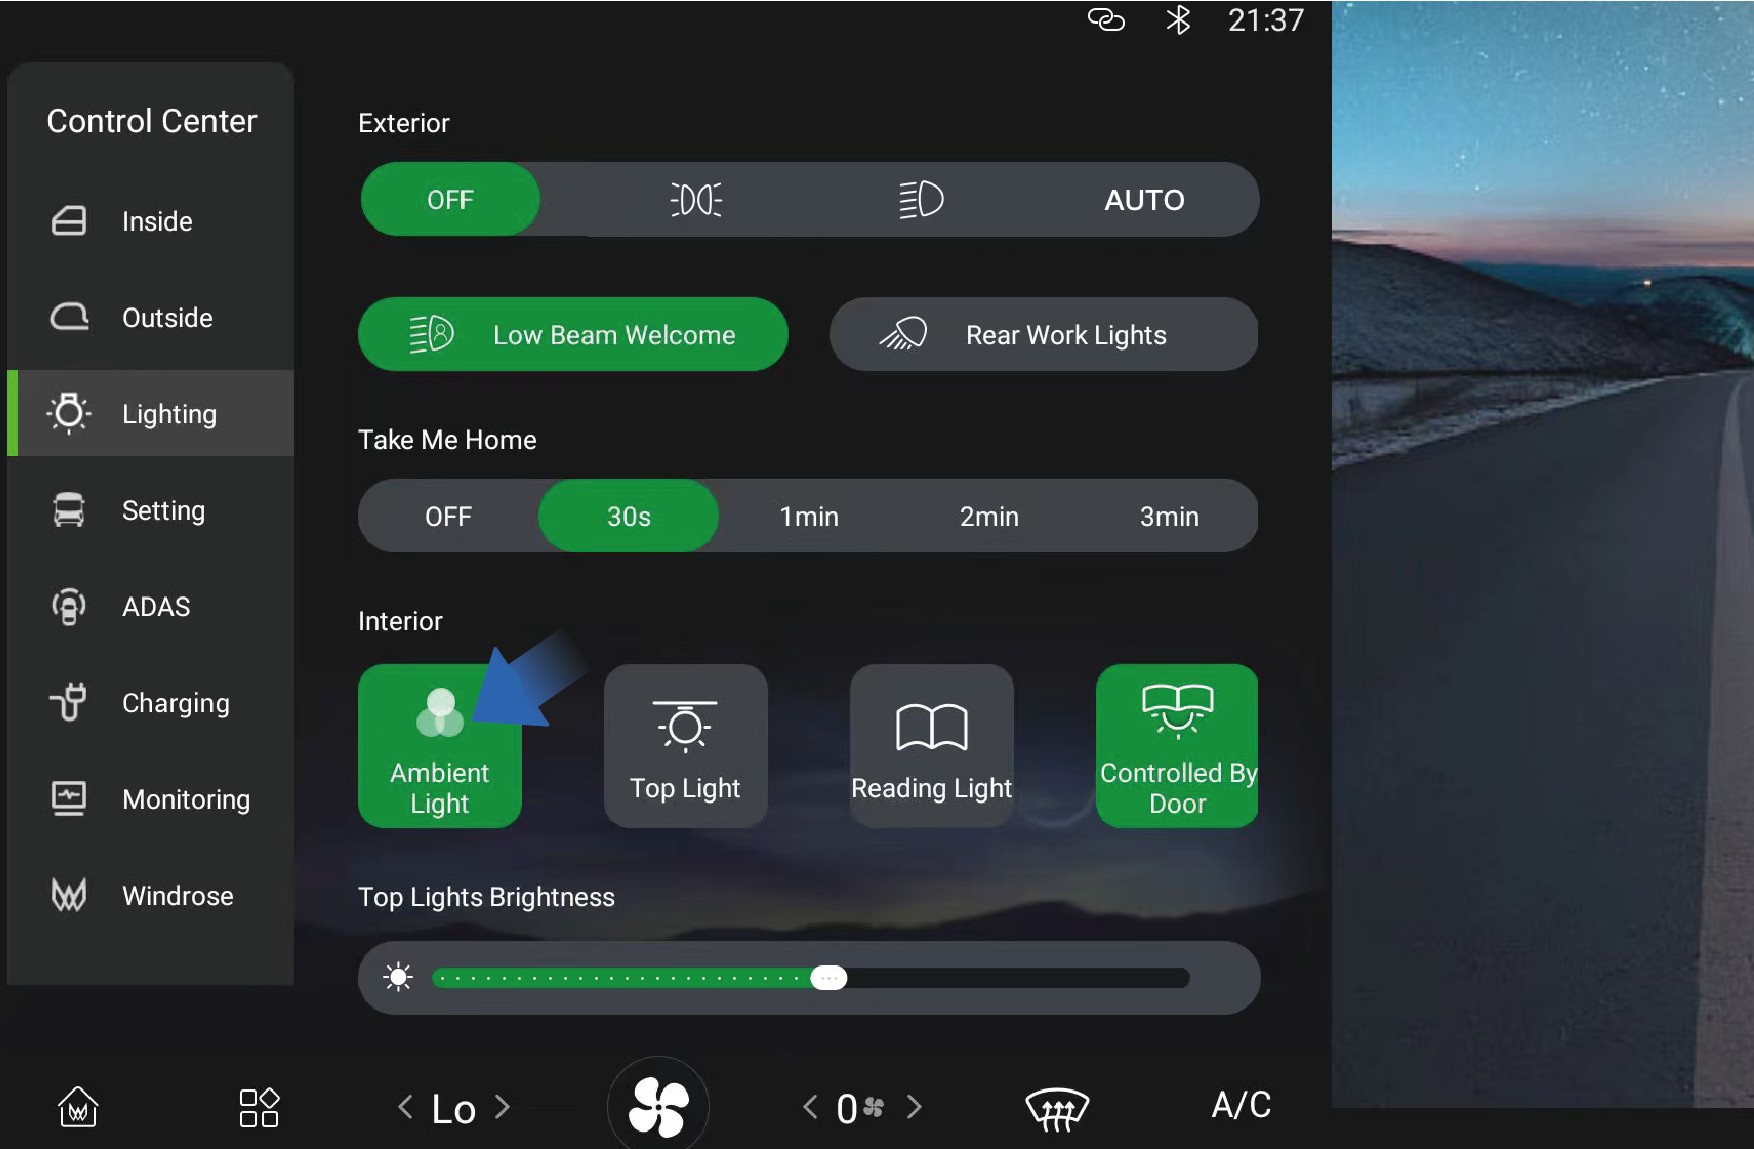
↑ Til toppenDu kan justere stemningslyset ved å velge «Control Center», bytte til grensesnittet «Lighting» og velge «Ambient Light»-knappen på kjøretøyets informasjonsskjerm i instrumentpanelet.
Du kan justere stemningslyset selv etter behov og preferanser.
3.W.2Forholdsregler
↑ Til toppenMerkVed bruk av stemningslys, sørg for at lysfargen ikke forstyrrer førerens sikt, og ivareta kjøresikkerheten.
3.XStyringssystem for klimaanlegg
↑ Til toppenKlimaanlegg i kjøretøyet
Du kan stille inn og styre klimaanlegget via klimagrensesnittet på kjøretøyets informasjonsskjerm eller via betjeningspanelet for klimaanlegget øverst til høyre ved køyen.
Grensesnitt for fremre klimaanlegg
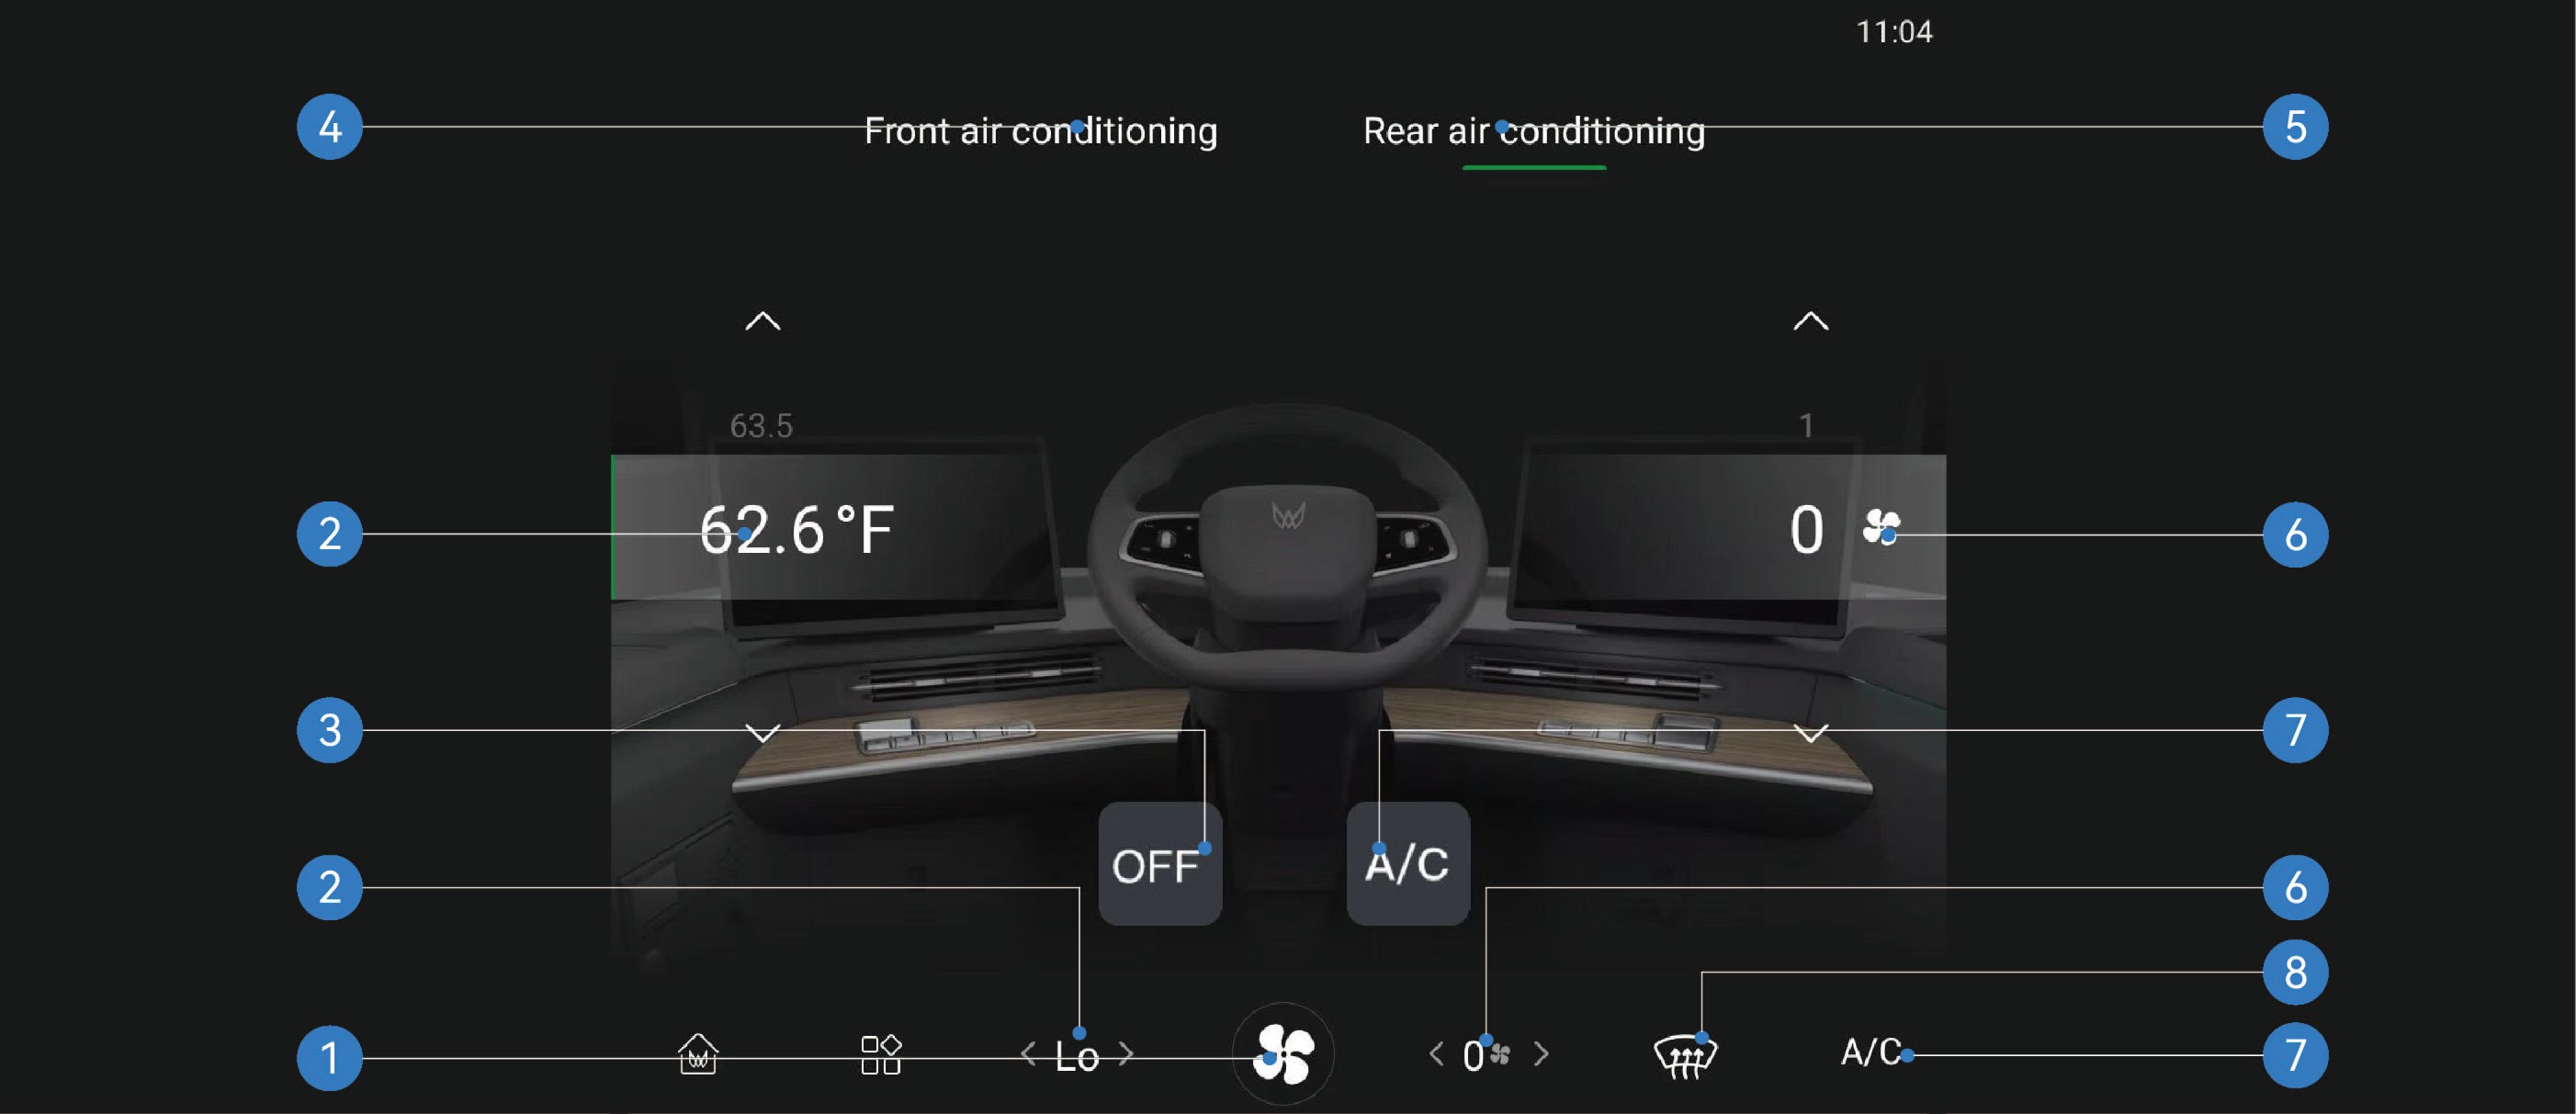
I klimagrensesnittet på kjøretøyets informasjonsskjerm kan du stille inn luftmengde, temperatur eller luftretning for fremre og bakre klimaanlegg ved å bytte mellom grensesnittet for fremre og bakre klimaanlegg.
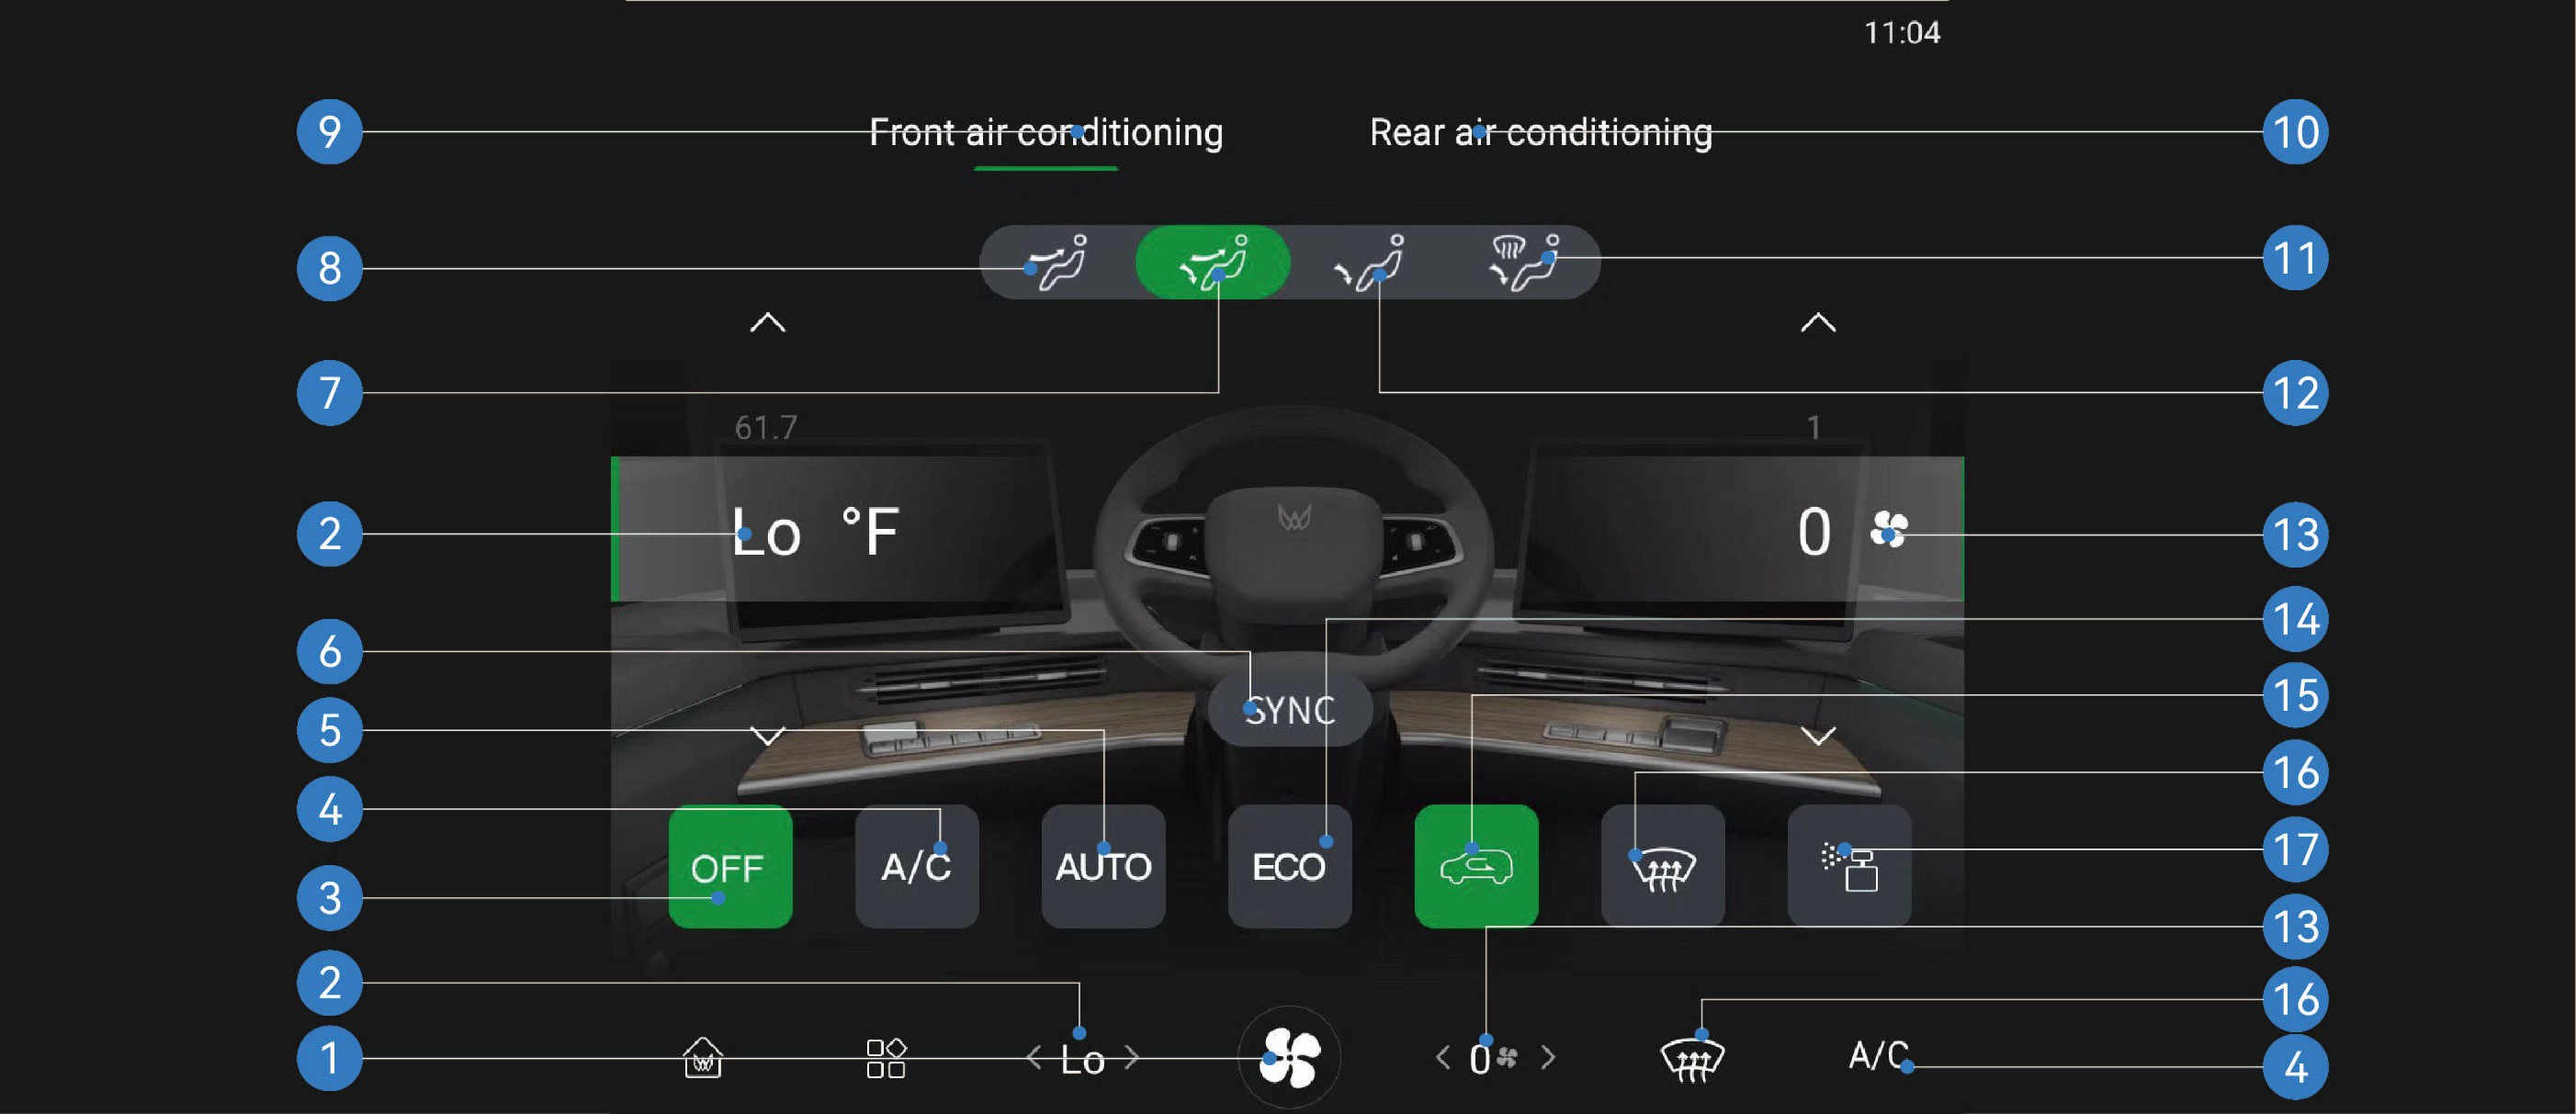
Åpne klimagrensesnitt 6. Bryter for temperatursynkronisering av klimaanlegget
11. Fotbrønn- og avrimingsmodus
Bryter for avriming/avdugging av frontrute
Temperatur fremre klimaanlegg 7. Ansikt- og fotbrønnmodus 12. Fotbrønnmodus 17. Duftgrensesnitt*
Av-bryter fremre klimaanlegg 8. Ansiktsblåsemodus 13. Luftmengde fremre klimaanlegg
Kompressorbryter 9. Grensesnitt fremre klimaanlegg 14. ECO-modusbryter
Automatisk modus-bryter 10. Grensesnitt bakre klimaanlegg 15. Intern/ekstern sirkulasjon
bryter
Grensesnitt for bakre klimaanlegg
|
|
|
|
|---|---|---|---|
|
|
|
|
3.X.1Bruksanvisning
|
|
|
|---|---|---|
|
|
|
|
|
|
|
|
|
|
|
|
|
|
|
|
|


|
|
|
|---|---|---|
|
|
|
|
|
|
|
|
|
|
|
|
|
|


|
|
|
|---|---|---|
|
|
|
|
|


Betjeningspanel for klimaanlegg
Betjeningspanelet for klimaanlegget styrer bare de tilsvarende funksjonene for det bakre klimaanlegget.
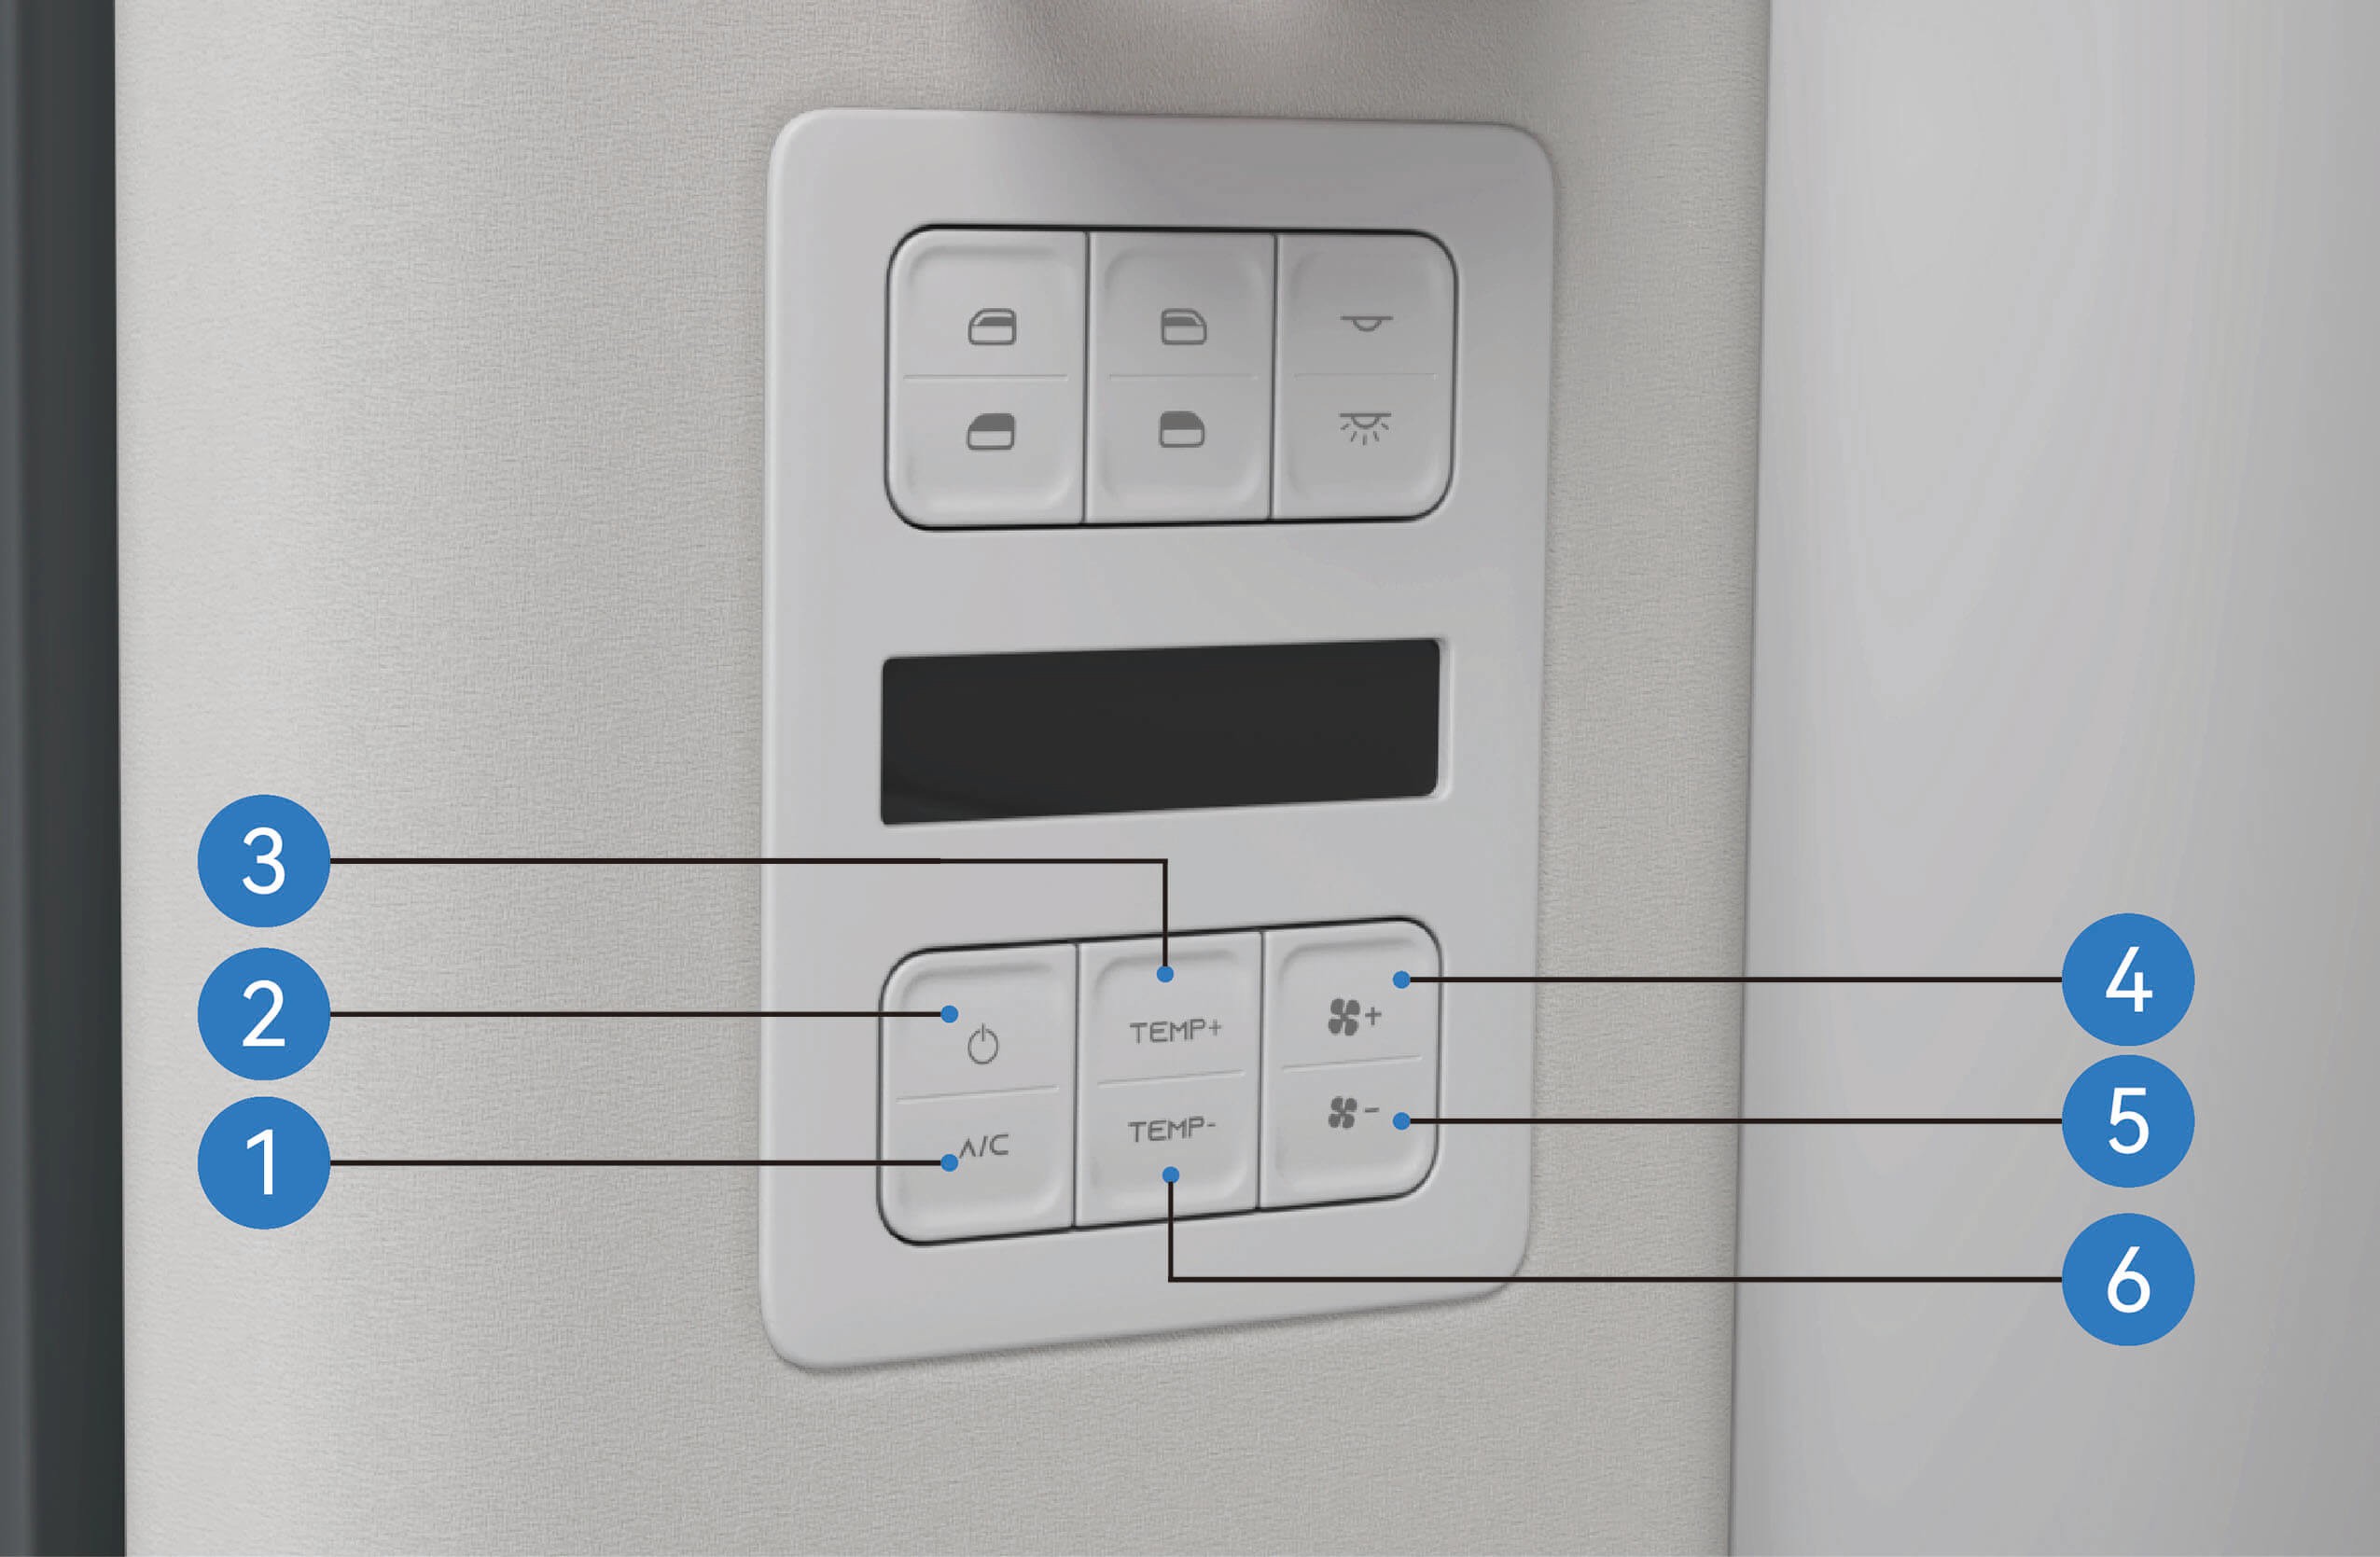
Bryterknapp for bakre kompressor
Bryter for bakre klimaanlegg
Øk temperatur bakre klimaanlegg
Luftmengde bakre klimaanlegg +
Luftmengde bakre klimaanlegg −
Reduser temperatur bakre klimaanlegg
3.X.2
Forholdsregler
Advarsel
Før kjøring, kontroller at alle vinduer er fri for is, snø eller dugg, ellers hindres sikten og det kan oppstå en trafikkulykke.
Ikke ha intern sirkulasjon på over lengre tid, da dette kan gjøre luften i kjøretøyet dårlig og dugge vinduene.
Merk
Å slå av kompressorbryteren slår ikke av klimaanlegget, og varmesystemet kan fortsatt være i drift.
Når du slår på klimaanlegget for første gang i svært fuktige omgivelser, er det normalt at frontruten dugger litt.
Hvis klimaanlegget bråker, kan du manuelt redusere luftmengden.
En svak lyd som rennende vann eller en susende lyd kan
høres når klimaanlegget er i drift eller slås av. Denne
lyden lages av kjølemediet under normal drift av klimaanlegget og er normalt.
Når du synes luften i kjøretøyet er tung og innestengt, kan du slå på ekstern sirkulasjon for å slippe uteluft inn og holde luften i kjøretøyet frisk.
3.YJustering av luftdyser
↑ Til toppenKlimaanlegg i kjøretøyet
De fremre luftdysene er plassert i frontruten, instrumentpanelet og i benplassen under instrumentpanelet. De bakre luftdysene er plassert på venstre side av køyen i kjøretøyet.
3.Y.1
Bruksanvisning
Justering av fremre luftdyse
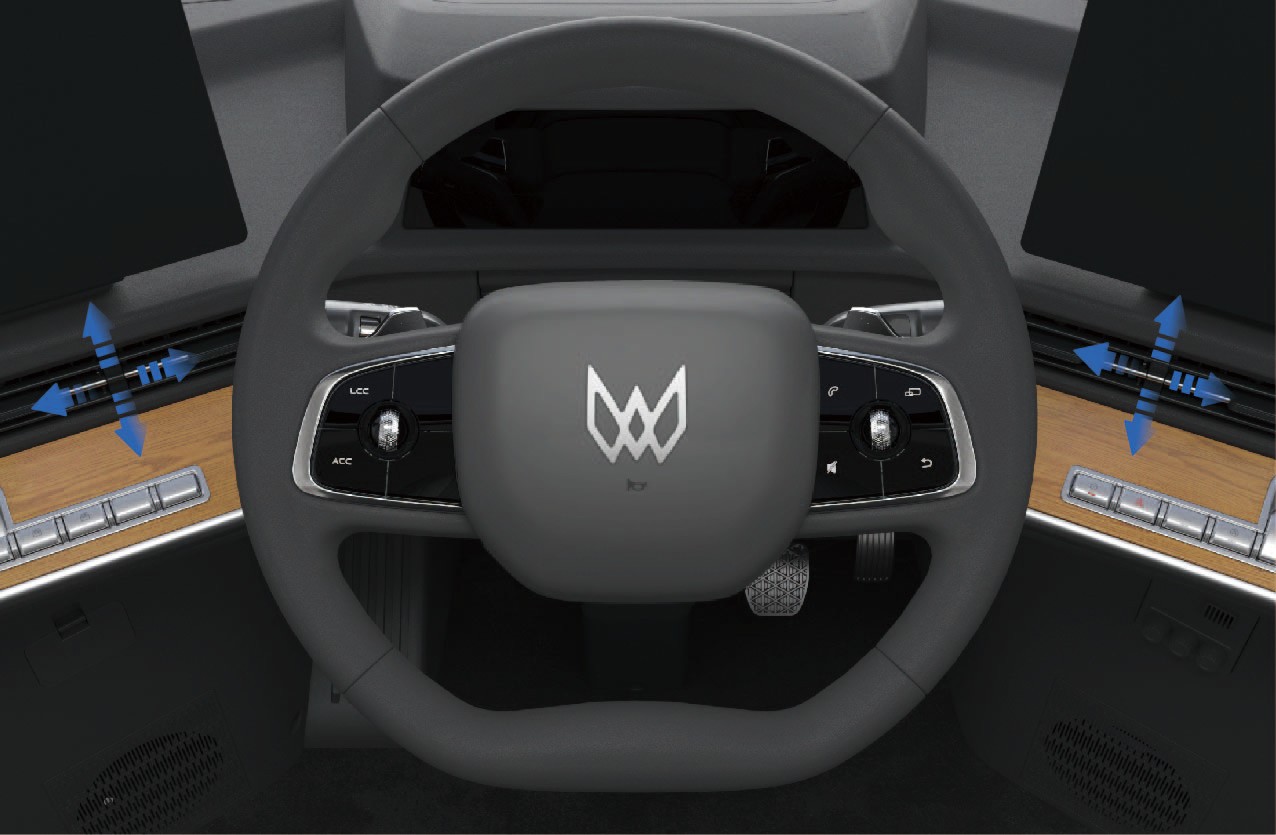
↑ Til toppenDu kan justere spakene ved den fremre dysen manuelt for å styre blåseretningen opp/ned eller venstre/høyre for den fremre dysen.
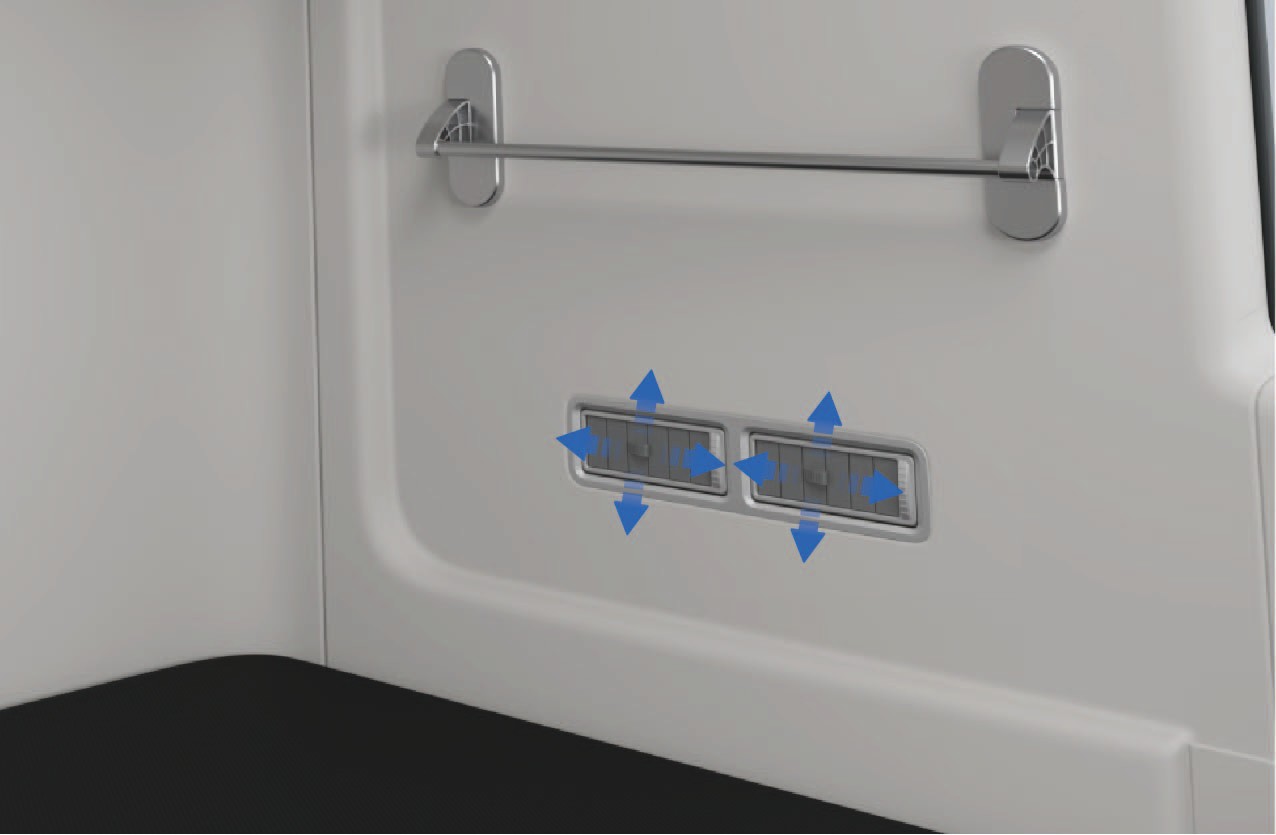
Justering av bakre luftdyse
Du kan justere spakene ved den bakre dysen manuelt. Du kan vri spaken opp og ned for å justere blåsevinkelen opp/ned for den bakre dysen, eller vri spaken til venstre og høyre for å justere blåsevinkelen venstre/høyre for den bakre luftdysen eller lukke dysen. Hold minst én dyse åpen når du justerer de bakre luftdysene.
3.Y.2Forholdsregler
↑ Til toppenMerknadVed justering av dysespakene, ikke bruk stor kraft, for å unngå skade på spakene.
3.ZDuftsystem i kjøretøyet
↑ Til toppenKlimaanlegg i kjøretøyet
Kjøretøyet har et duftsystem som kan monteres i duftboksen i det nedre trekkområdet på høyre side av førersetet etter eget ønske.
3.Z.1Bruksanvisning
Åpne lokket på duftflasken, sett den tynne enden av flasken inn i hullet i duftmekanismen over det nedre høyre trekkområdet ved setet, og trykk forsiktig ned for å montere duftflasken på plass.
Når duftflasken settes inn i hullet, holdes den på plass av magneten i duft-
mekanismen.
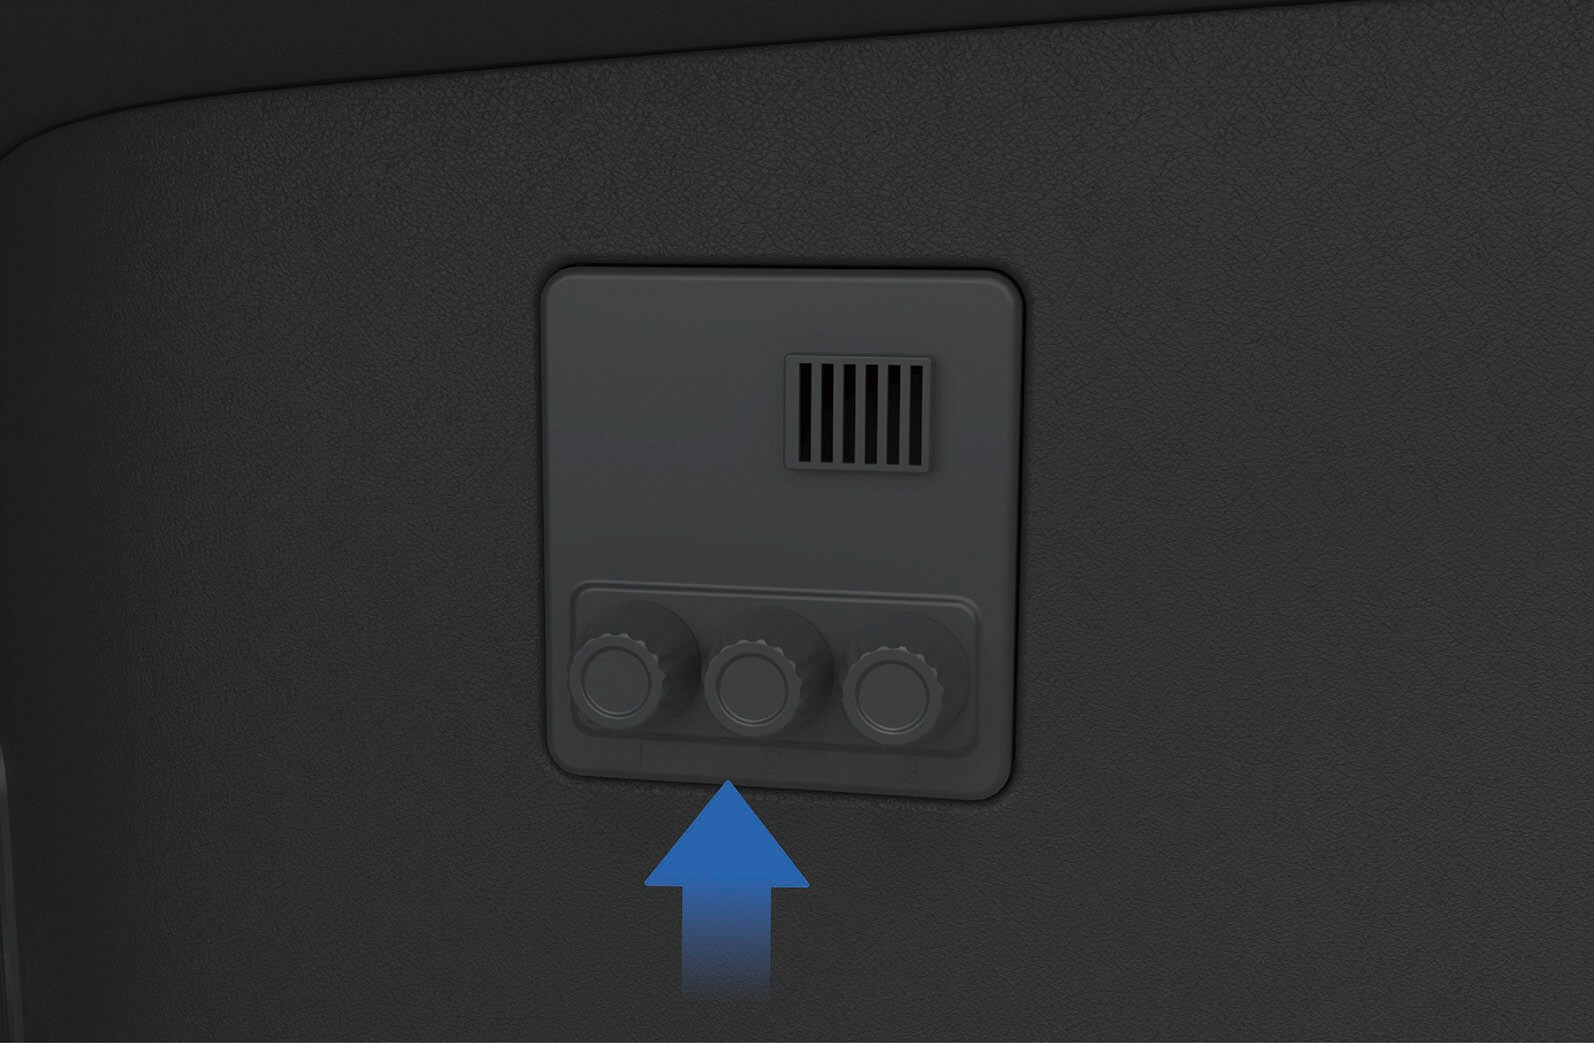
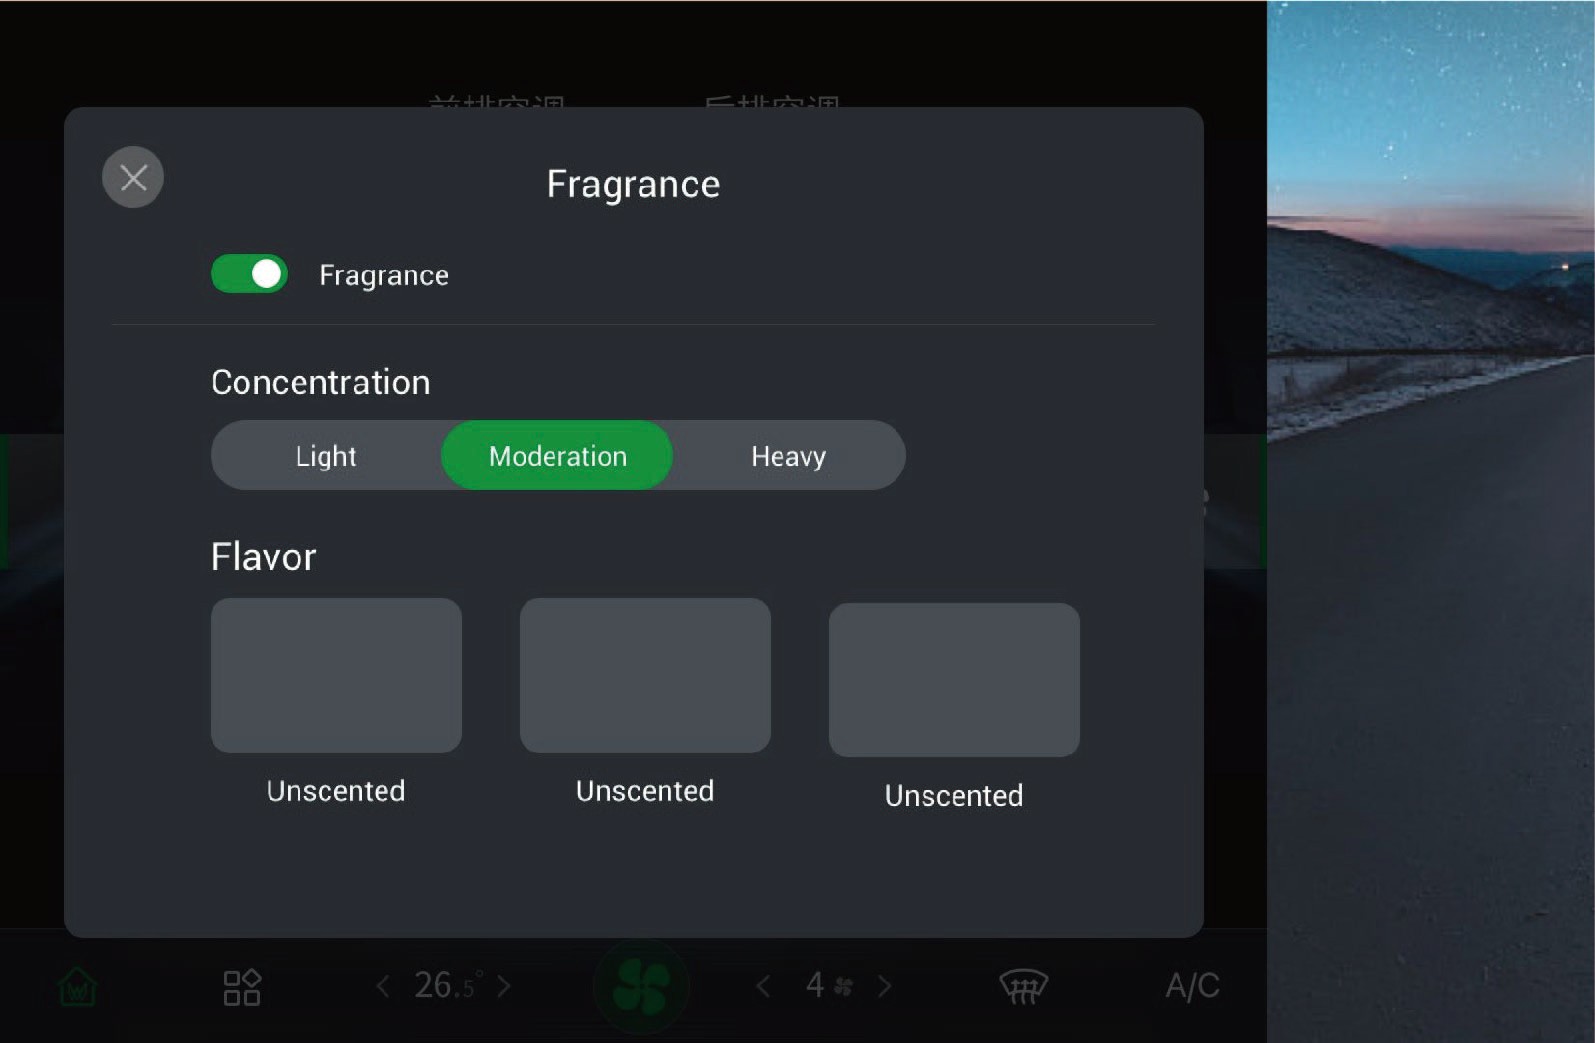
Etter at duftflasken er montert på plass, vises informasjon om duften i det aktuelle hullet på kjøretøyets informasjonsskjerm.
Ved bytte av duftflaske må du klemme bunnen av flasken med fingrene og trekke flasken sakte ut av duftmekanismen.
Når duften er montert, kan du åpne klimainnstillingene på kjøretøyets informasjonsskjerm og klikke på «Fragrance» for å slå duftsystemet på/av, justere konsentrasjonen av den aktuelle duften og velge ulike dufter i dette grensesnittet.
3.Z.2
Forholdsregler
Advarsel
Oppbevar duftflasken utilgjengelig for barn for å unngå forgiftning ved utilsiktet svelging av innholdet i flasken.
Ikke stikk fingrene inn i hulrommet i duftmekanismen, for å unngå personskade.
Ikke monter eller bytt duftflasken under kjøring, for å unngå ulykker.
Hvis du føler ubehag ved bruk av duften, slutt å bruke
duftsystemet umiddelbart.
Hvis personer med allergi eller luftveissykdommer sitter i kjøretøyet, bruk duftsystemet med forsiktighet.
Merknad
Vær oppmerksom på duftflaskens holdbarhetsdato før montering. Uåpnet holder duften i 1 år, mens åpnet holder i 3 måneder. Bruk duften innen holdbarhetsdatoen, og bytt den ut når datoen er nådd.
Ved bytte av duftflaske, hold hendene rene og kontroller at duftsystemet fungerer som det skal.
Det sitter en magnet under duftmekanismen. Ikke legg mobiltelefoner, nettbrett eller andre elektroniske enheter nær dufthullet over det åpne oppbevaringsområdet i midtkonsollen, for å unngå å påvirke funksjonen til elektroniske enheter og duftmoduler.
Siden dufter kan reagere kjemisk med organiske stoffer, er direkte kontakt med plastdelene forbudt for den keramiske duftkjernen i flasken.
Merk
 Duftopplevelsen varierer med innetemperaturen, klimaanleggets luftmengde og din fysiologiske tilstand.
Den keramiske duftkjernen i flasken bør kjøpes via offisielle kanaler for å unngå skade på flasken og sikre duftens kvalitet.
Hvis duftsystemet ikke gjenkjenner flasken etter montering, monter duftflasken på nytt.
4.ALadeport
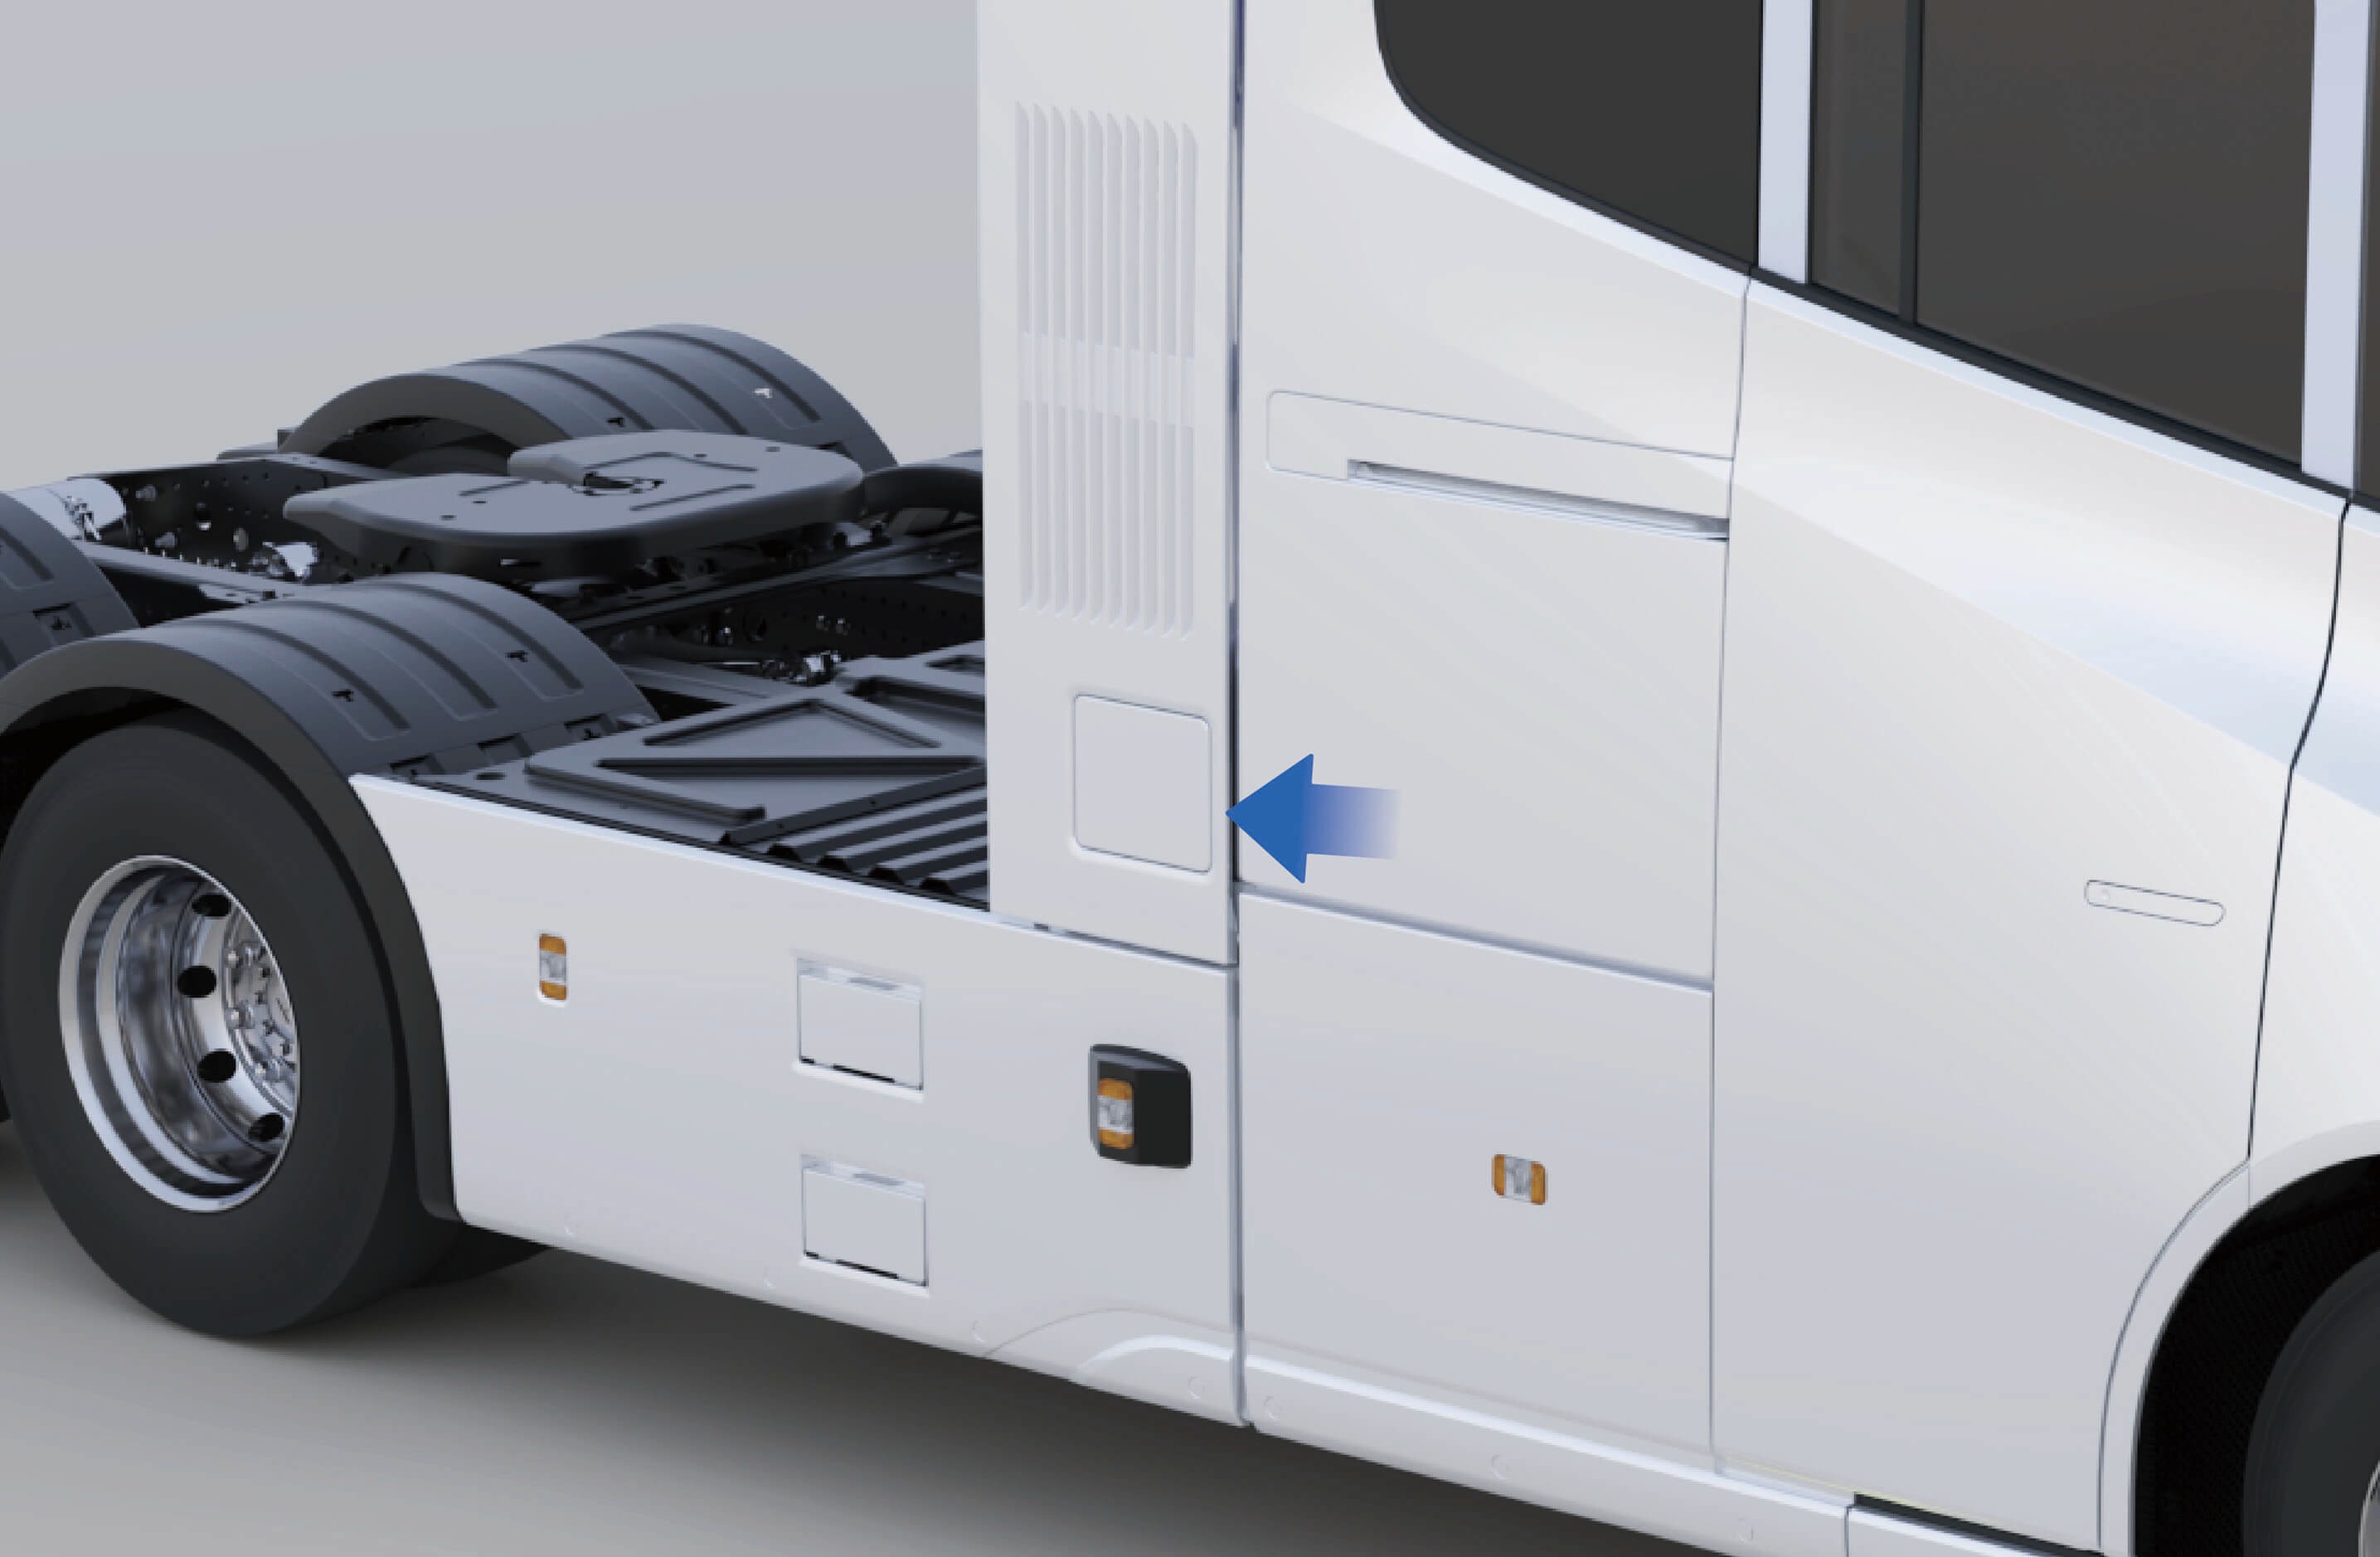
Lading av kjøretøyet
 Ladeport
Kjøretøyet har ladeporter på begge sider.
4.A.1Bruksanvisning
↑ Til toppenInnvendig betjening
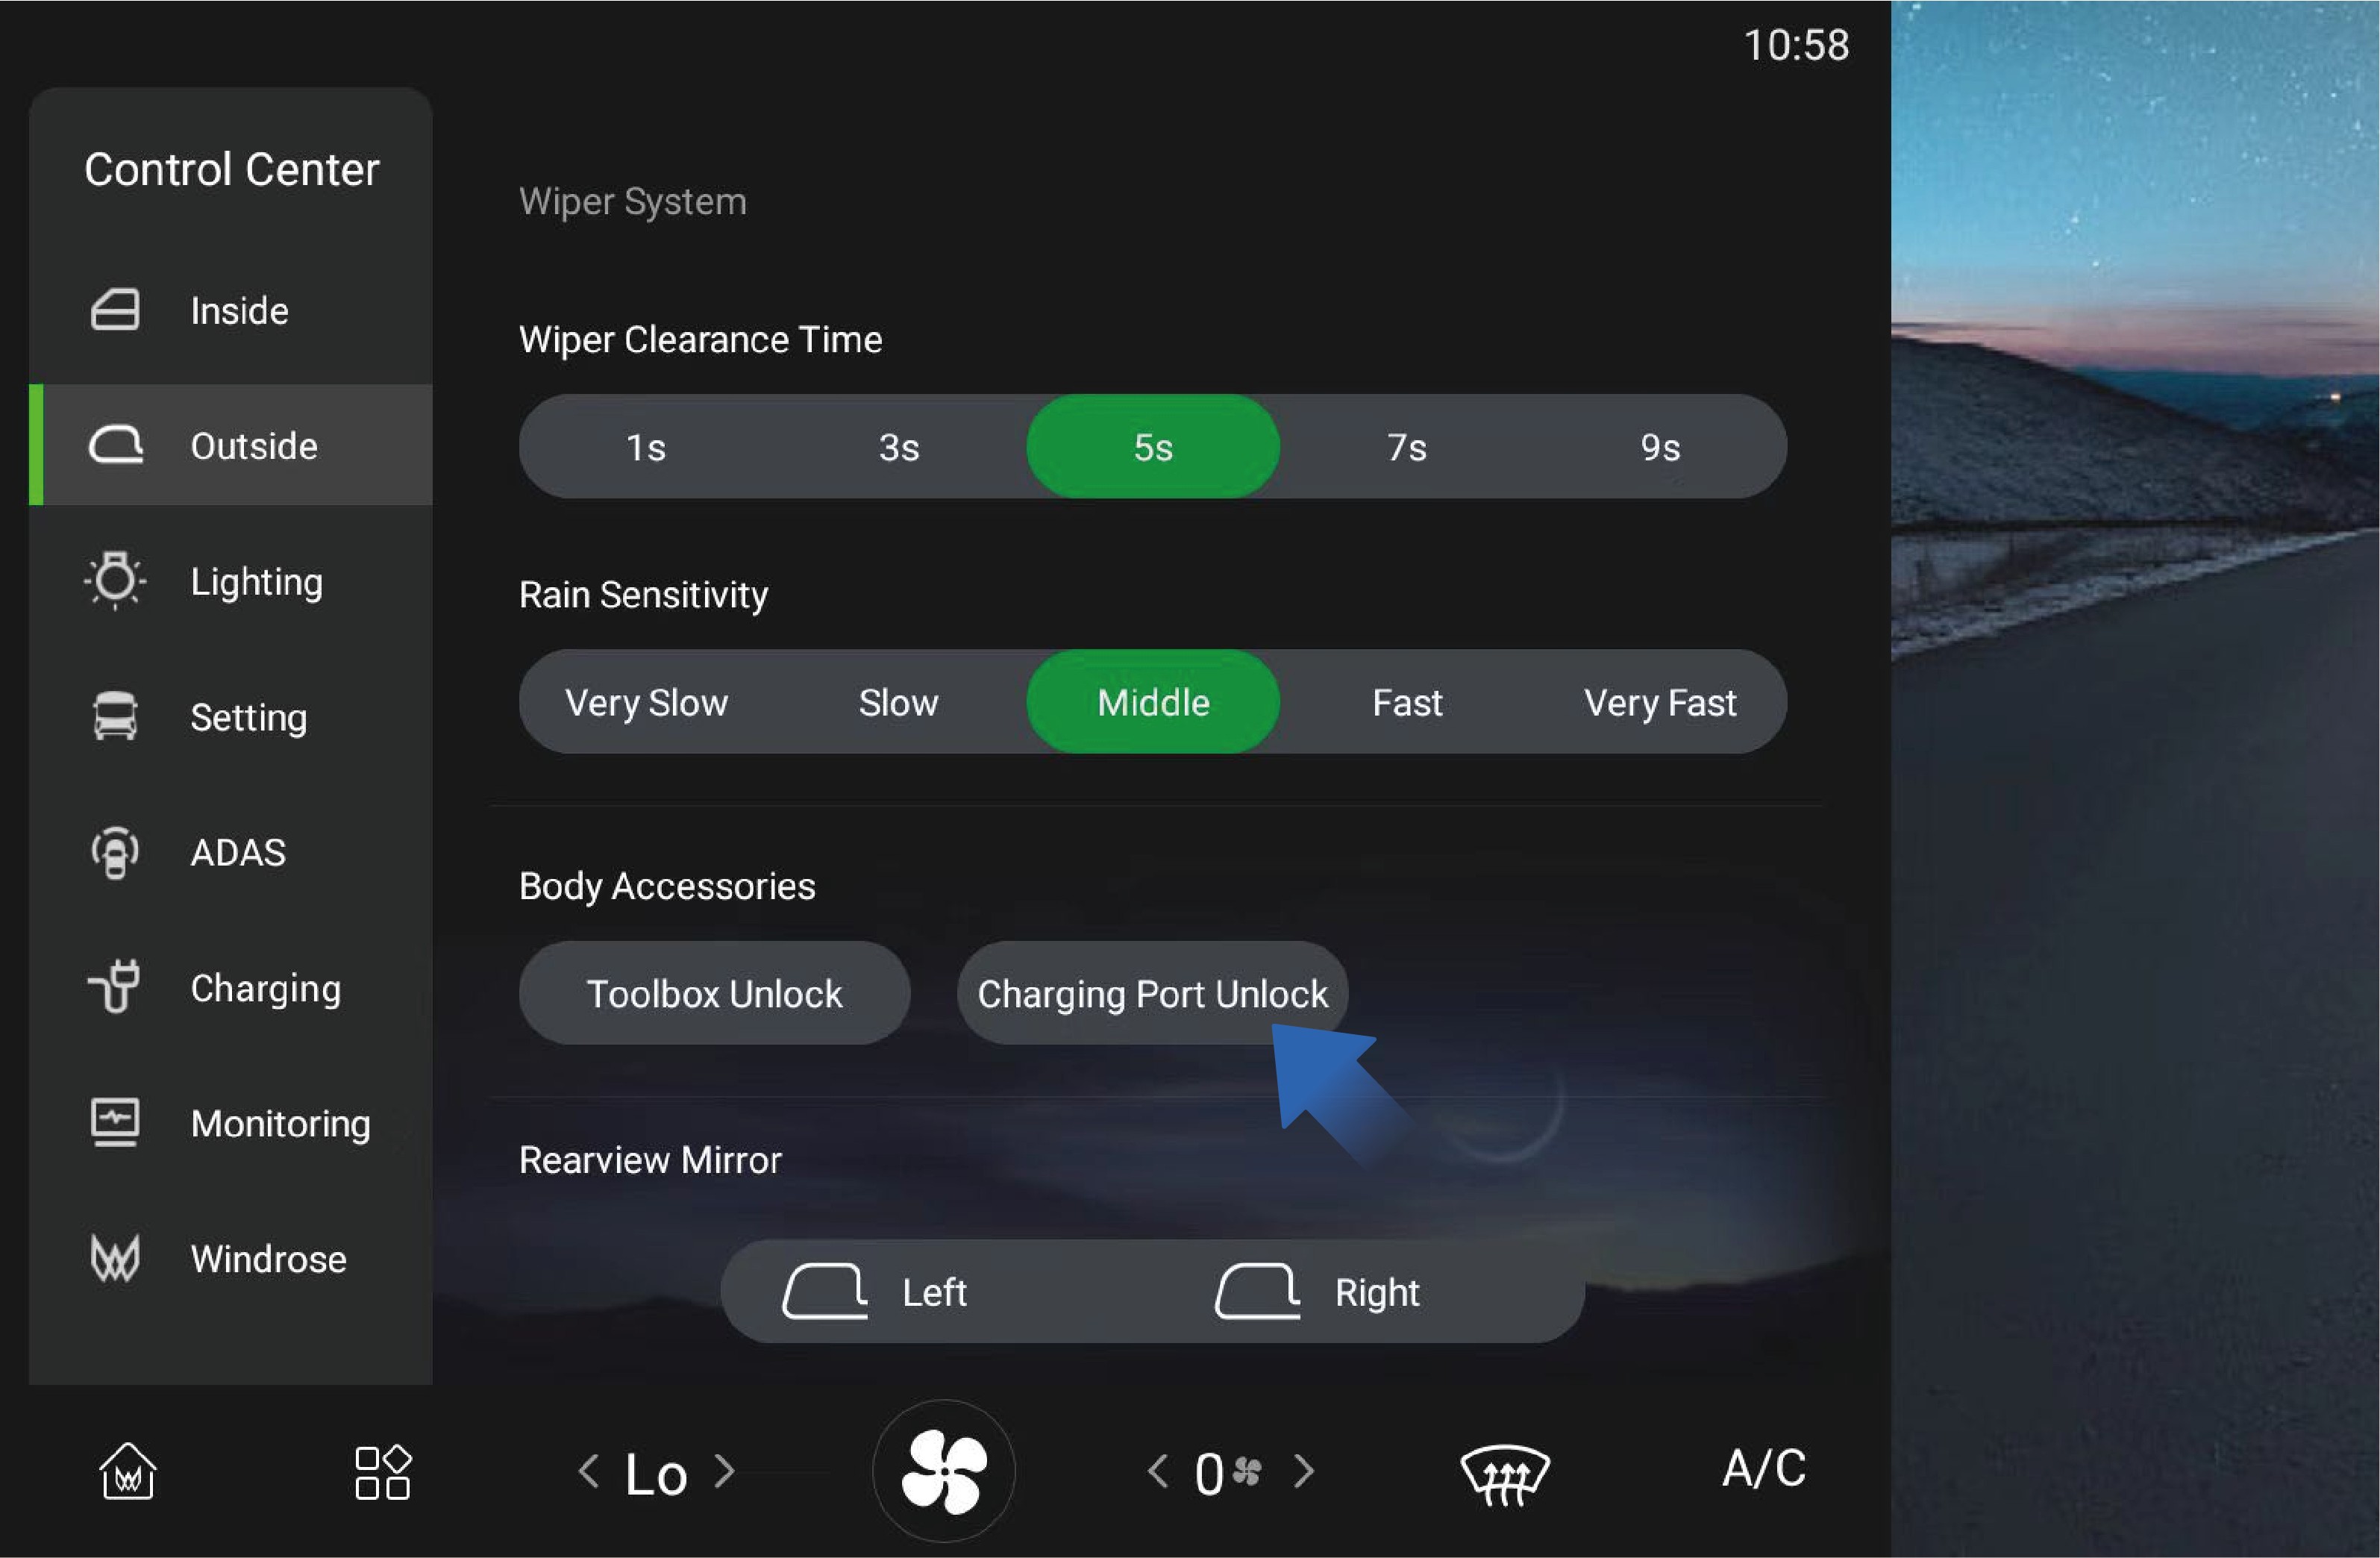
Du kan låse opp ladeportdekselet ved å velge «Control Center», bytte til grensesnittet «Outside» og klikke på «Charging Port Unlock»-knappen på kjøretøyets informasjonsskjerm i instrumentpanelet. Deretter kan ladeportdekselet aktiveres ved å trykke på det.
4.A.2Forholdsregler
Merk
Ladeportdekselet kan bare låses opp – ikke lukkes – via kjøretøyets informasjonsskjerm. For å lukke ladeportdekselet må du fortsatt betjene det fra utsiden av kjøretøyet.
4.BForberedelse til lading
↑ Til toppenLading av kjøretøyet
Ved lading av dette kjøretøyet, bruk en ladeenhet med spenning ≥ 1000V. Ladeenheter under denne standarden vil ikke kunne lade kjøretøyet.
4.B.1Bruksanvisning
Forberedelse
Kontroller ladestasjonens kabel og kjøretøyets ladekontakt for skade, vanninntrengning, brannskade og andre tydelige avvik, og kontroller at det ikke er åpenbare sikkerhetsfarer ved ladestasjonen og i omgivelsene før lading.
Parker kjøretøyet nær ladeenheten og kontroller at kjøretøyet er fritt for avvik som isolasjonsfeil. Kjøretøyet kan lades både med og uten høyspenning tilkoblet.
Forberedelse til lading
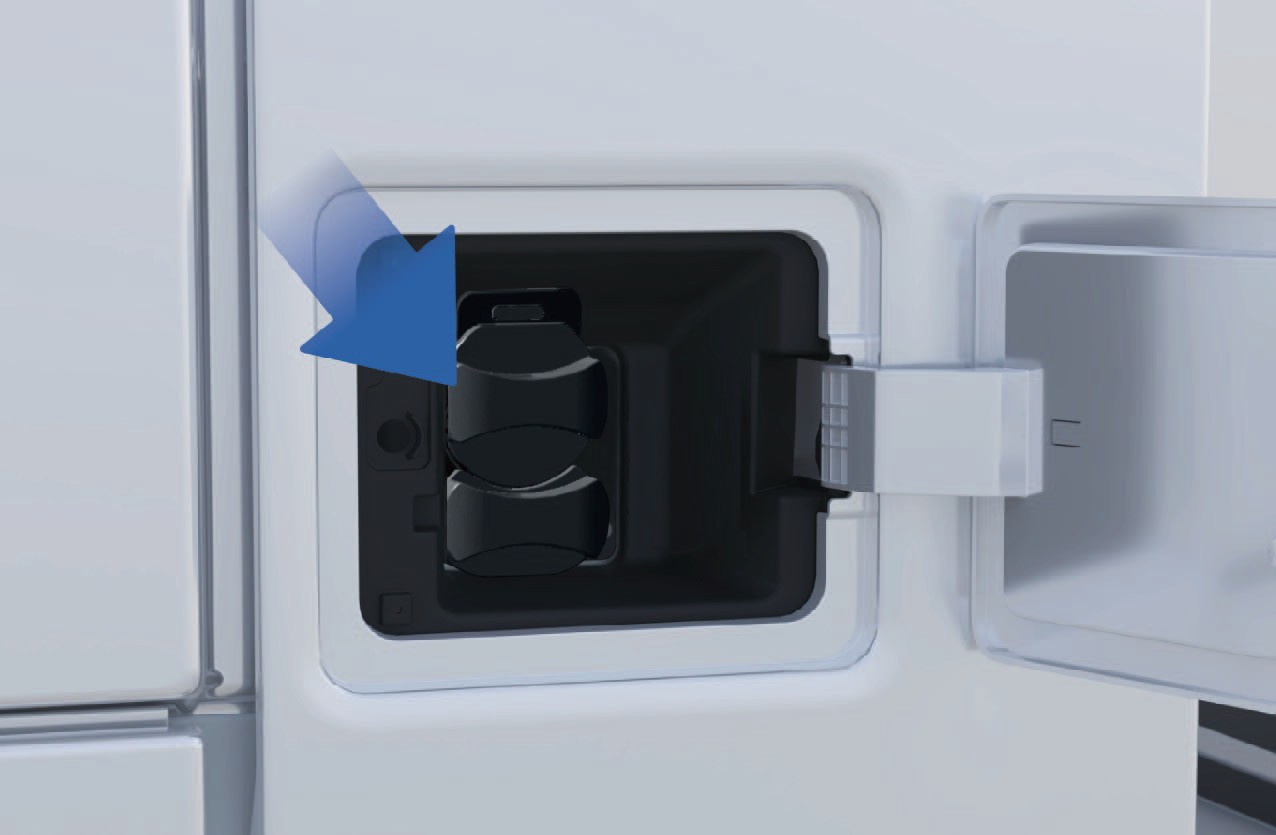
Sett ladepluggen inn i ladeporten. Når den er satt riktig på plass, hører du et «klikk» som betyr at tilkoblingen er vellykket. Deretter aktiveres den elektroniske låsen i ladeporten, og kombiinstrumentet viser symbolet for ladetilkobling.
Følg instruksjonene på ladeskjermen for å starte ladingen ved å trekke kortet eller skanne koden.
På ladestasjonens display, velg riktig
lademodus og ladeparametere, bekreft at informasjonen er riktig, og klikk på «Start charging»-knappen for å starte ladingen av kjøretøyet med ladeenheten. Ladestasjonens display viser ladeforløp, ladetid, ladeeffekt og annen informasjon i sanntid.
Under lading kan du når som helst klikke på «Stop charging»-knappen for å stoppe ladingen. Når ladingen er fullført, viser enhetens display at ladingen er ferdig. Klikk på «Stop charging»-knappen for å stoppe ladingen og låse opp den elektroniske låsen i ladeporten. Trekk ut ladepluggen og sett den tilbake i pluggholderen på ladeenheten.
Ladeindikator
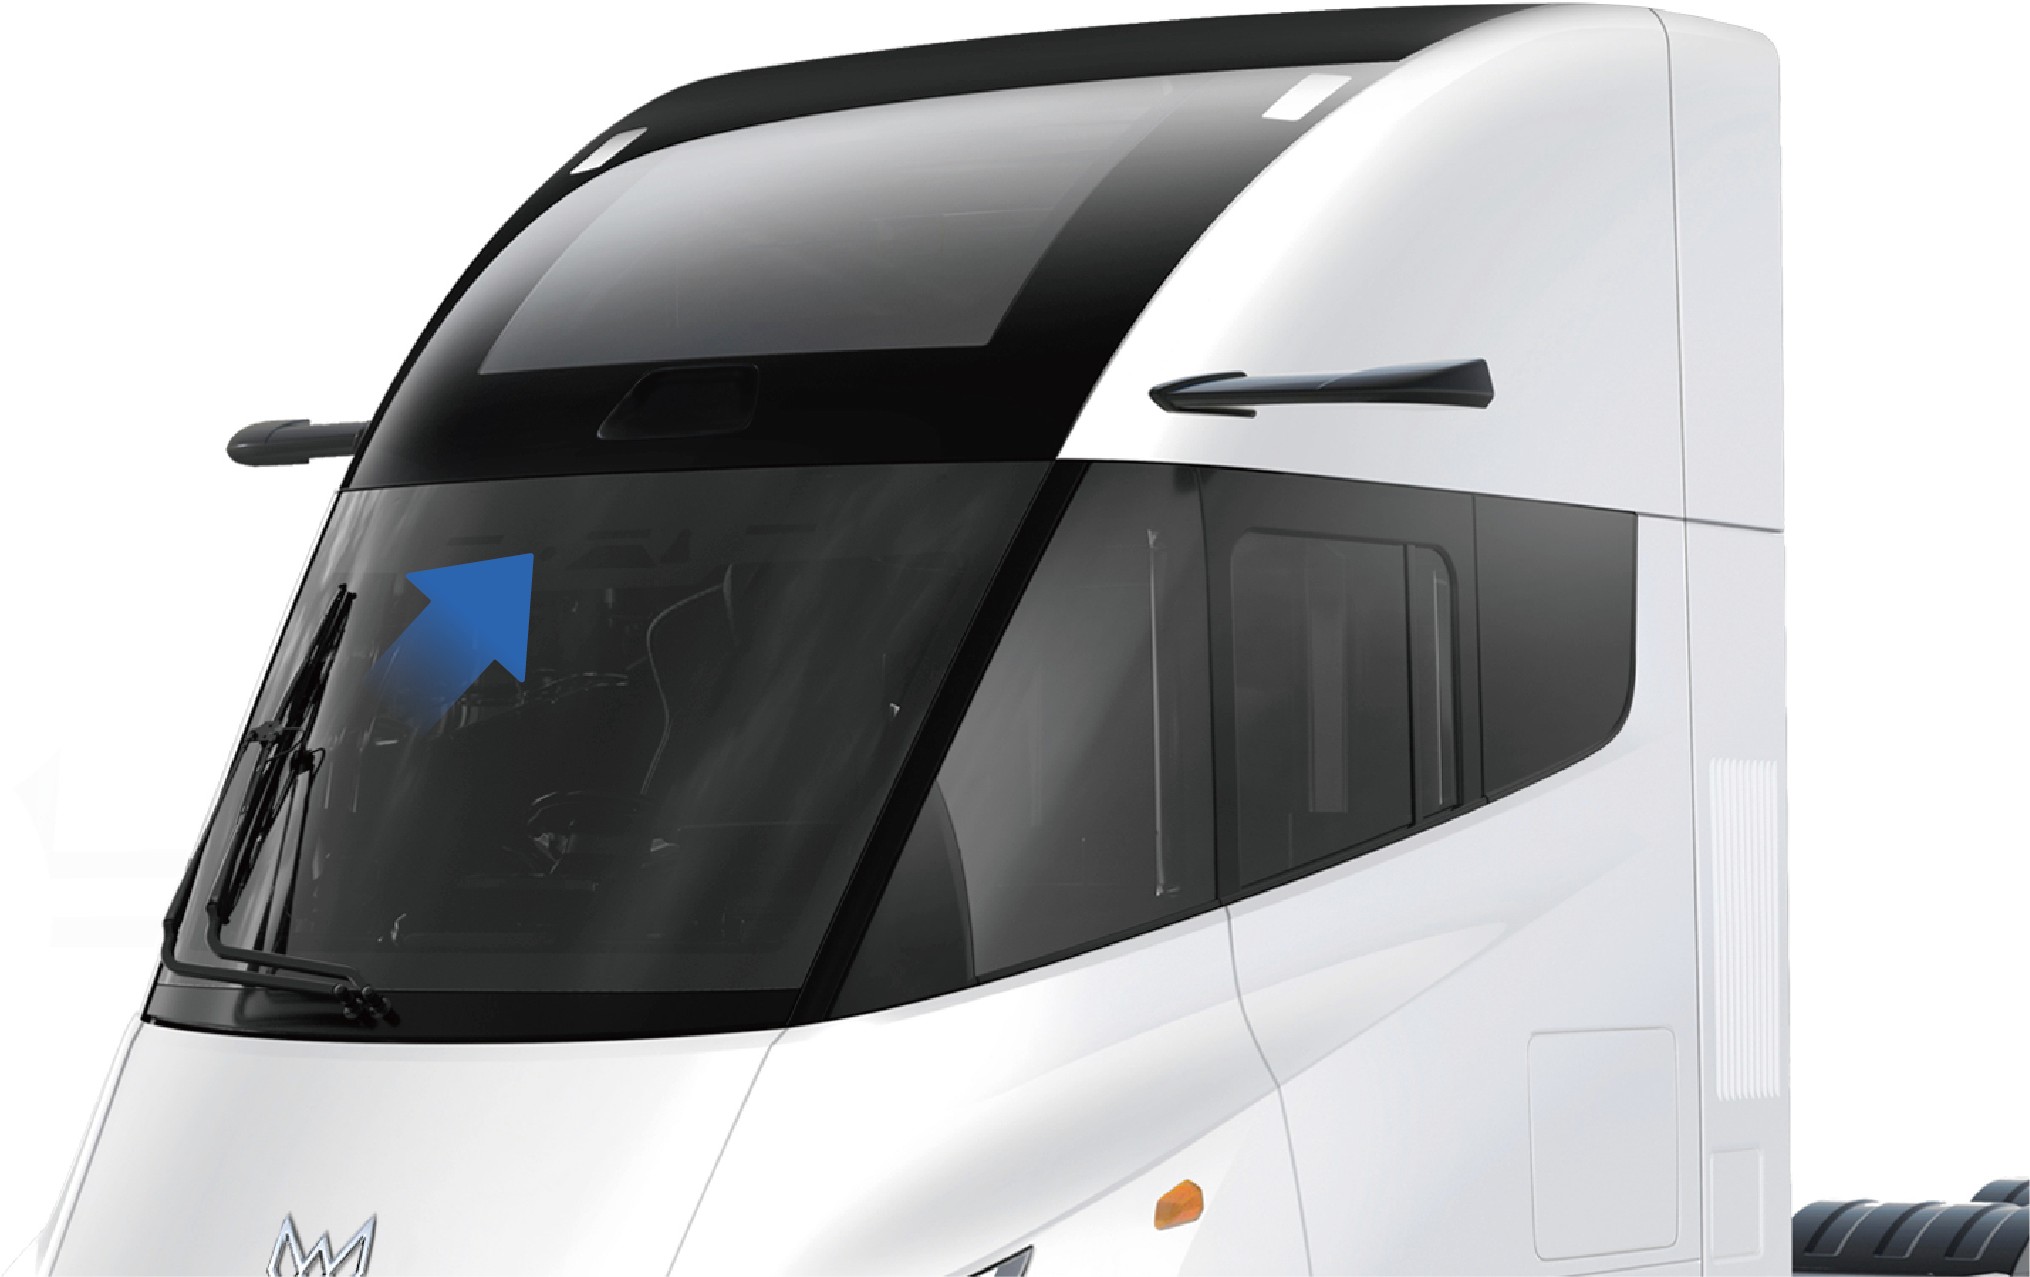
Indikatoren øverst på frontruten endres til en ladeindikator under lading. Når høyspenningsbatteriets ladenivå (SOC) er under 30 %, blinker den venstre ladeindikatoren. Når SOC er 30–90 %, lyser den venstre ladeindikatoren fast. Når høyspennings-
batteriets SOC er over 90 %, lyser venstre og midtre ladeindikator fast og den høyre blinker. Når SOC når 100 %, lyser venstre, midtre
og høyre ladeindikator fast.
Nødåpning
↑ Til toppen
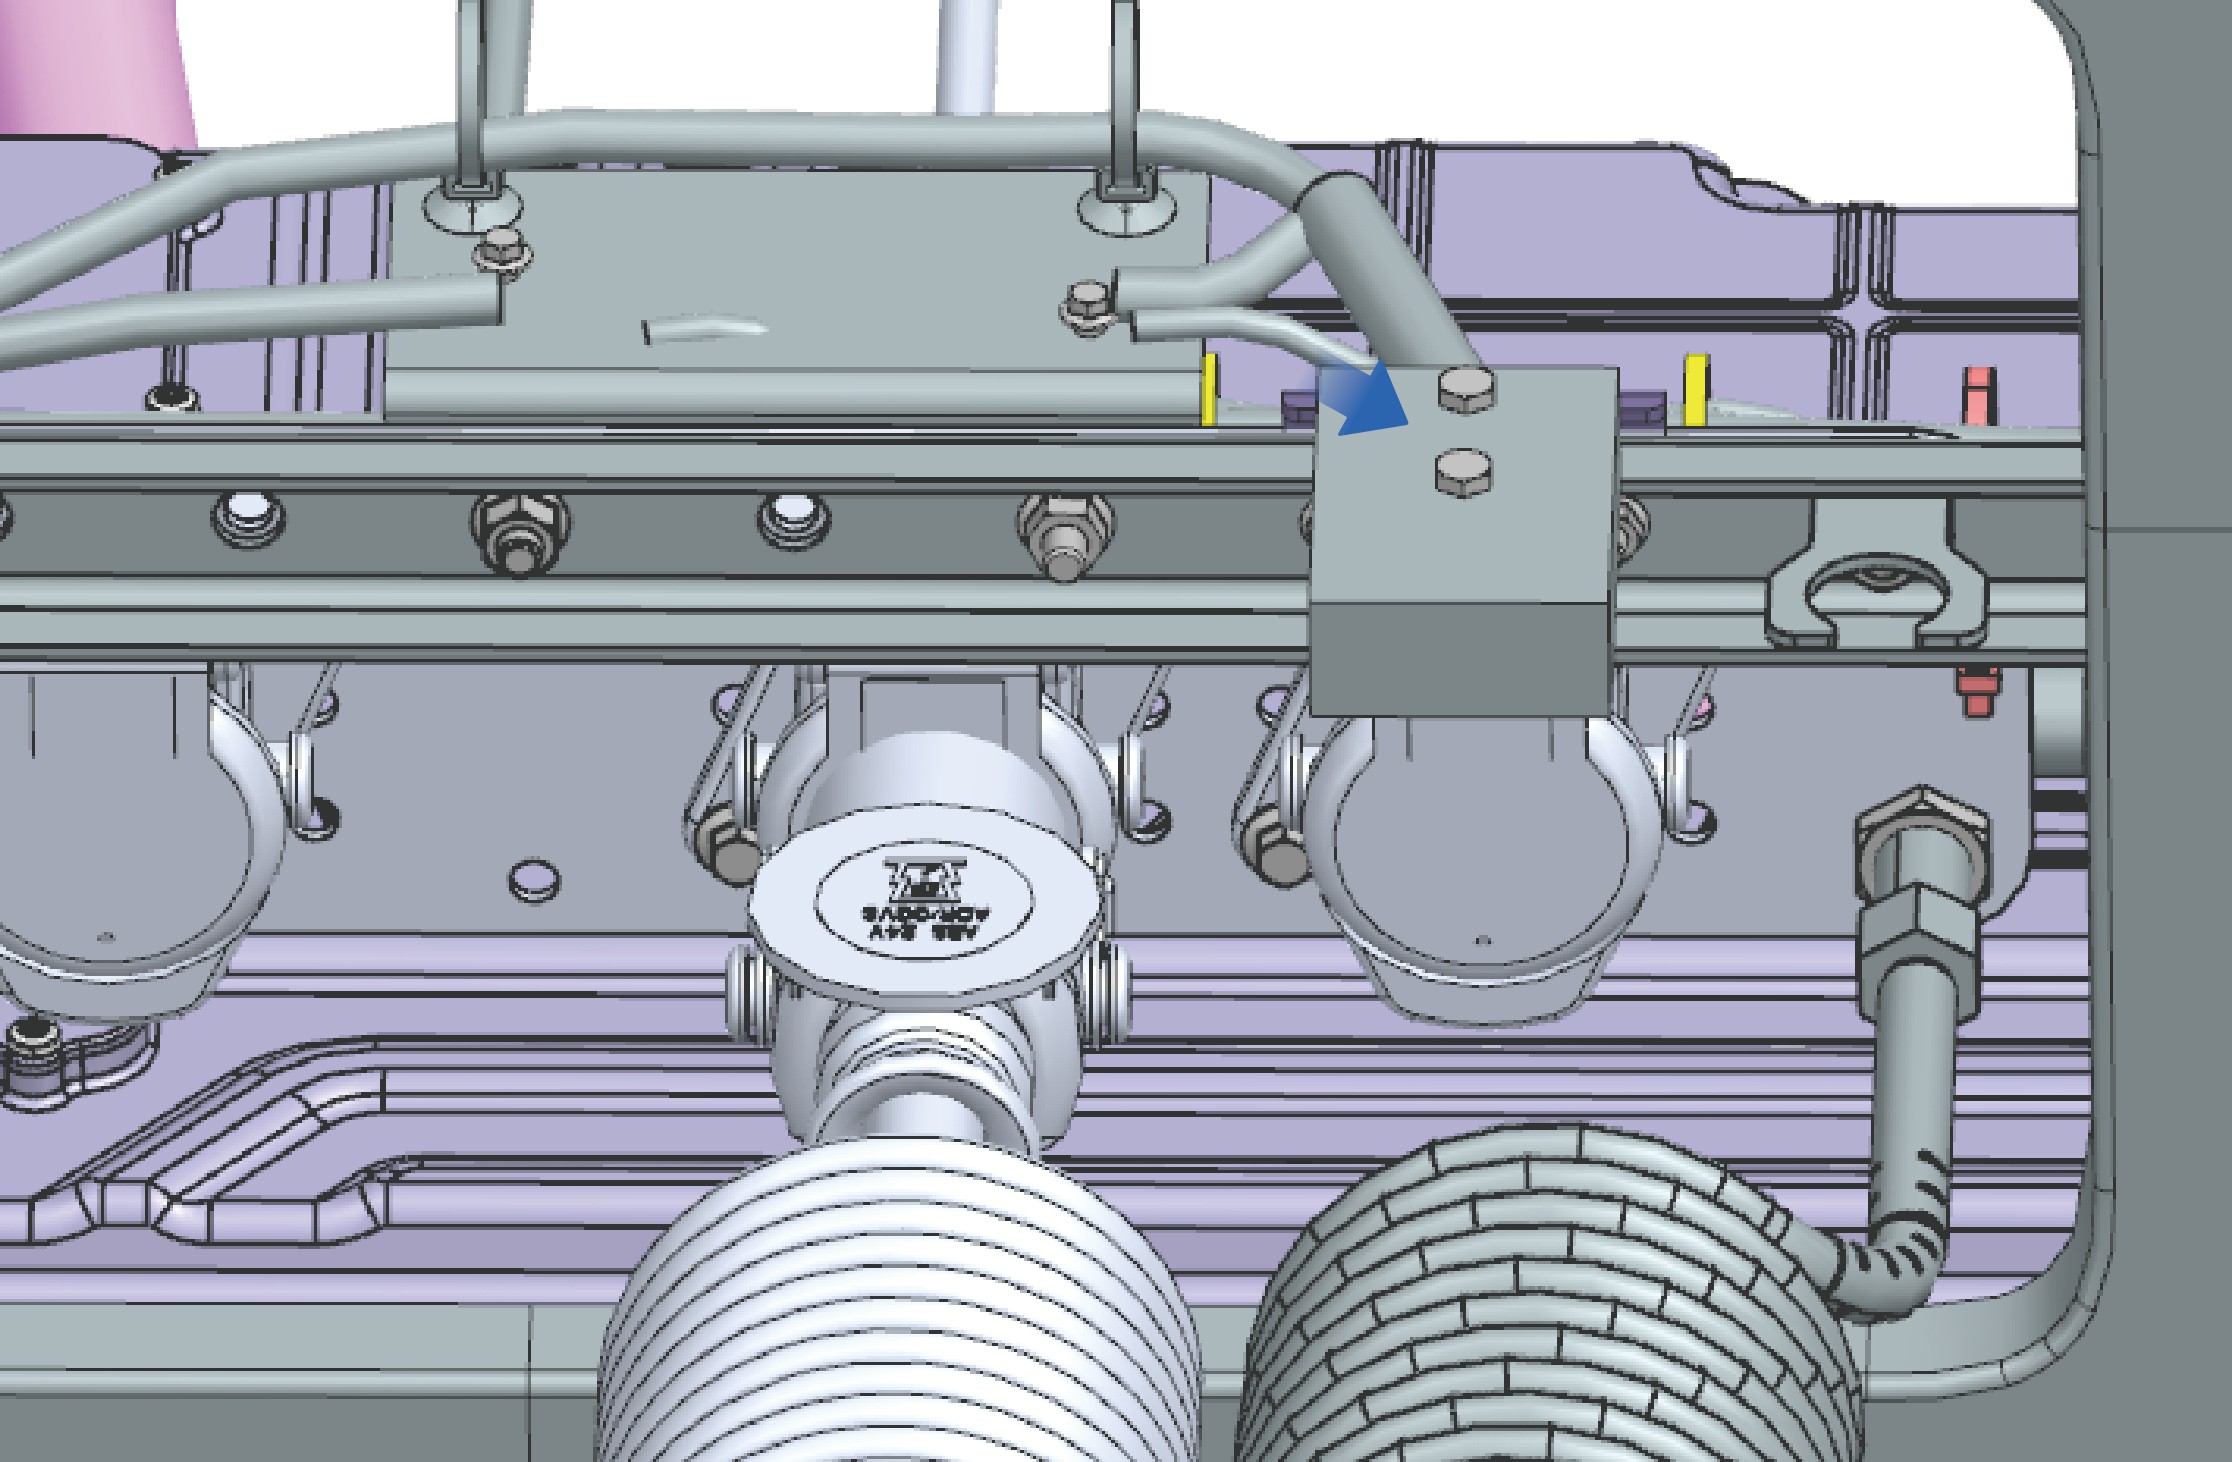
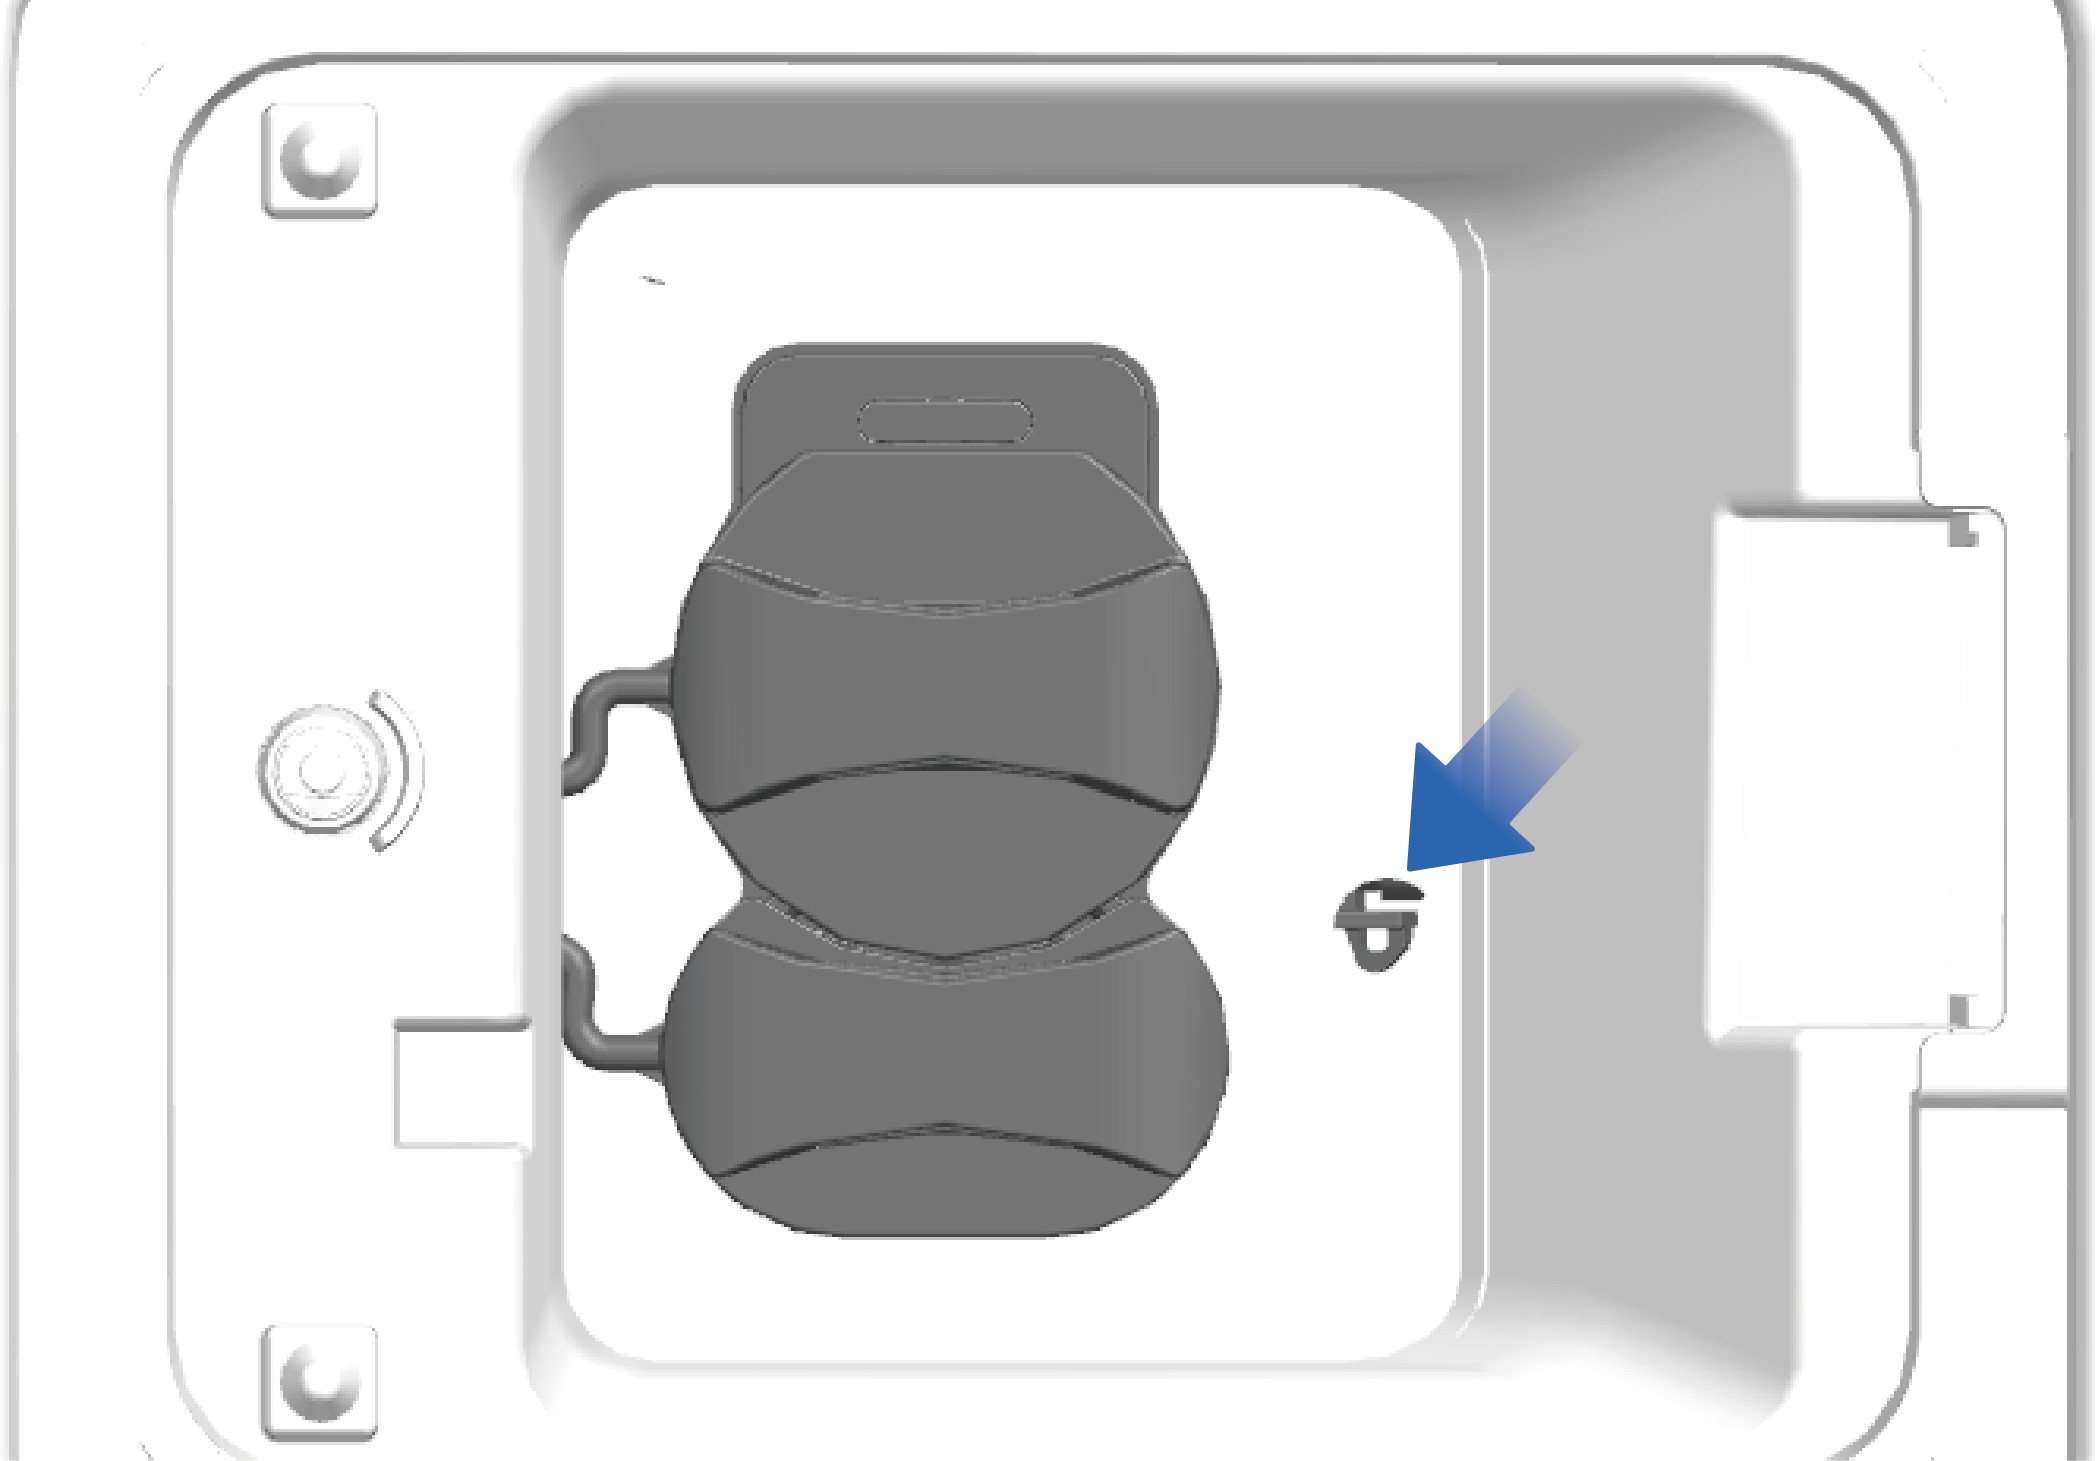
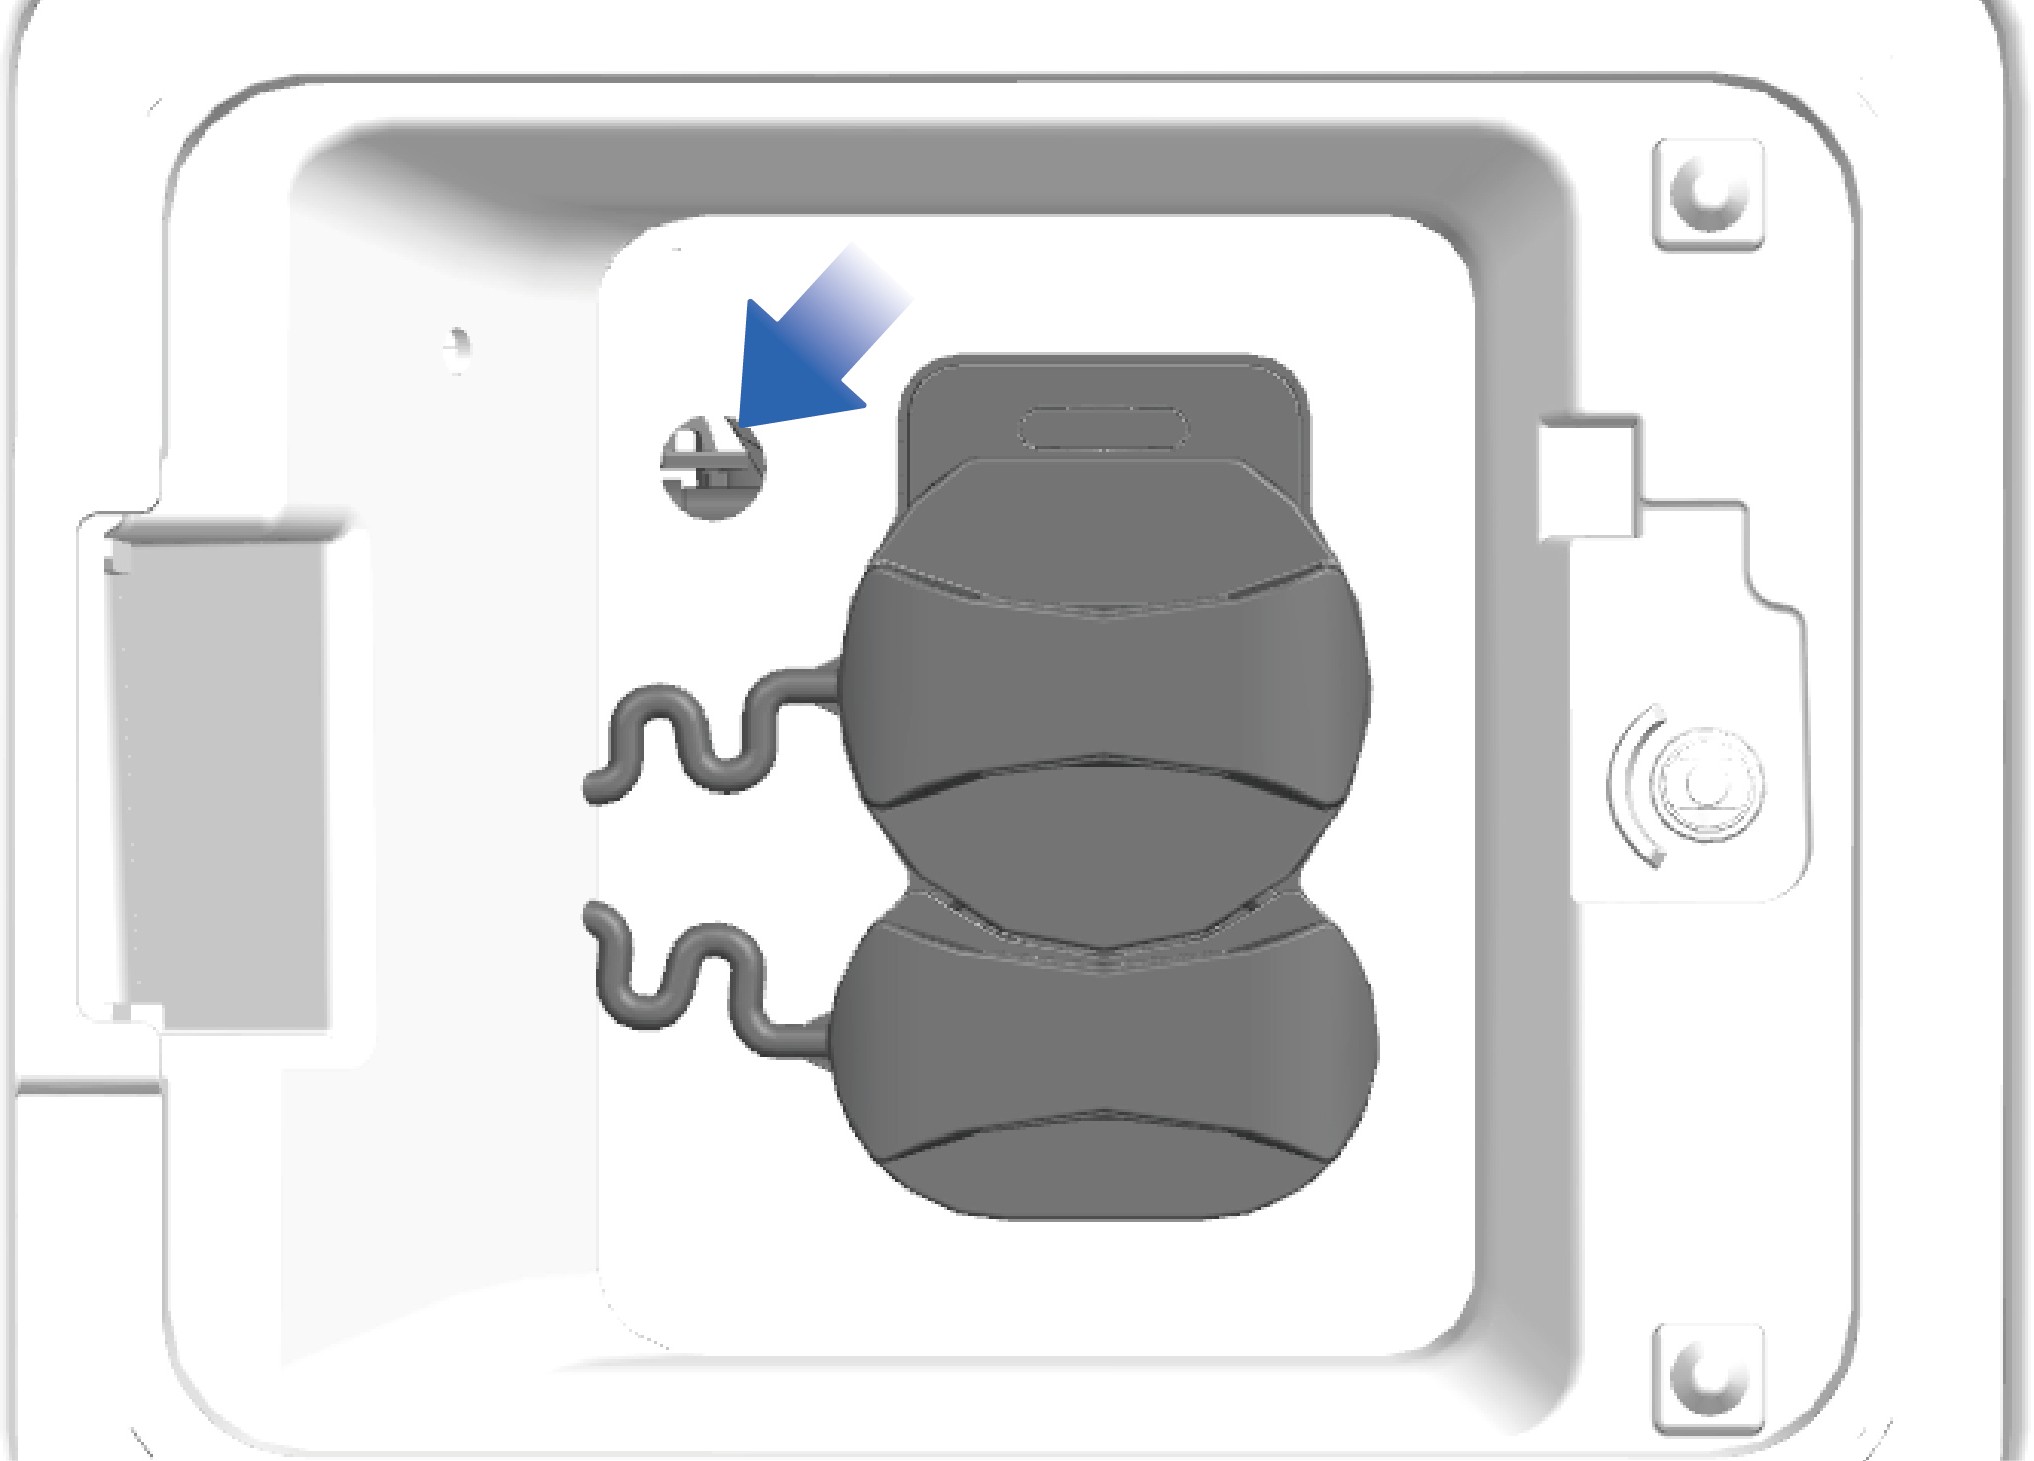
Hvis ladekontakten ikke kan trekkes ut etter at ladingen er fullført, kan nødåpningsmekanismen ved siden av ladekontakten brukes til å låse opp. Bruk et verktøy til å skyve åpningsmekanismen innover mot kjøretøyet, slik at den endrer posisjon fra parallell med kjøretøyets kjøreretning til vinkelrett på den. Plassering av nødåpningsmekanismen for ladekontakten.
4.B.2
Forholdsregler
Advarsel
Før lading er det viktig å bekrefte at ladeenhetens utgangsspenning og lavspennings-hjelpestrømforsyning passer til kjøretøyet, og at ladekontakten er i samsvar med kravene i regelverket.
Det er forbudt å lagre brennbare og eksplosive materialer rundt ladestasjonen, og det er viktig å holde omgivelsene rundt ladeenheten godt ventilert.
Under lading er det forbudt å berøre ladepluggen og kjøretøyets ladeport, for å unngå elektrisk støt.
Hvis enheten oppfører seg unormalt, for eksempel røyker, avgir lukt, lager unormal lyd osv., stopp ladingen umiddelbart og kontakt en fagperson for vedlikehold.
Lås opp kjøretøyet før du setter inn / trekker ut lade-
pluggen, uten skjevhet, risting eller hardhendt håndtering.
Den elektroniske låsen i ladeporten aktiveres og låses når ladingen starter, derfor er det forbudt å trekke ut ladepluggen med makt. Når ladingen avsluttes, lås opp
kjøretøyet og avslutt ladingen på kjøretøyets informasjonsskjerm for å frigjøre den elektroniske låsen i ladeporten.
Ikke betjen opplåsingsbolten til den elektroniske låsen under normal lading.
MerknadOverutladning av høyspenningsbatteriet bør unngås så mye som mulig for å sikre batteriets trygge levetid. Når høyspenningsbatteriets SOC er under 20 %, viser kombiinstrumentet et varsel om at SOC er for lav. Når SOC er under 5 %, går kjøretøyet i effektbegrenset modus, og hastigheten reduseres etter hvert som utladningsdybden (DoD) til høyspenningsbatteriet øker. Finn da en ladeenhet i nærheten så snart som mulig for å lade kjøretøyet.
Høyspenningsbatteriet bør brukes ved en temperatur på 10 °C–30 °C. Batteriets levetid forkortes ved for høy eller for lav omgivelsestemperatur.
Hvis kjøretøyet ikke brukes over lengre tid, bør hovedstrømbryteren slås av, og høyspenningsbatteriet bør lades én gang hver halve måned.
Når kjøretøyet er i underspenningsbeskyttelse, bør du lade det i tide før bruk. Ellers kan overutladning av høyspenningsbatteriet oppstå og påvirke batteriets ytelse og levetid.
Merk
Kjøretøyet kan ikke lades hvis den elektroniske låsen i ladeporten ikke er aktivert, noe som kan kontrolleres ved å vri litt på ladepluggen.
4.CForberedelse til kjøring
Forberedelse før kjøring
Før kjøretøyet tas i bruk, kontroller det for å ivareta sikkerheten:
Kontroller tilkobling og festing av hver del.
Kontroller om motoren og E-akselen lager unormal lyd under drift.
Kontroller monteringen av tilbehøret.
Kontroller oljenivået i E-akselen og styreoljetanken.
Kontroller væskenivået i spylevæskebeholderen og kjølevæskebeholderen.
Kontroller oljetilstanden ved hvert smørepunkt.
Kontroller om bremsesystemet og styresystemet fungerer som de skal.
Kontroller om det elektriske utstyret og ledningene er godt tilkoblet.
Kontroller dekktrykket.
Kontroller om førerverktøyet og den medfølgende tekniske dokumentasjonen er komplett.
4.DFørersete
↑ Til toppenForberedelse før kjøring
Du kan justere funksjonene på førersetet etter eget behov og ønske for en mer komfortabel kjøreopplevelse.
4.D.1Bruksanvisning
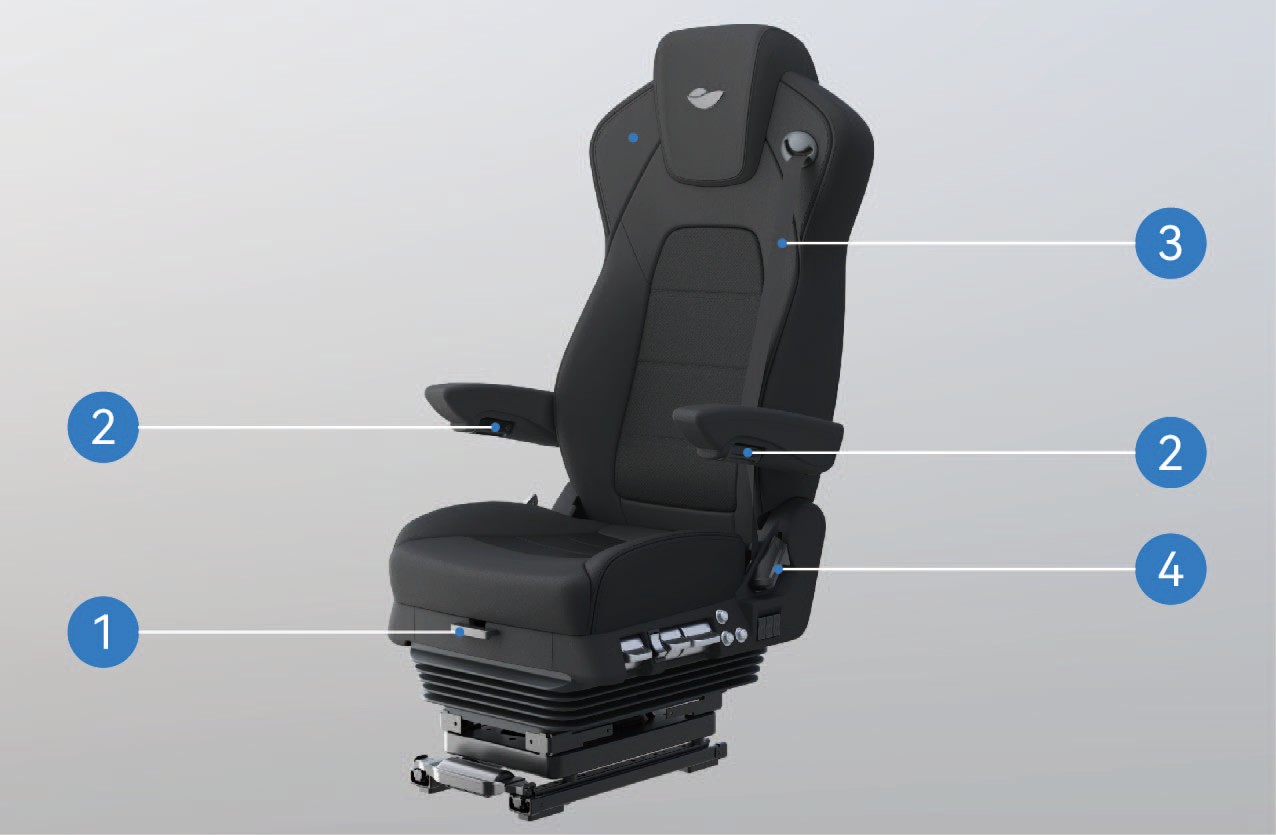
Spak for justering av seteputen frem/tilbake på førersetet
Løft og hold spaken, skyv seteputen frem eller tilbake selv, og slipp opplåsingsspaken når du har funnet riktig posisjon for å låse seteputen.
Armlenebryter på førersetet
Vri armlenebryteren for å justere armlenet. Når bryteren vris mot venstre, senkes armlenet. Når bryteren vris mot høyre, heves armlenet.
Førerens sikkerhetsbelte
Du kan trekke sikkerhetsbeltet rett ut for å bruke det.
Håndtak for justering av ryggvinkel på førersetet
Løft håndtaket for ryggvinkel for å låse opp ryggstøtten; len deg forsiktig bakover mot ryggstøtten eller beveg deg sakte vekk fromittoadjustthebackresttoyourdesiredangle.Slipphåndtaket, så låses ryggstøtten automatisk.
Håndtak for rotasjonsjustering av førersetet
Vri rotasjonshåndtaket på førersetet, så kan setet roteres 90° mot bildøren.
Bryter for justering av førersetet frem/tilbake
Vri bryteren forover eller bakover for å justere setets posisjon frem/tilbake.
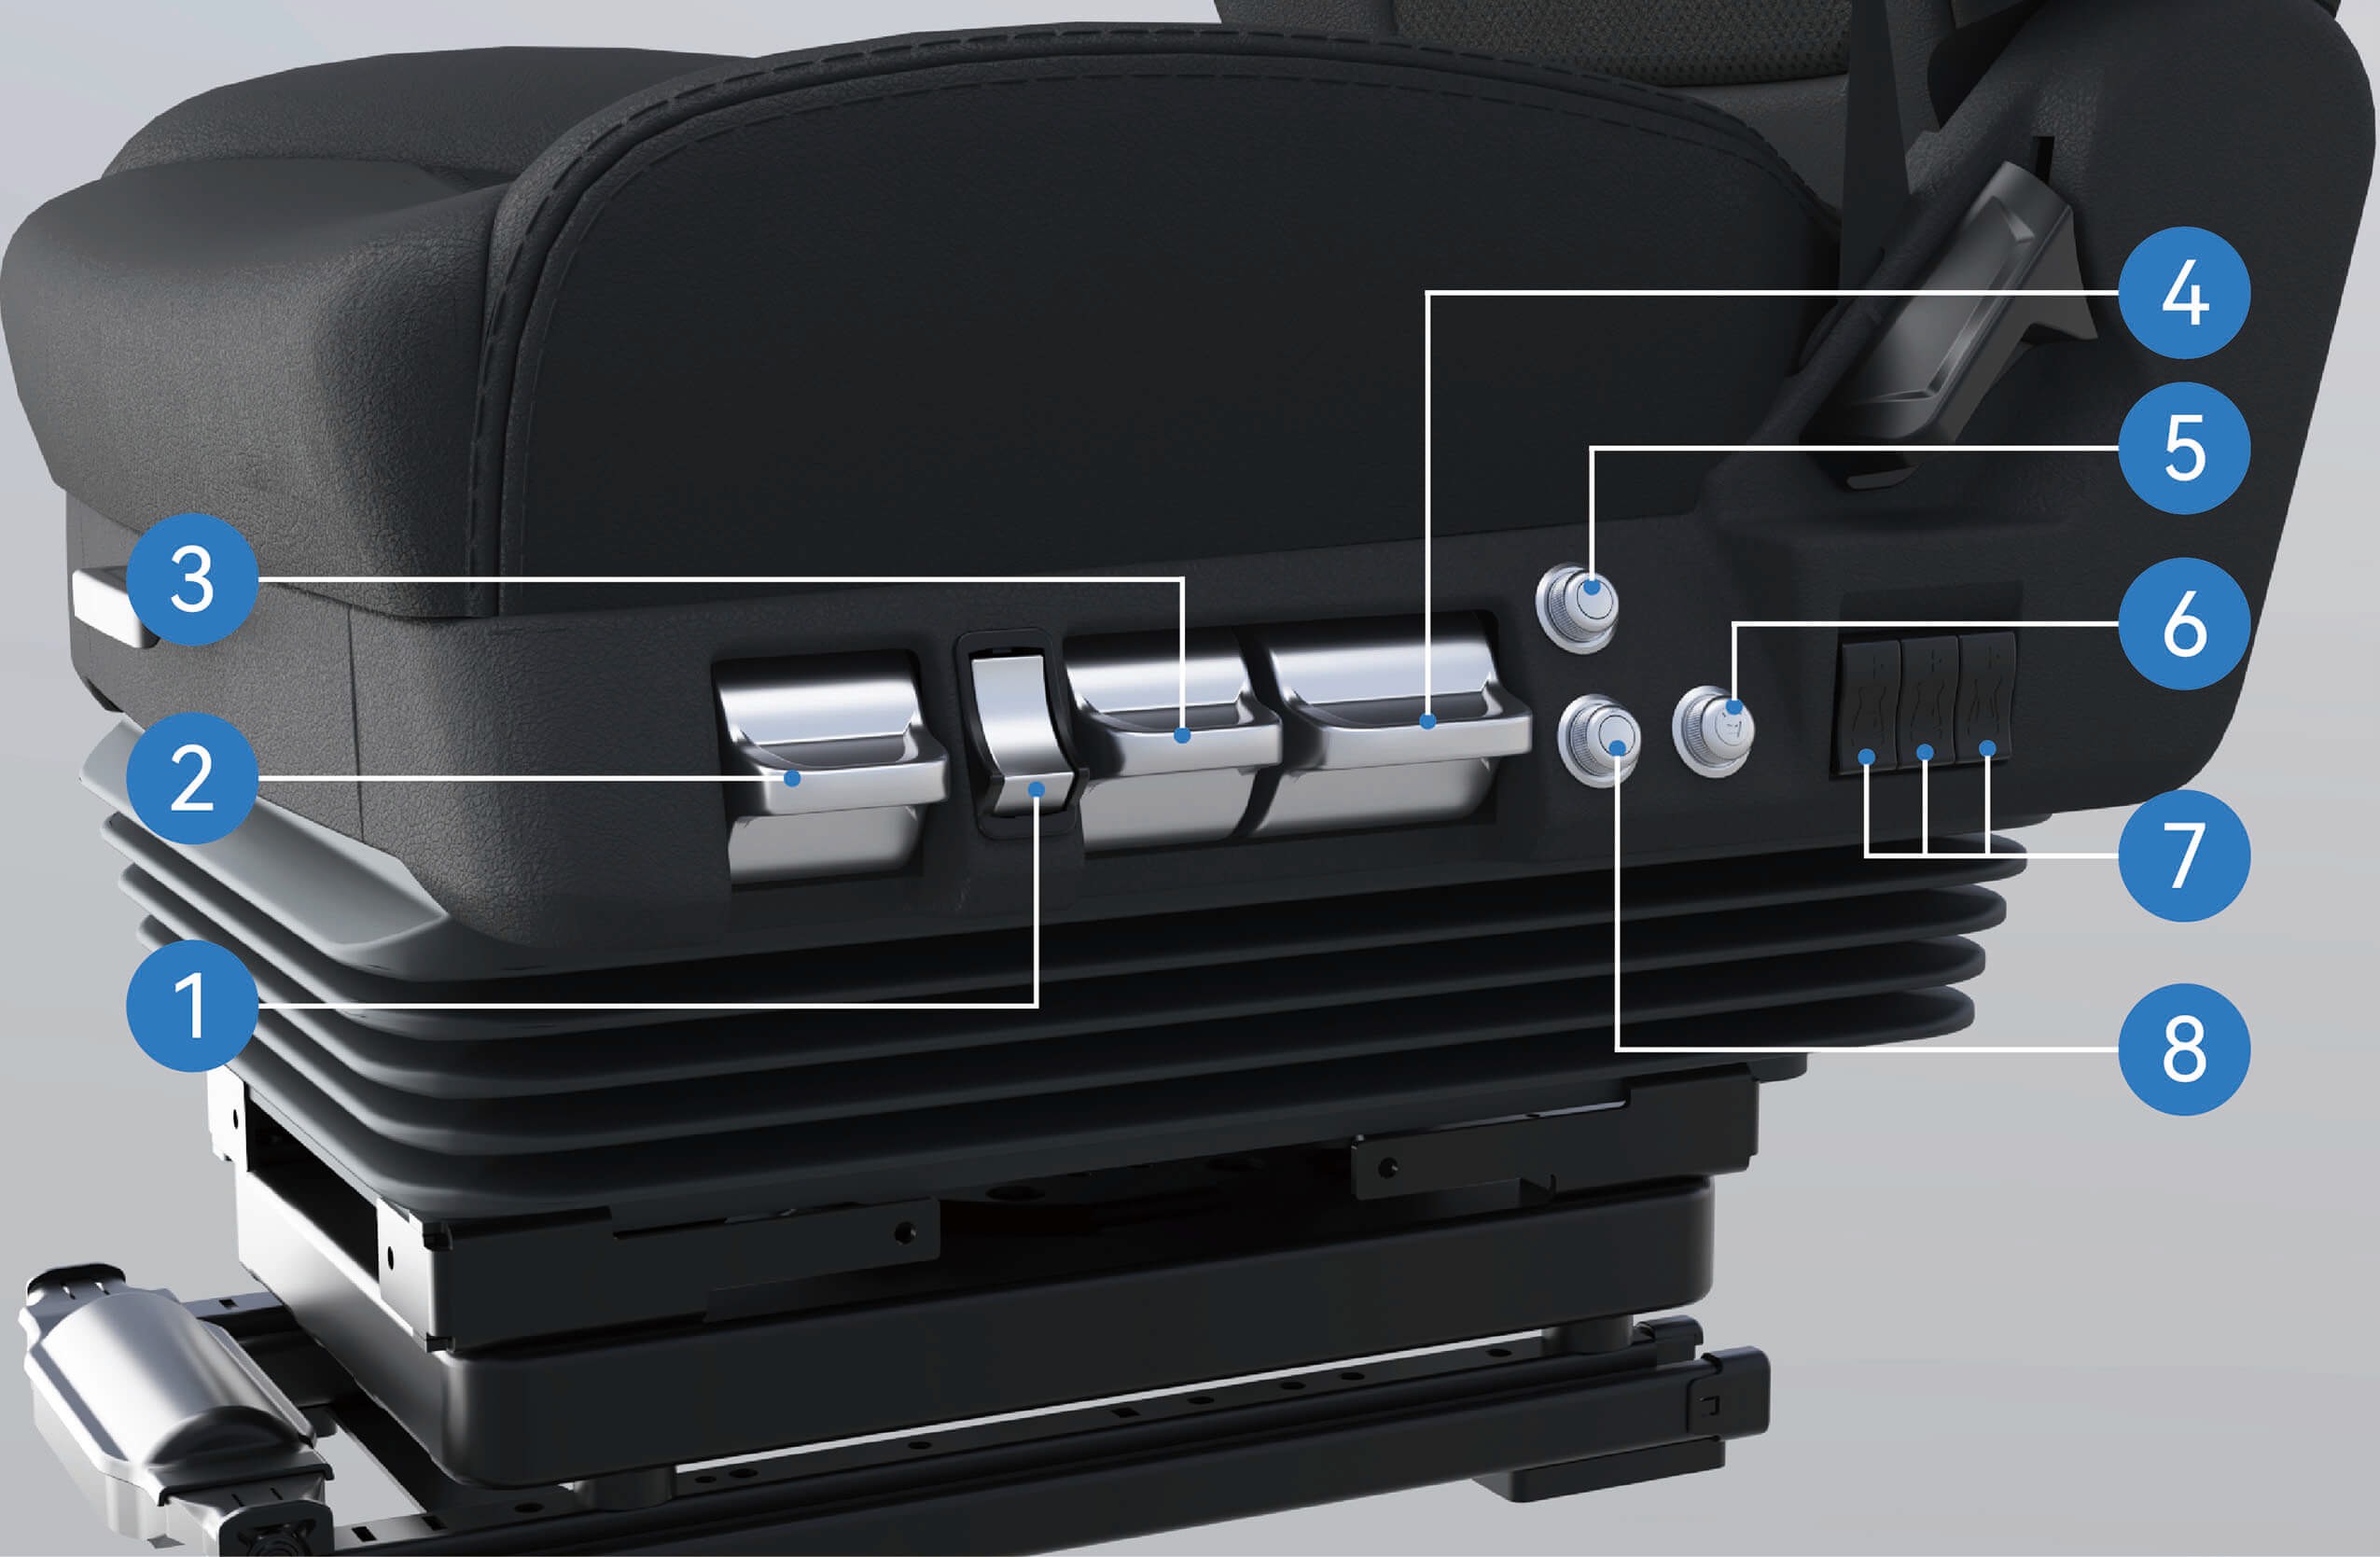
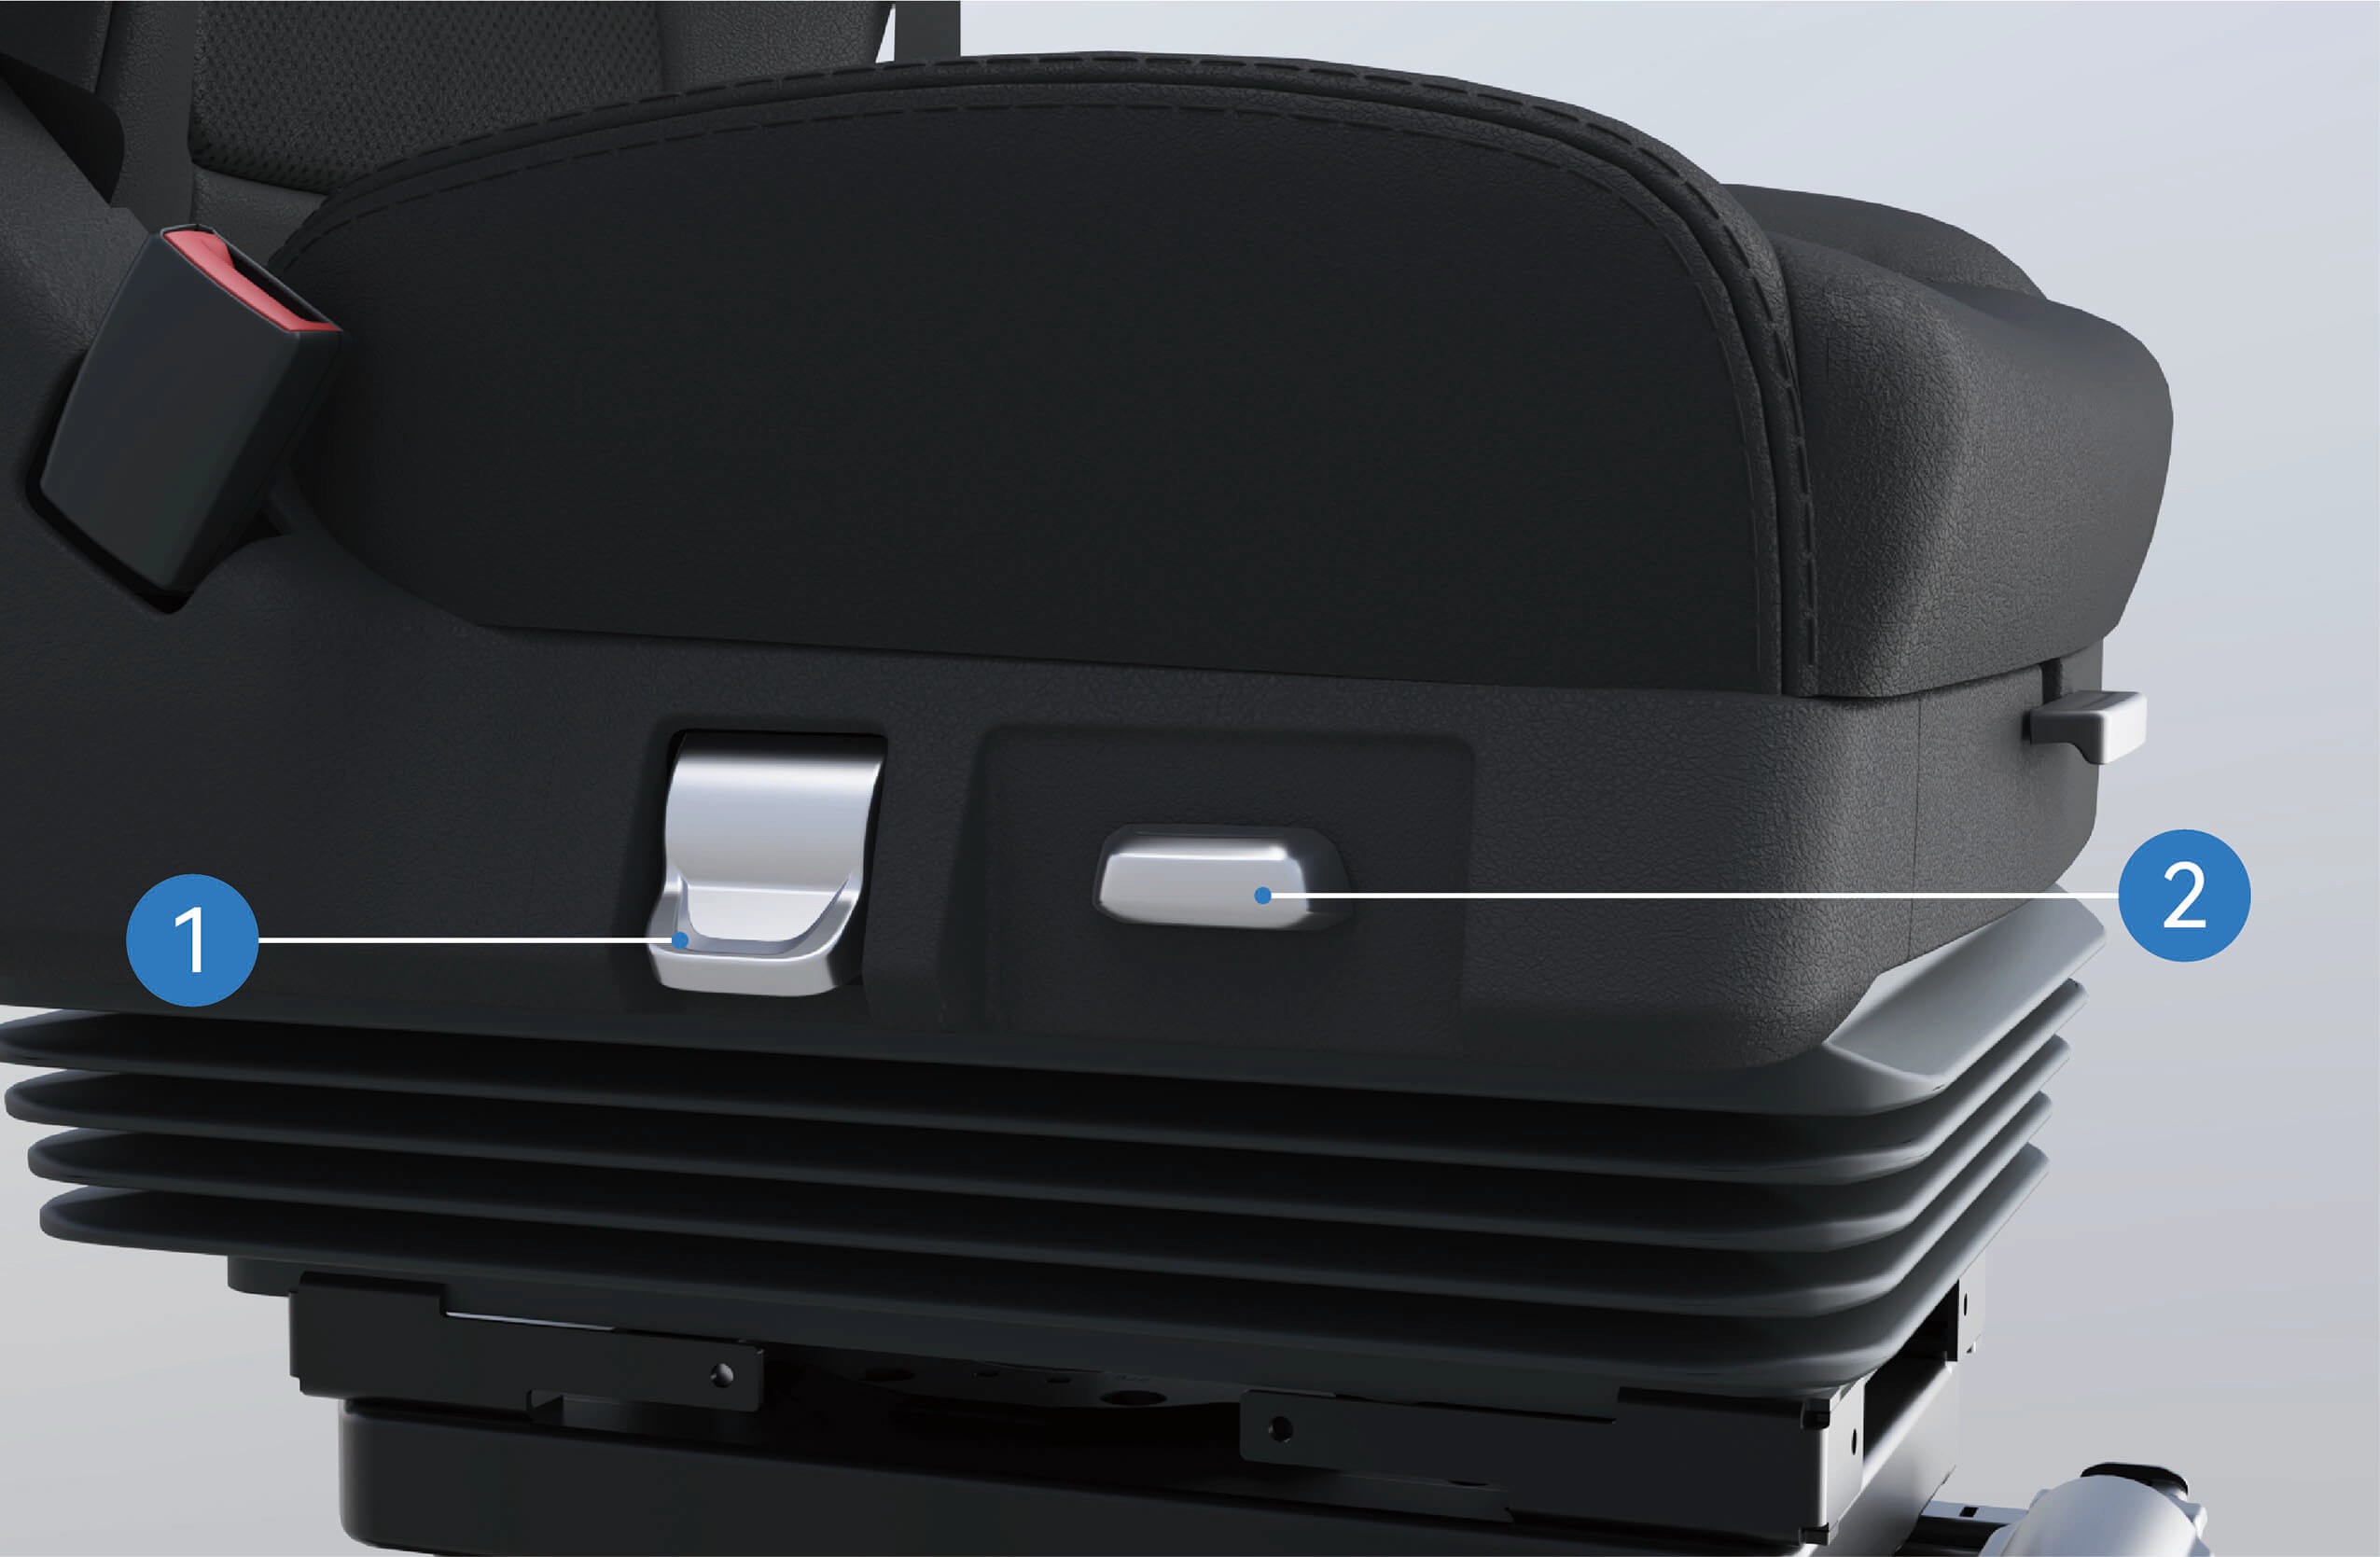
Hurtigtømmeknapp for førersetet Pressthelowerpartofthequickdeflationbuttonandtheseatwilllow- er rapidly; trykk på den øvre delen og the sewithout following proper procedures fylles raskt med luft og hever seg til normal brukerstilling.
Håndtak for helningsjustering av førersetet
Vri helningshåndtaket opp eller ned for å endre seteputens vertikale helningsvinkel, og slipp håndtaket for å låse seteputen når du har funnet en behagelig stilling.
Håndtak for dempingsjustering av førersetet
Vri dempingshåndtaket opp eller ned for å justere setets fasthet.
Håndtak for høydejustering av førersetet
Toggletheseatheightadjustmenthandleuptoraisetheseat; vri det ned for å senke setet.
Varmebryter for førersetet
Vri setevarmebryteren for å slå varmefunksjonen på eller av; bryteren kan stilles på tre varmenivåer: høy, middels og lav.
Massasjebryter for førersetet
Vri setemassasjebryteren for å slå massasjefunksjonen på eller av; bryteren kan stilles på tre massasjemoduser: Nivå 1: Sonevis massasje nedenfra og opp
Nivå 2: Sonevis massasje i nedre område Nivå 3: Sonevis massasje i øvre område
Knapper for justering av korsryggstøtte på førersetet
Trykk på den øvre delen av knappen for å heve korsryggstøtten; trykk på den nedre delen for å senke korsryggstøtten.
Ventilasjonsbryter for førersetet
↑ Til toppenVri seteventilasjonsbryteren for å slå ventilasjonsfunksjonen på eller av; bryteren kan stilles på tre luftmengdenivåer: høy, middels og lav.
4.D.2Forholdsregler
Advarsel
Ikke juster setet mens kjøretøyet er i bevegelse, ellers kan kjøretøyet miste kontrollen og det kan oppstå ulykker.
Ikke len ryggstøtten for langt bakover, ellers gir ikke sikkerhetsbeltet tilstrekkelig beskyttelse. For eksempel kan personen som bruker beltet i et for langt tilbakelent sete, gli ned under beltet og bli skadet ved en ulykke eller bråbremsing.
Setet skal justeres riktig for å sikre at bremsepedalen kan trykkes ned på riktig måte.
Før kjøring, rist førersetet frem og tilbake for å kontrollere at det er låst på plass, ellers kan det oppstå skade ved en ulykke eller bråbremsing.
Før setet flyttes, kontroller at setets bevegelsesområde er fritt for hindringer, for å unngå skade på gjenstander eller klemskade på personer.
Merknad
Kontroller at ingen andre gjenstander sitter fast i setet i førerhuset. Ellers kan setet bli skadet.
4.EPassasjersete foran
↑ Til toppenForberedelse før kjøring
Passasjersetet foran er plassert på høyre side av køyen i kjøretøyet. Du kan ta av køyens nakkestøtte og stille ryggstøtten på passasjersetet foran i loddrett posisjon for å sitte i passasjersetet foran.
4.E.1Bruksanvisning
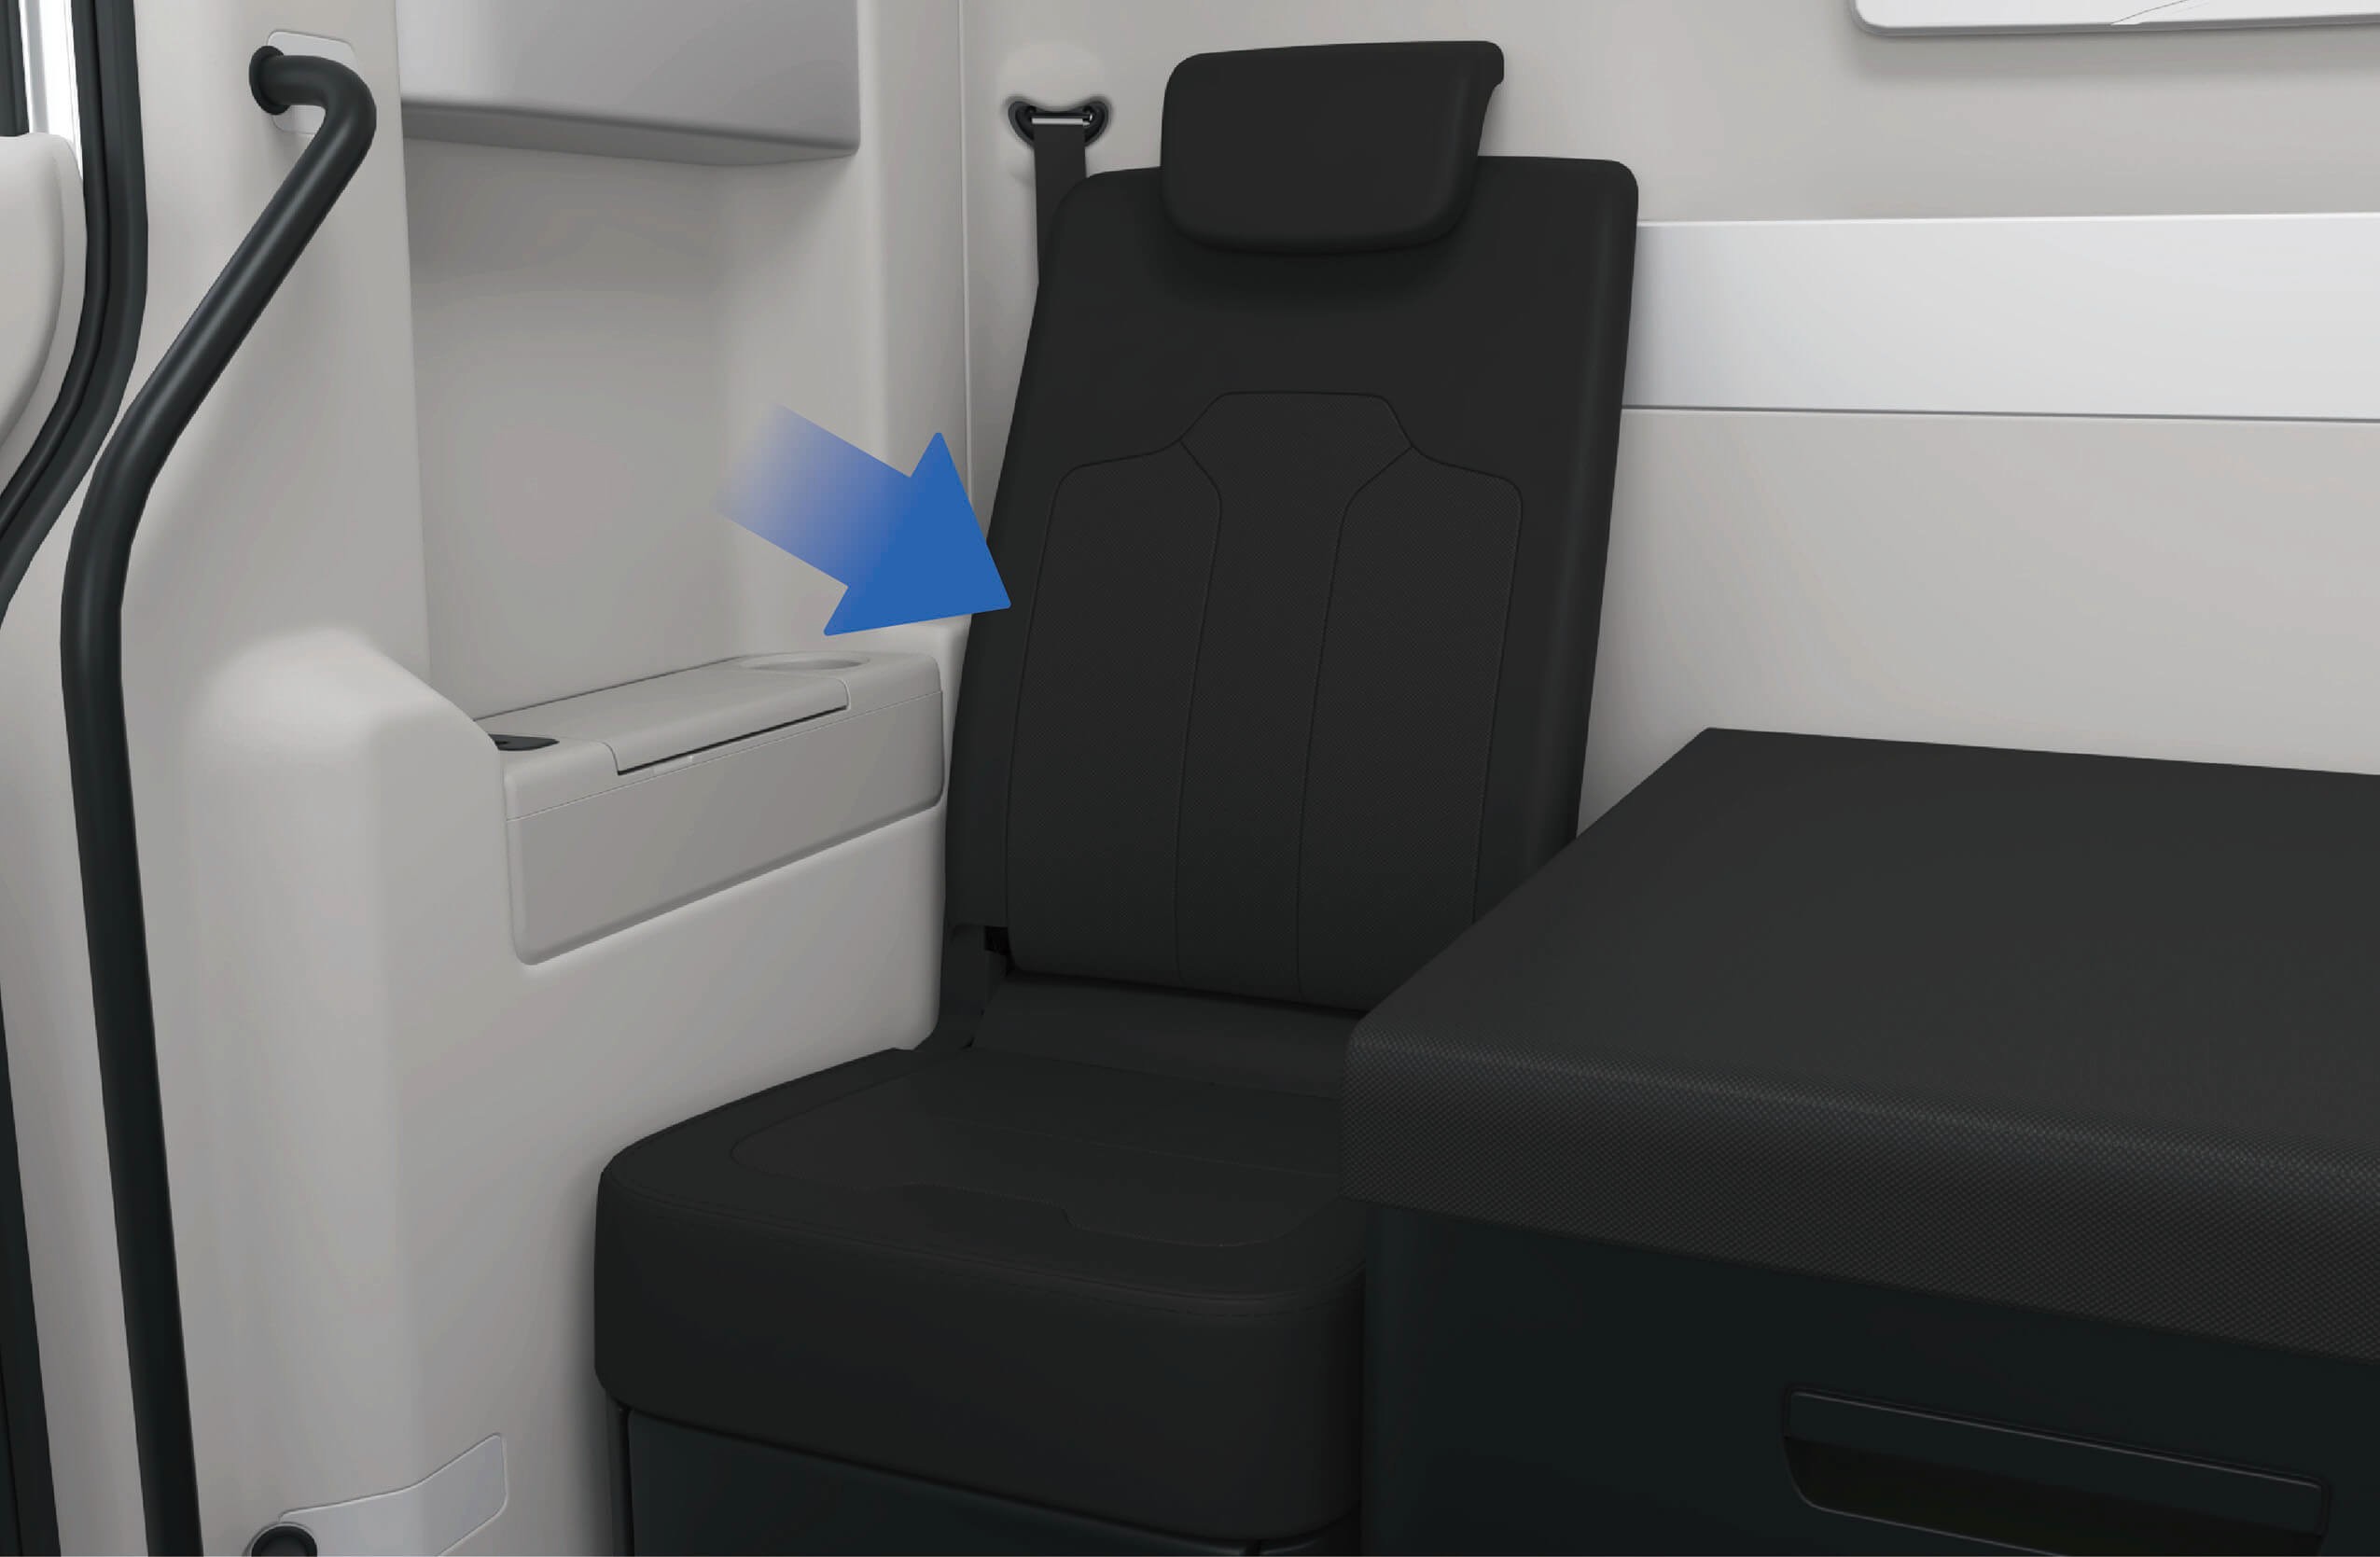
↑ Til toppenFor å bruke nakkestøtten på passasjersetet foran, løft nakkestøtten opp til høyeste stilling. Når du ikke trenger nakkestøtten, trykk den ned. Nakkestøtten kan bare brukes i høyeste stilling.
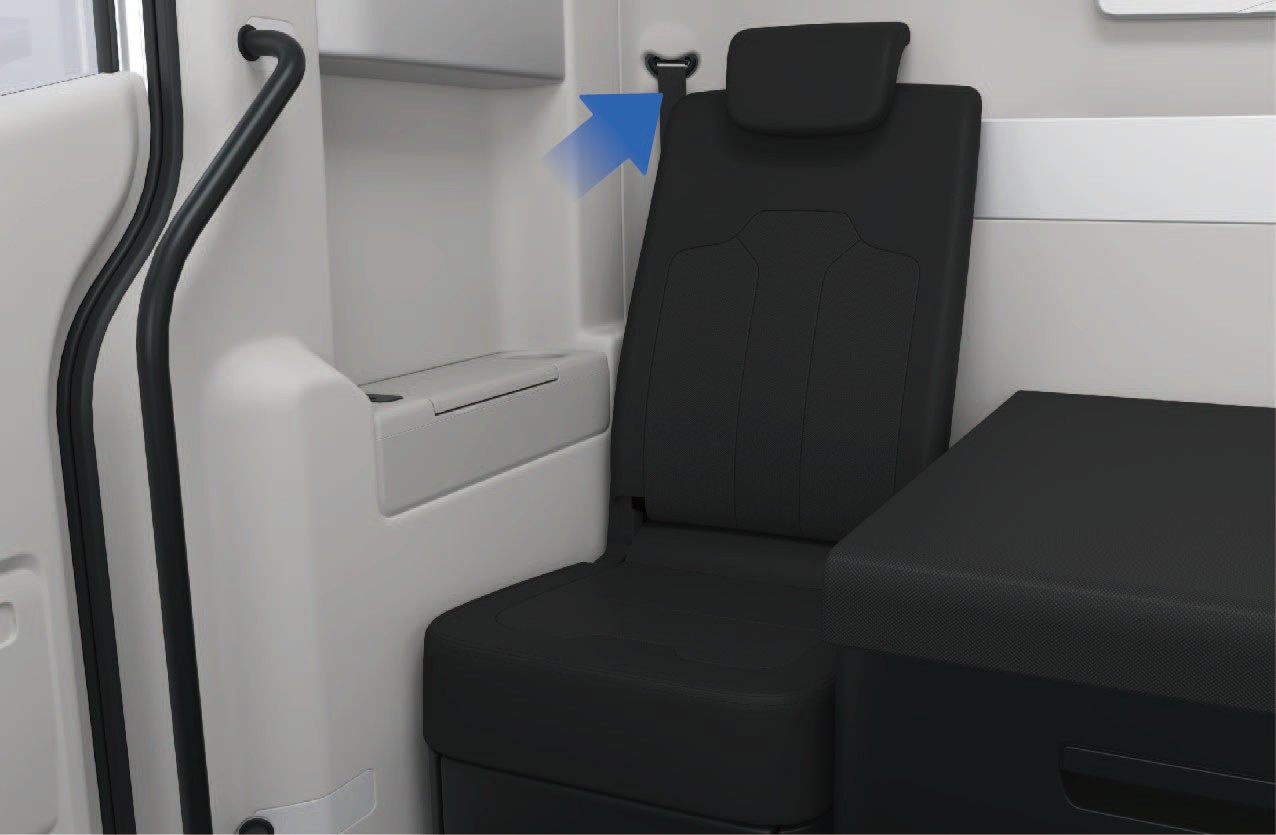
For å felle sammen passasjersetet foran kan du trekke i opplåsingsstroppen bak ryggstøtten for å låse opp ryggstøtten, og felle den ned.
4.E.2Forholdsregler
Merknad
Ved justering av nakkestøtten på passasjersetet foran oppover, slutt å løfte med kraft hvis du merker at nakkestøtten ikke kan bevege seg mer, for ikke å skade nakkestøttemekanismen.
Ved felling av ryggstøtten på passasjersetet foran, kontroller at det ikke ligger gjenstander på setet, for å unngå skade på setemekanismen når ryggstøtten felles.
↑ Til toppenMerk
4.FNFC-kort
↑ Til toppenForberedelse før kjøring
Kjøretøyet er utstyrt med et NFC-kort som lar deg låse opp, låse, slå på og slå av kjøretøyet.
4.F.1Bruksanvisning
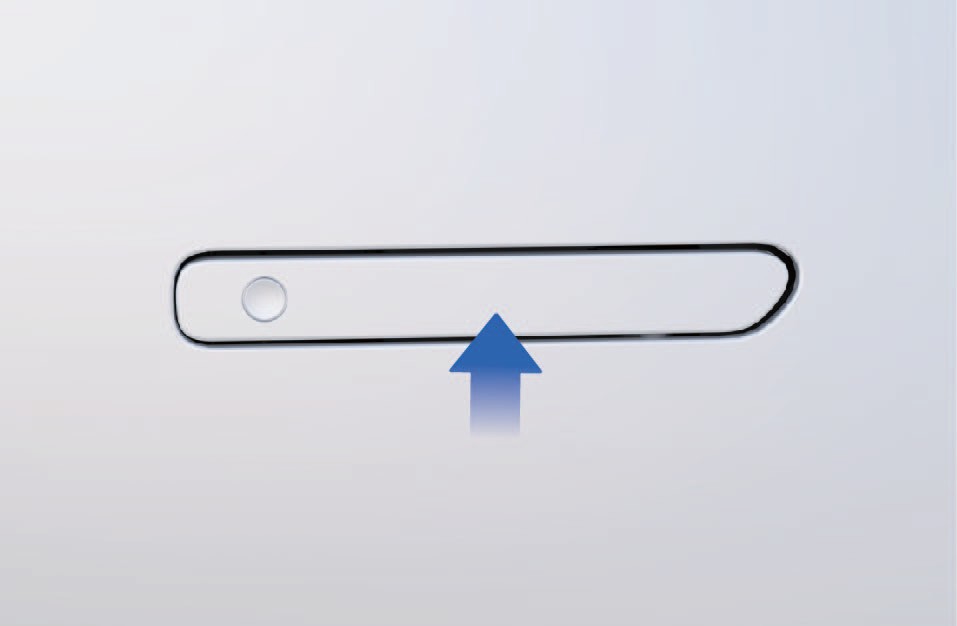
↑ Til toppenHold NFC-kortet midt på flaten av det innfelte dørhåndtaket, så tennes lampen i dørhåndtaket og kjøretøyets blinklys blinker én gang samtidig for å vise at opplåsingen er vellykket. Hold NFC-kortet mot flaten av det
innfelte dørhåndtaket på nytt, så slukkes lampen i dørhåndtaket og kjøretøyets blinklys blinker to ganger samtidig for å vise at låsingen er vellykket.
Etter at kjøretøyet er låst opp, kan du holde NFC-kortet mot det angitte avlesningspunktet på høyre del av instrumentpanelet for å slå på kjøretøyet.
For å slå av kjøretøyet kan du enten klikke på «Power OFF» på kjøretøyets informasjonsskjerm eller holde NFC-kortet mot det angitte avlesningspunktet på høyre del av instrumentpanelet.
4.F.2Forholdsregler
Merknad
Ikke bøy, vri eller klipp NFC-kortet.
Ikke plasser NFC-kortet på steder med høy temperatur, fukt eller sterke vibrasjoner.
Ikke legg NFC-kortet på trådløse ladere for husholdningsbruk, for å unngå skade.
Ikke legg NFC-kortet i telefondekselet, for å unngå å skade kortet når det kommer i kontakt med den trådløse laderen.
Ikke la NFC-kortet ligge utsatt til i kjøretøyet, for å unngå deformasjon og svikt av kortet.
Ikke bruk samme korttype (bankkort, reisekort, ID-kort eller adgangskort osv.) sammen med NFC-kortet (oppå hverandre, avlesing samtidig osv.).
Merk
Ved opplåsing/låsing av kjøretøyet med NFC-kort bør kjøretøyet stå stille, og du holder NFC-kortet mot flaten av det innfelte dørhåndtaket.
Etter avlesing bør du fjerne NFC-kortet fra avlesningspunktet i tide for å hindre at avlesingen utløses gjentatte ganger.
Hvis flaten av det innfelte dørhåndtaket er tilsmusset av skitt eller frost, kan avlesingen av NFC-kortet påvirkes, slik at opplåsing/låsing av kjøretøyet mislykkes.
Hvis et NFC-kort mistes eller det må bestilles flere brikker, kontakt Windrose servicetelefon.
4.GMekanisk nøkkel
↑ Til toppenForberedelse før kjøring
Hvis kjøretøyet under visse spesielle omstendigheter ikke kan låses opp med digital nøkkel og NFC-kort, kan du bruke den mekaniske nøkkelen til å låse opp kjøretøyet i en nødssituasjon.
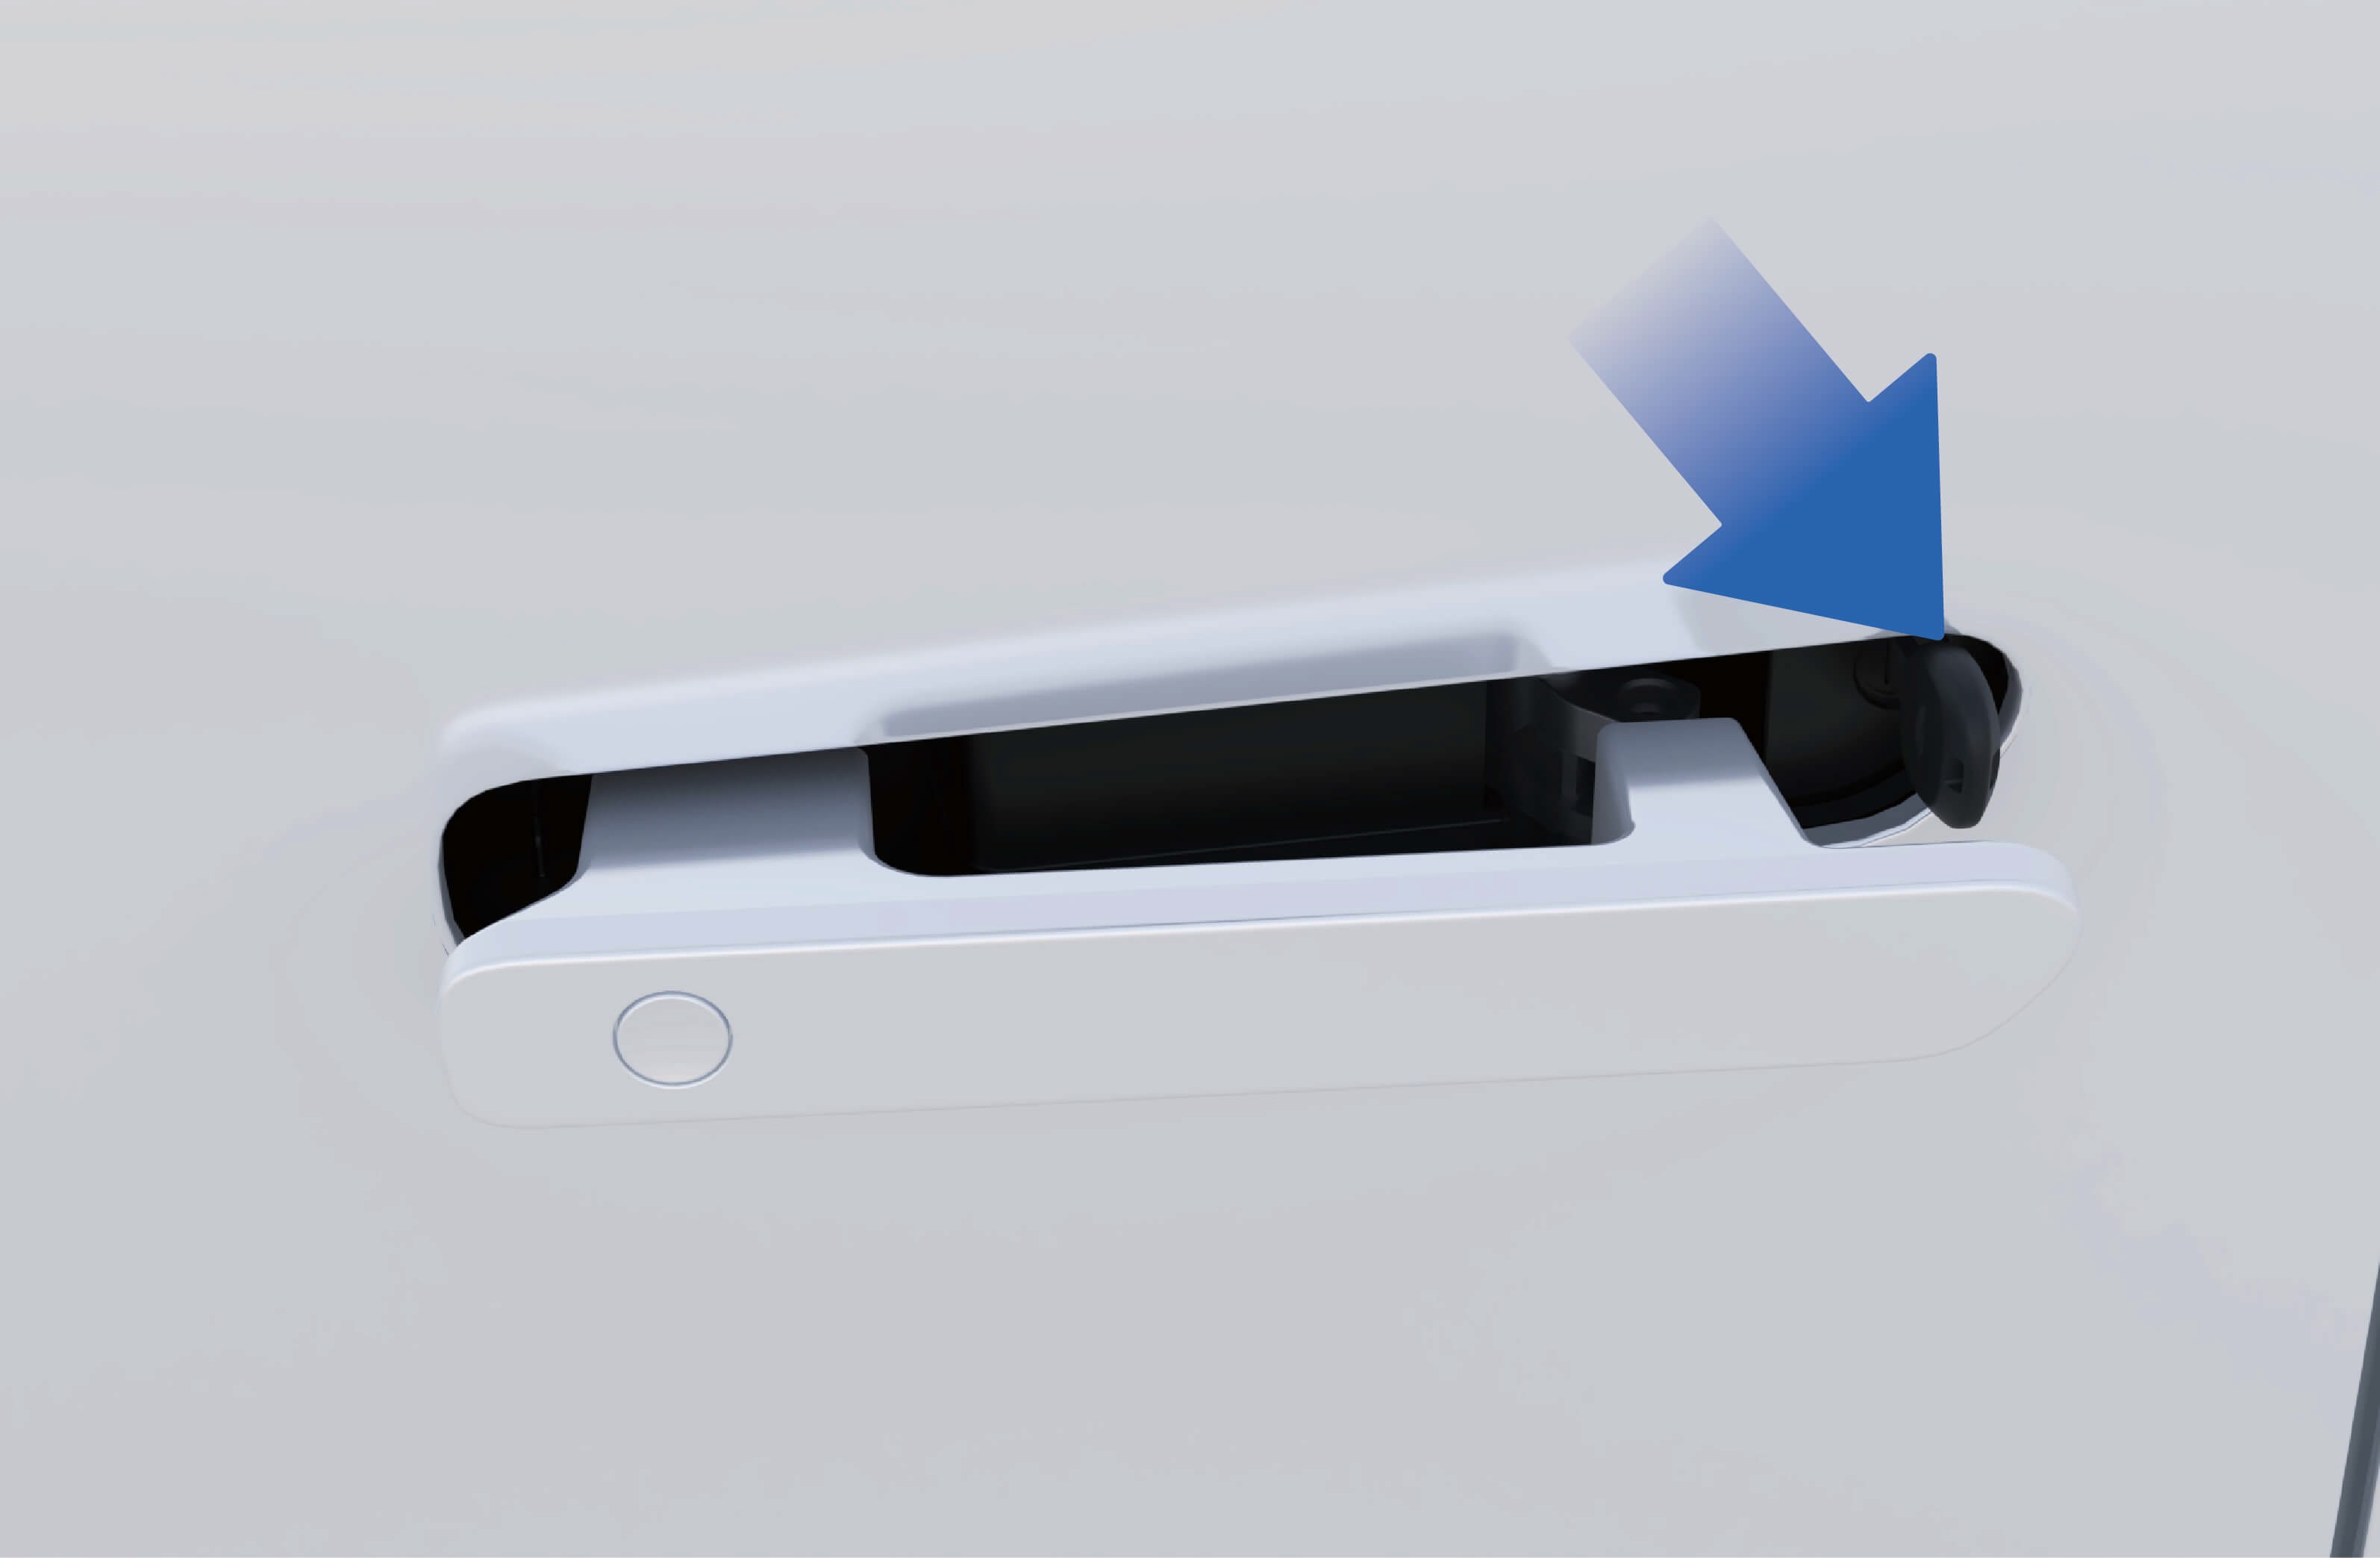
Når du trykker på den fremre enden av det innfelte dørhåndtaket, vipper den bakre enden ut. Da kan du trekke ut hele det innfelte dørhåndtaket og holde det med fingrene.
2. Sett den mekaniske nøkkelen inn i dørlåsen under det innfelte dørhåndtaket og vri nøkkelen mot høyre for å låse opp kjøretøyet.
Merknad
- Når du trekker ut det innfelte dørhåndtaket, hold det vannrett for å hindre at den fremre enden kommer i kontakt med døren og skader lakken.
Oppbevar den mekaniske nøkkelen forsvarlig for å unngå å miste den, noe som vil føre til at kjøretøyet ikke kan låses opp i en nødssituasjon.
4.HJustering av ratt
↑ Til toppenForberedelse før kjøring
Rattet kan justeres frem, tilbake, opp og ned for å passe dine kjørebehov.
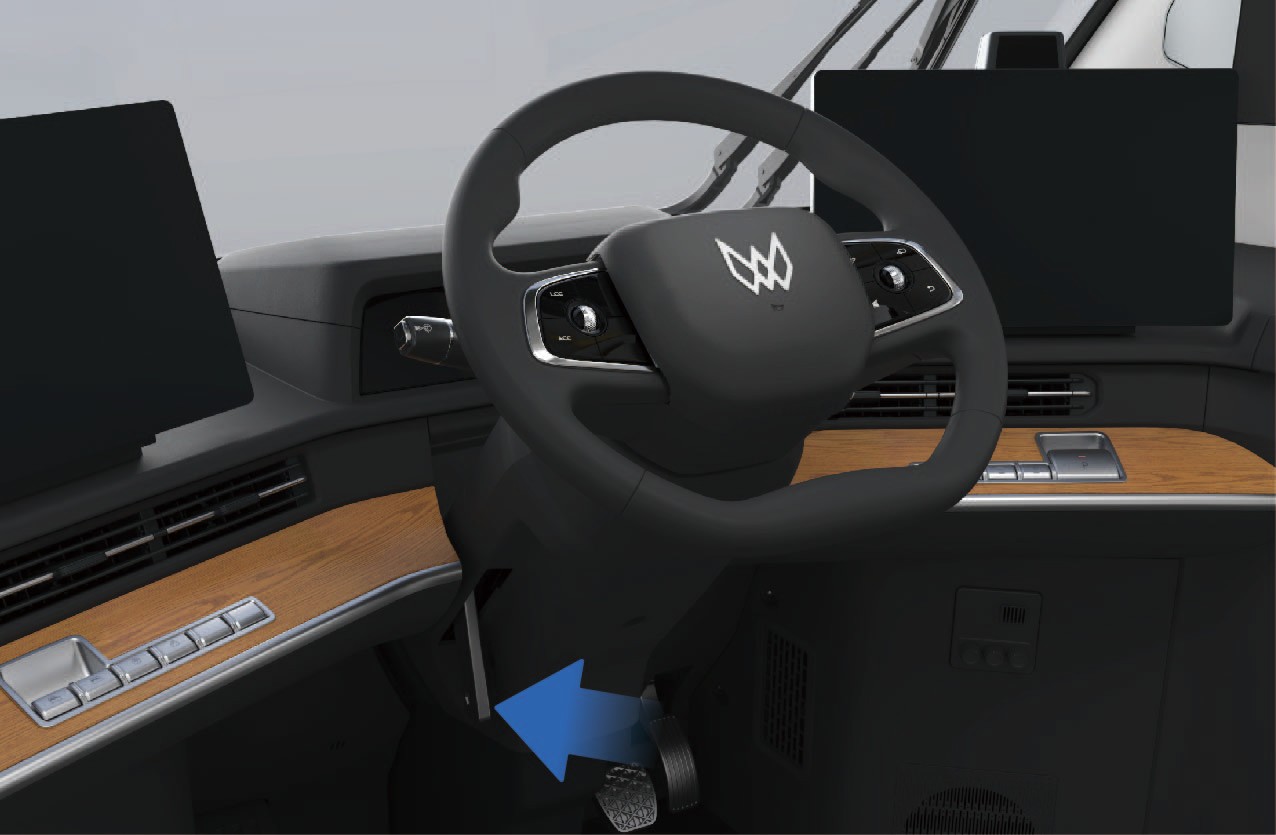
Juster aldri rattet under kjøring, for å unngå ulykker.
Etter justering av rattposisjonen, kontroller at rattet er låst, ellers kan det føre til personskade eller død og materielle skader.
4.IKnapper på rattet
Forberedelse før kjøring
Trekk opp justeringshåndtaket for rattet for å låse opp rattet.
Juster rattets høyde og avstand til kroppen din manuelt etter behov.
Når justeringen er fullført, trykk justeringshåndtaket ned for å låse rattet.
4.I.1Funksjonsbeskrivelse
↑ Til toppenKjøretøyet er utstyrt med et multifunksjonsratt som lar deg enkelt styre enkelte funksjoner i kjøretøyet.
4.I.2Bruksanvisning
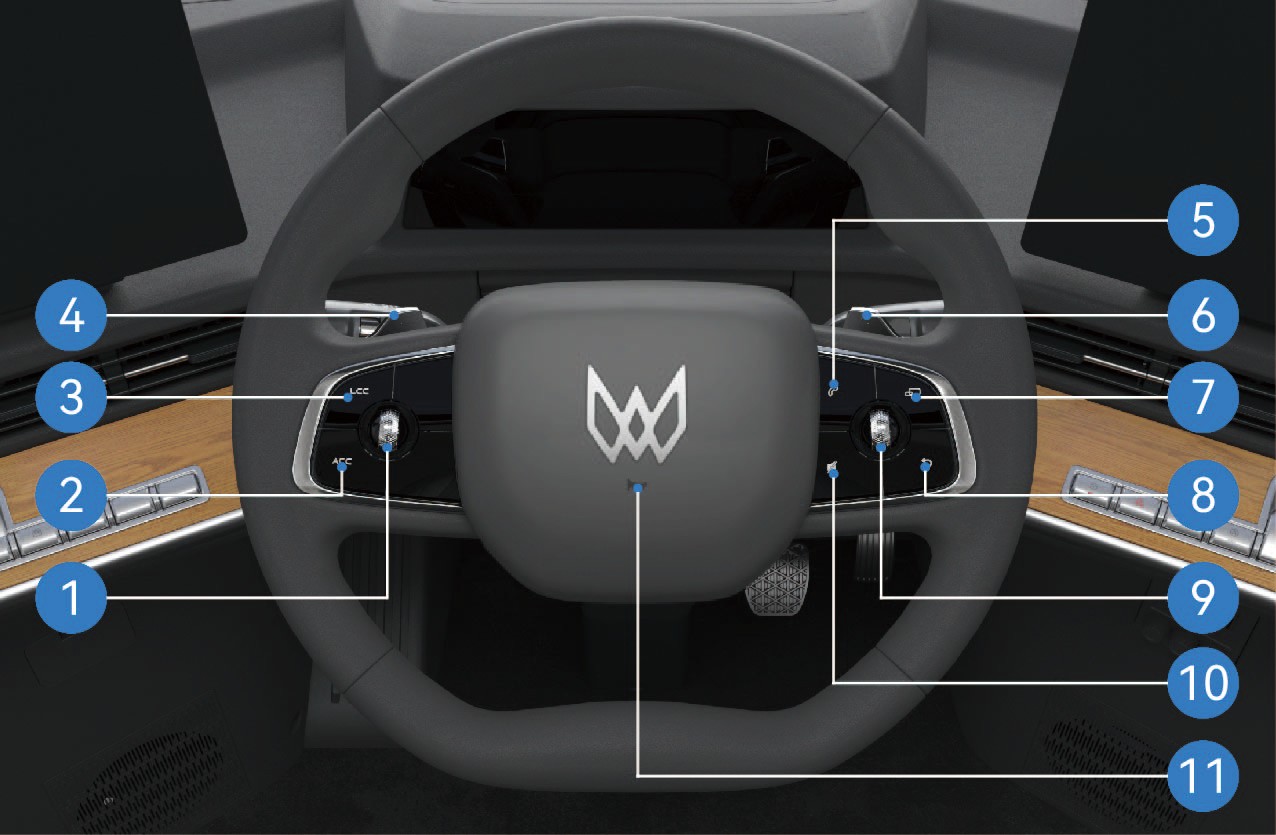
Knapp for bekreftelse samt avstands- og fartsjustering
Vri rullehjulet mot venstre for å redusere følgeavstanden i cruise-modus. Vri rullehjulet mot høyre for å øke følgeavstanden i cruise-modus.
Vri rullehjulet oppover for å øke hastigheten i cruise-modus. Vri rullehjulet nedover for å redusere hastigheten i cruise-modus.
Trykk midt på rullehjulet for å bekrefte det valgte målet.
Aktivering av adaptiv cruisekontroll (ACC)
Trykk én gang for å aktivere ACC-funksjonen. Trykk igjen for å slå av ACC-funksjonen.
Aktivering av filsentreringsstyring (LCC)*
Trykk én gang for å aktivere LCC-funksjonen. Trykk igjen for å slå av LCC-funksjonen.
Padlespak for regenerativ bremsing (venstre)
Vri venstre padlespak for det kinetiske regenerative bremsesystemet (KERS) for å redusere kjøretøyets regenerative bremsestyrke.
Bluetooth-telefon
Trykk én gang for å svare på et Bluetooth-anrop.
Trykk og hold for å legge på eller ringe.
Padlespak for regenerativ bremsing (høyre)
Vri høyre padlespak for det kinetiske regenerative bremsesystemet (KERS) for å øke kjøretøyets regenerative bremsestyrke.
MODE-funksjon
Trykk på denne knappen for å veksle mellom radio, musikk og video.
Tilbake
Trykk på denne knappen for å gå tilbake til forrige grensesnitt på den sist betjente informasjonsskjermen. For å bytte til
en annen informasjonsskjerm, berør den aktuelle informasjonsskjermen manuelt.
Multimediestyring
Vri rullehjulet mot venstre for å gå til forrige multimediefunksjon. Vri rullehjulet mot høyre for å gå til neste multimediefunksjon.
Vri rullehjulet oppover for å øke volumet for den valgte multimediefunksjonen. Vri rullehjulet nedover for å redusere volumet.
Trykk midt på rullehjulet for å bekrefte det valgte i den aktuelle medielisten.
Lyd av
Trykk én gang for å slå på lydløs. Trykk igjen for å slå på lyden igjen.
Horn
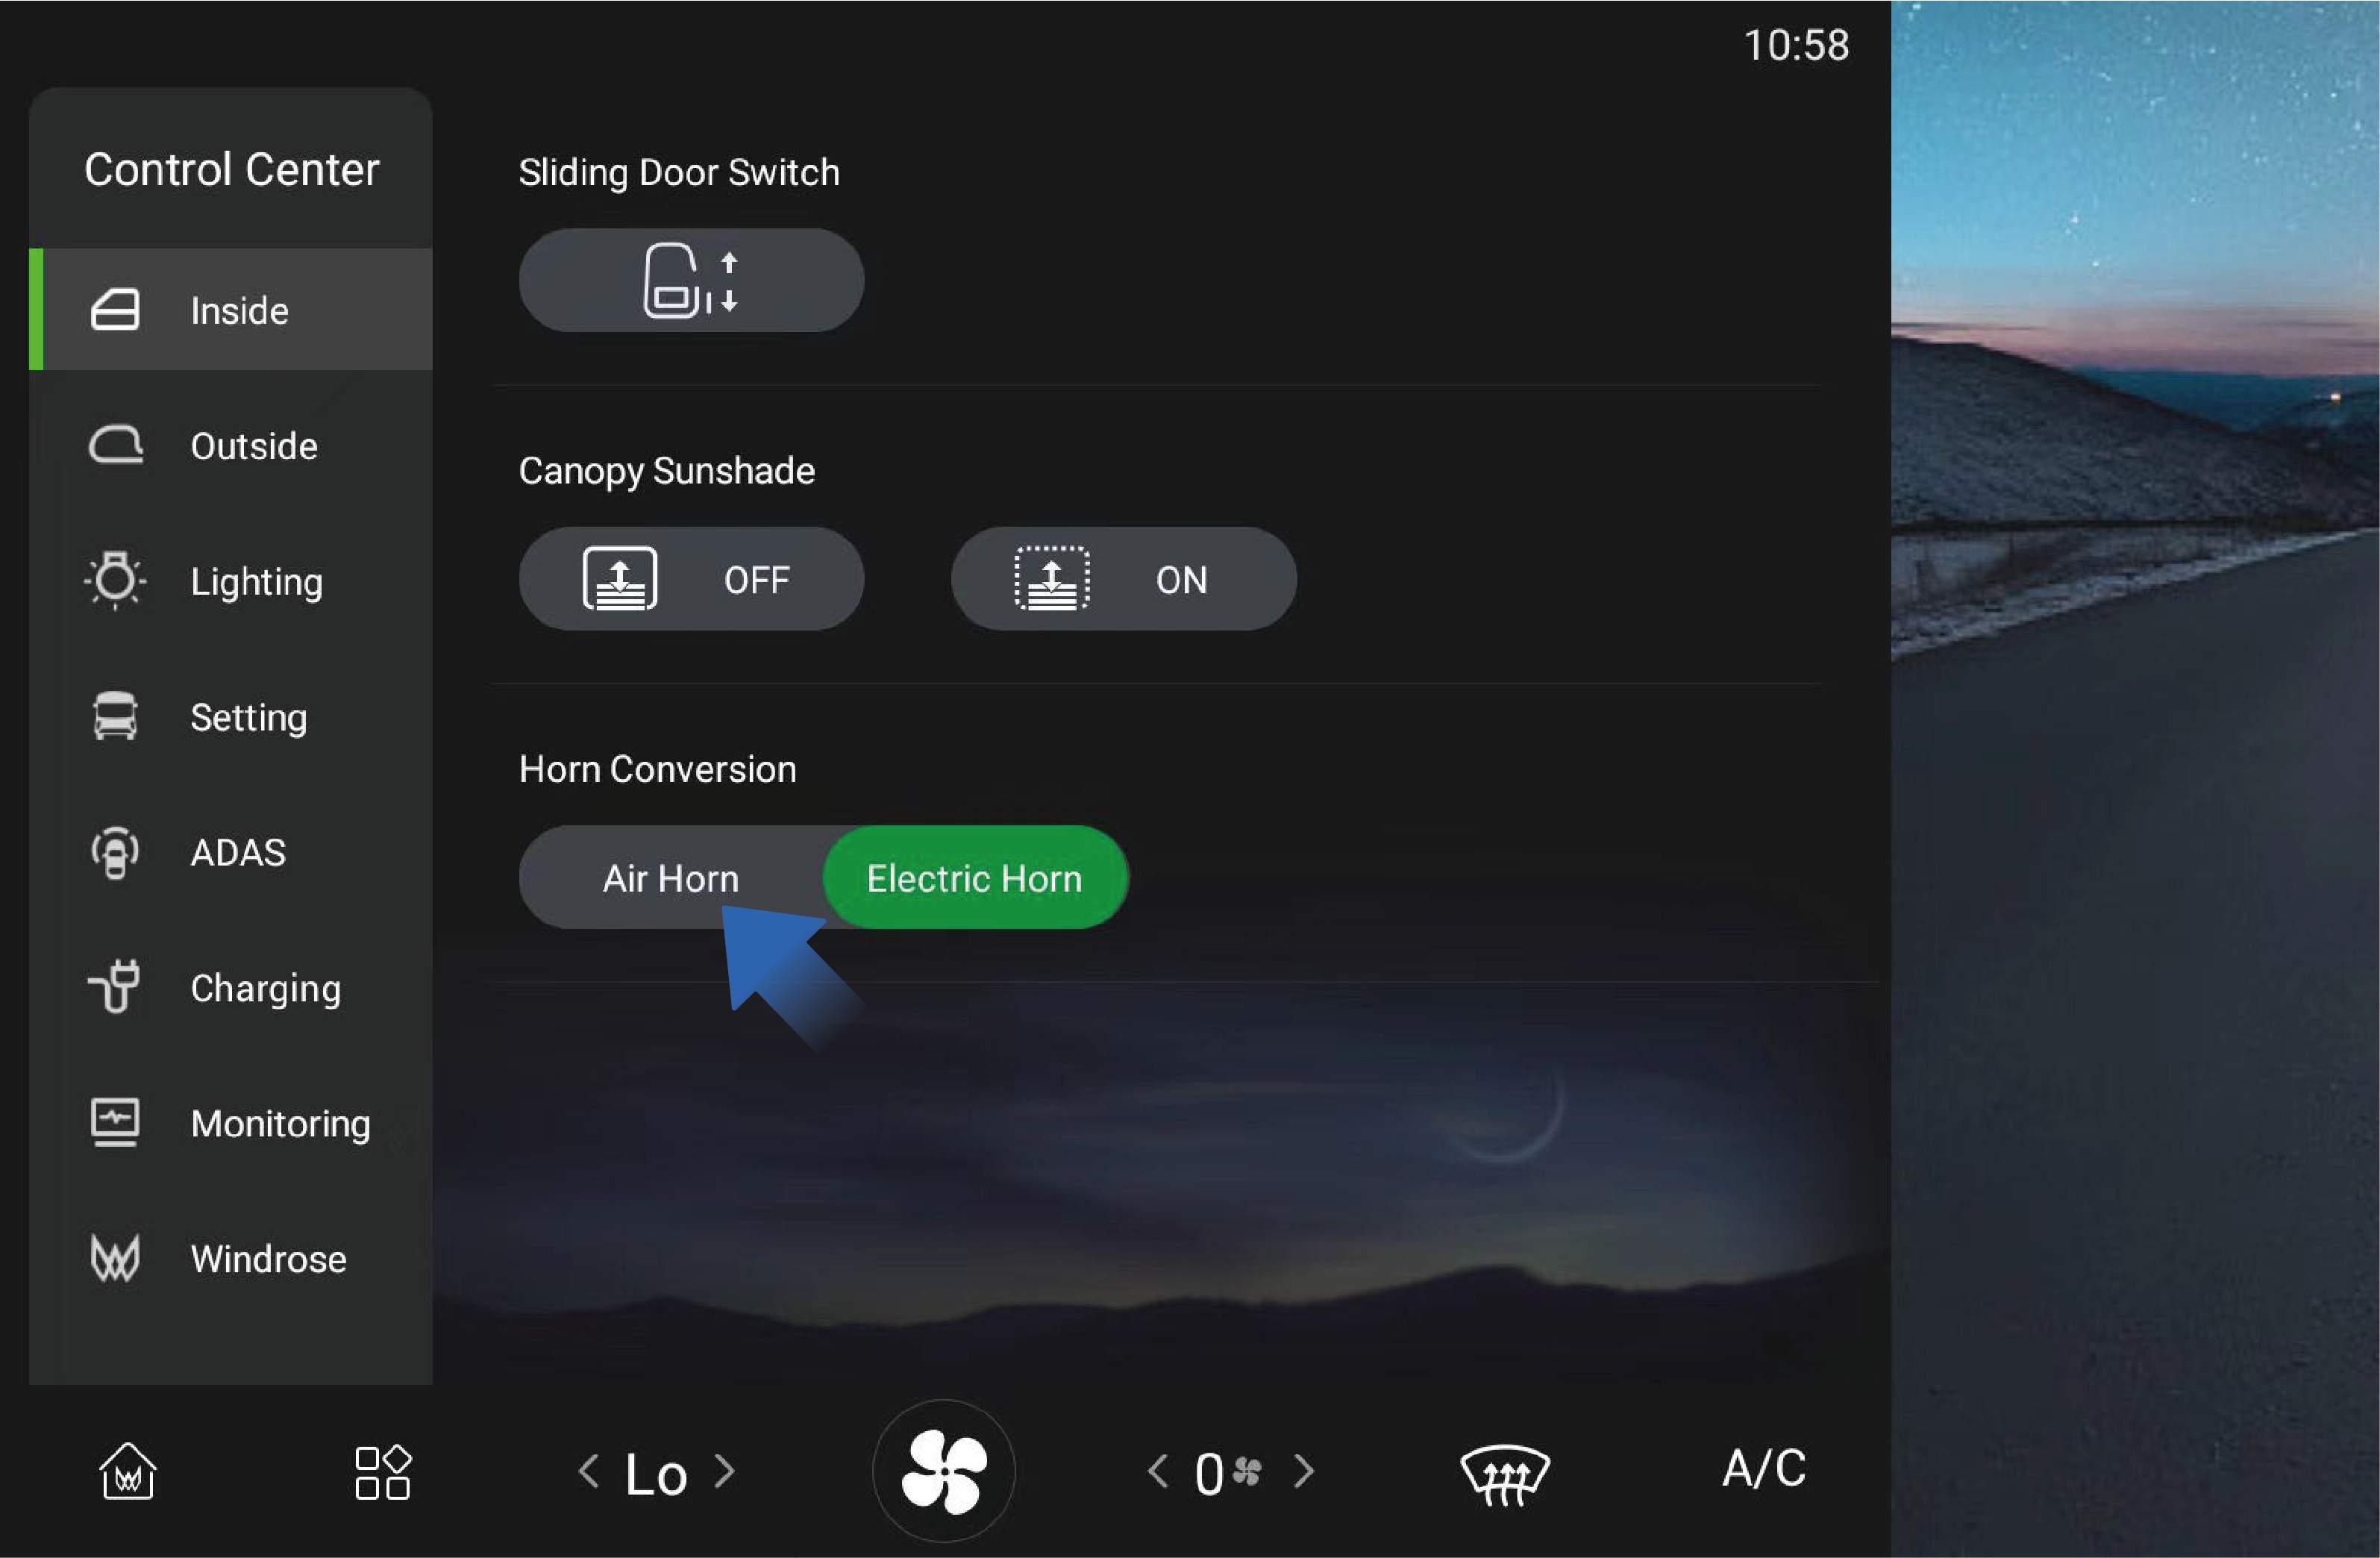
↑ Til toppenTrykk midt på rattet for å bruke hornet.
Du kan klikke på «Inside» i «Control Center»-grensesnittet på kjøretøyets informasjonsskjerm for å velge horntype.
4.I.3Forholdsregler
↑ Til toppenMerkPlasser fingrene i en passende posisjon for å unngå at knappen blir vanskelig å nå eller betjene.
5.AOversikt over instrumentpanelet
Forberedelse før kjøring
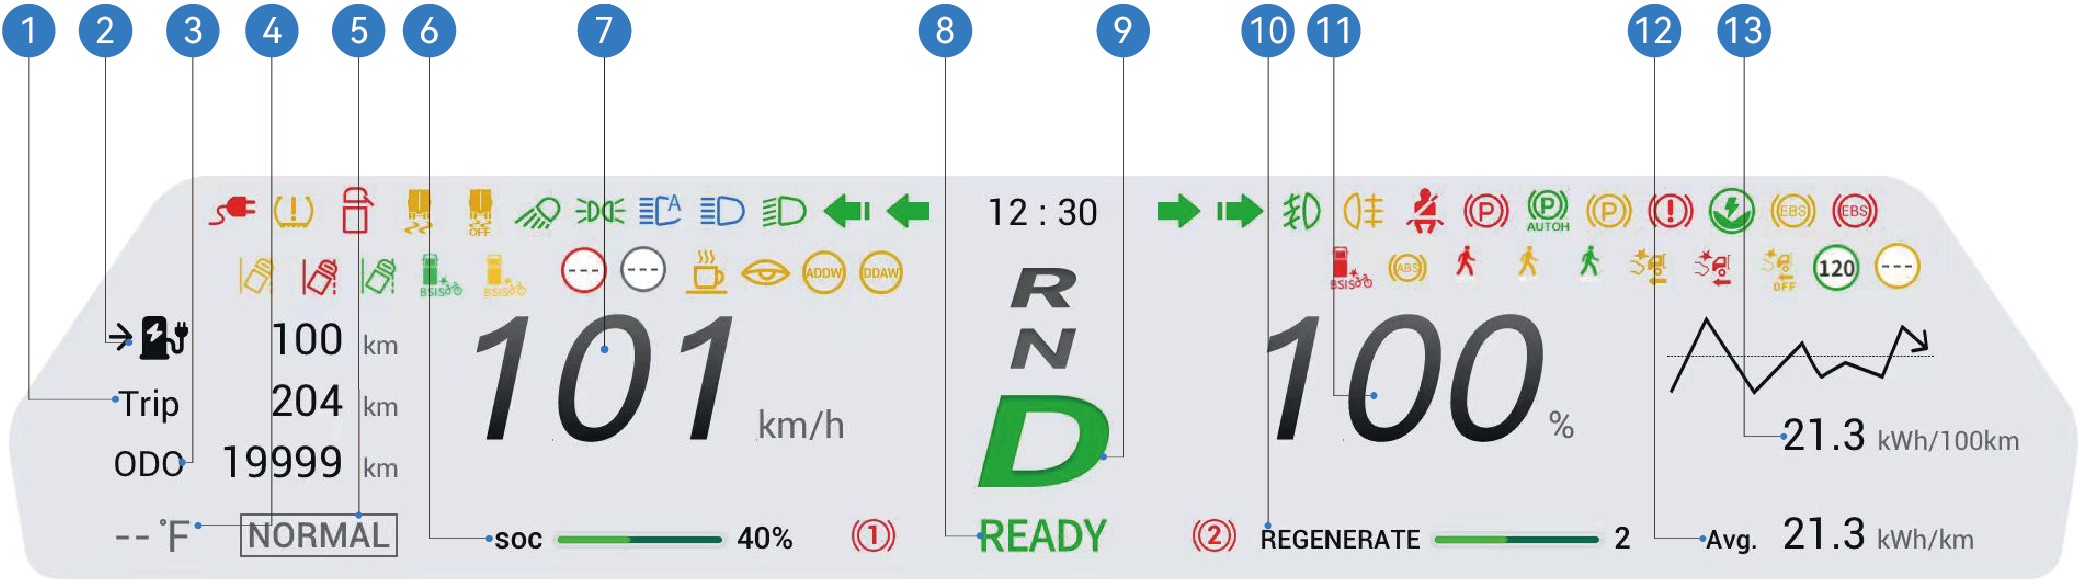
Turteller 5. Kjøremodus 9. Gjeldende gir 13.Momentant strømforbruk per 100 km
Estimert rekkevidde 6. Høyspenningsbatteriets kapasitet 10. Nivåer for energigjenvinning
Kilometerteller (total distanse) 7. Gjeldende hastighet 11. Andel momentan
drivkraft
Utetemperatur 8. Kjøretøyet er klart 12.Gjennomsnittlig strømforbruk
per 100 km
Du kan velge «Windrose» i «Control Center»-grensesnittet på kjøretøyets informasjonsskjerm for å velge dag-, natt- eller automodus.
Dagmodus: Grunnfargen i kombiinstrumentet er hvit.
Nattmodus: Grunnfargen i kombiinstrumentet er svart.
Automodus: Systemet veksler automatisk mellom dag- og nattmodus basert på lyset utendørs.
↑ Til toppenMerknadBildene i kombiinstrumentets grensesnitt er kun skjematiske og ment som referanse. Se det faktiske kjøretøyet.
5.BIndikatorer og varsellamper
Leter du etter en bestemt lampe? Bruk den søkbare oversikten over varsellamper for alle indikatorer på denne siden i en filtrerbar liste.
Forberedelse før kjøring
|
|
|
|---|---|---|
|
|
|
|
|
|
|
|
|
|
|
|
|
|
|
|
|
|
|
|
|
|
|
|
|
|






|
|
|
|---|---|---|
|
|
|
|
|
|
|
|
|
|
|
|
|
|
|
|
|
|
|
|
|
|
|
|
|
|
|
|
|


|
|
|
|---|---|---|
|
|
|
|
|
|
|
|
|
|
|
|
|
|
|
|
|
|
|
|
|
|
|
|
|
|
|
|
|





|
|
|
|---|---|---|
|
|
|
|
|
|
|
|
|
|
|
|
|
|
|
|
|
|
|
|
|
|
|
|
|
|
|
|
|


|
|
|
|---|---|---|
|
|
|
|
|
|
|
|
|
|
|
|
|
|
|
|
|
|
|
|
|
|
|
|
|
|
|
|
|


|
|
|
|---|---|---|
|
|
|
|
|
|
|
|
|
|
|
|
|
|
|
|
|
|
|
|
|
|
|
|
|
|
|
|
|


|
|
|
|---|---|---|
|
|
|
|
|
|
|
|
|
|
|
|
|
|
|
|
|
|
|
|
|
|
|
|
|
|
|
|
|






|
|
|
|---|---|---|
|
|
|
|
|
|
|
|
|
|
|
|
|
|
|
|
|
|
|
/ | |
|
/ | |
|
/ | |
|
/ |




|
|
|
|---|---|---|
|
/ | |
|
/ |


When the vehicle is powered on, some warning lamps will be illuminated for self-test and go out after a few seconds. If the warning lamp remains illuminated or gets illuminated during driving due to a fault, you should attach importance to this phenomenon and contact a Windrose authorised service centre as soon as possible to avoid accidents which may lead to personal injury or property damage.
If the warning lamp remains illuminated after the vehicle is powered on, or gets illuminated during driving, it indicates that the vehicle may be subject to a serious fault. In this case, contact a Windrose authorised service centre immediately.
↑ Til toppenThe black icons in the table will change between black and white according to the background in the instrument cluster display.
6.ABetjening av vindusviskere
↑ Til toppenForberedelse før kjøring
When you release the windscreen washing button, the water spraying will stop immediately, and the wiper will reset after three wipes. When you press and release the windscreen washing button, the washer does not spray water, and the
You control the functions of wipers on the vehicle through the
combination switch handle on the left side of the steering wheel.
6.A.1Bruksanvisning
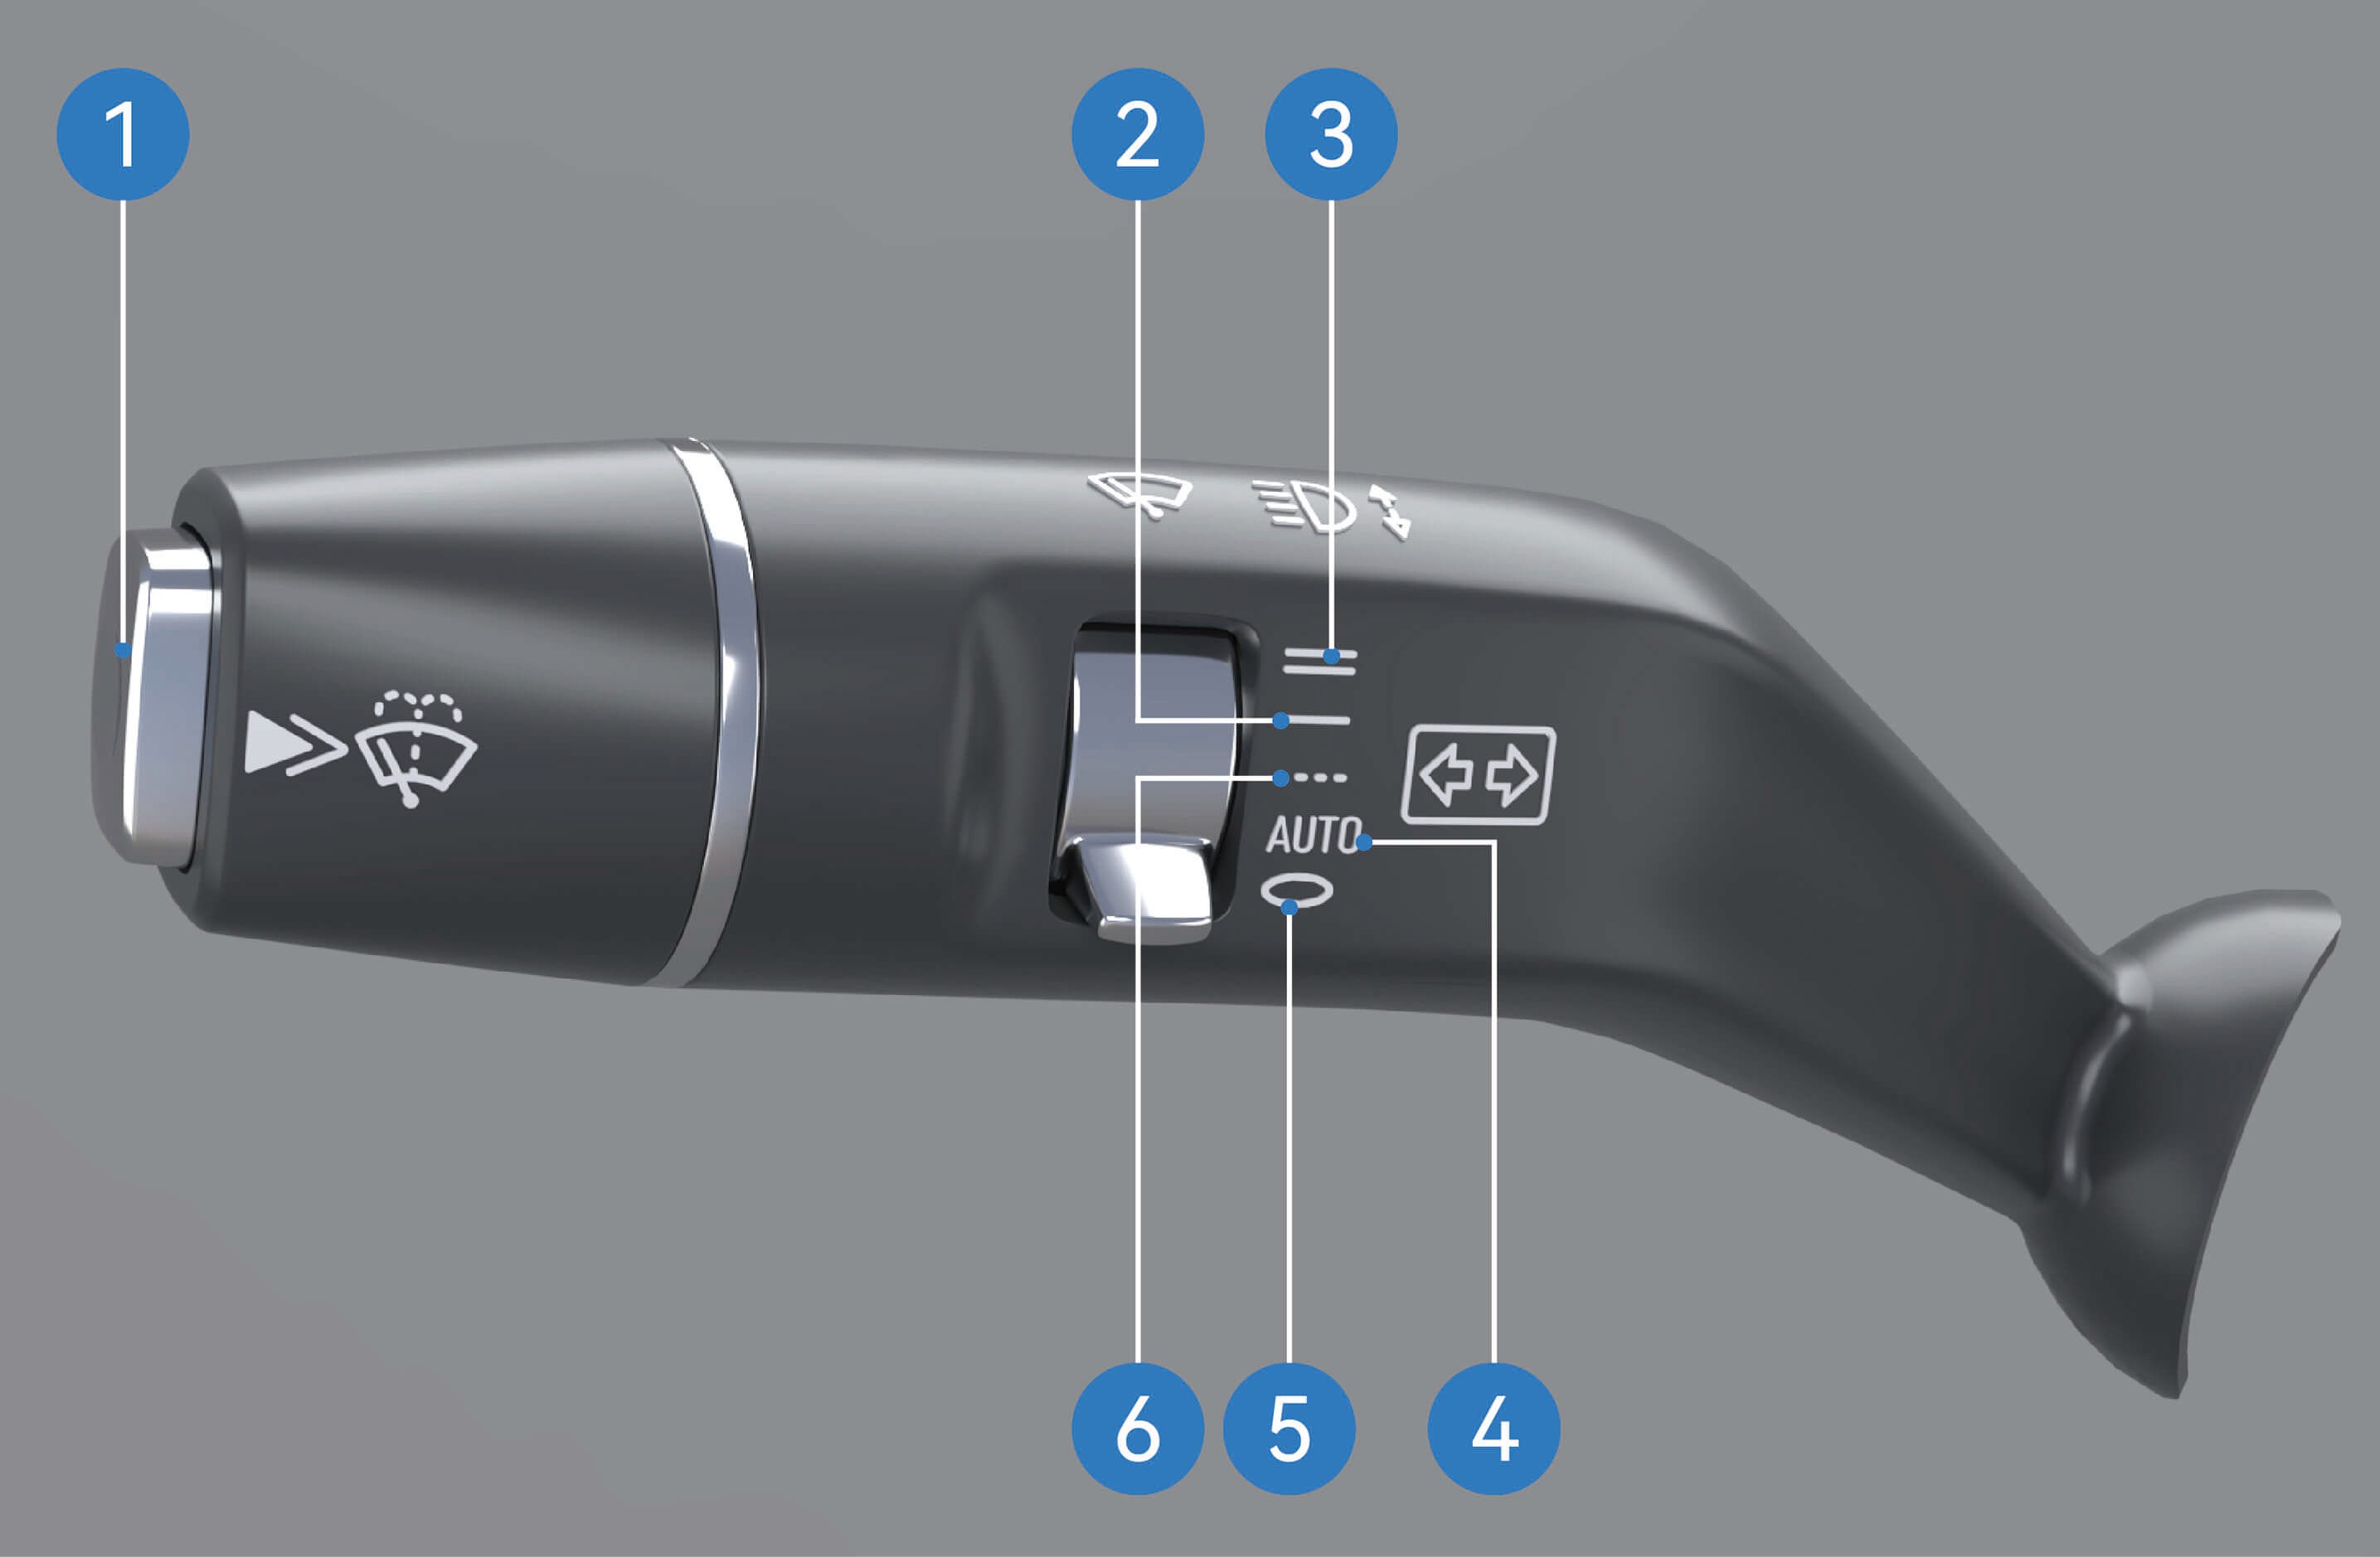
Windscreen washing: Press and hold the windscreen washing button to enter the washing mode. In this mode, the washer will keep spraying water, and the wiper will wipe continuously.
wiper will be reset after one wipe.
Low-speed continuous wiping: Move the wiper blade to this position, and the wiper will enter low-speed continuous wiping mode.
High-speed continuous wiping: Move the wiper blade to this position, and the wiper will enter high-speed continuous wiping mode.
Auto wiping: Move the wiper blade to this position, and the wiper will enter auto wiping mode.
Wiper OFF: Move the wiper blade to this position, and the wiper will be in off mode.
Intermittent wiping: Move the wiper blade to this position, and the wiper will enter intermittent wiping mode, in which you can adjust the intermittent wiping frequency of the wiper in the vehicle information screen.
↑ Til toppen
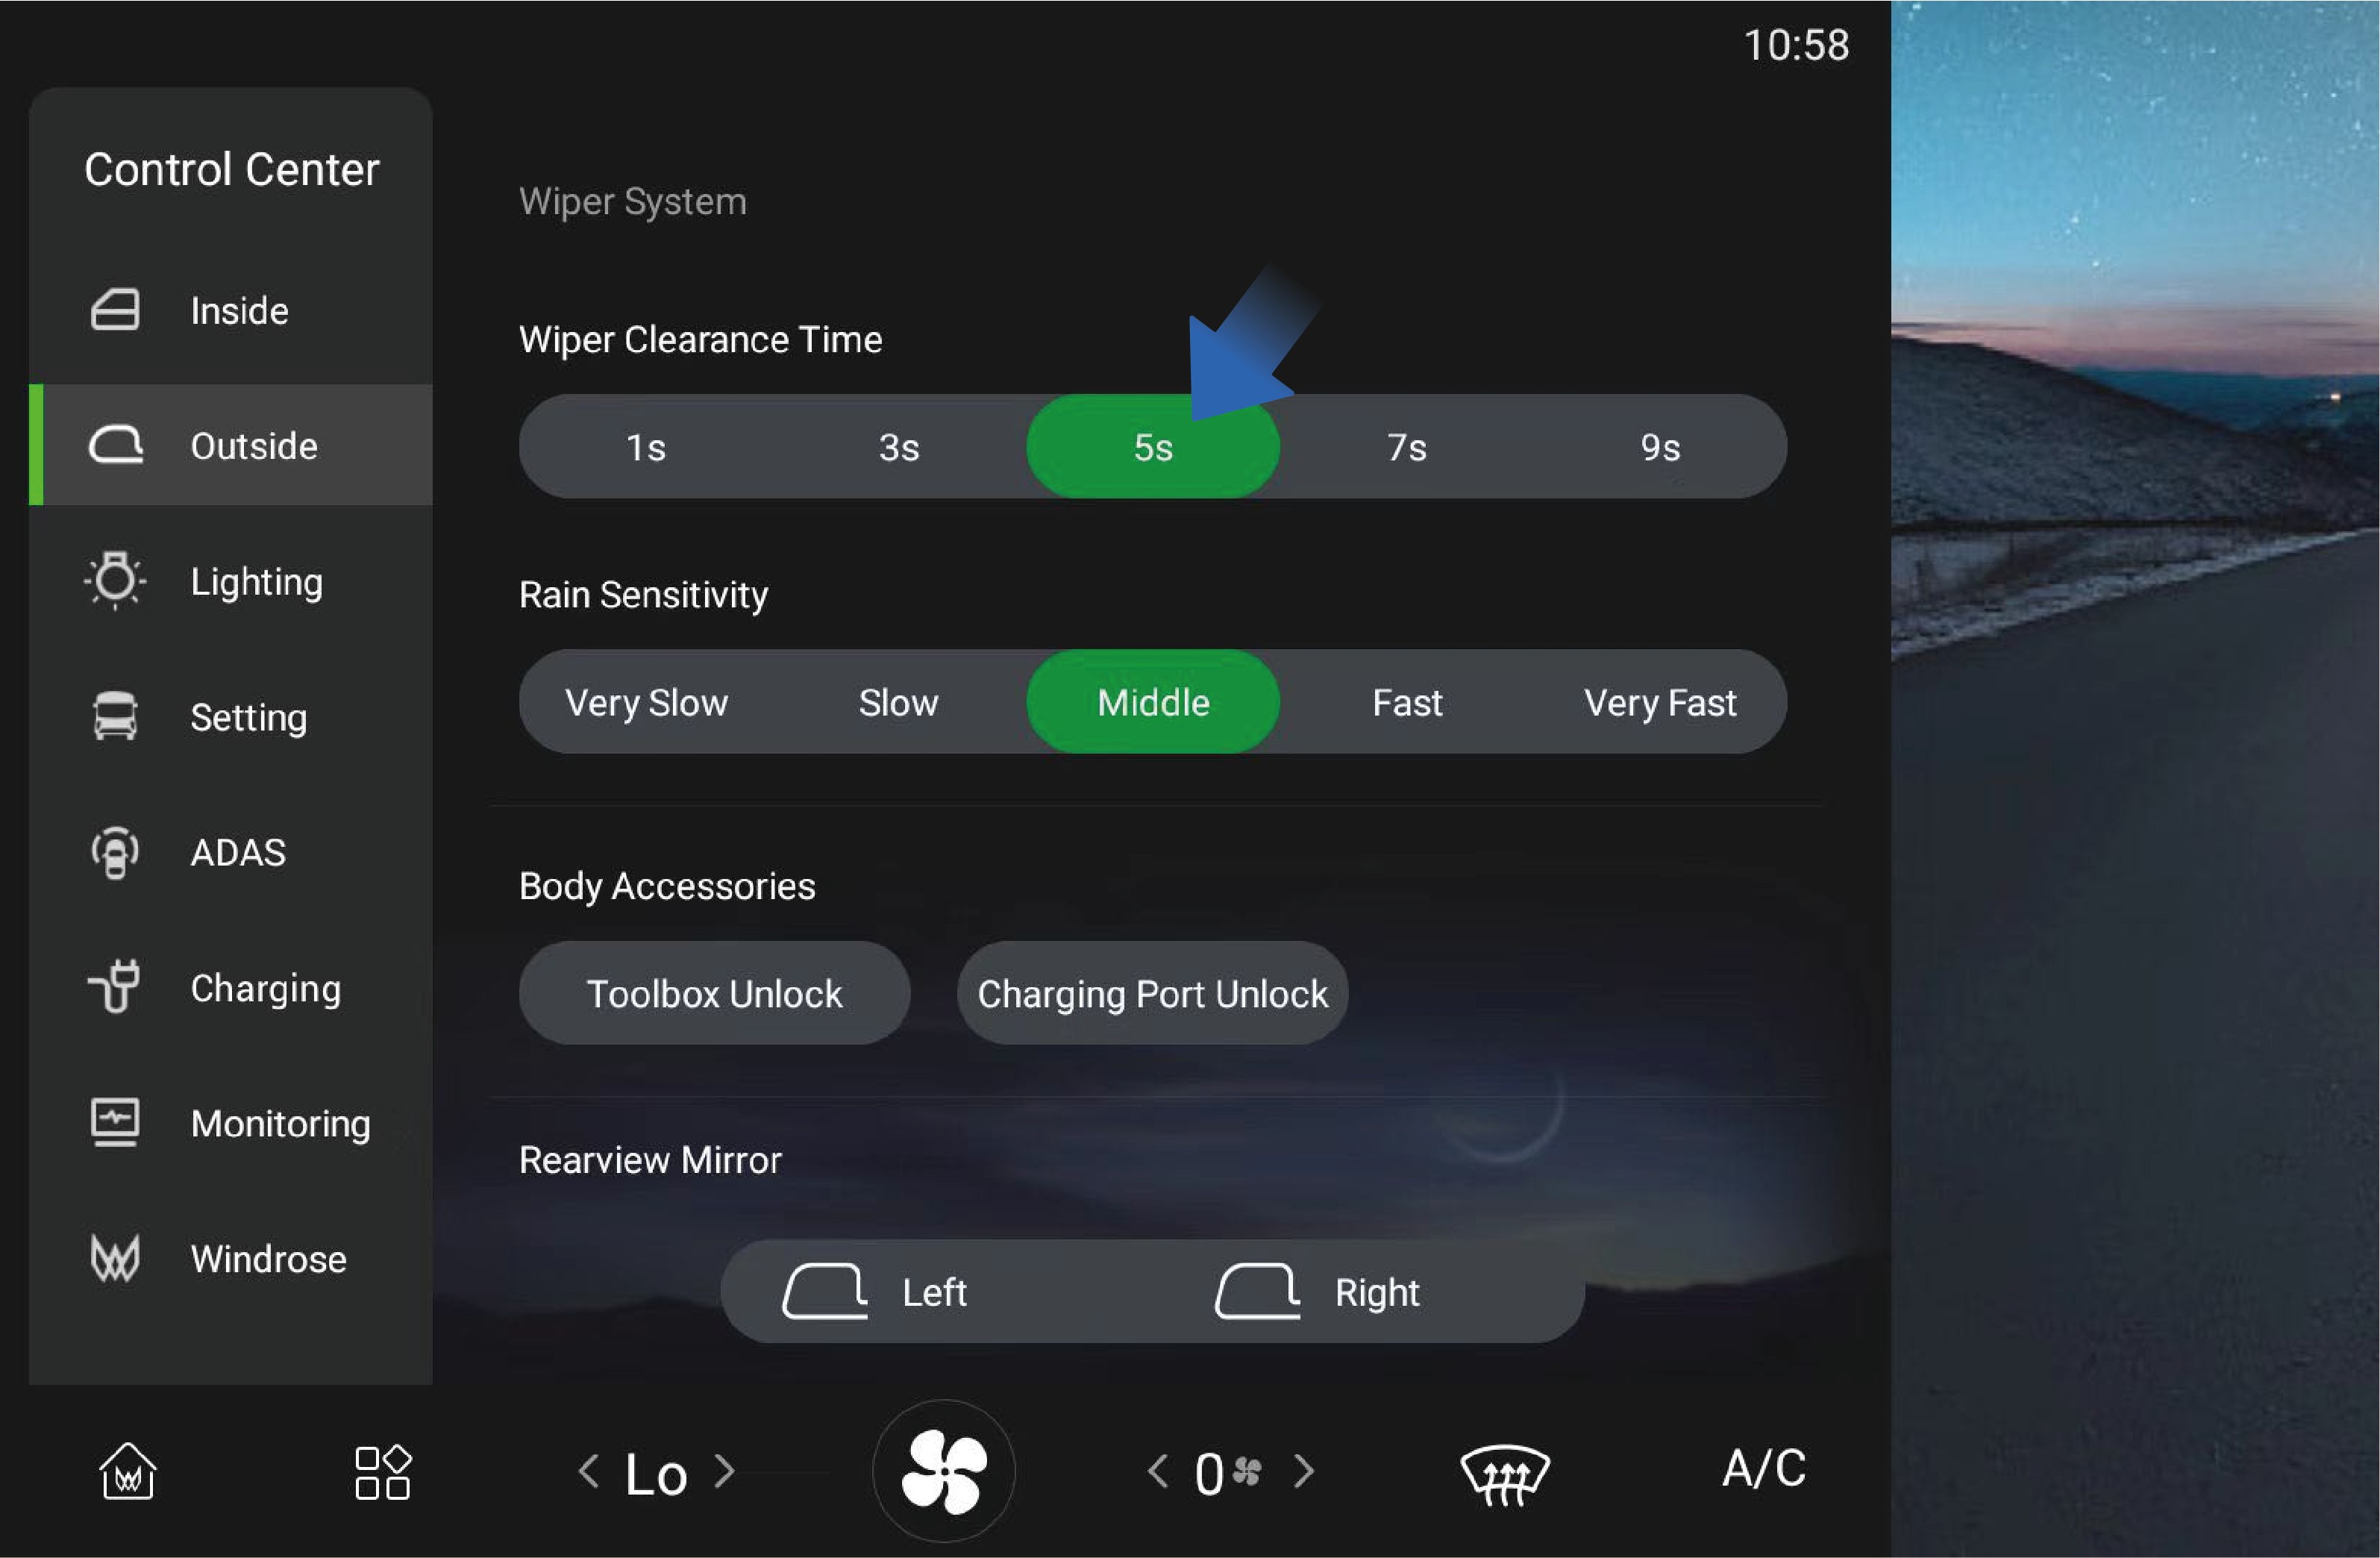
You can click "Outside" in the "Control Center" interface of the vehicle information screen to select the wiper intermittent wiping interval according to your needs.
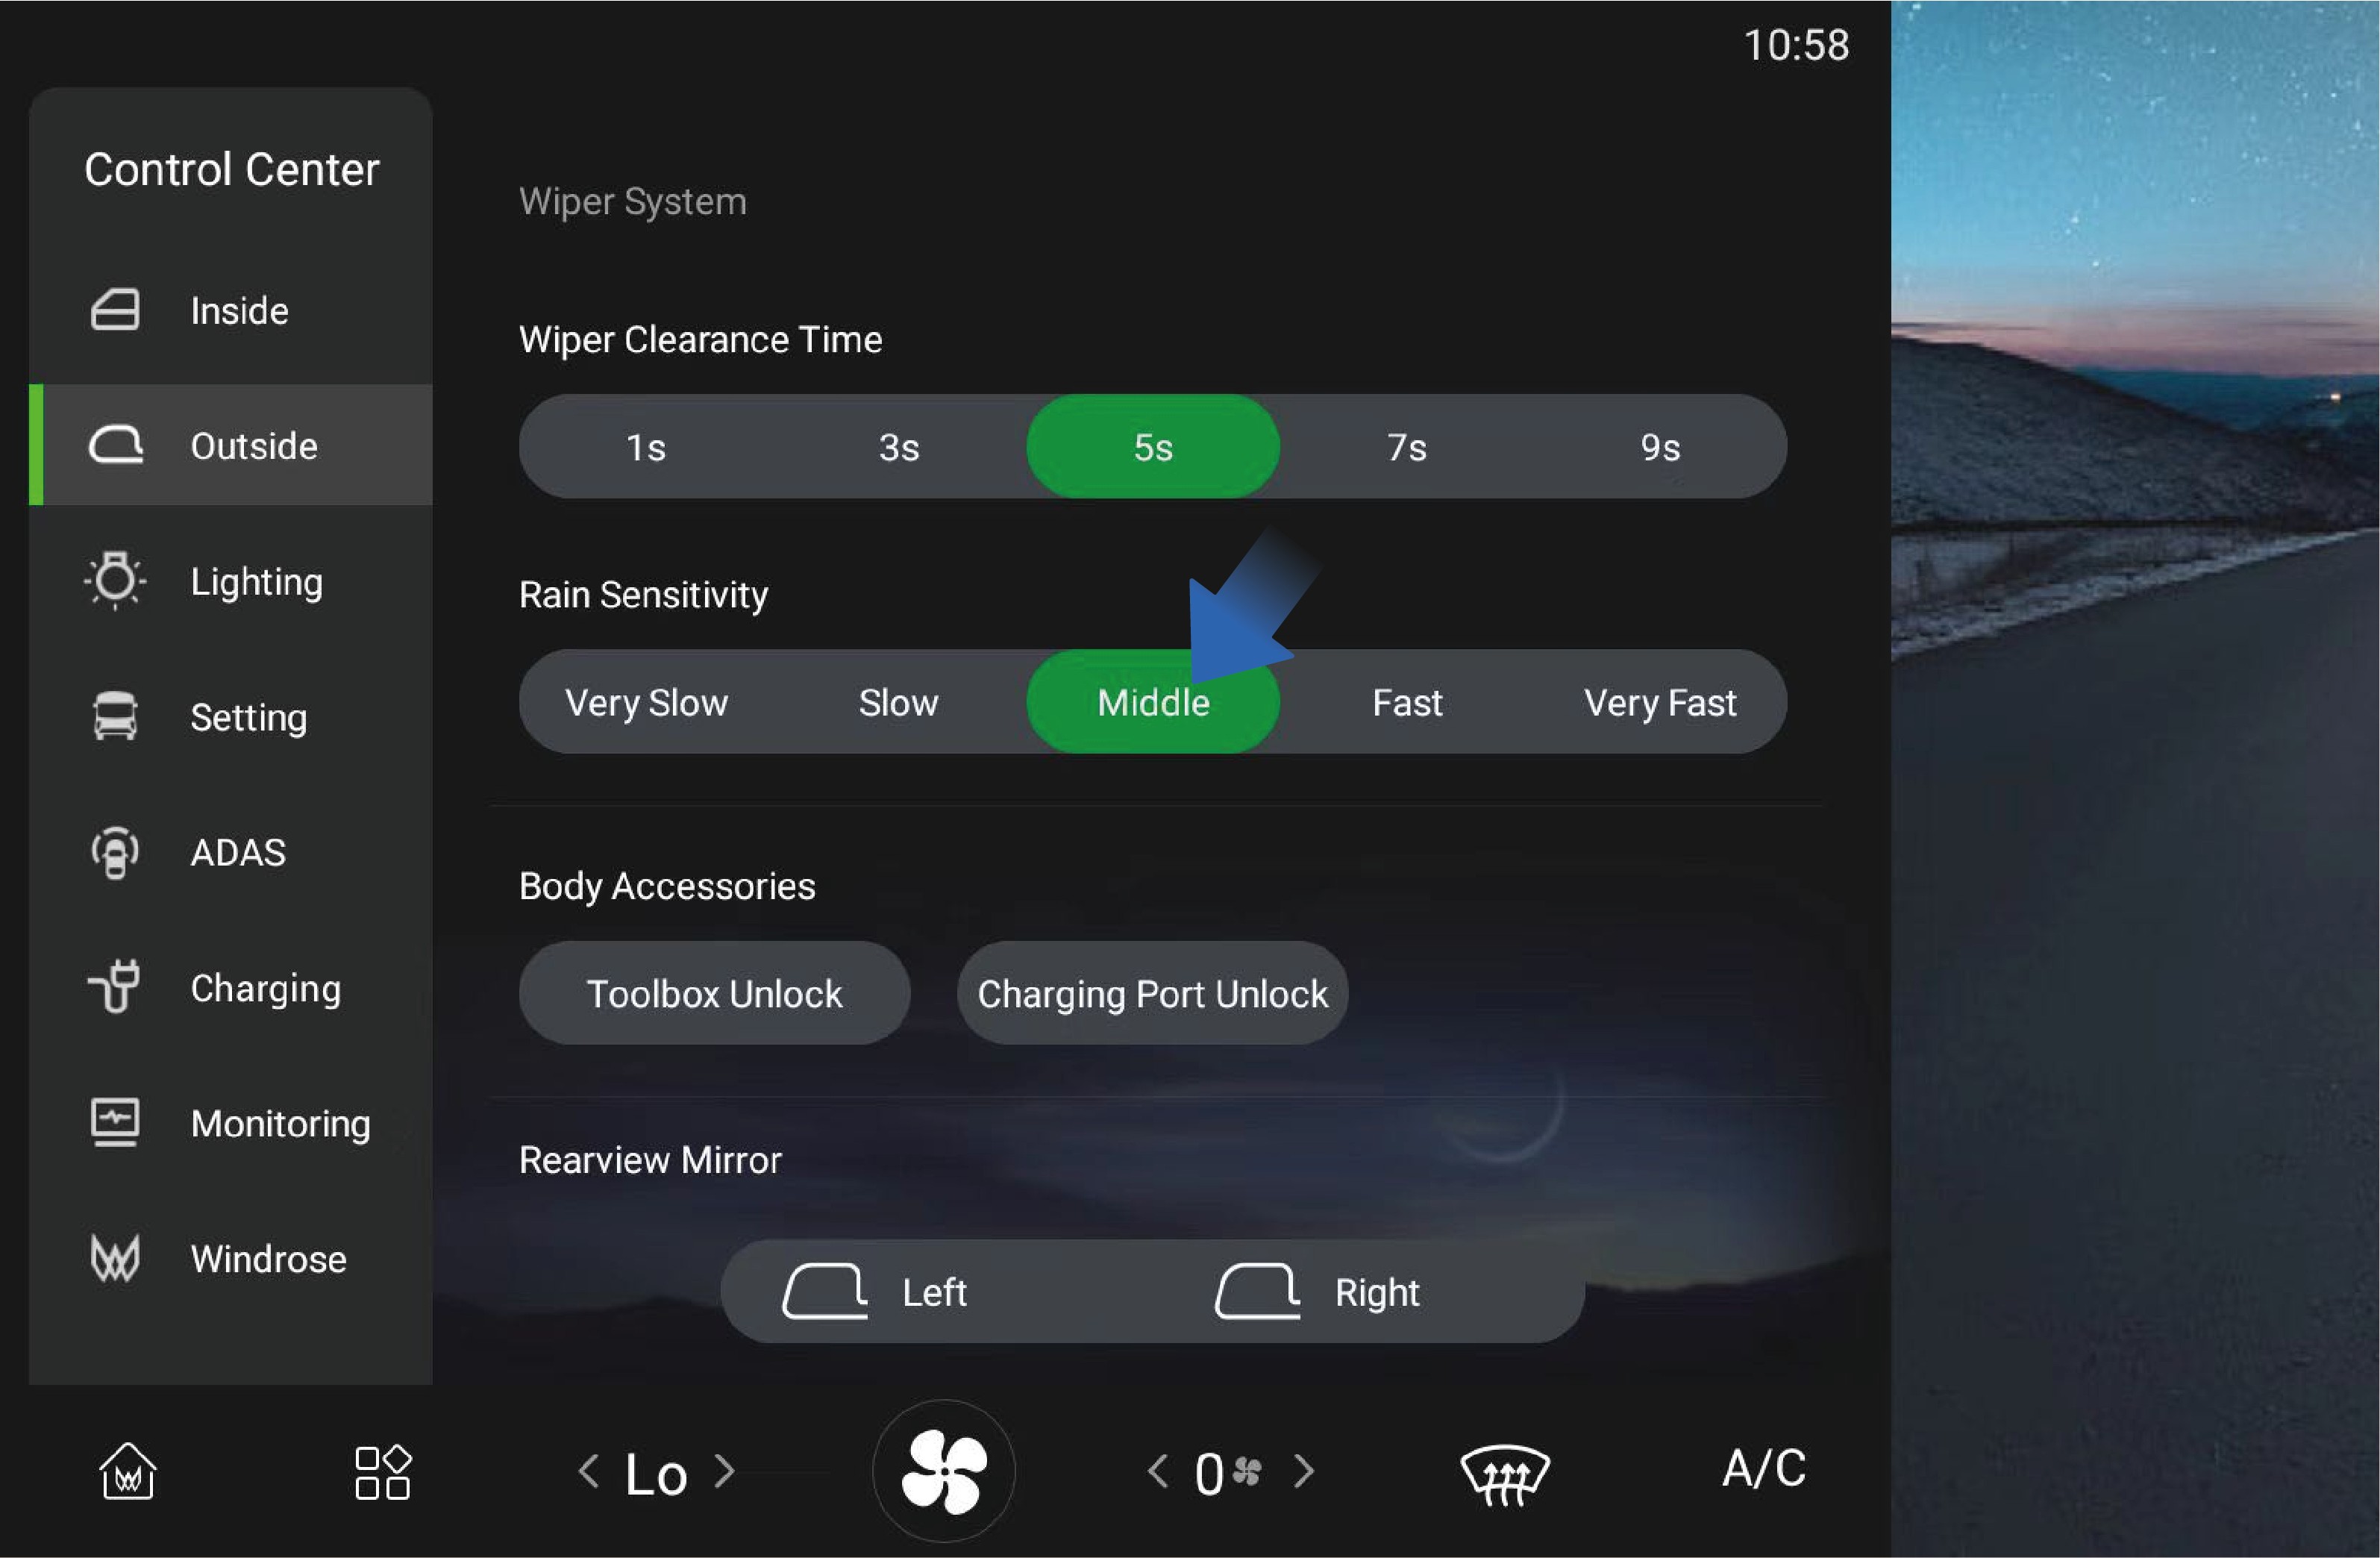
When the wiper blade is moved to auto wiping position, you can also select the rain sensitivity in this interface, and the system will adjust the auto wiping frequency according to the sensitivity you selected.
6.A.2Forholdsregler
AdvarselIn cold season, if the washer fluid freezes on the windscreen, do not use the wipers, as this may obstruct the view and cause traffic accidents or casualties.
Merknad
Before using the wipers in winter, be sure to remove the ice and snow from the windscreen to ensure that the wiper blades are not frozen at fixed positions.
6.BLight Switch
↑ Til toppen
Forberedelse før kjøring
Do not rely solely on the automatic wipers. Always adjust the wiping manually according to the actual situation.
Merk
When there are foreign objects such as dust, bird droppings, insects, and tree pulp on the windscreen, please clean the windscreen first, otherwise the wiper blades may be damaged.
Wipers should be used to clean the windscreen with washer liquid. Otherwise, both the wiper and the windscreen may be damaged.
Check the wiper blades on a regular basis. If scheduled maintenance is not carried out properly, the service life of the wiper blades will be shortened.
Please use acceptable detergent, as non-conforming detergent products may cause damage to the washer or corrosion to the glass.
After tuning on the automatic headlamps or light switch in the
vehicle information screen, you can switch between low and high beams through the light stalk on the left side of the steering wheel. Proper use of exterior lights can effectively improve the driving safety of a vehicle.
6.B.1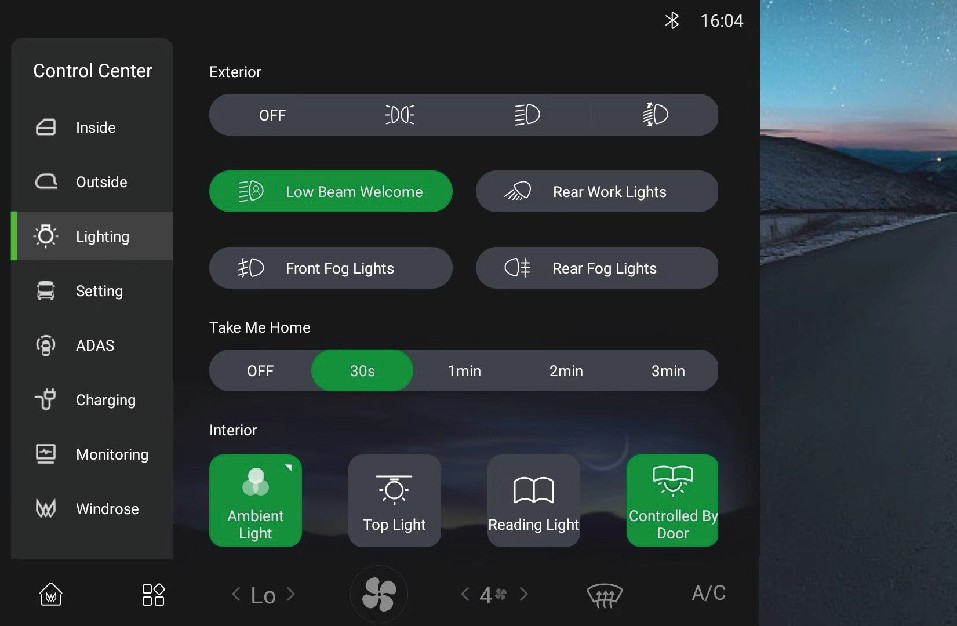 Bruksanvisning
Click "Lighting" icon in the "Control Center" interface of the vehicle information screen to enter the vehicle light control interface, where you can click the position lamp (outline marker lamp), low beam or AUTO icon to activate the external lights of the vehicle.
Once the exterior lights are activated, you can switch between low and high beams through the light stalk on the left side of the steering wheel.
Move the light stalk forward to turn on the high beam.
Move the light stalk backward to turn off the high beam.
With the high beam not turned on, move the light stalk backwards and release, then the light stalk will automatically reset and the overtaking lamp will flash once.
Move the light stalk downward to turn on the left indicator lamp.
Move the light stalk upward to turn on the right indicator lamp.
Daytime running lamp
After the vehicle is started, the daytime running lamp will be automatically turned on when the low beam is turned off; When the low beam is turned on, the daytime running lamp will turn off automatically.
Sidemarkeringslys (kombinasjonslykt)
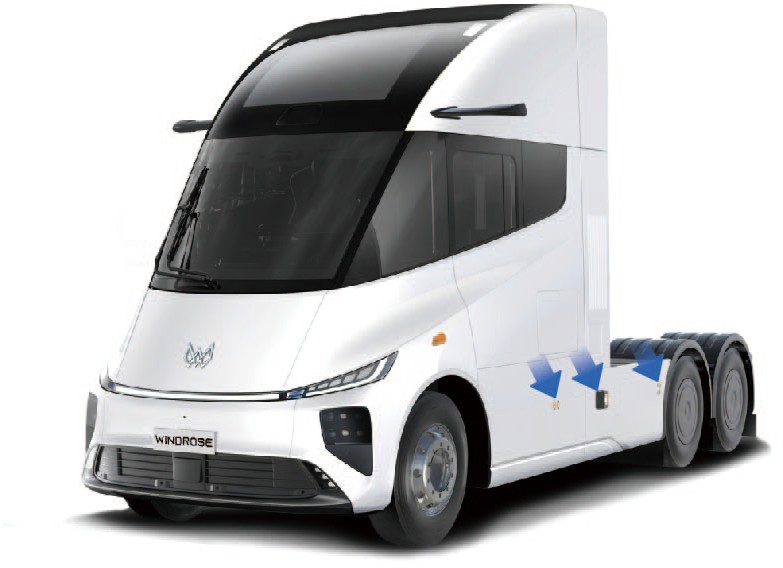
Side marker combination lamps are designed on both sides of the vehicle, which will be automatically turned on when the "AUTO", "Low beam" or "Position lamp" is turned on in the light control interface of the vehicle.
Rear working lamp
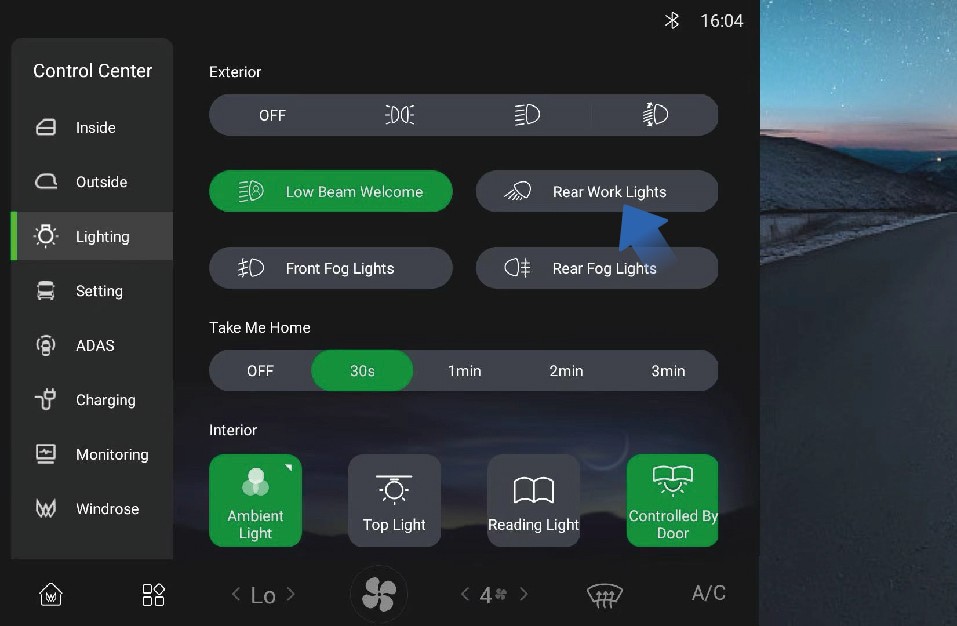
↑ Til toppenIf it is necessary to turn on the rear working lamp of the vehicle in a specific situation, you can click "Rear Work Lights" switch in "Lighting" interface.
6.B.2Forholdsregler
↑ Til toppenMerkWhen operating the indicator lamps, there is no need to activate the exterior lights in advance in the vehicle information screen.
6.CBryter for nødblink
Forberedelse før kjøring
↑ Til toppenIn the case of an emergency while driving, immediately turn on the hazard warning lamp to alert the vehicle behind, thereby avoiding accidents.
6.C.1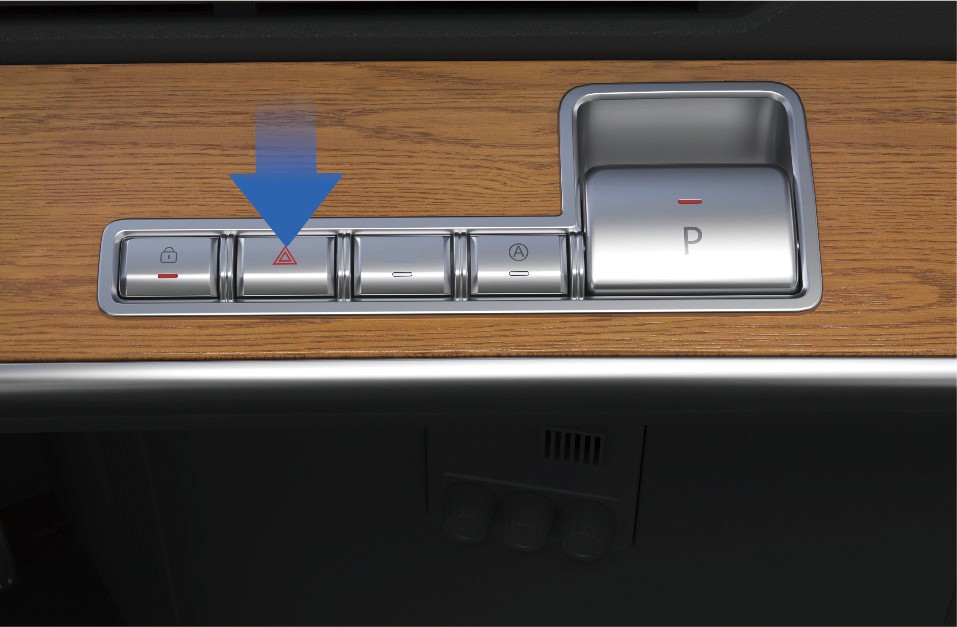 Bruksanvisning
↑ Til toppenWhen pressing the hazard warning lamp switch on the right side of the instrument panel in the vehicle, if the indicator on the switch flashes, it indicates that the hazard warning lamp has been activated.
6.C.2Forholdsregler
↑ Til toppenAdvarselThe hazard warning lamp switch is used under conditions that the vehicle may cause traffic accidents or other special situations to alert passing vehicles to avoid accidents.
6.DAv/på (strøm)
↑ Til toppenDriving
After the vehicle is unlocked, open the door and swipe the NFC Card at the designated swiping position of the right instrument panel to power ON the vehicle, and the instrument cluster and center display will be illuminated.
If you are in the vehicle, you can power ON or off the vehicle
through the NFC Card. Operating instructions Power on
Power off
Before powering off the vehicle, make sure the vehicle is safe and stably parked. When parking on a ramp or special locations, fix the wheels using the parking wedges that come with the vehicle to avoid slipping.
When the above conditions are met, you can power OFF the vehicle as follows.
Method 1:
With the EPB turned on, swipe the NFC Card at the designated swiping position of the right instrument panel to power of the vehicle.
Method 2:
6.D.1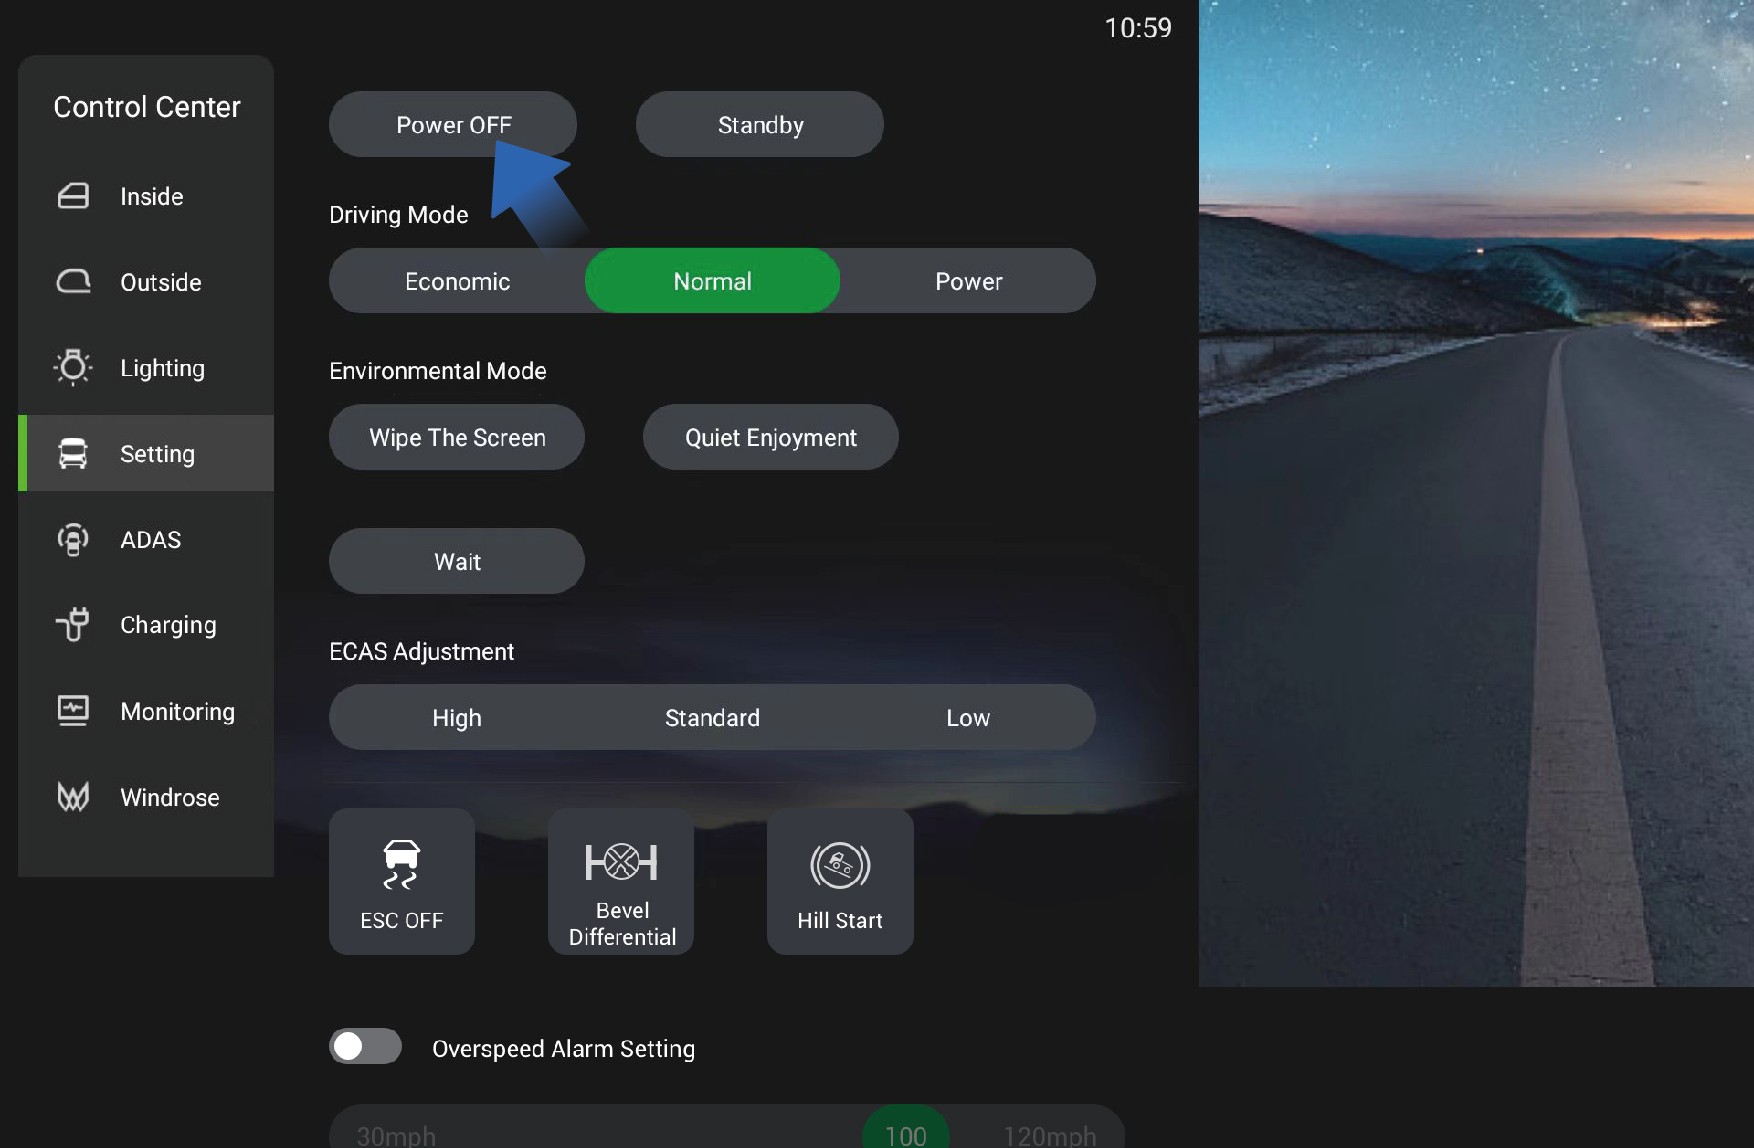 Forholdsregler
↑ Til toppenMerkDuring the vehicle power-off, you will hear a sound, which is a normal phenomenon caused by the self-test of braking system.
6.EDriftsbrems
↑ Til toppenDriving
With the EPB turned on, you can power OFF the vehicle by selecting "Control Center", switching to "Setting" interface, and clicking "Power OFF" button in the right IVI screen.
After powering off the vehicle from inside the vehicle, the electric switch of the electric sliding door inside or outside the vehicle can still be used to open or close the electric sliding door. When the electric sliding door is locked from outside the vehicle, it means the vehicle has been successfully powered off.
To slow down or stop the vehicle during driving, you can depress the brake pedal to reduce the vehicle speed or slow down until the vehicle comes to a complete stop.
6.E.1Bruksanvisning
To stop the vehicle smoothly during service braking, it is recommended to operate the brake pedal as follows in three situations:
Deceleration: In case it is necessary to slow down during high- speed driving, first completely release the accelerator pedal to reduce the vehicle speed by the drive motor, and if the
deceleration is not as expected, depress the brake pedal appropriately;
Stop: Gradually depress the brake pedal to reduce the vehicle speed, fully depress the brake pedal when arriving at the parking position, switch to N (neutral) gear, and turn on EPB to power OFF the vehicle and complete the parking operation.
Emergency braking: In case of an emergency, depress the brake pedal with great force quickly to stop the vehicle immediately.
6.E.2Forholdsregler
Advarsel
When entering a curve, brake in advance to reduce the vehicle speed below the safe speed, and drive cautiously when braking at the curve to avoid vehicle sideslip.
The service brake is not suitable for prolonged braking (e. g., long-term downhill driving) as this can cause safety hazards for service brake. In case continuous braking is required when driving down on a long slope, turn on the auxiliary braking for electric regenerative braking.
In rainy and snowy weather, increase the following distance appropriately to ensure driving safety.
6.FElektronisk parkeringsbrems (EPB)
Driving
↑ Til toppen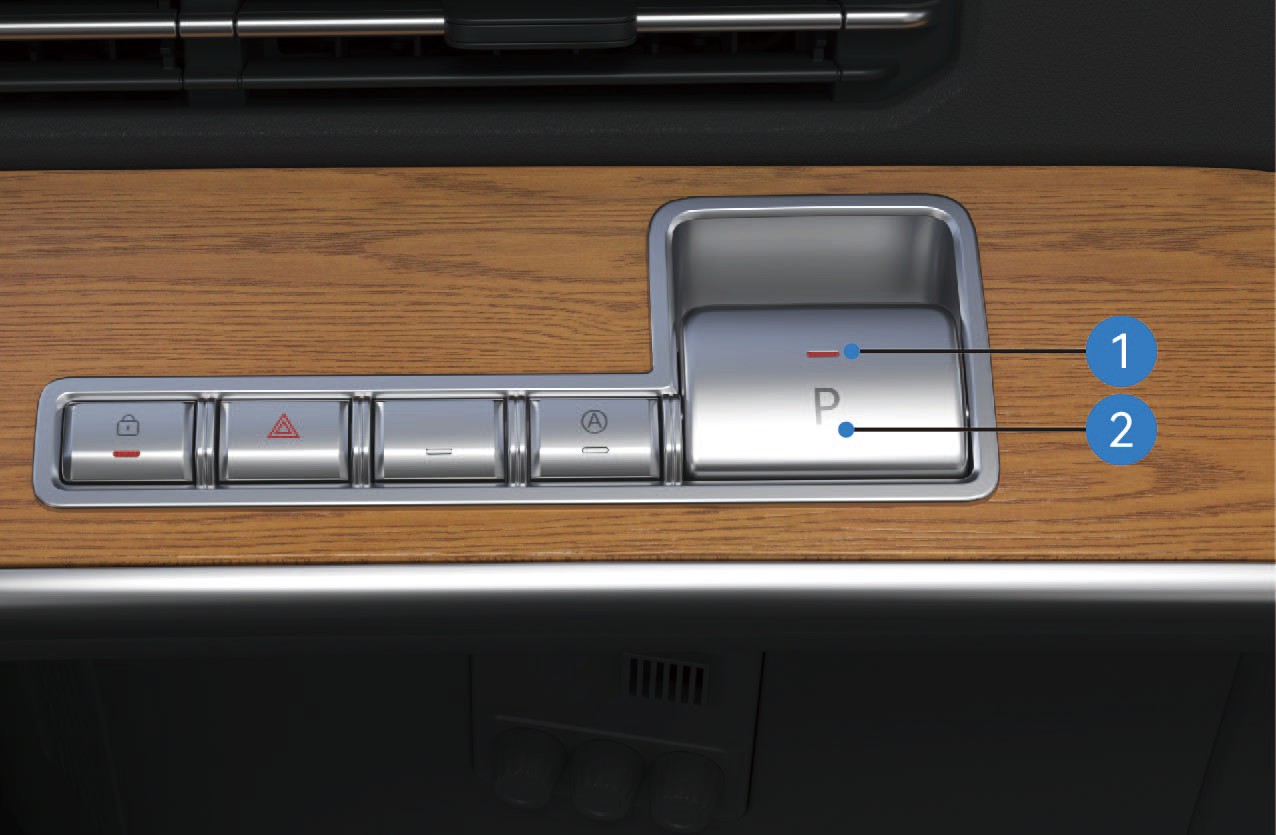
EPB Parking Brake Switch Status Indicator
EPB Parking Brake Switch
6.F.1Bruksanvisning
Parking Brake Release
Manual Release
When the vehicle is in the parking brake state with normal system self-check and air reservoir pressure, depress the brake pedal and press the EPB Parking Brake Switch to release the parking brake; the parking brake indicator light on the combination instrument will go out.
Automatic Release on Start-up
When the vehicle door is closed, the vehicle is in the parking brake state (on flat roads or ramps) with normal system self- check and air reservoir pressure, the parking brake will be automatically released when the vehicle starts normally; the parking brake indicator light on the combination instrument will go out.
MerkThe system cannot automatically release the parking brake when shifting to reverse gear (R). Please release the parking brake manually before shifting to R.
Low-pressure Release Restriction
The parking brake cannot be released when the air reservoir pressure is too low. The parking brake indicator light on the combination instrument will stay on, and a corresponding text prompt will be displayed.
Forced Low-pressure Parking Brake Release
If the parking brake cannot be released due to excessively low air reservoir pressure, depress the brake pedal and press and hold the EPB Parking Brake Switch for more than 5 seconds to release the parking brake; the parking brake indicator light on the combination instrument will go out.
Child Lock Function
The parking brake cannot be released if you press the EPB Parking Brake Switch without depressing the brake pedal first, and a corresponding text prompt will be displayed on the combination instrument.
Emergency Parking Brake Release
When the vehicle is in the parking brake state with normal system self-check and air reservoir pressure, power ON the vehicle and press the EPB Parking Brake Switch quickly 5 times within 10 seconds after power-on to release the parking brake; the parking brake indicator light on the combination instrument will go out.
Towing Mode
When the vehicle is in the parking brake state with normal system self-check and air reservoir pressure: Press and hold the EPB Parking Brake Switch; Tap the Power OFF button on the vehicle infotainment screen (do not power OFF via card swiping); Release the EPB Parking Brake Switch after holding for more than 5 seconds. After the vehicle is powered off, the EPB system will not activate the parking brake and remain in the released state. The parking brake indicator light on the combination instrument will go out, and the EPB Parking Brake Switch Status Indicator will flash until the system enters dormancy.
Parking Brake Activation
Manual Activation
When the vehicle is stationary and in the parking brake released state with normal system self-check and air reservoir pressure, pull up the EPB Parking Brake Switch to activate the parking brake; the parking brake indicator light on the combination instrument will turn on.
Activation on Vehicle Power-off
When the vehicle is stationary and in the parking brake released state with normal system self-check, tap the Power OFF button on the right vehicle control screen (do not power OFF via card swiping) to activate the parking brake; the parking brake indicator light on the combination instrument will turn on and go out 10 seconds after power-off.
Emergency Braking
When the vehicle is in driving state with a failure of the service brake system (and normal system self-check and air reservoir pressure): Slowly pull up the EPB Parking Brake Switch to activate the EPB emergency braking; If the vehicle speed is below 5 km/h when the switch is pulled up to the maximum travel, the system will fully activate the parking brake. The travel of the EPB Parking Brake Switch is proportional to the braking force. The brake light will turn on when emergency braking is activated during driving; the parking light will not turn on if the emergency braking does not trigger the parking brake function.
Dormancy and Wake-up
When the EPB system is in dormancy (the switch status indicator is off), pull up the EPB Parking Brake Switch to wake
up the system, and the EPB Parking Brake Switch Status Indicator will turn on.
Temporary Parking
The Temporary Parking Switch is located on the right side of the instrument panel.
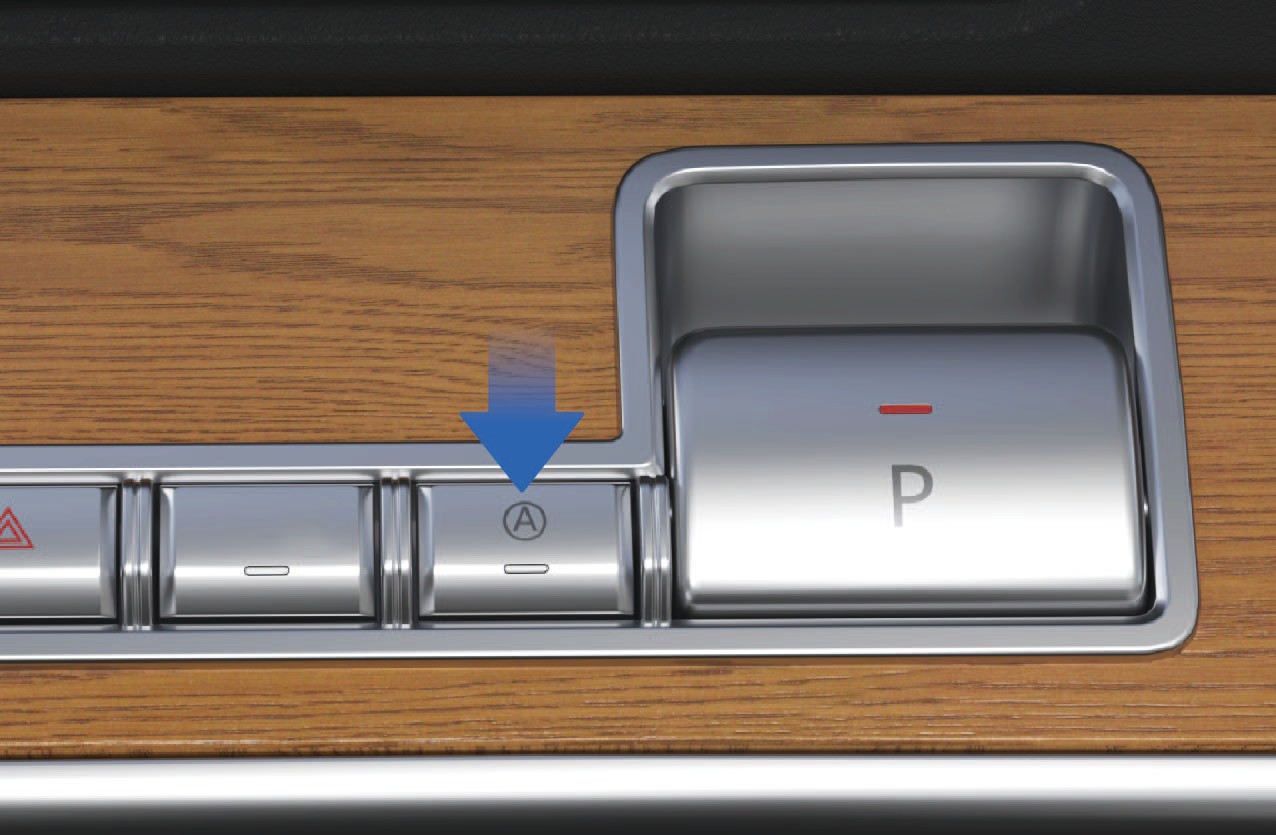
Activation and Deactivation of Temporary Parking
When the vehicle is stationary with normal system self-check, press the Temporary Parking Switch to activate the function (press the switch again to deactivate it).
Activated state: The AUTO HOLD indicator light on the combination instrument and the Temporary Parking Switch Status Indicator turn on; Deactivated state: The AUTO HOLD indicator light on the combination instrument and the Temporary Parking Switch Status Indicator turn off.
Temporary Parking Activation via Service Brake
When the vehicle is stationary with normal system self-check and air reservoir pressure, depress the brake pedal to a certain depth and hold for more than 3 seconds to activate temporary parking. The AUTO HOLD indicator light on the combination instrument and the Temporary Parking Switch Status Indicator will flash.
Temporary Parking Brake Release
When the vehicle door is closed, the vehicle is in the temporary parking state (on flat roads or ramps) with normal system self-check and air reservoir pressure, the temporary parking brake will be released when the vehicle starts normally. The AUTO HOLD indicator light on the combination instrument and the Temporary Parking Switch Status Indicator will cease flashing and remain on.
MerkThe system cannot automatically release the temporary parking brake when shifting to reverse gear (R). Please release the temporary parking brake manually before shifting to R.
Fault Alerts
Fault Alert During Parking: The parking brake indicator light on the combination instrument and the EPB Parking Brake Switch Status Indicator flash simultaneously.
Fault Alert During Parking Brake Release: The parking brake indicator light on the combination instrument turns yellow, and the EPB Parking Brake Switch Status Indicator flashes.
6.F.2Forholdsregler
Advarsel
When the air reservoir pressure is too low, try to release the parking brake only after the pressure is restored to normal.
When parking on a slope, choose a hardened road surface with a high friction coefficient to prevent vehicle rollback caused by loose pavement or insufficient static friction.
Use a parking chock when parking on a slope; add auxiliary objects such as stones according to the actual slope gradient to avoid accidental rollback.
The parking brake can be used temporarily as the service brake in an emergency, but long-term replacement of the service brake is prohibited.
Merknad
Release the EPB via normal operation unless necessary (i. e., when air reservoir pressure is sufficient).
During forced parking brake release, observe the surrounding road conditions to ensure the safety of the vehicle, pedestrians and other road users before operation.
6.GNødbremsing – under kjøring
Driving
↑ Til toppenThe parking brake can be used as an emergency brake when the vehicle's service brake system malfunctions.
6.G.1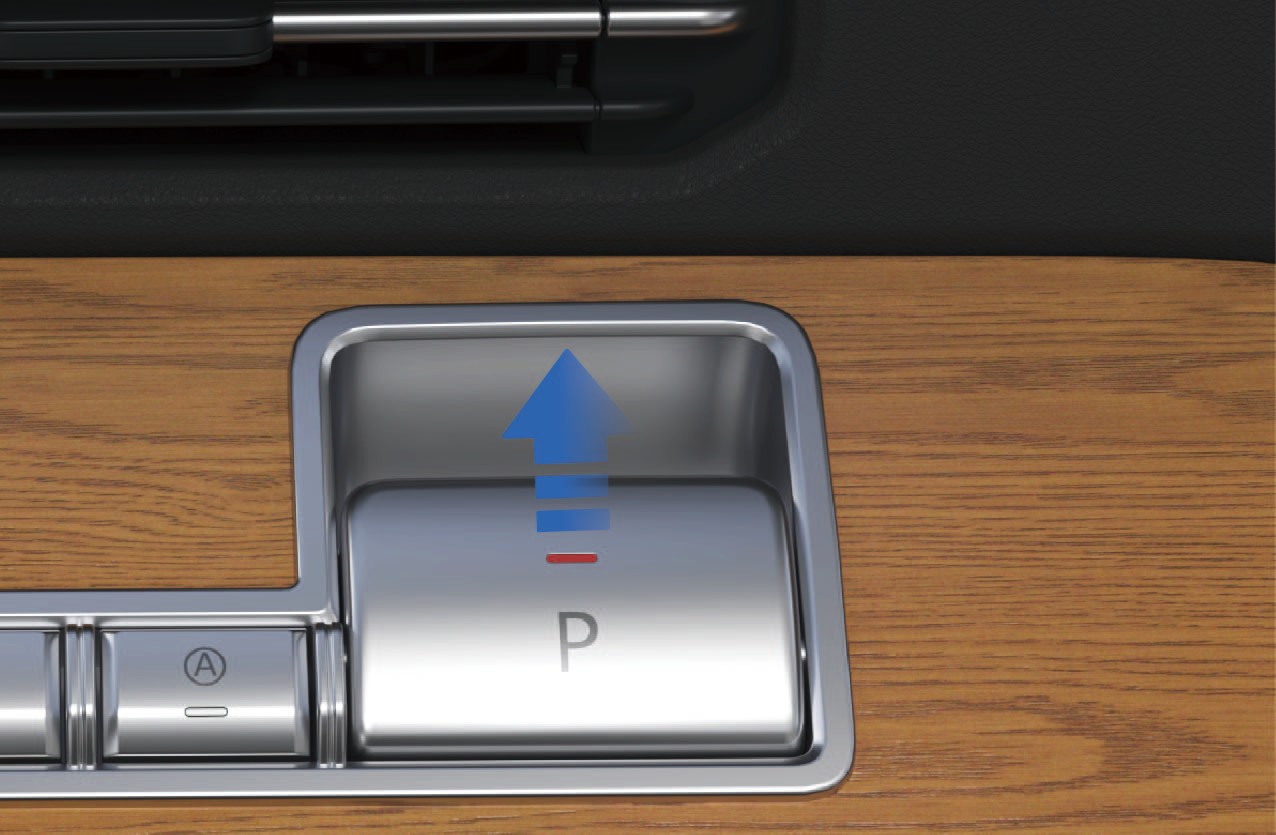 Bruksanvisning
For EPB electronic parking, it can be used as an emergency braking operation when the service brake fails. When EPB applies emergency braking, when the vehicle speed drops to 5 km/h, the system will directly activate the parking brake and maintain the parking state. Moreover, the parking brake cannot be automatically released when the vehicle starts, and can only be released manually by operating the EPB parking brake switch.
↑ Til toppenWhen you need emergency braking, pulling up the EPB parking brake switch can achieve emergency braking. The greater the
6.HShift Operation
↑ Til toppen
Driving
opening of the pull up switch, the greater the braking force applied.
6.H.1Forholdsregler
Advarsel
If the vehicle speed is high, the parking handle should be pulled in a similar way as a "spot brake". Do not tighten or lock it all at once to avoid damage to the brake and other related components and loss of braking efficiency.
↑ Til toppenYou can shift gears by using the shift lever on the right side of the steering wheel.
6.H.2Bruksanvisning
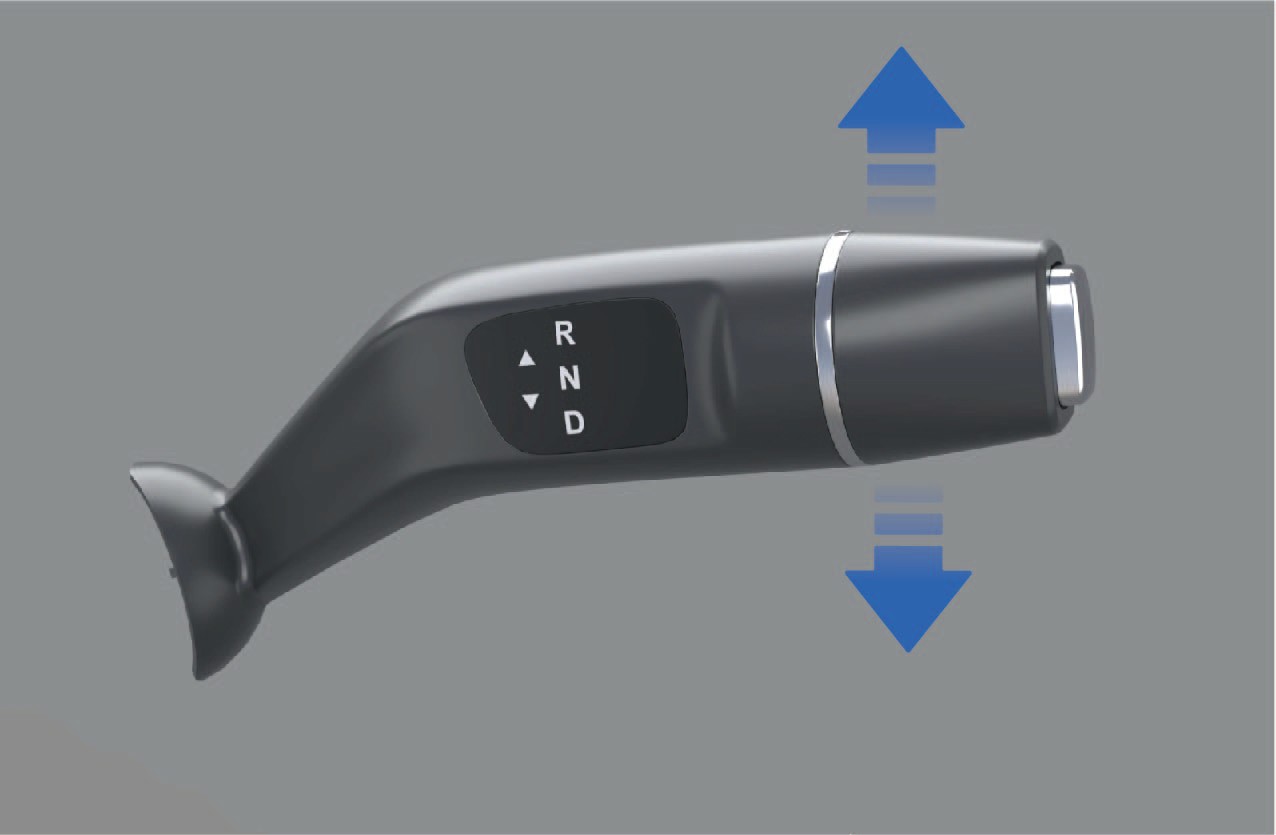
R (reverse) gear
When the vehicle is stationary, depress the brake pedal and push up the shift lever, then the instrument cluster will display "R" gear, indicating that the vehicle has been put into R gear.
N (neutral) gear
When the shift lever is in "R" gear, push the shift lever down by 1 gear and hold for 1 second.
When the vehicle is in EPB mode, depress the brake pedal and release the EPB.
D (drive) gear
↑ Til toppenWhen the vehicle is stationary, depress the brake pedal and push down the shift lever simultaneously, and the instrument cluster will display "D" gear, indicating that the vehicle has been put into D gear.
If the gear shift fails, the instrument panel will prompt the reason for the gear shift failure, and the text prompt includes: please press the brake to shift, please READY before shifting, or please stop and shift; If the gear shift is successful, there will be no text prompt.
6.H.3Forholdsregler
↑ Til toppenMerknadThe vehicle must be powered off in N gear, and it is forbidden to directly power OFF and stop the vehicle in D or R gear.
The vehicle can be engaged in N gear with "N" gear indicator
highlighted in the instrument cluster through the following operations:
When the shift lever is in "D" gear, push the shift lever up by 1
gear and hold for 1 second.
6.IRegenerativ bremsing
↑ Til toppenDriving
Turn the left paddle of kinetic regenerative braking system (KERS) to reduce the kinetic regenerative braking intensity of the vehicle during coasting.
2. Kinetic regenerative braking paddle (right)
During driving, you can improve the driving experience by adjusting
the regenerative braking level, which can reduce the loss of brake heat, thereby improving energy consumption.
6.I.1Bruksanvisning
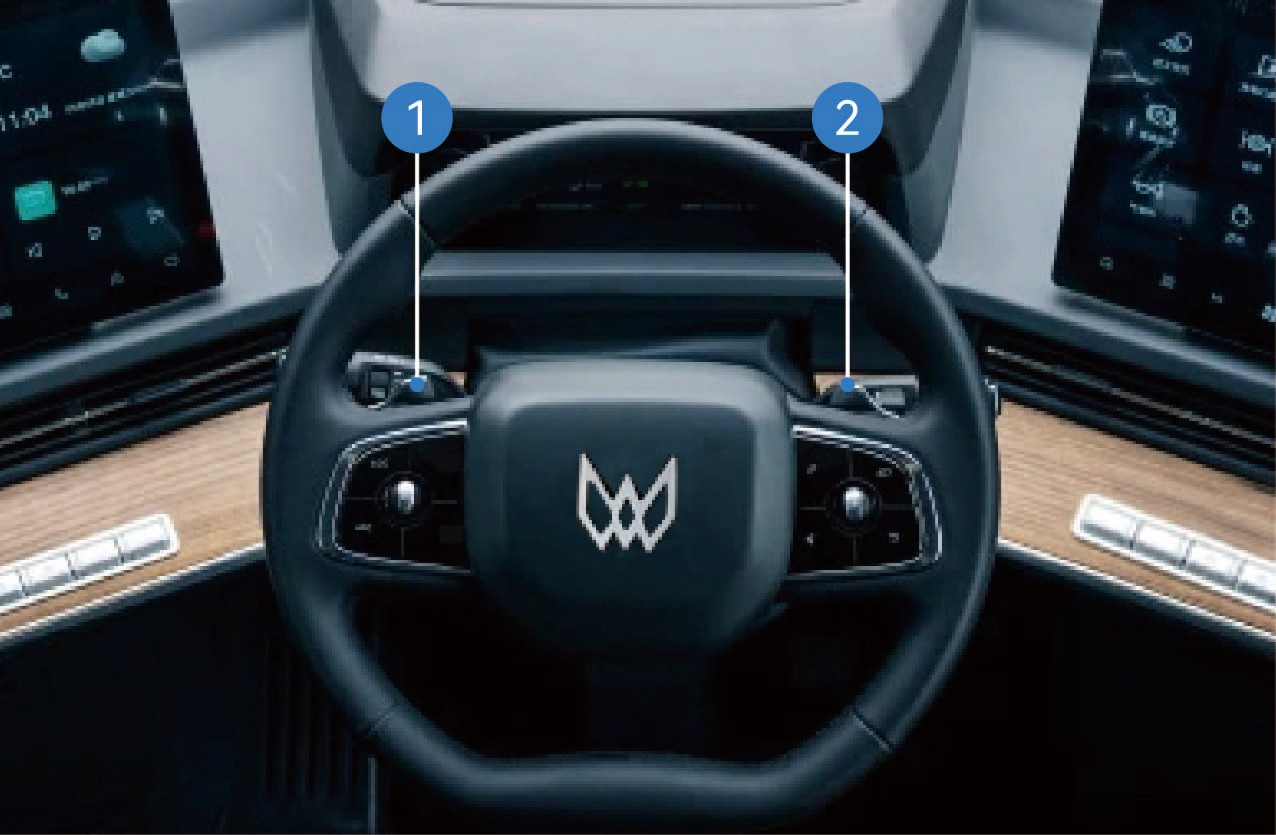
Padlespak for regenerativ bremsing (venstre)
↑ Til toppenTurn the right paddle of kinetic regenerative braking system (KERS) to increase the kinetic regenerative braking intensity of the vehicle during coasting.
During driving, the coasting energy is recovered when the accelerator pedal and the brake pedal are released. The braking energy will also be recovered when the brake pedal is depressed. You can adjust the regenerative braking intensity during coasting through the KERS paddles on the left and right sides of the steering wheel.
The lower right corner of the instrument cluster will show the current regenerative braking level (level-1, level-2, level-3, level-4 and level-5). When the regenerative braking level is set to 0, the regenerative braking function of the vehicle will be turned off.
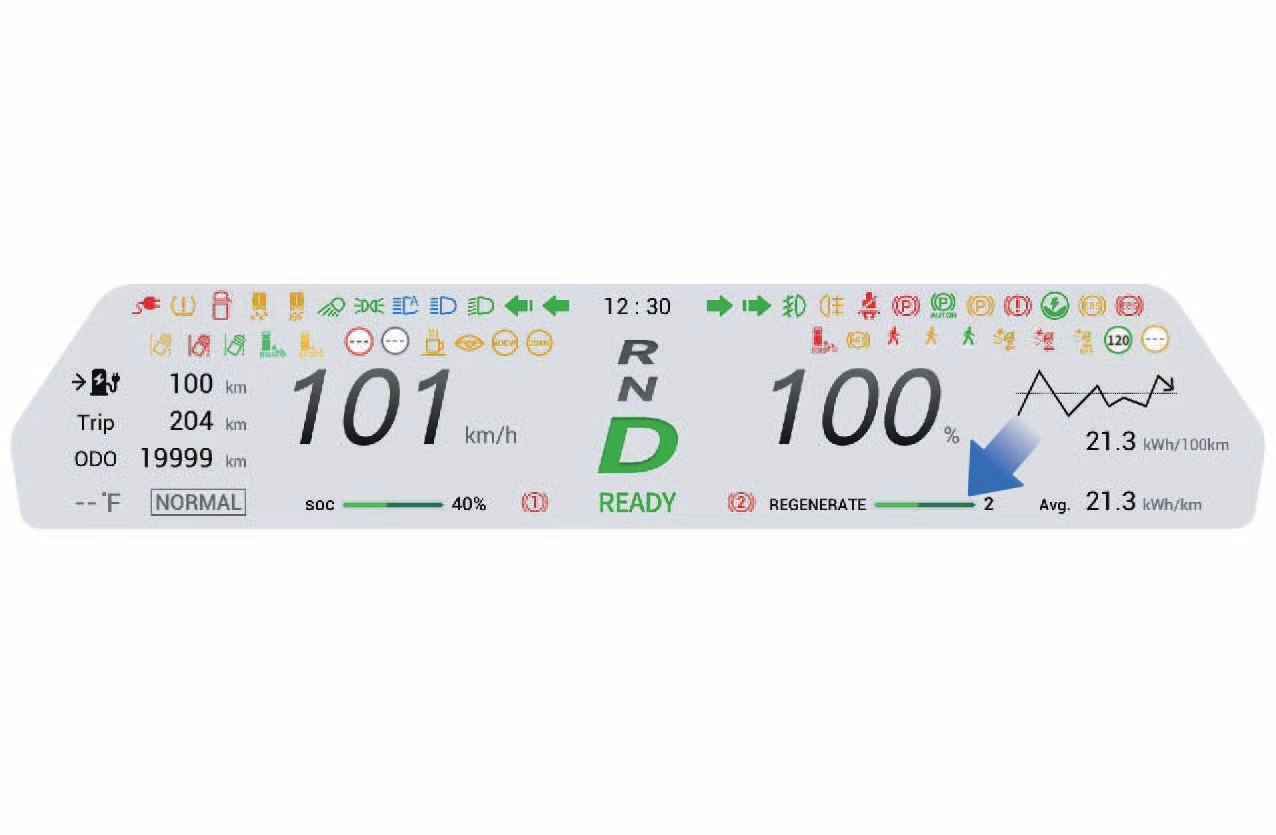
6.I.2Forholdsregler
Merknad
The regenerative braking with regenerative braking is not a substitute for braking to ensure safety. You should apply the brakes in time according to the actual situation.
Avoid using the regenerative braking function in rainy or snowy weather or on slippery roads.
↑ Til toppenMerkWhen the battery level of the vehicle drops below 95%, you can turn on and apply the regenerative braking function.
6.JAR-HUD*
↑ Til toppenDriving
The AR-HUD can project vehicle-related information onto the front windscreen so that it is easier for you to obtain legible information rapidly while driving, thus improving driving safety.
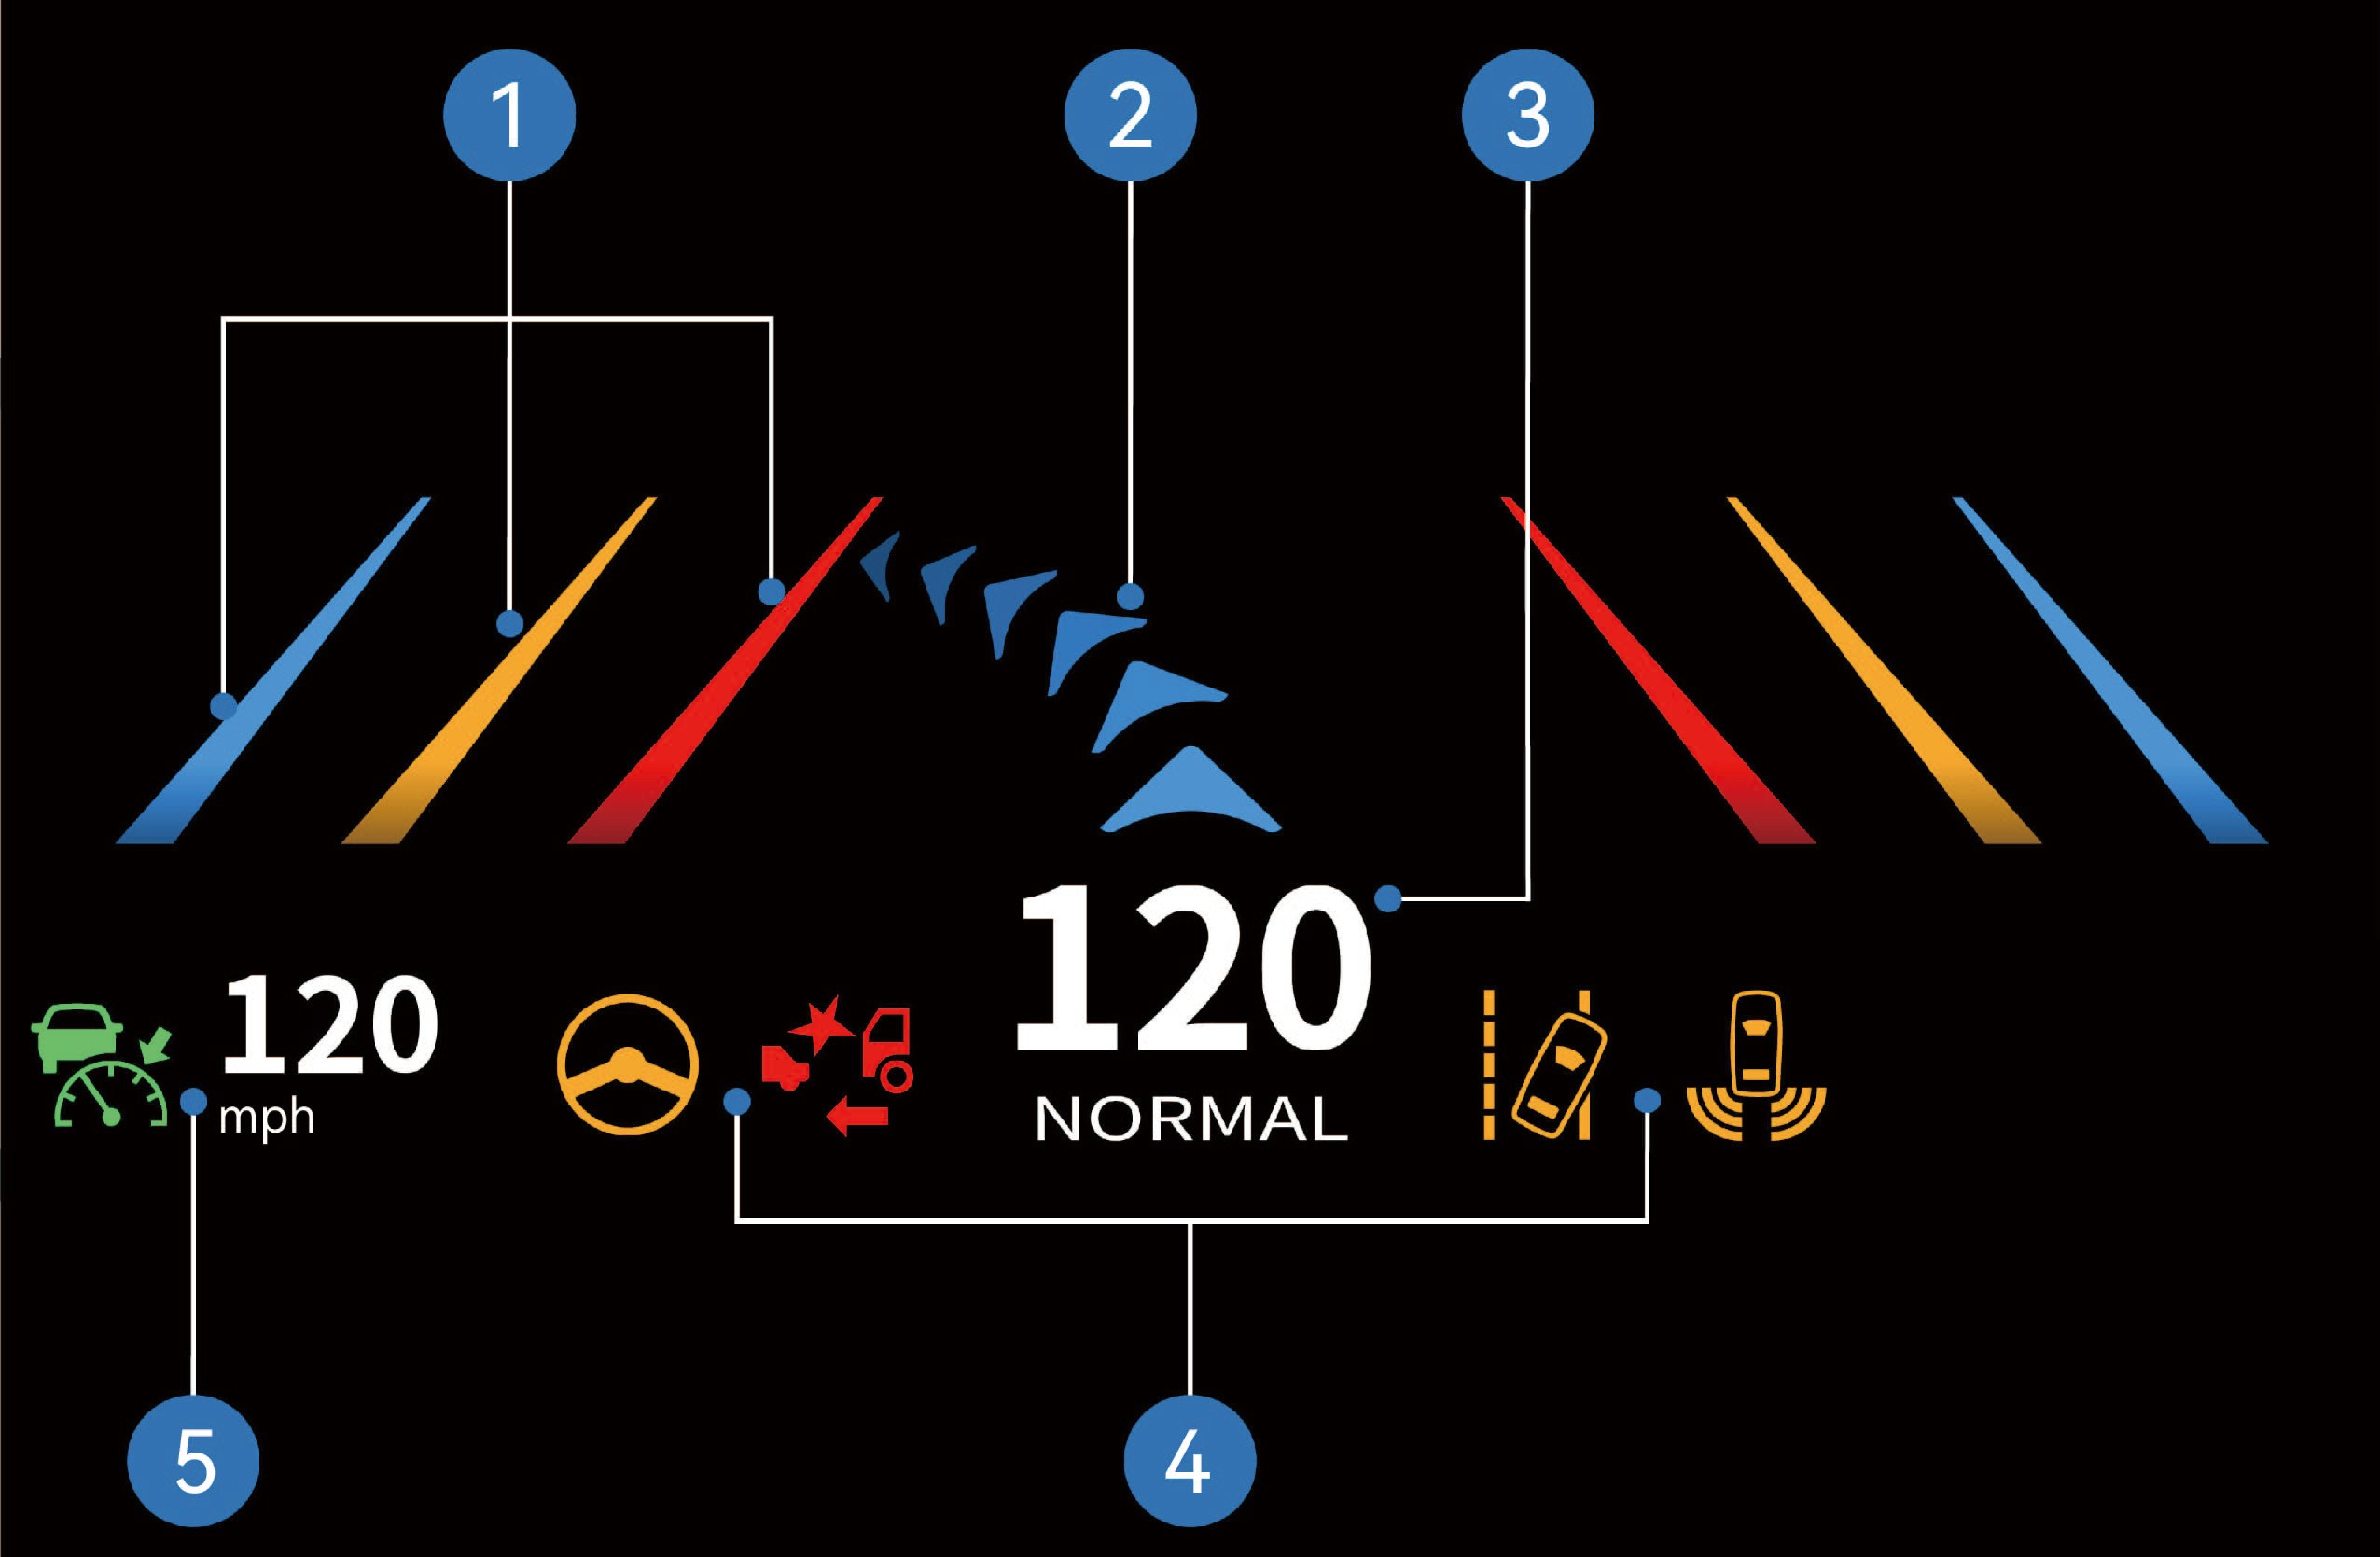
Lane departure line prompt
Navigation arrow
Driving speed + driving mode
Instrument cluster warning icon
ACC status icon + cruise speed
6.J.1Bruksanvisning
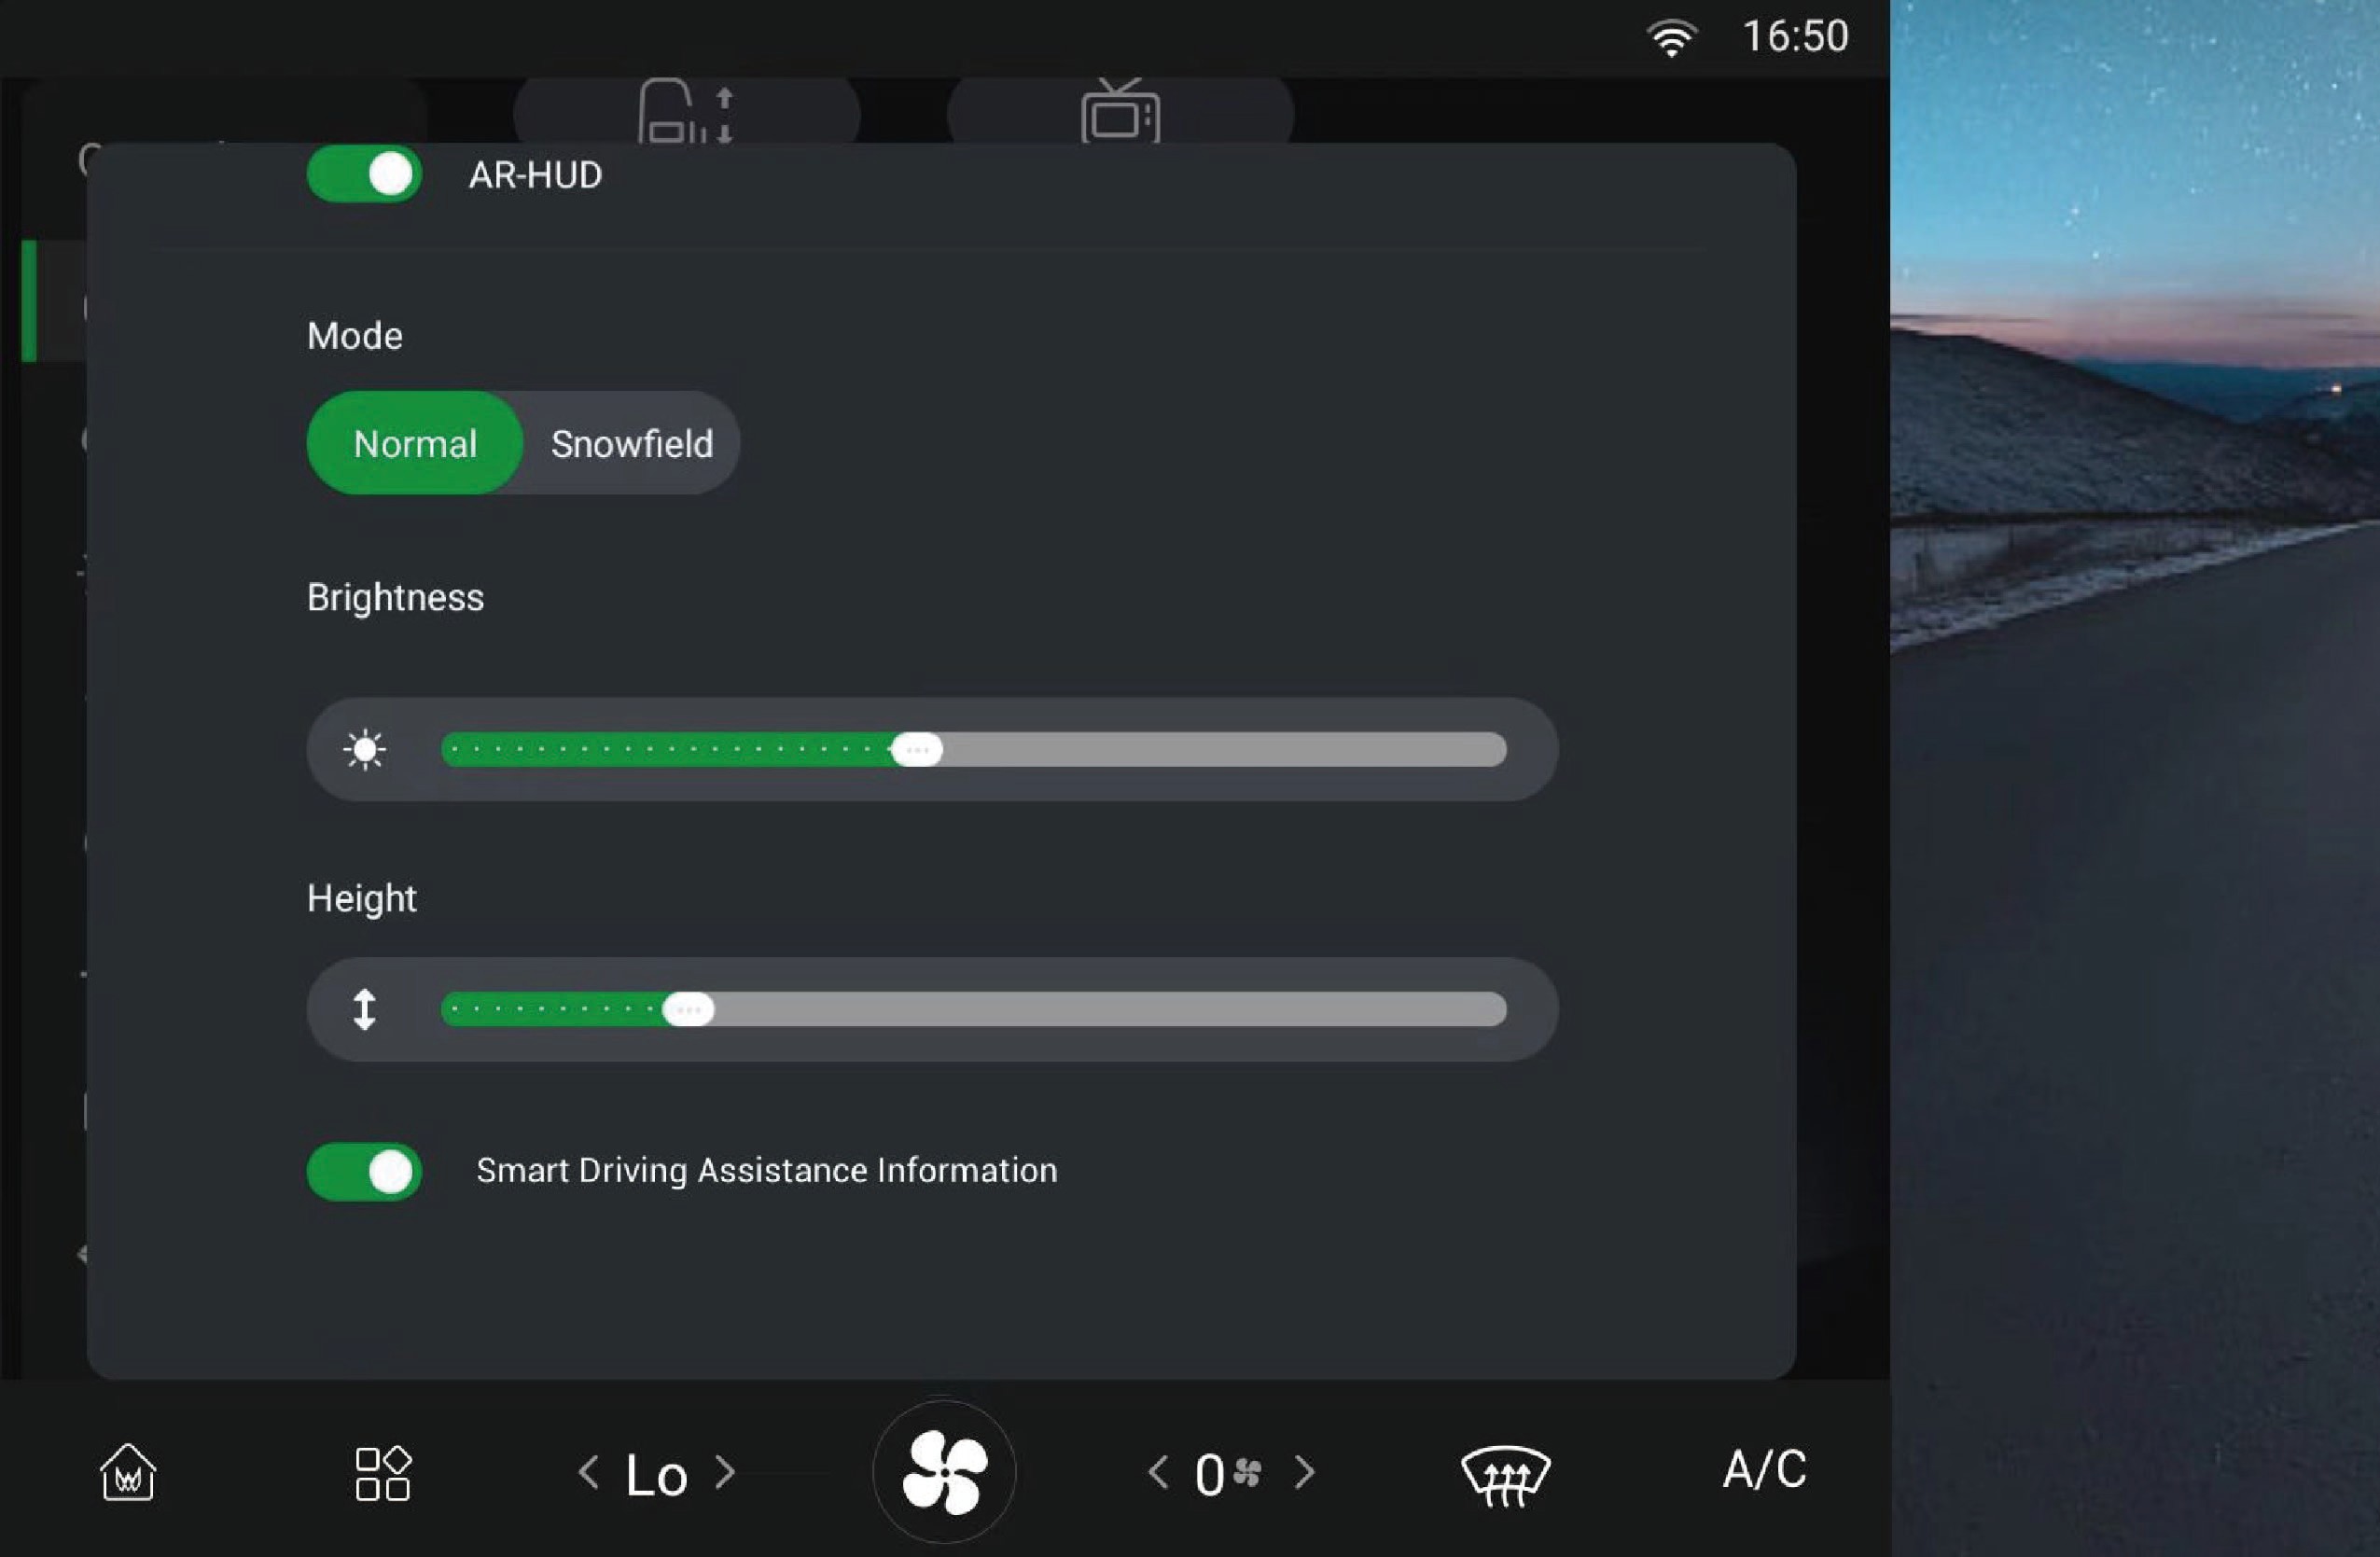
↑ Til toppenYou can select "Control Center", switch to "Inside" interface, and click "AR-HUD" button on the vehicle information screen to enter the interface where you can turn on/off the function, and adjust the display mode, brightness, height and display information according to your personal preferences.
6.J.2Forholdsregler
Advarsel
Before driving, make sure to check that the position and brightness of the AR-HUD will not interfere with safe driving. Improper adjustment of the image position or brightness may obstruct the your field of vision and cause an accident, resulting in personal injury.
Do not keep looking at the AR-HUD while driving, otherwise you may not be able to notice pedestrians and objects on the road in front of the vehicle.
Merknad
Do not allow liquids entering into the projector area as this may cause AR-HUD failure.
Do not place any objects and stickers on the projector or the projection area of the windscreen, otherwise the AR-HUD may not function properly to display.
If the seat is high, your head will be in a high position and you will not be able to see the display. You can lower the AR-HUD to a suitable height.
6.KDifferensiallås
Driving
↑ Til toppenWhen driving on muddy and slippery roads or when climbing under heavy loads, the driving wheels may slip or it may be difficult for the vehicle to drive. In this case, you can use the vehicle differential lock to improve the passability of the vehicle.
Merk
When driving on snowy roads, adjust to snow mode to prevent the AR-HUD image from interfering with the driving vision.
6.K.1Bruksanvisning
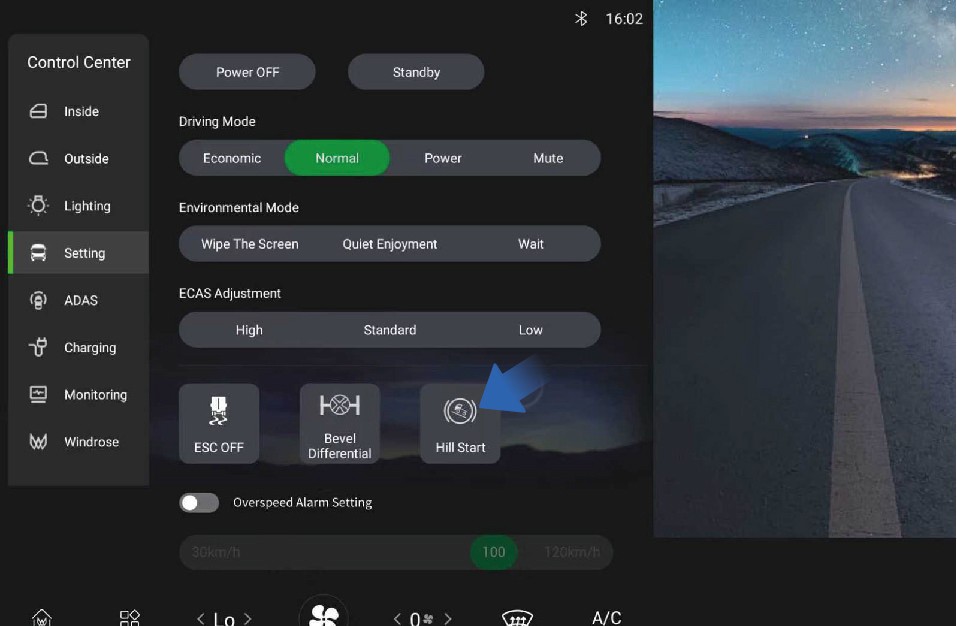
↑ Til toppenYou can select "Control Center", switch to "Setting" interface, and click "Bevel Differential" button on the vehicle information screen, then the switch will be highlighted and the differential function will
be turned off; When the switch is highlighted, click the "Bevel Differential" button again, then the switch will turn gray and the differential function will be turned on.
6.K.2
Forholdsregler
Advarsel
The differential lock is only applicable to situations where the wheels are slipping or the vehicle is trying to get out of trouble. Do not run for a long time with the lock in locked state.
The vehicle should not make turns after the differential lock is engaged. Otherwise it will cause damage to the differential and other parts.
After the vehicle passes through poor roads, release the differential lock immediately. When the vehicle speed is ≥ 5 km/h, it is strictly forbidden to use the differential lock.
6.LKjøremodus
↑ Til toppenDriving
You can select the drive mode by selecting "Control Center" and switching to the "Setting" interface on the vehicle information screen of the instrument panel to tailor your needs.
ECO mode
This vehicle has three driving modes, which offer you the chance
to choose how you want to drive. Each mode provides a different driving experience.
6.L.1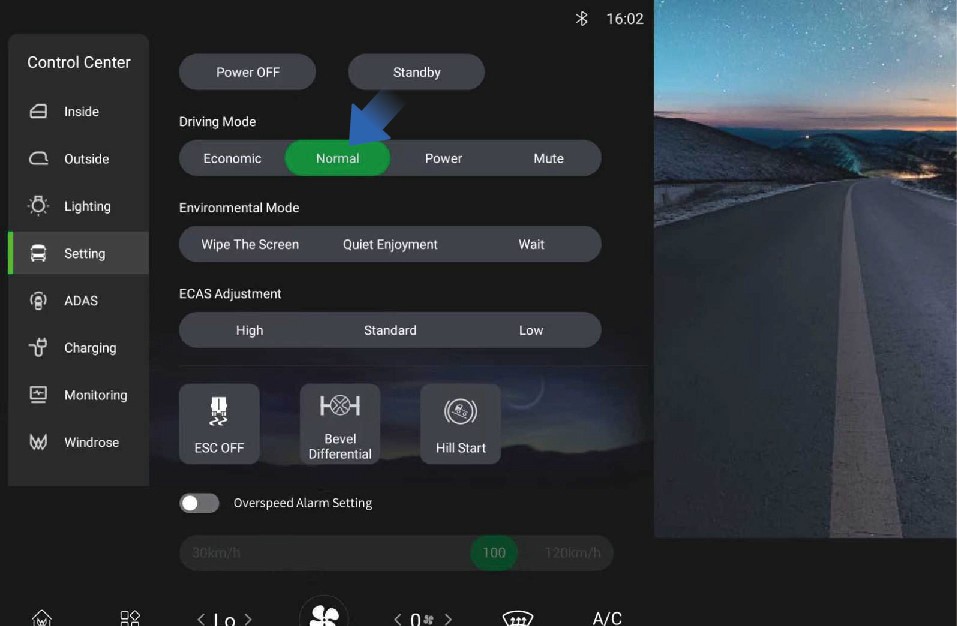 Bruksanvisning
It can effectively reduce the energy demand for high-voltage battery to achieve the economical driving; When the battery SOC is lower than 10%, the vehicle automatically enters the ECO mode.
Normal mode
It can offer a good balance of power and economy, which can meet the daily needs of most drivers.
Power mode
↑ Til toppenIt can provide the designed maximum power output of the vehicle and require the drive motor to respond as quickly as possible to achieve optimal output torque and strong power performance with higher energy consumption.
7.ARundtbildekamera (AVM)
Driving Assistance
↑ Til toppenThe around view monitor (AVM) uses cameras installed around the vehicle to capture images, and the AVM module stitches and synthesizes the high-definition image signals collected by the camera to achieve 2D/3D panoramic view. The part not contained by the panoramic view can be filled with the image of the rear camera.
7.A.1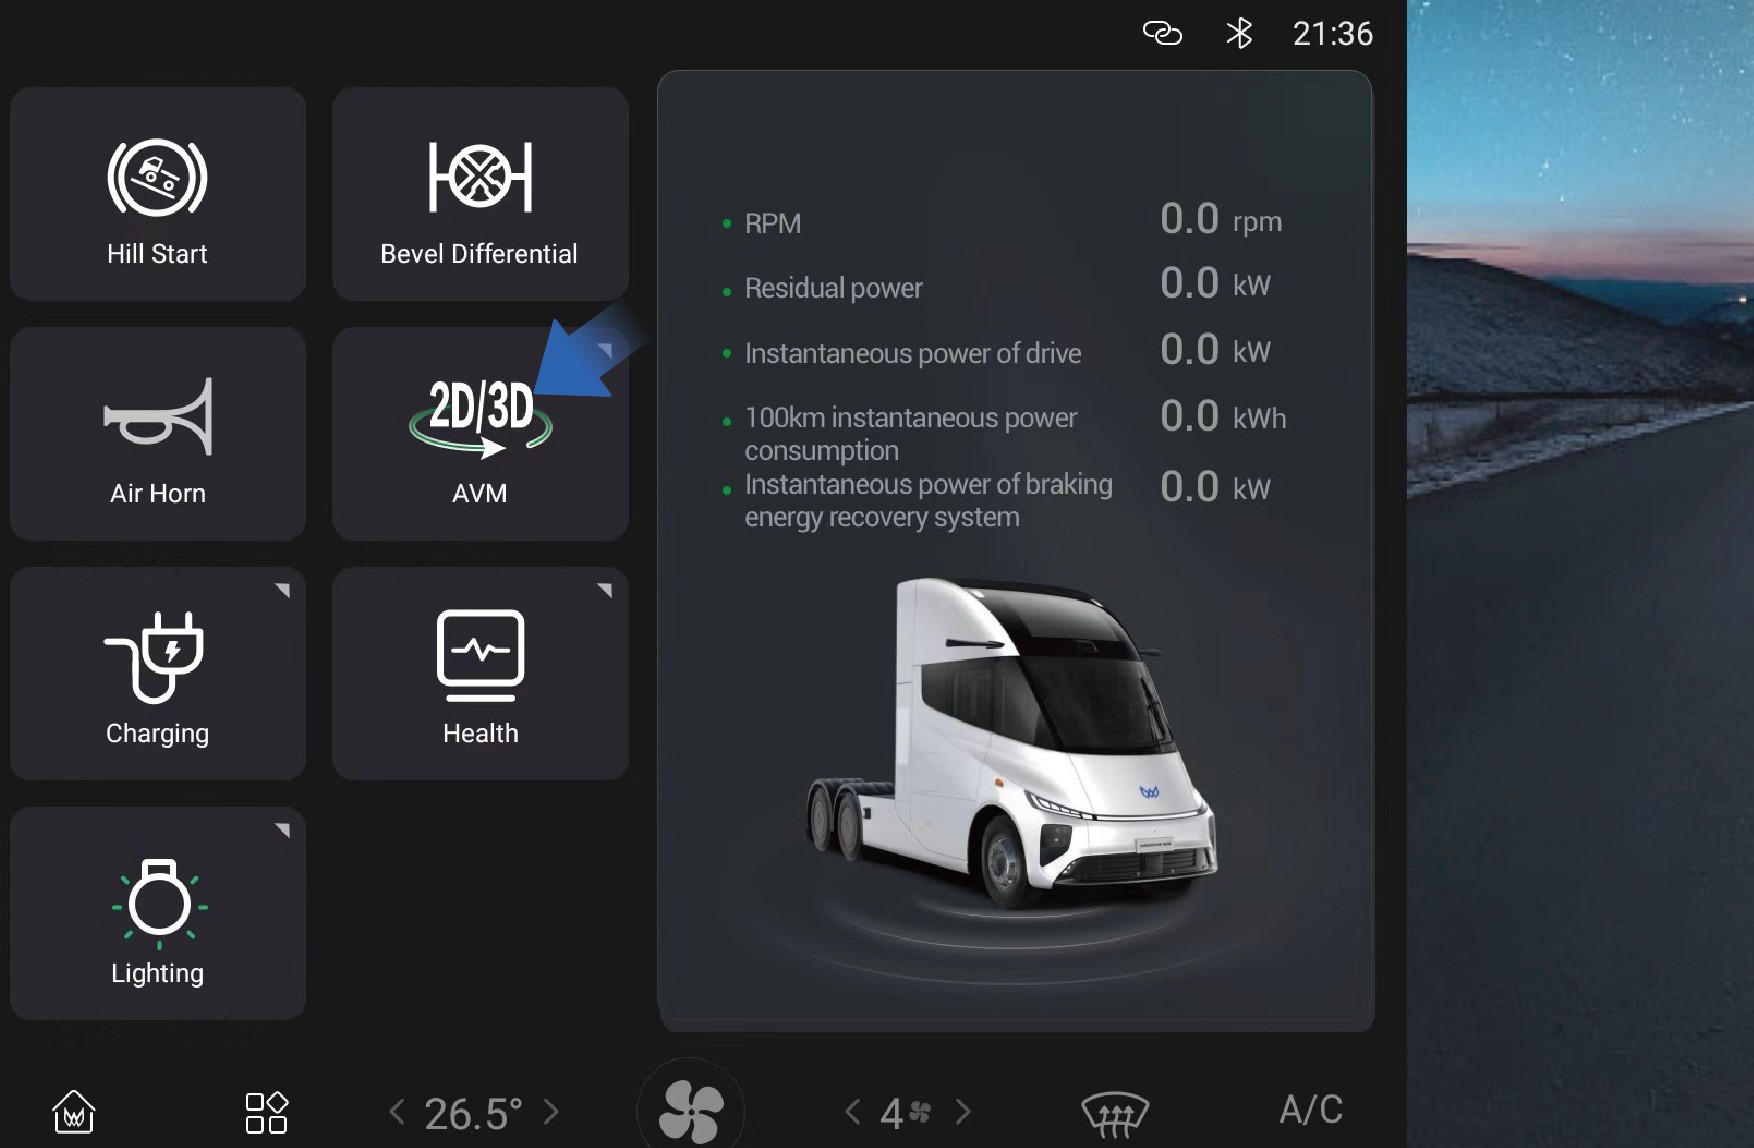 Bruksanvisning
You can set and adjust the AVM function by selecting "Home" and clicking the "AVM" button on the vehicle information screen of the instrument panel.
Parking assist (PA)
Parking assist can monitor the surrounding conditions of the vehicle when the vehicle is reversing at low speed to ensure the driving safety. During parking, the vehicle will remind you by warning sounds and images based on the distance between the obstacle and the front or rear of the vehicle.
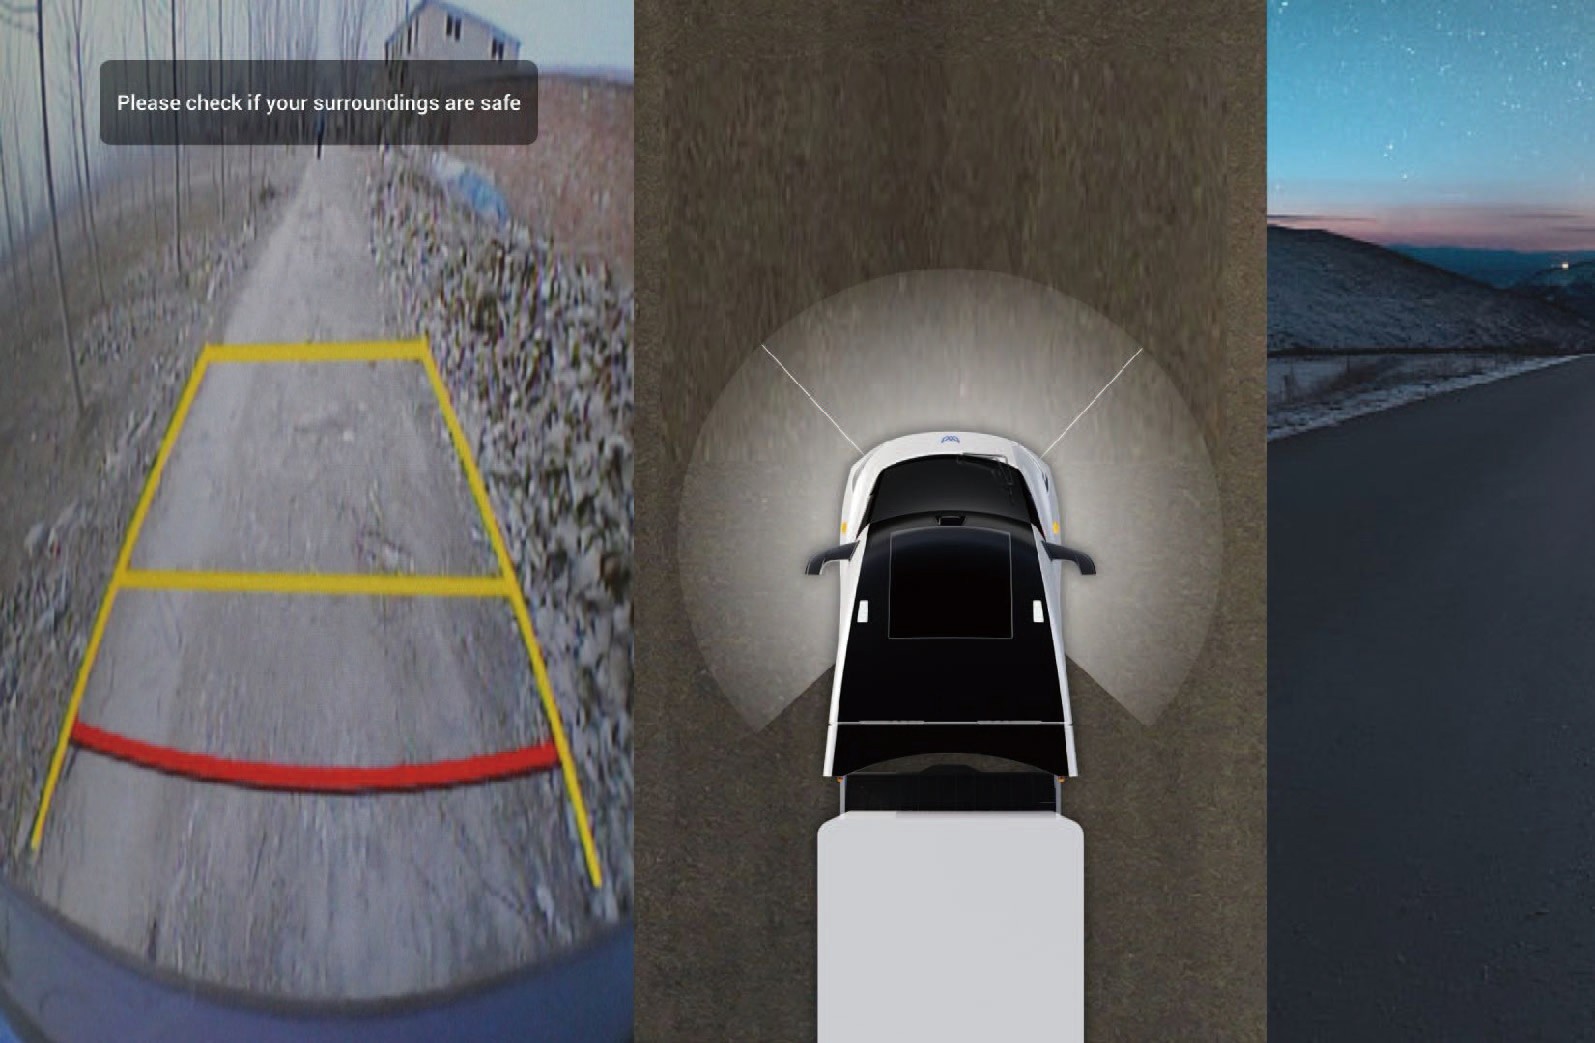
You can activate the parking assist image in the following ways:
On the home page of the vehicle information screen, click AVM to turn on the 270° panoramic image;
When the vehicle is engaged in R gear, the memory view (270° panoramic image) will be turned on.
↑ Til toppenReverse camera vision system(RCVS)
The RCVS system provides the driver with a rear view during vehicle reversing, improving safety during the reversing process.
Shifting to reverse gear will enter the interface.
7.A.2Forholdsregler
MerknadThe reverse image relies on the rearview camera sensor to operate normally. The following situations may cause the sensor to be limited and the camera function to be restricted:
• Camera installation position change, obstruction or dirt, defocusing or malfunction, etc.
The surrounding environment is dim, such as dawn, dusk, night, tunnels, buildings, and large vehicles casting large shadows.
Sudden changes in ambient brightness, such as at tunnel entrances or exits.
Adverse weather conditions such as rain, snow, fog, and haze.
7.BInformasjonssystem ved igangkjøring (MOIS)
↑ Til toppenDriving Assistance
The MOIS system can monitor pedestrians/bicycles in blind spots ahead of the vehicle and operate effectively at low speeds to prevent collisions with pedestrians or cyclists. When the MOIS system detects the presence of pedestrians or cyclists in front of the vehicle, it can inform the driver through a combination of optical and acoustic signals to ensure that the driver can take timely measures.
When the vehicle is stationary, the instrument panel will trigger an optical alarm if a pedestrian enters the front danger zone. If the vehicle is moving forward and a pedestrian enters the front danger zone, the instrument panel will activate both audible and visual alarms until the pedestrian leaves the danger zone.
When the sun is slanting or directly shining on the camera.
7.B.1Bruksanvisning
You can switch to the "ADAS" interface by selecting "Control Center" from the car infotainment screen on the right side of the dashboard, clicking the "MOIS" button to turn on/off the MOIS function, and synchronizing by selecting "MOIS Alarm Sound" to turn on and off the MOIS alarm sound.
MOIS system fault alarm
If there is an error/malfunction in the system, a fault warning signal will be displayed on the dashboard, which may cause the following faults:
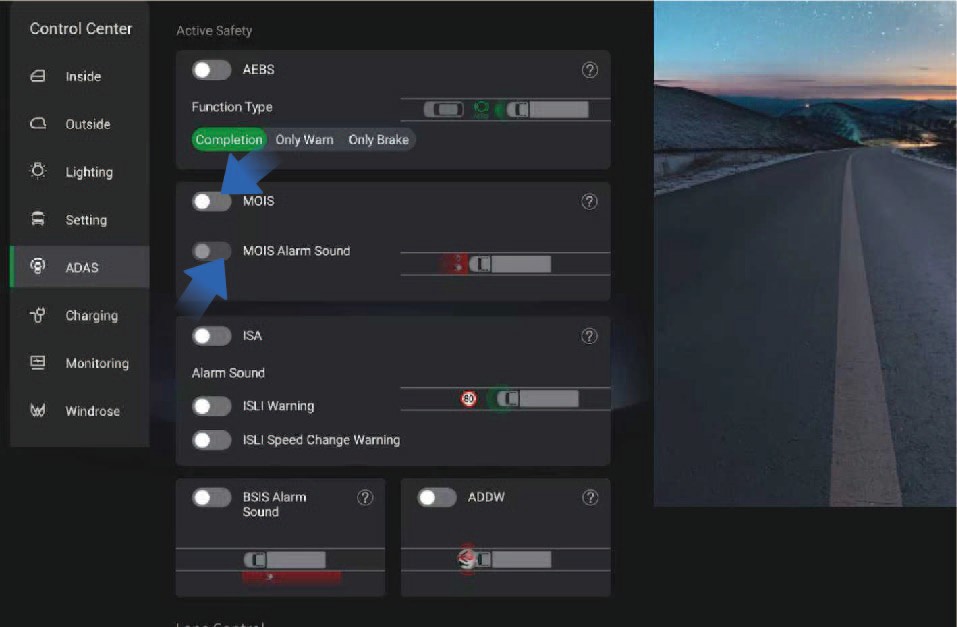
After being completely covered by ice, snow, mud, soil or similar substances, the obstruction can be detected and the function will be automatically turned off, and a fault signal will be sent to the driver to indicate the obstruction status. When the obstruction is removed, the function should be able to return to normal.
Detect the ambient light intensity, automatically shut down the system when the ambient light intensity is below 15lux, and notify the driver of this status with a fault signal. After the ambient light returns to normal, the function returns to normal.
When the MOIS system malfunctions due to hardware, software, or interactive component failures, relevant signals are used to alert the driver of the system's fault status.
7.CAdaptiv cruisekontroll (ACC)
↑ Til toppenDriving Assistance
The adaptive cruise control (ACC) is a driver assistance function to improve the driver’s comfort. If the road ahead is clear, the ACC will maintain the set maximum cruising speed and allow the
vehicle to drive forward. If a vehicle is detected ahead, the ACC will reduce the speed of the subject vehicle as needed to maintain the set following distance from the vehicle ahead until the appropriate cruising speed is reached.
With ACC activated, you still need to observe the road conditions ahead and control the vehicle when necessary. The ACC is mainly used for driving on dry straight roads such as highways. It is not recommended to activate the ACC when driving on city streets.
7.C.1Bruksanvisning
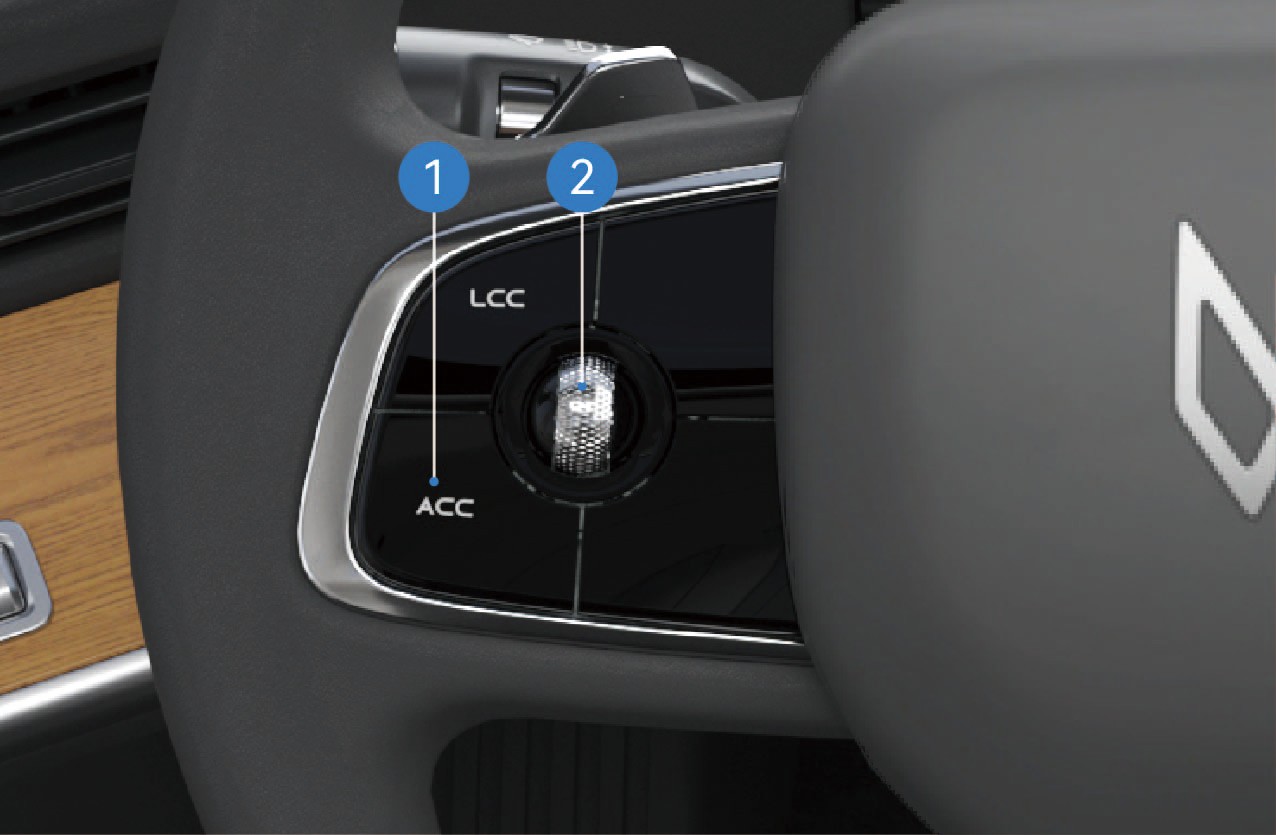
ACC ON/OFF
Click the button to turn on the ACC, and the ACC ON indicator will be illuminated in gray on the instrument cluster. When the ACC working conditions are met, the indicator will be illuminated in green, the ACC function will be activated, and text prompt and numerical information such as cruising speed will be displayed.
In cruise mode, click the button to turn off the ACC, the indicator will turn gray and text prompt will be displayed on the instrument cluster.
Cruise control scroll wheel
Right: Increase the following distance.
Left: Decrease the following distance.
Up: Increase the vehicle speed.
Down: Decrease the vehicle speed.
Slide the cruise control scroll wheel up or down and release it to gradually increase or decrease the target speed by ±1 km/h; Slide the cruise control scroll wheel up or down and hold it to gradually increase or decrease the target speed by ±5 km/h. Operate the distance button to change the following distance (five levels in total).
With ACC on, if you slide the cruise control scroll wheel down,
the system will set the current vehicle speed as the cruising
speed; If the brake pedal is depressed or the cruise switch is pressed during ACC activation or the vehicle speed does not meet the ACC activation conditions , causing ACC to deactivate, the system will memorize the previously set cruising speed when the ACC is successfully activated again and the cruise control scroll wheel is moved up.
When the vehicle is powered on for the first time, the following distance defaults to level 3. In the same power-on cycle, the last set following distance level will be memorized at the time of reactivating ACC, and the default level (level 3) will be maintained when the vehicle is powered on again.
Description of ACC function status
Cruise control
When there is no target vehicle ahead or the target vehicle speed is greater than the target cruising speed, the cruise control will keep the vehicle driving at the target cruising speed.
Following control
The following control function allows the vehicle to follow the vehicle ahead at the following distance set by the driver.
Overtaking mode
With ACC activated, when the driver depresses the accelerator pedal, the ACC will enter the overtaking mode; If the driver releases the accelerator pedal within 15 minutes, the vehicle will return to the target speed.
Driver takeover request
In certain scenarios, the ACC is unable to keep the vehicle driving at a safe distance and it will send a signal to prompt the driver to take over the vehicle. In this case, the icon on the instrument cluster will be illuminated, and an audible alarm will be given, reminding the driver to take over the vehicle.
Curve speed control
The curve control logic is that when the vehicle follows the vehicle ahead or cruises at a constant speed in a curve, the ACC will control the vehicle speed based on the curve radius to keep the lateral acceleration within a comfortable range.
Camera and radar recognition failure
In the following situations, the camera recognition failure may occur, affecting ACC performance, and even causing the function deactivation with the text prompts displayed in the instrument cluster, including but not limited to:
The camera mounting position is changed.
The camera is obscured or dirty.
The vehicle is driving at night.
The surroundings are dim, such as at dawn, dusk, and night or in the tunnel.
The brightness of the surrounding environment changes suddenly, such as entrance or exit of a tunnel.
Large shadows caused by buildings, landscapes or large vehicles.
The camera is exposed to direct light.
In bad weather such as rain, snow, fog, haze, etc.
Exhaust fumes, splashes of water, snowflakes or dust raised by the vehicles in front falling on the subject vehicle.
The windscreen in front of the camera is contaminated by water, dust, micro-scratches, oil, dirt, wiper, freezing, snow, etc.
The vehicle is driving on a wet road.
In the following situations, the radar recognition failure may occur, affecting ACC performance, and even causing the function deactivation, including but not limited to:
The radar is misaligned or blocked, or covered with mud, snow, metal plate, tape, label, leaves, etc.
The radar or the surrounding area is impacted due to vehicle collision or scratching.
Adverse weather conditions such as heavy rain, heavy snow, and heavy fog may affect the performance of radar.
Limited by characteristics of the object identified, the sensor may issue false alarms with regard to some metal fences, green belts, cement walls, etc., in few cases.
ACC can only identify qualified vehicles. The following targets may fail to be identified and may be responded to, including but not limited to:
Side passing vehicles.
Oncoming vehicles.
Bicycles, motorcycles, tricycles, etc.
The ACC cannot identify the following targets, including but not limited to:
Person.
Animal.
Traffic light.
Walls.
Barricades
Other non-vehicle objects.
The ACC may work or respond too late in the following situations where the target is not directly located in front, including but not limited to:
The ACC cannot identify targets in the blind spot of the sensor. For example, the ACC cannot identify the objects in the corner and side blind spots of the vehicle. When approaching or passing a curve, it may select a wrong target or miss the target, causing the vehicle to accelerate or decelerate.
When the vehicle is on a slope, the target may get lost or the distance from the vehicle ahead may be misjudged. When the vehicle going downhill, the ACC may increase the vehicle speed, resulting in exceeding the cruising speed.
The ACC may not be able to recognise in time if the vehicles (especially large vehicles such as buses and trucks) in the adjacent lane cut from the front of your vehicle with only part of the vehicle body. At this time, you shall override the vehicle in time.
The ACC may not be able to recognise the target in time if your vehicle suddenly cuts behind the vehicle in front, or if another vehicle suddenly cuts into or out of front of your vehicle. At this time, you shall override the vehicle in time.
In special or complex road conditions, it is not recommended to use ACC, as it may be affected or even deactivated, including but not limited to:
Waterlogged, muddy, potholes, ice and snow roads, or roads with speed bumps or obstacles.
Traffic conditions with pedestrians, bicycles, or many animals.
Complex and changeable traffic conditions, such as busy intersections, highway ramps, and congested roads.
Winding roads, sharp turns.
Uphill and downhill roads.
Bumpy roads.
Narrow roads.
Tunnel entrances and exits.
Non-standard roads.
Roads without median strips.
In the following situations, if the relative speed of the vehicle ahead is too high, the ACC may have limited controllability, resulting in failure to keep the distance in time: Including but not limited to:
The status of the vehicle ahead changes suddenly (such as sudden turning, acceleration, deceleration, etc.).
Other vehicles suddenly cut in or out of the subject vehicle.
The subject vehicle suddenly cuts in behind the vehicle ahead.
The subject vehicle is moving at high speed to a stationary or slow-moving target in front.
Sufficient braking force may not be obtained in the following situations. Including but not limited to:
The braking function cannot work normally (such as brake parts are too cold, too hot, wet, etc.).
The vehicle is maintained improperly (such as excessive wear of brakes or tyres, abnormal tyre pressure, etc.).
The vehicle is driving on special roads (such as uphill and downhill, water flooded roads, mud, potholes, icy and snowy roads, etc.).
Exit conditions of ACC
In any of the following situations, the ACC will be deactivated immediately:
Any door is open;
The driver seat belt is unfastened;
The vehicle is not in D gear;
The brake pedal is depressed;
The EPB is applied;
The vehicle is not powered on;
The ESC is deactivated;
The wheel speed signal is invalid;
The vehicle speed is not within the specified speed range;
The AEB works;
The radar/camera is blocked;
Other system errors have occurred.
In any of the following situations, the ACC will be gradually deactivated:
The ESC is activated;
The ABS activation time is greater than 2 seconds;
The ASR is activated;
The ACC off button is pressed.
7.Q.1Forholdsregler
Advarsel
If you are aware of a danger while using the ACC, please take over the vehicle immediately instead of waiting for the system warning prompt.
For stationary vehicles or objects, especially those appeared after the vehicle ahead drives away your lane, the ACC will not be able to recognise them and apply brakes or slow down. You should always pay attention to the road conditions ahead
and be ready to take over the vehicle at any time. Relying
solely on ACC may cause personal injury or even death. In addition, the ACC may react to vehicles or objects that do not exist or are not in the lane you are driving, causing unnecessary or inappropriate deceleration of the vehicle.
The ACC may not control the vehicle speed properly due to limited braking capacity and being on a slope. It may also misjudge the distance between the subject vehicle and the vehicle ahead. When the vehicle is going downhill, the ACC may increase the vehicle speed, resulting in exceeding the cruising speed (or limit speed).
Do not rely solely on ACC to slow down the vehicle and avoid a collision, otherwise, serious personal injury or death may occur. Always observe the road conditions while driving and be ready to take over the vehicle at any time.
The ACC is only a driver assistance function, which can not prevent all collisions. The ACC has a limited deceleration capability and cannot replace the driver in driving. It is always your responsibility to drive your car safely and to obey current laws and traffic regulations.
The ACC can adjust the vehicle speed smoothly based on vehicle conditions and traffic conditions ahead. However, due
to the limitations of the monitoring system, the system may fail
to apply brake in an emergency. When necessary, you should take the initiative to take braking actions.
The ACC cannot be applied in all driving scenarios and traffic, weather and road conditions.
You must intervene when the ACC fails to maintain a proper speed or distance from the vehicle ahead. It is your responsibility to determine and maintain a safe following distance at all times. Do not rely solely on ACC to maintain the distance between vehicles.
The ACC may not respond to animals, pedestrians, specially- shaped vehicles, vehicles loaded with irregularly shaped cargo, or small vehicles (such as bicycles, tricycles, and motorcycles) or traffic signs (such as traffic cones, water-filled barriers, signboards). ACC may also not respond to slow- moving, stopped or approaching vehicles, or other stationary objects.
The ACC may cause abnormalities such as excessive deceleration and deceleration shock due to the asynchronous response of the electronic brake system (EBS) between the trailer and the prime mover. In this case, please deactivate ACC.
Do not use the ACC in environments with poor driving
conditions, such as: in the city or other heavily congested
traffic, roads with water or slush, heavy rain and snow, poor visibility, windy conditions, or driving on slopes.
Loading too many items may cause a change in vehicle attitude, which may degrade or disable the target identification of ACC.
When another vehicle changes lanes to the front of your vehicle, ACC may not have time to respond, requiring you to apply braking in time.
When driving downhill on steep slopes, it may be difficult for ACC to maintain proper distance from the vehicle ahead. In these situations, be extra careful and always be ready to apply braking.
When you are driving into and out of curves, the selection of a target may be delayed or interfered, which may cause ACC to brake unexpectedly or brake too late.
On a sharp turning road, such as a serpentine road, the ACC may not be able to detect the vehicle ahead normally due to the limited field of view of the windscreen and front radar, in which case, the vehicle may accelerate, which requires you to take over the vehicle according to the actual situation.
At night with insufficient lighting or in a city with complex lighting, the camera may misidentify, miss, or inaccurately
identify the target, causing ACC to brake incorrectly or brake too late. You need to use the ACC function with caution, stay focused, and be ready to take over the vehicle at any time.
If you need to cut out of the current lane or the vehicle ahead cuts out while following the vehicle ahead, the ACC may be limited in acceleration for a period of time to ensure safety. You can actively depress the accelerator pedal to take over the vehicle.
MerknadAfter the ACC is deactivated, you must override the vehicle to ensure the driving safety.
Merk
When the following target is changed or lost (especially during turns or lane changes), the ACC may accelerate unexpectedly.
When the vehicles, objects or stationary targets in adjacent lanes are changed or lost (especially during turns or lane changes), the ACC may brake unexpectedly.
The ACC is mainly suitable for driving on smooth roads. When
ACC is used for driving downhill on steep slopes or with heavy
loads, it may be difficult to maintain the correct following distance from the vehicle ahead.
The ACC can control your vehicle to accelerate and decelerate. When the vehicle is decelerating, the brake system starts to work and may make a sound, which is normal.
When the ACC fails, a text prompt will be displayed on the instrument cluster to remind the driver that ACC is faulty.
When the vehicle speed is 0, the system will automatically turn off the prompt sound.
If the vehicle speed gradually increases, the prompt sound volume will gradually decrease until it is automatically turned off; If the vehicle speed gradually decreases, the prompt sound volume will gradually increase.
When the vehicle is in reverse gear (R gear), the reverse prompt sound is activated, and the prompt sound is "beep beep beep".
7.DLow Speed Alarm And Reverse
↑ Til toppenReminder Device
Driving Assistance
This car is equipped with a low-speed alarm and reverse reminder device, which will alert surrounding personnel and vehicles when you are driving at low speed or reversing.
7.D.1Reversing status
When the vehicle speed is reduced to the specified range, the vehi- cle turning sound alert device will be activated.
When the vehicle is driving at low speed, the prompt
↑ Til toppensound is "ding-ding-ding".
7.EAutomatic Emergency Braking (AEB)
↑ Til toppenDriving Assistance
The automatic emergency braking (AEB) system can detect target vehicles or obstacles, predict a risk of potential forward collision, and send a warning signal and display the image on the vehicle information screen in case of a danger to remind the driver and activate the brake system of the subject vehicle to avoid or
mitigate collisions by reducing speed.
AEB function
Safe distance alarm
In non-emergency situations, the system will remind the driver that the distance between the subject vehicle and the vehicle ahead is too small, sound the buzzer at a low frequency, and highlight the prompts in green on the simulated reality system.
Level 1 warning
When a dangerous situation occurs, the system will remind the driver that actions should be taken to respond to the level 1 warning, sound the buzzer at a low frequency, and highlight the prompts in yellow on the simulated reality system.
Level 2 warning
In the case of an emergency, the system will remind the driver that actions should be taken to respond to the level 2 warning, sound the buzzer at a high frequency, and highlight the prompts in red on the simulated reality system.
Emergency brake
After the collision alarm is issued, if the driver still does not take measures, AEB will actively apply the brake braking force, increasing the driver's reaction time and reducing the relative speed.
System fault
When the system fails, a text prompt will be popped out, the AEB switch in the vehicle information screen will be in the off position and the icon will be grayed out, indicating that the function is unavailable.
7.D.2Bruksanvisning
AEB activation
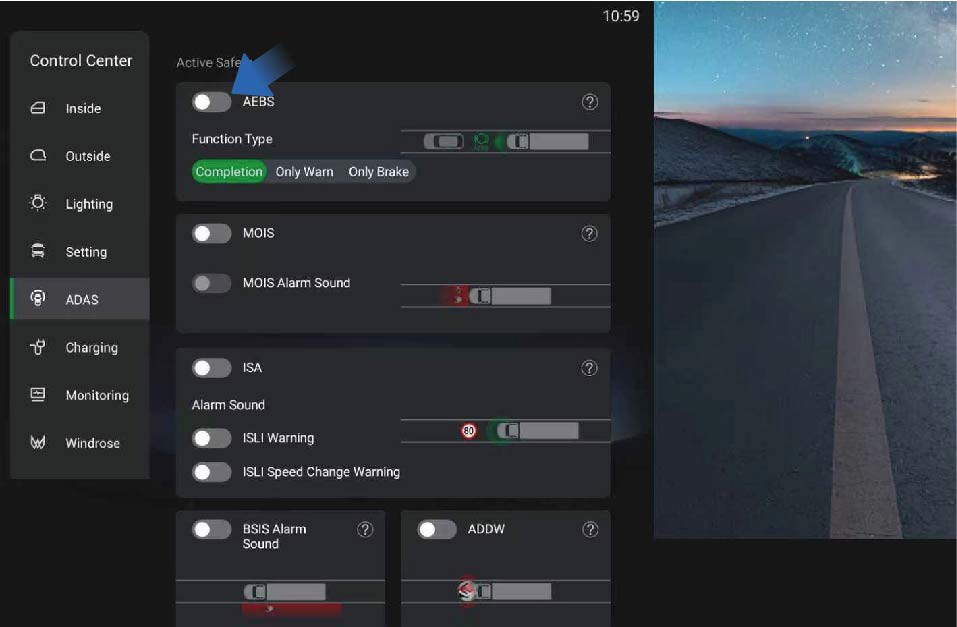
You can activate/deactivate this function by selecting "Control Center", switching to "ADAS" interface, and clicking the "AEBS" button on the vehicle information screen of the instrument panel.
The AEB is activated by default after the vehicle is powered on. When this function is deactivated manually, the system will display the corresponding text prompt on the vehicle information screen. When the AEB fails, the system will display the corresponding text prompt on the vehicle information screen, and the AEB icon will be grayed out, indicating that the function is unavailable.
Applicable scenarios of AEB
The AEB can detect the pedestrians, two-wheeled vehicles, passenger cars, trucks, and etc., except for oncoming vehicles and crossing vehicles. If the visual detection capability is limited, the AEB will give a warning for moving targets, but will not apply brakes. (Note: When the vehicle is driving through curves, the AEB will give a warning but not apply brakes to the detected pedestrians and two-wheeled vehicles).
Limitations of AEB
The function will be limited in the following situations:
The AEB can assist the driver in dangerous situations, but the driver should not solely rely on the system.
In adverse weather conditions, such as heavy rain, snow, etc., the function will be degraded, and cannot detect the target or
detect the target too late.
The AEB is running in the background under normal conditions and will not be noticed by the driver. Therefore, if the relevant targets are detected by the system, they will not be displayed.
The AEB may be triggered by mistake due to its limitations.
Please note that the sensor cannot detect dangerous obstacles ahead in all situations.
Certain targets can weaken and block radar detection, such as highway guardrails, tunnel entrances, heavy rain or snowy weather, thus affecting the AEB.
In some scenarios, only radars or cameras detect objects, and the system cannot achieve optimal performance, and such system performance degradation will not be perceived by the driver.
The AEB is designed to detect moving targets in the same lane and direction in normal traffic conditions. When certain conditions and speed ranges are met, the AEB system can also detect stationary targets in the lane where the subject vehicle is driving.
The system will not respond to animals, oncoming and crossing vehicles.
For safety reasons, the implementation of the AEB function requires the support of the ESC system.
The AEB can only respond to a target that is in the detection range of the radar sensor and has been identified. For cut-in targets, targets that are detected after the subject vehicle changes lanes, and those on sharp turns, the performance of AEB will be greatly limited.
If the radar is affected by strong vibration or slight impact during calibration, the system performance will be reduced and the false trigger rate will be increased. Therefore, the radar needs to be checked for the installation position or to be re- calibrated.
The radar system requires special performance to detect relevant targets. When affected by the environment such as under electromagnetic interference or by the target itself, the detection will be disturbed and the system performance will be reduced.
The radar system is installed in front of the vehicle, and no other obstacles are allowed in the field of view of the radar sensor. In the installation position, the radar will be affected by dust and snow. When the radar is completely covered by snow, the system may be turned off. In this case, the driver will be informed of relevant information through the IVI interface.
The target will not be detected until it appears in the detection range of the sensor; When the target changes lanes or cuts in too close, the system may not detect the target in front.
Targets that cannot be clearly identified, such as motorcycles or bicycles, and vehicles with high driving positions are often detected too late or cannot be detected.
7.D.3Forholdsregler
Advarsel
The driver is responsible for safe driving without dangerous situations.
AEB is only a driver assistance system and cannot exempt the responsibility of the driver to drive the vehicle safely. The driver must be fully responsible for all traffic scenarios.
Even if the traffic conditions are not very dangerous, AEB may still give alarms and apply brakes, such as power loss of vehicle ahead, overtaking, or passing through curves, so the driver must be ready to take over the vehicle at all times.
AEB cannot avoid all accidents in all traffic scenarios.
AEB cannot respond to oncoming vehicles, animals, and crossing vehicles.
When the AEB system fails or the system cannot work properly, please go to a Windrose authorised service centre for repair immediately. Do not modify it without authorization.
The braking performance of AEB depends on the braking system of the vehicle.
When the ESC/EBS MIL is on, the AEB system will not work properly. Check and troubleshoot related faults in time.
Do not use AEB when the vehicle is being towed, the vehicle is placed on a drum bench, the vehicle is driving on a sloped curve, or the radar camera is blocked or obscured by the deformed components.
7.FElektronisk bremsesystem (EBS)
↑ Til toppenDriving Assistance
The electronic braking system (EBS), as a control system upgraded from the ABS and ESC, can reduce the response time and pressure building time of the braking system, realize the
electronic brake force distribution of the vehicle and the consistency control of the prime mover and trailer, shorten the braking distance and improve the overall braking performance of the vehicle. The EBS integrates functions such as ASR, HSA, and ESC.
7.F.1Forholdsregler
↑ Til toppenAdvarselWhen the EBS fails, the yellow EBS MIL will be illuminated on the instrument cluster. Contact the Windrose authorised service centre as soon as possible to inspect and repair the system.
7.GElektronisk bremsekraftfordeling (EBD)
↑ Til toppenDriving Assistance
7.G.1Funksjonsbeskrivelse
↑ Til toppenElectronic Brakeforce Distribution (EBD) ensures good braking performance and stability of the vehicle under different load conditions by regulating the distribution of braking forces between front and rear wheels and controlling the slip of rear wheels.
7.HAntispinnregulering (ASR)
↑ Til toppenDriving Assistance
The acceleration slip regulation (ASR) is an electronic system that monitors and controls the driving force of the driving wheels during driving on the basis of ABS. If the system detects vehicle slipping when accelerating or starting, the ASR will be activated to brake the slipping wheels so as to maintain the stability in driving direction and the starting ability of the vehicle.
7.IFeltskiftevarsling (LDW)
↑ Til toppenDriving Assistance
When the vehicle deviates from the current lane unconsciously, the lane departure warning (LDW) will alert the driver with visual and audible alarm sounds.
Activation conditions of LDW
LDW may be restricted or not work normally under the following circumstances, including but not limited to:
The operating speed is outside the normal operating speed range (60-120 km/h).
The vehicle is affected by crosswinds.
The vehicle is driving on a slope.
The vehicle is driving through a road with sharp curves.
The vehicle is extremely inclined under heavy loads or abnormal tyre pressure.
The vehicle is driving on roads that can result in great amplitude of oscillatory motion in the vehicle, or on road surfaces with a large number of road joints.
The vehicle is driving on roads without lane lines, or with unclear lane lines or disordered lane lines due to construction.
The following distance is too close to detect the lane lines.
The imaging capability of the camera is affected. Including but not limited to the following situations:
Poor visibility at night.
Poor visibility due to bad weather, such as heavy rain, heavy snow, fog, dust.
Bright light, backlight, water reflection, or extreme light
contrast.
The camera is blocked by dirt, ice, snow, etc.
The performance of the camera deteriorates under high temperatures, extreme cold weather and other extreme weather.
7.I.1Bruksanvisning
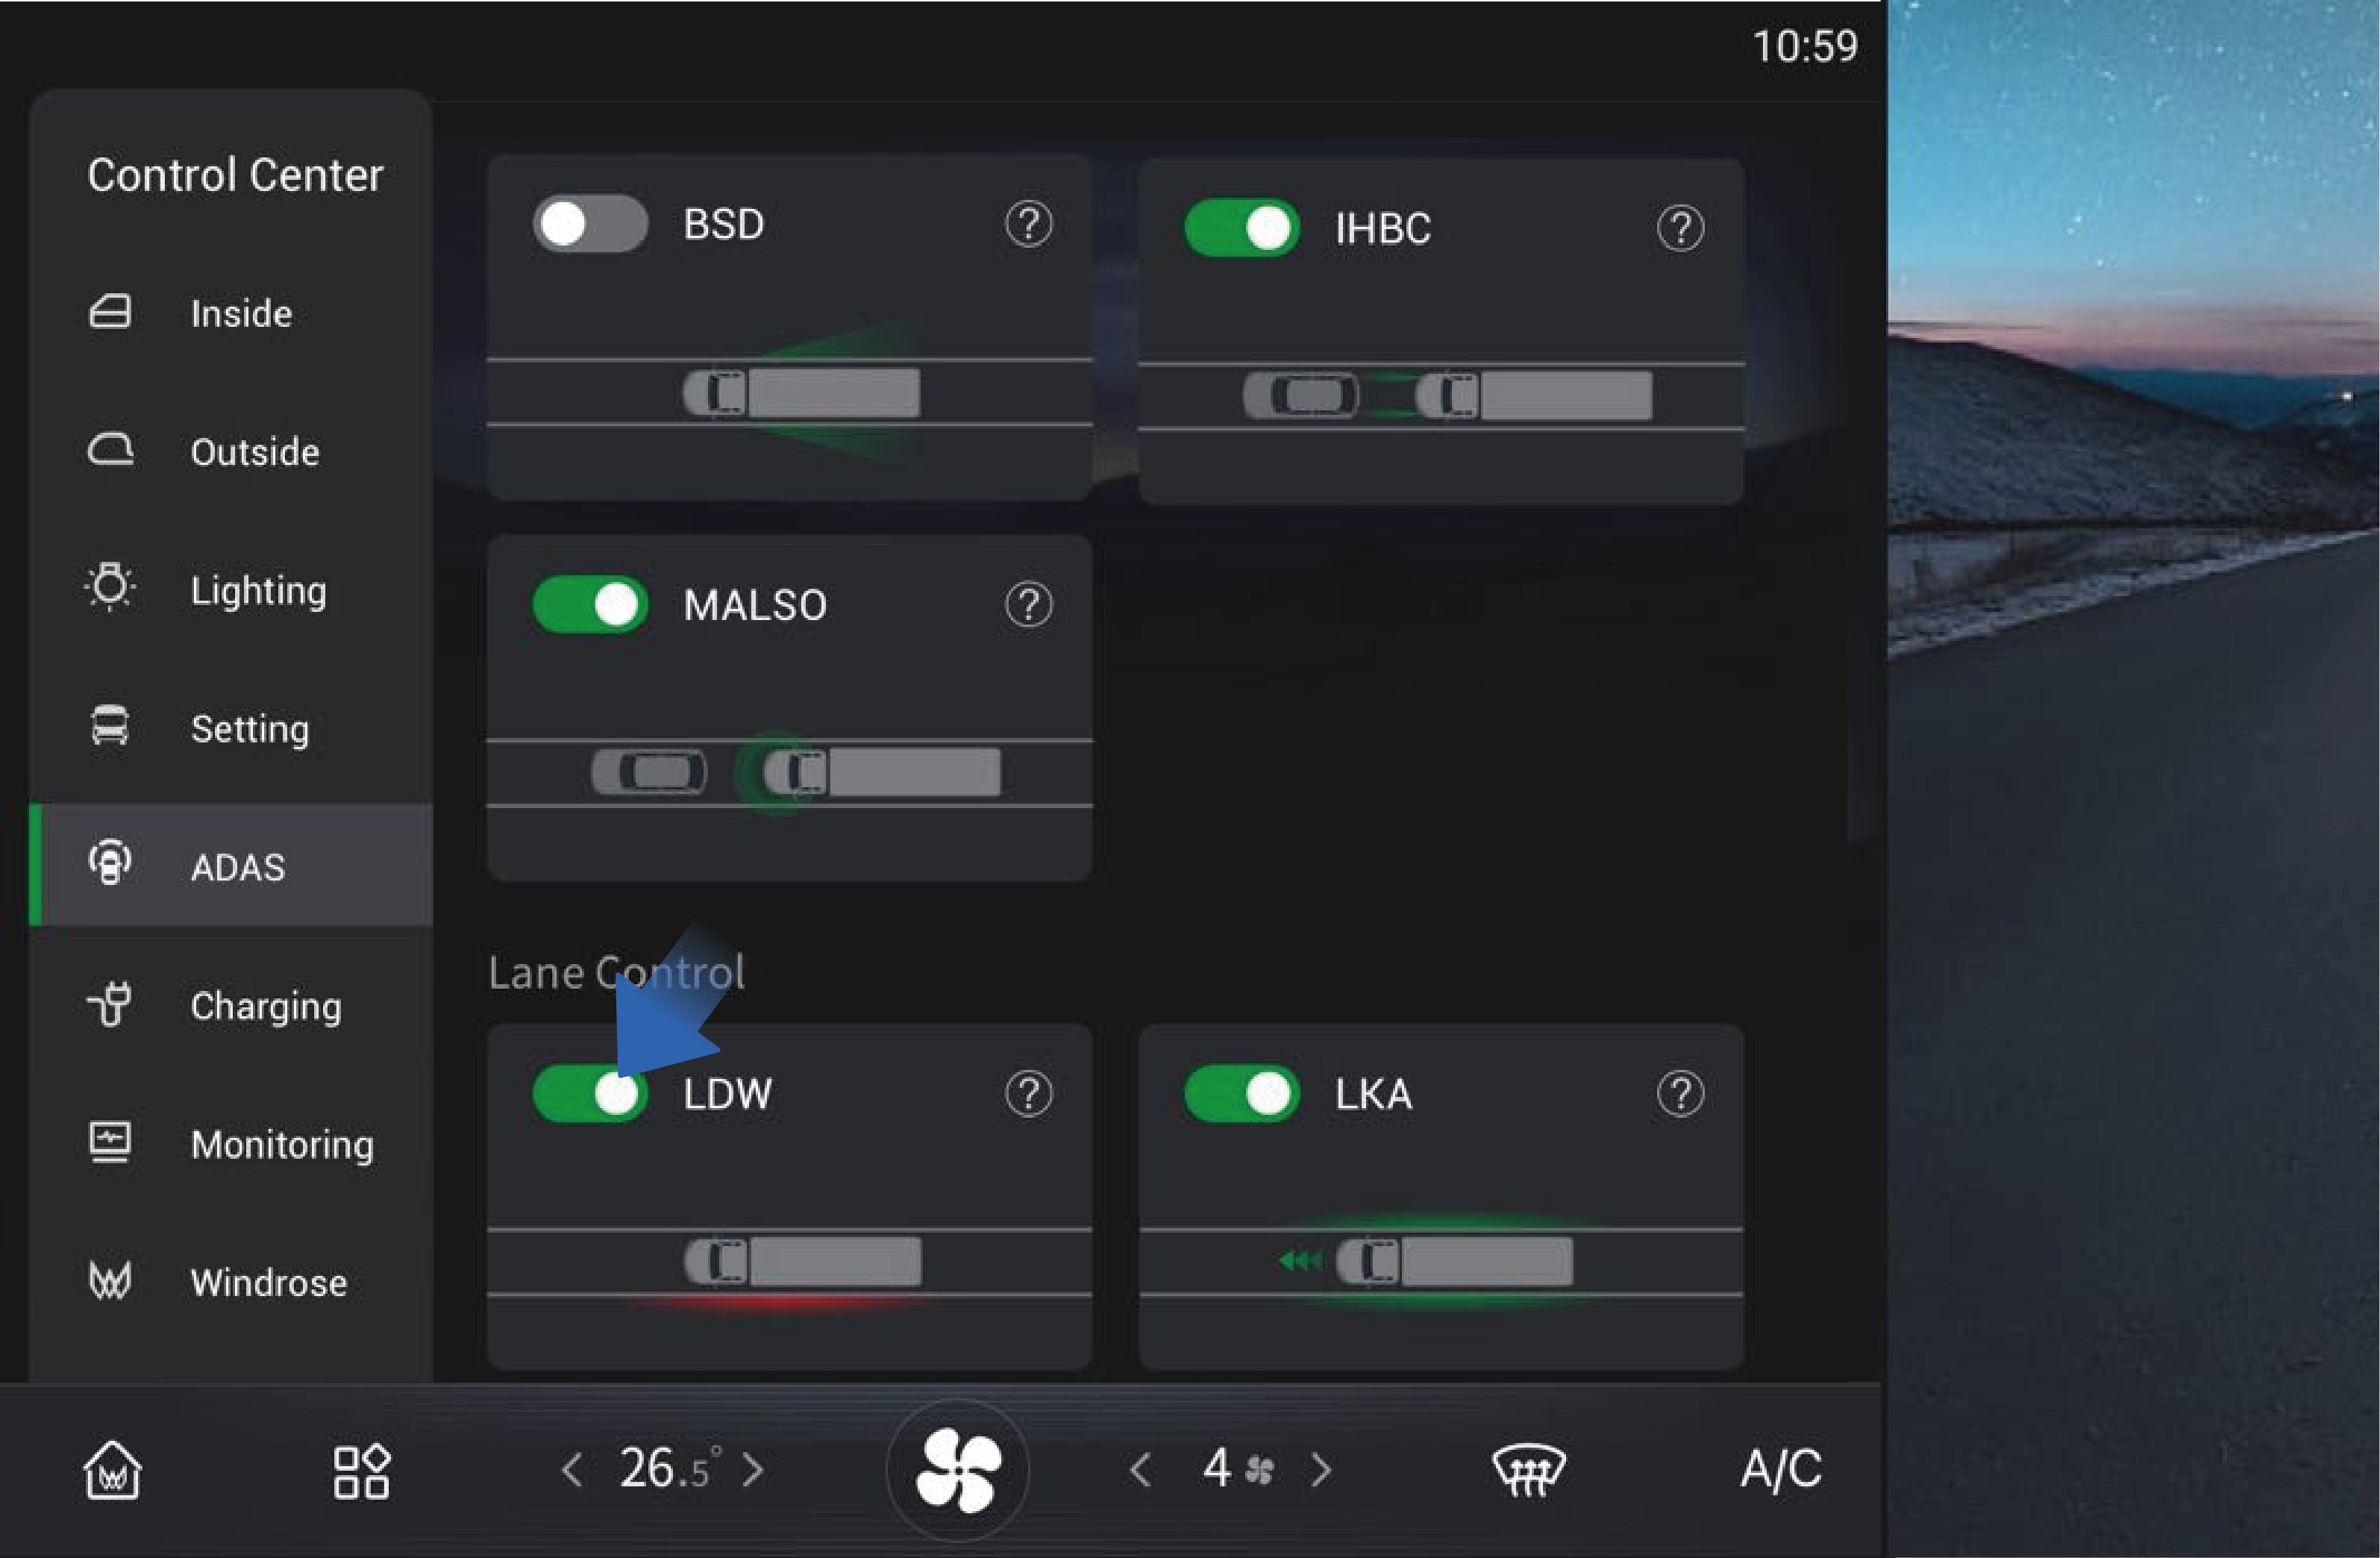
↑ Til toppenYou can activate/deactivate the function by selecting "Control Center", switching to "ADAS" interface, and clicking "LDW" button on the vehicle information screen of the instrument panel.
LDW is enabled by default when powered on, and you can
manually disable it as needed.
7.I.2
Forholdsregler
Advarsel
LDW is a driving assistance function, and it cannot replace your observation and judgment of traffic conditions and the driver's responsibility for safe driving.
Do not use LDW at road forks, conjunctions, etc.
Do not use LDW when snow chains are used in the vehicle.
Do not use LDW when the tyres are excessively worn or the tyre pressure is too low.
Do not use LDW when mixing tyres of different constructions, or brands or from various manufacturers, or having diverse tread patterns.
Do not use LDW when the vehicle is driving on construction roads (with construction signs, cone barrels, etc.).
Do not use the LDW in poor driving conditions, such as sharp
turns, steep slopes, icy and slippery roads, or in bad weather such as rain, snow, fog.
You should maintain attention and judgment at all times, ensure that the vehicle is in its own lane, and comply with current laws and traffic regulations.
LDW may not work properly on roads without lane lines, with multiple lane lines, worn or unclear lane lines or where the lane lines are covered by other objects.
LDW cannot prevent collision. It is always your responsibility to drive the vehicle safely.
7.JElektronisk stabilitetskontroll (ESC)
driving direction of the vehicle and ensure the stability of the direction.
Anti-rollover: When the vehicle is at risk of rollover, the ESC will reduce the motor torque or brake the vehicle to slow down the vehicle and prevent the vehicle from rolling over.
7.J.1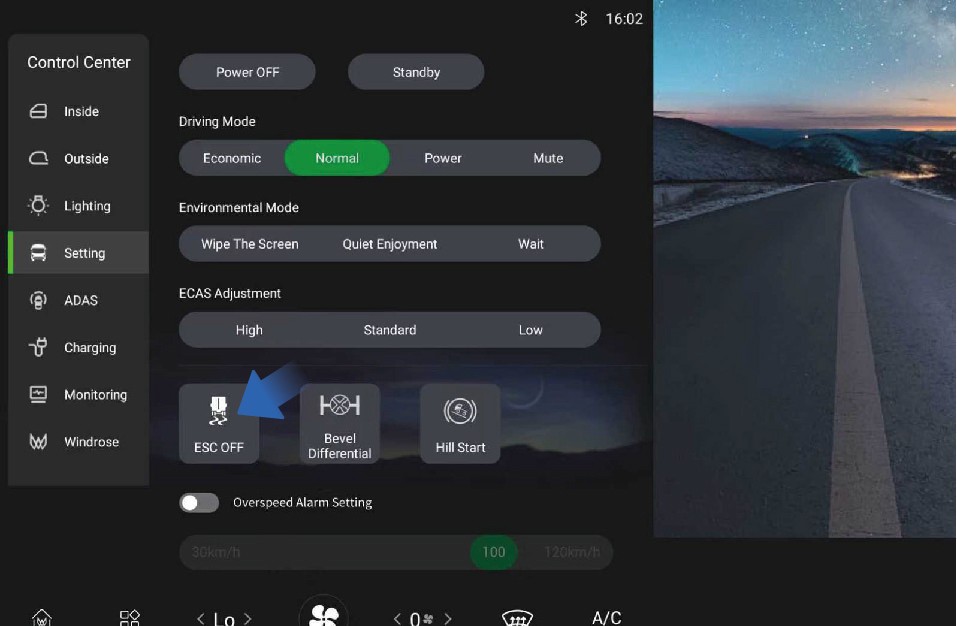 Bruksanvisning
Function introduction
Driving Assistance
The electronic stability control (ESC) is a system integrating numbers of comprehensive strategies for stability control of the vehicle. It is intended to improve the handling performance of the vehicle and prevent the vehicle from losing control when it reaches its dynamic limits. The ESC improves the safety and controllability of the vehicle.
The ESC mainly has two sub-functions:
Direction control: When the vehicle is oversteered or understeered, the ESC brakes a single wheel to correct the
↑ Til toppenYou can manually turn off the ESC by selecting "Control Center", switching to "Setting" interface, and clicking "ESC OFF" button on the vehicle information screen of the instrument panel.
After the ESC is turned off, the corresponding ESC OFF indicator will be displayed on the instrument cluster.
7.J.2Forholdsregler
MerknadWhen the ESC is faulty, the yellow ESC MIL on the instrument cluster will be illuminated. You should contact a Windrose authorised service centre as soon as possible to have the system repaired.
Merk
ESC is turned on by default when the vehicle is started. When the vehicle restarts, ESC will also be turned on automatically.
The ESC OFF switch controls activation and deactivation of both ESC and ASR. When ESC is turned off, the ASR will also be turned off.
7.KBlind spot information system (BSIS)
↑ Til toppenDriving Assistance
The BSIS system detects pedestrians and cyclists in the vehicle's blind spots. When the vehicle is stationary and detects an object entering the danger zone, the BSIS alarm screen immediately triggers an alert, with the dashboard indicator lights activating simultaneously. If the corresponding indicator is on and the vehicle is moving forward, the dashboard will sound and flash the alarm until the pedestrian completely exits the danger zone.
BSIS warning
Level 1 warning
When the vehicle's BSIS sensor detects the presence of a bicycle rider with a speed of 5-20 km/h entering its detection area, the BSIS system displays a yellow warning light on the instrument panel and BSIS alarm screen through optical signals, alerting the driver until the target leaves the alarm area.
Level 2 warning
On the basis of the first level alarm, when the vehicle is in forward gear and the indicator on the side with the target object is synchronously activated, the BSIS system displays a red warning light on the instrument panel and BSIS alarm screen through optical signals, synchronously emitting an alarm sound to inform the driver that the target has left the alarm area.
BSIS fault warning
When the system fails, a pop-up window will appear once, and the function switch in the setting interface of the IHU control screen will be tuned off and grayed out, prompting the operator that the function is unavailable.
7.K.1
Bruksanvisning
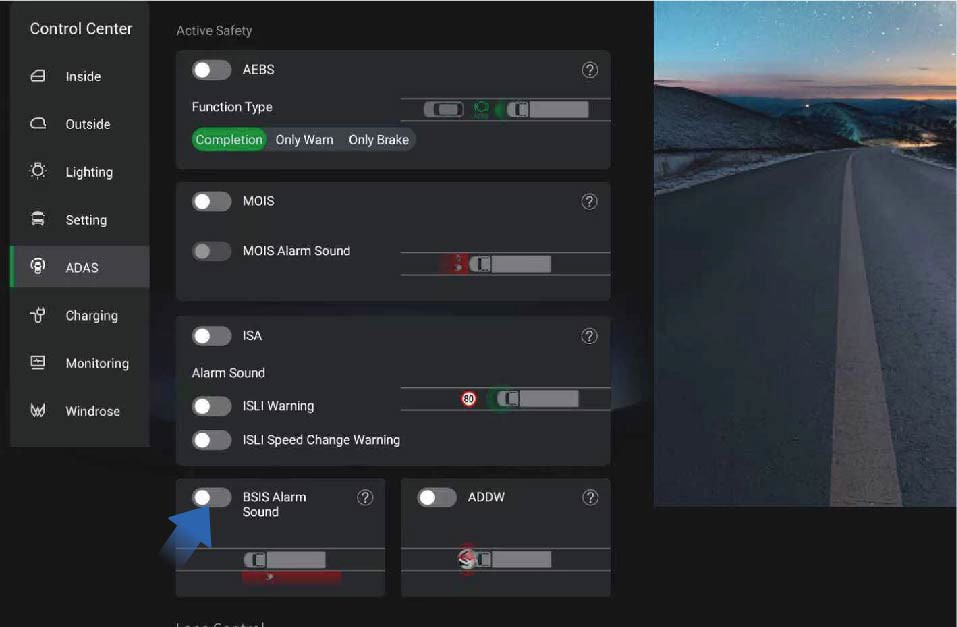
You can switch to the control centre by selecting "Control Center" from the car's infotainment screen on the right side of the dashboard. On the "ADAS" interface, click the "BSIS Alarm Sound" button to turn on/off the BSIS function alarm sound.
Limitations of BSIS
In any of the following situations, BSIS may not be able to detect targets or work well. We recommend that you do not rely too much on BSIS:
Adverse weather conditions such as snow and fog, as well as low light environments, prevent the system from detecting targets.
Changing lanes directly without turning on the indicator.
The target is relatively small or moves slowly and is in a stationary state.
The vehicle is making a sharp turn or in an open area.
When there is a system malfunction (such as camera, controller, alarm, brake, steering, etc.).
7.K.2Forholdsregler
Advarsel
BSIS is a driving assistance function, and it cannot replace your observation and judgment of traffic conditions and the driver’s responsibility for safe driving.
7.LADDW
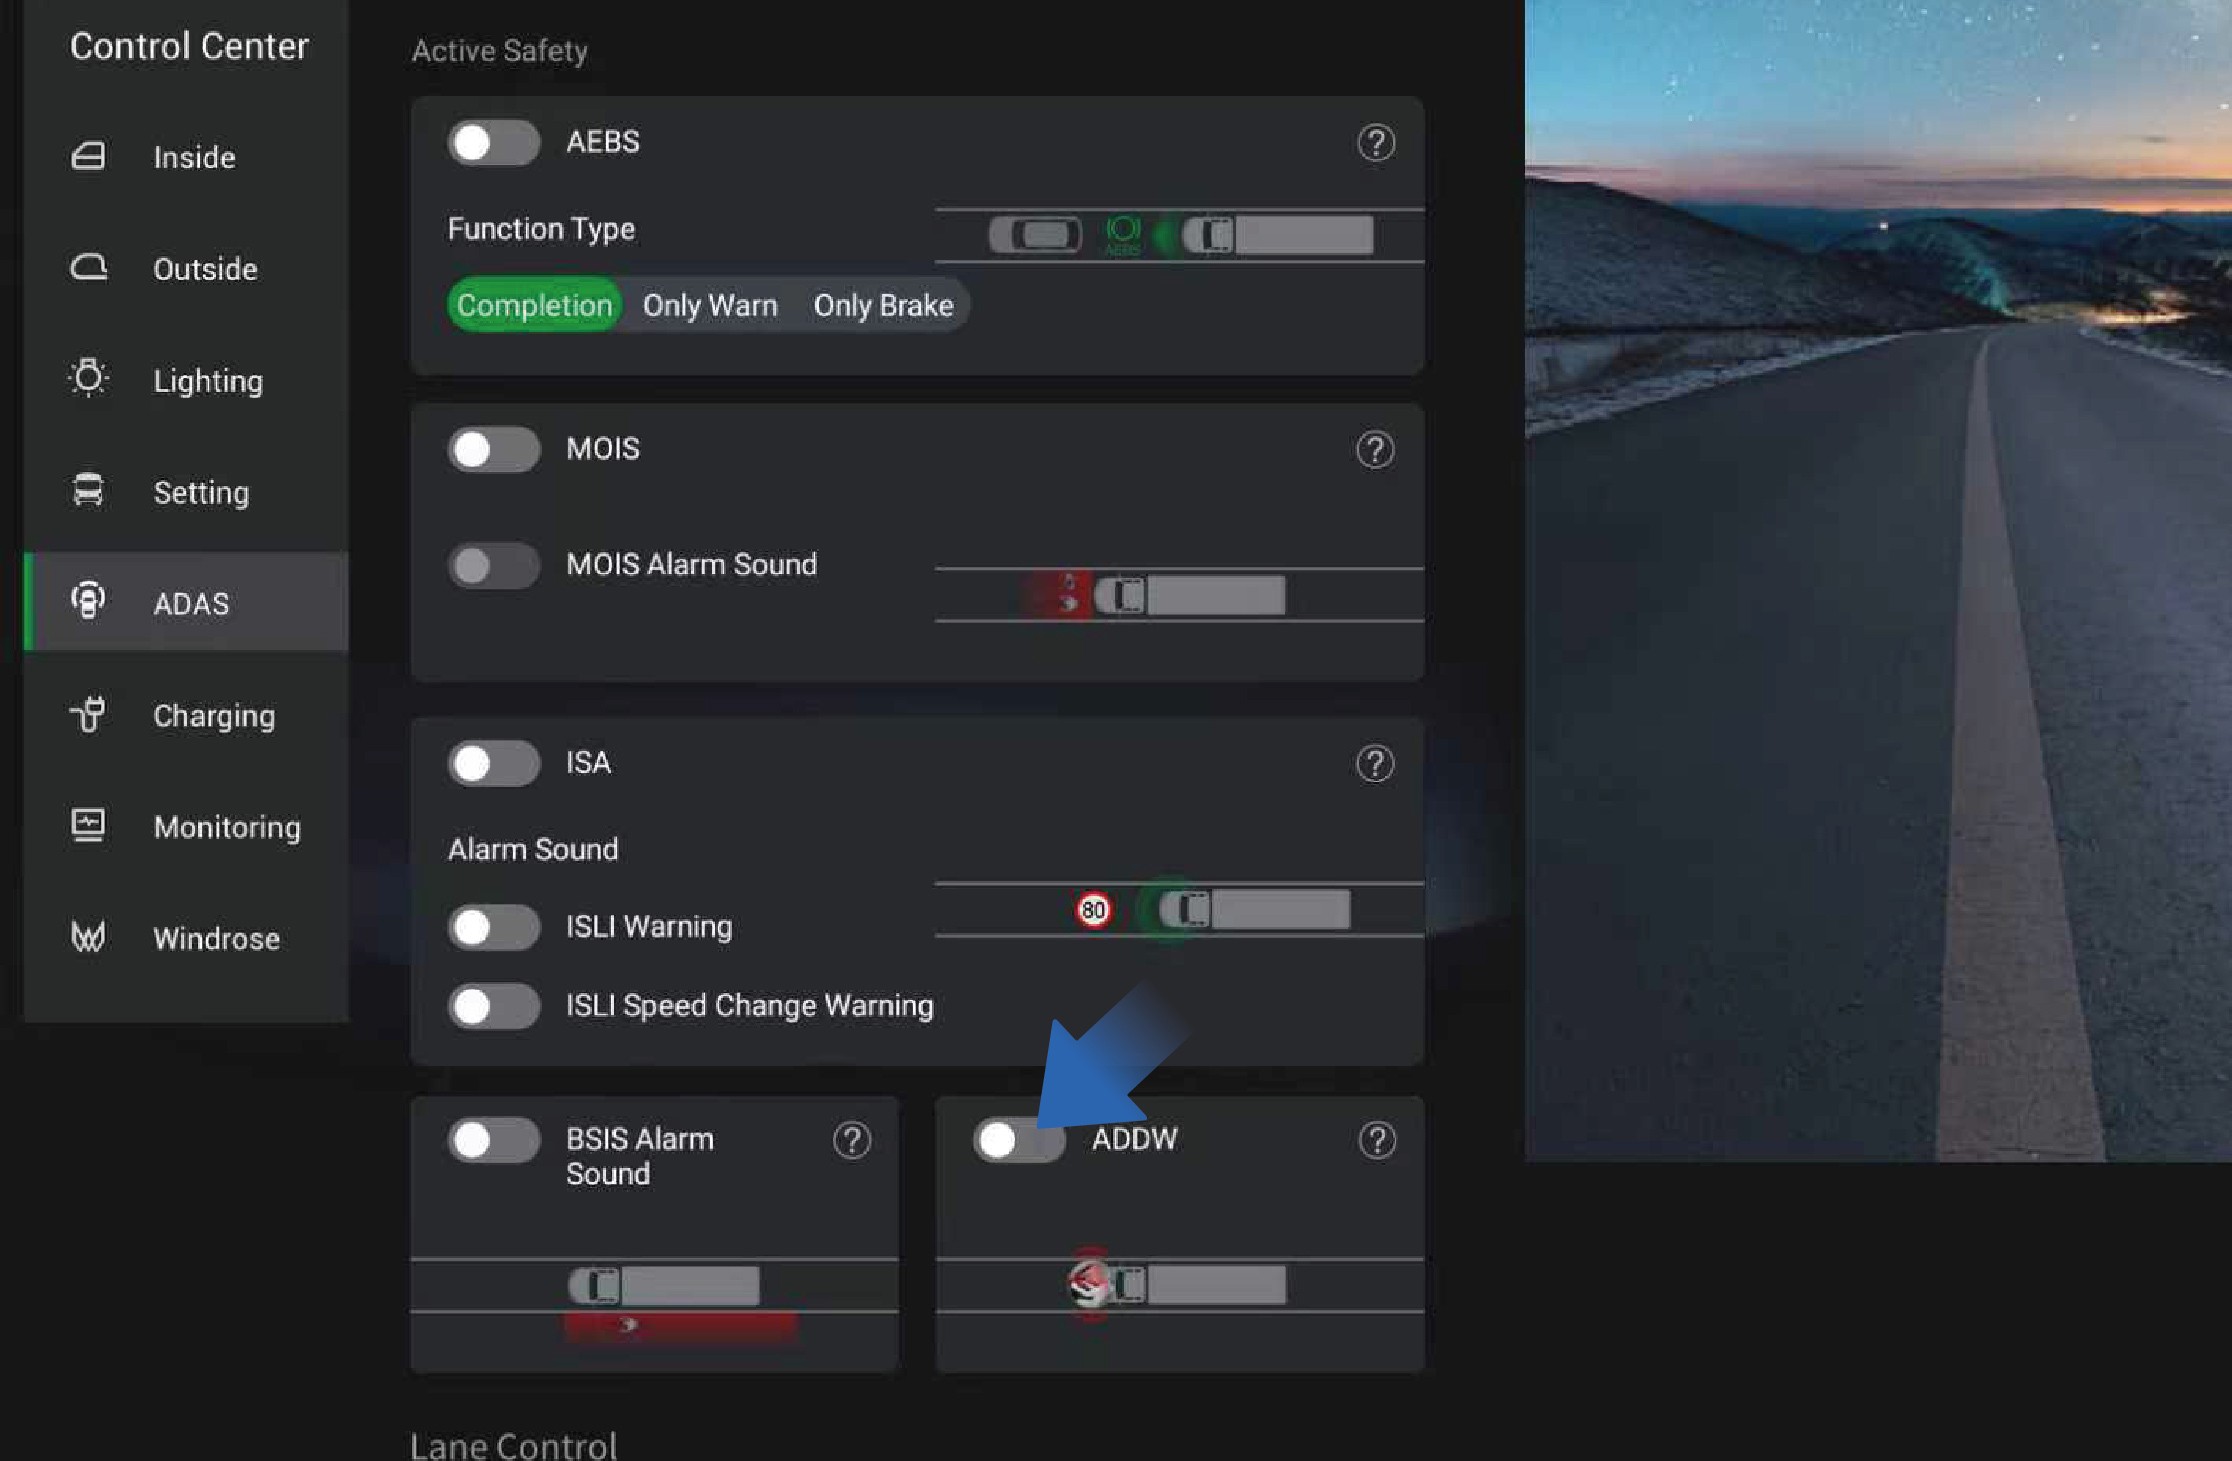
Driving Assistance
Do not rely too much on the BSIS, and it is forbidden to test the triggering of the function intentionally or wait for the function to be triggered intentionally. Due to the inherent limitations of system performance, false triggering and missed triggering cannot be completely avoided.
ADDW is the Driver Distraction Warning System, which issues a
warning when the driver is distracted; When the ADDW switch is turned off, the distraction reminder function can be turned off during the current power-on period
7.MIntelligent fartstilpasning (ISA)
↑ Til toppenFunction introduction
Driving Assistance
The ISA system combines forward facing camera recognition and offline maps to detect speed limits. When the system detects the perceived speed limit, the dashboard will display the perceived speed limit of the current road. If the vehicle speed exceeds the perceived speed displayed on the dashboard, the system will emit a flashing light signal and an audible signal warning. Releasing the accelerator or stepping on the brake can terminate the audible warning.
The ISA function can be completely turned off until it is turned on again or the vehicle is restarted.
You can switch to the control centre by selecting "Control Center" from the car's infotainment screen on the right side of the dashboard. On the "ADAS" interface, click the "ISA" button to turn on/off the ISA function.
Drivers can turn on or off the overspeed warning sound through the settings option; Drivers can set the recognition speed limit change reminder sound to be turned on or off through the settings.
Identification and detection of vehicle speed limit sign by ISA
The ISA perception system can detect and recognise speed limit signs within 50 meters ahead.
The ISA perception system can detect speed limit signs within a height of no more than 7 meters.
The ISA system can recognise speed limit signs that comply with national standards.
The ISA system can detect multiple speed limit signs within a visible range.
The ISA system is capable of detecting and identifying embedded speed limit signs.
ISA function failure
When the system detects a sensor malfunction that the system function depends on, excluding sensor obstruction, the driver should be informed of the system malfunction status through a fault signal.
When the system detects a malfunction in the associated electronic components, it should inform the driver of the system's fault status through a fault signal.
As long as there is a malfunction, it should continue to be displayed after the vehicle is powered on.
7.M.1Forholdsregler
Advarsel
The speed limit information and speed measurement information are for reference only. Please refer to the information on the actual road and drive the vehicle safely.
Affected by driving environment, the camera may send false alarms when it detects a sign similar to the speed limit sign. For this reason, the driver should not rely solely on the system for judgment at any time.
7.NHill Start Assist (HSA)
↑ Til toppenDriving Assistance
The hill start assist (HSA) helps you prevent the vehicle from moving backward when starting on a slope. The HSA will keep the vehicle stationary on a slope for a short time after the brake pedal is released.
7.N.1Bruksanvisning
↑ Til toppenYou can activate/deactivate the function by selecting "Control Center", switching to "Setting" interface, and clicking "Hill Start"
button on the vehicle information screen of the instrument panel. When the vehicle is going to start on the ramp, first depress the brake pedal, release the parking brake, and then press the HSA button in the IHU control screen to activate the HSA function. At this time, the HSA indicator on the instrument cluster will be illuminated, and the driver should start the vehicle within 3S. Before the HSA is deactivated, the HSA indicator on the instrument cluster
7.N.2
Forholdsregler
Advarsel
The HSA is not a substitute for EPB. When you are going to leave the vehicle, be sure to depress the brake pedal and enable the EPB.
If the vehicle starts to slip backward, the brake pedal should be depressed immediately. The HSA cannot prevent the vehicle from rolling backwards on a steep slope under full load or on special roads.
It is forbidden to depress the brake pedal and the accelerator pedal simultaneously when starting on a slope.
Merk
It is recommended to turn off the HSA immediately after the vehicle starts; If continuous start is required, turn off the HSA after continuous hill start is completed.
It is recommended to turn off the HSA when driving on level roads.
The HSA is turned off by default when the vehicle is started.
↑ Til toppenwill flash rapidly.
7.ONødsikkerhetsanordning for dekk (TESD)
Driving Assistance
When replacing tyres, the operator need to remove the tyre emergency safety device first, next remove the tyre, install the new tyre, and then refit the tyre emergency safety device.
7.O.1Funksjonsbeskrivelse
↑ Til toppenThe tyre emergency safety device is a passive safety device that can effectively prevent the wheel hub from contacting the ground at the moment of a tyre blowout, so that the steering force and braking force of the vehicle can still be controlled to ensure the safety of personnel and vehicles at the first time.
7.O.2Forholdsregler
Merk
When the removed tyre emergency safety device is refitted, it is necessary to check whether the device is damaged. Only when it is confirmed that there is no damage can the device be used again, but the bolts and nuts must be replaced with new ones. If damaged, a new tyre emergency safety device needs to be installed.
7.PElektrohydraulisk servostyring (EHPS)
↑ Til toppenDriving Assistance
7.P.1Funksjonsbeskrivelse
The electro-hydraulic power steering (EHPS) realizes steering assistance and intelligent driving assistance by controlling the hydraulic power output of power motor.
For steering, the system will provide steering assistance to enhance the controllability and stability of the vehicle and make steering easier.
Active steering alignment
After steering, the EHPS will calculate the angle and speed of active steering alignment according to the steering angle and the vehicle speed at that time, to realize the active alignment of steering wheel.
Speed-dependent power assist
When the vehicle turns at high speed, the opposite direction force is appropriately increased linearly; When the vehicle turns at low speed, the same direction force is appropriately increased linearly to adjust your steering feel and provide speed-dependent assistance.
Hands-off detection (HOD)
↑ Til toppenThe EHPS system can determine whether you have taken your hands off the steering wheel based on the steering wheel torque.
7.P.2Forholdsregler
Advarsel
When the EHPS system fails, contact a Windrose authorised service centre in time to check and repair the system.
EHPS is only a driver assistance function and cannot replace your steering wheel control. During driving, you are always responsible for controlling the steering wheel to steer.
7.QElectronic-Controlled Air Suspension (ECAS)
↑ Til toppenDriving Assistance
7.P.3Funksjonsbeskrivelse
The electronically controlled air suspension (ECAS) drives the solenoid valve in the control mechanism by collecting the height of the frame and the axle, airbag pressure, vehicle speed signal, braking signal and operation switch signal, to realize the inflation and deflation of the airbag, thereby achieving the raising and lowering of the suspension.
Instructions for operation of remote control The remote control is indispensable to ECAS on the truck. It integrates commonly used raising and lowering buttons of ECAS
for manual raising and lowering of the front and rear axles,
restoration of normal height, and memory height control.
The remote control is fixed in the storage cabinet under the right instrument panel and it can be taken out for use.
The remote control button is a self-resetting, inching button, and when using the button, you should select the target position (front/ rear axle), then the corresponding indicator will be illuminated, and the target airbag will be lifted and lowered.
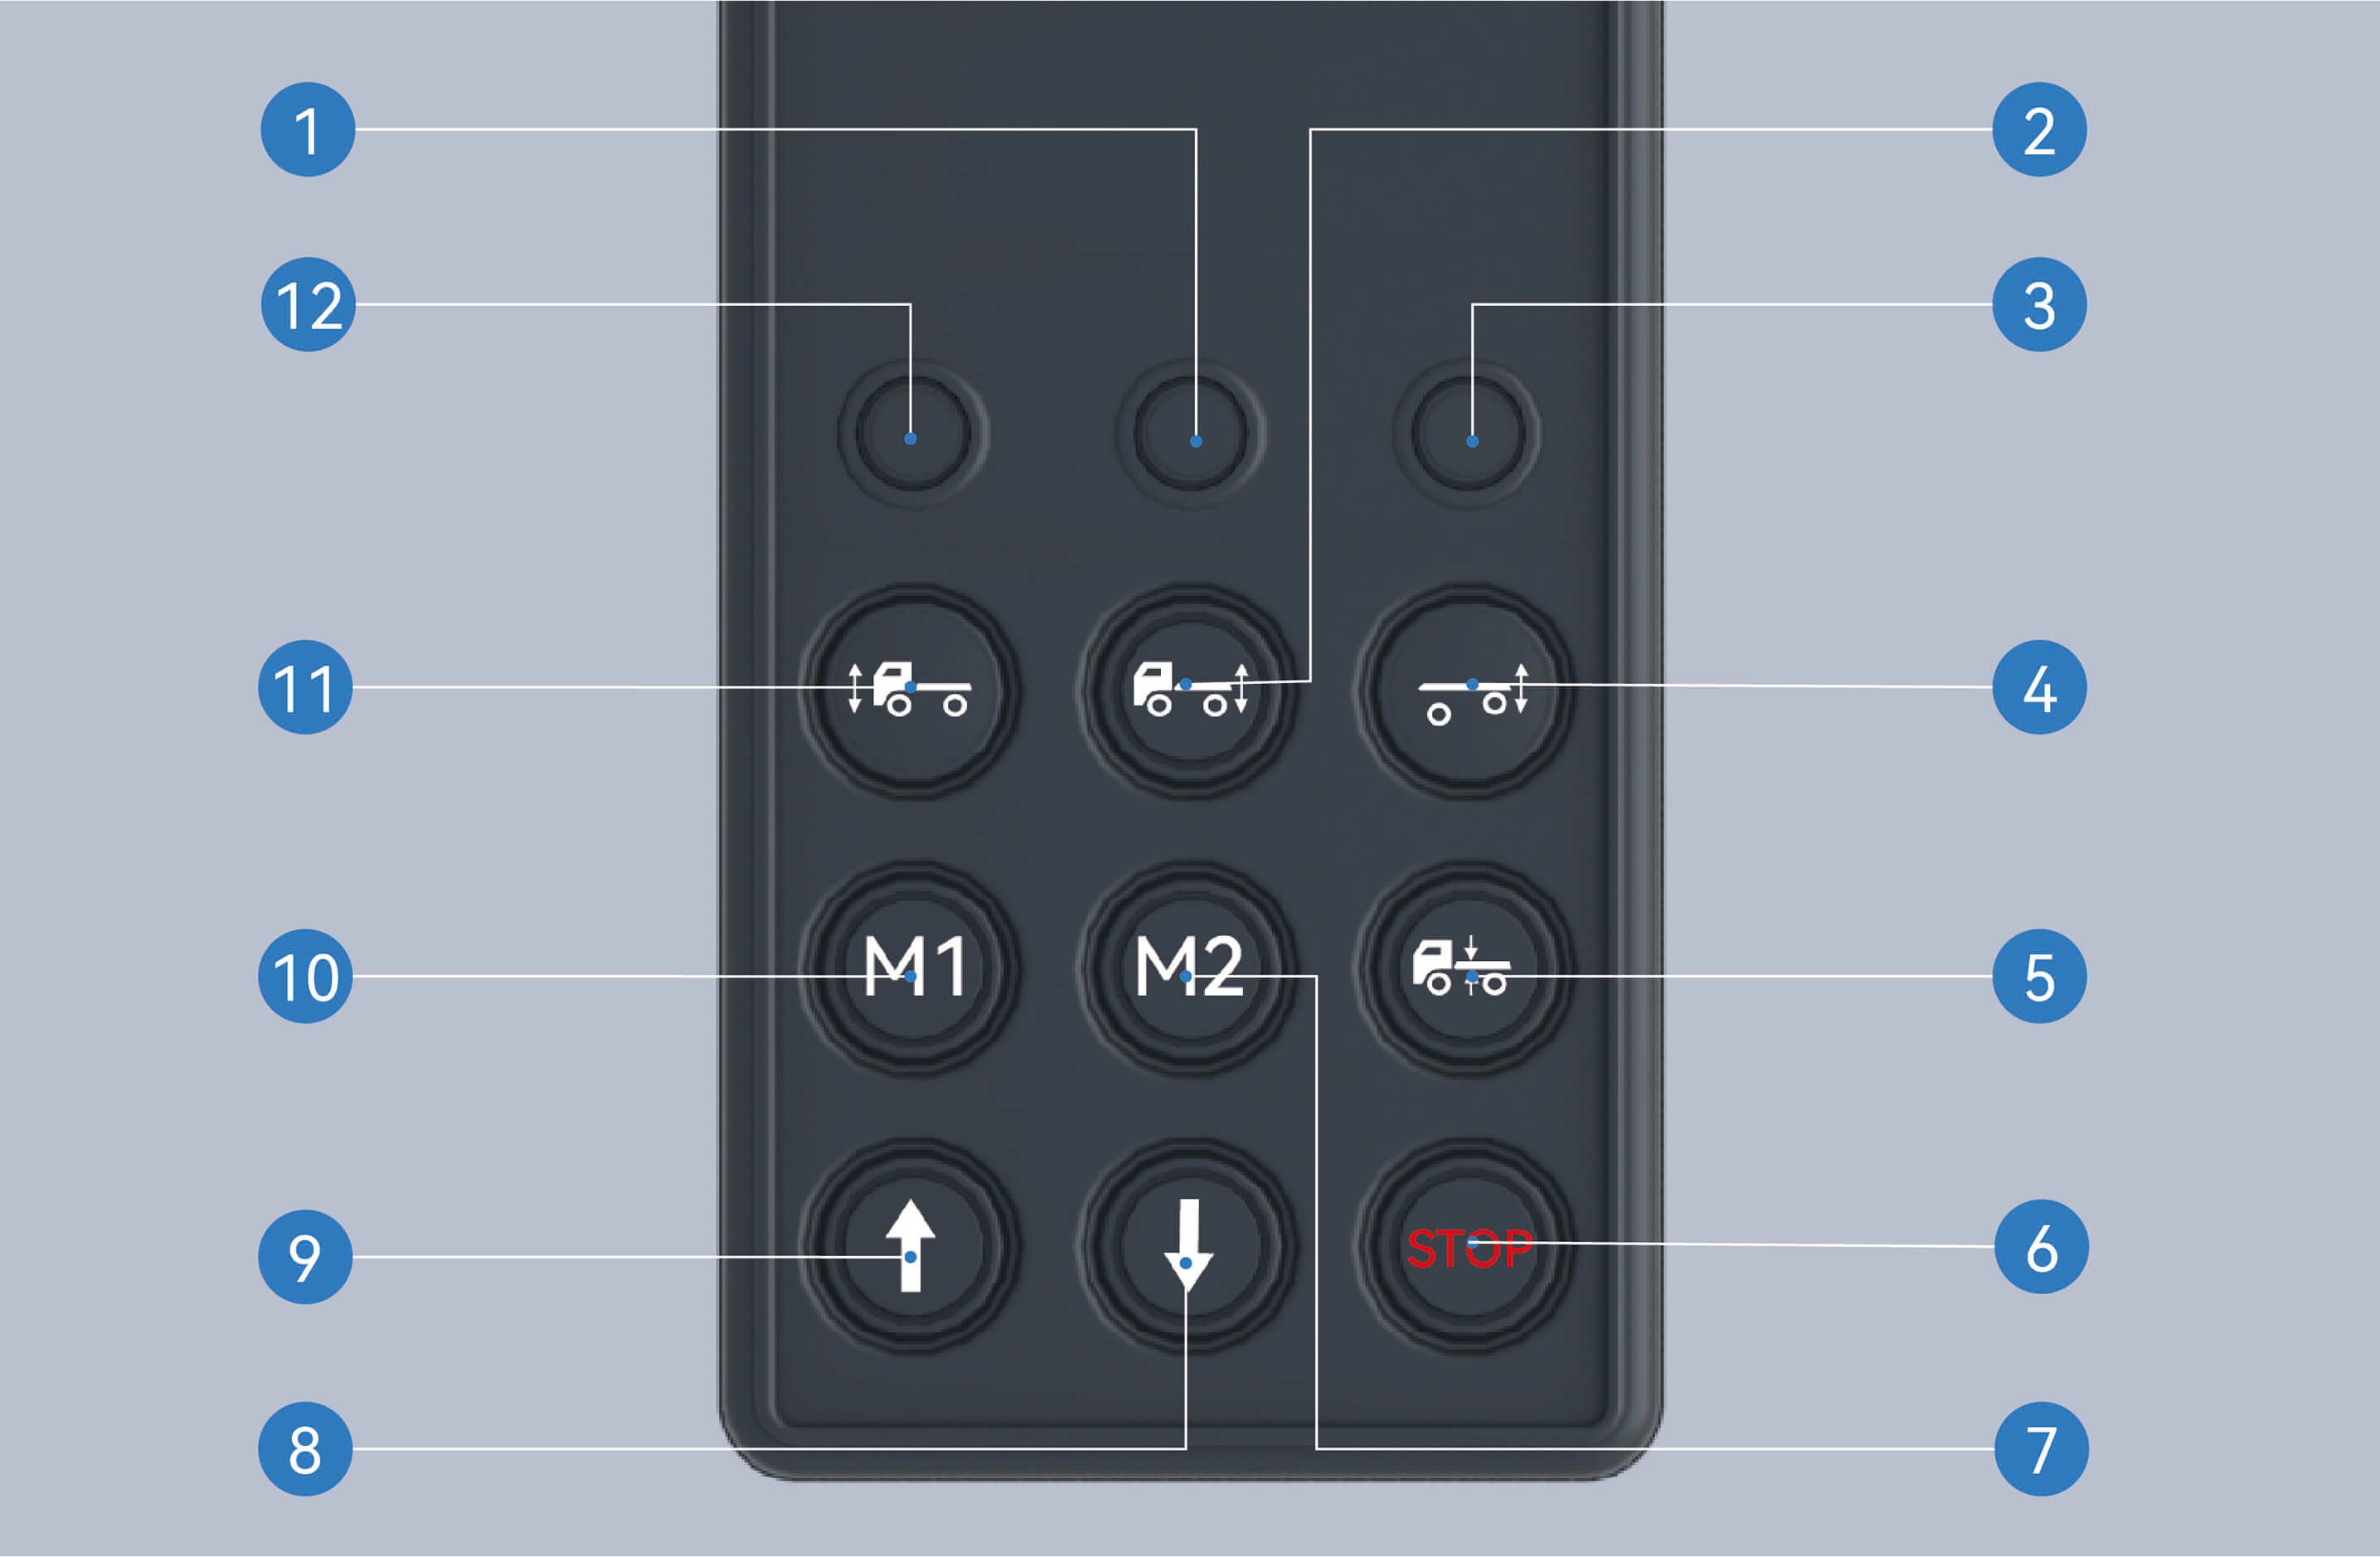
Rear axle indicator
When the rear axle is selected, the rear axle indicator will be illuminated and you can operate the rear axle.
Rear axle selection button
After pressing this button and selecting the rear axle, the rear axle indicator will be illuminated.
Lifting axle indicator
When the lifting axle is selected, the lifting axle indicator will be illuminated and you can operate the lifting axle.
Lifting axle selection button
After pressing this button and selecting the lifting axle, the lifting axle indicator will be illuminated.
Reset button
When selecting the axle, the indicator will be illuminated. When you press the button at this time, the selected axle will return to normal height.
Stop button
After pressing this button, any raising and lowering of the vehicle that is in progress will be stopped.
Memory height M2
Activation of memory height M2: After selecting the front/ rear axle, press this button to automatically adjust the current axle height to memory height M2.
Storage of memory height M2: Select the front/rear axle, adjust the axle position to the height to be memorized, press and hold the stop button without releasing it, press this button simultaneously, hold it and release after 2 seconds.
Lowering button
Press this button to lower the axle.
Raising button
Press this button to raise the axle.
Memory height M1
Activation of memory height M1: After selecting the front/ rear axle, press this button to automatically adjust the current axle height to memory height M1.
Storage of memory height M1: Select the front/rear axle, adjust the axle position to the height to be memorized, press and hold the stop button without releasing it, press this button simultaneously, hold it and release after 2 seconds.
Front axle selection button
After pressing this button and selecting the front axle, the front axle indicator will be illuminated.
Front axle indicator
When the front axle is selected, the front axle indicator will be illuminated and you can operate the front axle.
7.P.4Instructions for operation of vehicle information screen
You can select the appropriate driving height by selecting "Control Center", switching to "Setting" interface, and clicking "ECAS Adjustment" button on the vehicle information screen of the instrument panel.
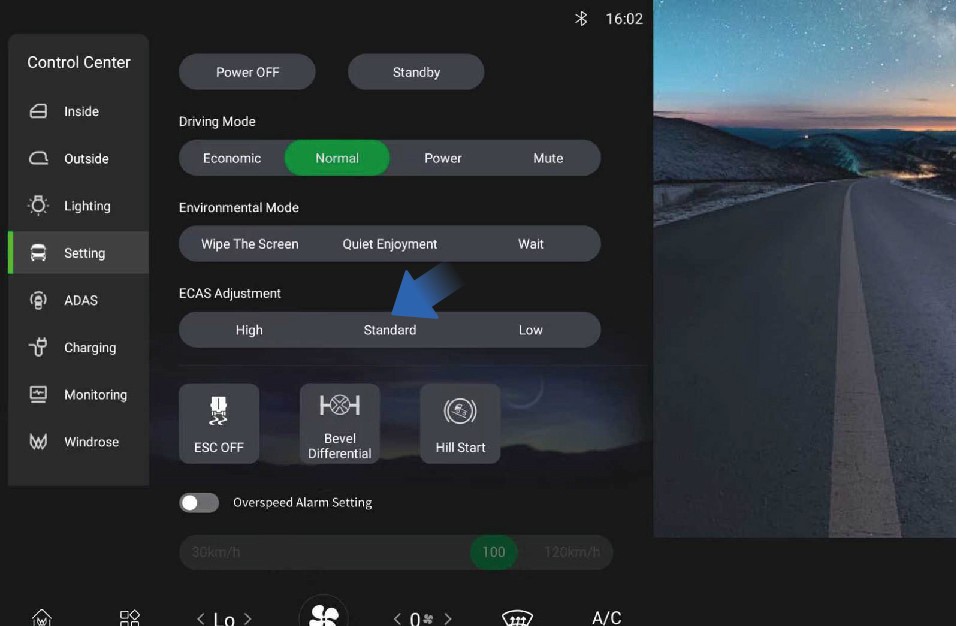
High
When driving on bumpy roads or wading roads, you can select a larger driving height to prevent the wheel from jumping and contacting the frame, etc.
The height of the high-level airbag is increased by 50 mm relative to the standard height.
Standard
The standard height controlled by the vehicle information screen and the standard height controlled by the remote control are the same.
If the airbag is not in the standard position, the non-normal height warning icon will be illuminated on the instrument cluster.
Low
At high speeds, a smaller driving height can be selected to improve the ride comfort of the vehicle and reduce energy consumption to a certain extent.
The height of the low-level airbag is reduced by 35 mm compared to the standard height.
7.P.5Forholdsregler
AdvarselWhen the ECAS is faulty, the red ECAS MIL on the instrument cluster will be illuminated. You should contact a Windrose
authorised service centre as soon as possible for inspection and repair of the system.
Merknad
The airbag cannot be raised or lowered when the pressure in the air reservoir is insufficient.
When the vehicle speed exceeds 10 km/h, the manual button control function of ECAS will be disabled.
When the vehicle is just powered on, if the airbag is not in the normal position, ECAS will automatically return to and maintain at the standard height immediately.
If the airbag is not in the normal position, when the vehicle accelerates from standstill state to above 10 km/h, it will automatically return to the standard height and maintain at the normal height.
The front/rear airbag can be raised by up to 85 mm and lowered by up to 50 mm.
If the airbag is not at the standard position, the non-normal height warning icon will be illuminated on the instrument cluster.
Merk
- The vehicle can be driven for a long time at the height you have selected on the vehicle information screen.
7.RDekktrykkovervåkingssystem (TPMS)
Driving Assistance
↑ Til toppen7.R.1Funksjonsbeskrivelse
↑ Til toppenThis vehicle is equipped with a tyre pressure monitoring system (TPMS), which allows you to check the tyre pressure status of the vehicle at any time.
7.R.2Bruksanvisning
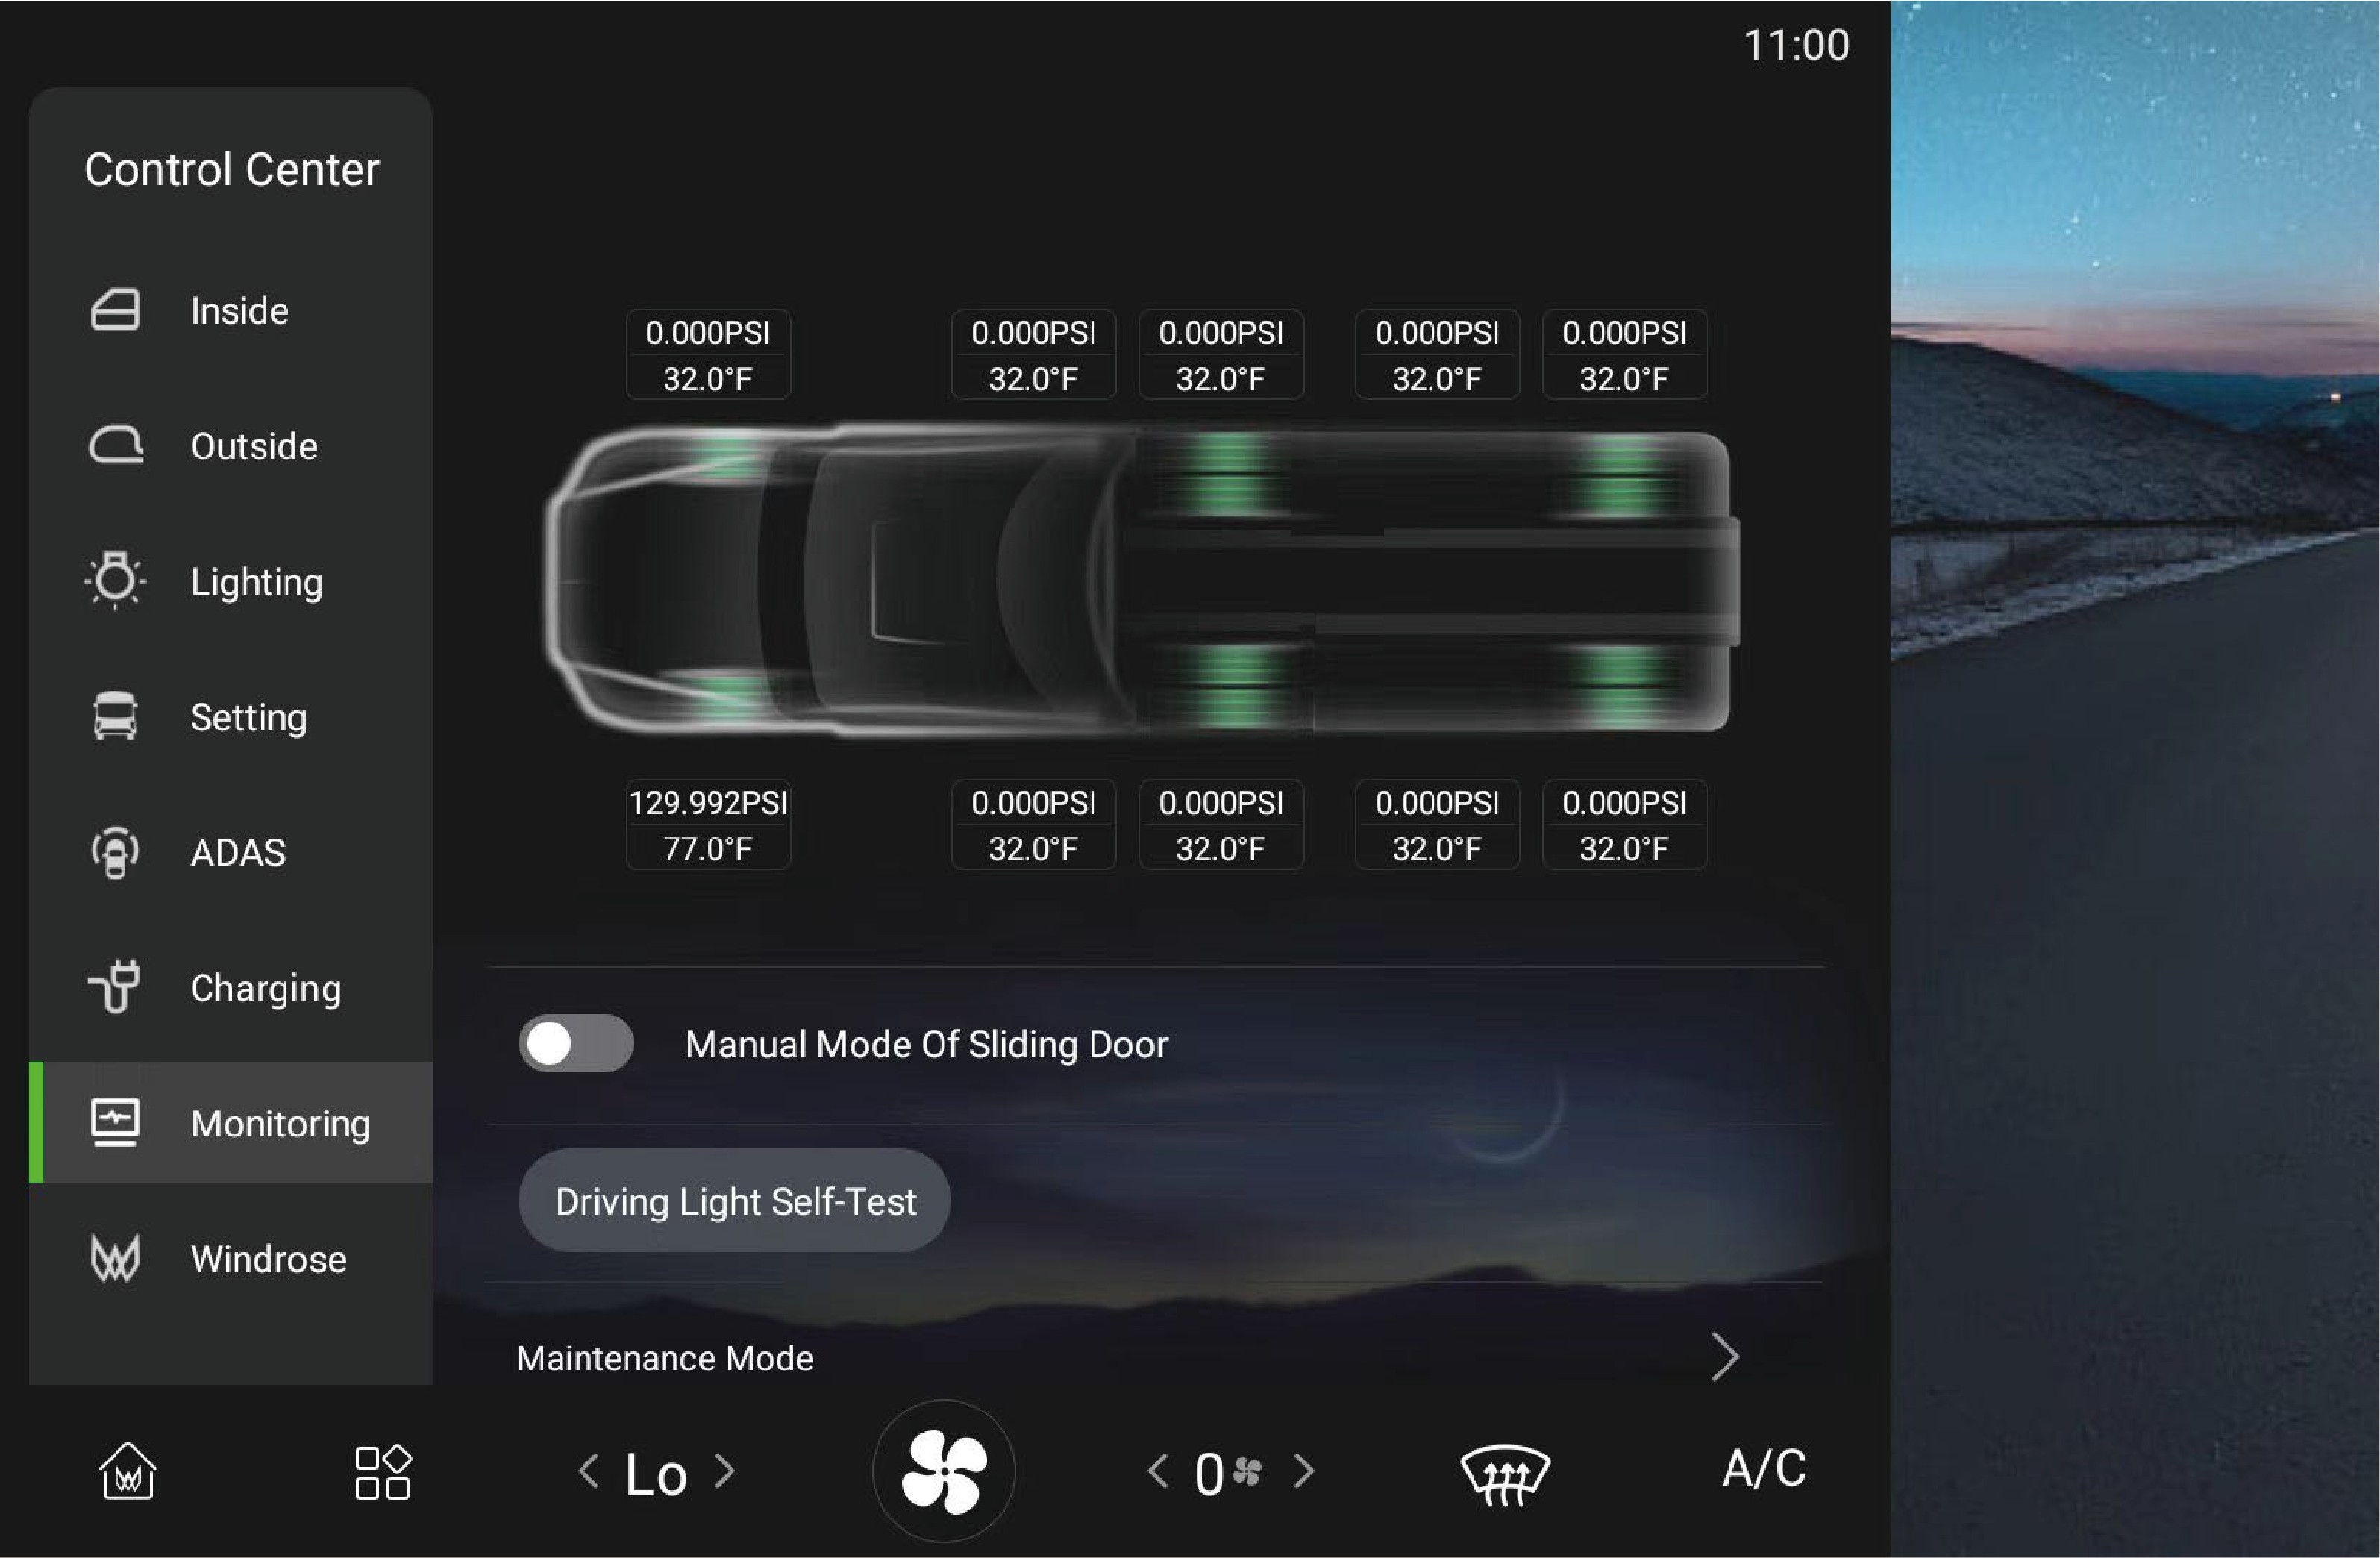
↑ Til toppenYou can check the current tyre pressure and temperature monitored by TPMS by selecting "Control Center" and switching to "Monitoring" interface on the vehicle information screen of the instrument panel. If the current tyre pressure and temperature cannot be displayed, contact a Windrose authorised service centre.
If the pressure or temperature of one or more tyres is abnormal, the sensor is lost, or the tyre is leaking rapidly, the tyre pressure warning lamp will be illuminated on the instrument cluster, and a pop-up window will appear to describe the cause of the fault and the location of the faulty tyre, accompanied by a period of "beeping" sound to prompt you to stop as soon as possible, check the tyres, and contact a Windrose authorised service centre for checking and repair of the system.
7.R.3Forholdsregler
↑ Til toppenMerkThe TPMS is based on tyre temperature and atmospheric temperature. In the areas with high altitude or low temperature, it may be necessary to inflate the tyres to a slightly higher pressure to clear the low tyre pressure alarm.
7.SOversikt over multimedia
Multimedia System
You can click here to turn off the in-vehicle infotainment screen.
Application Centre
You can click here to view or use related applications.
Radio
You can click here to switch to the radio interface and listen to local radio stations.
Local music
You can view or play music files stored in the IHU system here.
Home page
You can click here to return to the home page.
Music player
You can pause and switch music here.
Mobile phone interconnection
You can click here to connect your phone to the IHU.
Bluetooth-telefon
After the on-board Bluetooth is connected to the phone, you can use it to answer/make calls in the vehicle.
In-vehicle infotainment screen switch
7.S.1Funksjonsbeskrivelse
Multimedia System
cleaning, just press and hold the vehicle information screen for a while to illuminate the screen.
Quiet enjoyment: After clicking "Quiet Enjoyment", you can
↑ Til toppenThe vehicle information screen is equipped with three environment
modes to choose from, depending on your usage.
7.S.2Bruksanvisning
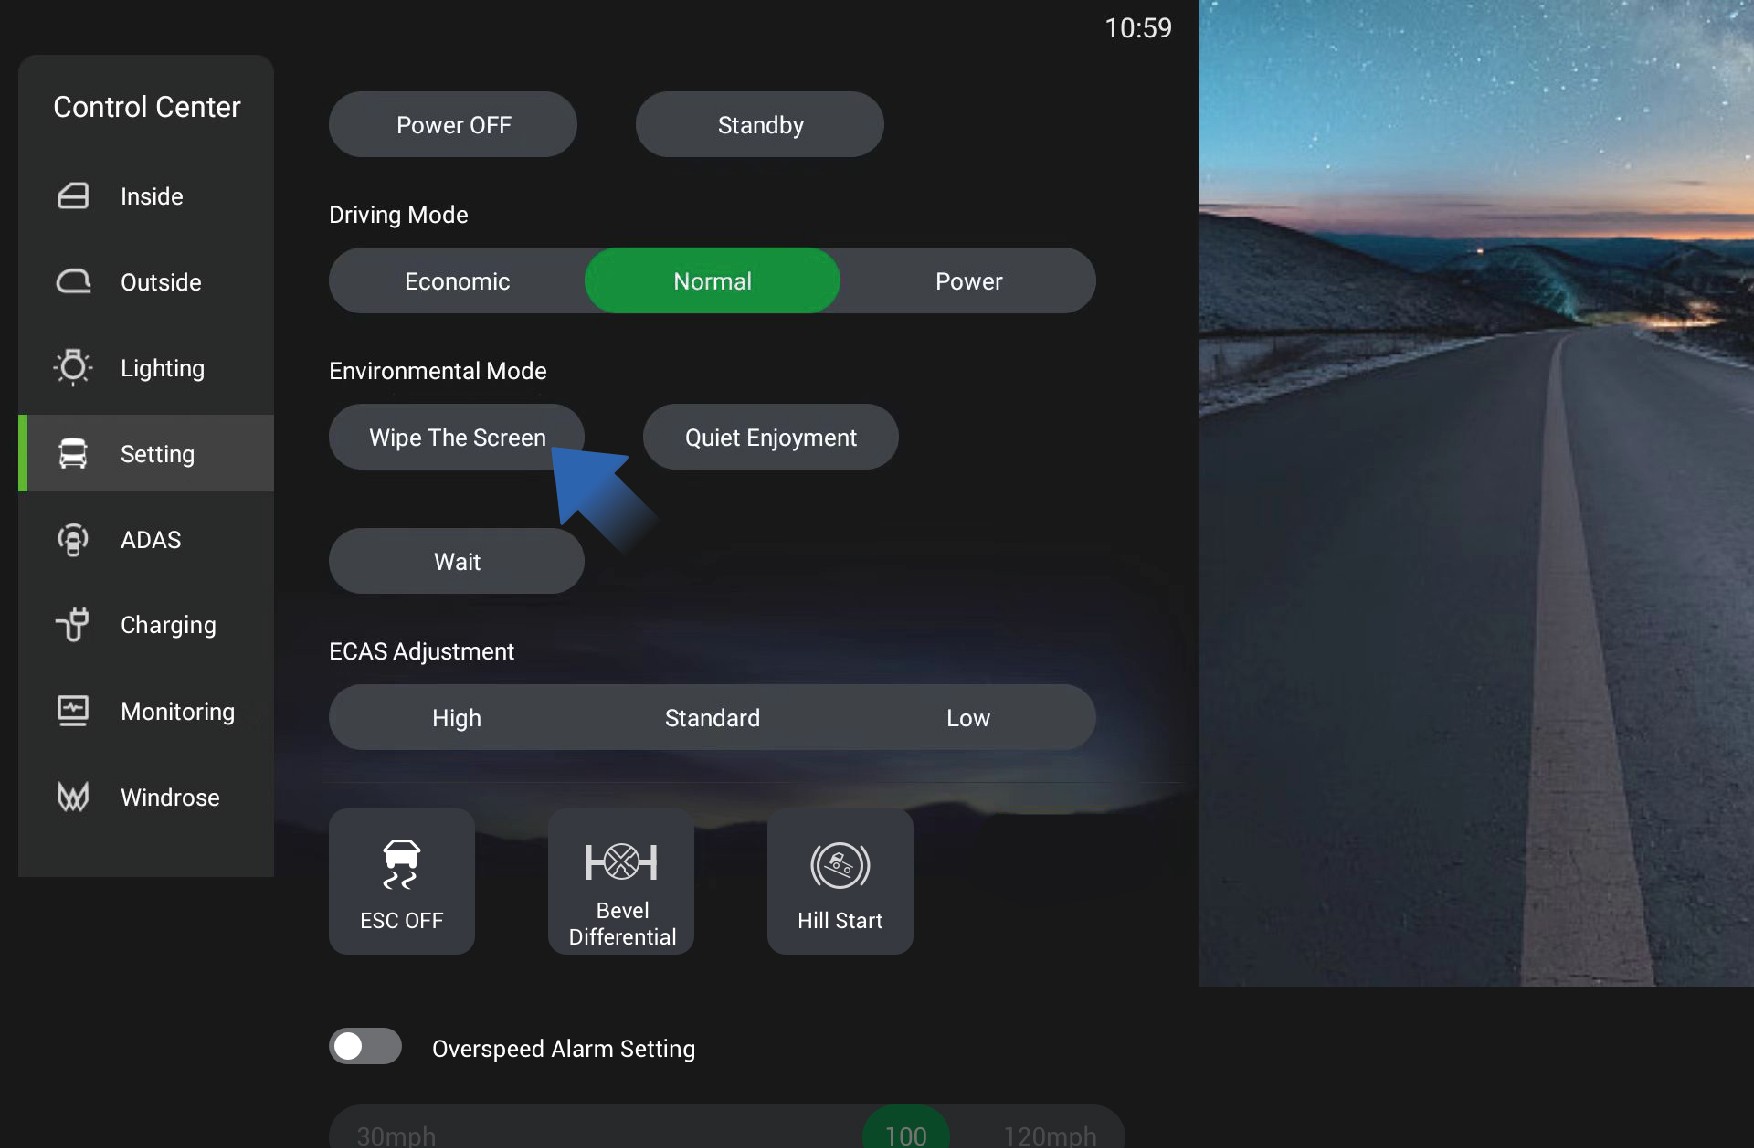
You can click "Setting" in the system settings interface on the vehicle information screen to select the environment mode:
Screen cleaning: After clicking "Wipe The Screen", the vehicle information screen will immediately go black to facilitate the
choose and play the desired ambient sound, and the vehicle information screen will immediately go black. When you need to illuminate the screen, just double-click the vehicle information screen.
Wait: After clicking "Wait", the vehicle information screen will immediately go black. When you need to illuminate the screen, just double-click the vehicle information screen.
7.TFørerens verktøy
Emergency Handling
weather, the sign must be positioned 200 meters away from the vehicle.
This vehicle is equipped with driver's tools when it leaves the factory. The driver's tools are stored in the tool box on the left side of the vehicle for emergency use in specific situations, including:
Towing hook
Warning triangle
7.USafety Hammer
↑ Til toppen
Emergency Handling
7.T.1Towing hook
When towing this vehicle, you need to install the towing hook in place first and ensure the stability of the vehicle on the towing vehicle.
7.T.2Triangular Warning Sign
When an emergency renders the vehicle immobile, turn on the hazard warning lights first, then place the triangular warning sign at a sufficient distance from the rear of the vehicle. The required placement distance of the sign varies depending on the environment and road type. On regular roads, it should be placed 50 to 100 meters away from the vehicle; on expressways, the distance should be 150 meters; and in rainy, foggy or snowy
In the event of an emergency or disaster, the doors may not be
able to open, including but not limited to the following situations:
Vehicle fire
When a vehicle catches fire, the fire may cause the doors to deform and fail to open.
Vehicle falling into water
When a vehicle accidentally falls into water, the doors will be difficult to open due to the pressure difference between the inside and outside.
Traffic accident
↑ Til toppenIn a major traffic accident, the collision may cause the doors to deform and fail to open.
In this case, you can use the safety hammer equipped with this
vehicle to break the window and escape.
7.T.3Bruksanvisning
1. Take out the safety hammer
The safety hammer is located on the right side of the electric sliding door and can be directly removed for use.
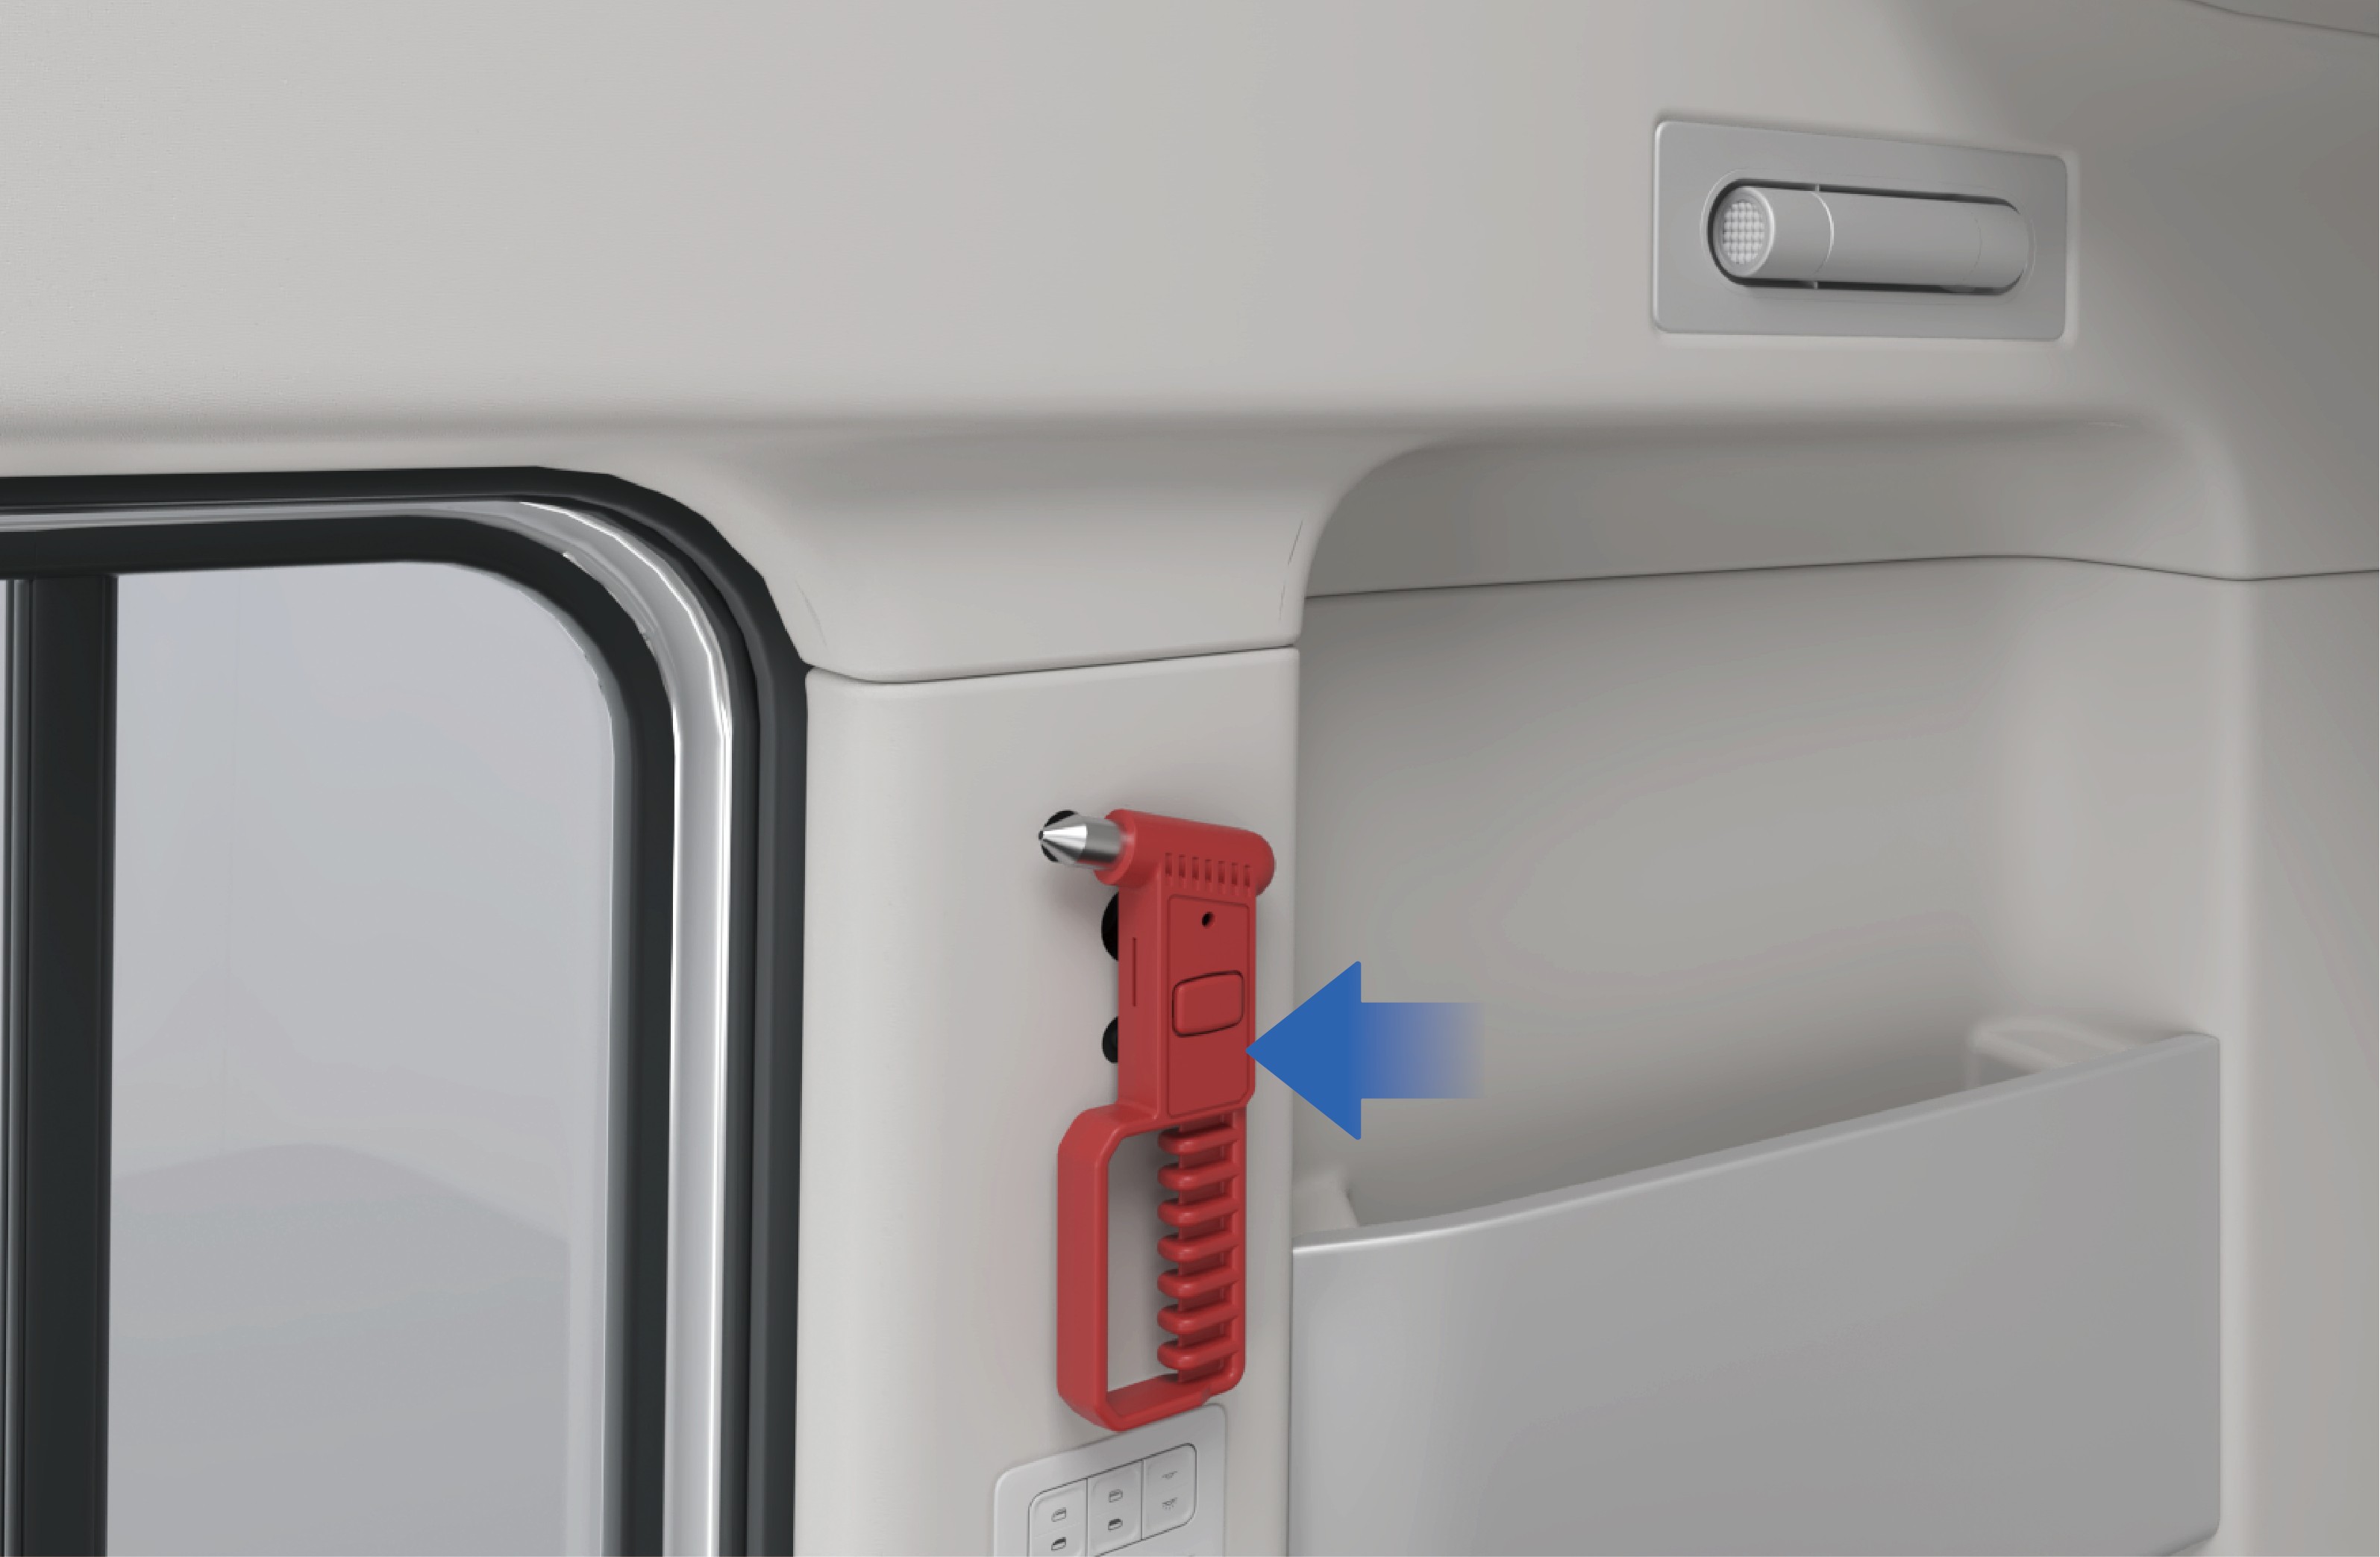
Break the window
Aim the sharp end of the safety hammer at the four corners or edges of the window, and strike hard until the window is broken.
Escape from the vehicle
↑ Til toppenEscape from the inside of the vehicle and stay away from the vehicle in a safe place. Call the police and wait for rescue.
7.T.4Forholdsregler
Advarsel
The corners and edges of tempered glass are relatively weak, making it easier to break for evacuation.
Glass may not immediately come off after being shattered due to film or other reasons. In this case, the glass can be forcefully impacted to come off.
Regularly check the safety hammer to ensure that it is in good working condition.
8.ABrannslukker
↑ Til toppenEmergency Handling
8.BTowing a Trailer
8.A.1Vehicle Recovery and Towing
↑ Til toppenEmergency Handling
When the vehicle cannot be driven due to breakdown or accident, contact a Windrose authorised service centre immediately for professional recovery and towing service. Do not attempt to tow the vehicle without following proper procedures. Incorrect towing may cause serious vehicle damage, loss of braking, or a road traffic incident.
MerknadBefore towing, verify that the vehicle has adequate brake air pressure. If brake pressure is insufficient, the rear axle spring brake actuators must be released mechanically or pneumatically to prevent the brakes from locking.
The fire extinguisher is placed at the lower left of the sleeper, which can be used to suppress a fire in an emergency.
AdvarselIn an emergency, please extinguish the fire and contact the fire department for disposal only if it is safe to do so.
8.A.2
Towing
When your vehicle needs to be towed out of trouble, follow the steps below:
Take out the towing hook from the tool box on the left side of the vehicle.
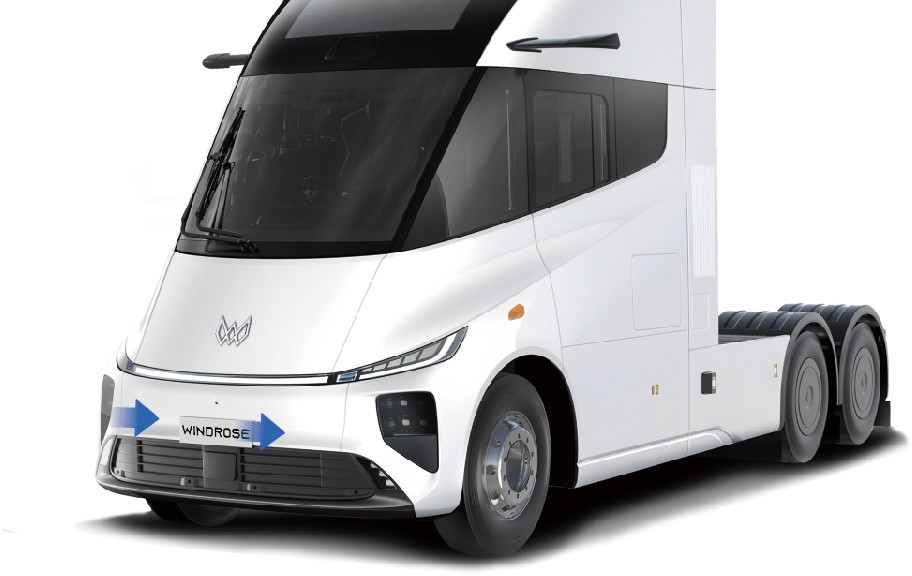
Open the cover plate of the towing hook mounting holes, which are located on the front left and right sides of the vehicle.
Screw the towing hook into left or right towing hook mounting hole according to the actual conditions, and make sure that the hook is completely screwed in without shaking. If there are impurities or oil stains in the towing hook thread, please clean it before screwing in the towing hook. Before installing the towing hook, make sure that the vehicle is stationary.
Connect the towing device on the towing vehicle to the towing
hook.
Keep the vehicle powered on to ensure that the steering and braking systems can operate normally.
Turn on the hazard warning lamps.
Start the towing vehicle to help the faulty vehicle get out of trouble.
AdvarselThe original towing hook is made of special materials and has high strength. If you use a towing hook that is not factory-fitted, the towing hook may be broken. If you need to buy a new towing hook, contact a Windrose authorised service centre.
Merknad
If this vehicle is connected to a trailer, disconnect the trailer before towing.
If this vehicle is stuck in mud or soft dirt, do not suddenly tow the vehicle outward. Also avoid oblique or lateral traction to prevent the vehicle chassis form damage.
When starting the towing vehicle, pay attention to controlling the vehicle speed and avoiding towing the faulty vehicle too fast or too hard to prevent vehicle form damage and endangering other road users.
When towing this vehicle, the towing vehicle speed must not exceed 15 km/h to avoid damage to the vehicle drive motor.
When arriving at the destination, be sure to slow down and stop towing the vehicle. After completing the towing operations, please clean up the site in time, remove the towing hook and put it back in place, and close the towing hook protective cover.
The towing hook can be used to get the vehicle out of trouble, and do not tow the vehicle for long distances.
Towing is allowed only when there is no safety risk to the vehicle. In case the battery pack is deformed, leaks, smokes, etc., you should eliminate safety risks immediately.
8.CBremssvikt
Emergency Handling
↑ Til toppen8.C.1Emergency operation
If the brake fails suddenly while driving, please turn on the hazard warning lamps immediately, hold the steering wheel firmly, and pay attention to avoid and alert passing vehicles by visual and acoustic alarms.
Slowly turn on the electronic parking brake, observe the driving conditions and use ramps or the runaway truck lane to assist parking if necessary.
For special road conditions such as winding mountain roads, bridges, cliffs, etc., you should also hold the steering wheel firmly to avoid getting into a dangerous situation such as falling off.
8.C.2Follow-up procedures
↑ Til toppenAfter parking the vehicle, place warning signs around the vehicle and block the wheels with wedges to prevent the vehicle from slipping, and contact a Windrose authorised service centre for inspection and repair of the vehicle.
8.C.3Prevention measures
Regularly maintain the brake system.
Check the free travel of brake pedal regularly.
↑ Til toppenMerkIt is strictly forbidden to immediately apply emergency brakes when the brakes fail, otherwise it may cause the vehicle slipping and even roll-over.
8.DStyring ute av kontroll eller styringssvikt
↑ Til toppenEmergency Handling
8.D.1Emergency operation
When you lose control of steering wheel suddenly while driving on common roads (straight driving), release the accelerator pedal first, turn on the hazard warning lamps as soon as possible, and depress the brake pedal evenly.
Before driving, check whether the steering wheel rotation meets the standard requirements.
Before driving, check whether the steering pitman arm, ball joint, tie rod, etc. are loose.
When braking, try to avoid wheel locking.
MerknadDo not perform emergency braking immediately when you lose control of steering wheel suddenly on common roads, otherwise it will cause the vehicle slipping and even roll-over.
When you lose control of steering wheel suddenly while driving
↑ Til toppenon special roads (curves, mountain roads), release the accelerator pedal should be released immediately, apply the
brakes quickly to stop the vehicle in time to prevent the vehicle from running off the road or colliding with other vehicles.
Follow-up procedures
8.ETyre Burst
↑ Til toppen
8.D.2Emergency operation
Emergency Handling
After parking the vehicle, place the warning signs around the
vehicle and block the wheels with wedges to prevent the vehicle from slipping, and call the Windrose service hotline.
8.D.3Prevention measures
Regularly maintain the steering system.
In the case of tyre blowout, follow the steps below:
Hold the steering wheel firmly with both hands, control the driving direction, and turn on the hazard warning lamps.
Release the accelerator pedal completely, repeatedly and
lightly depress the brake pedal, and try to control the vehicle to drive in a straight line.
After slowing down, make sure that there are no vehicles or pedestrians behind and on the right side of the vehicle, and slowly pull over to the side of the road.
8.FVehicle Sideslip
↑ Til toppen
8.D.4Emergency operation
Emergency Handling
8.D.5Follow-up procedures
After parking the vehicle, place the warning signs around the vehicle and block the wheels with wedges to prevent the vehicle from slipping.
After the vehicle stops completely, contact a towing truck for rescue.
8.D.6Prevention measures
Before driving, check the tyre tread and tyre pressure for bulges, cracks, cuts, nails, and abnormal tread wear.
Merknad
In the case of tyre blowout, do not turn the steering wheel sharply, otherwise, vehicle drifting will occur.
Besides, it is forbidden to perform emergency braking operations or brake hardly (especially on highways) to avoid roll-over.
In the case of vehicle slipping, the driver should:
Release the accelerator pedal, and turn the steering wheel slightly to the side of the slipping, and turn the steering wheel back in time.
Hold the steering wheel to prevent it from turning.
8.D.7Prevention measures
Before driving, check whether the tyre pattern, pressure and other items meet the safety standards.
After the vehicle is started, check the braking effect of the vehicle at low speed. If there is any brake deviation, stop the vehicle immediately, check the braking system and troubleshoot the fault before driving.
Overloading and overweight will reduce the anti-rollover capacity and driving stability. Therefore, please load the vehicle properly.
When driving on slippery or icy roads, it is recommended to use the snow chains, drive at low speed, depress the brake
pedal carefully for braking, and avoid emergency braking.
When going down a long steep hill, the centre of gravity shifts forward, making the vehicle more prone to tipping, so please slow down the speed, hold the steering wheel firmly,
and apply the brakes intermittently to control the vehicle speed with the help of the motor drag force.
Do not use the brakes while steering, accelerating or decelerating to ensure the optimal coordination of braking.
Before turning, be sure to slow down the vehicle in advance and turn the steering wheel properly.
It is forbidden to coast in neutral, especially when going downhill, to avoid sudden braking of the vehicle due to excessive inertia forces.
Advarsel
When the vehicle is slipping on wet or icy roads, do not brake and steer at the same time to avoid aggravating the slipping hazard.
If slipping is caused by braking (vehicle drifting), release the brake immediately. When it is necessary to slow down, auxiliary braking can be used.
When the vehicle slips on a curve, stabilise the vehicle first and then apply the brake intermittently.
8.GAccidental Removal of High Voltage
↑ Til toppenEmergency Handling
8.D.8Emergency operation
When the vehicle is powered off with high voltage accidentally while driving, the driver should:
Press the hazard warning lamp switch and try to start the vehicle again.
After the motor is working, be sure to pull over the vehicle for inspection and eliminate the potential risks before driving.
If the vehicle cannot be powered on with high voltage, pull over the vehicle with the help of inertia force.
8.D.9Follow-up procedures
↑ Til toppenAfter parking the vehicle, place the warning signs around the vehicle and call the Windrose service hotline immediately.
8.D.10Prevention measures
↑ Til toppenGo to a Windrose authorised service centre regularly to maintain and inspect the vehicle to ensure the stable operation of vehicle systems.
8.HNødevakuering
Emergency Handling
↑ Til toppen8.H.1Emergency operation
When an emergency situation occurs and the car door cannot be opened, you can follow the following steps for emergency evacuation.
8.H.2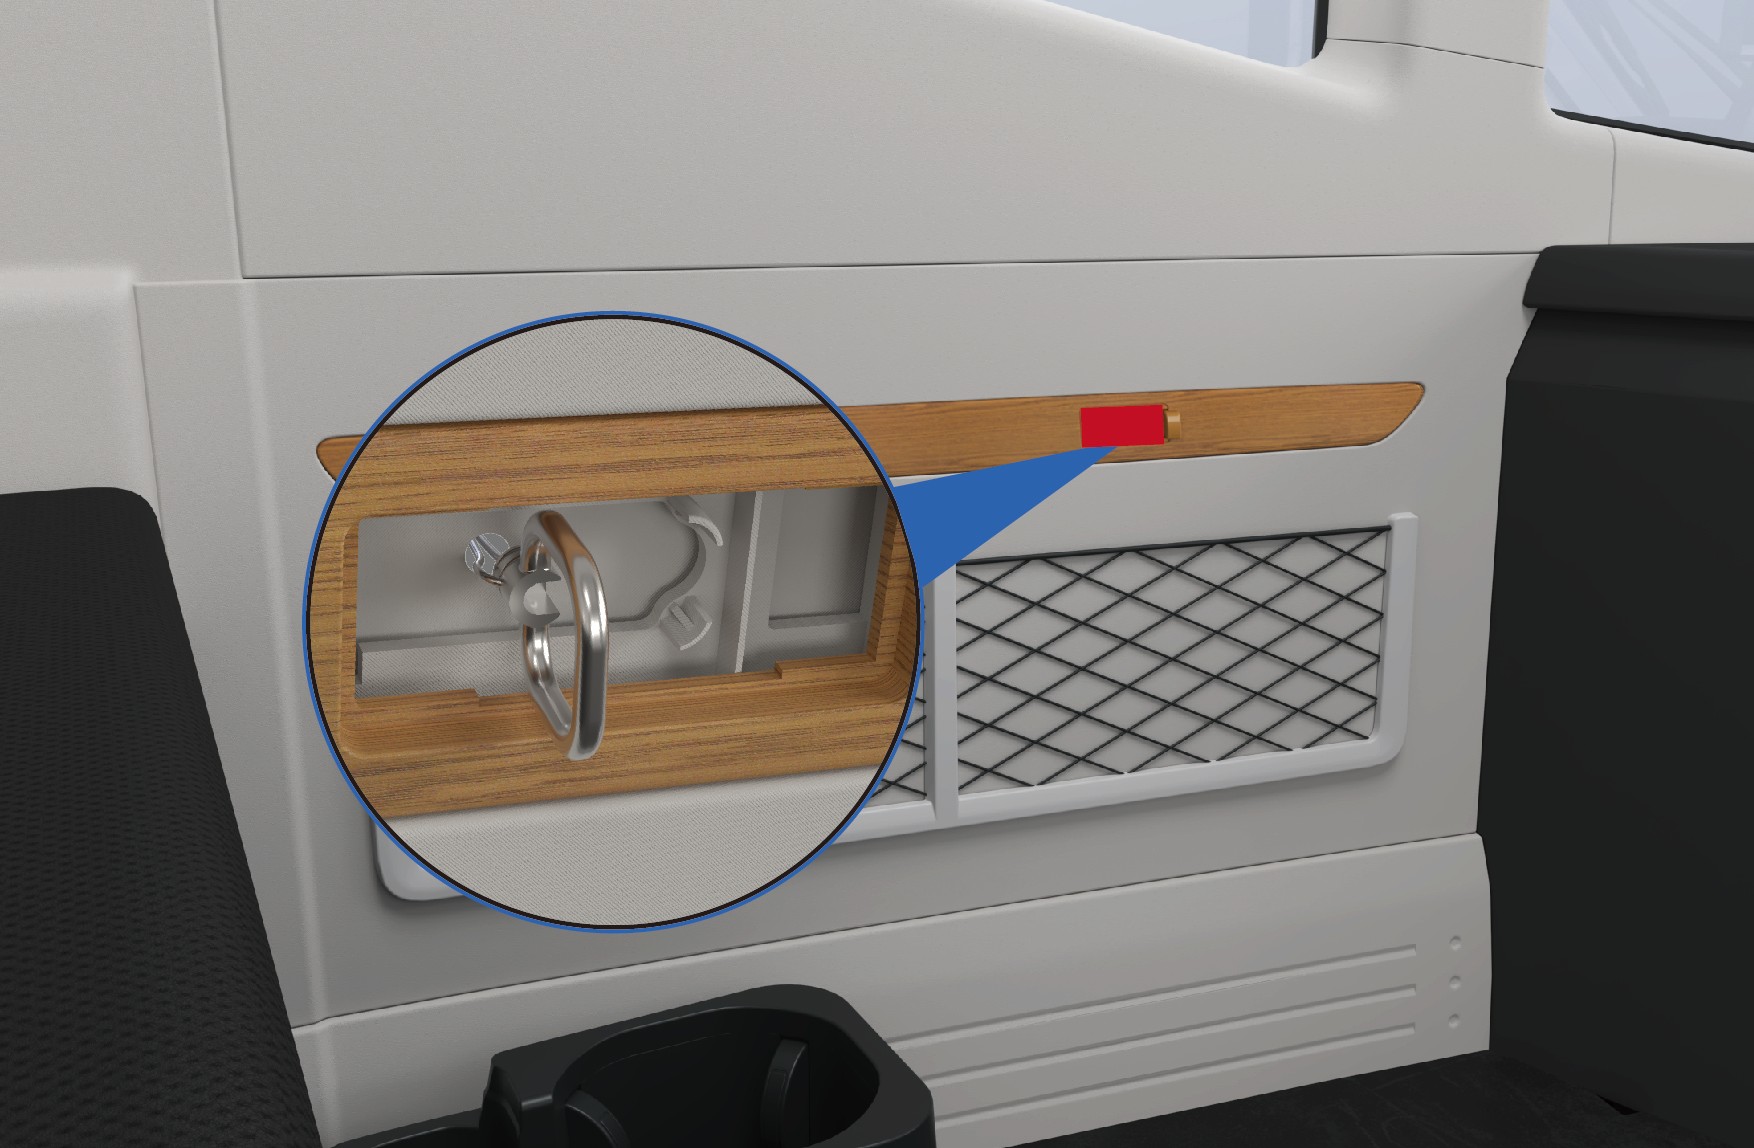 Follow-up procedures
Locate the emergency pull ring cover above the left net bag. Open the cover, and then pull the ring firmly outward to break the left window glass.
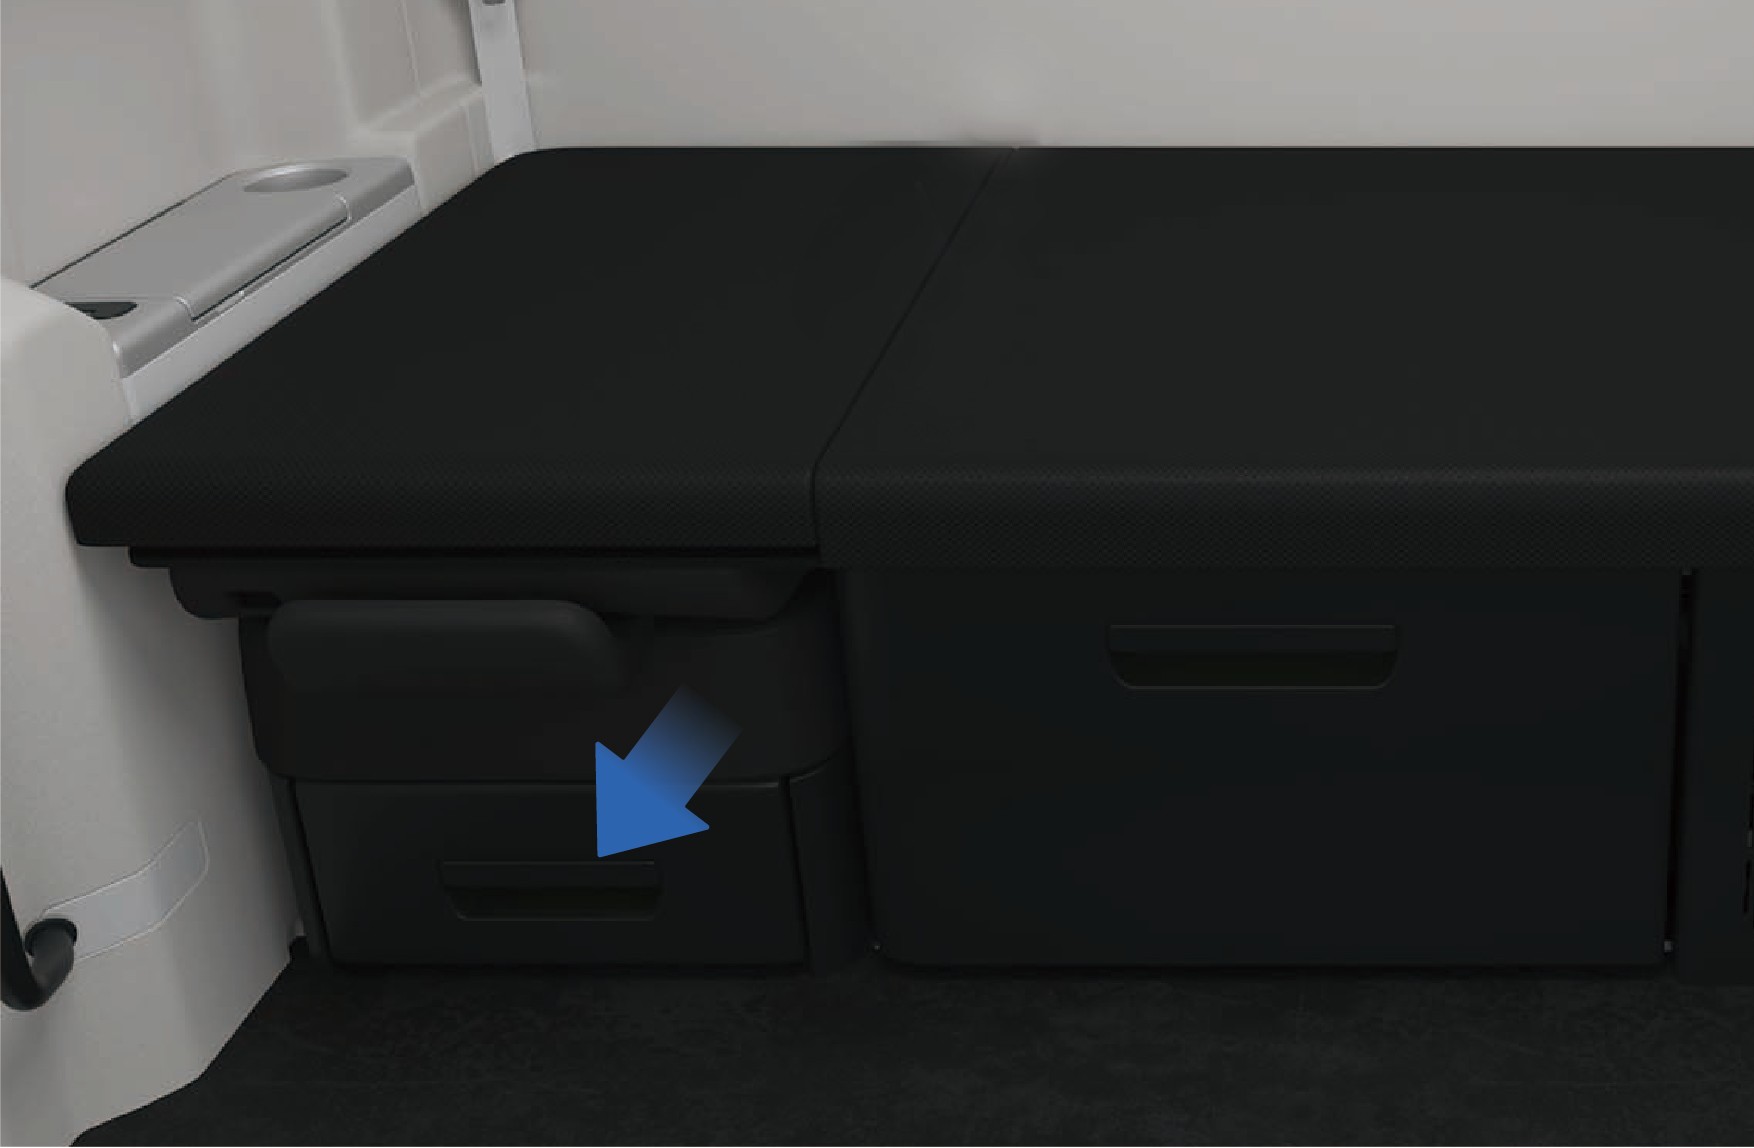
Take out the sleeper protection net from the storage box under the front passenger seat, and connect the socket at one end of the sleeper protection net to the fixed point on the left side wall.
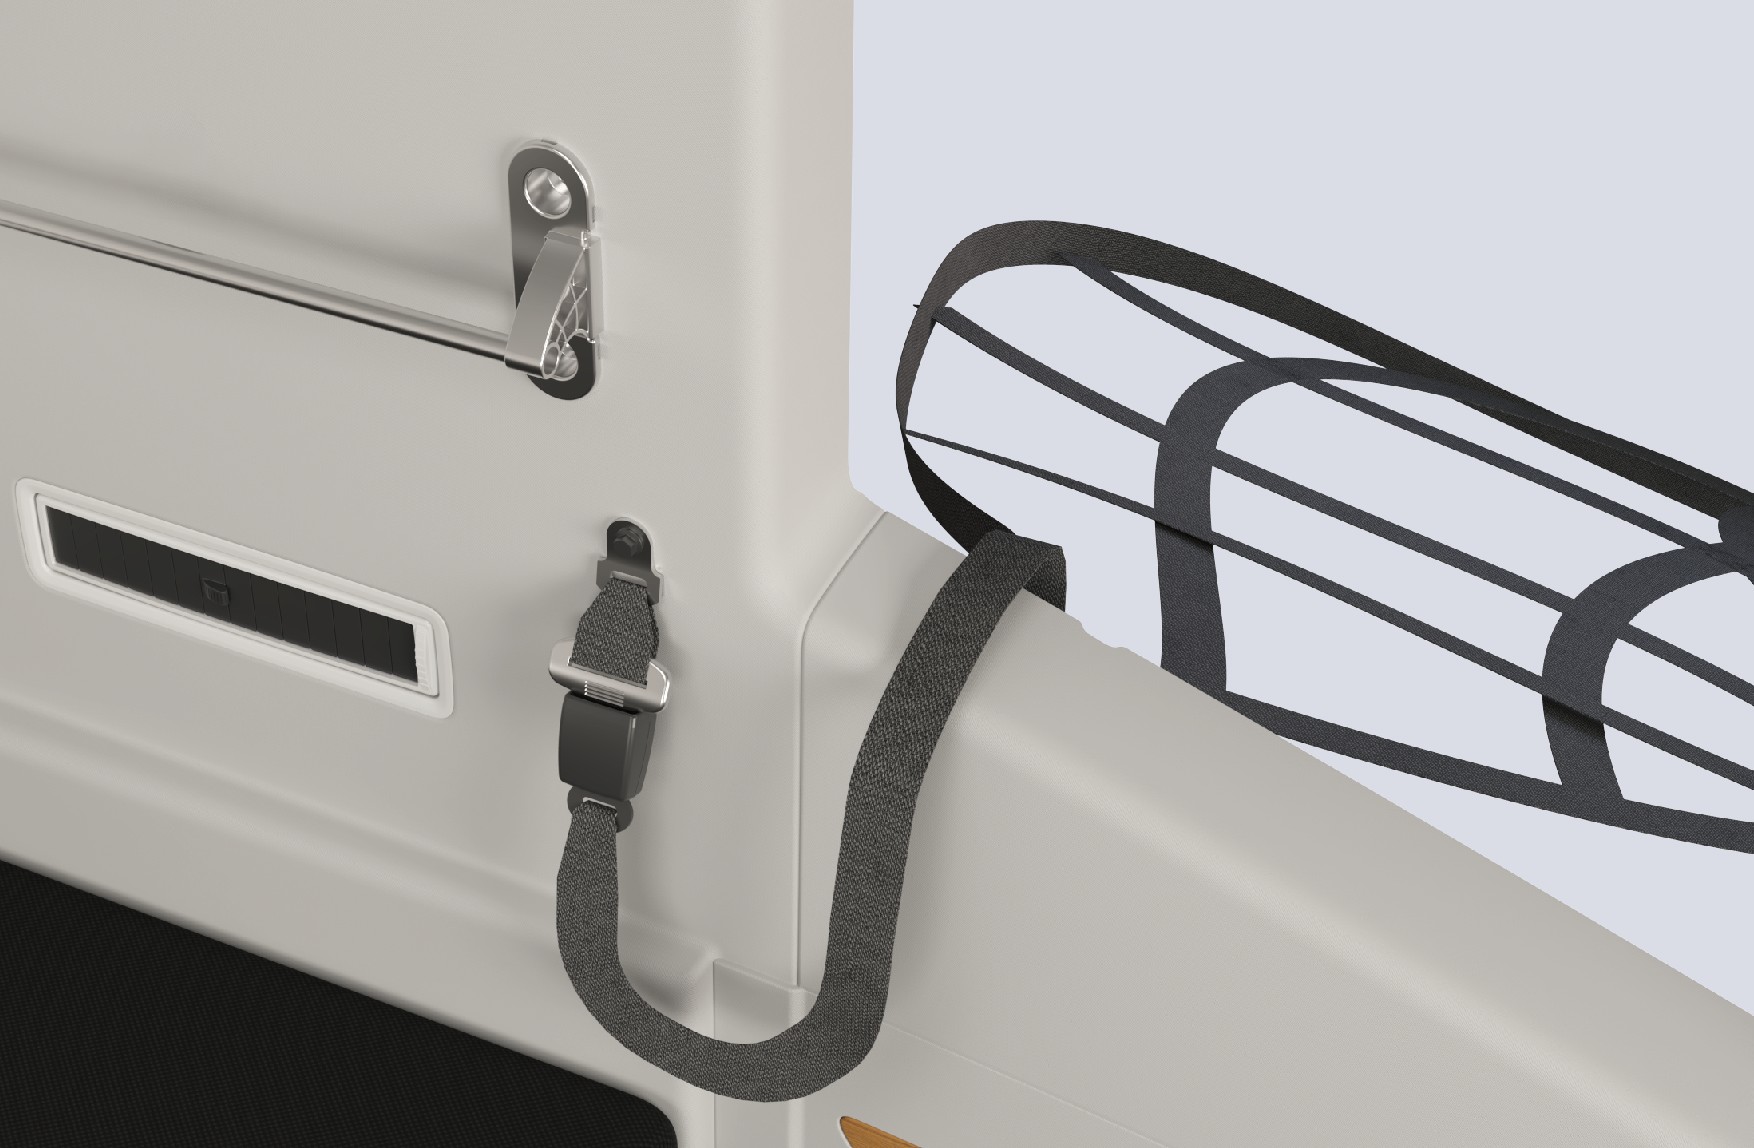
Pull the sleeper protection net out of the window, and use it as an auxiliary escape rope to quickly exit the cab.
Advarsel
When activating the window breaker, the broken window glass may cause glass splinters to fly. Please protect yourself by using your arm to shield your eyes.
Do not disassemble or modify the window breaker without authorization. Any product damage or other consequences resulting from unauthorised disassembly, modification, or use not in accordance with our specified requirements shall be
borne by the operator.
The window breaker can be activated underwater, but prolonged immersion in water is strictly prohibited.
Regularly check whether the fasteners of the window breaker are loose, and whether the pull ring and sleeper protective net are damaged.
During daily vehicle maintenance, prevent all components of the window breaker from coming into contact with water sources or corrosive substances, so as to avoid product corrosion and subsequent failure.
Keep away from fire sources, and replace the window breaker promptly after use.
Do not operate the pull ring arbitrarily in non-emergency situations. All consequences caused by misoperation shall be borne by the operator.
8.IVerneutstyr for nødredningspersonell
Emergency Rescue
This vehicle is powered by a high-voltage battery system. In the event of a serious collision, hazardous conditions may occur, including high-voltage electrical leakage, battery pack damage, and chemical fluid leaks. Emergency responders must wear appropriate personal protective equipment (PPE) before approaching or working on the vehicle.
Wear impact-rated safety goggles when working on high-voltage systems.
Wear Class 0 (1,000 V rated) insulating gloves when handling any high-voltage component.
Use insulated tools rated for high-voltage work when working on high-voltage components.
Have insulating rescue hooks available.
Have a fire extinguisher rated for lithium battery fires available.
Merknad
A buddy system must be used when emergency responders is working on high-voltage components. One person must supervise while another performs the work. It is forbidden for two or more people
to work simultaneously. Do not make physical contact with the person performing the work.
Emergency responders must remove all metal jewellery when performing rescue operations.
8.JInformasjon om høyspenningssystemet
Emergency Rescue
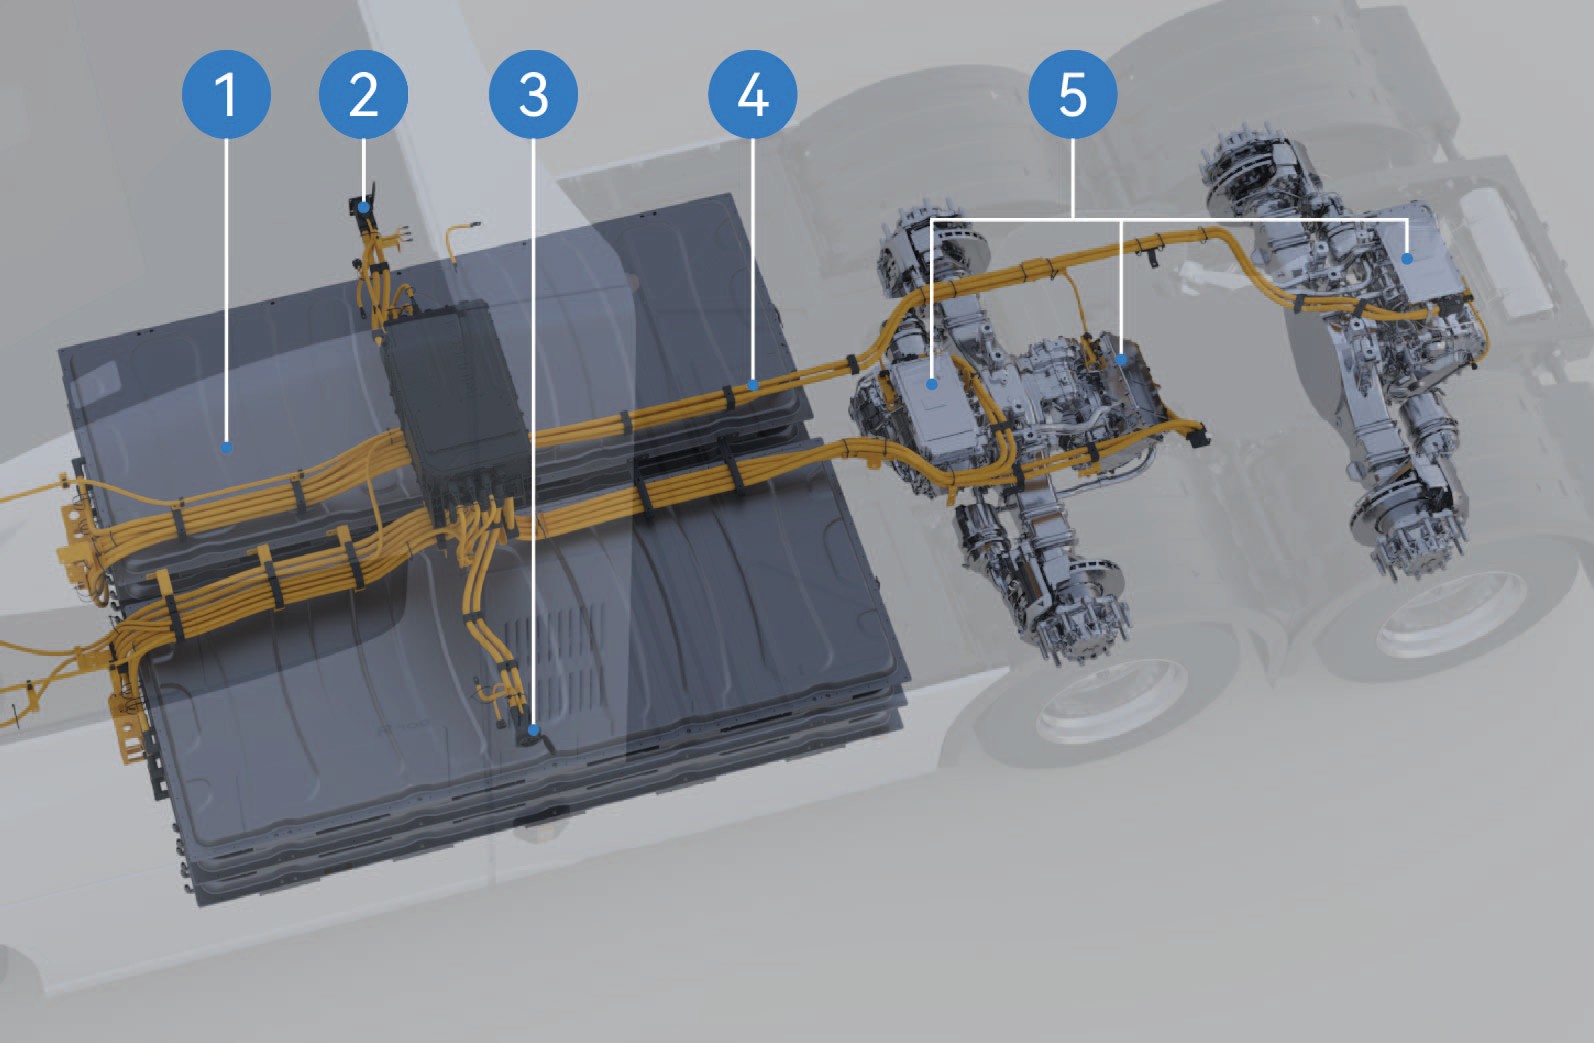
High voltage battery
Right CCS1 mode charging port
Left MCS mode charging port
High-voltage harness
Drive motor
Merknad
During startup and use, do not touch parts with "high voltage warning signs" or orange parts of the vehicle.
It is strictly forbidden to trample or bump the high-voltage battery of the vehicle.
Merk
When the high-voltage battery and motor MILs on the instrument cluster stay on, contact after-sales immediately and use a scan tool to read the DTC.
If the EIC system emits smoke, catches fire, or explodes, please evacuate from the vehicle immediately, call the police and take safety measures.
When working on the EIC system, please wear insulating gloves, insulating shoes, and insulate the tools. Do not make physical contact with the person performing the work.
8.KMetode for å deaktivere høyspenningssystemet
↑ Til toppenEmergency Rescue
8.K.1High voltage cutoff from outside
Park the vehicle, apply the EPB.
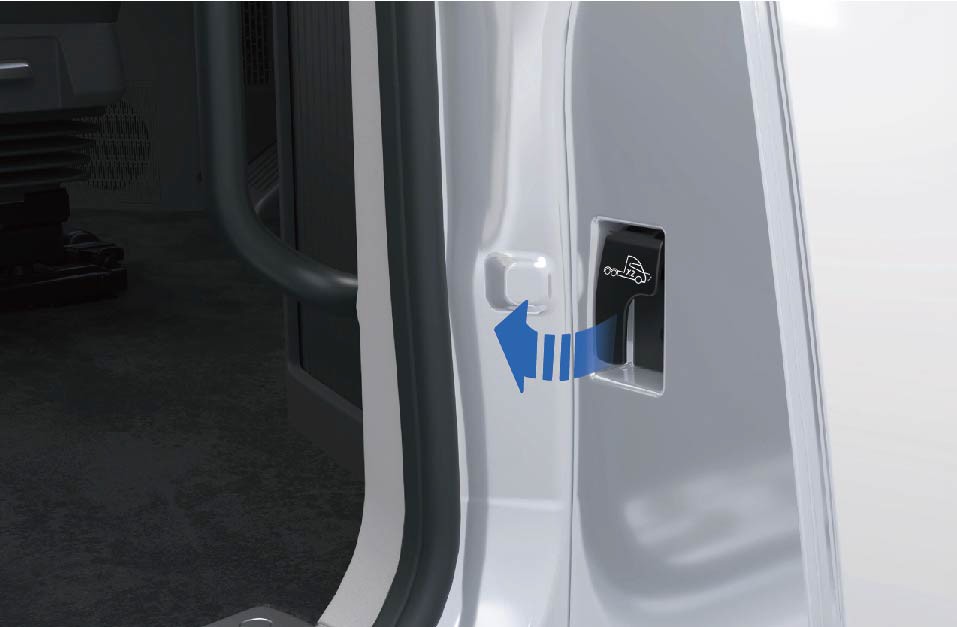
Pull the bonnet release handle twice in a row to release the bonnet.
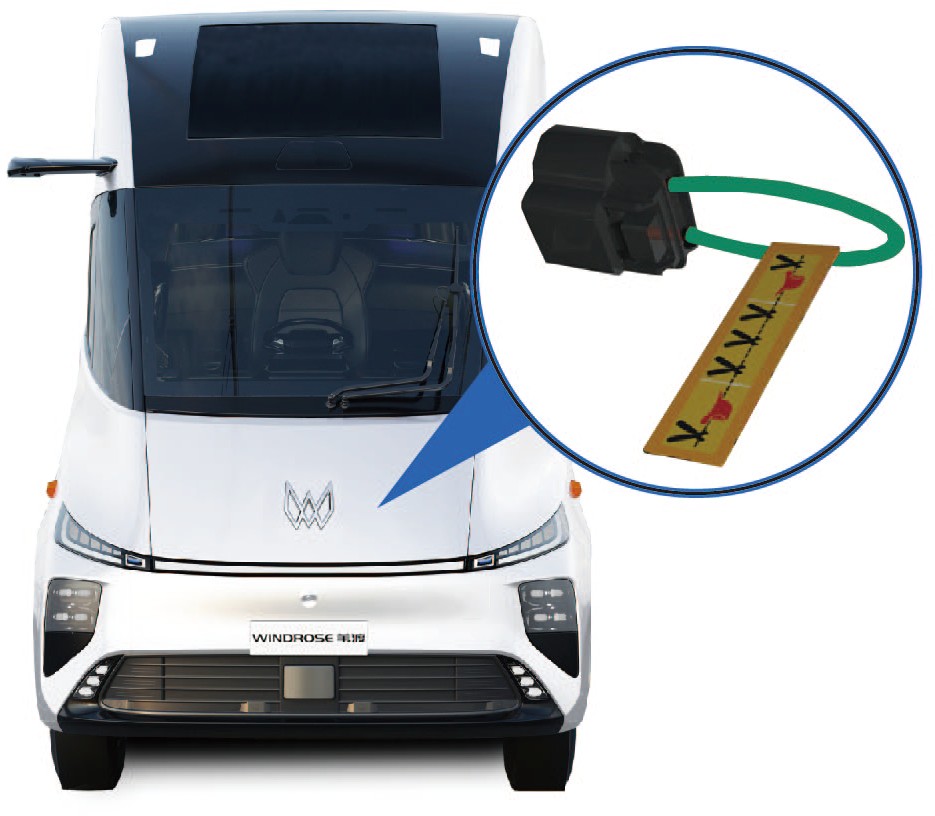
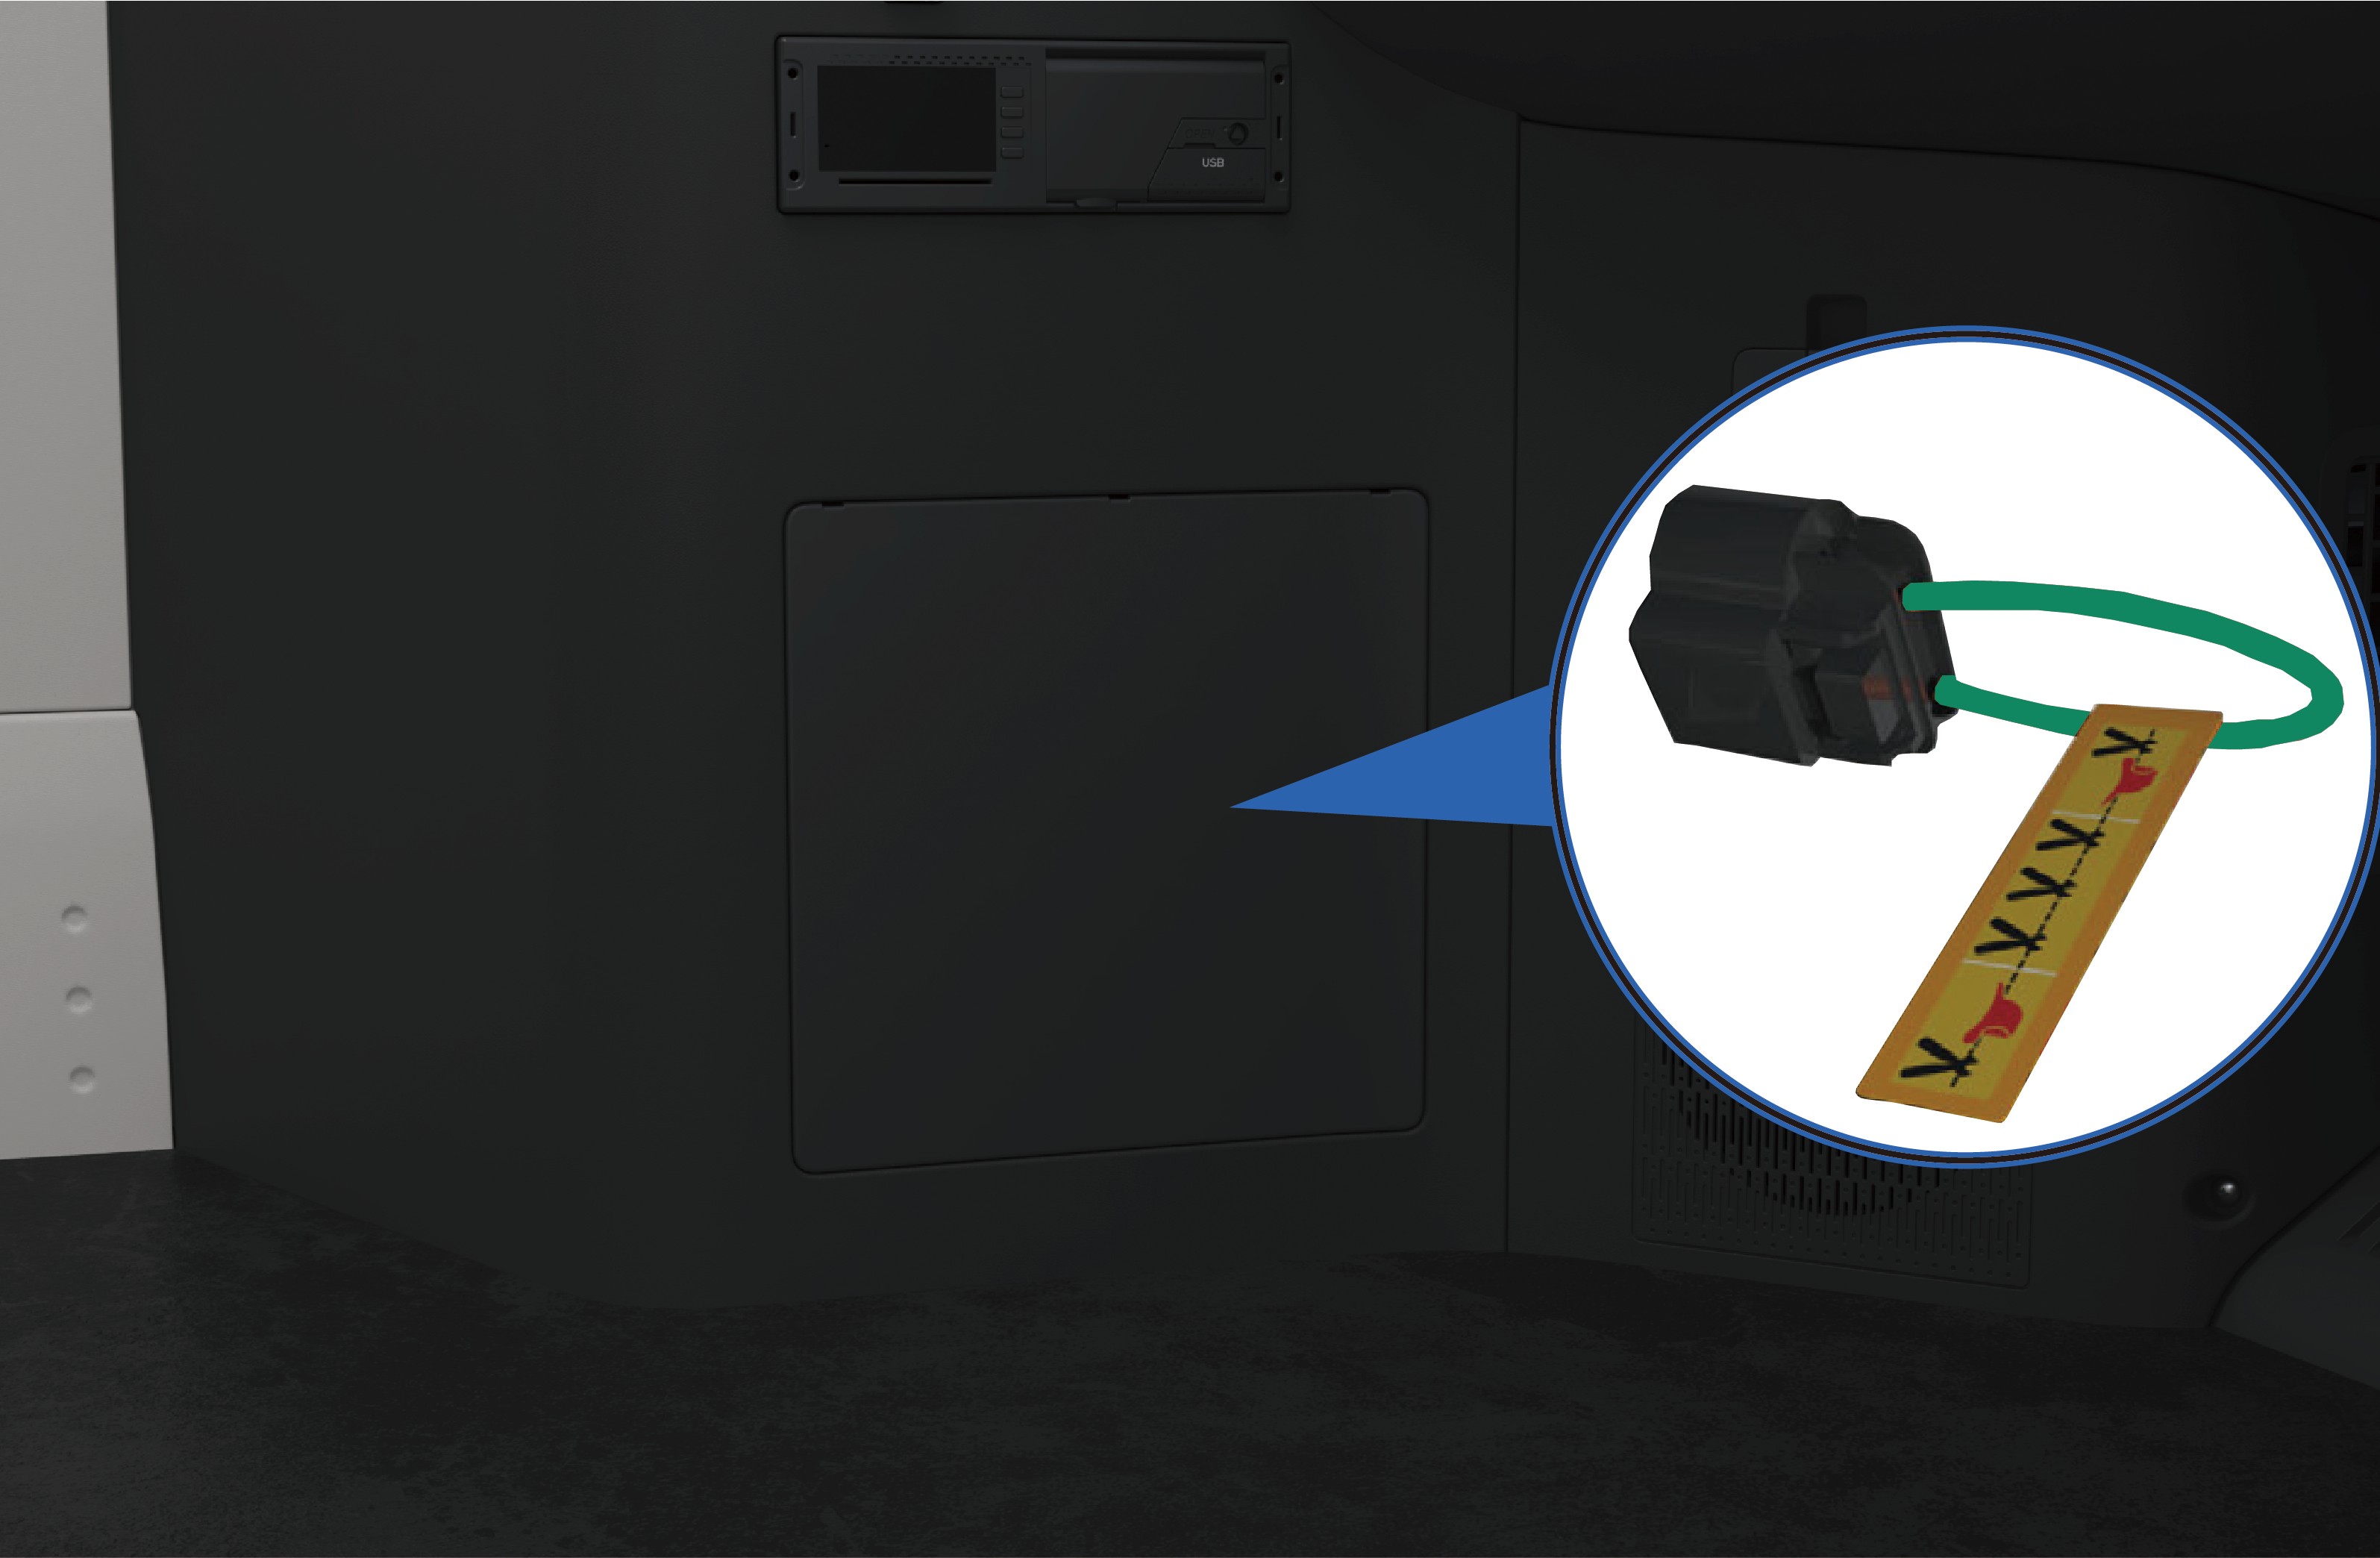
Find the low voltage MSD in the engine compartment and remove it, and the vehicle will deactivate the high-voltage system automatically.
8.K.2High voltage cutoff from inside
Park the vehicle, apply the EPB.
Open the trim cover on the lower left of the instrument panel, find and disconnect the low voltage MSD, and the vehicle will automatically cut off the high-voltage system.
Advarsel
Be sure to wear appropriate personal protective equipment when touching any high-voltage components.
It is forbidden to touch the high-voltage battery components even though the high-voltage system has been deactivated. Be sure to wear appropriate personal protective equipment if it
is necessary to operate the high-voltage battery components.
If any damage is found in the high-voltage components, be sure to wrap the damaged parts with the insulation tapes.
Merk
In an emergency, the operator can cut the orange harness on the MSD to prevent the harness from being energized again and allow the vehicle to deactivate the high-voltage system automatically.
In case of a vehicle collision, the high-voltage system will be automatically deactivate.
8.LRedning av kjøretøy i brann
Emergency Rescue
In the event of a vehicle fire, immediately assess the severity of the fire. If the fire is small and can be contained, emergency responders should use a suitable fire extinguisher such as a dry powder extinguisher, CO₂ extinguisher, or dry sand.
If the fire is large or the battery is found to be severely squeezed or bent, apply large volumes of water continuously to suppress the fire. Simultaneously, move all combustible materials away from the burning vehicle to prevent the fire from spreading.
Advarsel
If the vehicle catches fire, all occupants must evacuate immediately. Call the emergency services number according to the scene situation, and inform the emergency responders that the vehicle is a battery electric vehicle with a high-voltage battery system, which presents risks of electric shock, chemical exposure, and thermal runaway.
If the emergency responders find that there are occupants in the vehicle and the door cannot be opened during rescue, they may use a rescue tool to break the door window glass at its edge to assist trapped occupants in the vehicle break the window to escape.
↑ Til toppenMerknadFires in high-voltage components must be extinguished using a fire extinguisher suitable for lithium batteries.
8.MRedning av kjøretøy ved vassing
Emergency Rescue
A vehicle that has been driven through floodwater may show no obvious external damage, but the high-voltage system may be compromised and at risk of electrical leakage. Therefore, when rescuing wading vehicles, the emergency responders must wear appropriate protective equipment to avoid the risk of electric shock, which may cause serious injury or death.
Advarsel
The emergency responders must wear appropriate protective equipment before touching high-voltage system components in water to prevent electric shock.
After the emergency responders remove the vehicle from the wading area, allow the vehicle to dry completely before performing any further work, to prevent electric shock.
8.NNødvendigheten av vedlikehold
Daily Maintenance
↑ Til toppenRegular routine and scheduled maintenance is essential to ensure safe operation, reliability, and optimal vehicle performance, and to help minimise long-term maintenance costs.
Routine maintenance tasks described in this manual may be performed by the operator following the relevant instructions.
Windrose recommends that all scheduled maintenance be performed at a Windrose authorised service centre.
MerknadThe operator is responsible for maintaining the vehicle and ensuring that all components comply with local regulatory requirements, including but not limited to tyres, side deflectors, roof deflectors, side skirts, bumpers, front covers, and the vehicle speed limiter. You must ensure that the performance of these components always meets or
exceeds the original-specification components that are replaced.
of this manual.
This manual provides the information needed to operate and maintain the vehicle and its components. More detailed information of vehicle maintenance is contained in the Windrose Product Warranty Manual.
This vehicle must be regularly inspected and maintained as indicated in the Windrose Product Warranty Manual, in order to ensure coverage of the vehicle under the manufacturer’s warranty The systems installed on the vehicle are sophisticated and there are strict after-sale service requirements for electric vehicles in accordance with national laws and regulations. Therefore,
MerkIf you have any questions about how to maintain your vehicle, contact a Windrose authorised service centre directly for help.
9.AServicemodus
↑ Til toppenDaily Maintenance
9.BInspection of Electric Drive System
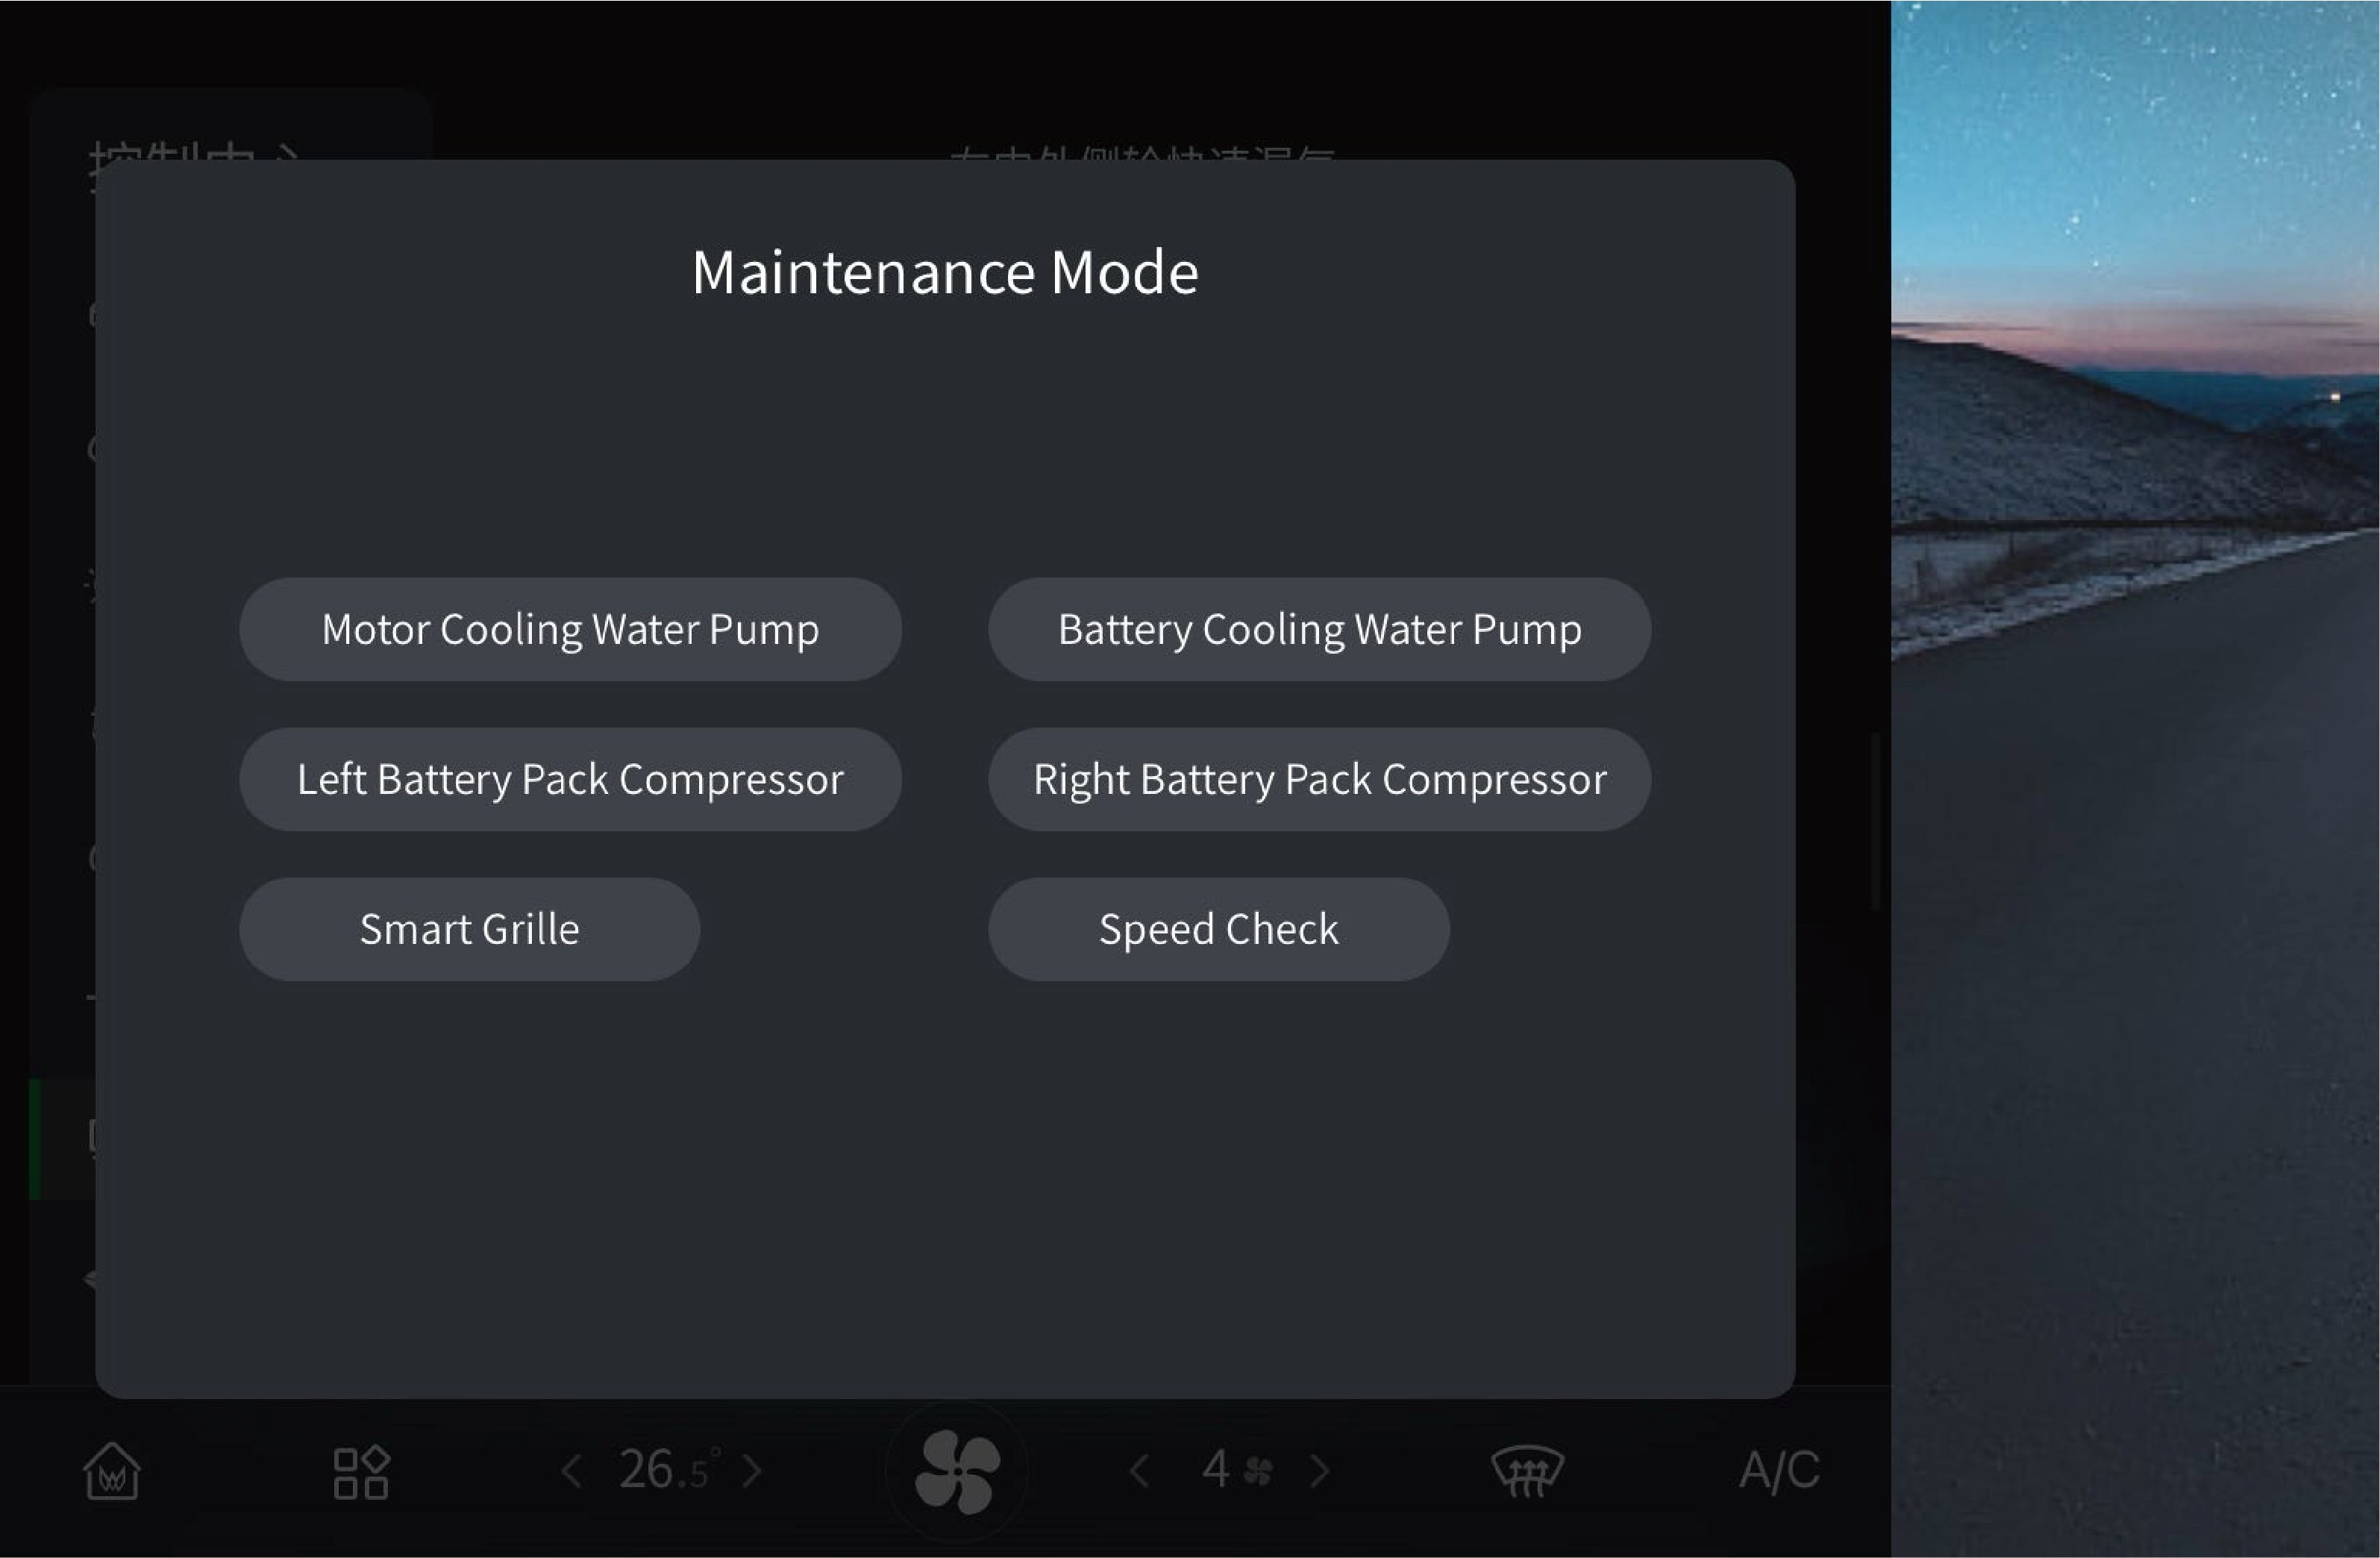 Daily Maintenance
Before starting the vehicle, check whether the relevant data displayed on the instrument cluster is normal. If the data is abnormal, do not drive the vehicle. Instead, record the system fault type and related data, and report the information to the Windrose authorised service centre.
MerknadIf the high-voltage battery or motor system fails, contact a Windrose authorised service centre for repair in time.
The speed limit test switch in the service mode is only used for inspection of vehicle speed limit. After activating this function, the switch will be highlighted. It must be kept closed during normal driving.
The motor coolant pump switch, battery coolant pump switch, left battery pack compressor switch, right battery pack compressor switch and active grille shutter switch in the service mode are only used for vehicle inspection and coolant filling. They must be kept
9.COvervåking av dekktrykk
↑ Til toppenDaily Maintenance
This vehicle is equipped with a tyre pressure monitoring system, which will display the tyre pressure on the instrument cluster and the vehicle information screen. If the tyre pressure is abnormal,
closed during normal driving.
please do not continue to drive the vehicle for a long time and contact a Windrose authorised service centre in time.
9.DKontroll av lys
Daily Maintenance
↑ Til toppenThis vehicle is equipped with a self-test function for verifying functionality of each driving lamp.
9.D.1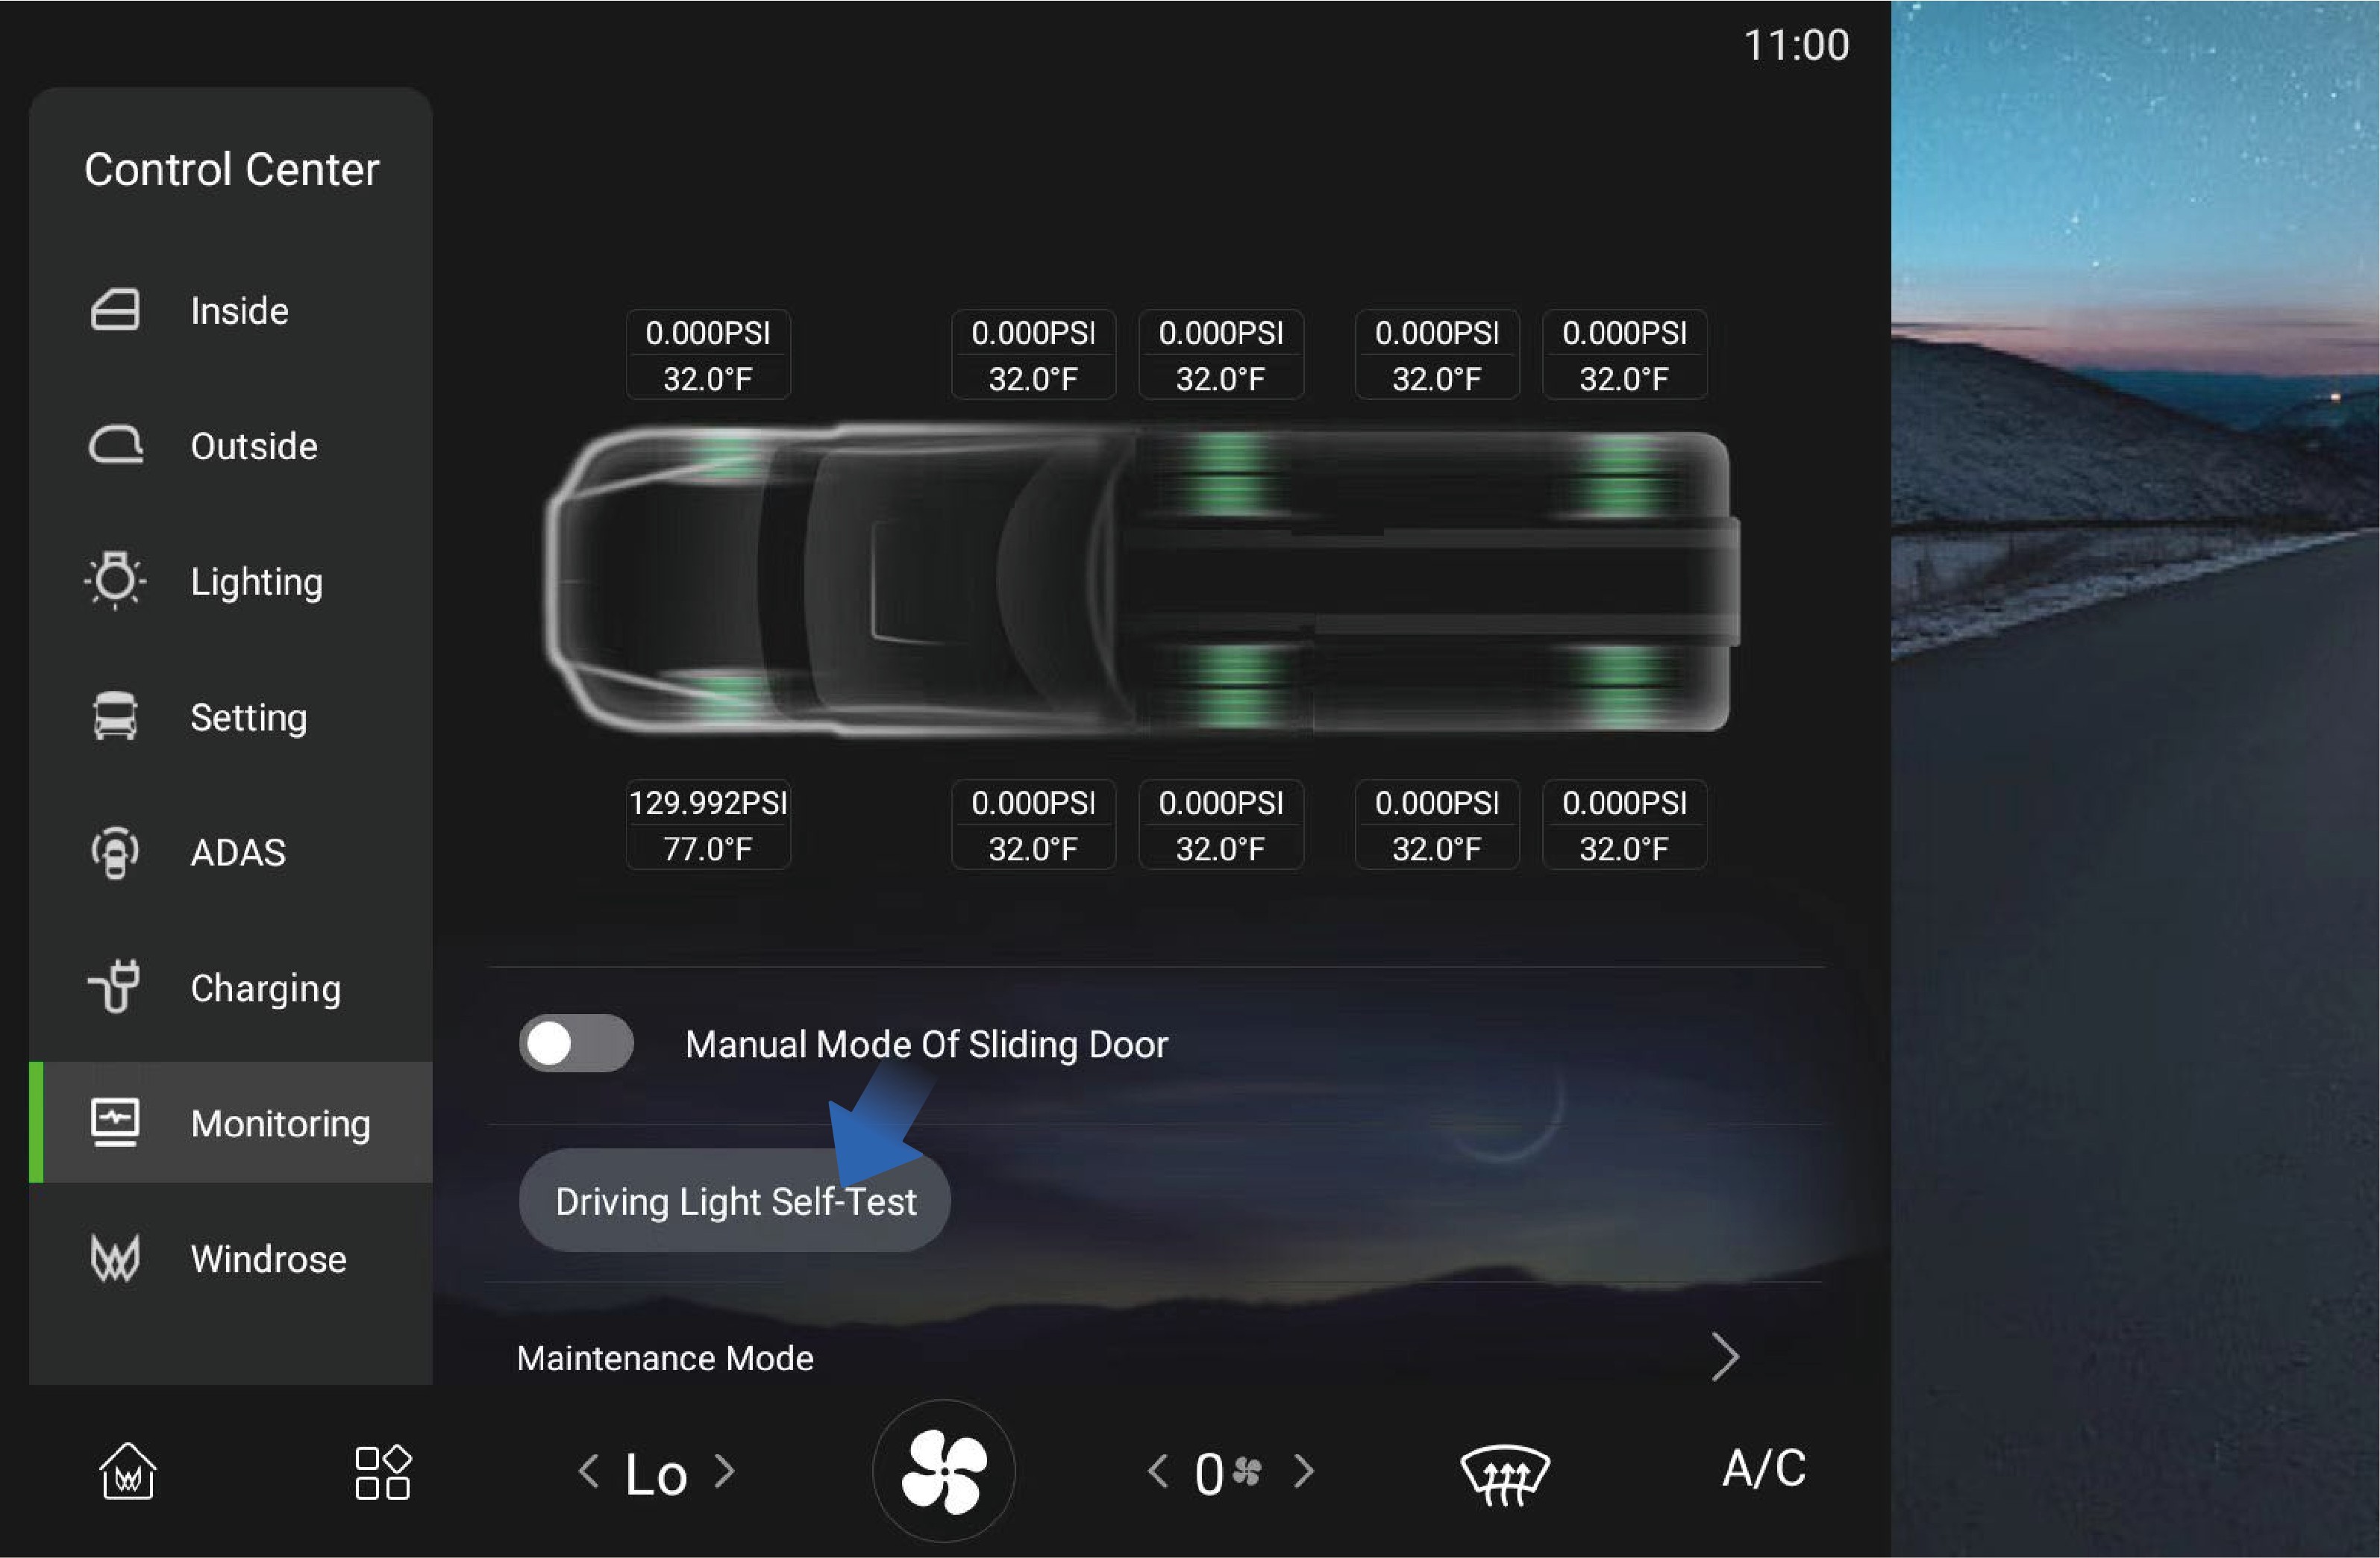 Bruksanvisning
↑ Til toppenYou can activate this function by selecting "Control Center", switching to the "Monitoring" interface and clicking "Driving Light Self-Test" button on the vehicle information screen of the instrument panel. After activation, all lamps of the vehicle will be illuminated at the same time. You can observe the lamps and indicators on the instrument cluster to determine whether there is a faulty lamp.
9.D.2Forholdsregler
↑ Til toppenAdvarselIf any, contact a Windrose authorised service centre in time to check and repair the vehicle lamps.
9.EKontroll av horn og vindusviskere
Daily Maintenance
Check the electric/air horns as below:
Park the vehicle, press the horn button on the steering wheel to check whether the electric horn is working properly.
Press the electric/air horn change-over switch, press the horn switch repeatedly, and check whether the air horn is working properly.
Power on the vehicle, turn on the wiper switch, and check whether the wiper is working properly at each gear.
9.FHøyspenningsbatteri
↑ Til toppenRoutine Maintenance
9.F.1Position of high-voltage battery
The high-voltage battery is located under the floor of the vehicle. When the vehicle is driving on bumpy or uneven roads, be careful to prevent collisions.
AdvarselWhen the high-voltage battery catches fire in a crash, pull over the vehicle immediately and evacuate the occupants from the vehicle and move them away from traffic. When the vehicle speed is below 20 km/h, the electric sliding door will automatically unlock; When the vehicle speed is below 6 km/h, the electric sliding door will automatically open. To ensure the life safety of the occupants in the vehicle, if the driver does not decelerate the vehicle within 4 minutes in the above situation, the system will decelerate and stop the vehicle automatically.
9.F.2Maintenance of high-voltage battery
The high-voltage battery SOC needs to be calibrated:
once a month.
After the vehicle has been stored for more than 3 weeks, SOC calibration should be performed once at least.
Calibration method:
Use the high-voltage battery to 20% -25% SOC.
Charge the high-voltage battery fully.
Use the battery power to 40%-60% SOC.
9.GKjølevæske
↑ Til toppenRoutine Maintenance
9.G.1Coolant selection
Please select the coolant with the corresponding freezing point according to driving environment to ensure the normal operation of the vehicle cooling system.
9.G.2Inspection of coolant
↑ Til toppenAfter the coolant temperature drops, check whether the coolant level in the reservoir is between the MIN to MAX marks; If the coolant is insufficient, the warning lamp on the instrument cluster will be illuminated to remind you to add coolant.
If the coolant has suspended matter, sediment or discoloration,
replace it with new coolant immediately.
Regularly check the freezing point of the coolant to ensure that it meets the requirements of the local environment and replace it regularly.
9.G.3Replace the coolant
Drain the coolant as below:
Park the vehicle on the flat ground.
Turn on the EPB switch.
After the coolant temperature drops, unscrew the auxiliary water tank filler cap.
↑ Til toppen4. Loosen the drain plug at the bottom of the radiator to drain the coolant.
9.G.4
Filling of coolant
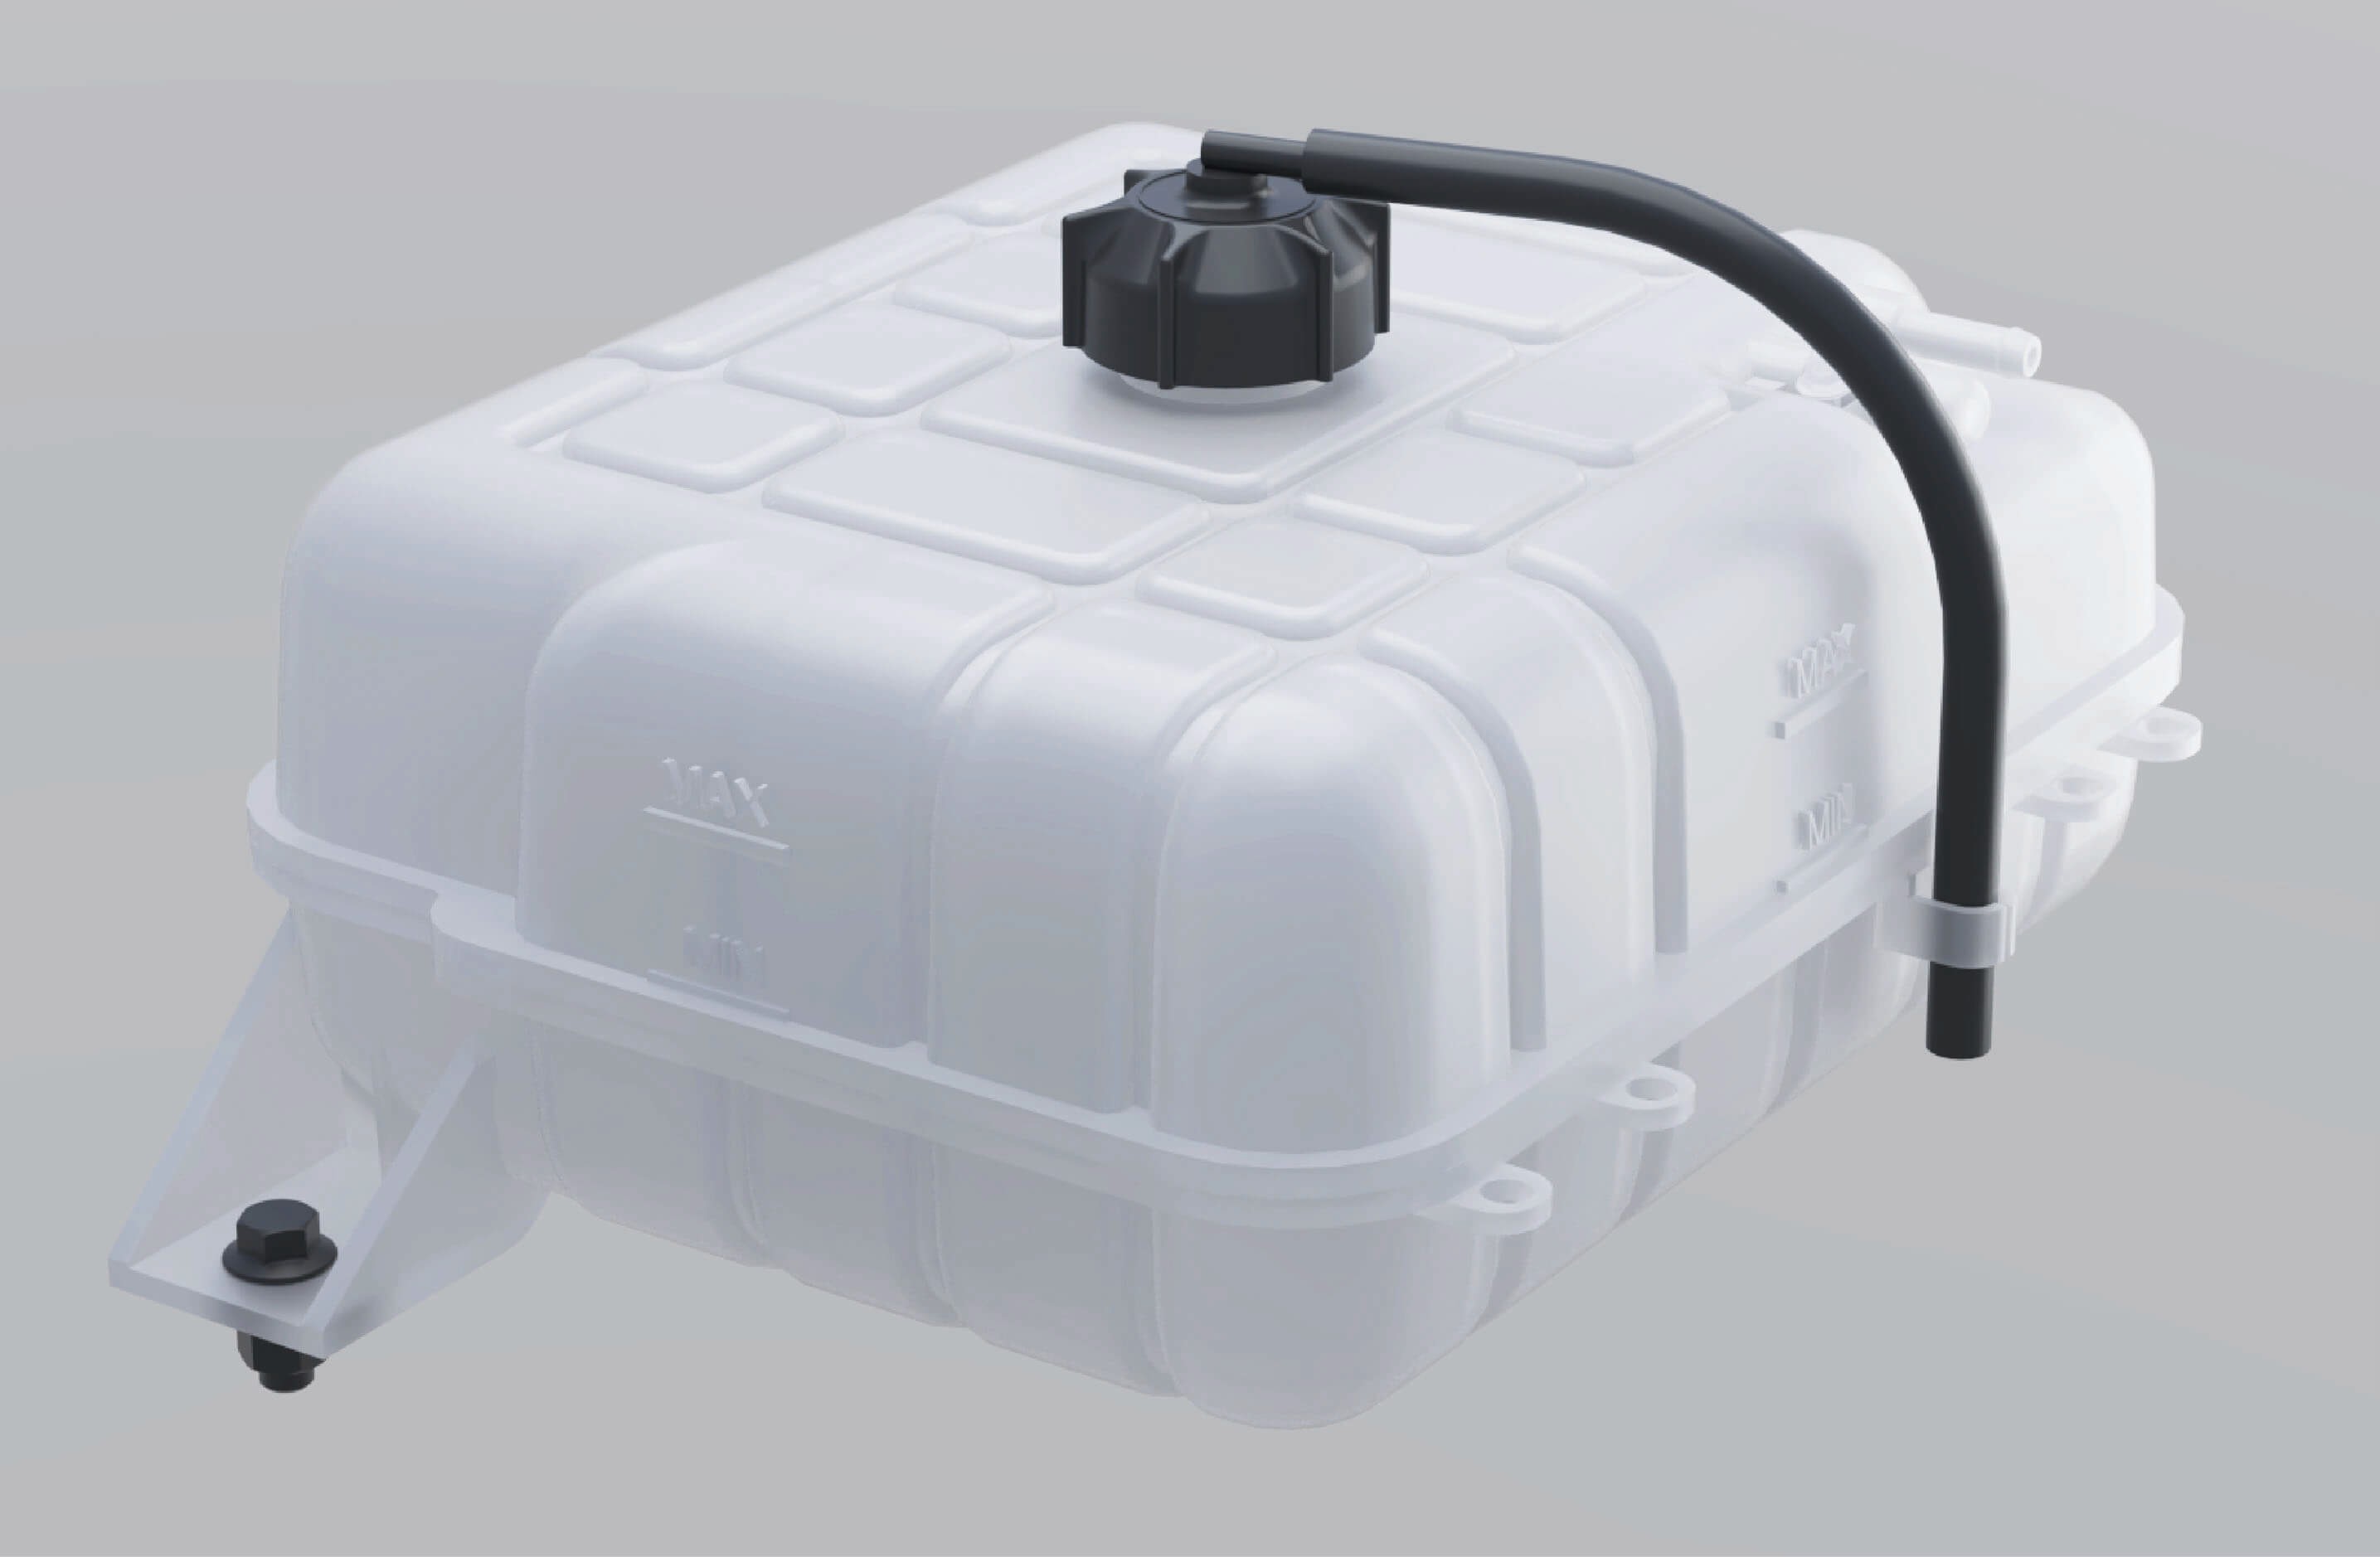
Fill the coolant as below:
Add the coolant slowly and evenly until it reaches the MAX level, and tighten the filler cap.
Power on the vehicle and run the water pump for about 10 minutes.
Power off the vehicle and add coolant to the MAX level.
Tighten the auxiliary water tank filler cap.
Advarsel
Use the coolant recommended by Windrose. Do not mix different types of coolant to avoid reactions that may corrode the motor and radiator or block the cooling system.
Never add liquids other than coolant to the cooling system to avoid damaging the motor and other components.
Do not step on the auxiliary water tank.
Merknad
Check, add and replace the coolant regularly.
Rinse the cooling system repeatedly with clean water for ≥3 times when adding or draining the motor coolant for the first time.
When adding the coolant, keep the motor and room temperature ≤45℃ to avoid burns.
Add the coolant slowly and evenly until it reaches the MAX level
After the vehicle is powered off, the motor, ECU, radiator and other components are still hot. In this case, do not open the auxiliary water tank filler cap. Otherwise, hot coolant or steam
will spray out, causing burn injuries. Perform the inspection,
replacement and filling of the coolant after the temperature of the motor system drops.
Only professionals can remove the pressure cap on the side of the auxiliary water tank.
9.G.5Cleaning of radiator
↑ Til toppenAfter the radiator has been used for a period of time, insects, catkins, dirt or other residues in the radiator fins will reduce the cooling capacity of the cooling system. You need to check the outer surface of the radiator frequently and clean the foreign objects in time (do not flush it with high-pressure gas or water).
9.G.6Maintenance of cooling system
Check the cooling system to ensure that the cooling system does not leak. Check whether the cooling system leaks before driving. There are 4 common reasons for water leakage:
The radiator welding part leaks, and the radiator should be replaced.
The aging and cracking of the hose and the rust of welding part of the pipe will cause coolant leakage. Please replace the pipe.
Using inferior coolant will cause electrolytic corrosion and leakage of the cooling system. Use a special cleaning agent to clean the cooling system, and add new coolant that meets the requirements after installation.
The cooling pipe clamp is loose. Use the corresponding tool to replace or tighten the clamp.
9.HDekk
Routine Maintenance
Tyres are the connection to the road and affect driving safety. Check the following items of the tyres regularly or before driving:
Tyre pressure
When checking tyre pressure, note that the pressure will change with temperature.
Tread pattern
The tread pattern affects the grip and control of the tyre. The smaller the depth or the fewer the pattern, the worse the grip and control of the tyre.
Tyre conditions
Check the tyre conditions before driving:
External damage;
Foreign objects in the tread pattern;
Foreign objects in the tyre (dual tyres);
Cracks or dents;
One-sided shoulder tyre wear or irregular tread wear.
Tyre service life
When the tyre is used for more than 6 years, replace it with a new one.
Advarsel
After parking the vehicle, wait for the tyre to cool down before inflation or deflation.
The tyre pressure should be kept within a reasonable range. Too high or too low tyre pressure will accelerate tyre wear, increase power consumption, and lengthen the braking distance. In severe cases, tyre blowout may occur, resulting in traffic accidents and even personal injuries.
Before driving, you must check the integrity of the tread pattern. Excessive worn tread will cause serious slipping on wet roads (rainy days, snowy days) or when driving at high speed, resulting in loss of control of the vehicle and even personal injuries.
Cracks, dents or external damage will cause the tyre blowout. If any, the tyre should be repaired or replaced immediately to avoid accidents.
Merknad
Please follow local and national regulations for the wear standard of the tyre tread pattern. When the tread wear exceeds the specified value, the tyre should be replaced as soon as possible.
Avoid contact of tyres with oil, grease, fuel, etc., as this may accelerate tyre aging.
When parking the vehicle, avoid only part of the tyre in contact with the ground or parking on road with sharp stones.
↑ Til toppenMerkThe correct tyre pressure is specified in the tyre pressure table section.
9.ISteering System
↑ Til toppenRoutine Maintenance
Before driving, check the free travel and looseness of the steering wheel, shake the steering wheel to ensure that it is locked. During driving, check whether there is heavy steering, shaking steering or steering offset. In case of any of the situations above, please stop driving the vehicle and contact a Windrose authorised service centre immediately.
9.JSikkerhetsvedlikehold av høyspenning
↑ Til toppenRoutine Maintenance
9.J.1Principles of safe operation under high voltage
↑ Til toppenDo not modify and install accessories on the high-voltage system and body of the vehicle without following proper procedures. Please operate according to the regulations, otherwise it may cause fire; Considering that there is a risk of electric shock in the high-voltage system of the complete vehicle, the high-voltage system should be operated by workers
who have been subject to professional training and acquired the qualification for the employment in accordance with relevant safety regulations.
9.J.2Personnel requirements
Drivers should not disassemble components attached with high-voltage warning sign without following proper procedures if they have not received any training; Do not touch high-voltage components, such as orange high-voltage cables or components that come into contact with high-voltage cables, after an accident. Failure to do so may result in a risk of high-voltage electric shock. When disassembling and repairing high-voltage electrical components, the operator should unplug the low-voltage maintenance power-off plug, disconnect the low-voltage battery power supply and cut off the high-voltage circuit simultaneously.
Operators should not wear metal ornaments, such as watches and rings, and should not have metal objects in the pockets of work clothes, such as keys, metal shell pens, mobile phones, and coins.
Operators should not bring tools unrelated to work into the work site, and must use metal tools with the handheld parts being insulated.
Before connecting the high-voltage power supply, the operator should check whether there is any debris around the high-voltage electrical appliances, and notify irrelevant personnel to stay away from the above-mentioned parts, and remind loudly when closing the switch.
9.J.3Maintenance requirements
↑ Til toppenThe maintenance and repair of the vehicle can only be carried out by service stations or maintenance units with the corresponding maintenance qualifications, and by personnel who have received the corresponding training and obtained the qualifications. Otherwise, the high voltage in the high-voltage system may impose danger and even threaten your life.
9.J.4Charging maintenance
↑ Til toppenIn case the vehicle has parked for a long time, the condition of the high-voltage battery should be checked every two weeks to prevent electric leakage in the high-voltage battery. The vehicle, if parked for a long time, should be charged and maintained
regularly to prevent the high-voltage battery that has not been
used over a long time from affecting the performance of the vehicle.
9.KBatteri
Routine Maintenance
The low voltage battery is located in the engine compartment. The service life and function of the battery are affected by many factors, such as the number of starts, driving style, driving conditions, climatic conditions, etc.:
If the battery is completely discharged multiple times, its service life may be shortened. Keeping the battery charged enough helps extend its lifespan.
The starting capacity of the battery will be weakened over time. If the vehicle is parked for a long time, the battery may need to be recharged.
Advarsel
- Battery electrolyte is corrosive, and if it gets into the eyes or skin by accident, rinse immediately with plenty of water and seek medical care.
The maintenance and care of the battery should be handled by professionally trained personnel.
It is prohibited to touch the positive and negative terminals of the battery with both hands or a conductor simultaneously at any time.
If the low voltage battery catches fire, be sure to leave the vehicle quickly. If the smoke is inhaled accidentally, please go to an open area and seek medical attention as soon as possible.
It is forbidden to connect the battery cell to an external 12V electrical appliance.
It is forbidden to disassemble the battery without authorization to prevent acid leakage from corroding the human body, vehicle, etc.
MerknadIf you notice the following, be sure to stop using the vehicle and cut off the power immediately. Contact the Windrose authorised service centre for further guidance:
Power cords, plugs or communication lines cracked or damaged.
Signs of overheating, smokes and sparks.
Battery pack damage (e.g. cracking), battery leakage.
The dust in the battery cell will cause the battery to discharge automatically and be easily damaged.
9.K.1 Cleaning of battery
Keep the battery clamp and battery surface clean and dry.
Apply a small amount of acid-proof grease to the lower end of the battery clamp.
Please use commercial detergent to clean the corroded parts of the battery.
Advarsel
Please keep the surface of the battery terminal and the post clean, otherwise the service life of your battery will be shortened.
Do not use detergents containing flammable substances, which will corrode the battery case.
10.AKjøretøyets utvendige mål
Technical Data
|
|
|
|
|---|---|---|---|
|
|
|
|
10.BParametere for kraftsystemet
Technical Data
|
|
|
|---|---|---|
|
|
|
|
|
|
|
|
|
|
|
|
|
|
|
|
|
|
|
|
|
|
|||
|---|---|---|---|
|
|
|
|
|
4 | 4 | |
|
|
|
|
|
|
|
|
|
|
|
|
|
|
|
|
|
|
|
|
|
|
|
|
|
|
|
|
|
|
|
|
|
|
||
|
|
|
|
|
|
||
|
|
|
|
|
|
||
|
|||
|---|---|---|---|
|
|
|
|
|
|
|
|
|
|
||
|
|
||
|
|
||
|
|
|
|
10.CTiltrekkingsmoment
Technical Data
|
|
|
|
|---|---|---|---|
|
|
|
|
|
|||
|
|
|
|
|
|
|
|
|
|
|
|---|---|---|---|
|
|
|
|
|
|
|
|
|
|
|
|
|
|
|
|
|
|
|
|
|
|
|
|
|
|
|
|
|
|
|
|
|
|
|
|
|
/ |
|
|
|
/ |
|
|
|
|
|
|
|
|
|
|
|
|
|
|
|
|
|
|---|---|---|---|
|
|
|
|
|
|
|
|
|
|
|
|
|
|
|
|
|
|
|
|
|
|||
|
|
|
|
|
|
|
|
|
|
|
|
|
|
|
|
|
|
|
|
|
|
|
|
|
|||
|
|
|
|
|
|
|
|---|---|---|---|
|
|
|
|
|
|
|
|
|
/ |
|
|
|
/ |
|
|
|
|
|
|
|
|
|
|
|
|
|
|
|
|
|
|
|
|
|
|
|
|
|
|
|
|
|
|
|
|
|
|---|---|---|---|
|
|
|
|
|
|
|
|
|
|
|
|
|
|
|
|
|
|
|
|
|
|
|
|
|
|
|
|
|
|
|
|
|
|
|
|
|
/ |
|
|
|
|
|
|
|
|
|
|---|---|---|---|
|
|
|
10±1 |
|
M8×1.25 (10.9) | 10±1 | |
|
M8×1.25 (10.9) | 25±2 | |
|
M8×1.25 (10.9) | 25±2 | |
|
|
M20×1.5 (10.9) | 568±28 |
|
M12×1.5 (10) | 55±5 | |
|
M18×1.5 (10.9) | 270±25 | |
|
/ | 90±10 | |
|
|
|
210±20 |
|
|
M12×1.5 (10) | 55±5 |
|
M18×1.5 (10) | 270±25 | |
|
M14×2 (10.9) |
|
|
|
|||
|
M22×1.5 (10.9) | 700±50 | |
|
M22×1.5 (10) | 700±50 |
|
|
|
|
|---|---|---|---|
|
|
|
|
|
|
|
|
|
|
|
|
|
|
|
|
|
|
|
|
|
|
|
|
|
|
|
|
|
|
|
|
|
|
|
|
|
|
|
|
|
|
|
|
|
|
|
|---|---|---|---|
|
|
M20×1.5 (10.9) | 550±50 |
|
M20×1.5 (10.9) | 550±50 | |
|
M20×1.5 (10) | 550±50 | |
|
|
|
|
|
|
M8×1.25 (8.8) |
|
|
|
23-30 | |
|
|
|
|
|
|
|
|
|
M14×2 (10.9) | 137±5 | |
|
|
|
|
|
|
M14×2 (10.9) | 200±10 |
|
M14×2 (10.9) | 200±10 |
|
|
|
|
|---|---|---|---|
|
|
|
|
|
|
|
|
|
|
|
|
|
|
|
|
|
|
|
|
|
|
|
|
|
|
|
|
|
|
|
|
|
|
|
|
|
|
|
|
|
|
|
|
|
|
|
|
|
|
|
|---|---|---|---|
|
|
M14×1.5 (10.9) |
|
|
M14×2 (10.9) |
|
|
|
M14×1.5 (10.9) |
|
|
|
|
M16×1.5 (10.9) |
|
|
|
|
|
|
M14×1.5 (10.9) |
|
|
|
M14×1.5 (10.9) |
|
|
|
M14×1.5 (10) |
|
10.DDekktrykkmåler
Technical Data
|
|
|
|
|
|
|
|---|---|---|---|---|---|---|
|
|
|
|
|
|
|
|
|
|
|
|
|
|
|
|
|
|
|
|
|
|
|
|
|
|
|
|
|
|
|
|
|
|
|
|
|
|
|
|---|---|---|---|
|
|
|
|
|
|
|
|
|
|
|
|
10.EParametere for hjulstilling
Technical Data
|
|
|
|---|---|---|
|
|
|
10.FStigningsevne
Technical Data
| GVM | Transmission Gear | Gradeability | ||
|---|---|---|---|---|
| 46t | Gear D1 (Speed ≤12 km/h) | Three Motors | Continuous Gradeability | 15% |
| Maximum Gradeability | 30%(60s) | |||
| Four Motors | Continuous Gradeability | 17% | ||
| Maximum Gradeability | 33%(60s) | |||
| Gear D2 (Speed >12 km/h) | Three Motors | Continuous Gradeability | 5% | |
| Maximum Gradeability | 9%(60s) | |||
| Four Motors | Continuous Gradeability | 6% | ||
| Maximum Gradeability | 12%(60s) | |||
| 68t | Gear D1 (Speed ≤12 km/h) | Three Motors | Continuous Gradeability | 9% |
| Maximum Gradeability | 20%(60s) | |||
| Four Motors | Continuous Gradeability | 11% | ||
| Maximum Gradeability | 22%(60s) | |||
| Gear D2 (Speed >12 km/h) | Three Motors | Continuous Gradeability | 3% | |
| Maximum Gradeability | 6%(60s) | |||
| Four Motors | Continuous Gradeability | 4% | ||
| Maximum Gradeability | 8%(60s) | |||
| GVM | Transmission Gear | Maximum Gradeability of Downhill Motor Braking | ||
|---|---|---|---|---|
| 46t | Gear D2 (Speed >12 km/h) | Three Motors | Continuous Gradeability | 5% |
| Maximum Gradeability | 9% | |||
| Four Motors | Continuous Gradeability | 7% | ||
| Maximum Gradeability | 12% | |||
| 68t | Gear D2 (Speed >12 km/h) | Three Motors | Continuous Gradeability | 3% |
| Maximum Gradeability | 6% | |||
| Four Motors | Continuous Gradeability | 5% | ||
| Maximum Gradeability | 8% | |||
10.GArbeidstrykk for luftbeholder
Technical Data
|
|
|
|---|---|---|
|
|
|
10.HEffekttabell for lys
Technical Data
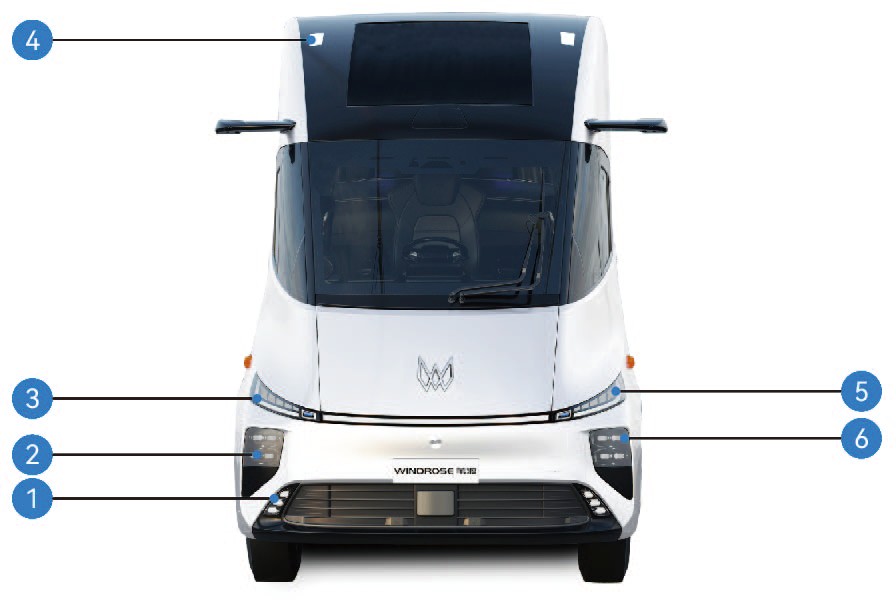
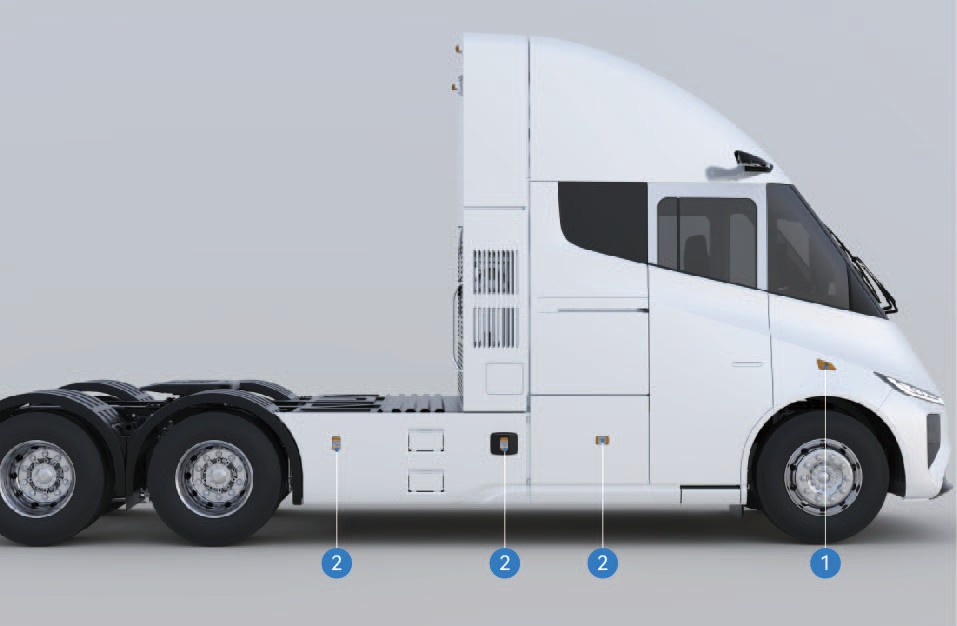
Front fog Lamp, Cornering lamp
Fjernlys
Front indicator lamp, daytime running lamp
Fremre markeringslys
Front parking lamp
Nærlys
Sideblinklys
Sidemarkeringslys (kombinasjonslykt)
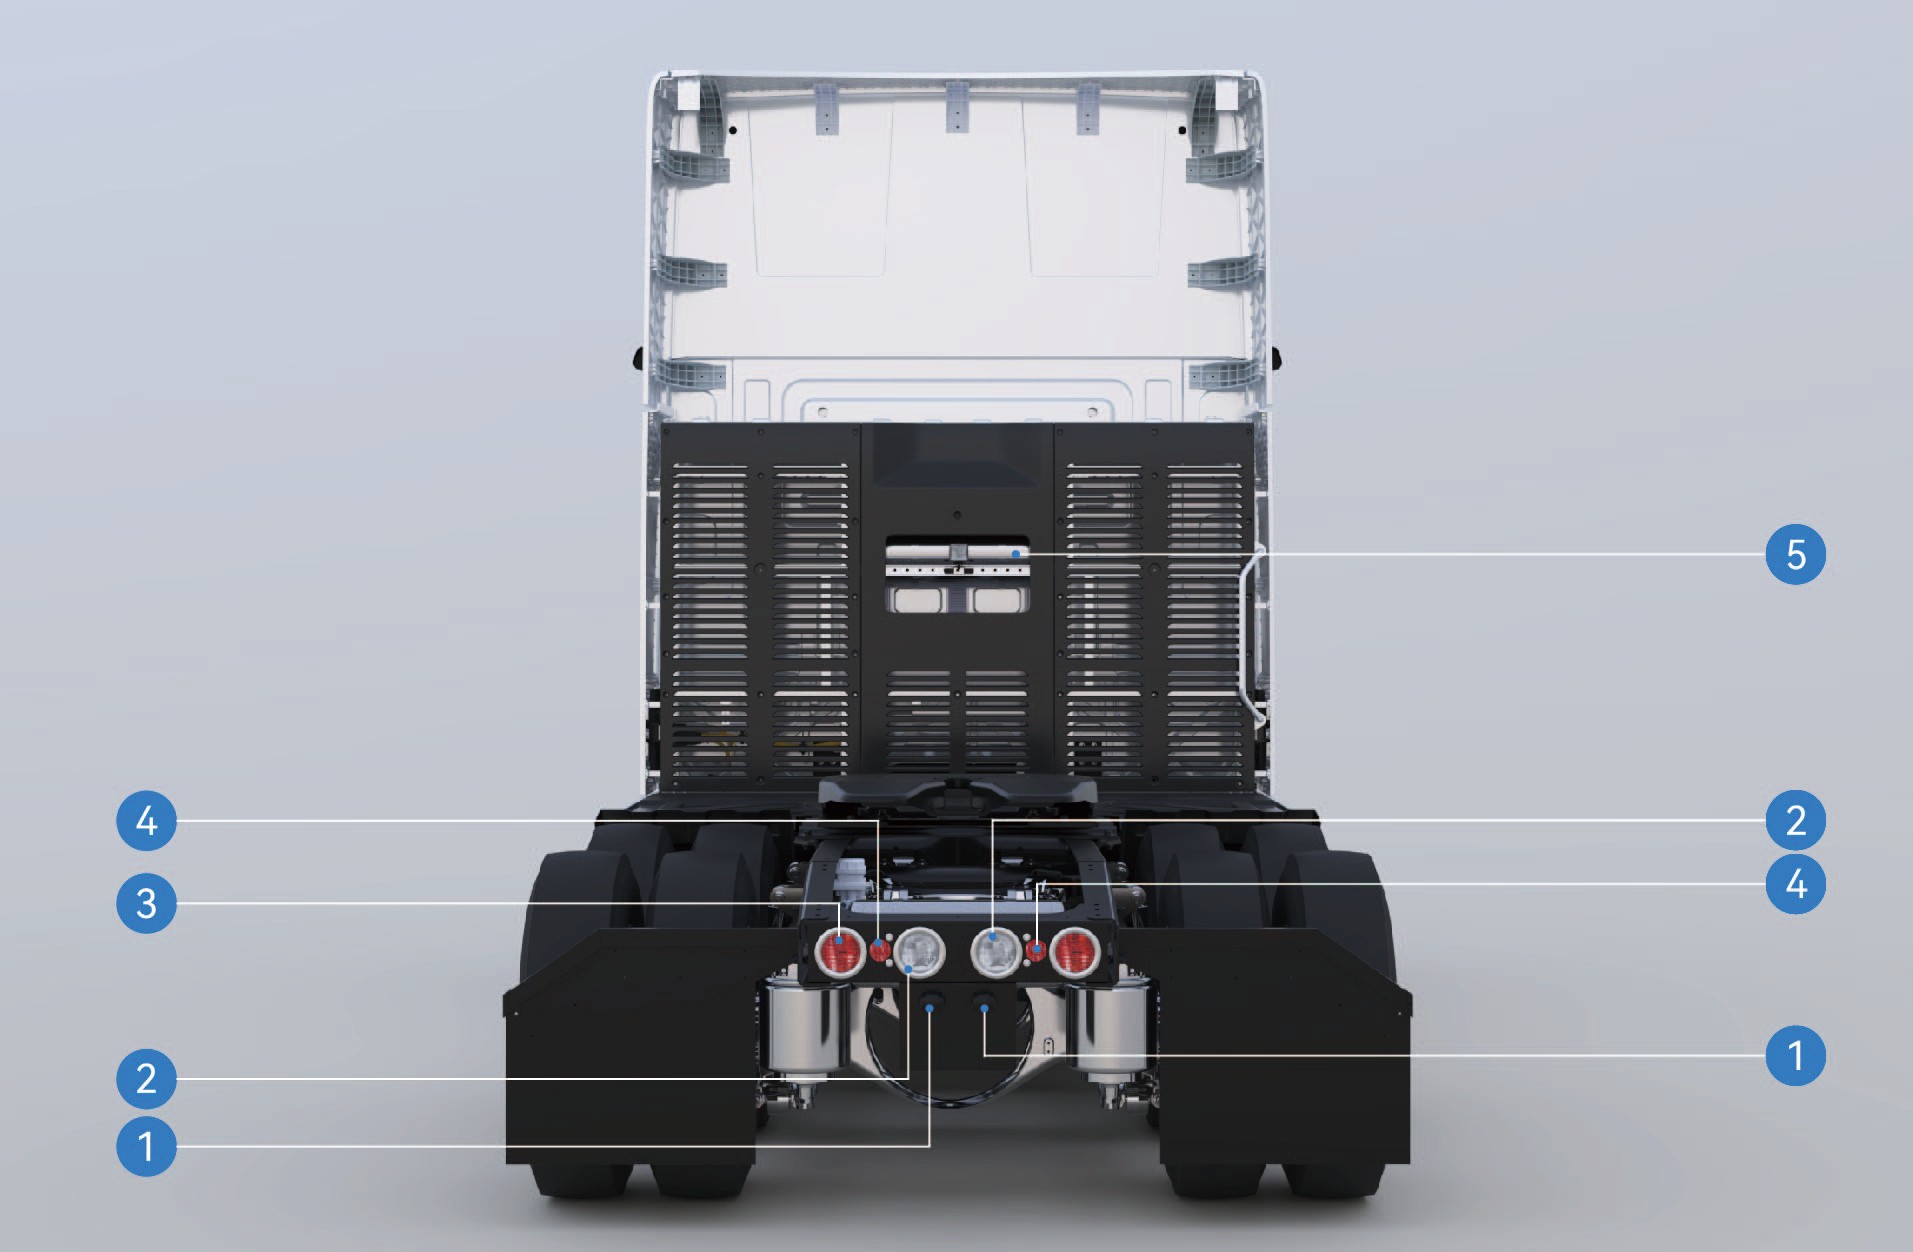
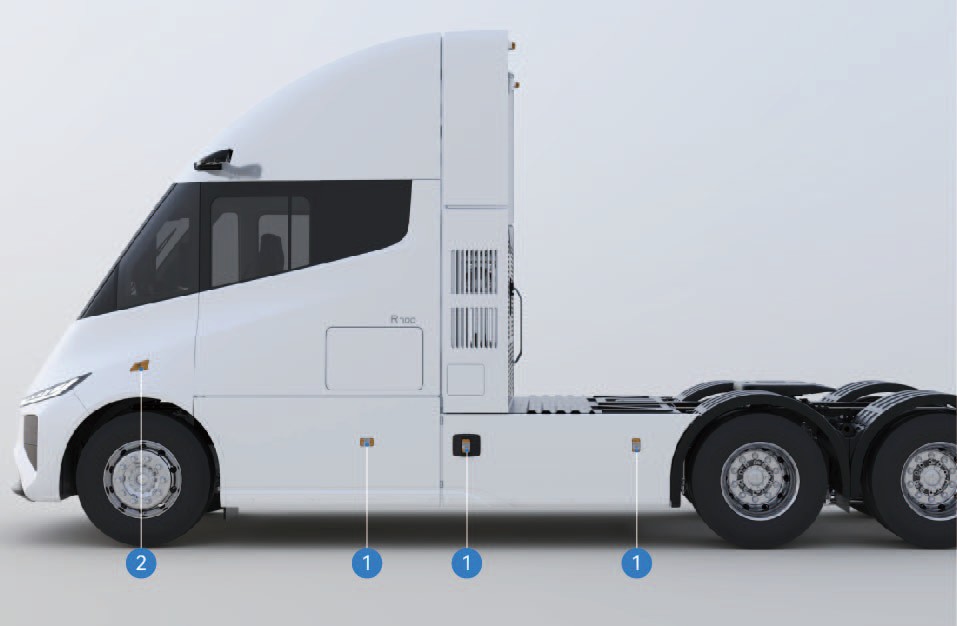
License plate lamp
Reversing lamp
Brake lamp/taillamp/indicator lamp
Rear retro-reflector
Rear working lamp
Sidemarkeringslys (kombinasjonslykt)
Sideblinklys
|
|
|
|
|
|---|---|---|---|---|
|
|
|
|
|
|
|
|
|
|
|
|
|
2 | |
|
|
|
|
2 |
|
|
|
|
2 |
|
|
|
|
2 |
|
|
|
2 | |
|
|
|
|
2 |
|
|
|
2 | |
|
|
|
2 | |
|
|
|
|
2 |
|
|
|
|
3 |
|
|
9 |
|
1 |
|
|
|
|
6 |
|
|
|
|
|
|---|---|---|---|---|
|
|
|
|
|
|
|
|
|
|
|
|
|
|
|
|
|
|
|
1 |
|
|
|
|
3 |
|
|
|
|
2 |
10.IData for sikringer og vern
Technical Data
|
|
|
|
|
|---|---|---|---|---|
|
|
|
|
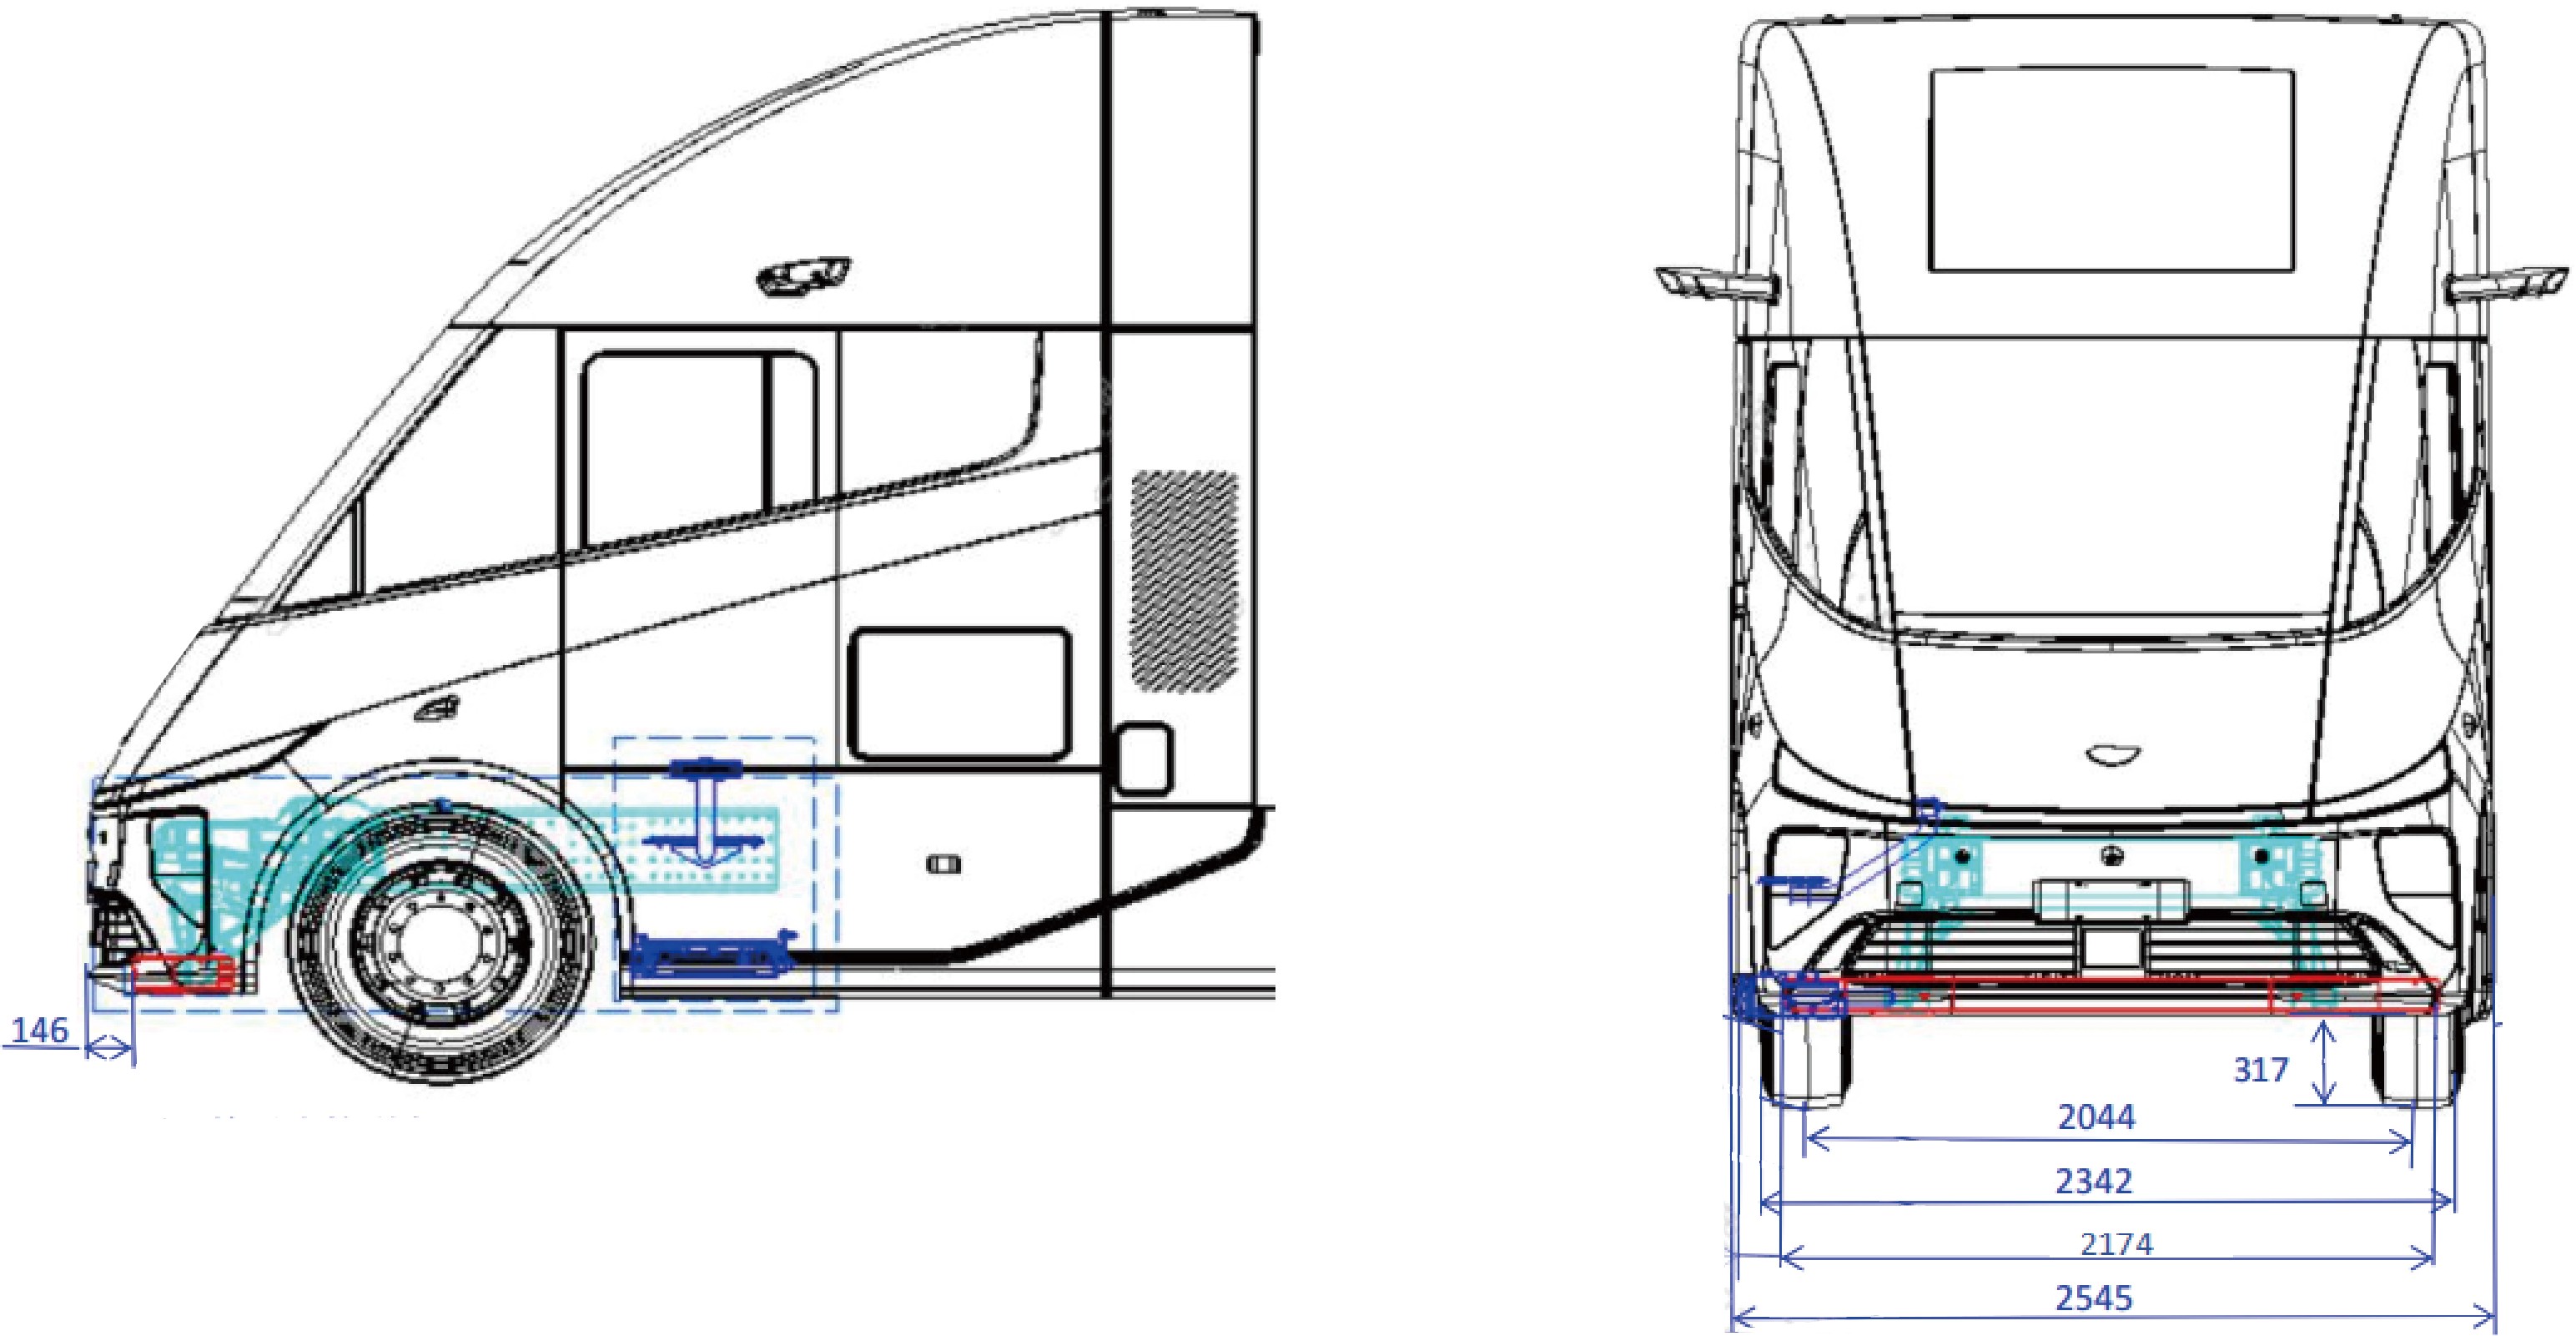
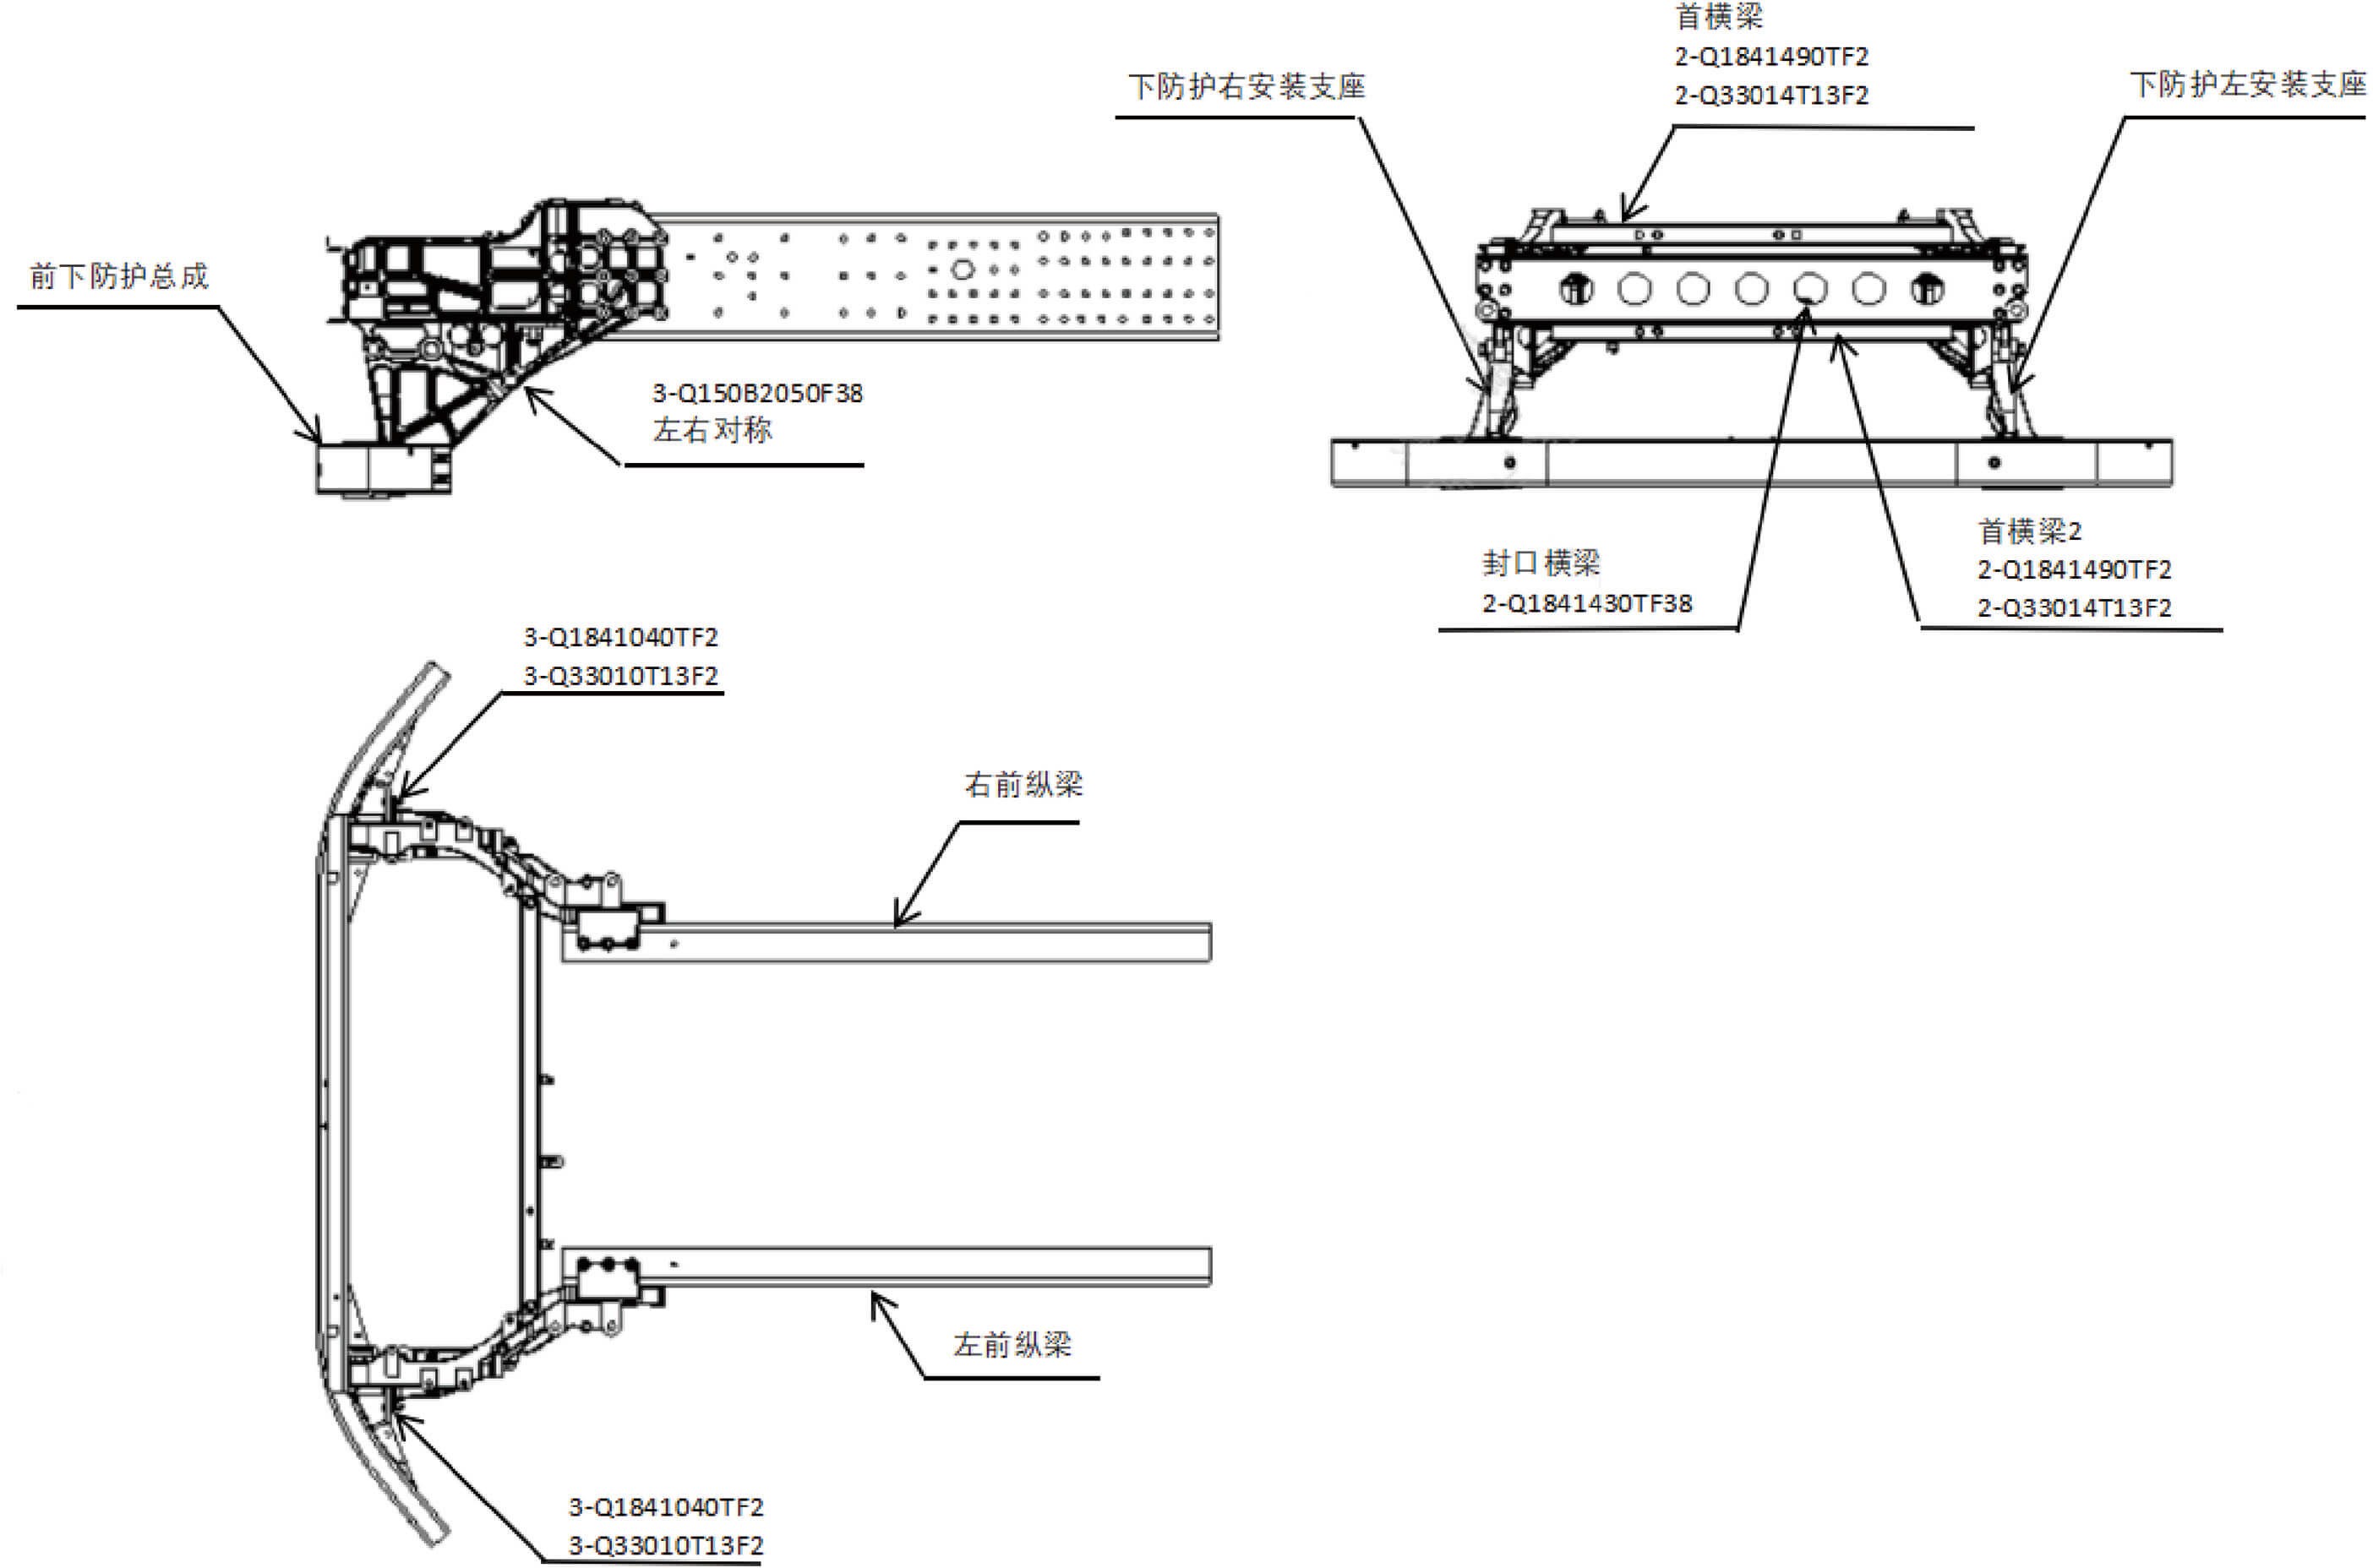
10.JEgenvekt, totalvekt (GVM), akseltrykk og drivmodus
Technical Data
|
|
|
|
|
|
|---|---|---|---|---|---|
|
11225kg |
|
|
|
|
|
11375kg |
|
|
|
|
|
12075kg |
|
|
|
|
|
12225kg |
|
|
|
|
10.KData for barometrisk trykk
Technical Data
|
|
|
|
|---|---|---|---|
|
|
|
|