Windrose E700 High-Voltage Course
Free course for drivers, mechanics and rescuers. Ten short modules. Each one has a short summary, steps, a quiz and its sources.
This is Windrose product training for the E700. It does not replace your country's high-voltage qualification. See the last module.
Who it is for
- Drivers: modules 1, 2, 4, 5, 6 and 9.
- Mechanics: all modules.
- Rescue services: modules 1, 2 and 9.
After the course you can
- Say which parts are always live.
- Switch the truck on and off.
- Jump-start flat 24 volt batteries.
- Make the truck safe for work, and prove it.
- Cut the high voltage in an emergency.
1 High-voltage safety rules
In short
What: The rules for anyone near the high voltage.
Why: The battery packs are always live.
⛔ Never touch orange parts or parts with a high-voltage sign.
Show details
Who may work on high voltage
- Only trained and qualified people work on high voltage.
- Only qualified workshops do service and repair.
- Do not change the high-voltage system or the body. Risk of fire.
- Drivers without training: do not take apart parts with a high-voltage sign.
On and around the truck
- Do not step on or hit the high-voltage battery.
- After an accident, do not touch orange cables or parts touching them.
- Battery and motor warning lamps stay on? Call after-sales. They read the fault codes.
- Smoke, fire or explosion from the EIC system? Leave the truck. Call the police.
- Truck parked for a long time? Check the high-voltage battery every two weeks. Charge it regularly.
Before and during high-voltage work
- Wear protective gear before you touch a high-voltage part. List: module 7.
- Even after switch-off, do not touch battery pack parts.
- Damaged high-voltage part? Wrap it with insulating tape.
- No watch, ring or metal jewellery.
- No keys, metal pens, phones or coins in your pockets.
- Only tools for the job. Metal tools need insulated handles.
- One person works. One person watches. Never two people working at once.
- Do not touch the person who is working.
- Before switching on: clear debris, send other people away, call it out loudly.
24 volt batteries
- Never touch + and − at the same time, with hands or metal.
- Never connect a 12 volt device to one battery.
- Battery acid burns. In eyes or on skin: rinse with lots of water. See a doctor.
- Do not take a battery apart. Only trained people service it.
- 24 volt battery on fire? Leave the truck fast. Breathed smoke? Go outside. See a doctor.
- Damaged cables, plugs or data lines? Stop. Cut the power. Call Windrose service.
- Overheating, smoke or sparks? Stop. Cut the power. Call Windrose service.
- Battery pack cracked or leaking? Stop. Cut the power. Call Windrose service.
Never
- Never touch orange parts or parts with a high-voltage sign.
- Never step on or hit the high-voltage battery.
- Never wear metal jewellery for high-voltage work.
- Never touch the person who is working.
Quiz
Module passed.
Sources: Owner's manual 9.J.1–9.J.4, 8.I, 8.J, 8.K, 9.K.
2 How high voltage works on this truck
In short
What: The high-voltage parts, and where power always stays on.
Why: Zone A is always live. Only zone B can be switched off.
⛔ Never open a battery pack.
Battery: LFP with 4 packs, or NCM with 6 or 4 packs.
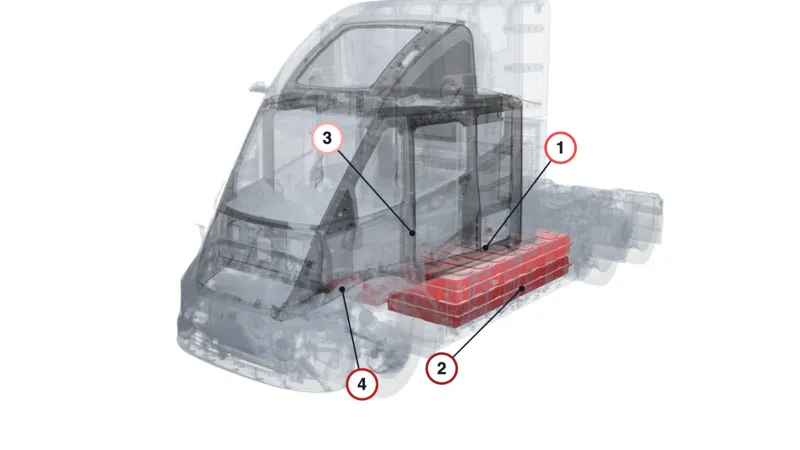
- 1 Pack 1 · left upper 2101100
- 2 Pack 2 · left lower 2101200
- 3 Pack 3 · right upper 2101300
- 4 Pack 4 · right lower 2101400
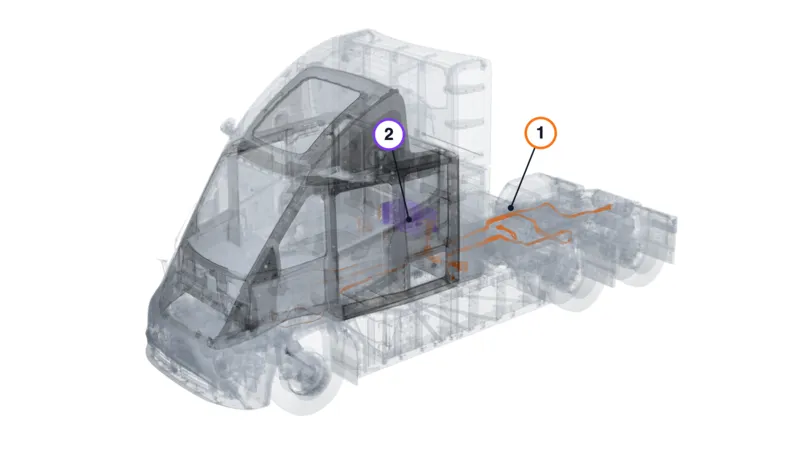
- 1 Orange high-voltage cables 2105210–2105240, 2105310, 2105320, 2105410, 2105510–2105530, 2105915–2105930, 2107101, 2107102
- 2 PDU (power distribution box) 2104100
Show details
- High-voltage parts: battery packs, orange cables, drive motors, charging ports.
- PDU (power distribution box): on the frame centre line, just behind the cab, in front of the middle axle.
- Contactors (electric switches) sit in the PDU. Circuits after them go dead at switch-off.
- MSD (low-voltage service plug): pull it and the contactors open.
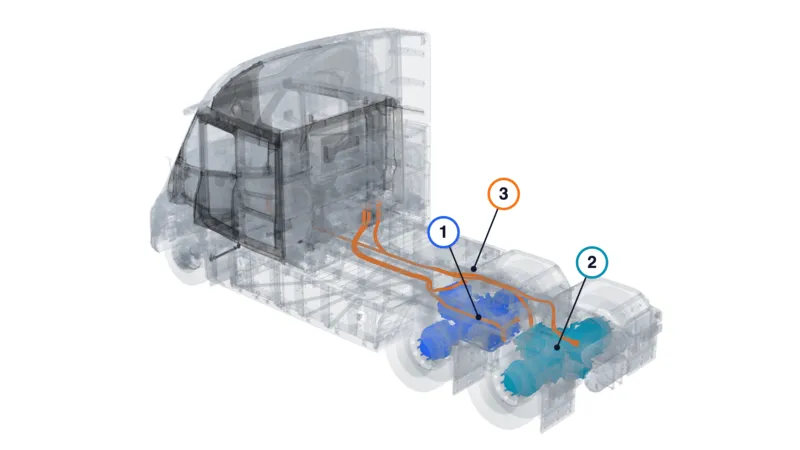
- 1 Middle e-axle, drive motor built in 2400100
- 2 Rear e-axle, drive motor built in 2400200
- 3 Motor power cables from the PDU 2105210–2105240
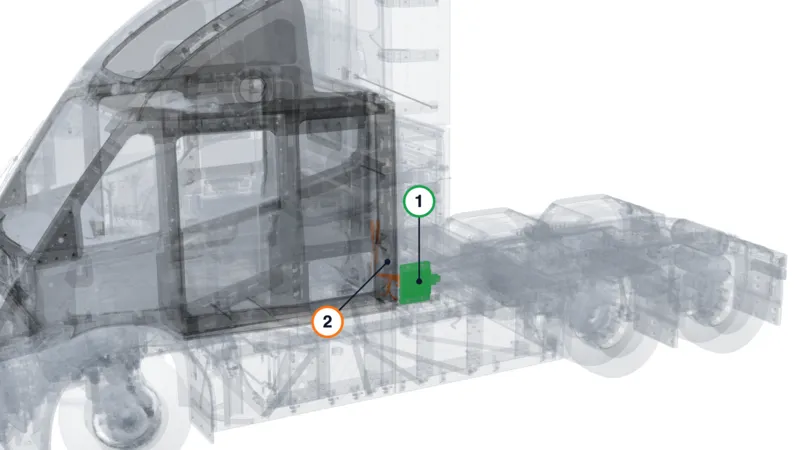
- 1 Charging port, left 5614010, 5614012
- 2 Charging cable 2107101
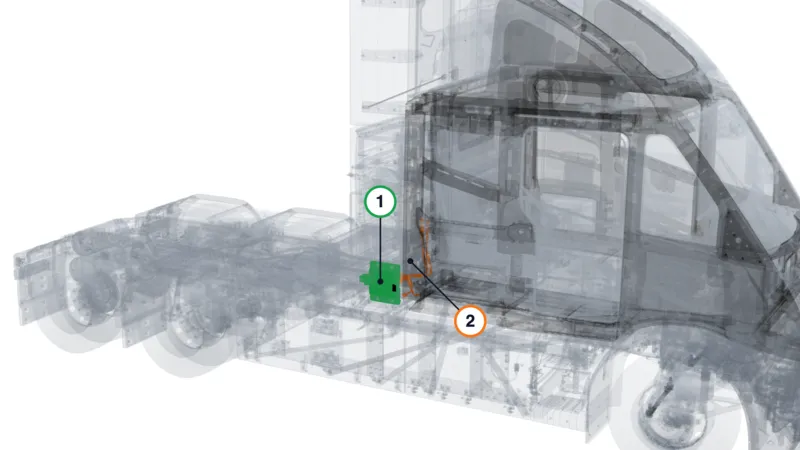
- 1 Charging port, right (CCS2) 5614020–5614022
- 2 Charging cable 2107102
Zone A · ALWAYS LIVE · about 766 volts
LFP version shown: 4 packs.
Zone B · after the contactors · below 60 volts 10 minutes after switch-off
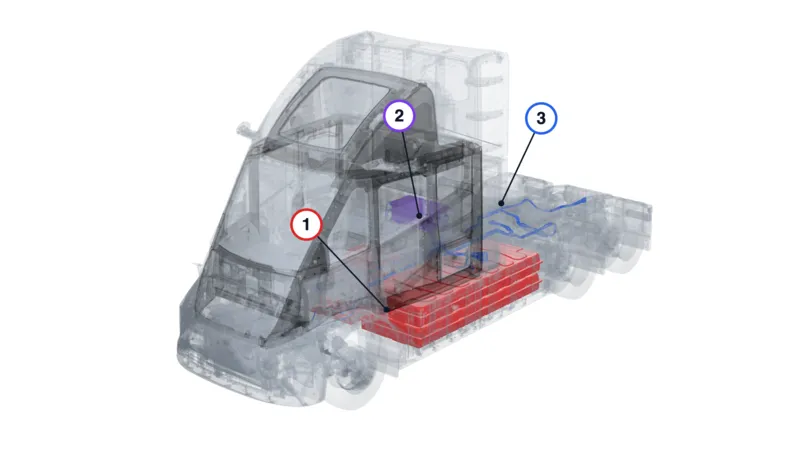
- 1 Zone A: battery packs, always live 2101100–2101400
- 2 PDU with the contactors 2104100
- 3 Zone B: cables after the contactors 2105210–2105240, 2105310, 2105320, 2105410, 2105510–2105530, 2107101, 2107102
- LFP version: 4 packs, 238 cells each. 766.4 volts nominal (595 to 868.7 volts).
- NCM version: 204 cells per pack. 754.8 volts nominal (571.2 to 887.4 volts).
- Each pack has an HV+ plug, an HV− plug and a small low-voltage plug.
- Each pack has its own + cable and − cable to the PDU. No switch on this cable.
Never
- Never treat a battery pack as dead. It is always live, about 766 volts.
- Never open a battery pack.
Quiz
Module passed.
Sources: Owner's manual 8.J; HV safety page §1–2; Service manual 1.9; PDU position: Windrose 3D model, from Teamcenter; pack count: Windrose, 2026.
3 Measuring: how to prove a part is dead
In short
What: How to prove a high-voltage part has no voltage.
Why: Switching off can fail. Only a measurement proves it.
⛔ Never start work at 60 volts DC or more.
Show details
- Safe limit: below 60 volts DC.
- Switching off only opens contactors. A welded (stuck) contactor stays closed.
- Capacitors (charge stores) stay charged after switch-off. Wait at least 10 minutes.
- Active discharge empties them. If it fails, resistors drain them slowly. The 10-minute wait covers this.
- Use a CAT III 1000 volt meter. DC range at least 1000 volts. Shrouded probes.
Take three readings
- Measure HV+ to HV−.
- Measure HV+ to chassis.
- Measure HV− to chassis.
- Why three: the system floats (IT system: no pole is tied to the chassis).
- With bad insulation, one pole can be live to chassis. HV+ to HV− can still read 0 volts.
Live–dead–live: test the meter twice
- Test the meter on the 24 volt battery. Expect 24 to 28 volts.
- Take the three readings.
- Test the meter on the 24 volt battery again.
- Second test fails? Earlier zero readings do not count. Use another meter.
Readings that mean danger
- One pole steady at several hundred volts to chassis: insulation fault. Any metal may be live. Close the area. Call a specialist.
- Pack HV+ to HV− reads 595 to 868.7 volts (LFP) or 571.2 to 887.4 volts (NCM). That is normal: the pack is always live.
- Pack pole to chassis near 0 volts or drifting: normal. Steady near pack voltage: insulation fault.
Never
- Never trust one reading. Take all three.
- Never trust a zero from a meter you did not test before and after.
- Never start work at 60 volts DC or more.
Quiz
Module passed.
Sources: HV safety page §1, §3, §5, §6; Service manual 1.5.
4 Switch on and off with the NFC card
In short
What: Switch the truck on and off with the NFC card.
Why: The same card spot switches on and off. Check the dashboard first.
⛔ Never swipe again while “Vehicle ready” is still off.
Show details
Read the dashboard
- Dashboard dark: truck OFF. Doors work. You cannot drive.
- Dashboard lit, “Vehicle ready” off: ON, not ready. You cannot select a gear.
- “Vehicle ready” and “High-voltage connected” lit: READY. You can drive.
Switch ON
- Swipe the card on the middle of the door handle. The truck unlocks.
- Get in.
- Hold the card on the NFC spot on the right dash. Take it away at once.
- Wait. The screens light up and “NFC Card valid” shows.
- Wait for “Vehicle ready”. Then select a gear and drive.
“Vehicle ready” stays off? Do not swipe again: that switches the truck off. Read the dashboard message. Fault shown? Call a Windrose service centre.
Switch OFF
- Stop the truck completely.
- Select N. Never D or R.
- Apply the EPB (electric parking brake). On a slope, also chock the wheels.
- Tap Control Centre → Setting → Power OFF on the screen. The parking brake applies itself.
- Check: “Vehicle ready” goes out, then the screens go dark.
- Get out. Swipe the card on the door handle to lock. The lights flash twice.
- Card instead of screen: apply the EPB by hand first. Then hold the card on the NFC spot.
- A brake noise at switch-off is normal. It is a self-test.
- The sliding door switches still work after switch-off.
Towing mode
- Press and hold the EPB switch.
- Tap Power OFF on the screen. Do not use the card.
- Release the EPB switch after more than 5 seconds. The brake stays released.
Good to know
- The 230 volt power outlet works only with high voltage on. Truck off: only 12 and 24 volts.
- High-voltage battery below 20 percent: alarm. Below 5 percent: less power, lower speed. Charge soon.
- Card care: do not bend, twist or cut it. Keep it away from heat, damp and strong vibration.
- Keep the card off wireless chargers and out of phone cases. Do not swipe it with other cards.
- Lost the card? Call the Windrose service hotline.
Never
- Never swipe again while “Vehicle ready” is still off.
- Never switch off in D or R.
- Never switch off with the card before you apply the EPB.
Quiz
Module passed.
5 Flat 24 volt batteries: check and jump-start
In short
What: The truck will not wake up. Check and jump-start the 24 volt batteries.
Why: A 12 volt source cannot wake a 24 volt truck.
⛔ Never connect + to −.
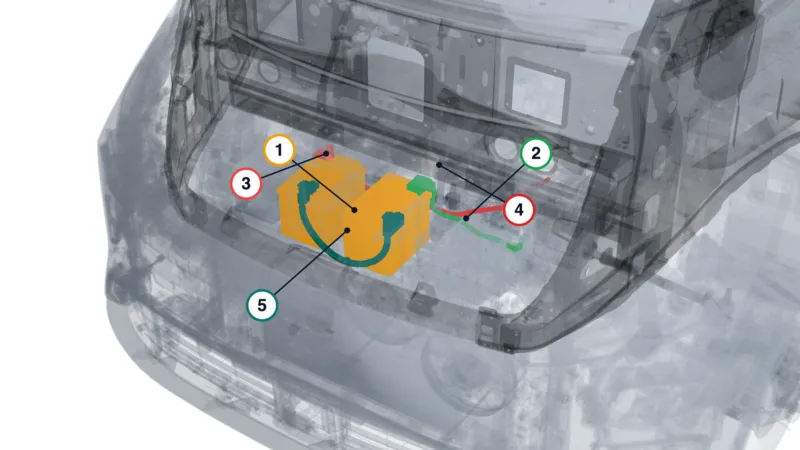
- 1 24 volt batteries (2 × 12 V) 3703100 ×2
- 2 + cable 4012102
- 3 IBS on the − post 3703300
- 4 − cable 4012101
- 5 Link cable between the batteries 4012600
Show details
- Two 12 volt batteries in series make 24 volts. They sit in the front compartment.
- IBS (battery sensor) sits on the − post. A link cable joins the two batteries.
- With high voltage on, the truck's 24 volt DC/DC (DCDC1, 6 kW) recharges the batteries.
Check
- Swipe the card on the dash. Screens dark and battery lamp on? Probably flat.
- Switch the truck off. With high voltage on, the reading is too high.
- Set the meter to DC volts.
- Measure the pair at the two outer posts.
- Measure each 12 volt battery.
- Compare with the table.
| Truck off, high voltage off | Each 12 volt battery | Pair, 24 volts |
|---|---|---|
| Full, at rest | ≥ 12.6 V | ≥ 25.2 V |
| Usable | 12.2–12.5 V | 24.4–25.0 V |
| Charge now | ≤ 12.0 V | ≤ 24.0 V |
| Flat | ≤ 11.8 V | ≤ 23.5 V |
- Charge the pair as 24 volts. Or switch high voltage on and let the DC/DC charge it.
- Workshop battery test: service manual 7.4.4 (good, charge, or replace).
Jump-start (24 volts only)
- Get a 24 volt source: another Windrose truck, or a 24 volt pack or charger.
- Switch both trucks off.
- Leave every cable on. Do not touch the link cable.
- Red clamp on the free + post. It is the one without the link cable.
- Other red clamp on the donor's 24 volt +.
- Black clamp on the donor's 24 volt − first.
- Other black clamp on clean chassis metal, away from the batteries. Or on the free − post with the IBS.
- Run the donor for a few minutes.
- Swipe the card on the dash. With high voltage on, DCDC1 recharges the pair.
- Remove in reverse: black from this truck, black from donor, red from donor, red from this truck.
- Keep the clamp jaws apart.
Hard reset of the 24 volt system: high voltage off first, then open the − post.
Touching + and − together: see the 24 volt rules in module 1.
Never
- Never jump from a 12 volt car or 12 volt jump box.
- Never connect + to −.
- Never clamp the link cable between the batteries.
- Never charge one 12 volt battery on its own.
Quiz
Module passed.
Sources: Battery reset page (Check, Specs, Jump); Service manual 7.4.4; Owner's manual 9.K.
6 High voltage lost while driving
In short
What: The truck loses high voltage while you drive.
Why: You must stop safely and get help.
⛔ Never drive on without an inspection.
Show details
- Switch on the hazard lights.
- Try to start the truck again.
- It works? Pull over. Get it inspected before you drive on.
- It does not work? Roll to the side of the road.
- Place warning signs around the truck.
- Call the Windrose service hotline.
- Prevent it: service the truck regularly at a Windrose centre.
- Warning lamps that stay on: see module 1.
Never
- Never drive on without an inspection after a high-voltage loss.
Quiz
Module passed.
Sources: Owner's manual 8.G.
7 Make the truck safe for high-voltage work
In short
What: Switch high voltage off, lock it out, and prove it is dead.
Why: Parts after the PDU must read below 60 volts before you touch them.
⛔ Never start before all three readings are below 60 volts.
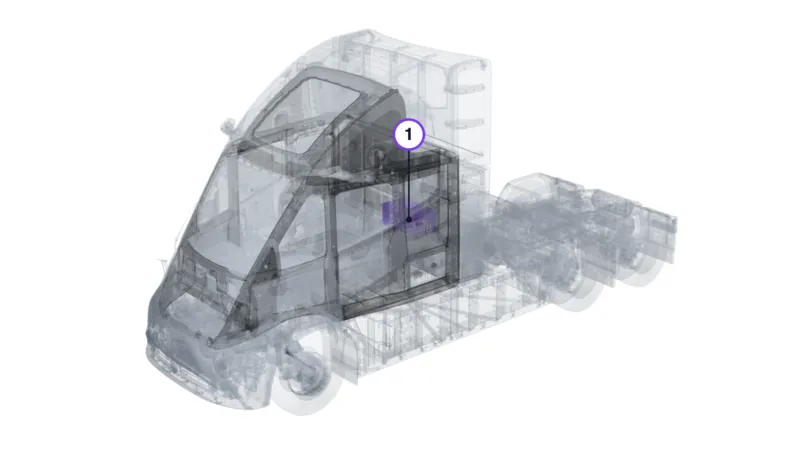
- 1 PDU (power distribution box) 2104100
Show details
For qualified high-voltage mechanics only. Follow your national rules too.
Gear you need
| Item | What you need |
|---|---|
| Meter | CAT III 1000 volts or higher. DC range at least 1000 volts. Shrouded probes. |
| Test source | Known voltage to test the meter. The truck's 24 volt battery is fine. |
| Insulating gloves | Class 0. Rating: 1,000 volts (owner's manual 8.I) / 1,500 volts DC (HV safety page §3). Leather over-gloves. Air-test before use. |
| Eyes and face | Arc-rated face shield. Impact-rated safety goggles. |
| Insulated tools | 1000 volt sockets and torque wrench. |
| Insulating shoes | For work on the high-voltage system. |
| Lock-out | MSD and key stay with you. Sign: “High-voltage work. Do not switch on.” |
| Second person | Present all the time, with an insulated rescue hook. |
| Diagnostic tool | To read fault codes and contactor status. |
Steps
- Park. Apply the EPB.
- Unplug any charging cable.
- Connect the diagnostic tool. Read the PDU fault codes.
- “Contactor welded” code? Stop. See “If something is wrong”.
- Pull the MSD. One place is enough. High voltage switches off by itself.
In the cab
- Open the cover at the lower left of the dash.
- Pull the MSD.
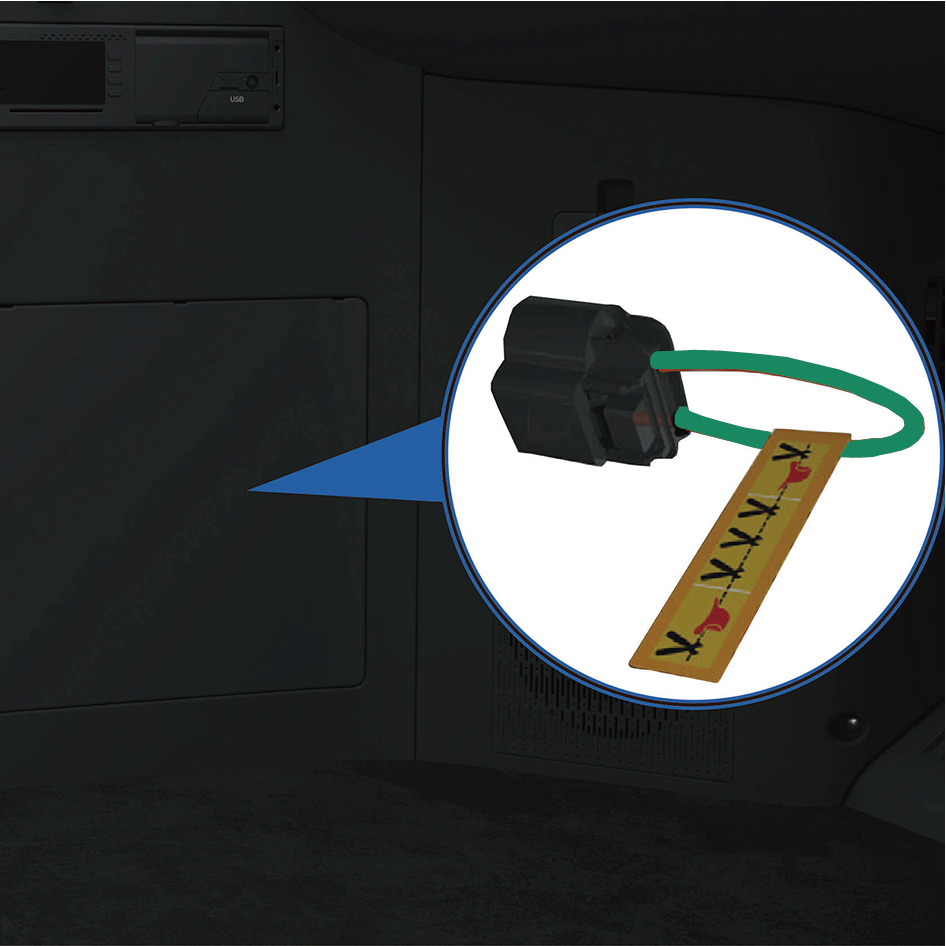
In the cab: behind the lower-left dash cover. Outside
- Open the door.
- Pull the hood release twice.
- Pull the MSD in the front compartment.
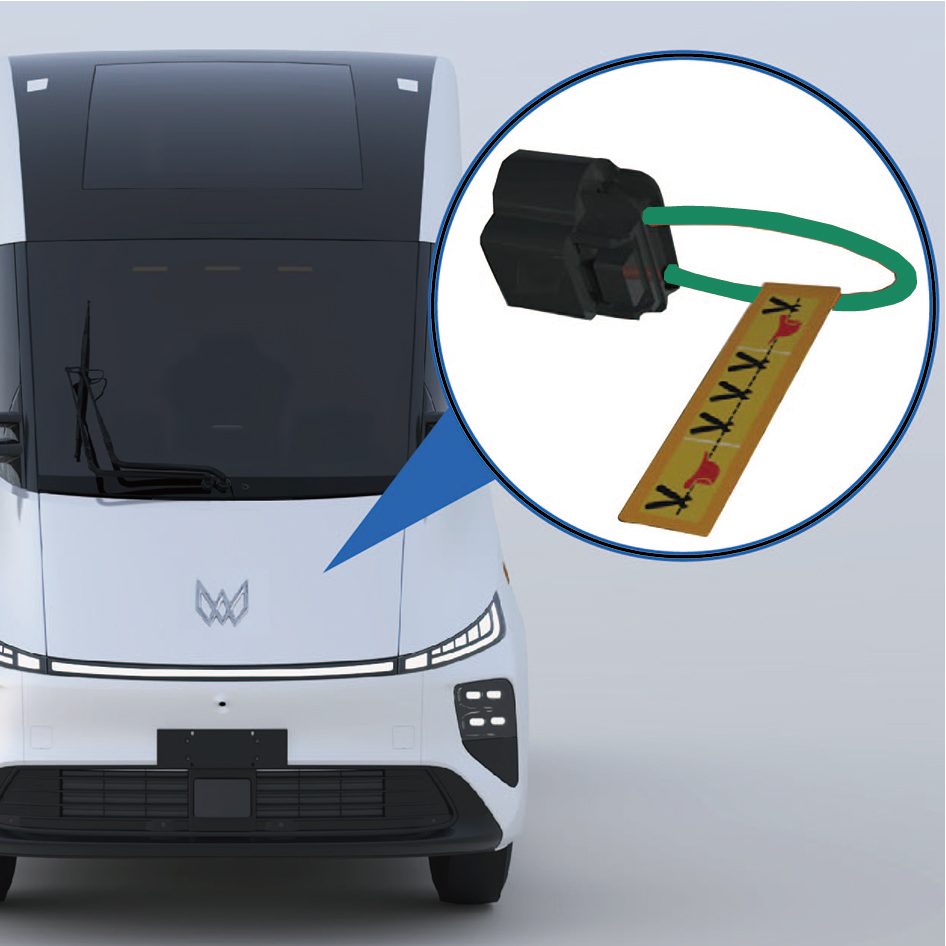
Outside: in the front compartment, under the hood. - Keep the MSD and the key on you. Hang a “Do not switch on” sign.
- Disconnect the 24 volt battery −.
- Wait at least 10 minutes.
- Put on insulating gloves and a face shield. Second person ready.
- Measure at the part: three readings, live–dead–live (module 3).
- All three below 60 volts? Start work.
If something is wrong
- Still above 60 volts after 10 minutes? Wait 10 more. Measure again. No drop: treat it as a welded contactor.
- Welded contactor, or steady pack voltage? The circuit is still live. Do not unplug: it arcs. Call a high-voltage specialist.
- Meter test fails? Change the meter. Start again.
- Battery pack hit, flooded, smoking, smelling or hot? No checks. Move the truck outside. Keep away. Watch the temperature. Stop charging.
- Damaged high-voltage cable? Wrap it with insulating tape. Then measure.
- Insulation fault: see module 3.
Never
- Never start before all three readings are below 60 volts.
- Never skip the 10-minute wait.
- Never unplug a high-voltage plug under load.
- Never check or work on a damaged, flooded or hot battery pack.
Quiz
Module passed.
Sources: Service manual 1.9.1.1, 1.9.1.2, 1.5; HV safety page §3–6; Owner's manual 8.I, 8.J, 9.J.2.
8 Switch back on after work
In short
What: Put high voltage back on after the work.
Why: Plugs, debris and people must be checked first.
⛔ Never switch on without calling it out loudly.
Show details
- Plug in every high-voltage connector until it clicks.
- Tug each connector once.
- Clear debris around the high-voltage parts.
- Send other people away.
- Refit the MSD.
- Reconnect the 24 volt battery −.
- Call out loudly: “Switching on!”
- Switch on (module 4).
- Read the fault codes. No insulation or interlock (safety loop) fault? Done.
Never
- Never switch on before you clear debris and people.
- Never switch on without calling it out loudly.
Quiz
Module passed.
Sources: HV safety page §4; Owner's manual 9.J.2.
9 Emergency and rescue
In short
What: Cut the high voltage in an emergency. Fire and water rules.
Why: In a crash, high voltage switches off by itself. Otherwise pull the MSD.
⛔ Never touch battery pack parts, even after cut-off.
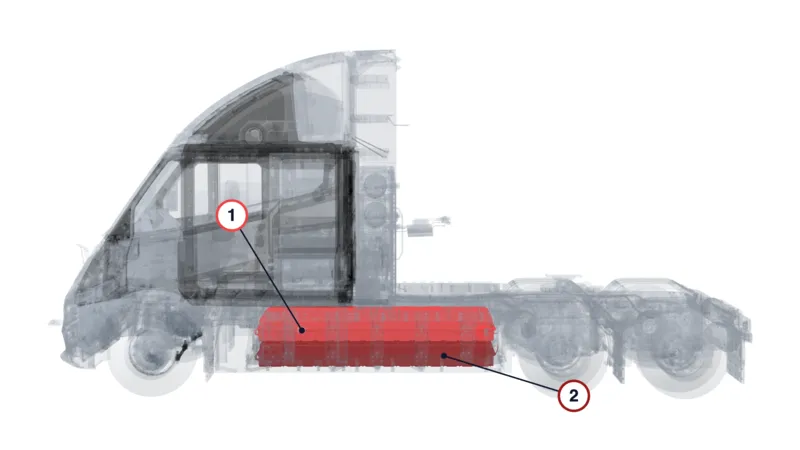
- 1 Pack 1 · left upper 2101100
- 2 Pack 2 · left lower 2101200
Show details
Cut-off from outside
- Park. Apply the EPB.
- Pull the hood release twice.
- Pull the MSD in the engine compartment.
Cut-off from inside
- Park. Apply the EPB.
- Open the cover at the lower left of the dash.
- Pull the MSD.
- High voltage then switches off by itself.
- Emergency: you may cut the orange wire on the MSD. Then it cannot switch back on.
Rescuers
- Wear impact-rated goggles, Class 0 gloves (1,000 volts) and insulated tools.
- Have insulated rescue hooks and a lithium battery extinguisher ready.
- One works, one watches, no touching, no metal jewellery: see module 1.
Fire
- Everyone out. Call 112.
- Tell them: battery electric truck with a high-voltage battery. Risk of shock, chemicals and thermal runaway.
- Small fire: dry powder, CO₂ or dry sand.
- High-voltage parts burning: a lithium battery extinguisher.
- Big fire, or a crushed or bent battery: lots of water, non-stop.
- Move burnable things away from the truck.
- Trapped people and doors will not open: rescuers may break a window at its edge.
- Battery fire after a crash: pull over. Everyone out, away from traffic.
- Battery fire: below 20 km/h the sliding door unlocks. Below 6 km/h it opens.
- Battery fire and no braking within 4 minutes? The truck slows and stops itself.
- Smoke, fire or explosion from the EIC system: leave the truck and call the police.
Water
- A truck from floodwater can look fine and still leak current.
- Wear protective gear before you touch high-voltage parts in water.
- Let the truck dry completely before any work.
Never
- Never touch battery pack parts, even after cut-off.
- Never work on a flooded truck before it is completely dry.
Quiz
Module passed.
10 High-voltage faults: what the manuals say
In short
What: What the truck does at switch-off, and how it reports faults.
Why: The fault code tells you which system to check first.
⛔ Never do live work without a national live-work qualification.
Show details
Windrose does not yet publish a step-by-step procedure for fault finding with high voltage on. Live work only by people with the national live-work qualification. Follow your employer's procedure.
What switch-off does
- Power domain controller (VDC): switches high voltage on and off.
- Normal switch-off: the VDC stops the motors. It opens the main positive contactor.
- Each pack has a main negative contactor. It stays closed for 10 minutes after a normal switch-off.
- Severe (level 3) fault: the VDC switches off without the 10-minute delay.
- Charging gun plugged in: the main negative contactors stay closed.
Insulation monitor
- The PDU has a built-in insulation monitor. It reports to the VDC.
- Released service manual values:
| Insulation resistance | What happens | Code |
|---|---|---|
| 5,000 kilo-ohms or less | Warning | P109E30 |
| 1,000 kilo-ohms or less | Power limited | P109D30 |
| 500 kilo-ohms or less | High voltage cut | P109C30 |
Fault codes and first checks
- Always first: read the code. Clear it. Restart. Read again. Code gone? Look for an intermittent fault.
- Insulation fault (VDC: P109E30, P109D30, P109C30): check the insulation resistance of the high-voltage parts.
- Interlock fault (VDC: P10A930): check the high-voltage harness and the interlock harness of each part. Interlock (HVIL) = a safety loop through the high-voltage plugs.
- Pack interlock fault (battery controller CMU, for example P163700): check the same two harnesses.
- Contactor or precharge fault (PDU, codes P26…): confirm the code. Inspect. Reload the software. Still there? Replace the PDU.
- 24 volt charging fault (DCDC1): check the 24 volt batteries. Then check the PDU charging circuit.
Measuring
- Before high-voltage work, the released manual asks for a 10-minute wait for the capacitors.
- The released manual gives no probe points for measuring with high voltage on.
Never
- Never do live work without a national live-work qualification.
- Never skip the 10-minute wait. The main negative stays closed that long.
Quiz
Module passed.
Sources: Service manual 7.2.4.44, 7.2.4.60, 4.3.4.3, 4.3.4.10, 4.6.4.9, 4.6.4.19, 1.5; Windrose engineering documentation (internal).
11 Course completed
Passed all ten modules? Write your name. Print this sheet or save it as PDF.
Windrose E700 High-Voltage Course: completion sheet
has completed the ten modules and quizzes of the Windrose E700 High-Voltage Course on windrose.ai.
Modules passed: 0 / 10
This is Windrose product training for the E700. It does not replace your country's high-voltage qualification. See the last module.
www.windrose.ai/high-voltage-course
National qualifications for high-voltage work
You also need your country's qualification. Windrose's target for its own service people is the highest live-work level.
| Country | Qualification | Good to know | Link |
|---|---|---|---|
| Belgium | Educam HEV3 Garage & Heavy Duty; HEV4 Risk Expert | Certificates valid 6 years. | HEV3 · HEV3 Garage & Heavy Duty · HEV4 Risk Expert |
| Germany | DGUV Information 209-093, Stufe 3S | Needs level 2S, age 18 or over, medical fitness. | DGUV 209-093 |
| France | NF C18-550 | Issued by the employer. | |
| Netherlands | NEN 9140 | Live-work level: ev-VP. | NEN 9140 |
| United Kingdom | IMI Level 4 | Needs Level 3. | IMI |
Source: the linked pages.
Based on the Windrose owner's manual and service manual (EU editions).