← Back to Contents
6 Vehicle Body / 6.12 Side Wall Interior Decoration Device | PDF pages 739-774
6.12 Side Wall Interior Decoration Device
6.12 Side Wall Interior Decoration Device
6.12 Side Wall Interior Decoration
Device
6.12.1 Specifications
6.12.1.1 Fastener Specifications
Range Of Torque
Fastener Specifications
Specifications
Foot Pounds of Torque (ft lbs)
The fixing bolt connecting the left side
panel assembly, the side panel clothes
drying rod assembly, and the side panel
(18.5 +/- 2) ft lbs
M8
sheet metal is the fixing bolt connecting
the left side panel lower decorative
panel body assembly
The fixing bolt connecting the right rear
(6.5 +/- .75) ft lbs
M6
side panel assembly and the side panel
sheet metal
The fixing bolt connecting the sunshade
cover assembly and the sunshade cover
(6.5 +/- .75) ft lbs
M6
installation bracket assembly
The fixing bolt connecting the thermos
holder bracket assembly and the white
(6.5 +/- .75) ft lbs
M6
body assembly assembly
The fixing bolt connecting the thermos
holder and the thermos holder bracket
(6.5 +/- .75) ft lbs
M6
assembly
6.12.2 Decomposition Diagram
6.12.2.1 Decomposition Diagram
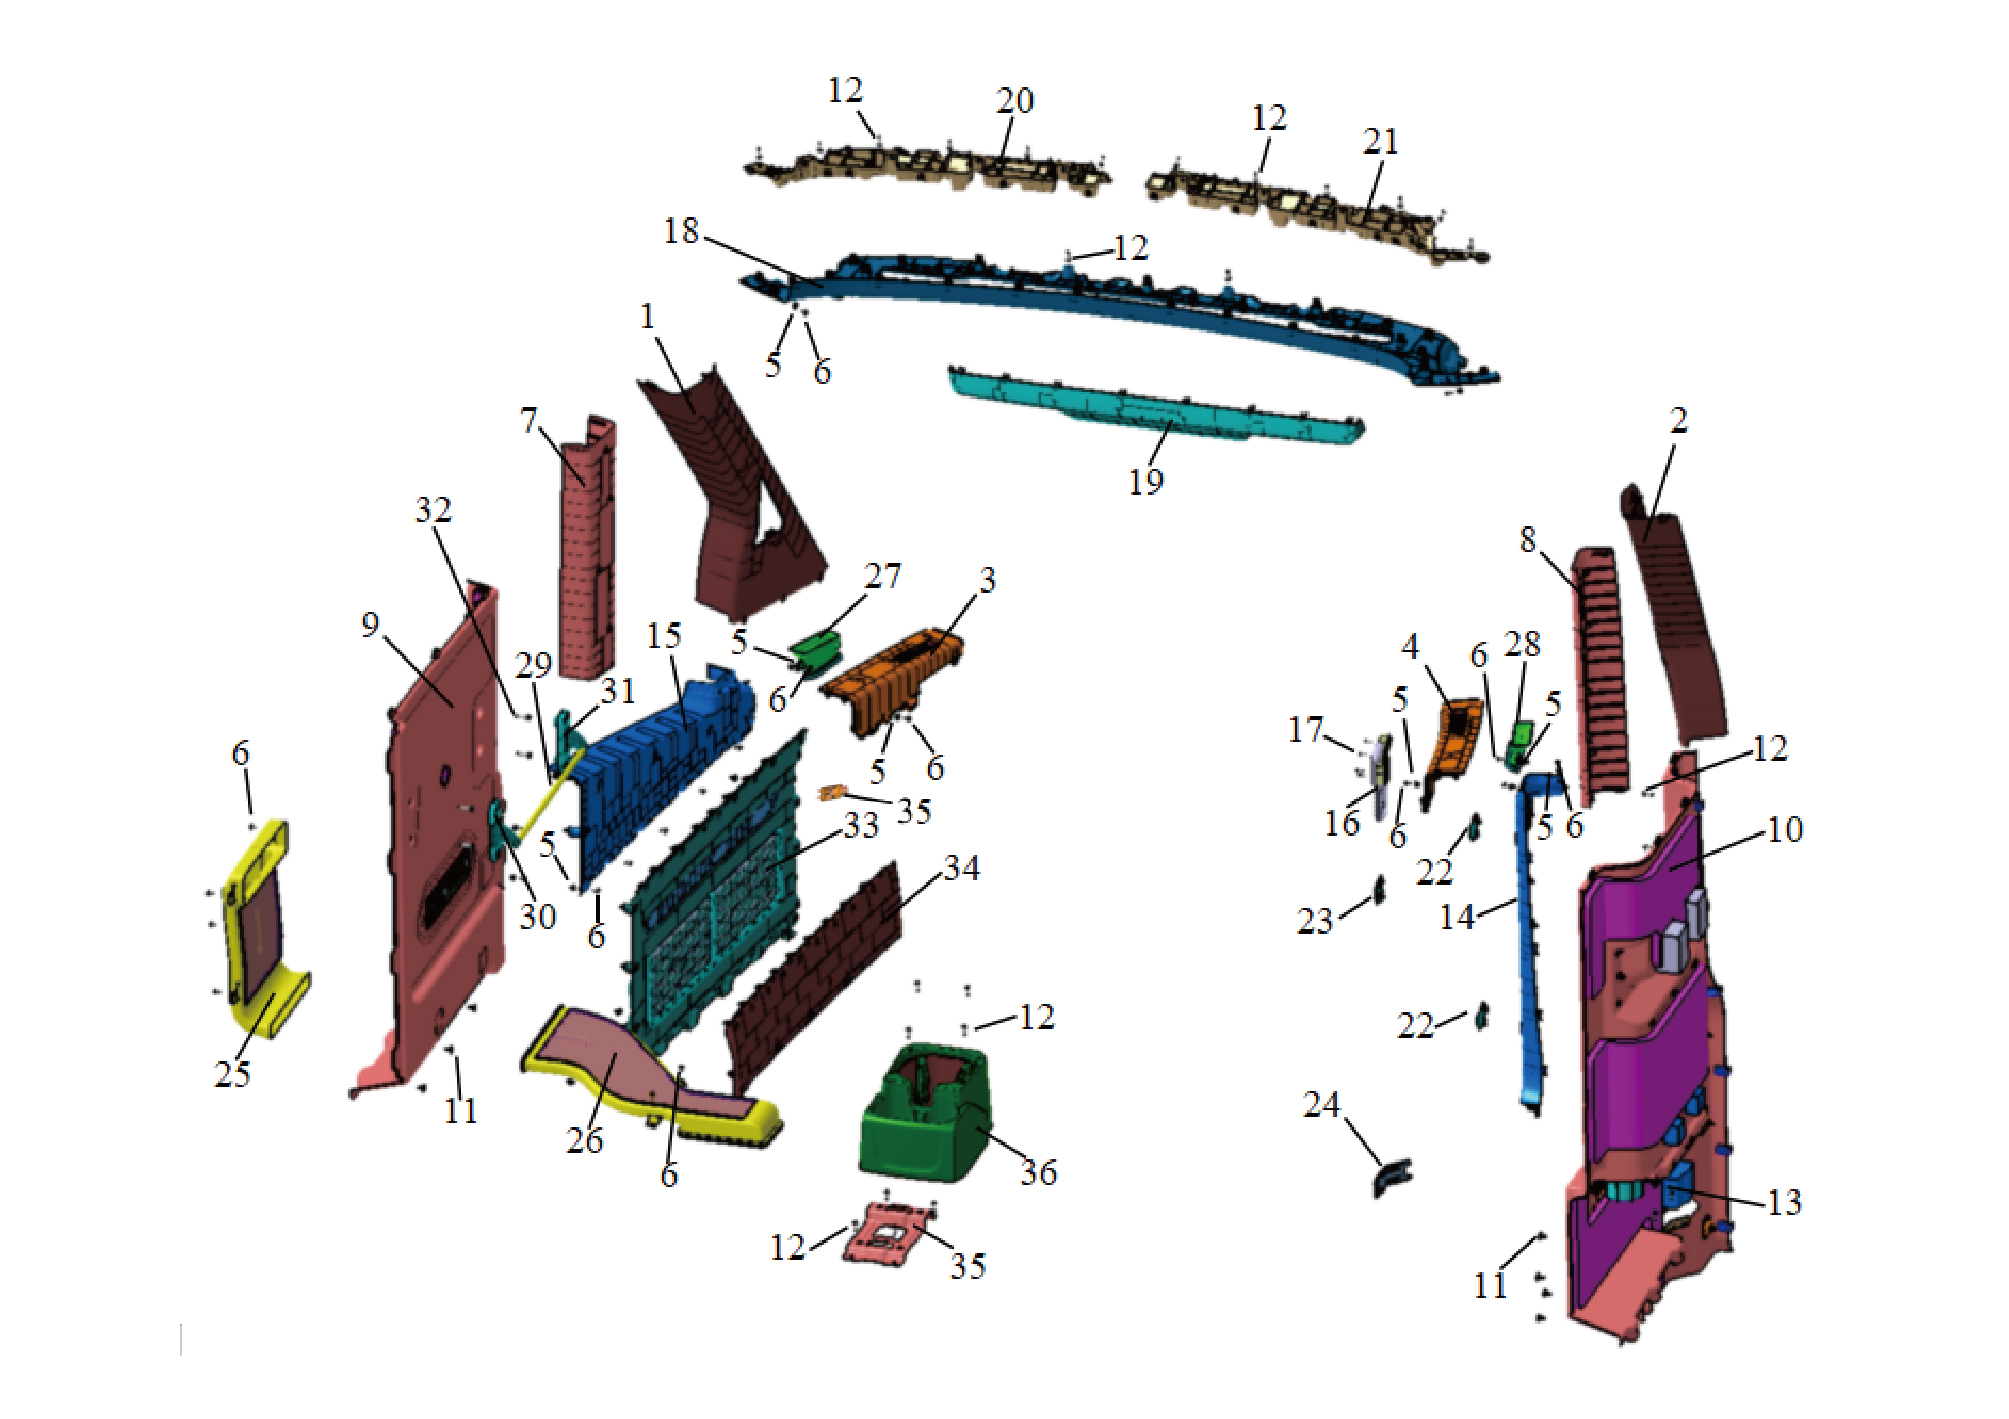
1.
19.
A-Pillar Guard Assy-Lh
BCover Assy-Front Camera Decorative
2.
20.
A-Pillar Guard Assy-Rh
Brkt Assy-Sun Blind Cover-Lh
3.
21.
Front Side Enclosure Assy-Lh
Brkt Assy-Sun Blind Cover-Rh
4.
22.
Front Side Enclosure Assy-Rh
Handle Cover-Frt
5.
23.
Plastic Nut Seat
Handle Cover-Rr Upr
6.
24.
Self-Tapping Screw
Handle Cover-Rr Lwr
7.
25.
B-Pillar Upper Guard Plate Assy-Lh
Air Duct-Rear Air Conditioner Upper
8.
26.
B-Pillar Upper Guard Plate Assy-Rh
Air Duct-Rear Air Conditioner Lower
9.
Enclosure Assy-lh Rr
27.
Wind Duct-Lh
10.
Rear Enclosure Plate Assy-Rh
28.
Wind Duct-Rh
11.
29.
Tree Clasp
Side Hanging Rod Assy
13.
30.
Cross Recessed Pan Head Machine Screw
The Bracket of Center Cover
14.
31.
B-Pillar Lower Shield Assy-Rh
Rear Car Pull Strap Body
15.
32.
Hexagon Flange Bolt
Center Side Enclosure Assy-Lh
16.
33.
Safety Hammer
Center Side Enclosure Assy-mid Lh
17.
34.
Self-Tapping Screw
Center Side Enclosure Assy-lwr Lh
18.
35.
Sun Blind Cover AAssy
Emergency Hammer Cable Cover
6.12.3 Dismantling and Installation
6.12.3.1 Replacement of Left A-pillar Protective Plate Assembly
Protective Plate Assembly
Removal Procedures
1
Open the door.
2
Open the front flip cover plate.
3
Disconnect the battery negative cable.
caution
power down the high-voltage system before
disconnecting the negative pole of the storage
battery.
4
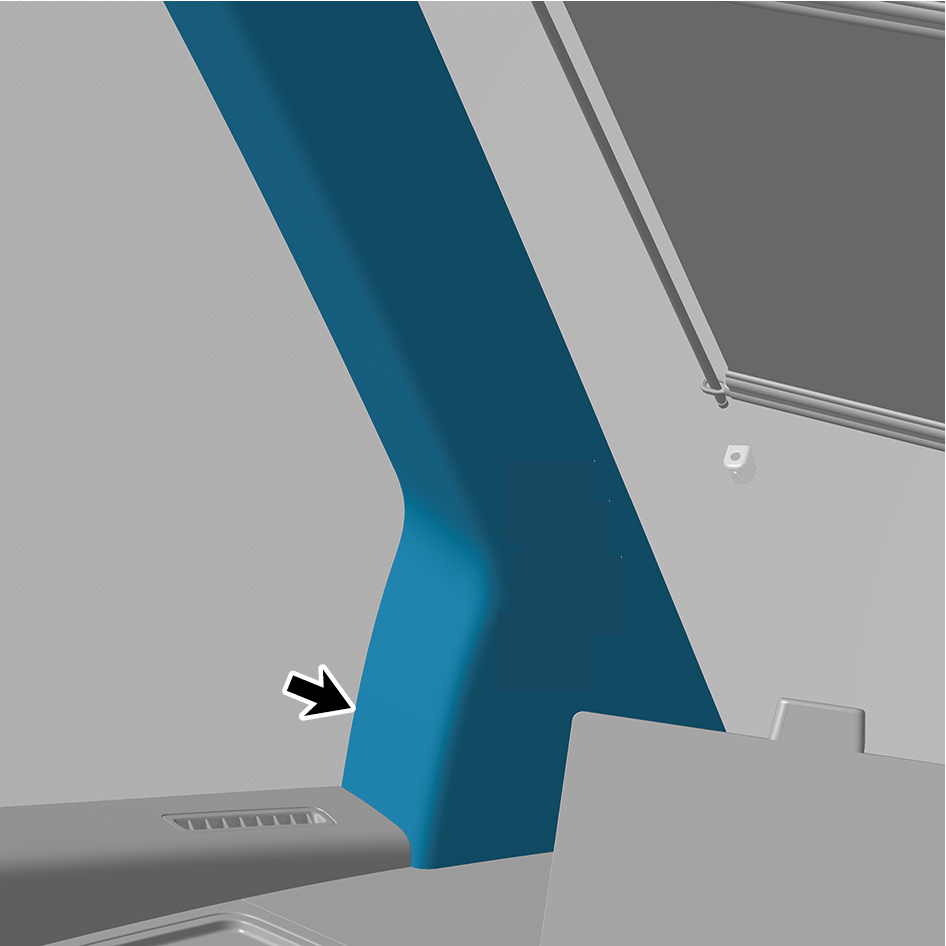
Remove the left A-pillar protective plate assembly.
Installation Procedures
1
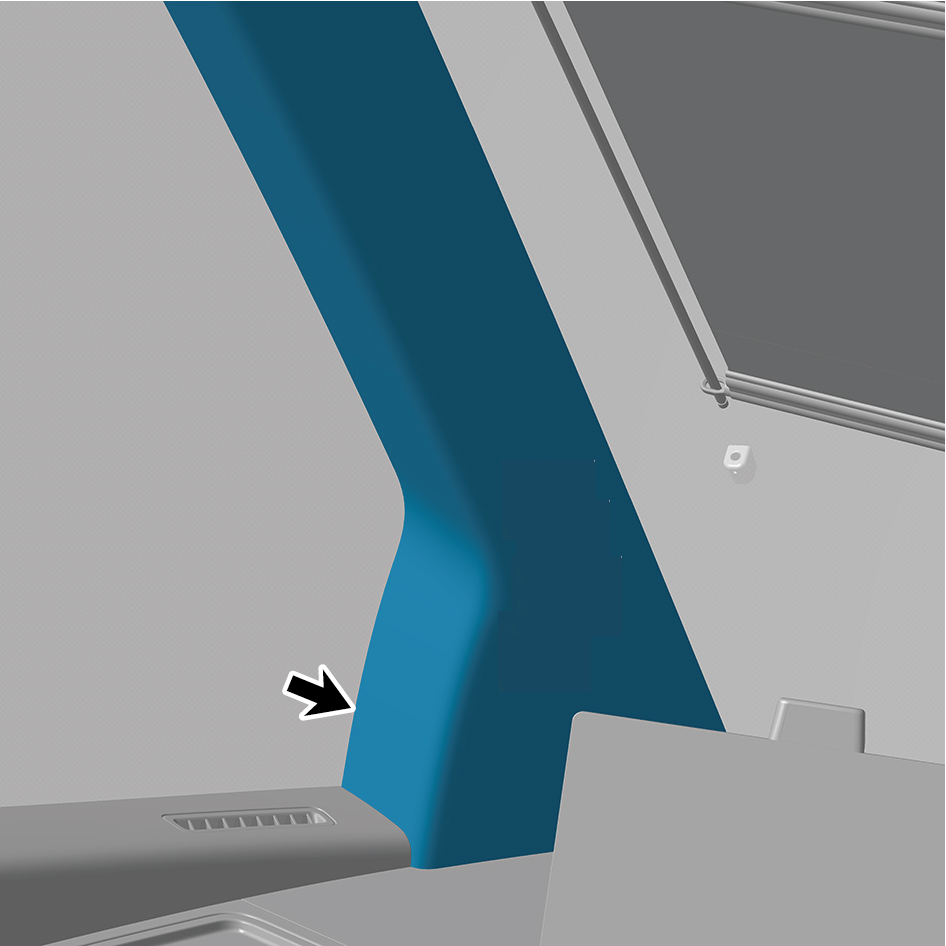
Install the left A-pillar protective plate assembly.
2
Connect the battery negative cable.
3
Close the front flip cover plate.
4
Close the door.
6.12.3.2 Replacement of Right A-pillar Protective Plate Assembly
Protective Plate Assembly
Removal Procedures
1
Open the door.
2
Open the front flip cover plate.
3
Disconnect the battery negative cable.
caution
power down the high-voltage system before
disconnecting the negative pole of the storage
battery.
4
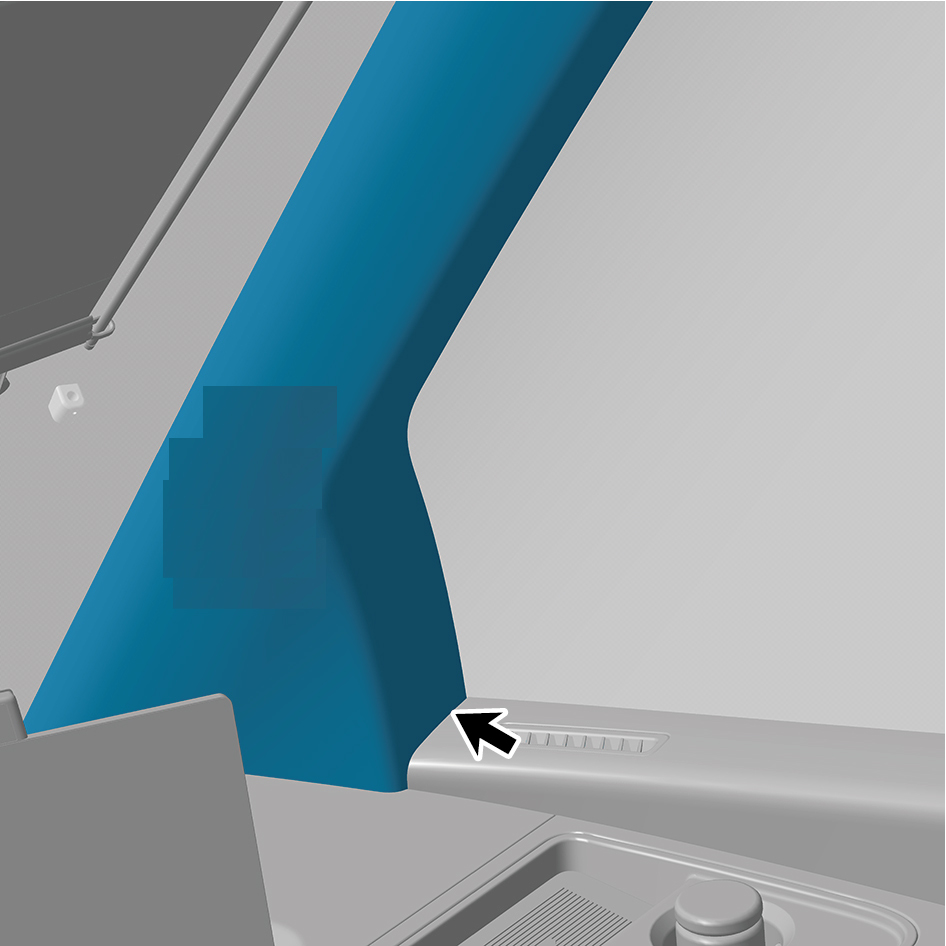
Remove the right A-pillar protective plate assembly.
Installation Procedures
1
Move the right A-pillar protective plate assembly to the
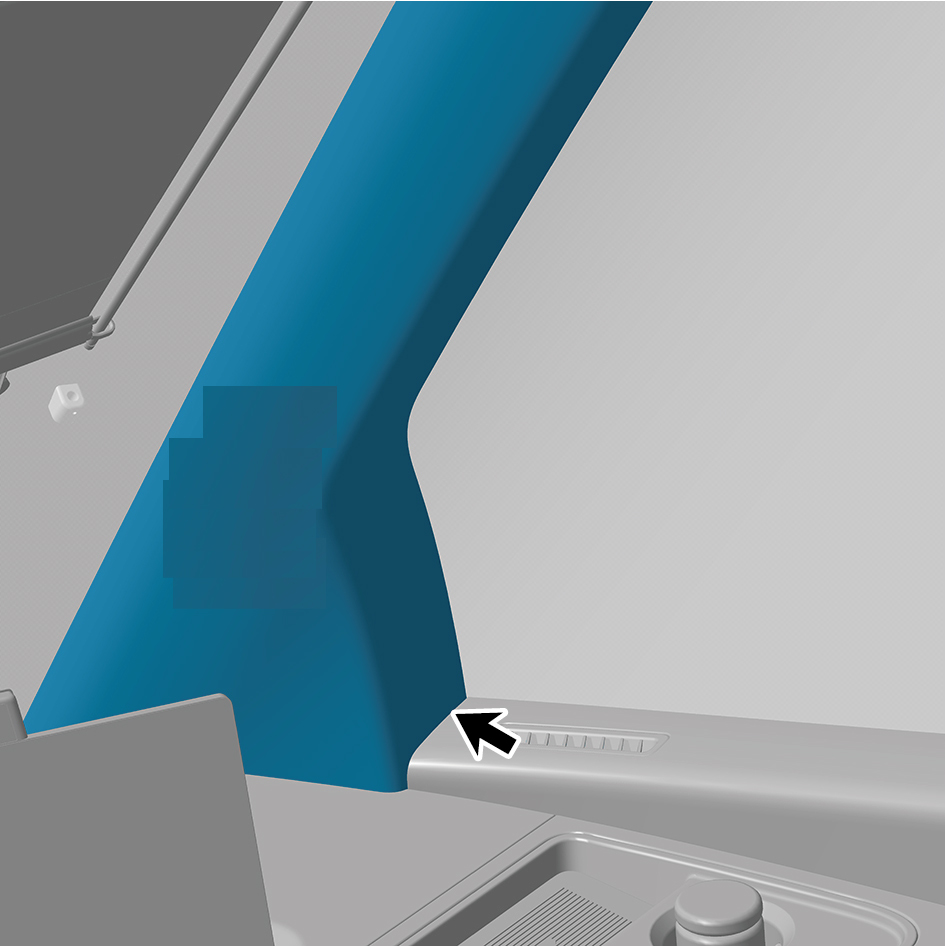
mounting position.
2
Connect the battery negative cable.
3
Close the front flip cover plate.
4
Close the door.
6.12.3.3 Replacement of Left Front Side Wall Protective Plate Assembly
Protective Plate Assembly
Removal Procedures
1
Open the door.
2
Open the front flip cover plate.
3
Disconnect the battery negative cable.
caution
power down the high-voltage system before
disconnecting the negative pole of the storage
battery.
4
Remove the IP left upper trim panel assembly.
5
Remove the left A-pillar protective plate assembly.
6
Remove 1 fixing screw of the left front side wall protective
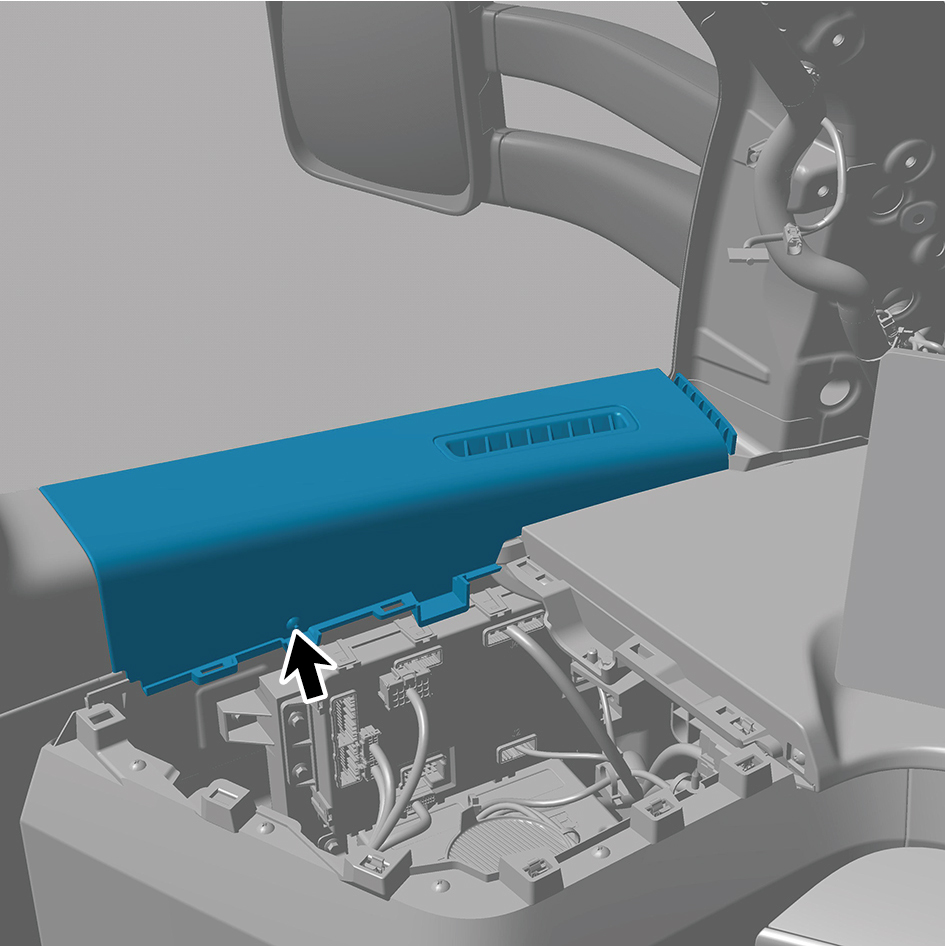
plate assembly.
7
Remove the left front side wall protective plate assembly.
Installation Procedures
1
Move the left front side wall protective plate assembly to
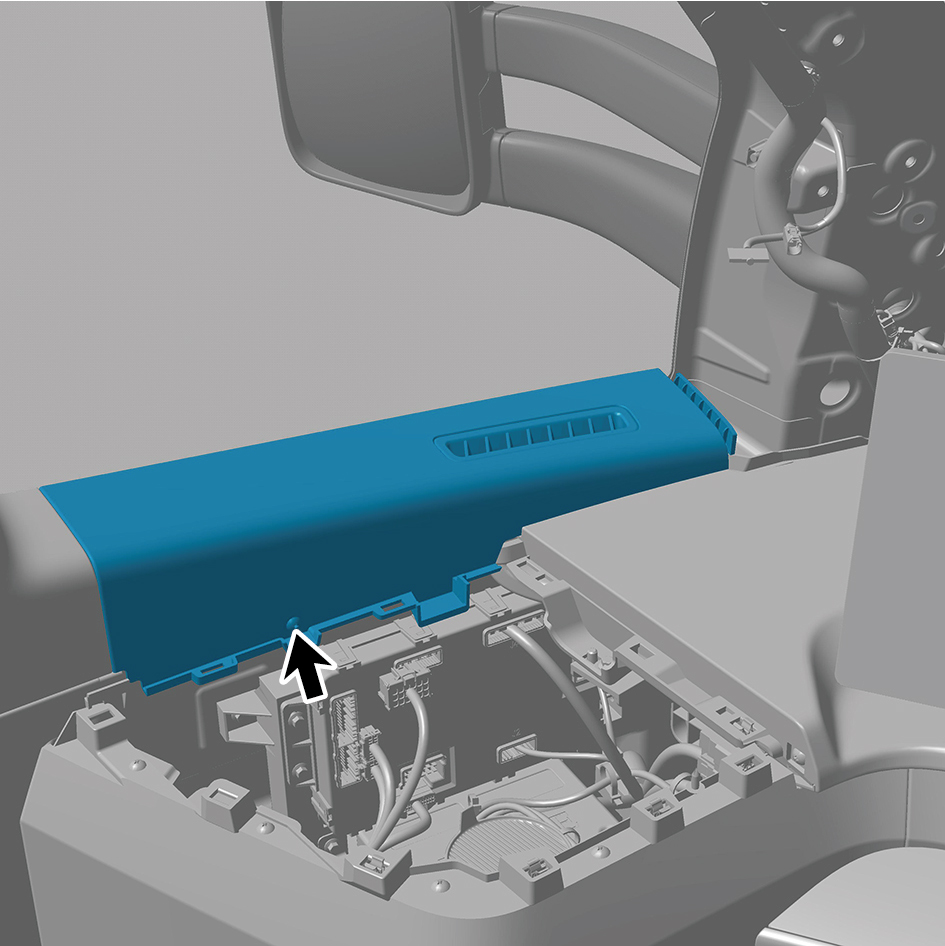
the mounting position.
2
Install 1 fixing screw of the left front side wall protective
plate assembly.
3
Install the left A-pillar protective plate assembly.
4
Install the IP left upper trim panel assembly.
5
Connect the battery negative cable.
6
Close the front flip cover plate.
7
Close the door.
6.12.3.4 Replacement of Right Front Side Wall Protective Plate Assembly
Protective Plate Assembly
Removal Procedures
1
Open the door.
2
Open the front flip cover plate.
3
Disconnect the battery negative cable.
caution
power down the high-voltage system before
disconnecting the negative pole of the storage
battery.
4
Remove the IP right upper trim panel assembly.
5
Remove the right A-pillar protective plate assembly.
6
Remove 1 fixing screw of the right front side wall
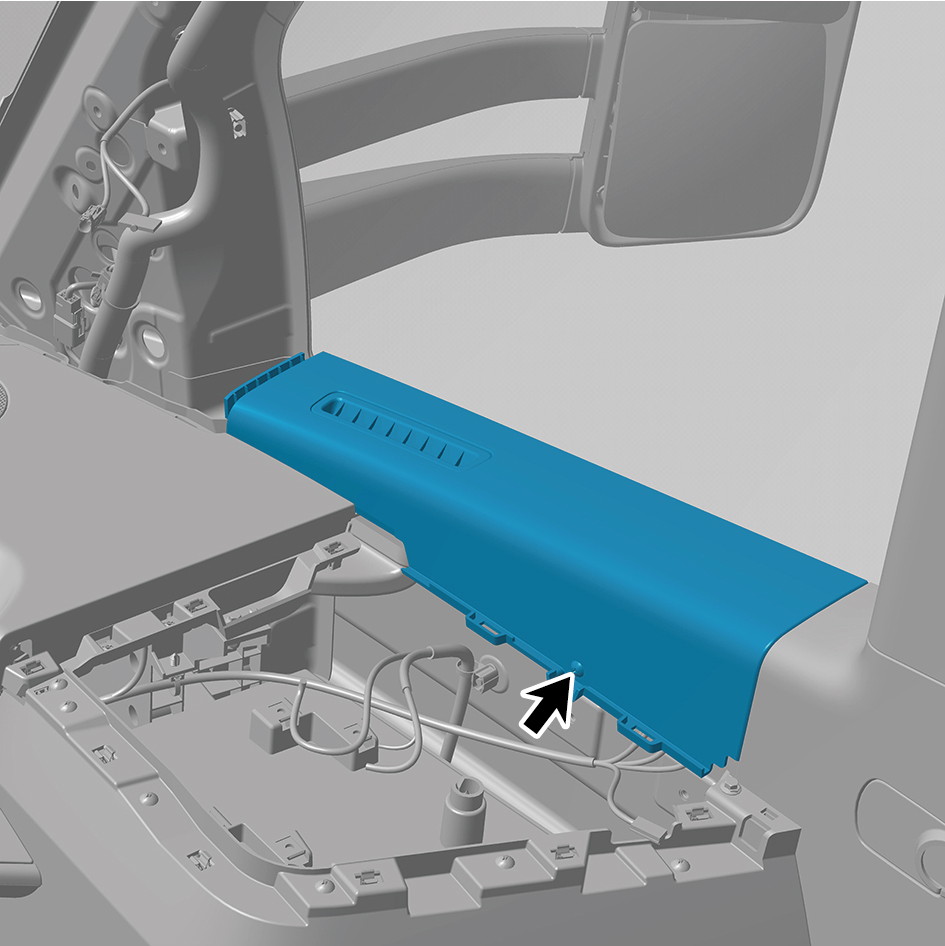
protective plate assembly.
7
Remove the right front side wall protective plate assembly.
Installation Procedures
1
Move the right front side wall protective plate assembly to
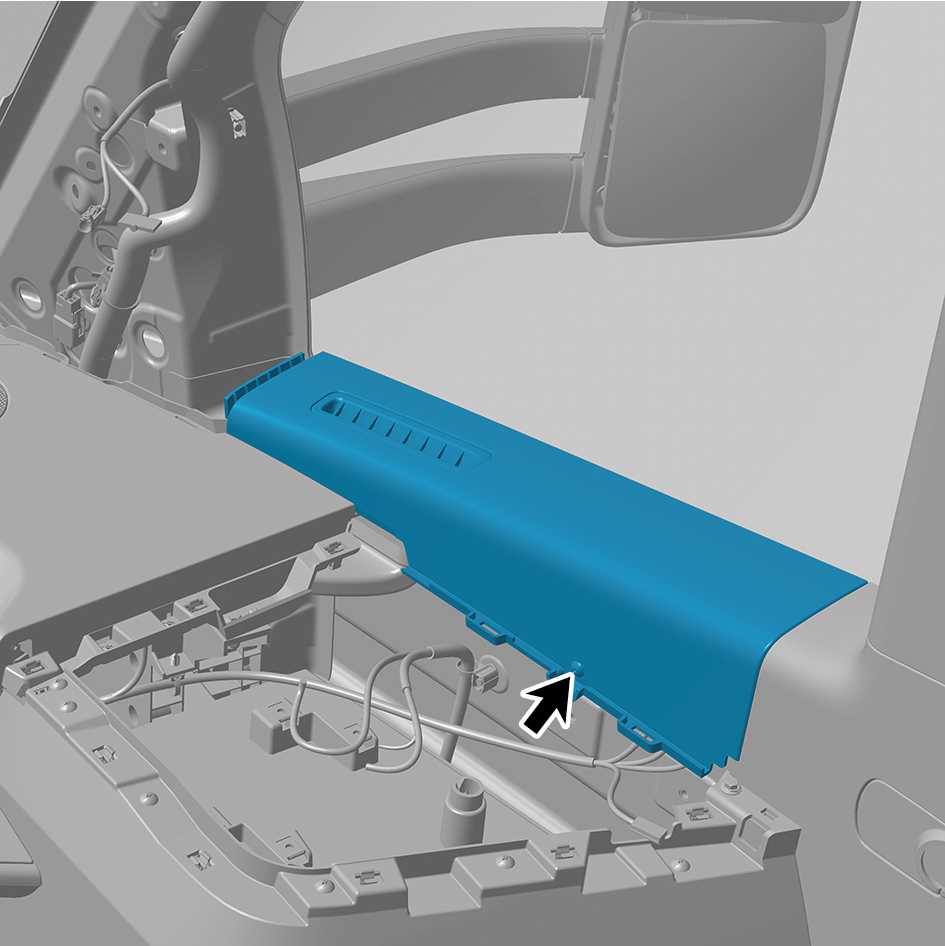
the mounting position.
2
Install 1 fixing screw of the right front side wall protective
plate assembly.
3
Install the right A-pillar protective plate assembly.
4
Install the IP right upper trim panel assembly.
5
Connect the battery negative cable.
6
Close the front flip cover plate.
7
Close the door.
6.12.3.5 Replacement of Left B-pillar Upper Protective Plate Assembly
Protective Plate Assembly
Removal Procedures
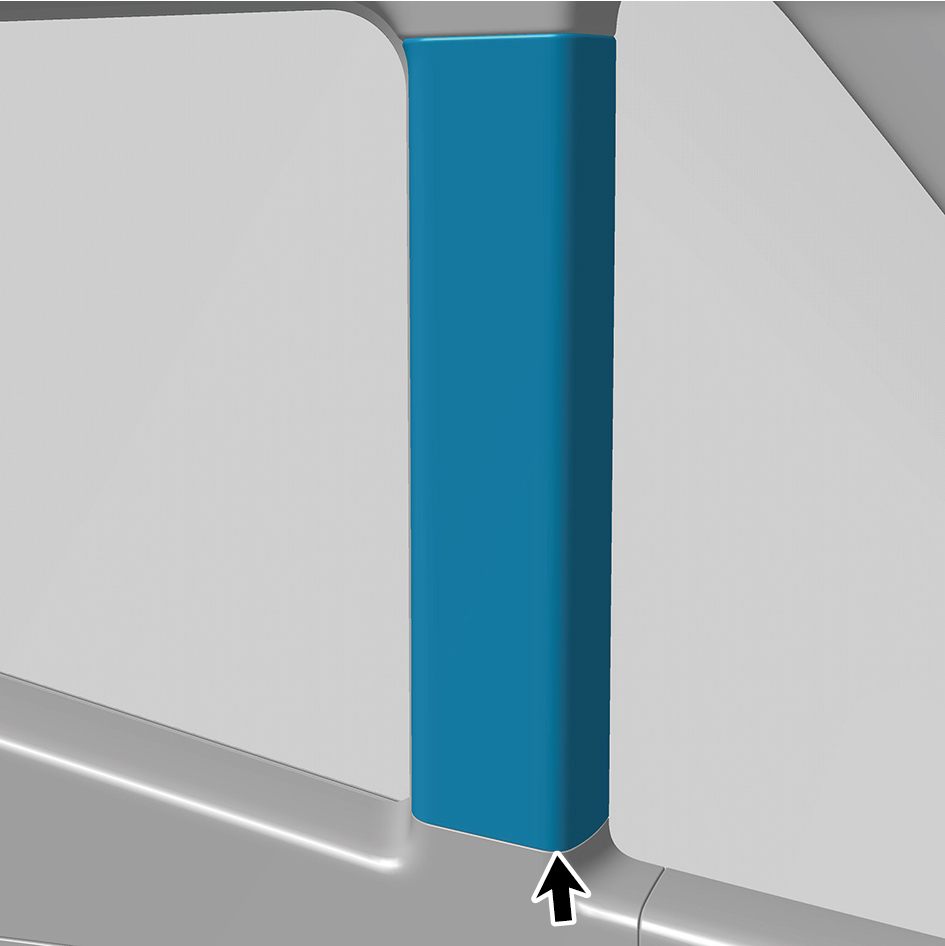
1
Open the door.
2
Remove the left B-pillar upper protective plate assembly.
Installation Procedures
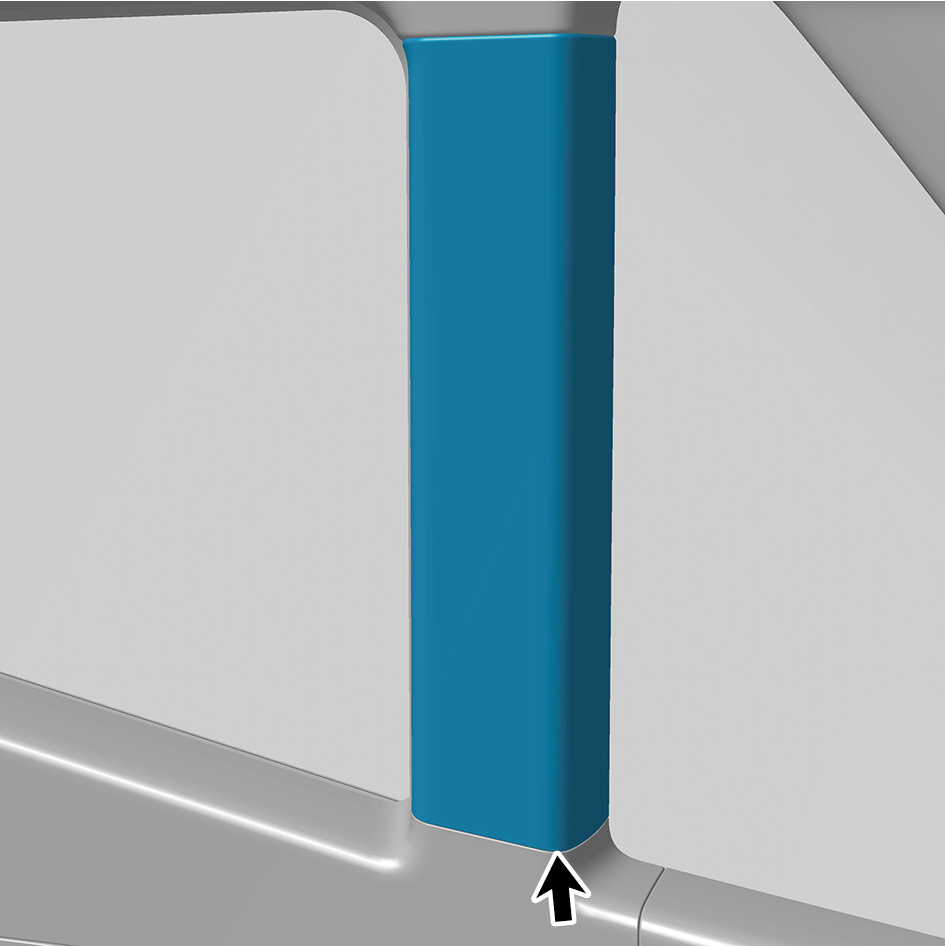
1
Install the left B-pillar upper protective plate assembly.
2
Close the door.
6.12.3.6 Replacement of Right B-pillar Upper Protective Plate Assembly
Protective Plate Assembly
Removal Procedures
1
Open the door.
2
Open the front flip cover plate.
3
Disconnect the battery negative cable.
caution
power down the high-voltage system before
disconnecting the negative pole of the storage
battery.
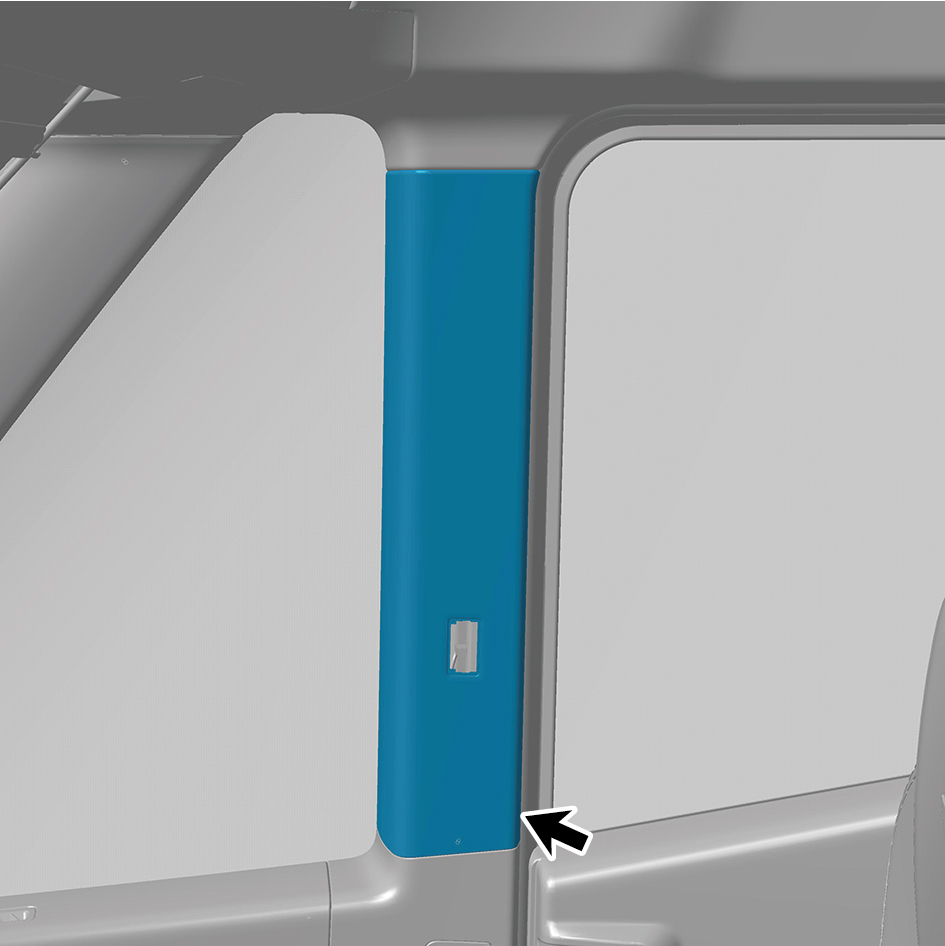
4
Remove the electric sliding door switch.
5
Remove the right B-pillar upper protective plate assembly.
Installation Procedures
1
Install the right B-pillar upper protective plate assembly.
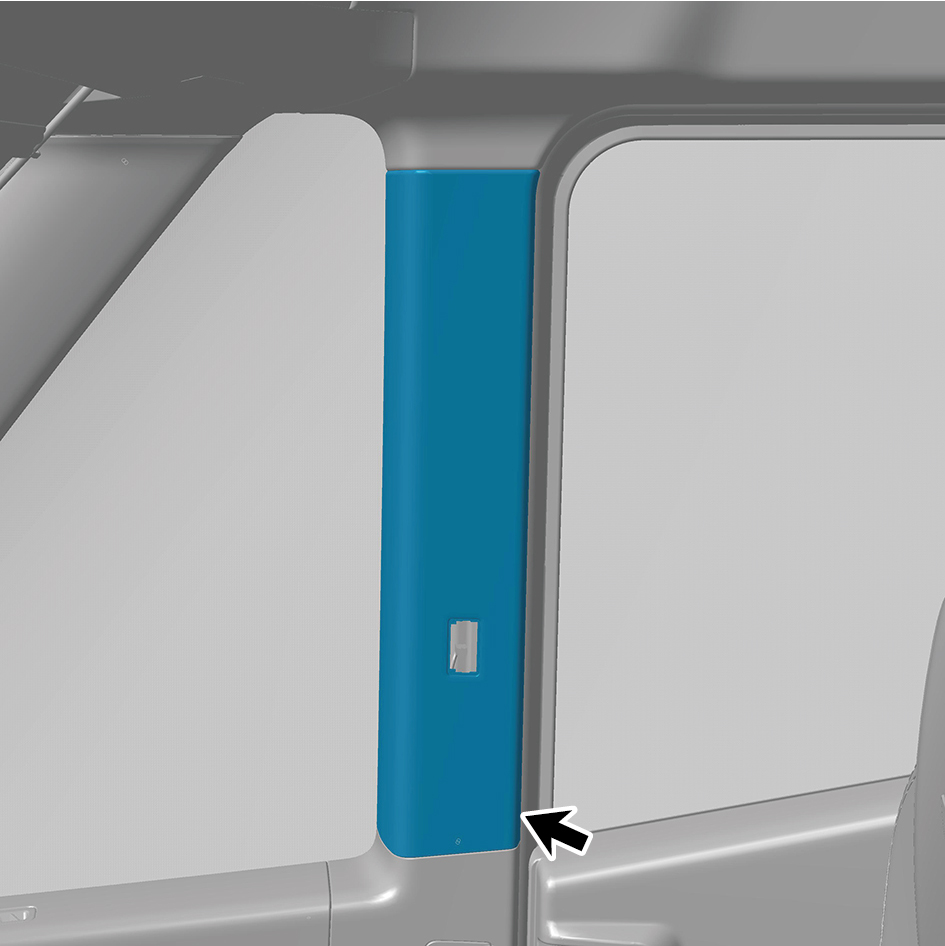
2
Install the electric sliding door switch.
3
Connect the battery negative cable.
4
Close the front flip cover plate.
5
Close the door.
6.12.3.7 Replacement of Left Rear Side Wall Protective Plate Assembly
Protective Plate Assembly
Removal Procedures
1
Open the door.
2
Open the front flip cover plate.
3
Disconnect the battery negative cable.
caution
power down the high-voltage system before
disconnecting the negative pole of the storage
battery.
4
Remove the IP left upper trim panel assembly.
5
Remove the left A-pillar protective plate assembly.
6
Remove the left front side wall protective plate assembly.
7
Remove the front USB interface.
8
Remove the IP left access cover plate assembly.
9
Remove the left switch panel assembly.
10
Remove the left switch panel lower trim panel assembly.
11
Remove the IP left lower trim panel assembly.
12
Remove the left middle side wall lower trim panel
assembly.
13
Remove the left middle side wall middle trim panel
assembly.
caution
1.First remove the break glass hammer's zipper
cover, carefully take out the break glass hammer's
pull ring and place it inside the trim panel.
2.Be careful to avoid accidentally pulling the break
glass hammer's pull ring.
14
Remove the left B-pillar upper protective plate assembly.
15
Remove the left middle side wall protective plate
assembly.
16
Remove the side wall clothes rail assembly.
17
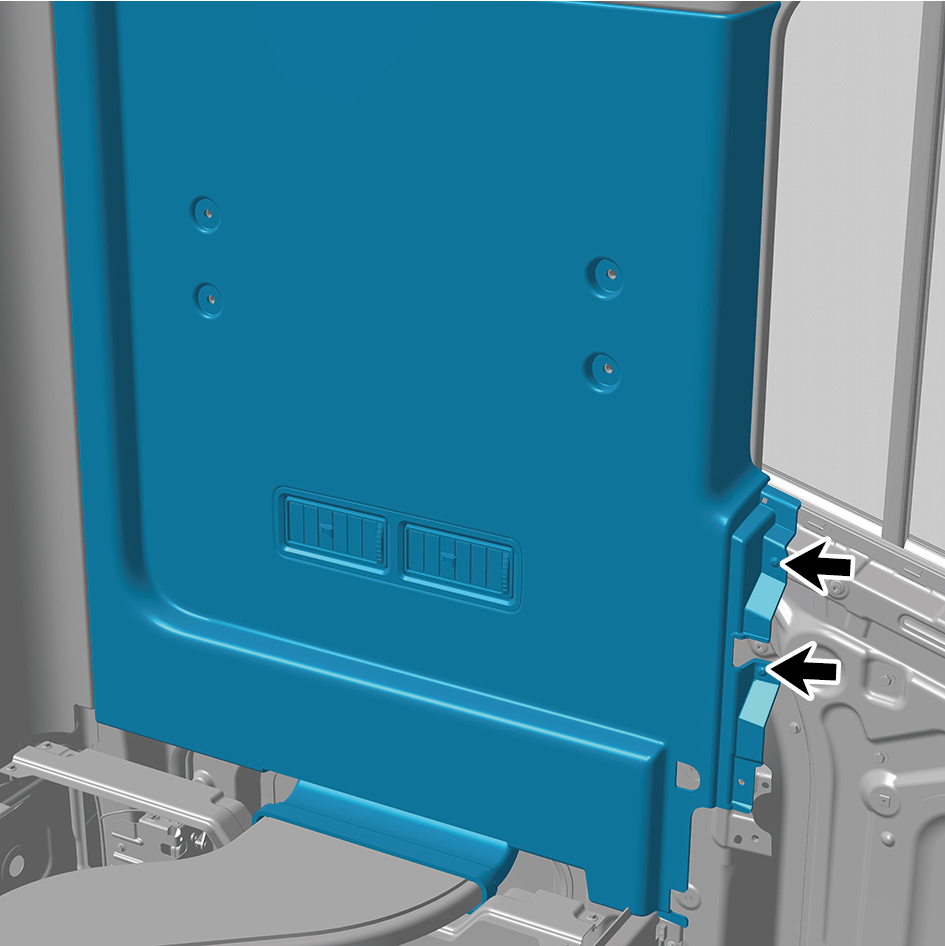
Remove 2 fixing screws of the left rear side wall protective
plate assembly.
18
Remove the left rear side wall protective plate assembly.
Installation Procedures
1
Move the left rear side wall protective plate assembly to
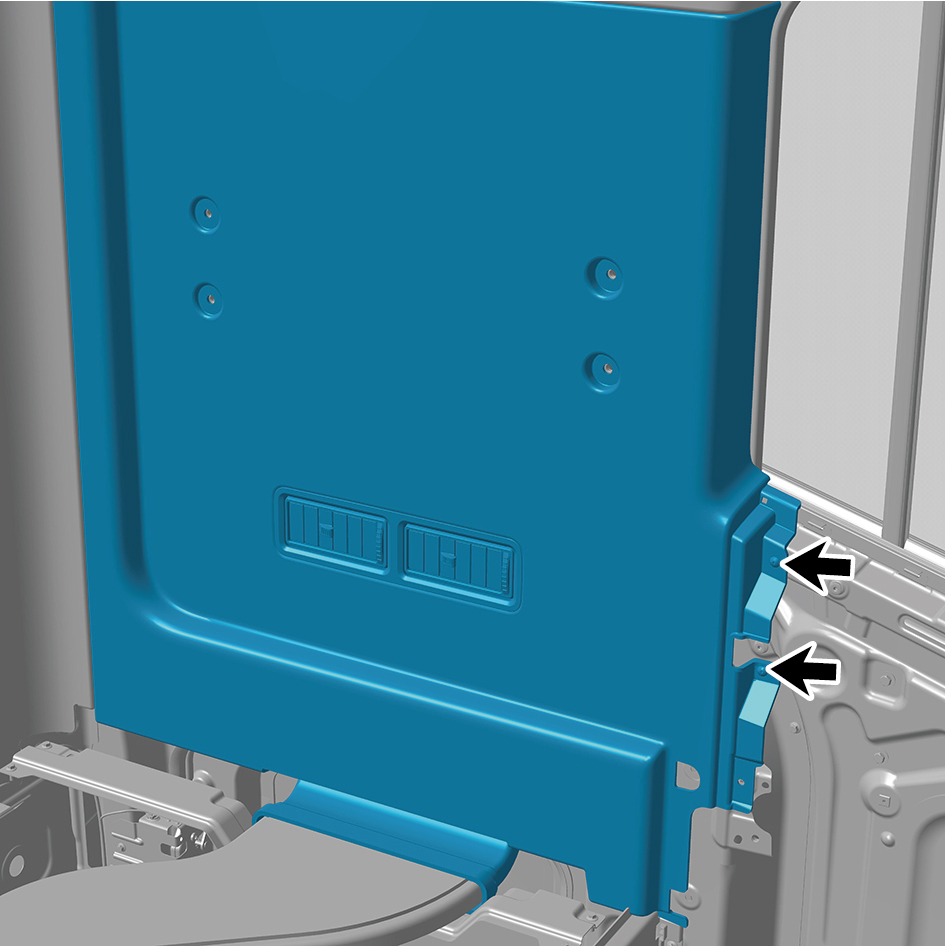
the mounting position.
2
Install 2 fixing screws of the left rear side wall protective
plate assembly.
3
Install the side wall clothes rail assembly.
4
Install the left middle side wall protective plate assembly.
5
Install the left B-pillar upper protective plate assembly.
6
Install the left middle side wall middle trim panel assembly.
7
Install the left middle side wall lower trim panel assembly.
8
Install the IP left lower trim panel assembly.
9
Install the left switch panel lower trim panel assembly.
10
Install the left switch panel assembly.
11
Install the IP left access cover plate assembly.
12
Install the front USB interface.
13
Install the left front side wall protective plate assembly.
14
Install the left A-pillar protective plate assembly.
15
Install the IP left upper trim panel assembly.
16
Connect the battery negative cable.
17
Close the front flip cover plate.
18
Close the door.
6.12.3.8 Replacement of Side Wall Clothes Rail Assembly
Rail Assembly
Removal Procedures
1
Open the door.
2
Remove the cover plate.
3
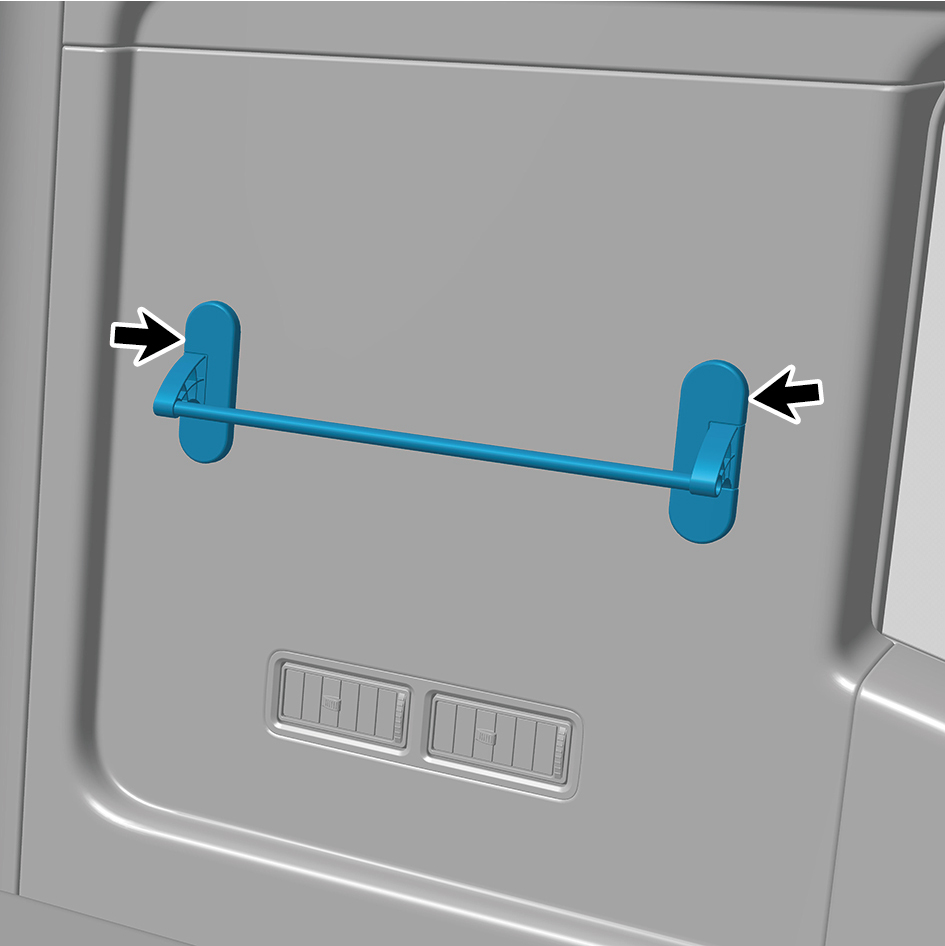
Remove 4 fixing bolts of the side wall clothes rail
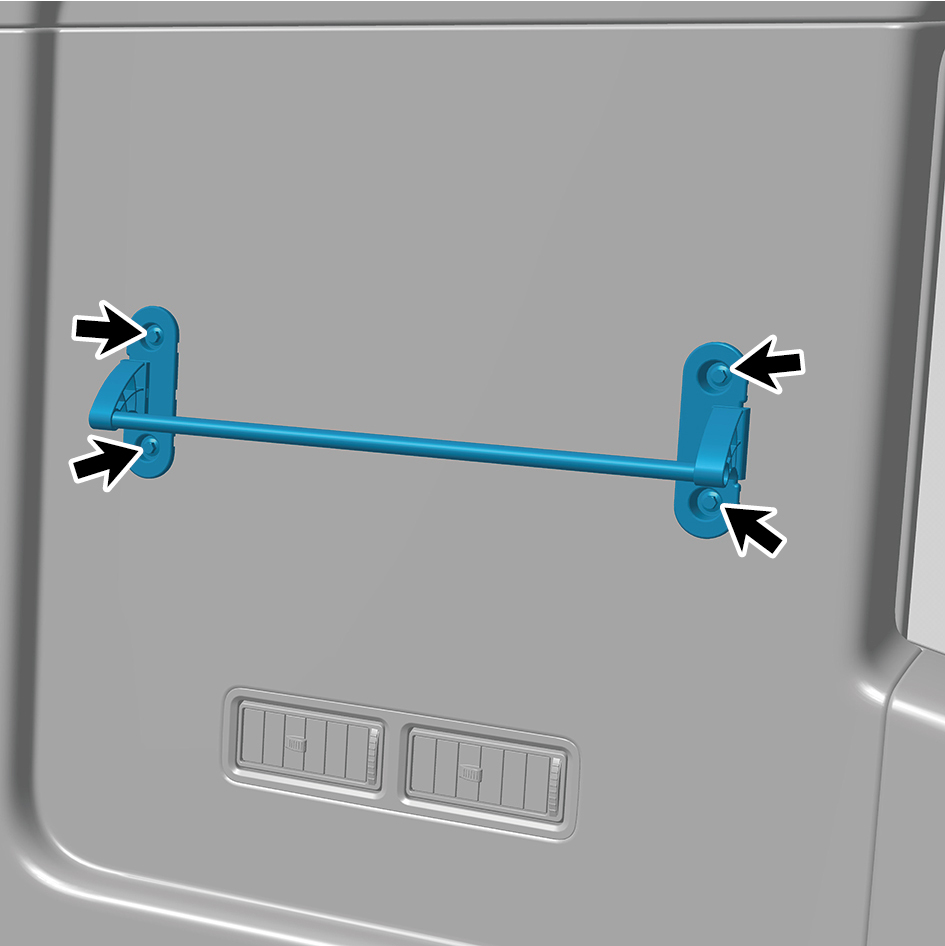
assembly.
4
Remove the side wall clothes rail assembly.
Installation Procedures
1
Move the side wall clothes rail assembly to the mounting
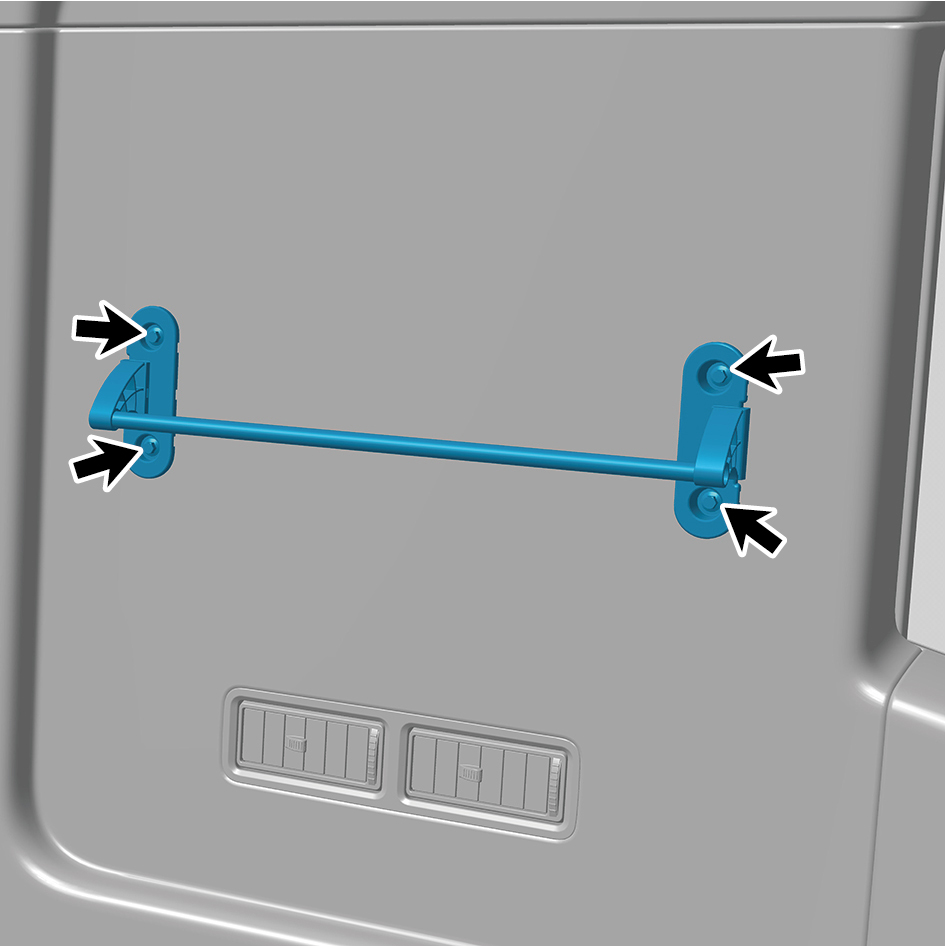
position.
2
Install 4 fixing bolts of the side wall clothes rail assembly.
Torque:(18.5 +/- 2) ft lbs
3
Install the cover plate.
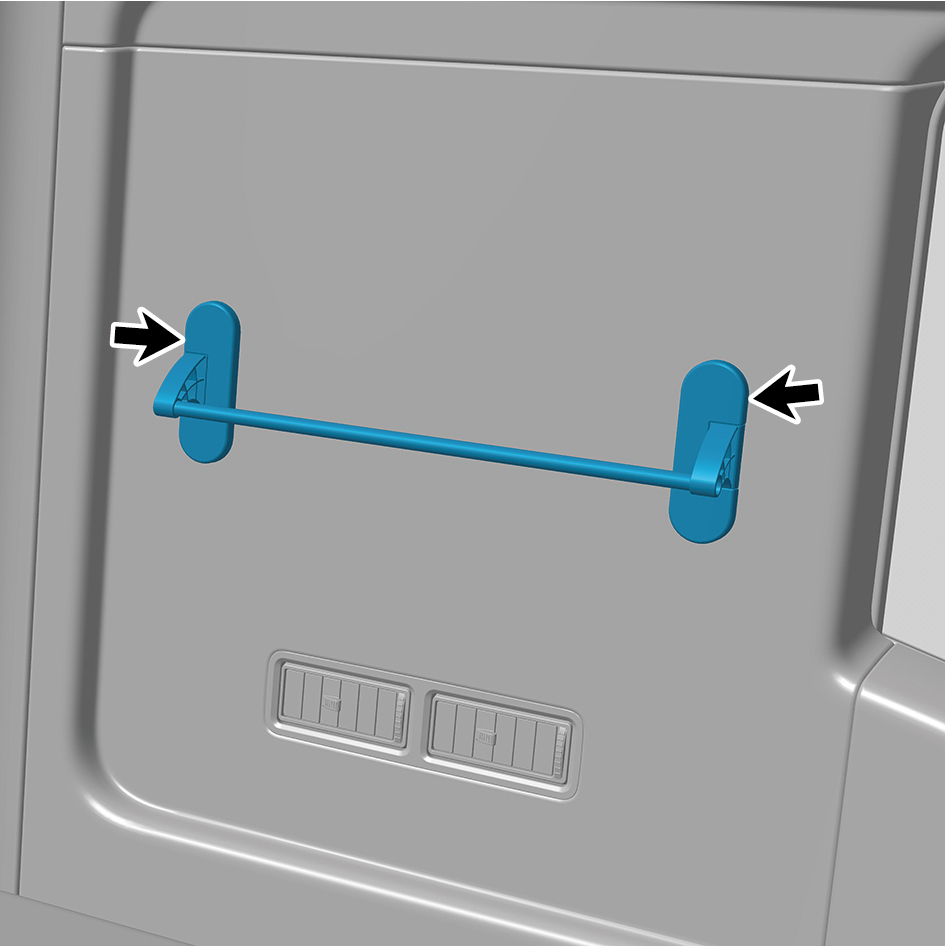
4
Close the door.
6.12.3.9 Replacement of Right Rear Side Wall Protective Plate Assembly
Protective Plate Assembly
Removal Procedures
1
Open the door.
2
Open the front flip cover plate.
3
Disconnect the battery negative cable.
caution
power down the high-voltage system before
disconnecting the negative pole of the storage
battery.
4
Remove the right sill molding assembly.
5
Remove the door opening sealing strip assembly.
6
Remove the safety hammer fixing bracket.
7
Remove the rear boarding handrail assembly.
8
Remove the SSM.
9
Remove 4 clips of the right rear side wall protective plate
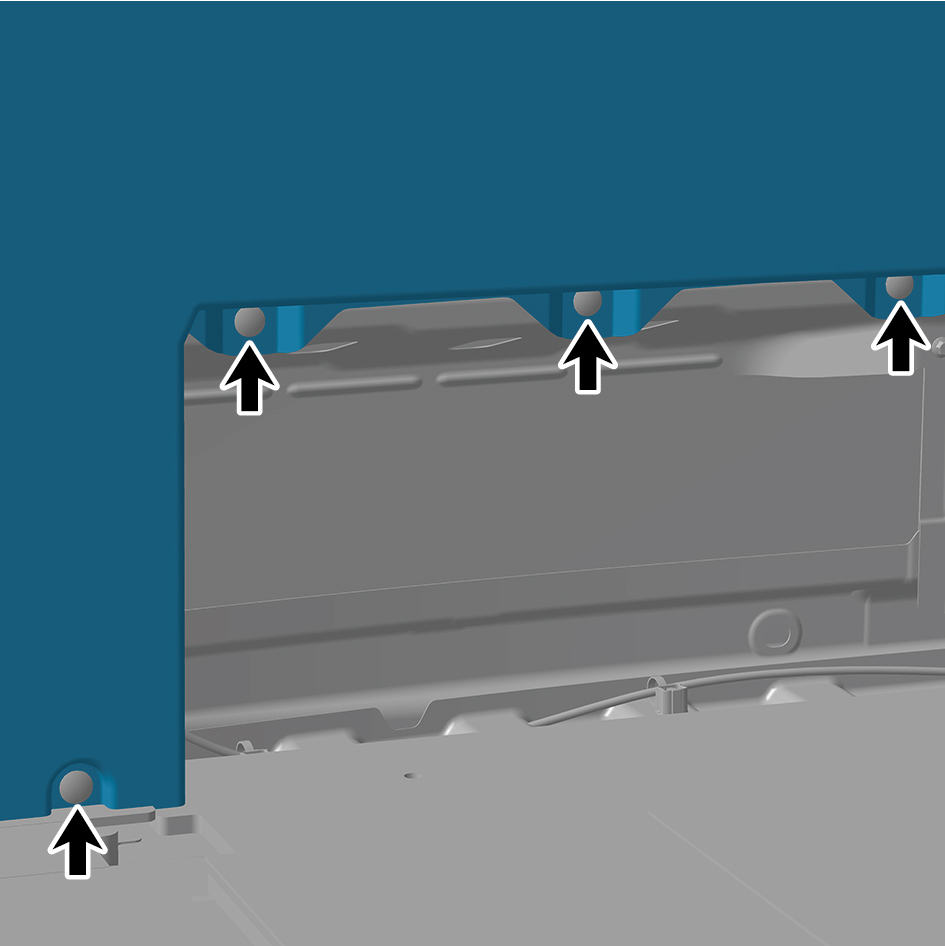
assembly.
10
Remove 1 fixing screw of the right rear side wall protective
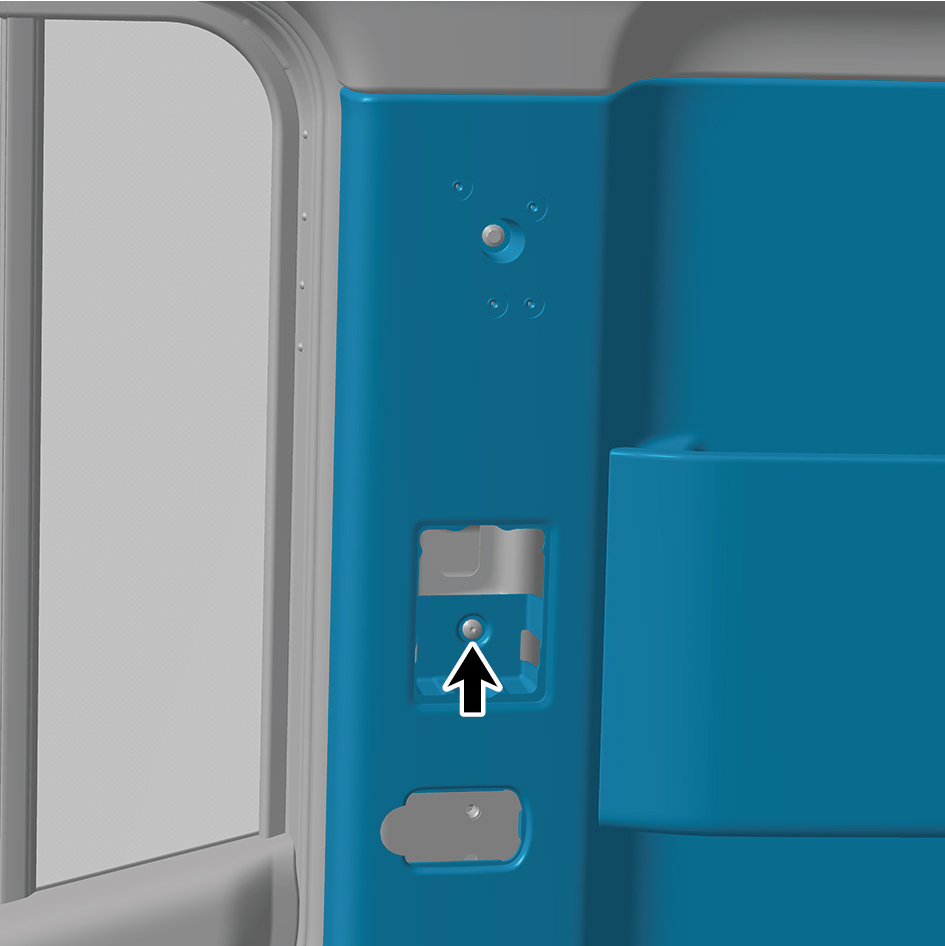
plate assembly.
11
Remove 1 fixing bolt of the right rear side wall protective
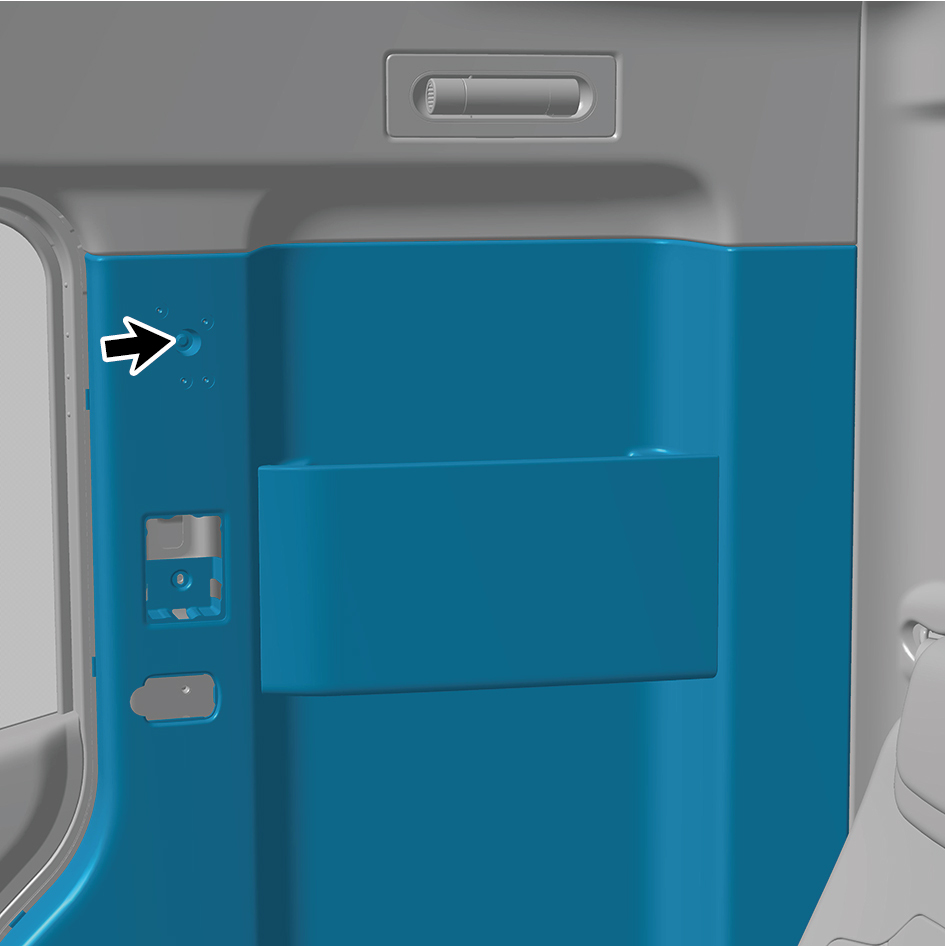
plate assembly.
12
Remove 2 fixing screw of the right rear side wall protective
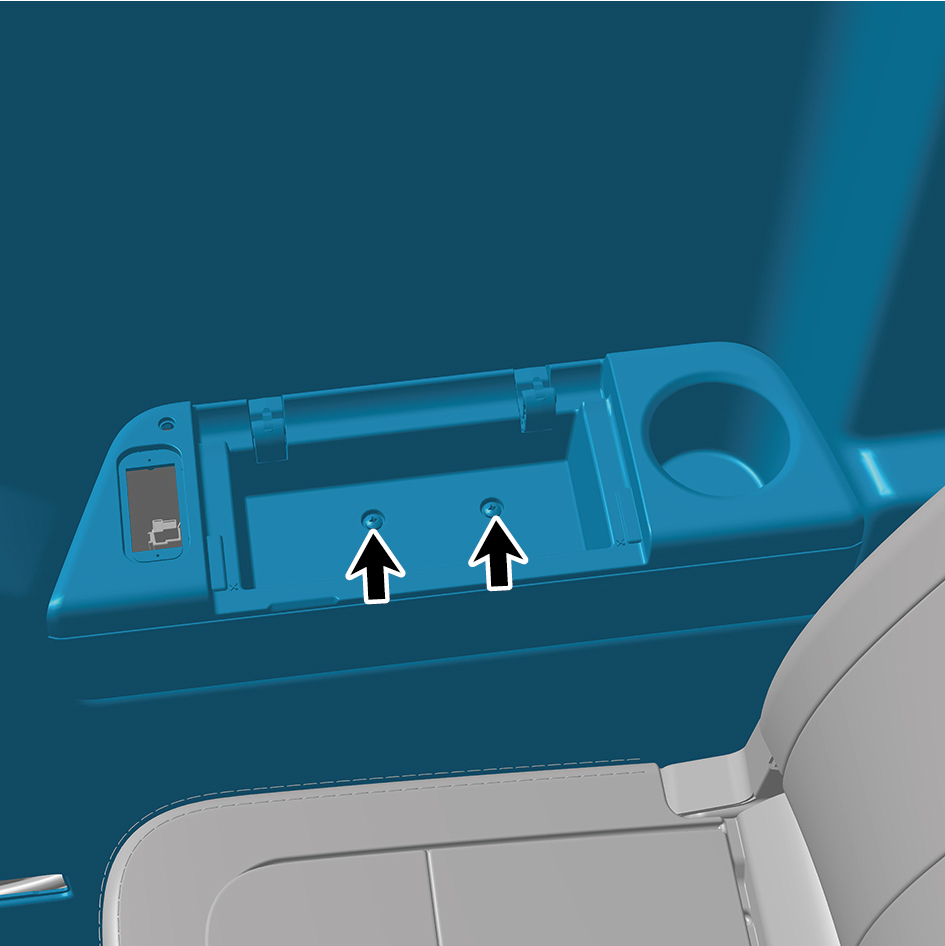
plate assembly.
13
Remove the right rear side wall protective plate assembly.
Installation Procedures
1
Move the right rear side wall protective plate assembly to
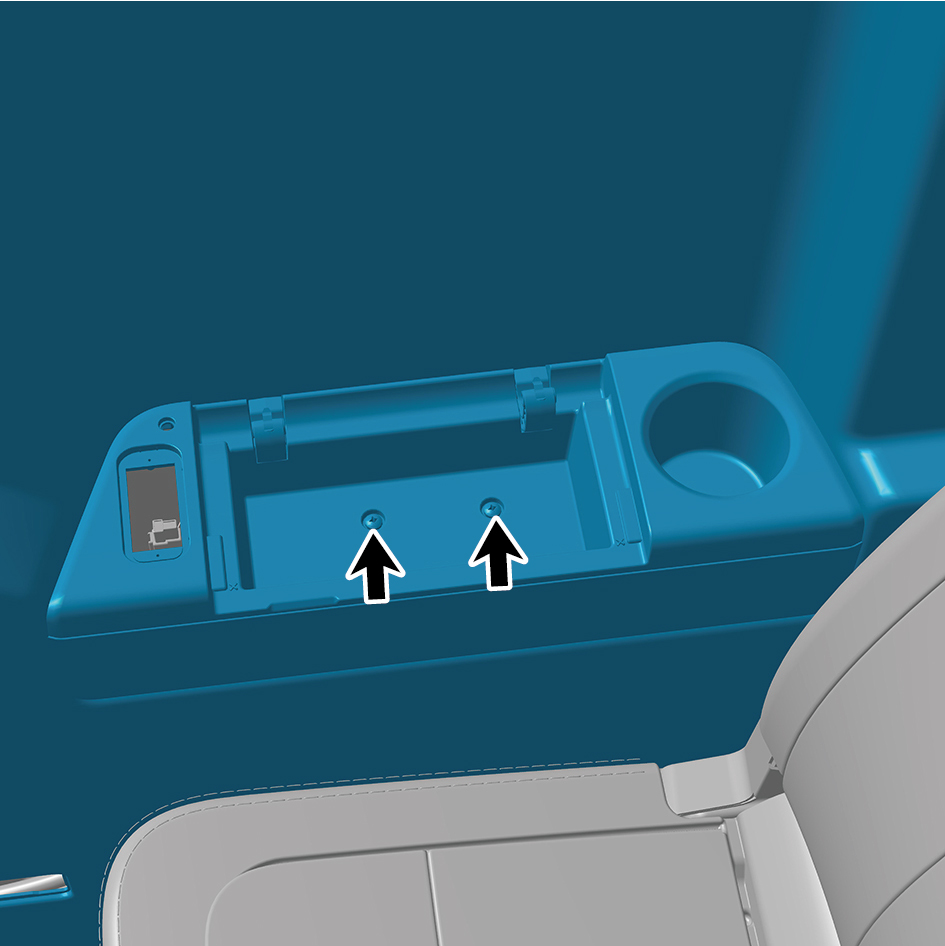
the mounting position.
2
Install 2 fixing screws of the right rear side wall protective
plate assembly.
3
Install 1 fixing bolt of the right rear side wall protective
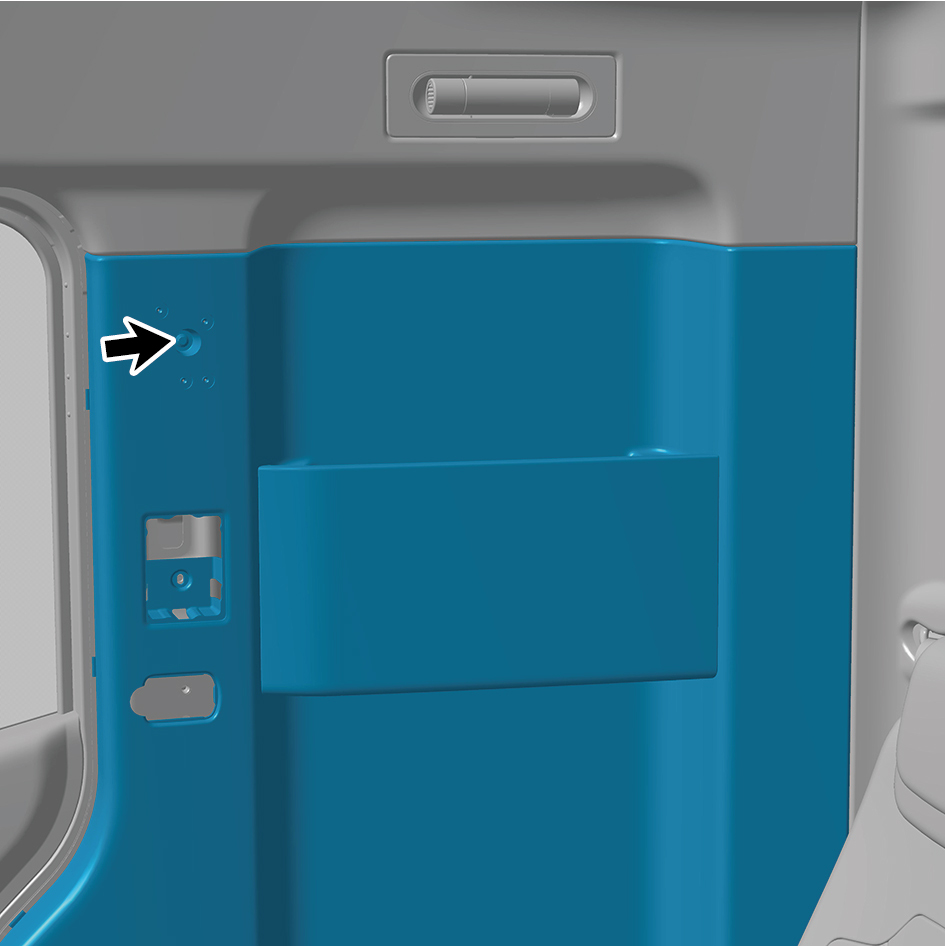
plate assembly.
Torque: (6.5 +/- .75) ft lbs
4
Install 1 fixing screws of the right rear side wall protective
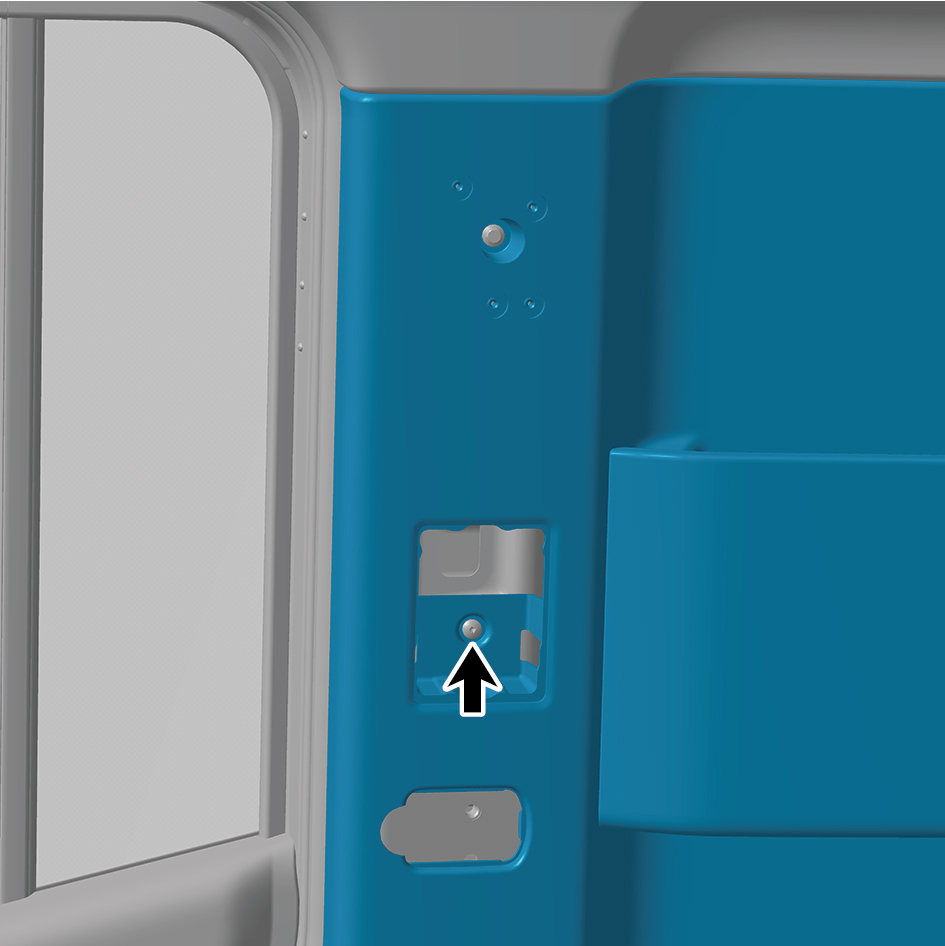
plate assembly.
5
Install 4 clips of the right rear side wall protective plate
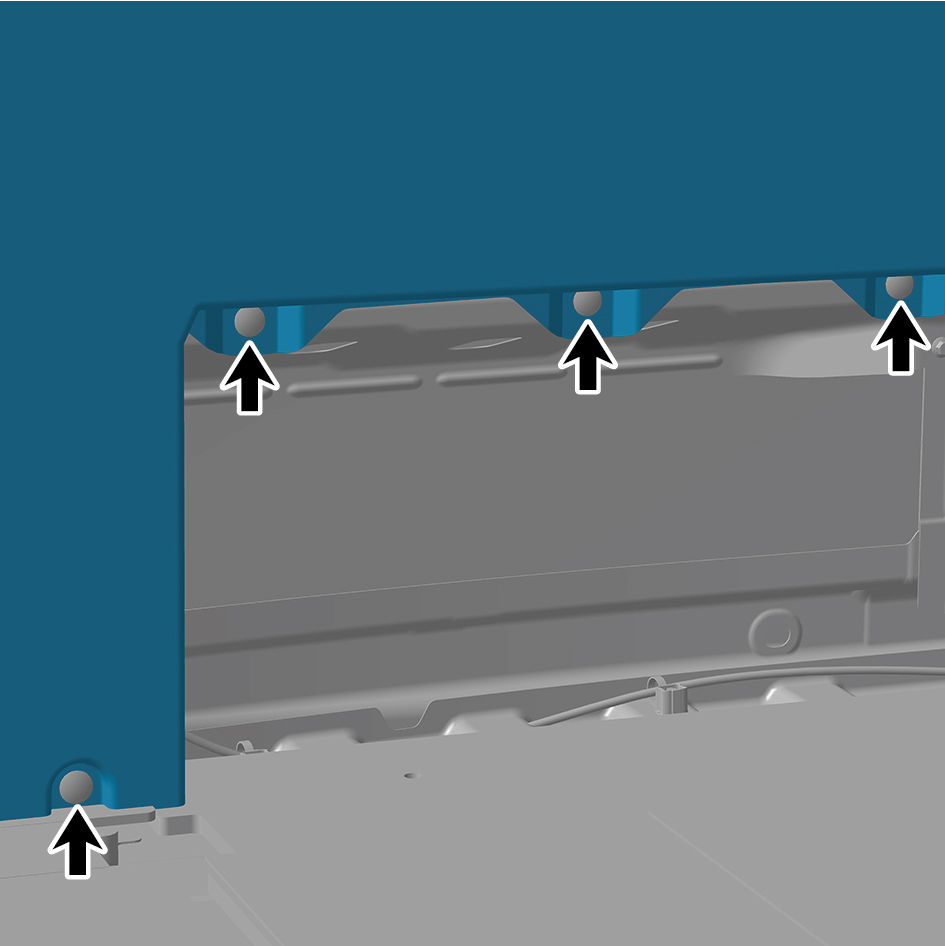
assembly.
6
Install the SSM.
7
Install the rear boarding handrail assembly.
8
Install the safety hammer fixing bracket.
9
Install the door opening sealing strip assembly.
10
Install the right sill molding assembly.
11
Connect the battery negative cable.
12
Close the front flip cover plate.
13
Close the door.
6.12.3.10 Replacement of Right B-pillar Lower Protective Plate Assembly
Protective Plate Assembly
Removal Procedures
1
Open the door.
2
Open the front flip cover plate.
3
Disconnect the battery negative cable.
caution
power down the high-voltage system before
disconnecting the negative pole of the storage
battery.
4
Remove the electric sliding door switch.
5
Remove the right B-pillar upper protective plate assembly.
6
Remove the right sill molding assembly.
7
Remove the front boarding armrest assembly.
8
Remove the IP right upper trim panel assembly.
9
Remove the right storage box assembly.
10
Remove the right A-pillar protective plate assembly.
11
Remove the right front side wall protective plate assembly.
12
Remove 2 fixing screws of the right B-pillar lower
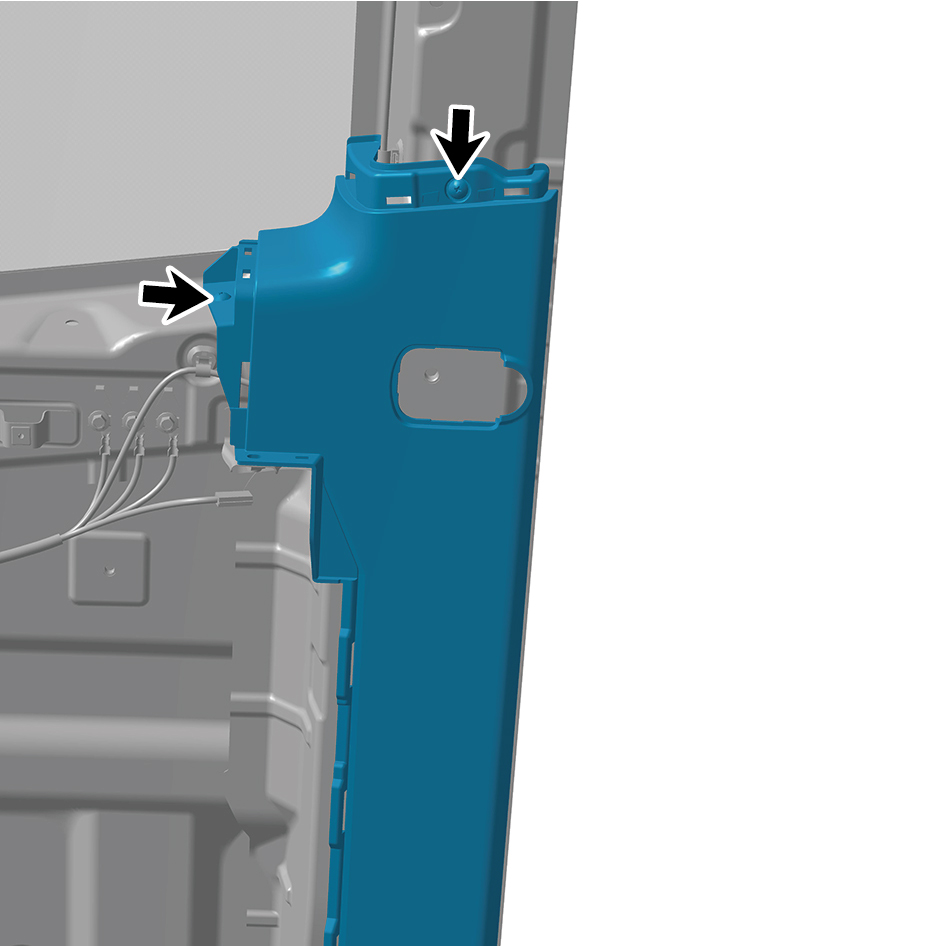
protective plate assembly.
13
Remove the right B-pillar lower protective plate assembly.
Installation Procedures
1
Move the right B-pillar lower protective plate assembly to
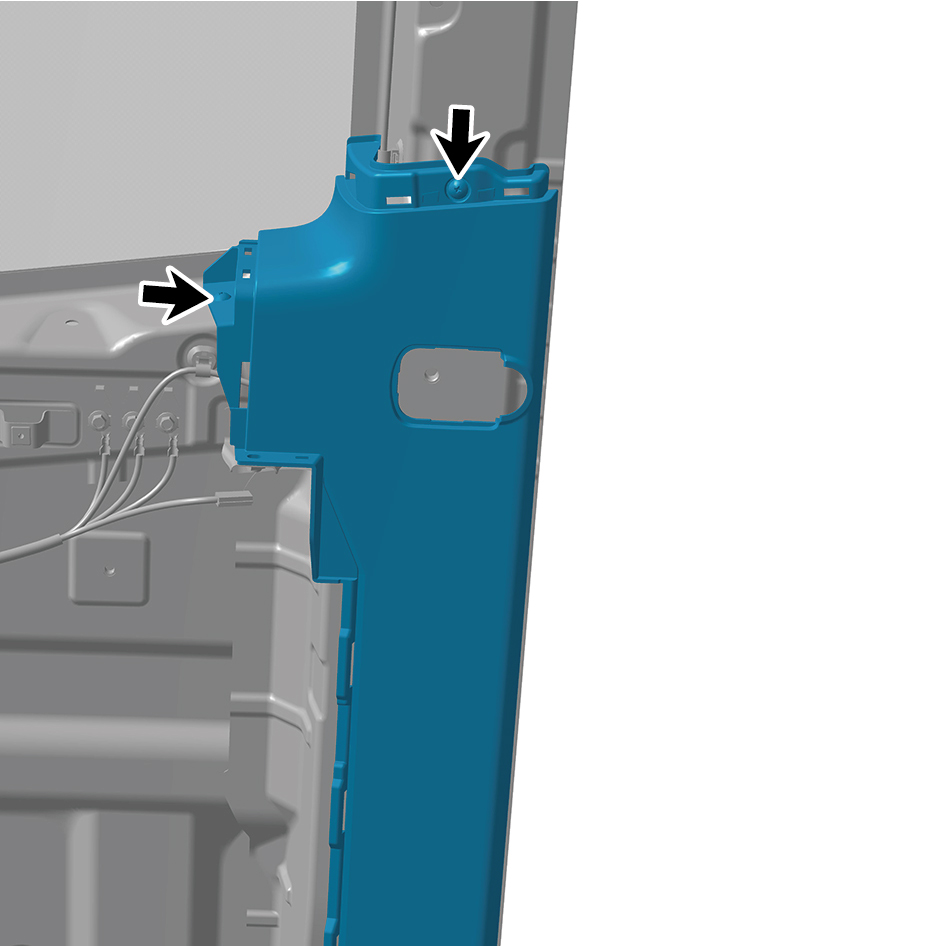
the mounting position.
2
Install 2 fixing screws of the right B-pillar lower protective
plate assembly.
3
Install the right front side wall protective plate assembly.
4
Install the right A-pillar protective plate assembly.
5
Install the IP right upper trim panel assembly.
6
Install the right storage box assembly.
7
Install the front boarding armrest assembly.
8
Install the right sill molding assembly.
9
Install the right B-pillar upper protective plate assembly.
10
Install the electric sliding door switch.
11
Connect the battery negative cable.
12
Close the front flip cover plate.
13
Close the door.
6.12.3.11 Replacement of Left Middle Side Wall Protective Plate Assembly
Wall Protective Plate Assembly
Removal Procedures
1
Open the door.
2
Open the front flip cover plate.
3
Disconnect the battery negative cable.
caution
power down the high-voltage system before
disconnecting the negative pole of the storage
battery.
4
Remove the IP left upper trim panel assembly.
5
Remove the left A-pillar protective plate assembly.
6
Remove the left front side wall protective plate assembly.
7
Remove the front USB interface.
8
Remove the IP left access cover plate assembly.
9
Remove the left switch panel assembly.
10
Remove the left switch panel lower trim panel assembly.
11
Remove the IP left lower trim panel assembly.
12
Remove the left middle side wall lower trim panel
assembly.
13
Remove the left middle side wall middle trim panel
assembly.
caution
1.First remove the break glass hammer's zipper
cover, carefully take out the break glass hammer's
pull ring and place it inside the trim panel.
2.Be careful to avoid accidentally pulling the break
glass hammer's pull ring.
14
Remove the left B-pillar upper protective plate assembly.
15
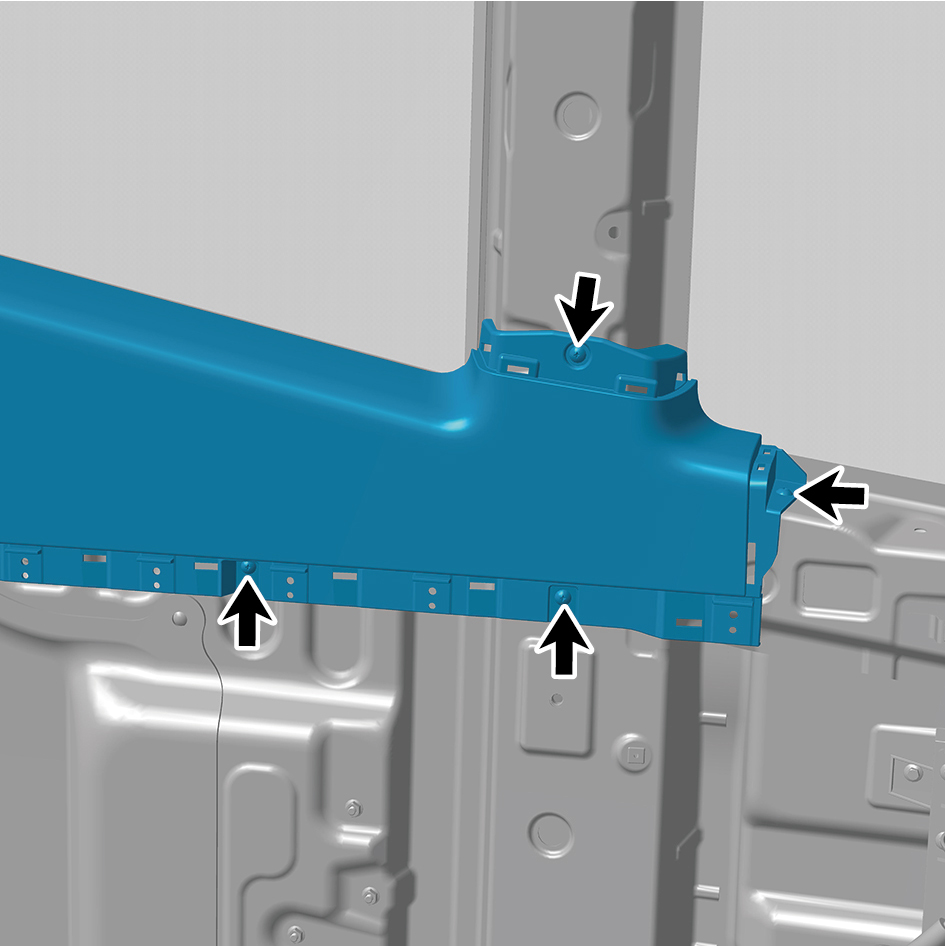
Remove 7 fixing screws of the left middle side wall
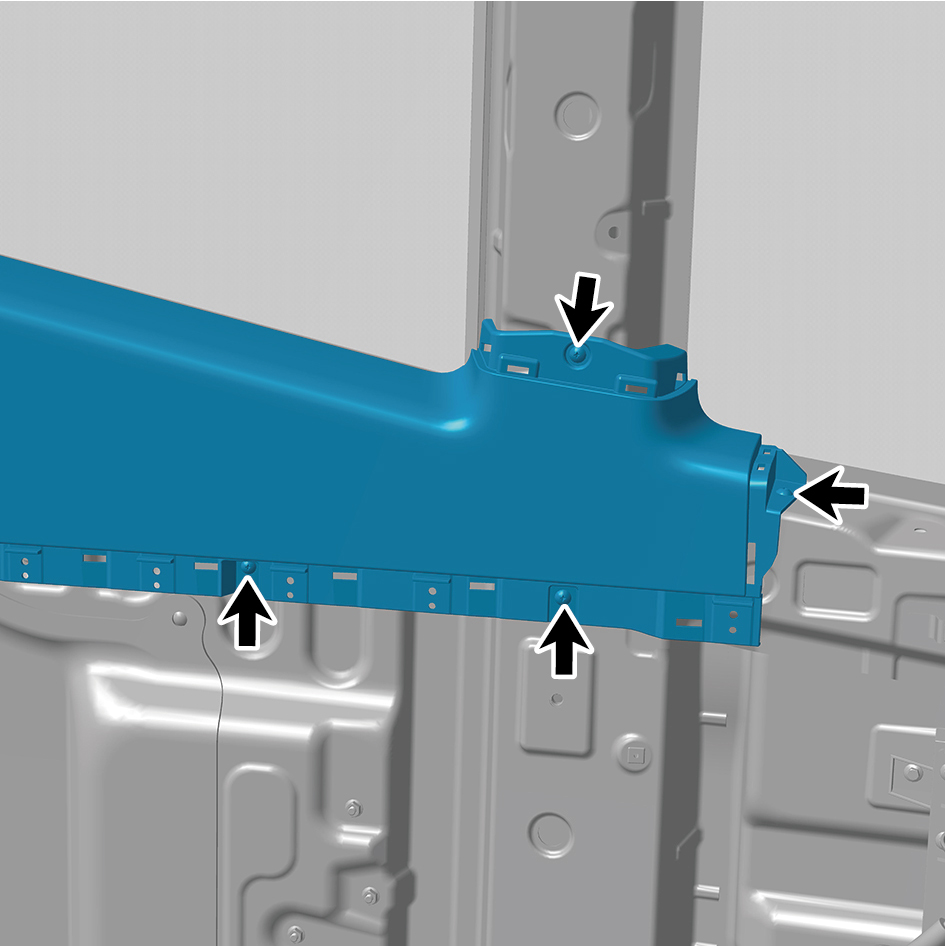
protective plate assembly, and remove the left middle side
wall protective plate assembly.
Installation Procedures
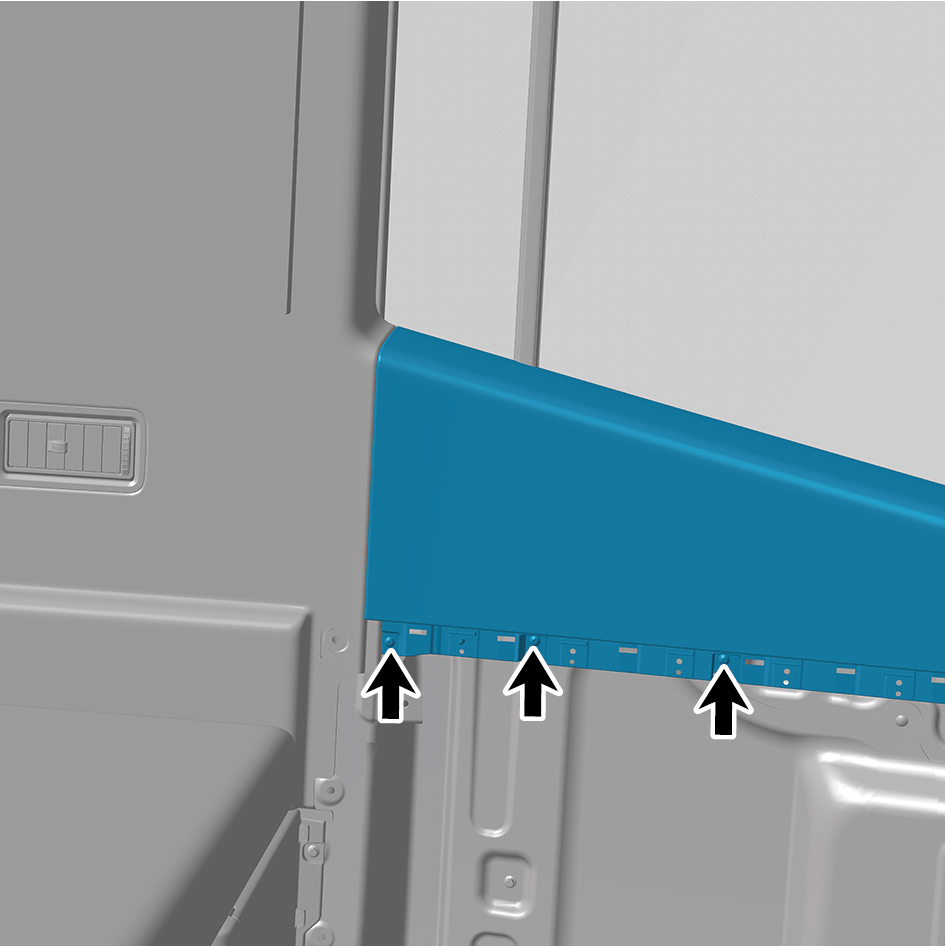
1
Move the left middle side wall protective plate assembly to
the mounting position.
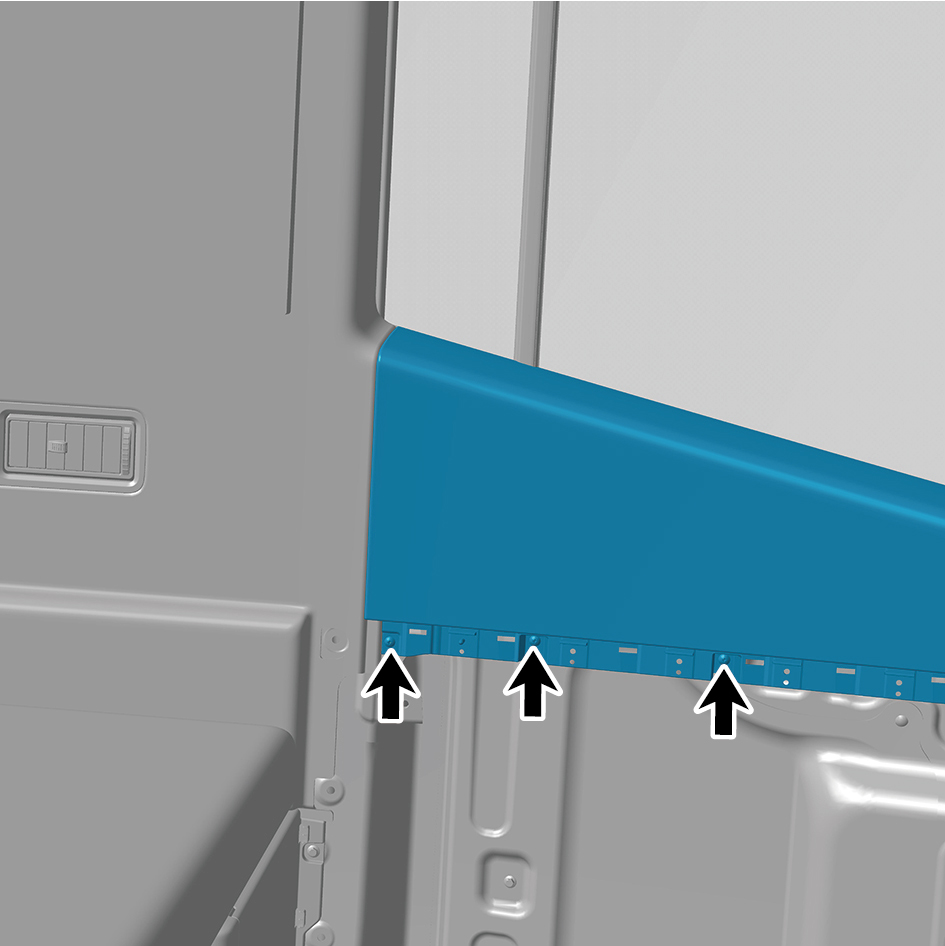
2
Install 7 fixing screws of the left middle side wall protective
plate assembly.
3
Install the left B-pillar upper protective plate assembly.
4
Install the left middle side wall middle trim panel assembly.
5
Install the left middle side wall lower trim panel assembly.
6
Install the IP left lower trim panel assembly.
7
Install the left switch panel lower trim panel assembly.
8
Install the left switch panel assembly.
9
Install the IP left access cover plate assembly.
10
Install the front USB interface.
11
Install the left front side wall protective plate assembly.
12
Install the left A-pillar protective plate assembly.
13
Install the IP left upper trim panel assembly.
14
Connect the battery negative cable.
15
Close the front flip cover plate.
16
Close the door.
6.12.3.12 Replacement of Left Middle Side Wall Middle Trim Panel Assembly
Wall Middle Trim Panel Assembly
Removal Procedures
1
Open the door.
2
Open the front flip cover plate.
3
Disconnect the battery negative cable.
caution
power down the high-voltage system before
disconnecting the negative pole of the storage
battery.
4
Remove the IP left upper trim panel assembly.
5
Remove the front USB interface.
6
Remove the IP left access cover plate assembly.
7
Remove the left switch panel assembly.
8
Remove the left switch panel lower trim panel assembly.
9
Remove the IP left lower trim panel assembly.
10
Remove the left middle side wall lower trim panel
assembly.
11
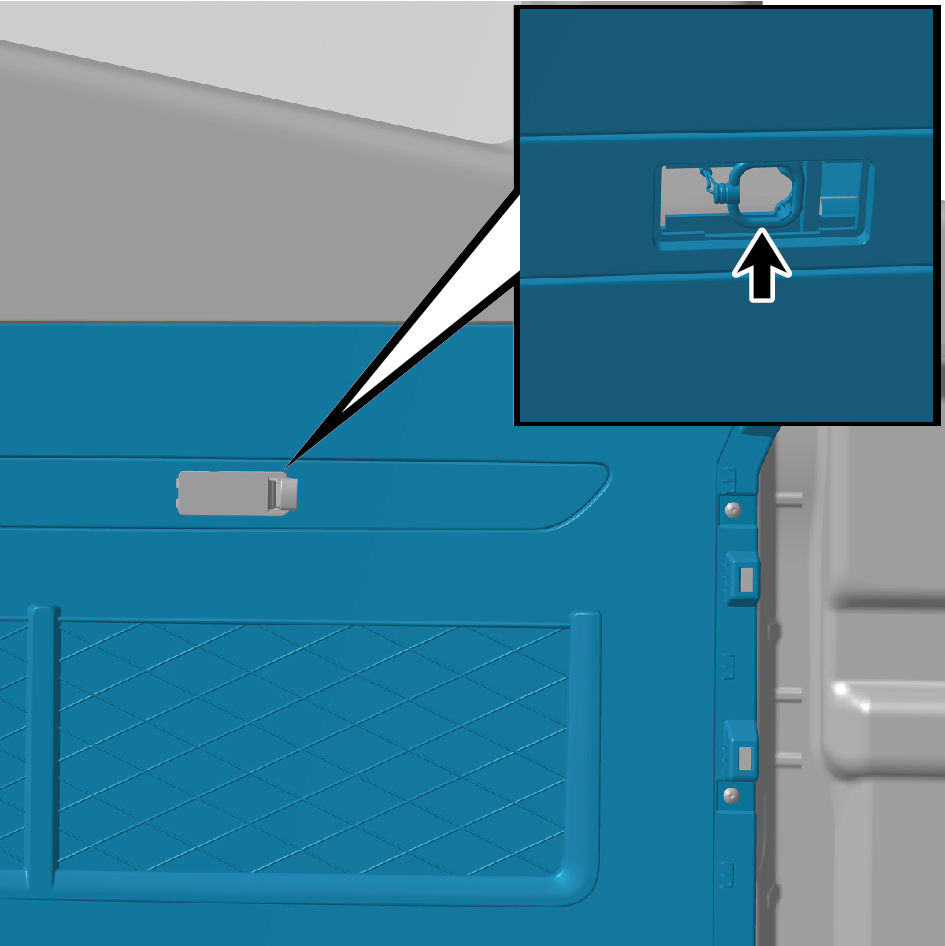
Remove the break glass hammer's zipper cover.
12
Carefully remove the break glass hammer's pull ring and
place it inside the trim panel.
caution
Be careful to avoid accidentally pulling the break
glass hammer's pull ring.
13
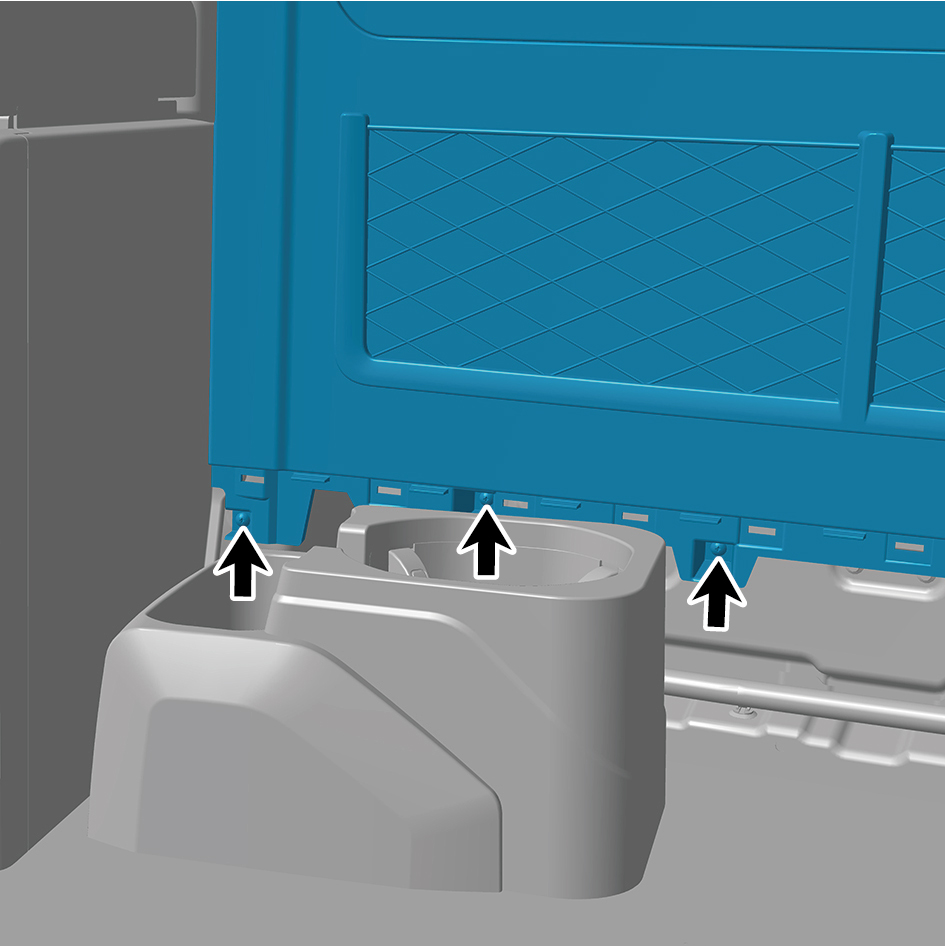
Remove 8 fixing screws of the left middle side wall middle
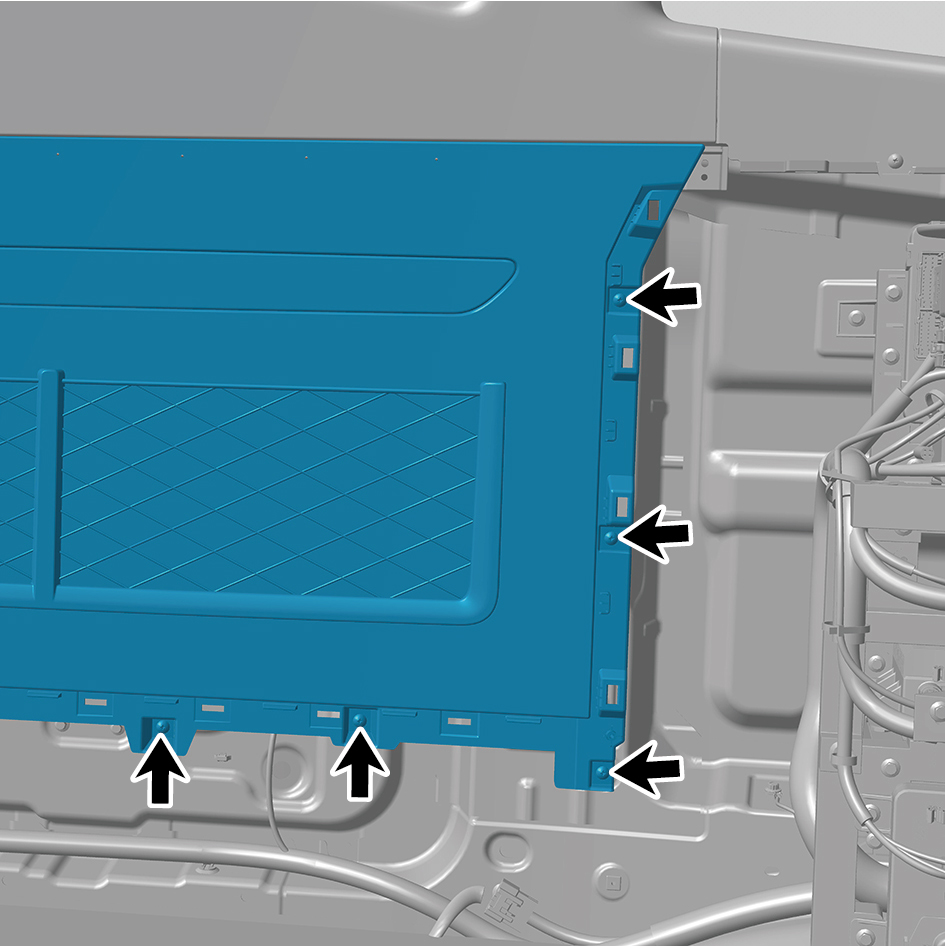
trim panel assembly, and remove the left middle side wall
middle trim panel assembly.
Installation Procedures
1
Move the left middle side wall middle trim panel assembly
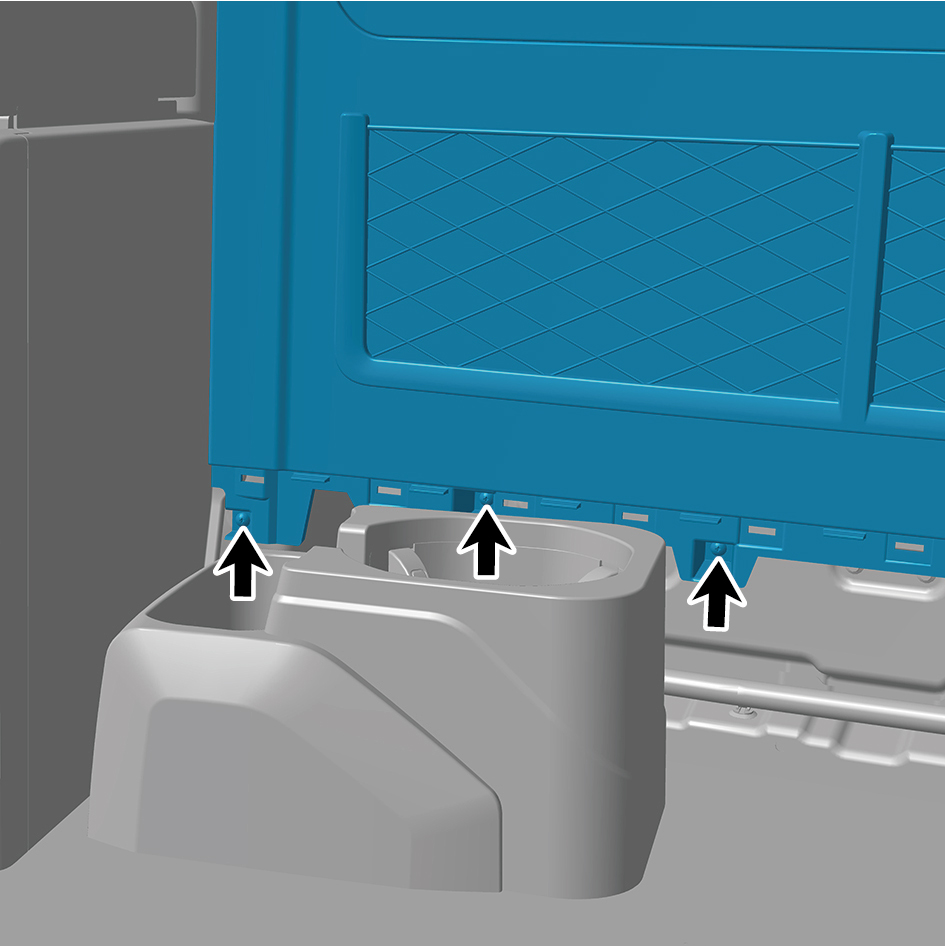
to the mounting position.
caution
1. Pass the break glass hammer's pull ring through
the position of the break glass hammer's zipper
cover.
2. Be careful to avoid accidentally pulling the break
glass hammer's pull ring.
2
Install 8 fixing screws of the left middle side wall middle
trim panel assembly.
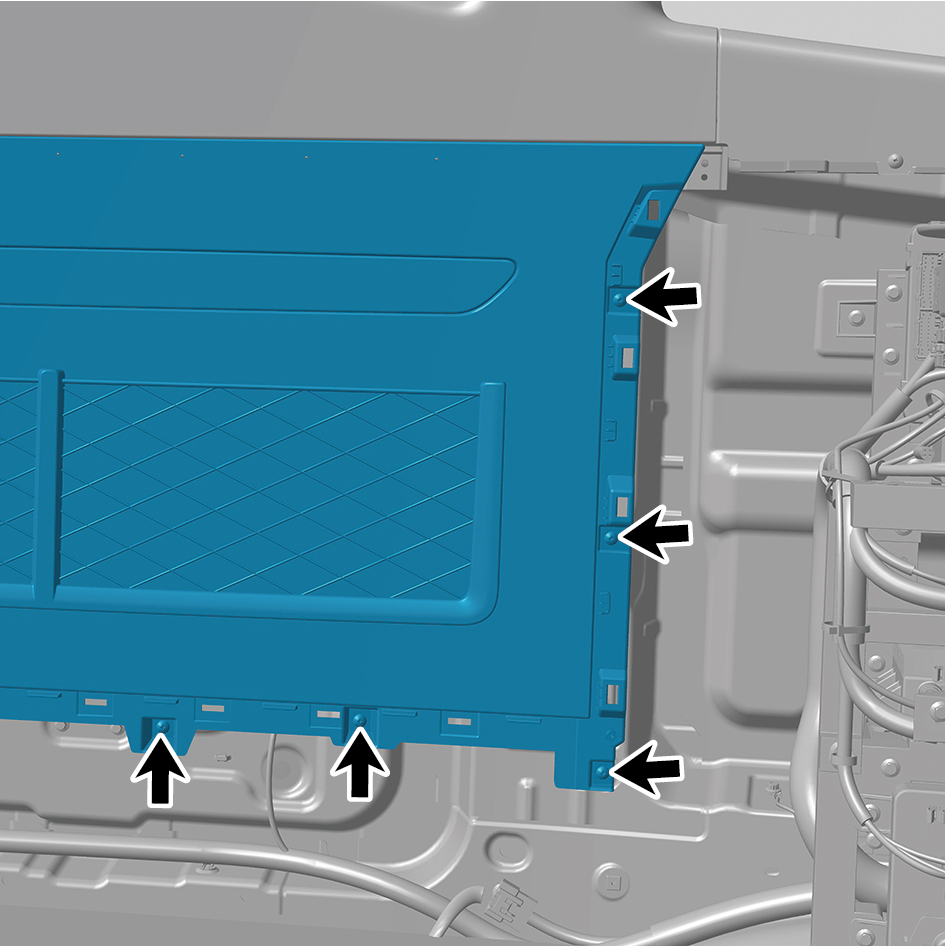
3
Place the break glass hammer's pull ring in the correct
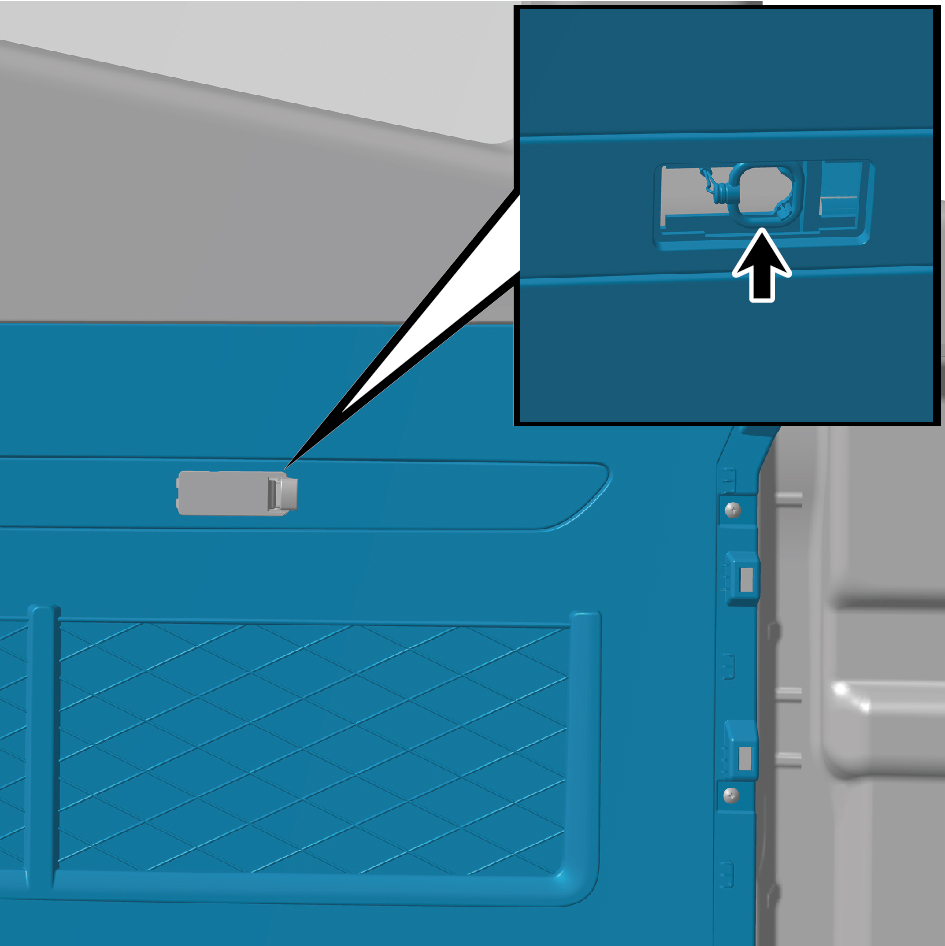
position.
caution
Be careful to avoid accidentally pulling the break
glass hammer's pull ring.
4
Install the break glass hammer's zipper cover.
5
Install the left middle side wall lower trim panel assembly.
6
Install the IP left lower trim panel assembly.
7
Install the left switch panel lower trim panel assembly.
8
Install the left switch panel assembly.
9
Install the IP left access cover plate assembly.
10
Install the front USB interface.
11
Install the IP left upper trim panel assembly.
12
Connect the battery negative cable.
13
Close the front flip cover plate.
14
Close the door.
6.12.3.13 Replacement of Left Middle Side Wall Lower Trim Panel Assembly
Wall Lower Trim Panel Assembly
Removal Procedures
1
Open the door.
2
Open the front flip cover plate.
3
Disconnect the battery negative cable.
caution
power down the high-voltage system before
disconnecting the negative pole of the storage
battery.
4
Remove the IP left upper trim panel assembly.
5
Remove the front USB interface.
6
Remove the IP left access cover plate assembly.
7
Remove the left switch panel assembly.
8
Remove the left switch panel lower trim panel assembly.
9
Remove the IP left lower trim panel assembly.
10
Remove 2 fixing screws of the left middle side wall lower
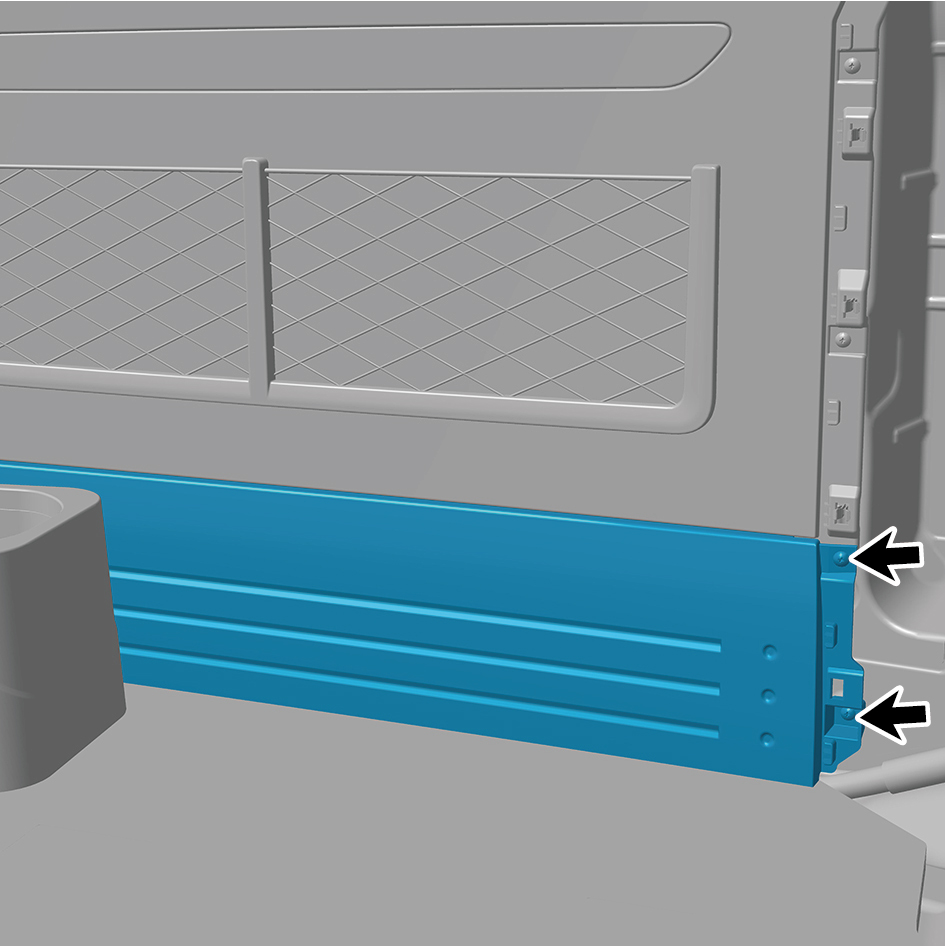
trim panel assembly.
11
Remove the left middle side wall lower trim panel
assembly.
Installation Procedures
1
Move the left middle side wall lower trim panel assembly
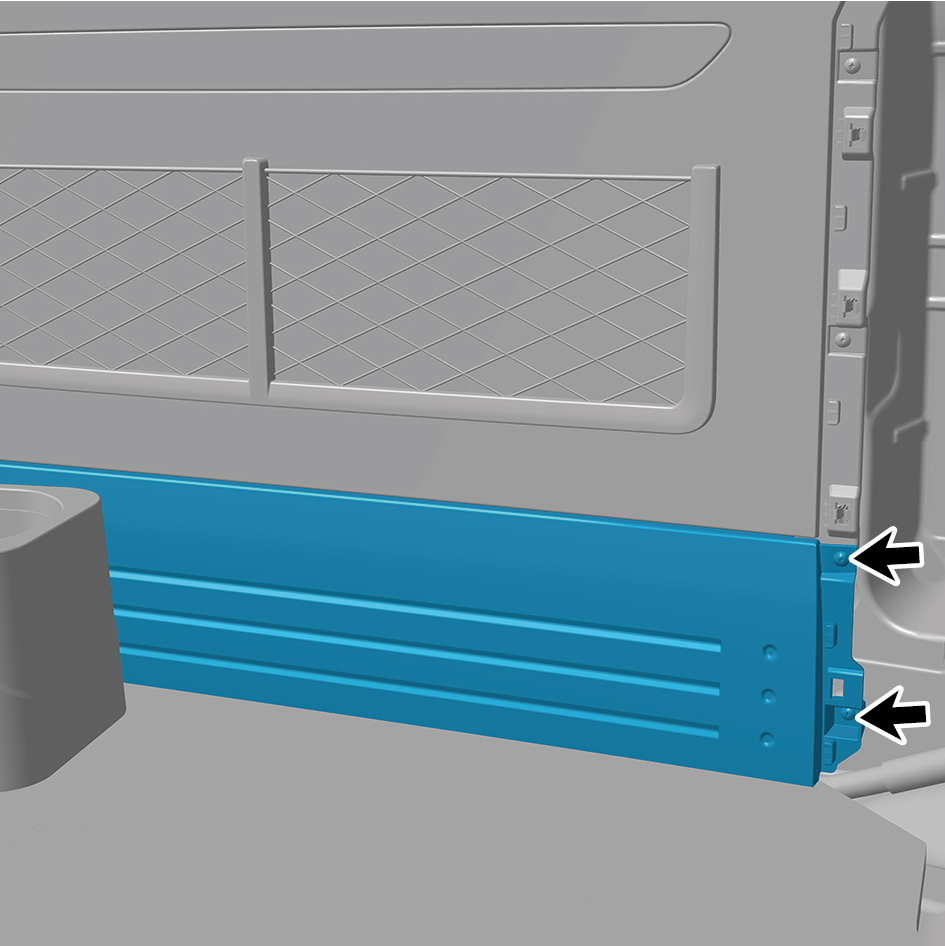
to the mounting position.
2
Install 2 fixing screws of the left middle side wall lower trim
panel assembly.
3
Install the IP left lower trim panel assembly.
4
Install the left switch panel lower trim panel assembly.
5
Install the left switch panel assembly.
6
Install the IP left access cover plate assembly.
7
Install the front USB interface.
8
Install the IP left upper trim panel assembly.
9
Connect the battery negative cable.
10
Close the front flip cover plate.
11
Close the door.
6.12.3.14 Replacement of Sunshade Cover Plate Assembly
Plate Assembly
Removal Procedures
1
Open the door.
2
Open the front flip cover plate.
3
Disconnect the battery negative cable.
caution
power down the high-voltage system before
disconnecting the negative pole of the storage
battery.
4
Remove the left A-pillar protective plate assembly.
5
Remove the right A-pillar protective plate assembly.
6
Remove the sunshade rail assembly.
7
Remove the front camera trim cover assembly.
8
Remove the sunshade cover plate assembly.
9
Remove the front reading lamp.
10
Remove the sunshade assembly.
11
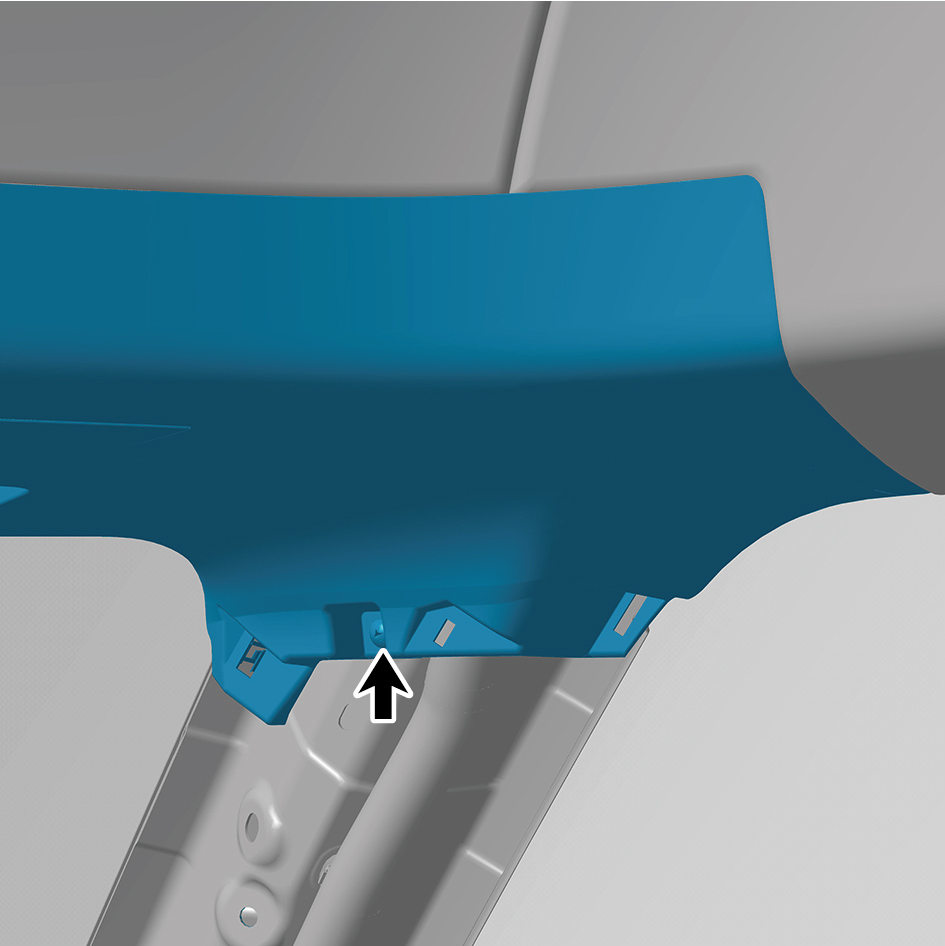
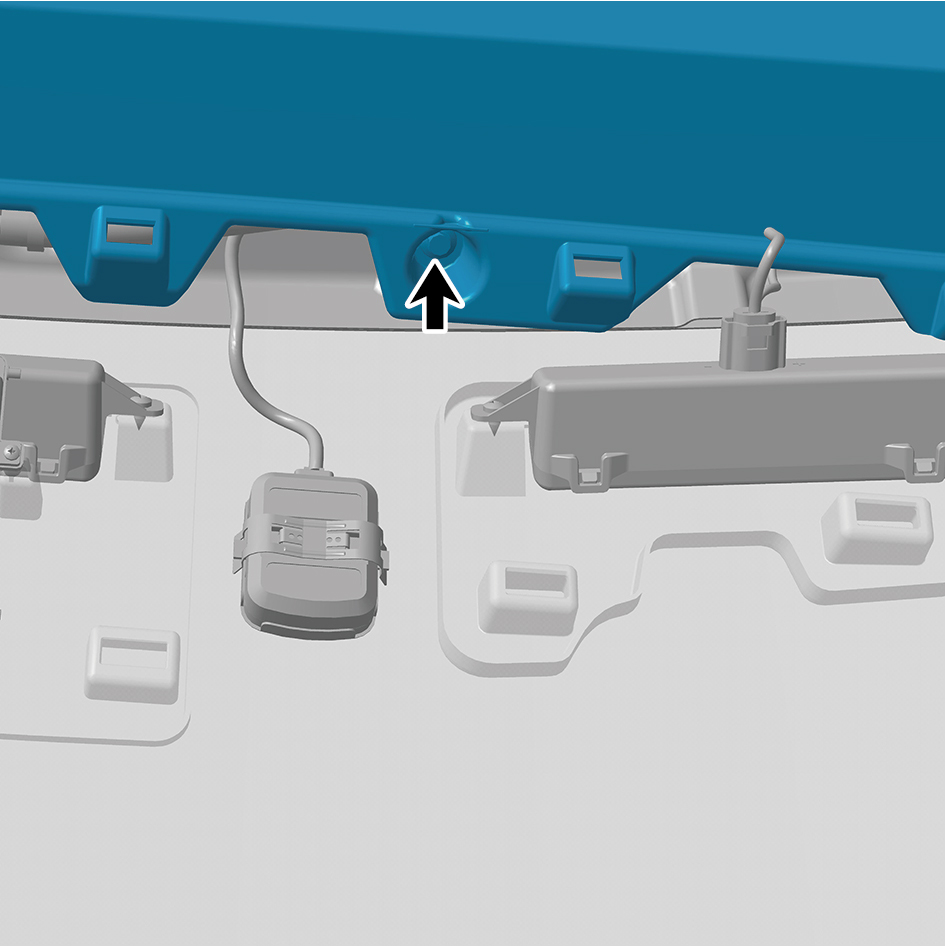
Remove 2 fixing screws of the sunshade cover plate
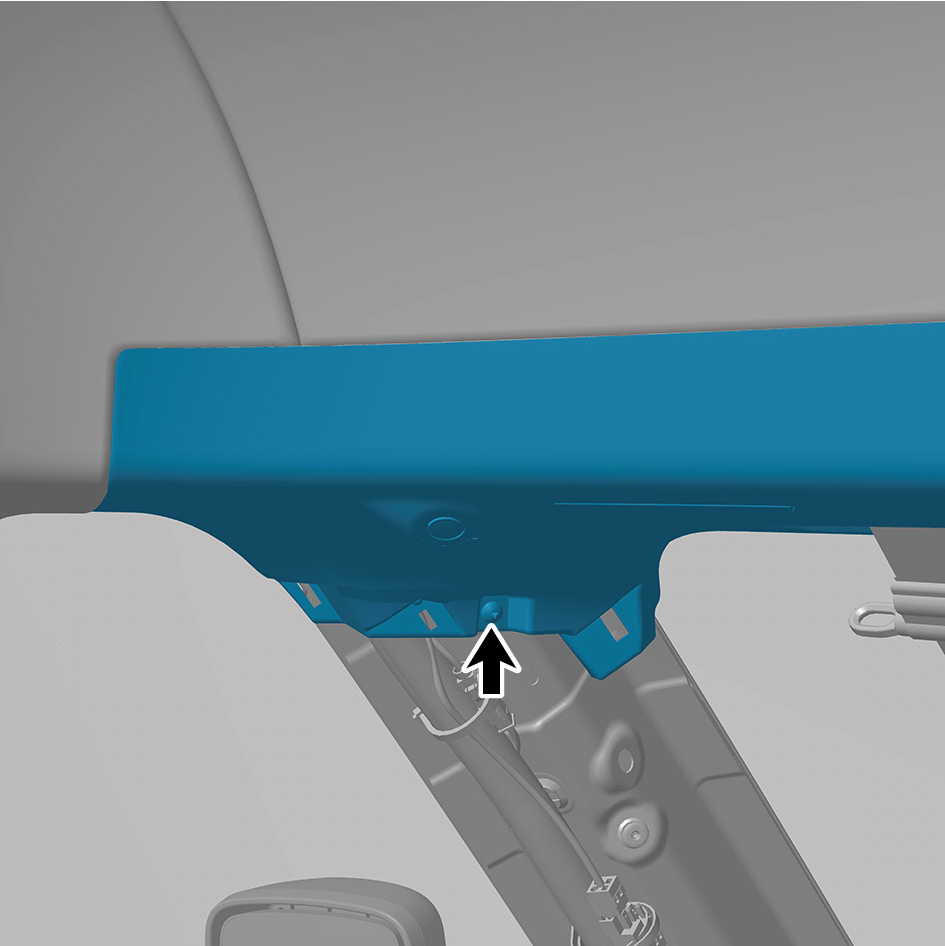
assembly.
12
Remove 2 fixing bolts of the sunshade cover plate
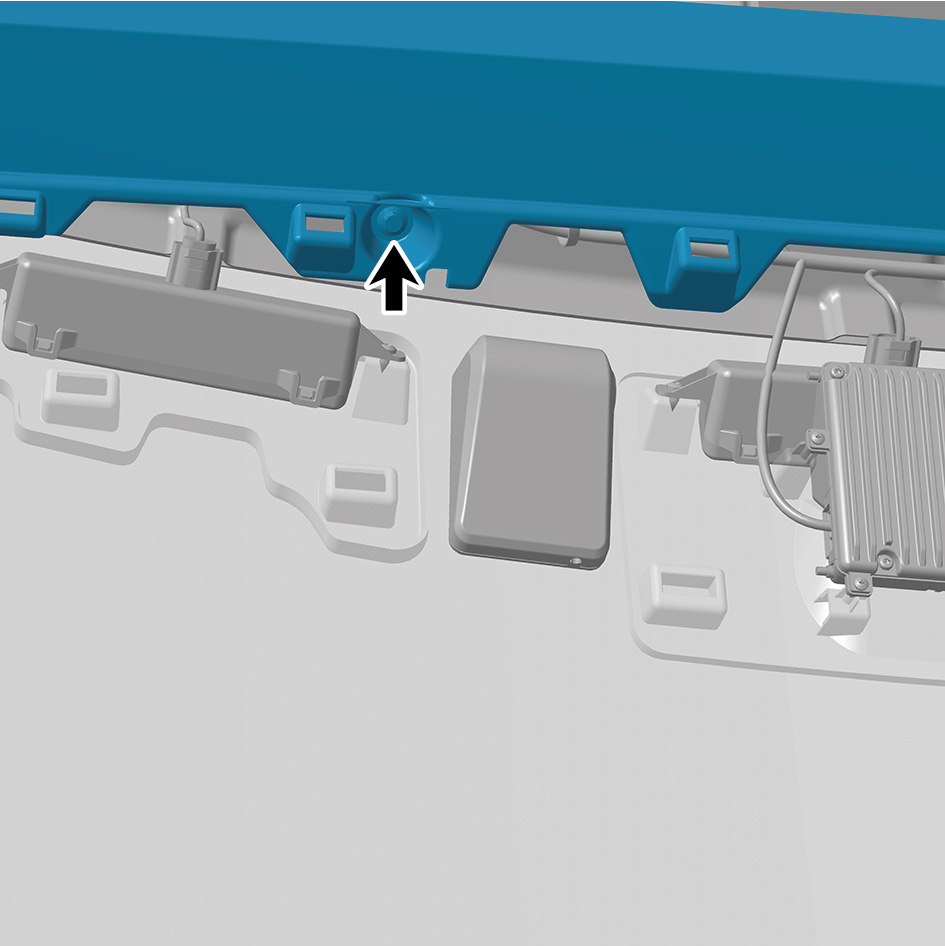
assembly.
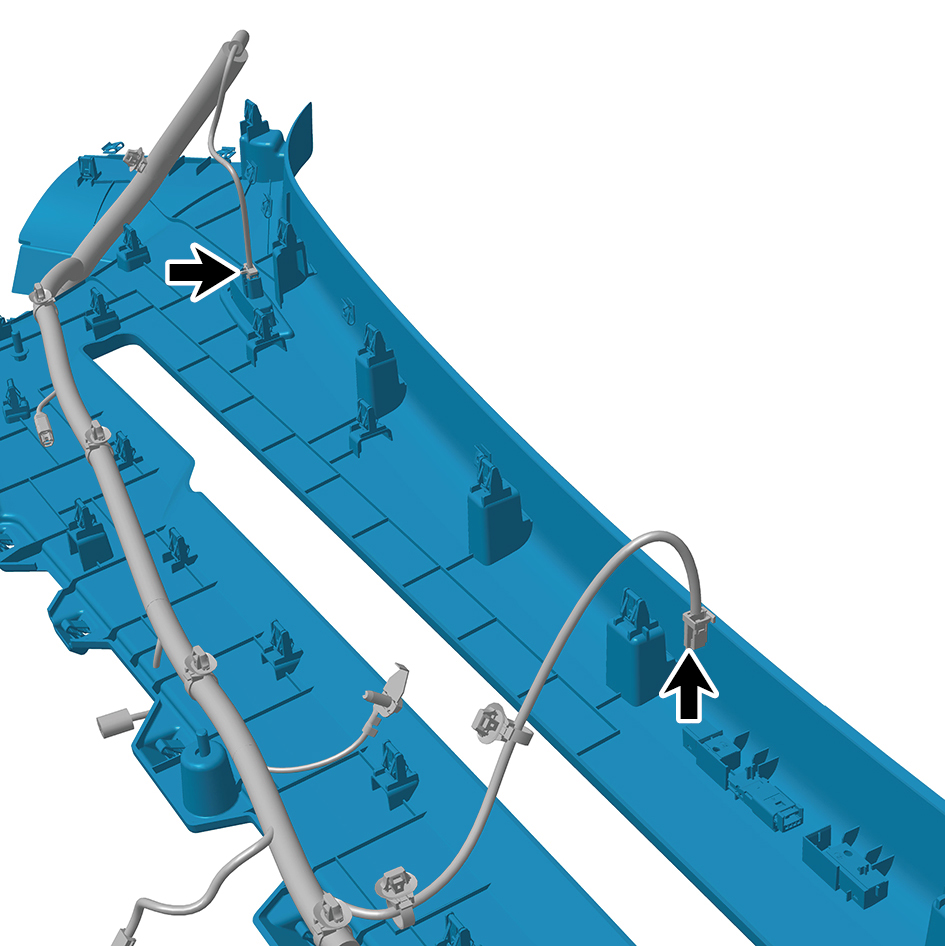
13
Disconnect 4 harness connectors of the sunshade cover
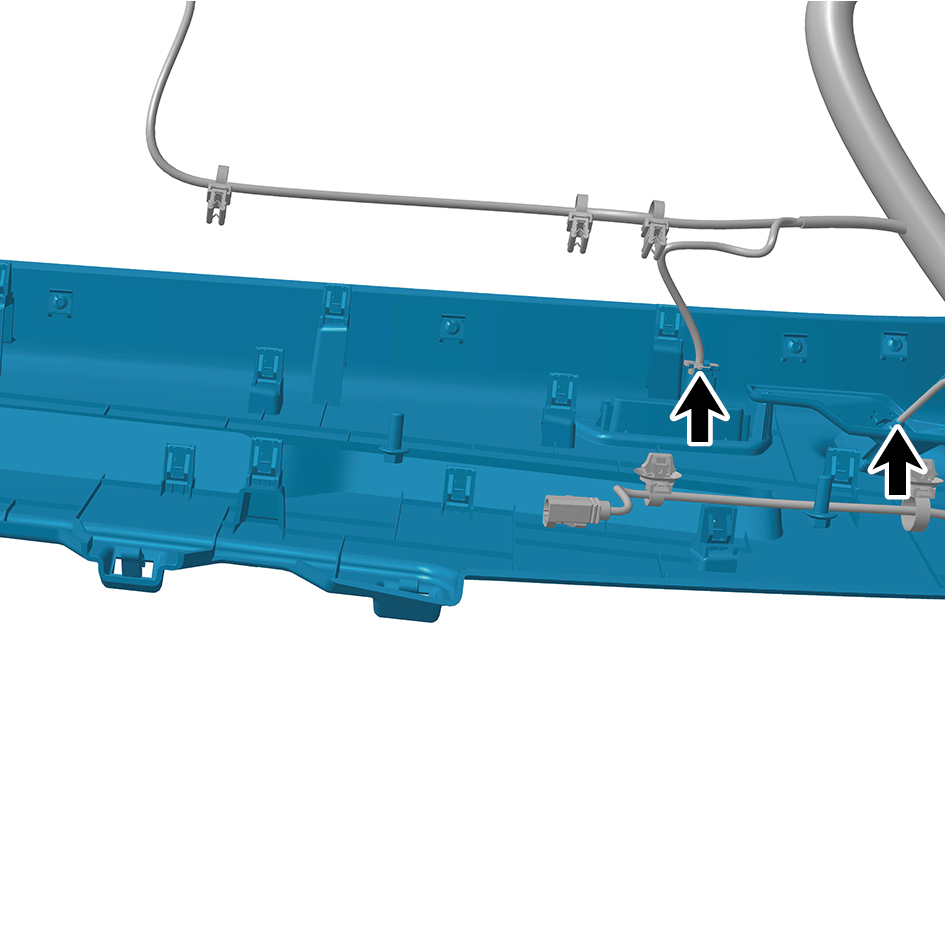
plate assembly, and remove the sunshade cover plate
assembly.
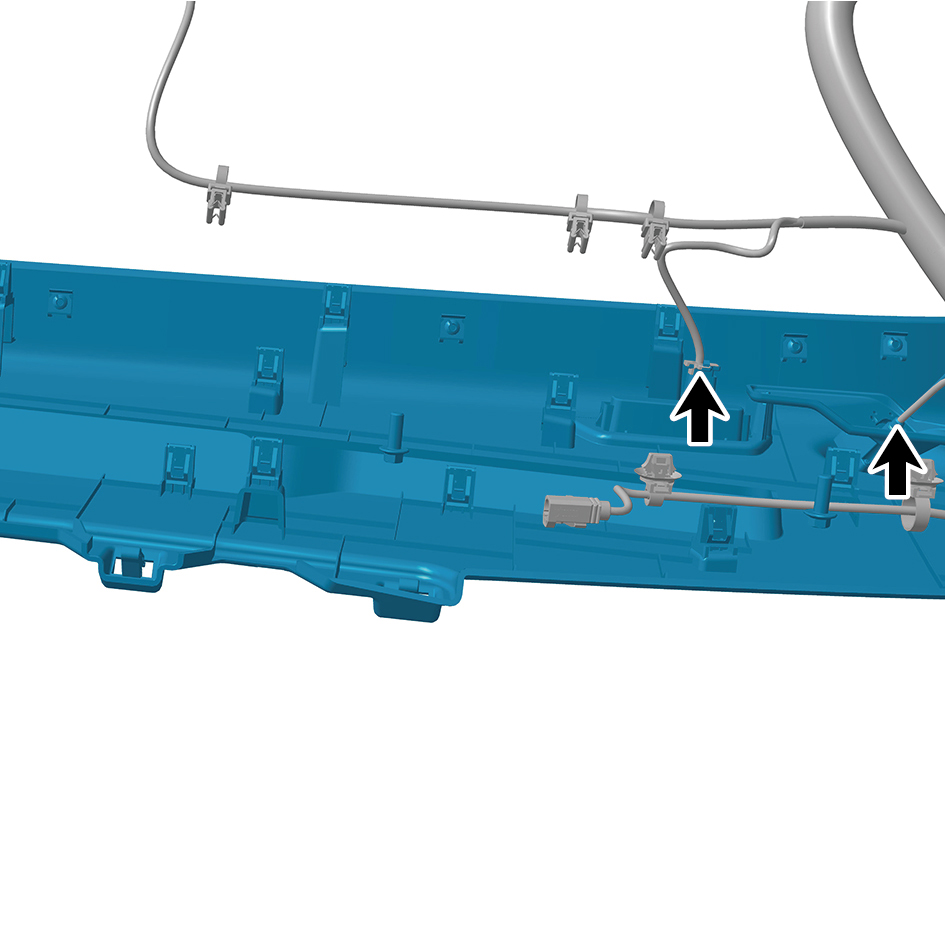
Installation Procedures
1
Move the sunshade cover plate assembly to the mounting
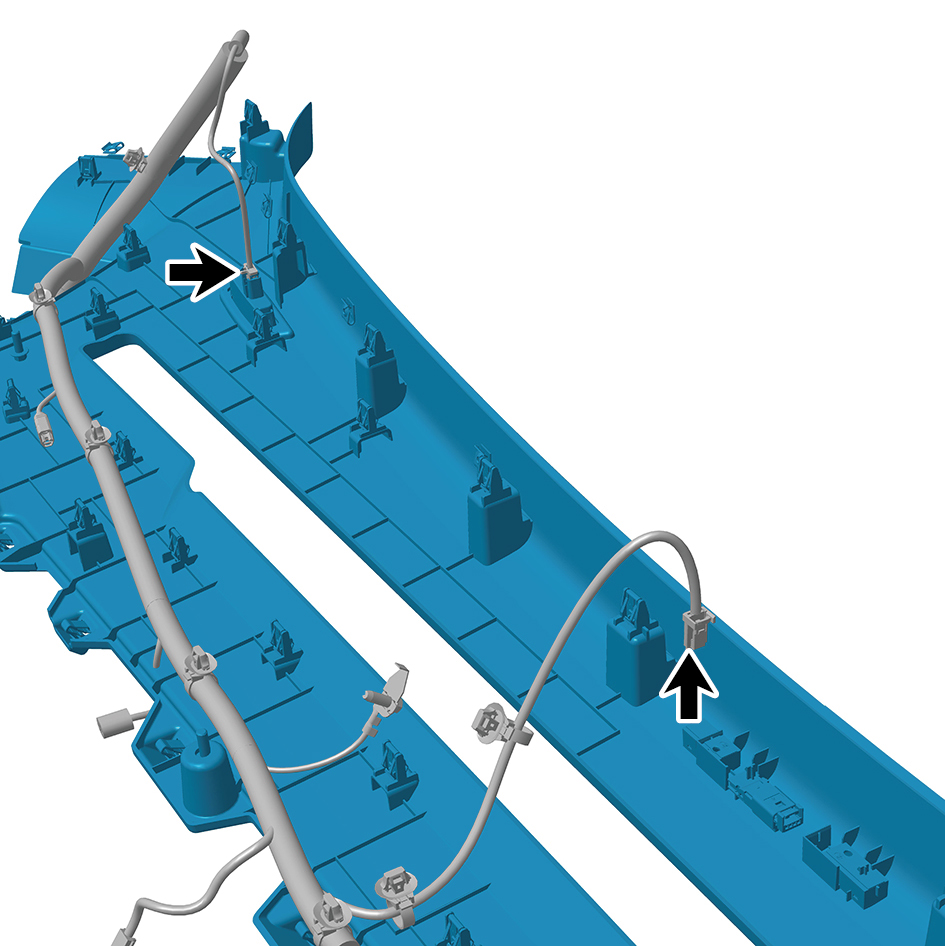
position.
2
Connect 4 harness connectors of the sunshade cover
plate assembly.
caution
The harness is firmly connected following the
principal of "insert until a click is heard for
confirmation".
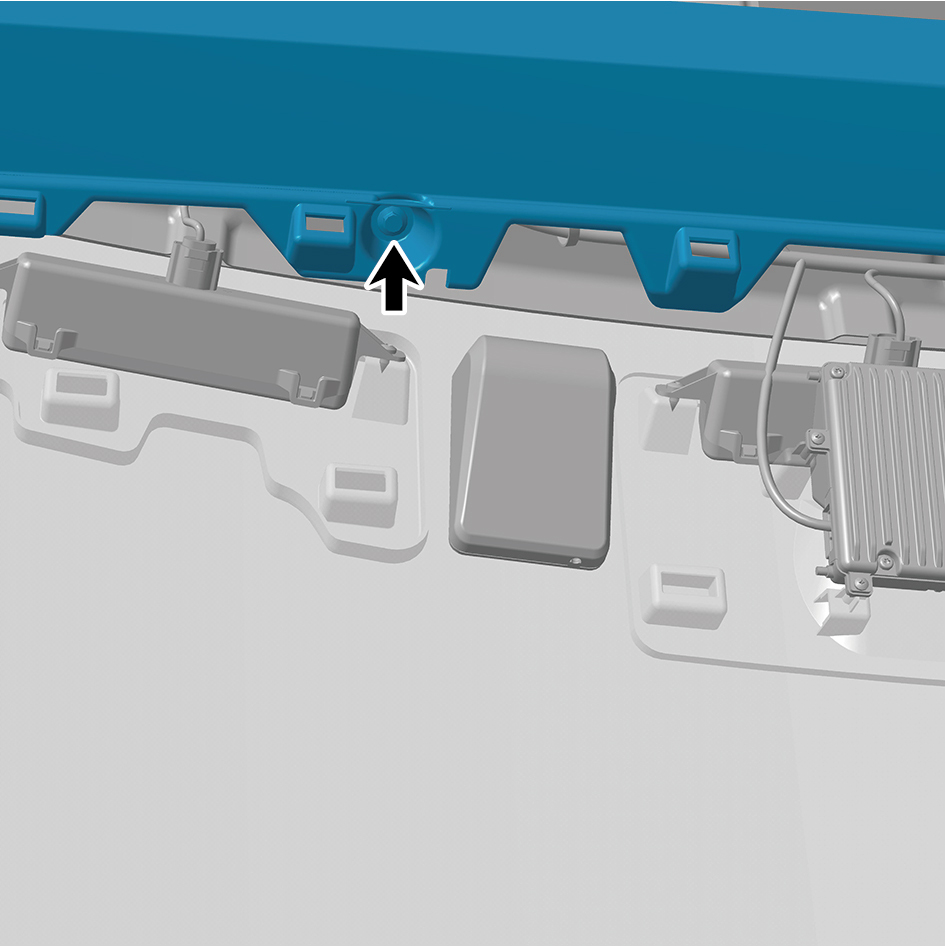
3
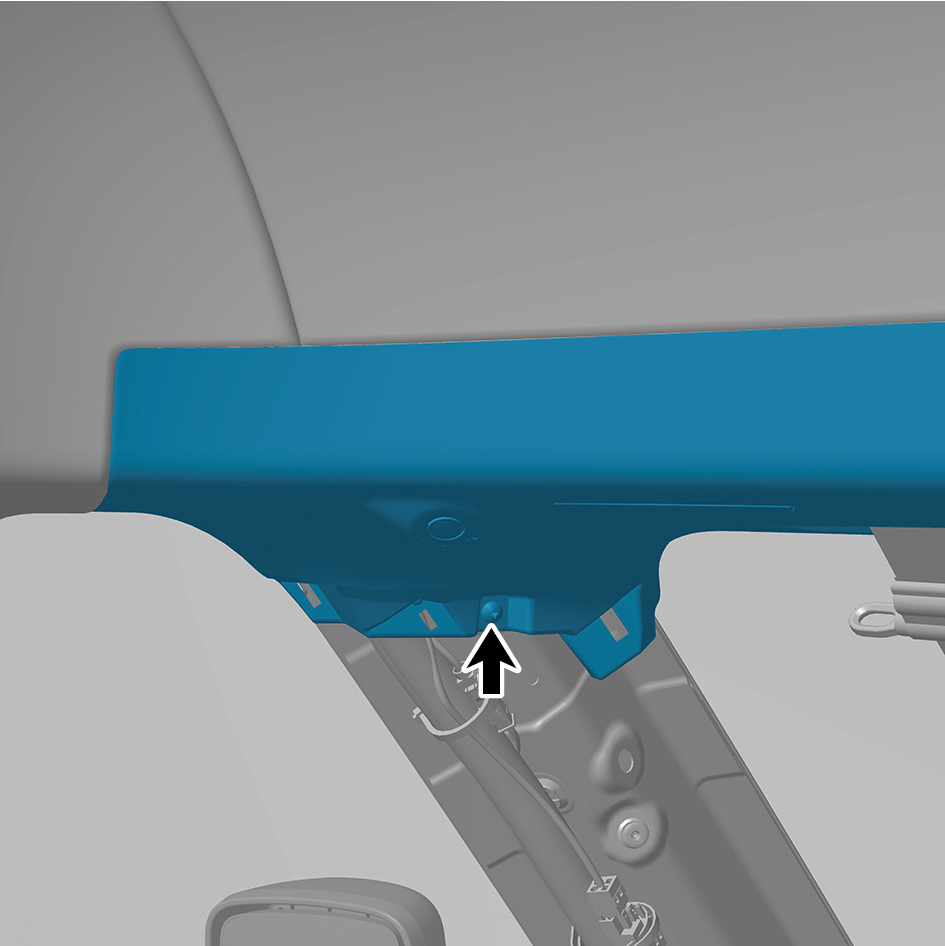
Install 2 fixing bolts of the sunshade cover plate assembly.
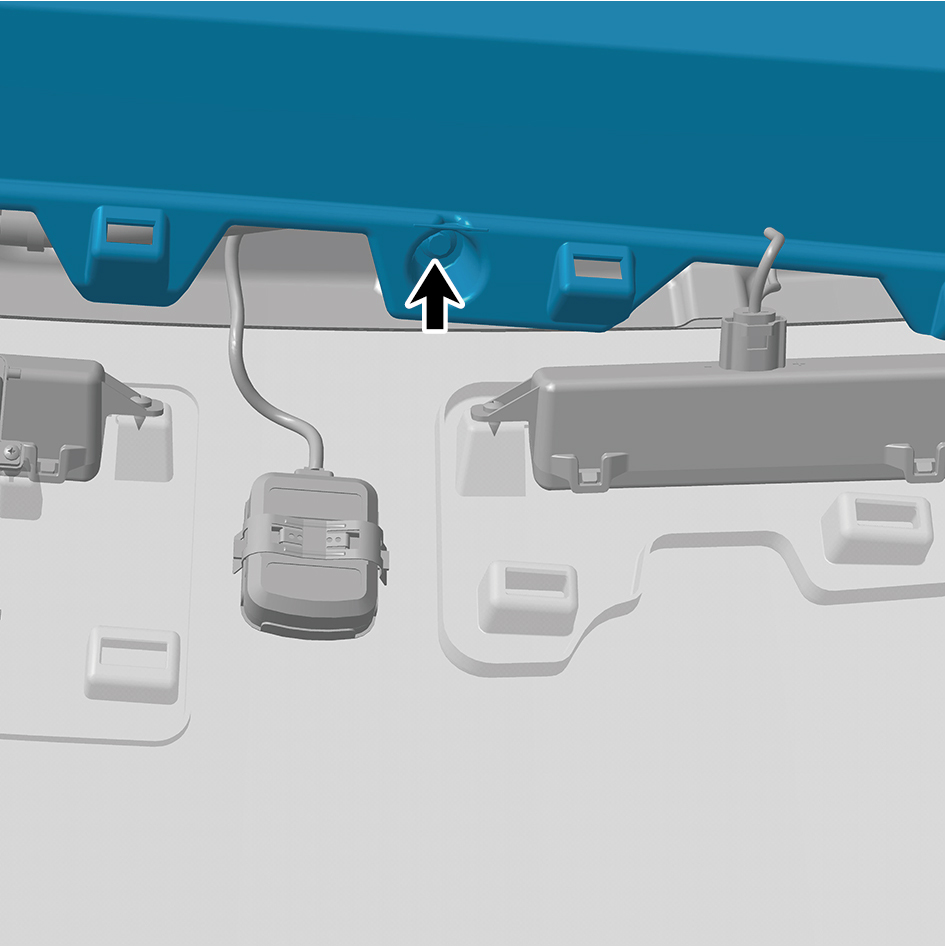
Torque: (6.5 +/- .75) ft lbs
4
Install 2 fixing screws of the sunshade assembly.
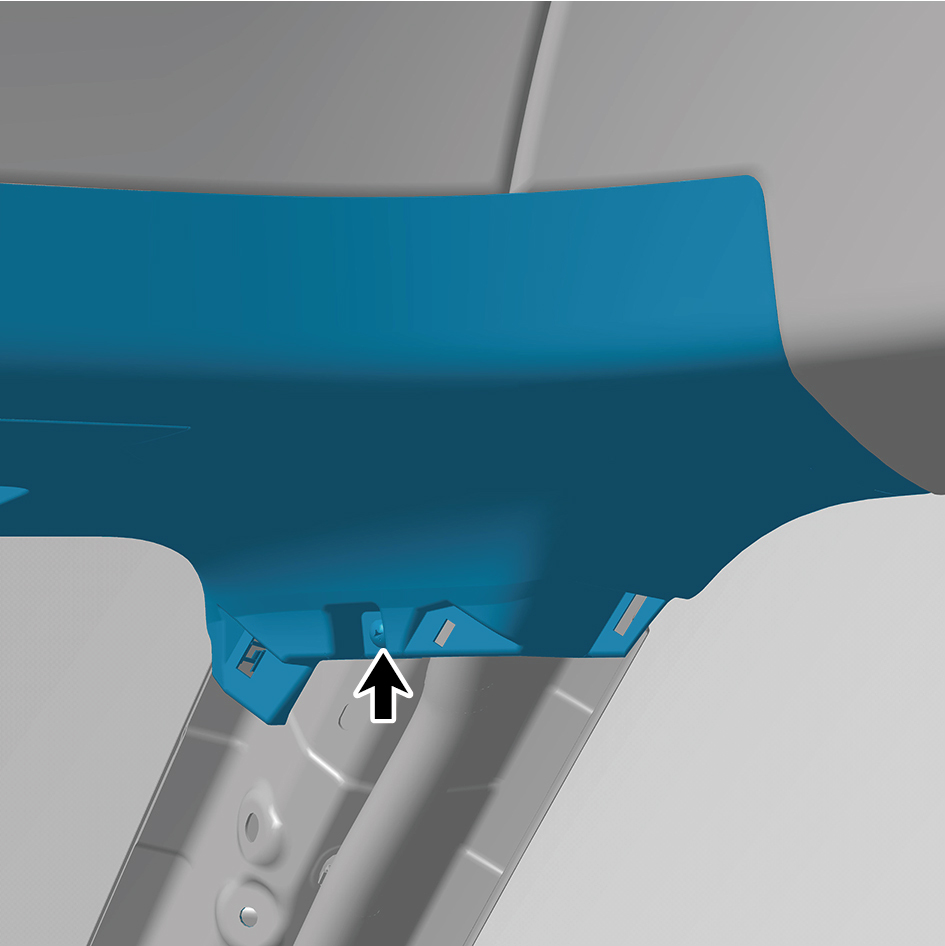
5
Install the sunshade assembly.
6
Install the front reading lamp.
7
Install the sunshade cover plate assembly.
8
Install the front camera trim cover assembly.
9
Install the sunshade rail assembly.
10
Install the right A-pillar protective plate assembly.
11
Install the left A-pillar protective plate assembly.
12
Connect the battery negative cable.
13
Close the front flip cover plate.
14
Close the door.
6.12.3.15 Replacement of Left Defroster Duct
Removal Procedures
1
Open the door.
2
Open the front flip cover plate.
3
Disconnect the battery negative cable.
caution
power down the high-voltage system before
disconnecting the negative pole of the storage
battery.
4
Remove the IP left upper trim panel assembly.
5
Remove the left A-pillar protective plate assembly.
6
Remove the left front side wall protective plate assembly.
7
Remove 2 fixing screws of the left defroster duct.
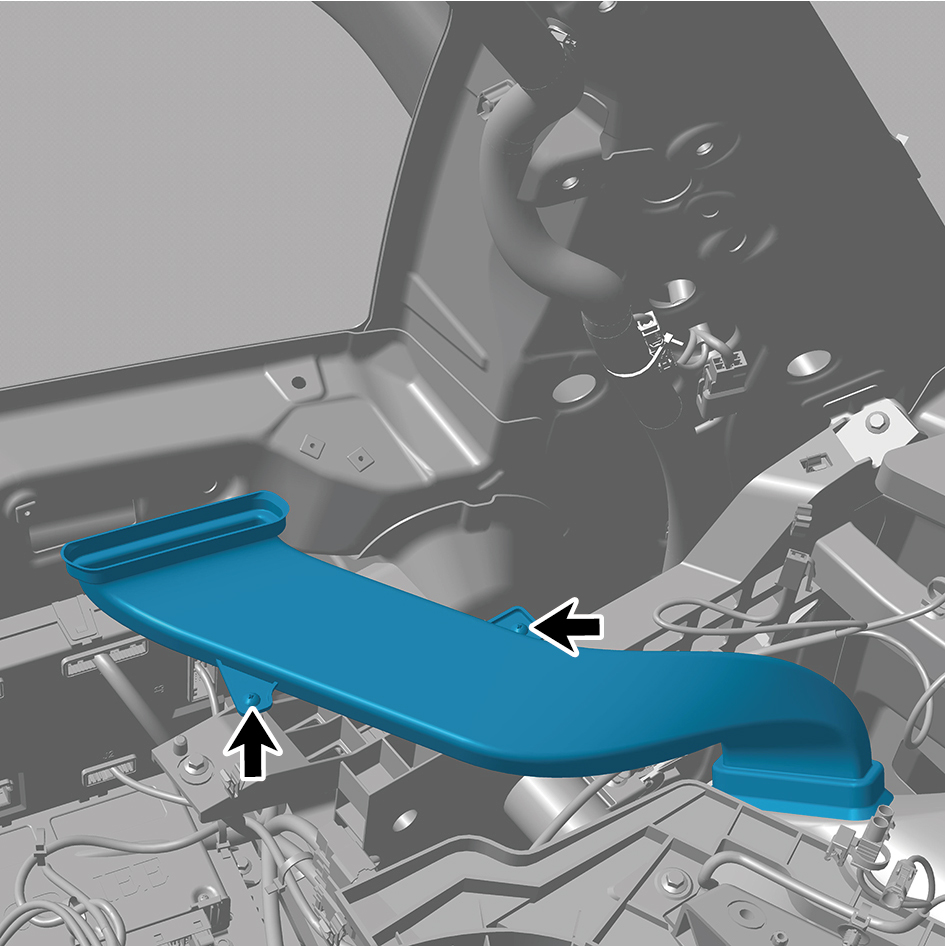
8
Remove the left defroster duct.
Installation Procedures
1
Move the left defroster duct to the mounting position.
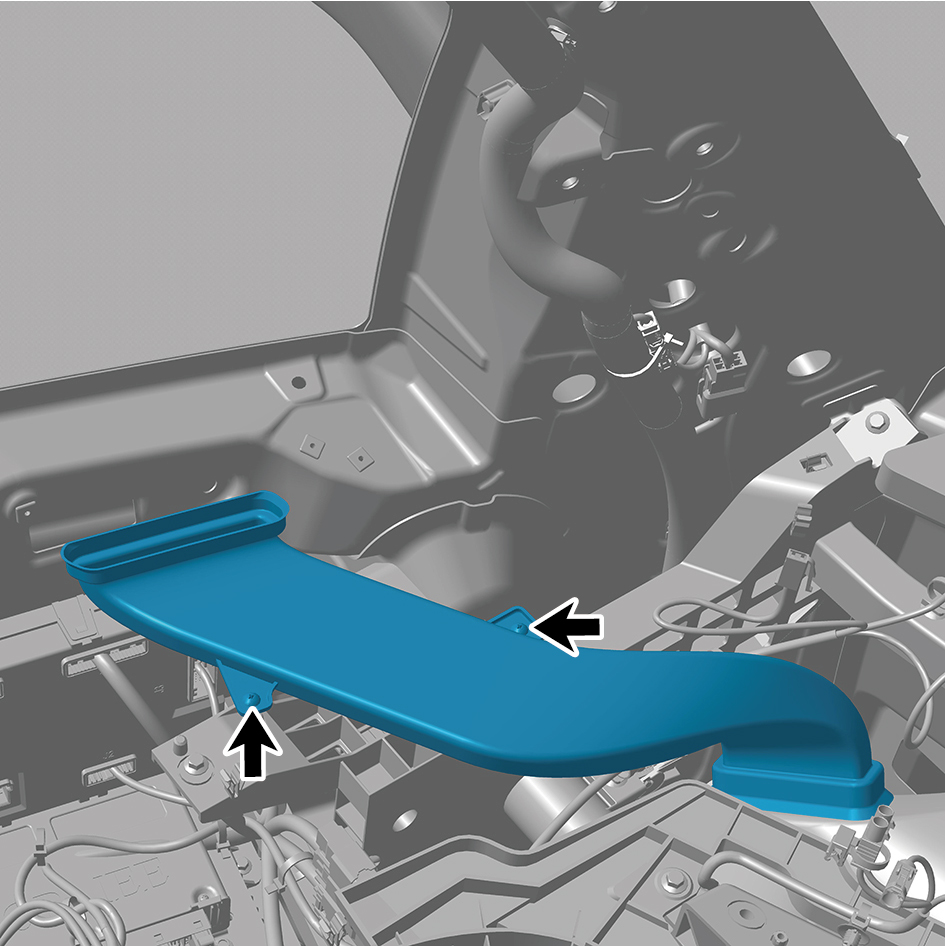
2
Install 2 fixing screws of the left defroster duct.
3
Install the left front side wall protective plate assembly.
4
Install the left A-pillar protective plate assembly.
5
Install the IP left upper trim panel assembly.
6
Connect the battery negative cable.
7
Close the front flip cover plate.
8
Close the door.
6.12.3.16 Replacement of Right Defroster Duct
Removal Procedures
1
Open the door.
2
Open the front flip cover plate.
3
Disconnect the battery negative cable.
caution
power down the high-voltage system before
disconnecting the negative pole of the storage
battery.
4
Remove the IP right upper trim panel assembly.
5
Remove the right A-pillar protective plate assembly.
6
Remove the right front side wall protective plate assembly.
7
Remove 2 fixing screws of the right defroster duct.
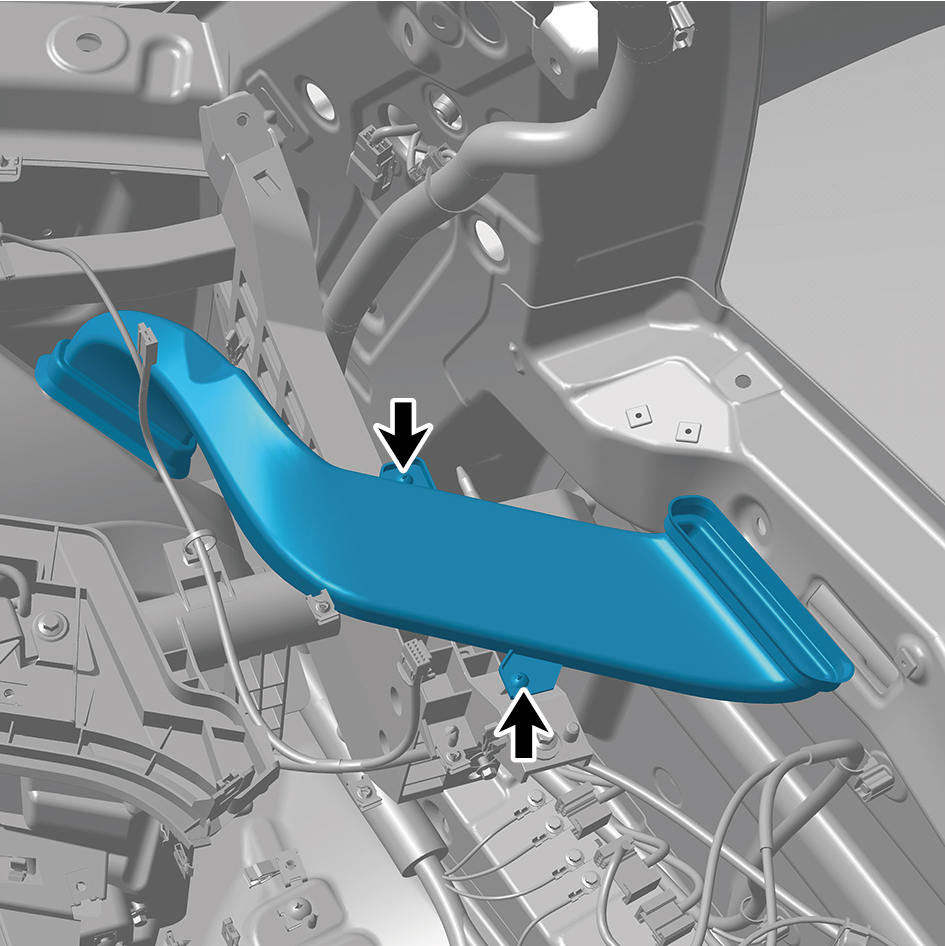
8
Remove the right defroster duct.
Installation Procedures
1
Move the right defroster duct to the mounting position.
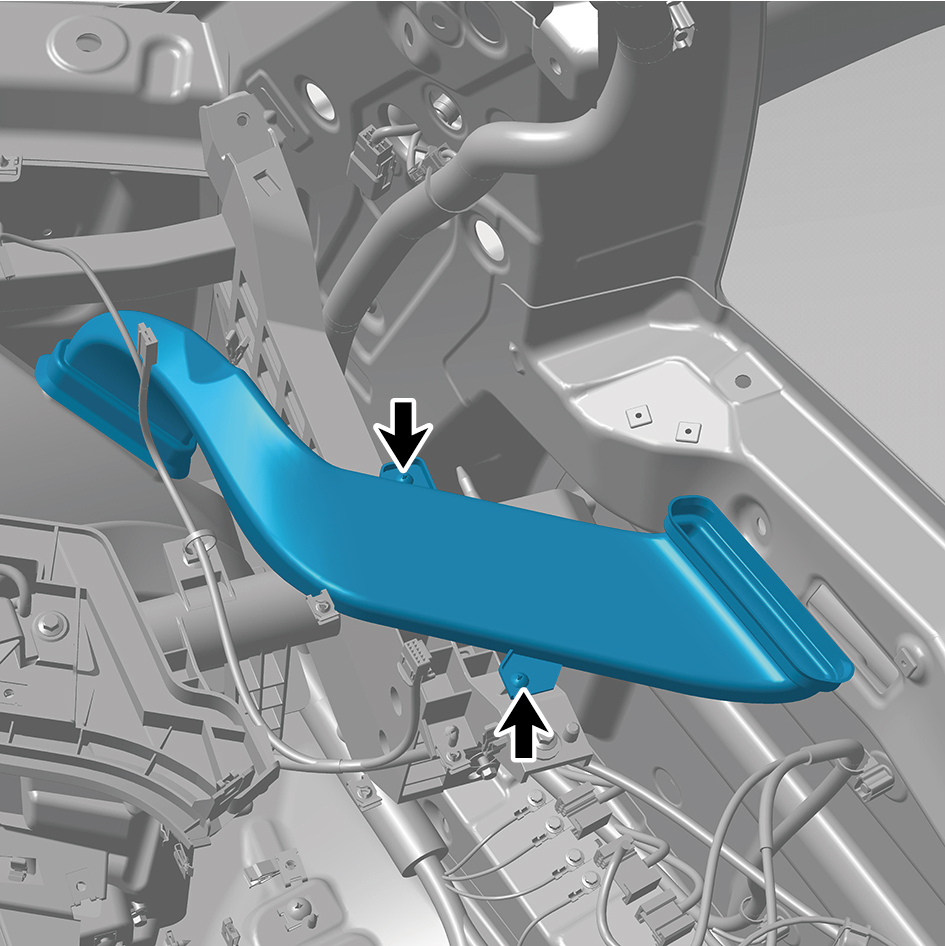
2
Install 2 fixing screws of the right defroster duct.
3
Install the right front side wall protective plate assembly.
4
Install the right A-pillar protective plate assembly.
5
Install the IP right upper trim panel assembly.
6
Connect the battery negative cable.
7
Close the front flip cover plate.
8
Close the door.