← Back to Contents
6 Vehicle Body / 6.8 Full Vehicle Glass Device | PDF pages 586-610
6.8 Full Vehicle Glass Device
6.8 Full Vehicle Glass Device
6.8.1 Specifications
6.8.1.1 Fastener Specifications
Range Of Torque
Fastener Specifications
Specifications
Foot Pounds of Torque (ft lbs)
The fixing nut connecting the lifting
(6.5 +/- .75) ft lbs
M6
glass assembly and the door trim body
6.8.2 Decomposition Diagram
6.8.2.1 Decomposition Diagram
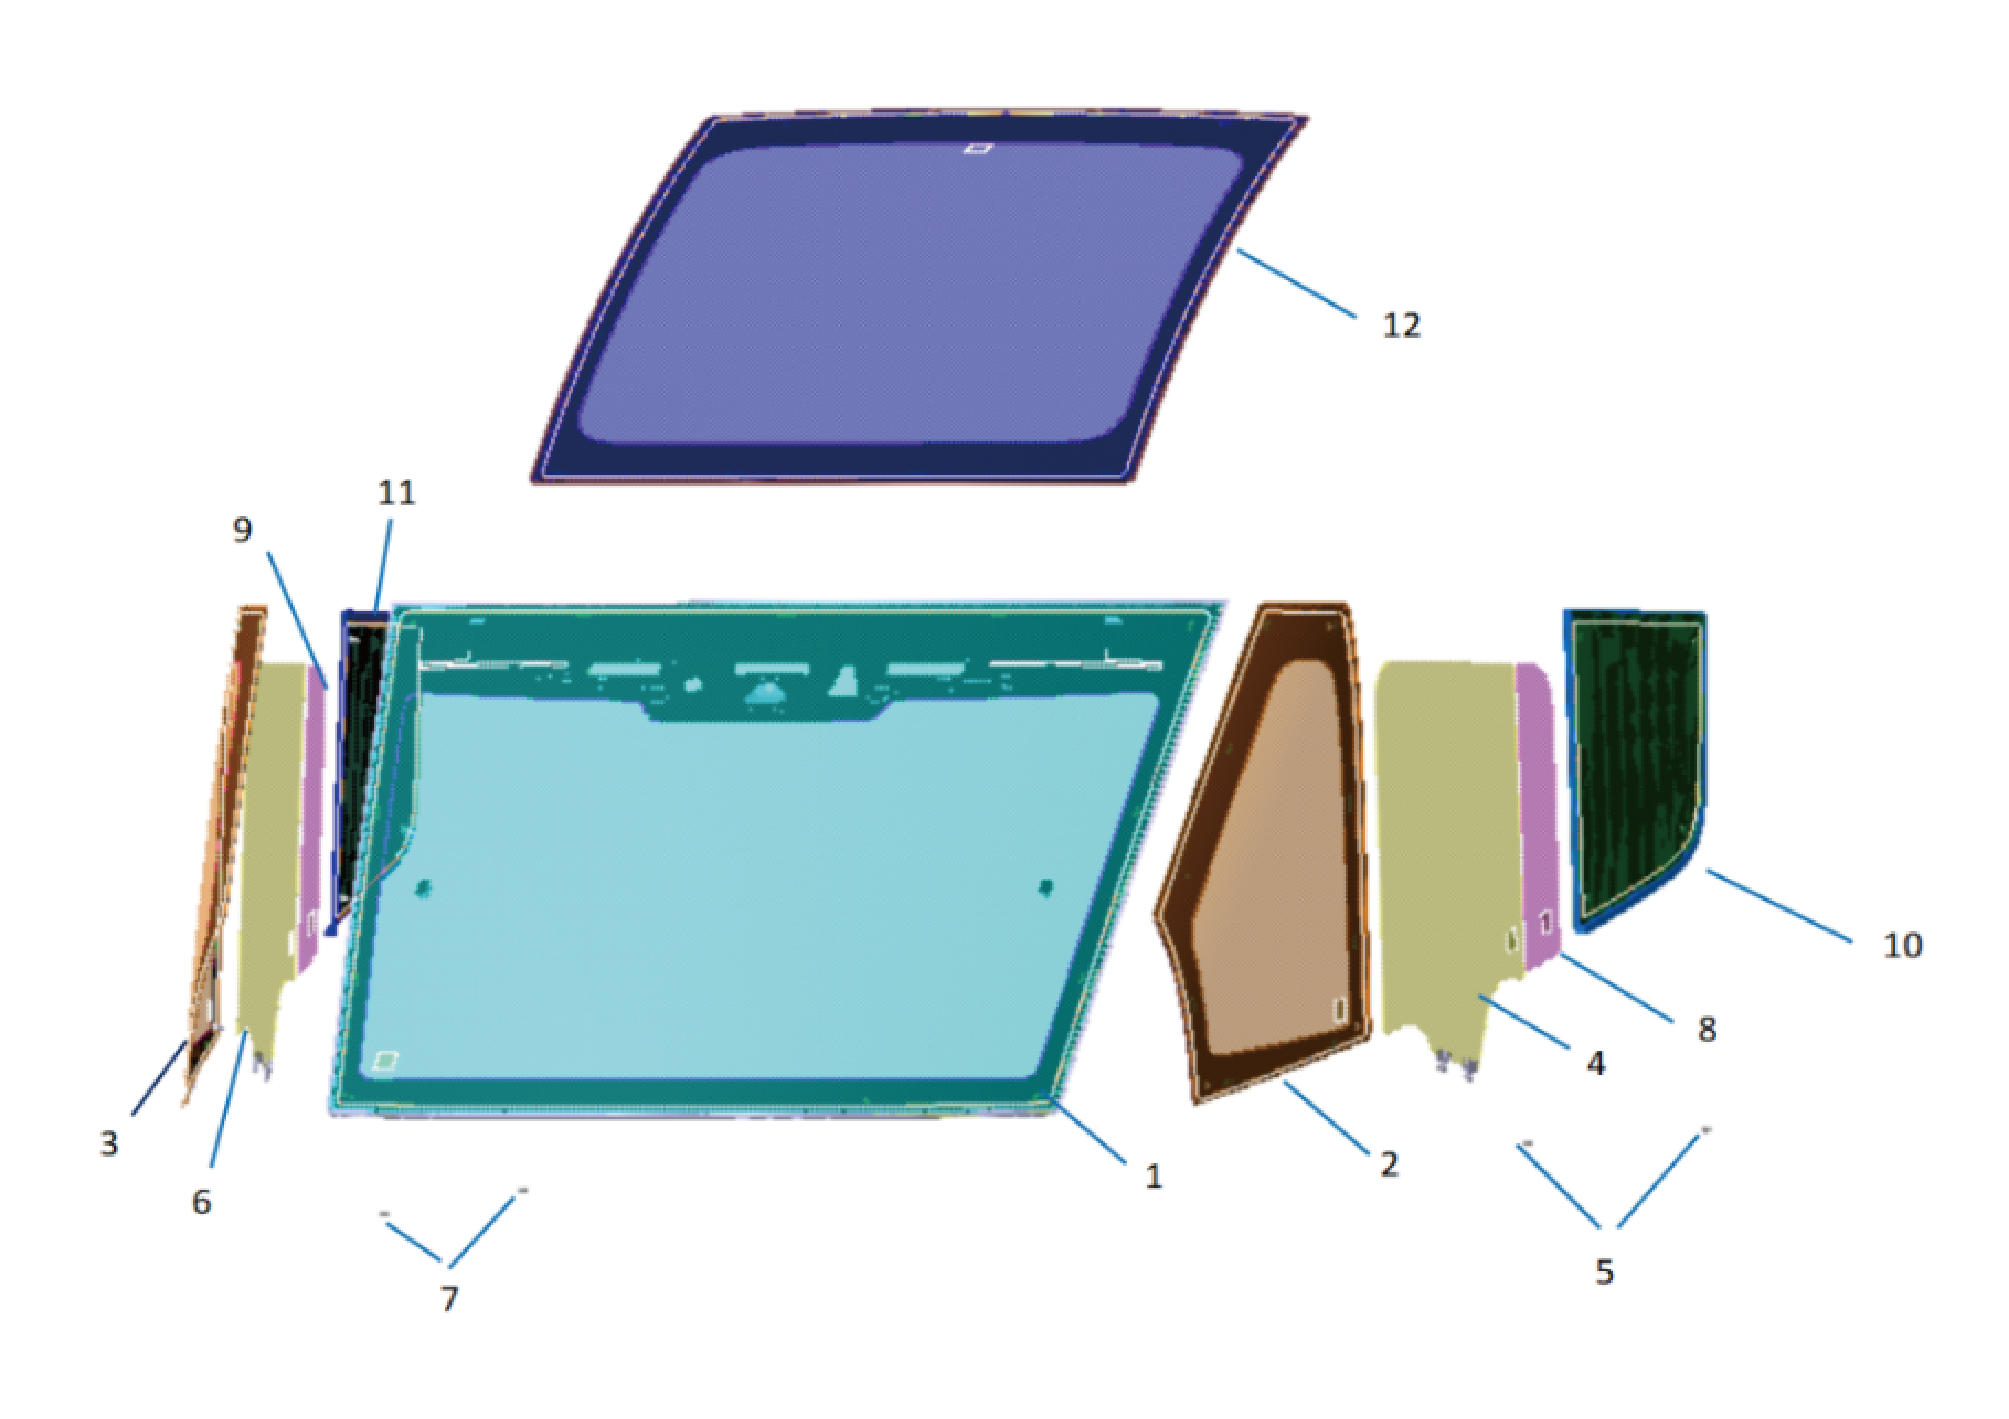
7.
1.
Windsheld Assy-Frt
Hexagon Flange Bolt
2.
8.
Front Quarter Glass Assy-Lh
Rear Quarter Glass Assy-Lh
3.
9.
Front Quarter Glass Assy-Rh
Rear Quarter Glass Assy-Rh
4.
10.
Front Glass Assy-Lh
Quarter Window Glass on the Left Rear Side Panel
5.
11.
Hexagon Flange Bolt
Right Rear Quarter Window Glass
6.
12.
Front Glass Assy-Rh
Fixed Glass Roof Assy
6.8.3 Dismantling and Installation
6.8.3.1 Replacement of Front Windshield Assembly
Assembly
Removal Procedures
1
Open the door.
2
Open the front flip cover plate.
3
Disconnect the battery negative cable.
caution
power down the high-voltage system before
disconnecting the negative pole of the storage
battery.
4
Remove the engine compartment trim panel body.
5
Remove the left physical exterior rearview mirror
assembly.
6
Remove the left front wheel housing body.
7
Remove the primary wiper arm blade assembly (nozzle
and hose).
8
Remove the front windshield cover plate assembly.
9
Remove the left fender trim strip.
10
Remove the left fender assembly.
11
Remove the left A-pillar outer trim assembly.
12
Remove the right triangular cover plate assembly.
13
Remove the right front wheel housing body.
14
Remove the right fender trim strip.
15
Remove the right fender assembly.
16
Remove the right A-pillar outer trim assembly.
17
Remove the roof sealing strip.
18
Remove the front camera trim cover assembly.
19
Remove the Identification lamp.
20
Remove the front view intelligent camera.
21
Remove the RLS.
22
Clear away the glass debris inside and outside the
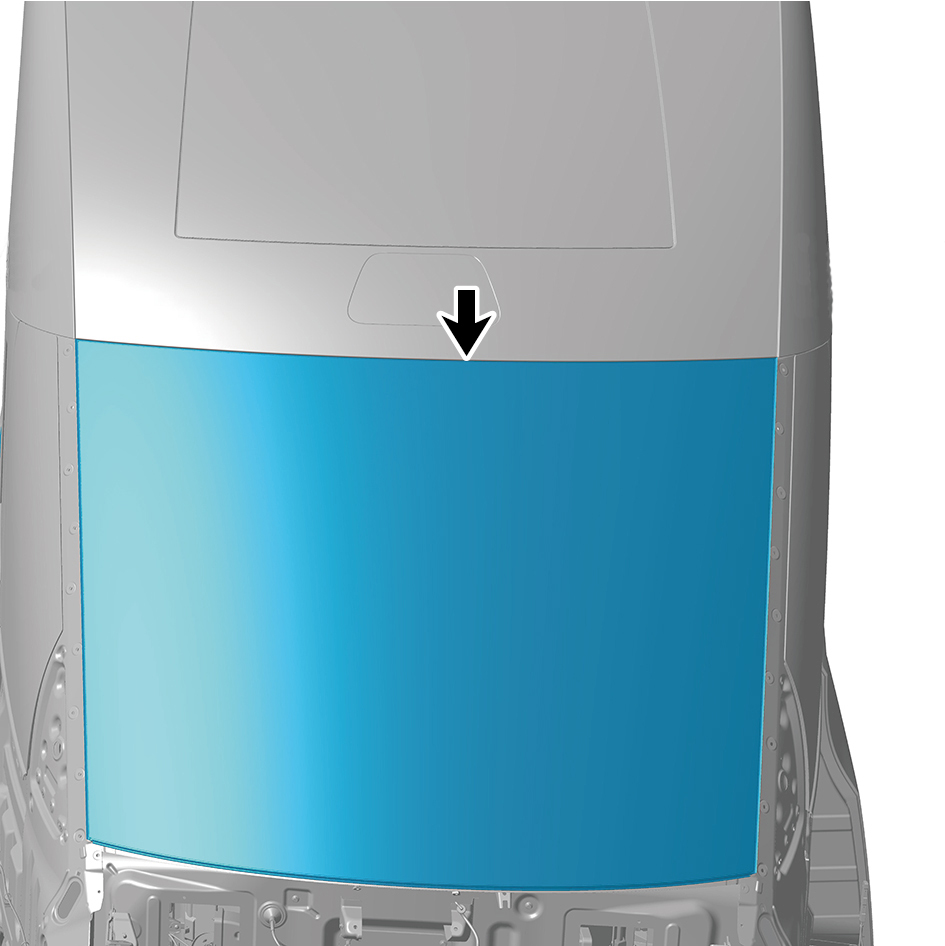
vehicle.
caution
Do not sweep debris, or score or scratch the vehicle
body.
23
Use an extended straight screwdriver to thread through
the windshield sealant.
caution
Install the floor mat, driver seat cover, sleeper
protective cover, and other protective measures
inside the cab.
24
Extend the wire rope through the glass adhesive, pull out
the joint of the wire rope at the other end, and cooperate
with the personnel inside and outside the cab to pull the
two ends of the wire rope and cut the glass adhesive.
caution
Before using the wire rope to pull and cut glass
sealant, the wire rope shall be wrapped around a
wooden stick before operation to avoid hand injury.
Personnel working at heights outside the cab must
take necessary safety precautions.
25
Remove the front windshield assembly using the suction
cup.
caution
Wear goggles and cut resistant gloves when
removing glass. Damaged glass can be removed
using a rubber hammer and cutting knife.
Installation Procedures
1
Install the right fender assembly.
2
Install the left fender assembly.
3
Move the front windshield assembly to the mounting
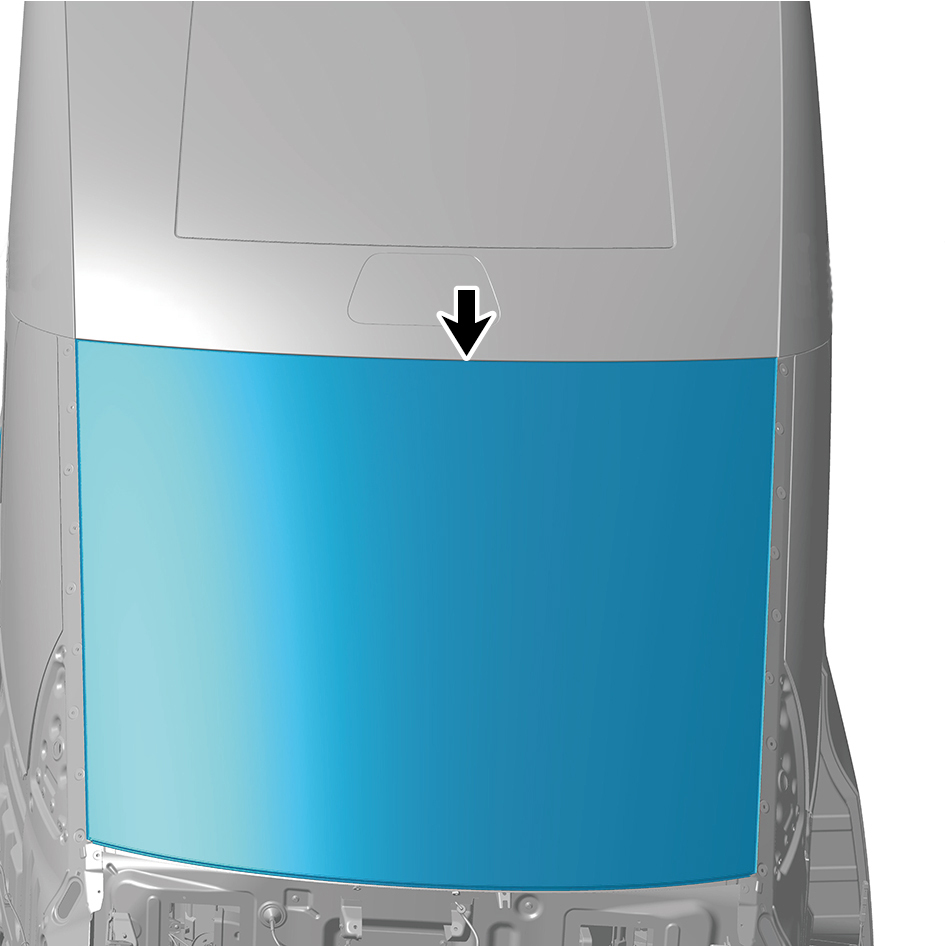
position.
4
Clean the bonding surfaces of the window frame and glass
separately with activated cleaning agents.
caution
Dry for 3 minutes after cleaning.
5
Use a clean degreased cotton or brush to evenly and thinly
apply the bottom coat of polyurethane glass adhesive to
the pre bonding area of the body sheet metal.
caution
After coating, let it dry for at least 30 seconds.
6
Apply polyurethane glass adhesive evenly to the glass
bonding position.
caution
The glue nozzle of the glue gun needs to be cut with
an art knife according to the standard.
7
Attach the glass suction cup to the outer curved surface of
the glass, align one of the clips with the corresponding
body sheet metal hole, then align the diagonal clips with
the corresponding sheet metal hole, and evenly press the
entire circumference to ensure that the locating clips are
effectively engaged with the body sheet metal.
caution
To ensure that the glass is not damaged, two people
need to simultaneously grab the suction cup for
operation.
8
Install the RLS.
9
Install the front view intelligent camera.
10
Install the Identification lamp.
11
Install the front camera trim cover assembly.
12
Install the roof sealing strip.
13
Install the right A-pillar outer trim assembly.
14
Install the right fender trim strip.
15
Install the right front wheel housing body.
16
Install the right triangular cover plate assembly.
17
Install the left A-pillar outer trim assembly.
18
Install the left fender trim strip.
19
Install the front windshield cover plate assembly.
20
Install the primary wiper arm blade assembly (nozzle and
hose).
21
Install the left front wheel housing body.
22
Install the left physical exterior rearview mirror assembly.
23
Install the engine compartment trim panel body.
24
Connect the battery negative cable.
25
Close the front flip cover plate.
26
Close the door.
6.8.3.2 Replacement of Left Adjustable Window Assembly
Window Assembly
Removal Procedures
1
Open the door.
2
Open the front flip cover plate.
3
Disconnect the battery negative cable.
caution
power down the high-voltage system before
disconnecting the negative pole of the storage
battery.
4
Remove the IP left upper trim panel assembly.
5
Remove the left A-pillar protective plate assembly.
6
Remove the left front side wall protective plate assembly.
7
Remove the front USB interface.
8
Remove the IP left access cover plate assembly.
9
Remove the left switch panel assembly.
10
Remove the left switch panel lower trim panel assembly.
11
Remove the IP left lower trim panel assembly.
12
Remove the left middle side wall lower trim panel
assembly.
13
Remove the left middle side wall middle trim panel
assembly.
caution
1.First remove the break glass hammer's zipper
cover, carefully take out the break glass hammer's
pull ring and place it inside the trim panel.
2.Be careful to avoid accidentally pulling the break
glass hammer's pull ring.
14
Remove the left middle side wall protective plate
assembly.
15
Remove the side wall clothes rail assembly.
16
Remove the left rear side wall protective plate assembly.
17
Remove the left inner weatherstrip assembly.
18
Remove the left outer weatherstrip assembly.
19
Remove the left body waterproof membrane (Ⅰ).
20
Remove the window regulator left lower mounting rail
assembly.
21
Remove the left glass run assembly.
22
Remove the left adjustable window assembly.
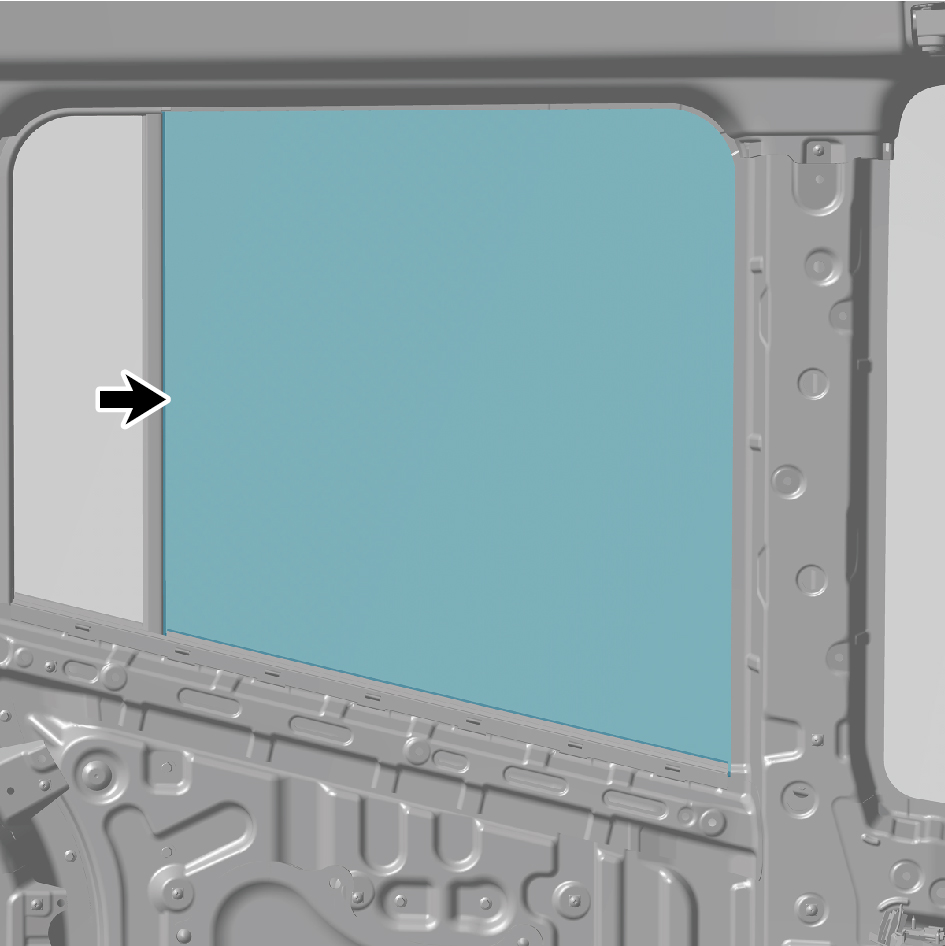
Installation Procedures
1
Install the left adjustable window assembly.
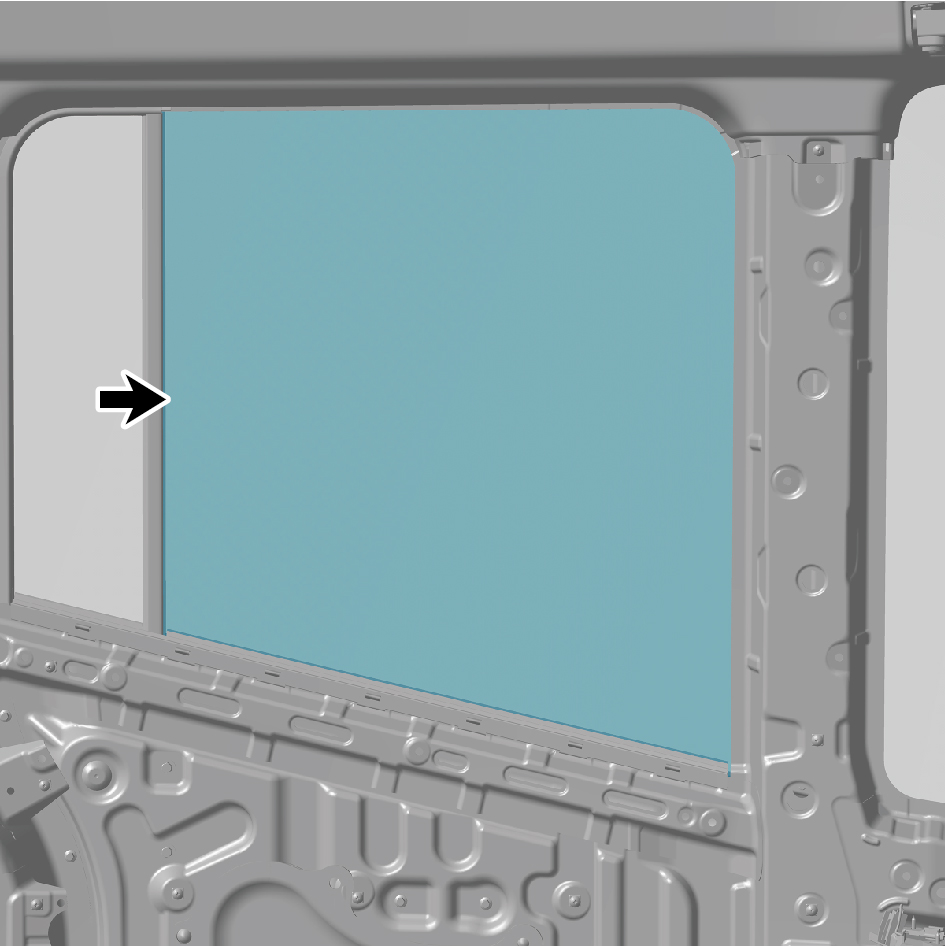
2
Install the left glass run assembly.
3
Install the window regulator left lower mounting rail
assembly.
4
Install the left body waterproof membrane (Ⅰ).
5
Install the left outer weatherstrip assembly.
6
Install the left inner weatherstrip assembly.
7
Install the left rear side wall protective plate assembly.
8
Install the side wall clothes rail assembly.
9
Install the left middle side wall protective plate assembly.
10
Install the left middle side wall middle trim panel assembly.
11
Install the left middle side wall lower trim panel assembly.
12
Install the IP left lower trim panel assembly.
13
Install the left switch panel lower trim panel assembly.
14
Install the left switch panel assembly.
15
Install the IP left access cover plate assembly.
16
Install the front USB interface.
17
Install the left front side wall protective plate assembly.
18
Install the left A-pillar protective plate assembly.
19
Install the IP left upper trim panel assembly.
20
Connect the battery negative cable.
21
Close the front flip cover plate.
22
Close the door.
6.8.3.3 Replacement of Right Adjustable Window Assembly
Window Assembly
Removal Procedures
1
Open the door.
2
Remove the cable cover plate.
3
Remove the door protective plate assembly.
4
Remove the right inner weatherstrip assembly.
5
Remove the right outer weatherstrip assembly.
6
Remove the right body waterproof membrane (Ⅰ).
7
Remove the right body waterproof membrane (II).
8
Remove the window regulator right lower mounting rail
assembly.
9
Remove the right glass run assembly.
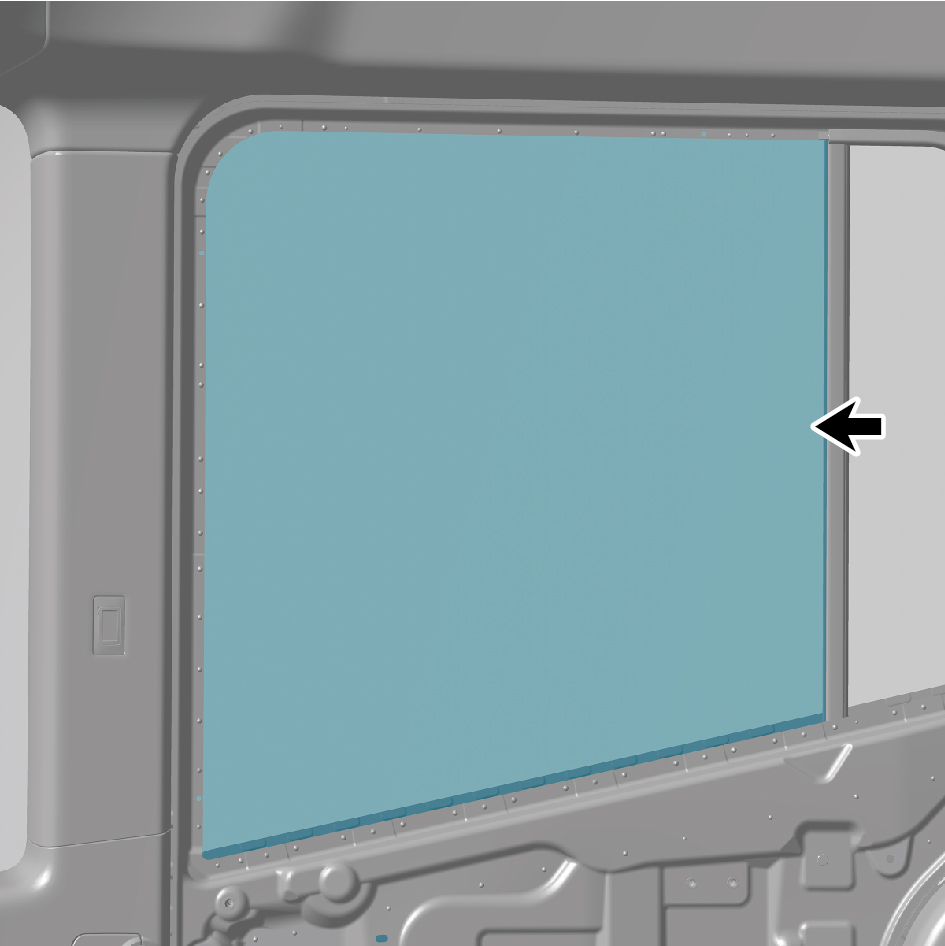
10
Remove the right adjustable window assembly.
Installation Procedures
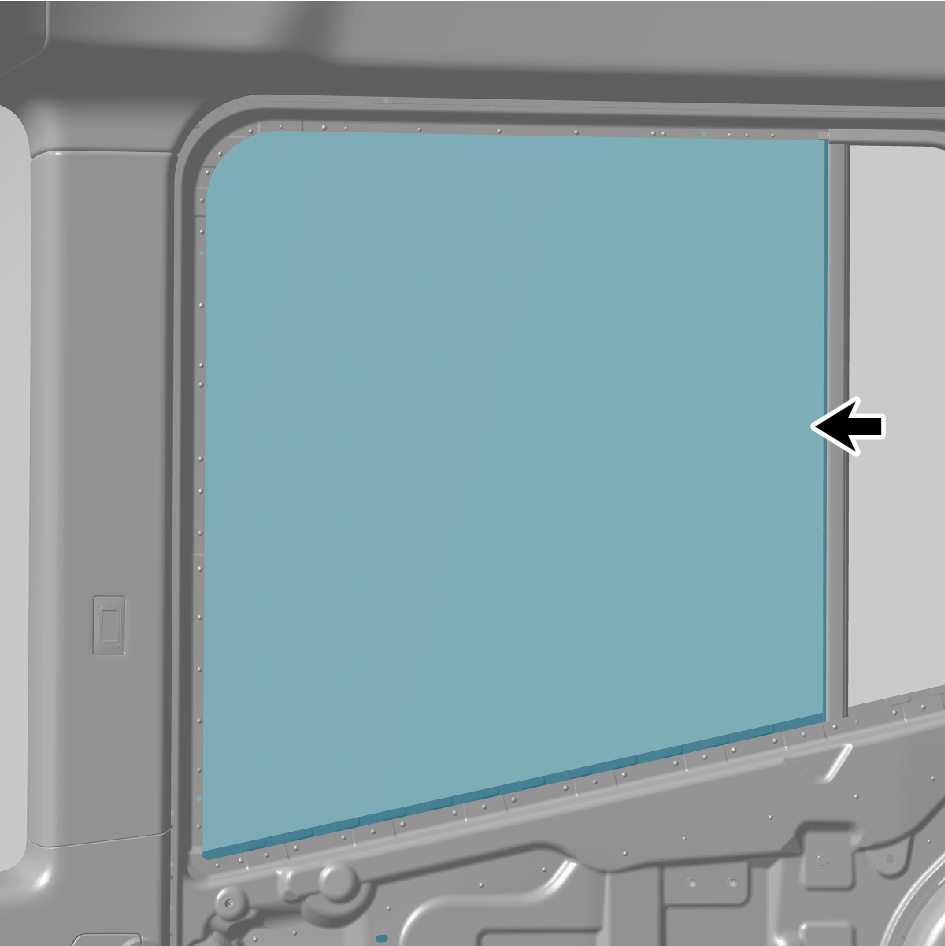
1
Install the right adjustable window assembly.
2
Install the right glass run assembly.
3
Install the window regulator right lower mounting rail
assembly.
4
Install the right body waterproof membrane (II).
5
Install the right body waterproof membrane (Ⅰ).
6
Install the right outer weatherstrip assembly.
7
Install the right inner weatherstrip assembly.
8
Install the door protective plate assembly.
9
Install the cable cover plate.
10
Close the door.
6.8.3.4 Replacement of Left Front Triangular Window Assembly
Window Assembly
Removal Procedures
1
Open the door.
2
Open the front flip cover plate.
3
Disconnect the battery negative cable.
caution
power down the high-voltage system before
disconnecting the negative pole of the storage
battery.
4
Remove the engine compartment trim panel body.
5
Remove the left physical exterior rearview mirror
assembly.
6
Remove the left front wheel housing body.
7
Remove the primary wiper arm blade assembly (nozzle
and hose).
8
Remove the front windshield cover plate assembly.
9
Remove the left fender trim strip.
10
Remove the left fender assembly.
11
Remove the left A-pillar outer trim assembly.
12
Clear away the glass debris inside and outside the
vehicle.
caution
Do not sweep debris, or score or scratch the vehicle
body.
13
Use an extended straight screwdriver to thread through
the windshield sealant.
caution
Install the floor mat, driver seat cover, sleeper
protective cover, and other protective measures
inside the cab.
14
Extend the wire rope through the glass adhesive, pull out
the joint of the wire rope at the other end, and cooperate
with the personnel inside and outside the cab to pull the
two ends of the wire rope and cut the glass adhesive.
caution
Before using the wire rope to pull and cut glass
sealant, the wire rope shall be wrapped around a
wooden stick before operation to avoid hand injury.
Personnel working at heights outside the cab must
take necessary safety precautions.
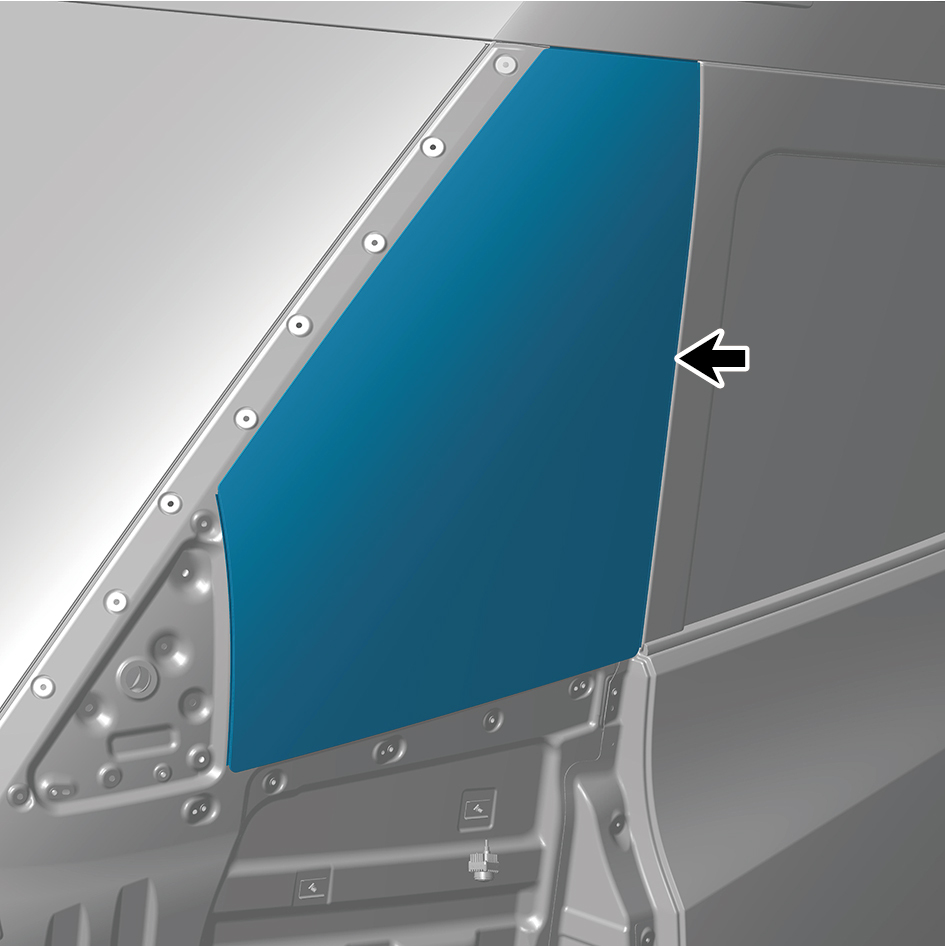
15
Remove the left front triangular window assembly using
the suction cup.
caution
Wear goggles and cut resistant gloves when
removing glass. Damaged glass can be removed
using a rubber hammer and cutting knife.
Installation Procedures
1
Install the left A-pillar outer trim assembly.
2
Move the left front triangular window assembly to the
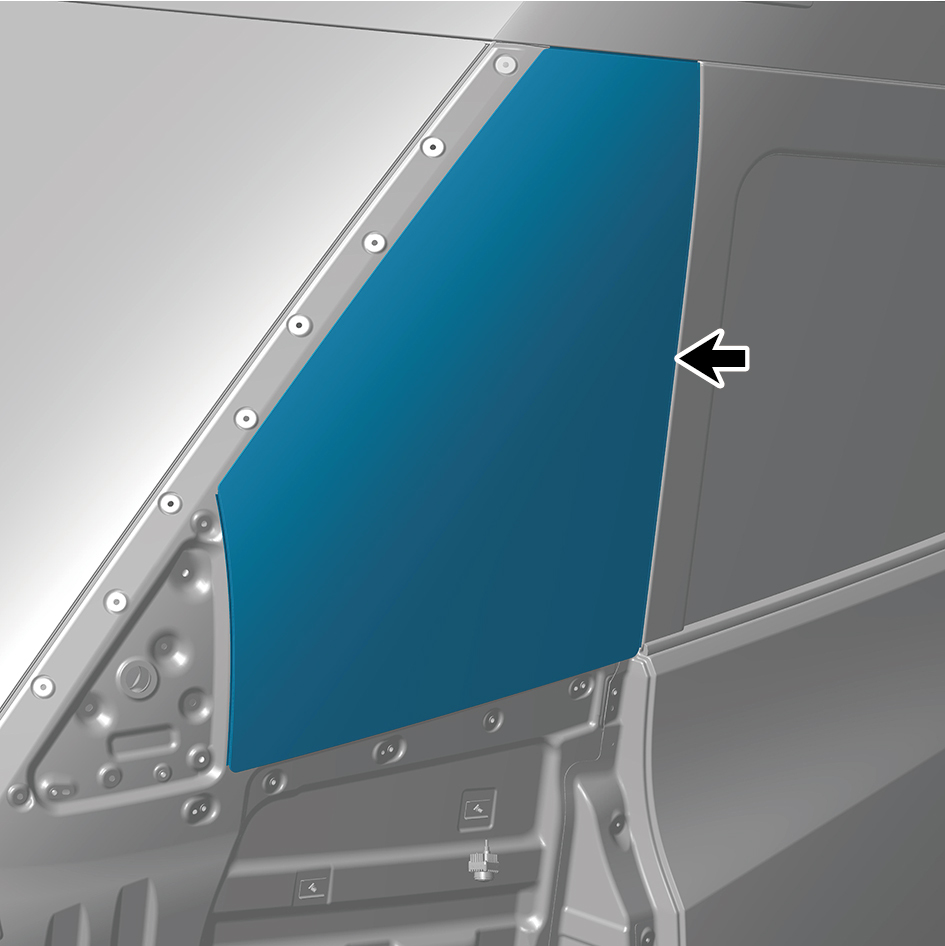
mounting position.
3
Clean the bonding surfaces of the window frame and
glass separately with activated cleaning agents.
caution
Dry for 3 minutes after cleaning.
4
Use a clean degreased cotton or brush to evenly and
thinly apply the bottom coat of polyurethane glass
adhesive to the pre bonding area of the body sheet metal.
caution
After coating, let it dry for at least 30 seconds.
5
Apply polyurethane glass adhesive evenly to the glass
bonding position.
caution
The glue nozzle of the glue gun needs to be cut with
an art knife according to the standard.
6
Attach the glass suction cup to the outer curved surface of
the glass, align one of the clips with the corresponding
body sheet metal hole, then align the diagonal clips with
the corresponding sheet metal hole, and evenly press the
entire circumference to ensure that the locating clips are
effectively engaged with the body sheet metal.
caution
To ensure that the glass is not damaged, two people
need to simultaneously grab the suction cup for
operation.
7
Install the left fender assembly.
8
Install the left fender trim strip.
9
Install the front windshield cover plate assembly.
10
Install the left front wheel housing body.
11
Install the primary wiper arm blade assembly (nozzle and
hose).
12
Install the left physical exterior rearview mirror assembly.
13
Install the engine compartment trim panel body.
14
Connect the battery negative cable.
15
Close the front flip cover plate.
16
Close the door.
6.8.3.5 Replacement of Right Front Triangular Window Assembly
Window Assembly
Removal Procedures
1
Open the door.
2
Open the front flip cover plate.
3
Disconnect the battery negative cable.
caution
power down the high-voltage system before
disconnecting the negative pole of the storage
battery.
4
Remove the engine compartment trim panel body.
5
Remove the right triangular cover plate assembly.
6
Remove the right front wheel housing body.
7
Remove the primary wiper arm blade assembly (nozzle
and hose).
8
Remove the front windshield cover plate assembly.
9
Remove the right fender trim strip.
10
Remove the right fender assembly.
11
Remove the right A-pillar outer trim assembly.
12
Clear away the glass debris inside and outside the
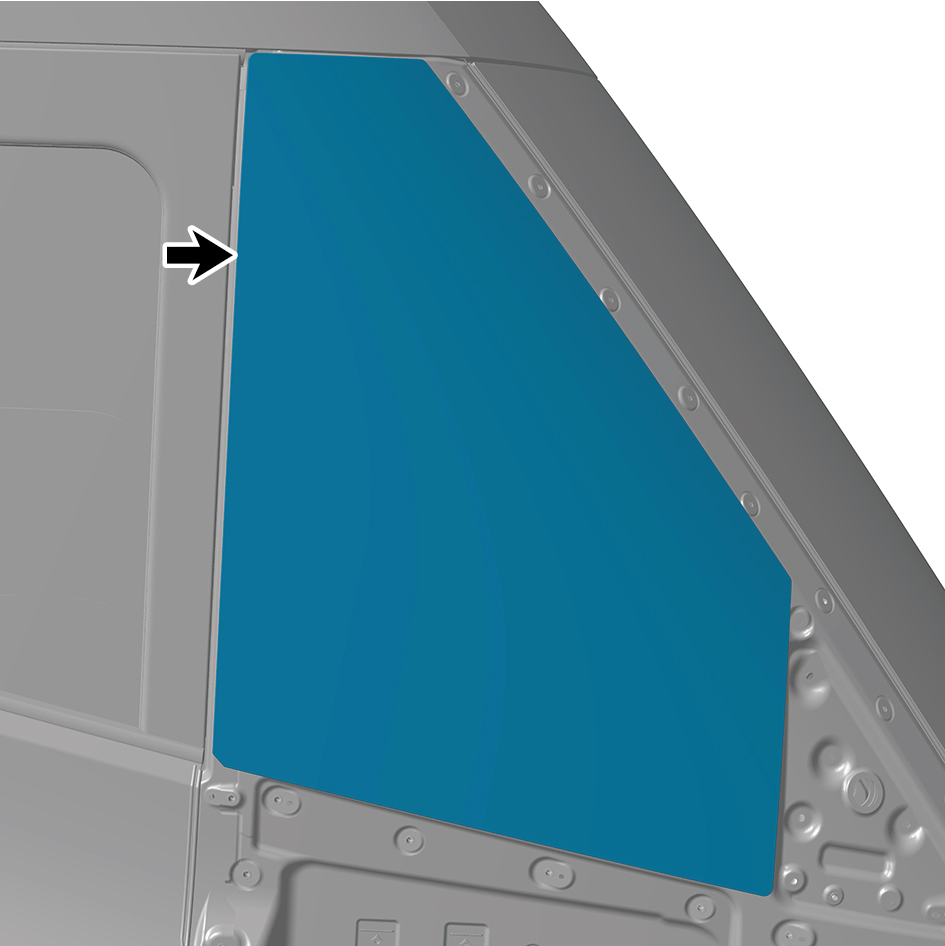
vehicle.
caution
Do not sweep debris, or score or scratch the vehicle
body.
13
Use an extended straight screwdriver to thread through
the windshield sealant.
caution
Install the floor mat, driver seat cover, sleeper
protective cover, and other protective measures
inside the cab.
14
Extend the wire rope through the glass adhesive, pull out
the joint of the wire rope at the other end, and cooperate
with the personnel inside and outside the cab to pull the
two ends of the wire rope and cut the glass adhesive.
caution
Before using the wire rope to pull and cut glass
sealant, the wire rope shall be wrapped around a
wooden stick before operation to avoid hand injury.
Personnel working at heights outside the cab must
take necessary safety precautions.
15
Remove the right front triangular window assembly using
the suction cup.
caution
Wear goggles and cut resistant gloves when
removing glass. Damaged glass can be removed
using a rubber hammer and cutting knife.
Installation Procedures
1
Install the right A-pillar outer trim assembly.
2
Move the right front triangular window assembly to the
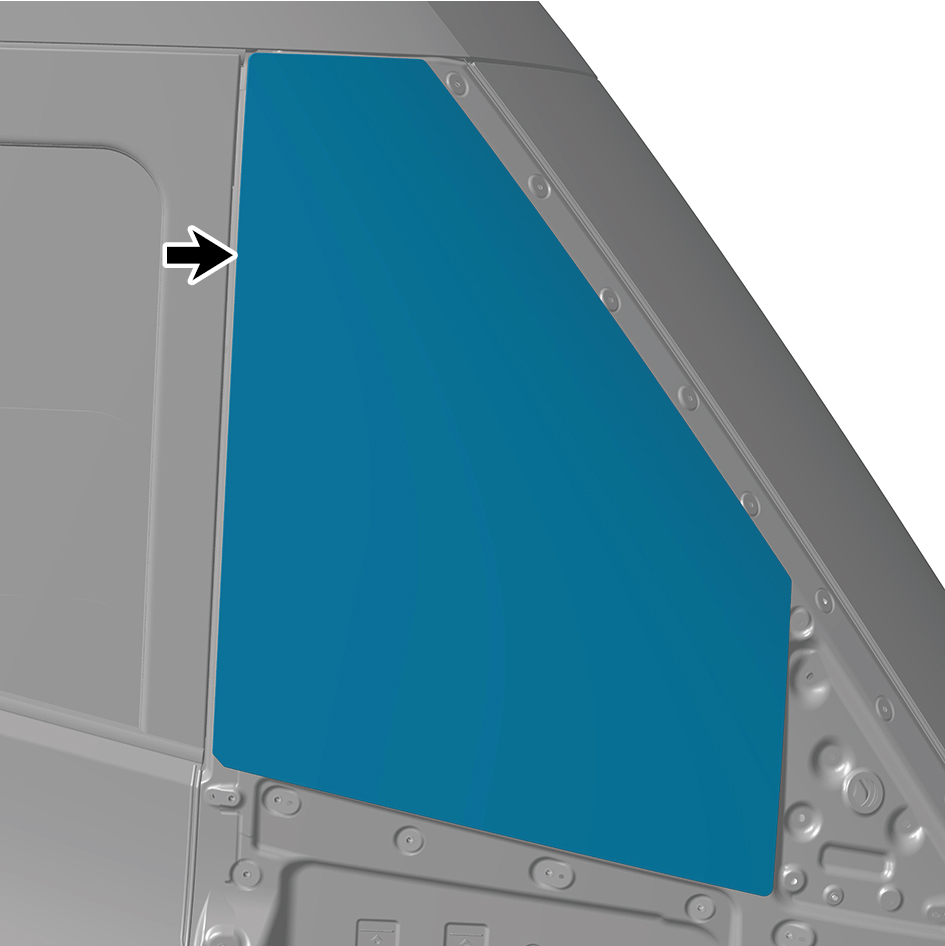
mounting position.
3
Clean the bonding surfaces of the window frame and
glass separately with activated cleaning agents.
caution
Dry for 3 minutes after cleaning.
4
Use a clean degreased cotton or brush to evenly and
thinly apply the bottom coat of polyurethane glass
adhesive to the pre bonding area of the body sheet metal.
caution
After coating, let it dry for at least 30 seconds.
5
Apply polyurethane glass adhesive evenly to the glass
bonding position.
caution
The glue nozzle of the glue gun needs to be cut with
an art knife according to the standard.
6
Attach the glass suction cup to the outer curved surface of
the glass, align one of the clips with the corresponding
body sheet metal hole, then align the diagonal clips with
the corresponding sheet metal hole, and evenly press the
entire circumference to ensure that the locating clips are
effectively engaged with the body sheet metal.
caution
To ensure that the glass is not damaged, two people
need to simultaneously grab the suction cup for
operation.
7
Install the right fender assembly.
8
Install the right fender trim strip.
9
Install the front windshield cover plate assembly.
10
Install the right front wheel housing body.
11
Install the primary wiper arm blade assembly (nozzle and
hose).
12
Install the right triangular cover plate assembly.
13
Install the engine compartment trim panel body.
14
Connect the battery negative cable.
15
Close the front flip cover plate.
16
Close the door.
6.8.3.6 Replacement of Left Rear Quadrangle Window Assembly
Window Assembly
Removal Procedures
1
Open the door.
2
Open the front flip cover plate.
3
Disconnect the battery negative cable.
caution
power down the high-voltage system before
disconnecting the negative pole of the storage
battery.
4
Remove the IP left upper trim panel assembly.
5
Remove the front USB interface.
6
Remove the IP left access cover plate assembly.
7
Remove the left switch panel assembly.
8
Remove the left switch panel lower trim panel assembly.
9
Remove the IP left lower trim panel assembly.
10
Remove the left middle side wall lower trim panel
assembly.
11
Remove the left middle side wall middle trim panel
assembly.
caution
1.First remove the break glass hammer's zipper
cover, carefully take out the break glass hammer's
pull ring and place it inside the trim panel.
2.Be careful to avoid accidentally pulling the break
glass hammer's pull ring.
12
Remove the left body waterproof membrane (Ⅰ).
13
Remove the window regulator left lower mounting rail
assembly.
14
Remove the left glass run assembly.
15
Remove the window regulator left mounting rail assembly.
16
Remove the left quadrangle window sealing strip.
17
Remove the left rear quadrangle window assembly.
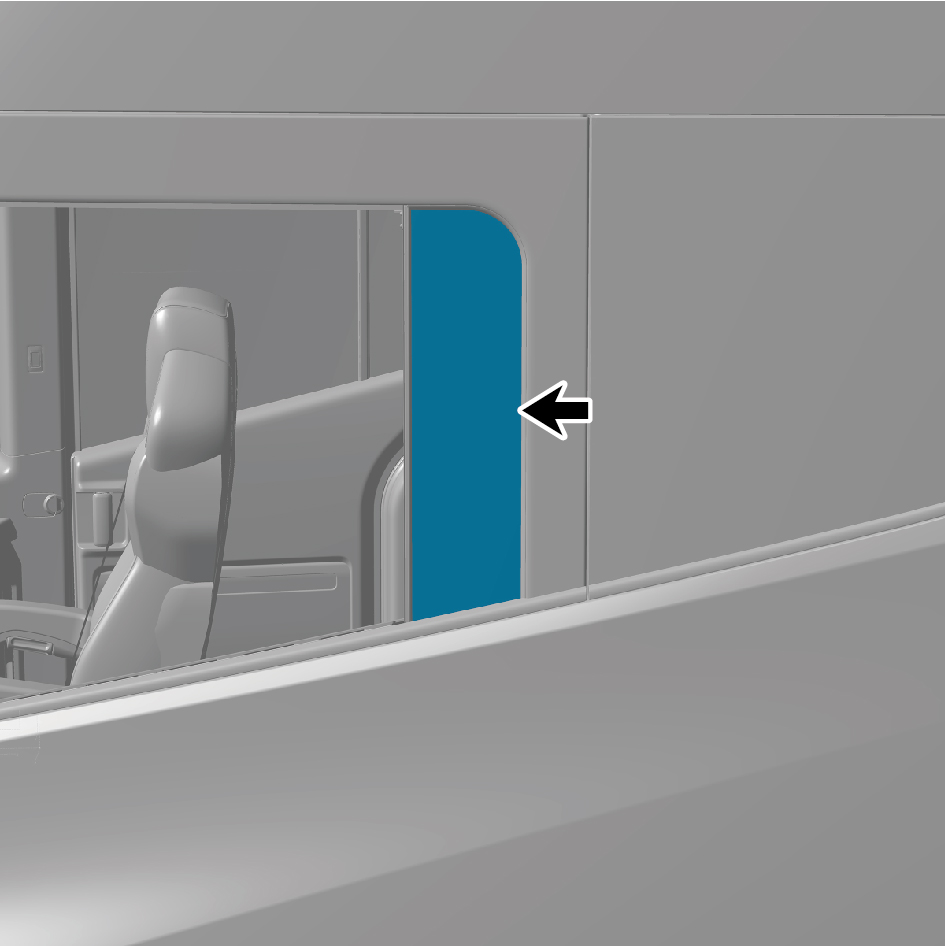
Installation Procedures
1
Install the left rear quadrangle window assembly.
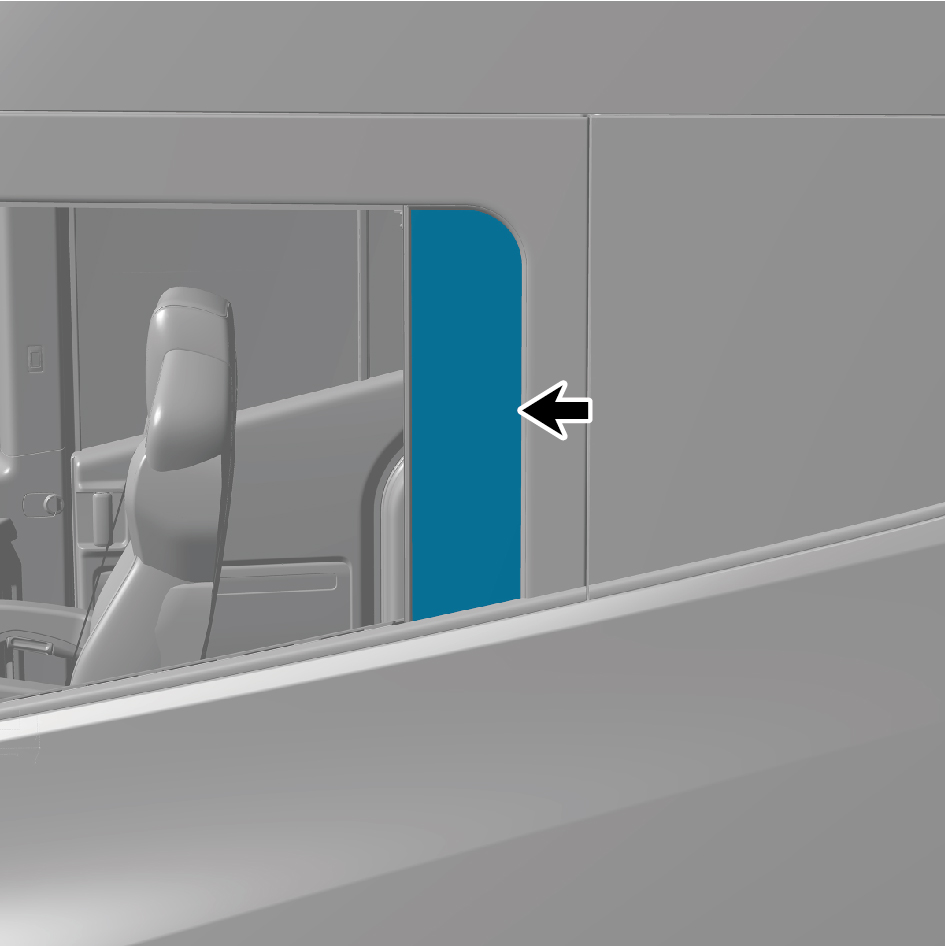
2
Install the left quadrangle window sealing strip.
3
Install the window regulator left mounting rail assembly.
4
Install the left glass run assembly.
5
Install the window regulator left lower mounting rail
assembly.
6
Install the left body waterproof membrane (Ⅰ).
7
Install the left middle side wall middle trim panel assembly.
8
Install the left middle side wall lower trim panel assembly.
9
Install the IP left lower trim panel assembly.
10
Install the left switch panel lower trim panel assembly.
11
Install the left switch panel assembly.
12
Install the IP left access cover plate assembly.
13
Install the front USB interface.
14
Install the IP left upper trim panel assembly.
15
Connect the battery negative cable.
16
Close the front flip cover plate.
17
Close the door.
6.8.3.7 Replacement of Right Rear Quadrangle Window Assembly
Quadrangle Window Assembly
Removal Procedures
1
Open the door.
2
Remove the cable cover plate.
3
Remove the door protective plate assembly.
4
Remove the right body waterproof membrane (Ⅰ).
5
Remove the right body waterproof membrane (II).
6
Remove the window regulator right lower mounting rail
assembly.
7
Remove the right glass run assembly.
8
Remove the window regulator right mounting rail
assembly.
9
Remove the right quadrangle window sealing strip.
10
Remove the right rear quadrangle window assembly.
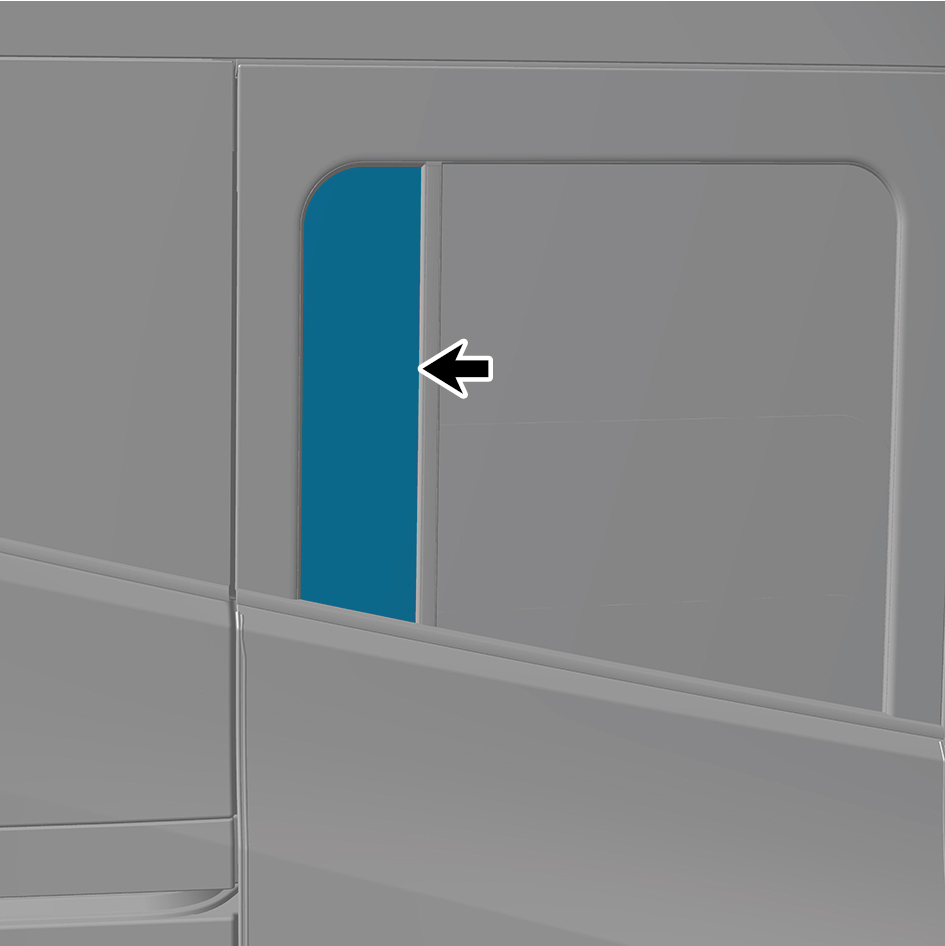
Installation Procedures
1
Install the right rear quadrangle window assembly.
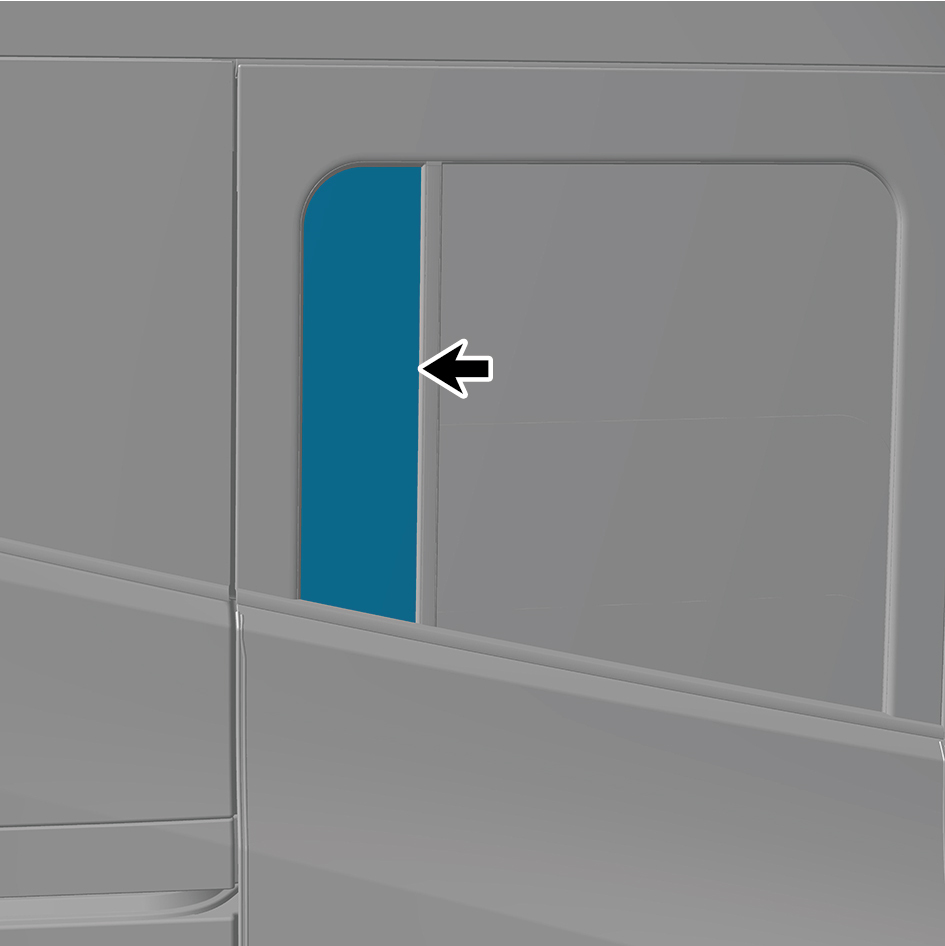
2
Install the right quadrangle window sealing strip.
3
Install the window regulator right mounting rail assembly.
4
Install the right glass run assembly.
5
Install the window regulator right lower mounting rail
assembly.
6
Install the right body waterproof membrane (II).
7
Install the right body waterproof membrane (Ⅰ).
8
Install the door protective plate assembly.
9
Install the cable cover plate.
10
Close the door.
6.8.3.8 Replacement of Awning Glass Assembly
Assembly
Removal Procedures
1
Open the door.
2
Open the front flip cover plate.
3
Disconnect the battery negative cable.
caution
power down the high-voltage system before
disconnecting the negative pole of the storage
battery.
4
Remove the left A-pillar protective plate assembly.
5
Remove the right A-pillar protective plate assembly.
6
Remove the sunshade rail assembly.
7
Remove the front camera trim cover assembly.
8
Remove the sunshade cover plate assembly.
9
Remove the left ceiling lamp.
10
Remove the right ceiling lamp.
11
Remove the middle ceiling assembly.
12
Remove the awning sunshade assembly.
13
Clear away the glass debris inside and outside the
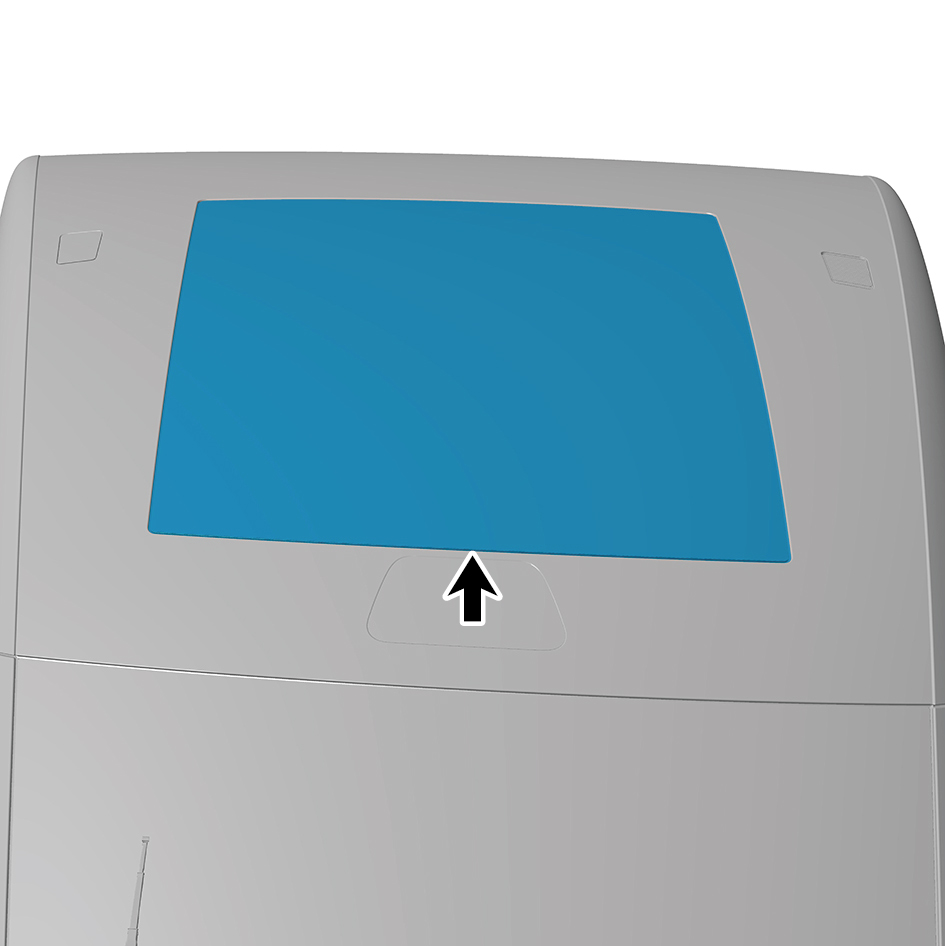
vehicle.
caution
Do not sweep debris, or score or scratch the vehicle
body.
14
Use an extended straight screwdriver to thread through
the windshield sealant.
caution
Install the floor mat, driver seat cover, sleeper
protective cover, and other protective measures
inside the cab.
15
Extend the wire rope through the glass adhesive, pull out
the joint of the wire rope at the other end, and cooperate
with the personnel inside and outside the cab to pull the
two ends of the wire rope and cut the glass adhesive.
caution
Before using the wire rope to pull and cut glass
sealant, the wire rope shall be wrapped around a
wooden stick before operation to avoid hand injury.
Personnel working at heights outside the cab must
take necessary safety precautions.
16
Remove the awning glass assembly using the suction cup.
caution
Wear goggles and cut resistant gloves when
removing glass. Damaged glass can be removed
using a rubber hammer and cutting knife.
Installation Procedures
1
Move the awning glass assembly to the mounting position.
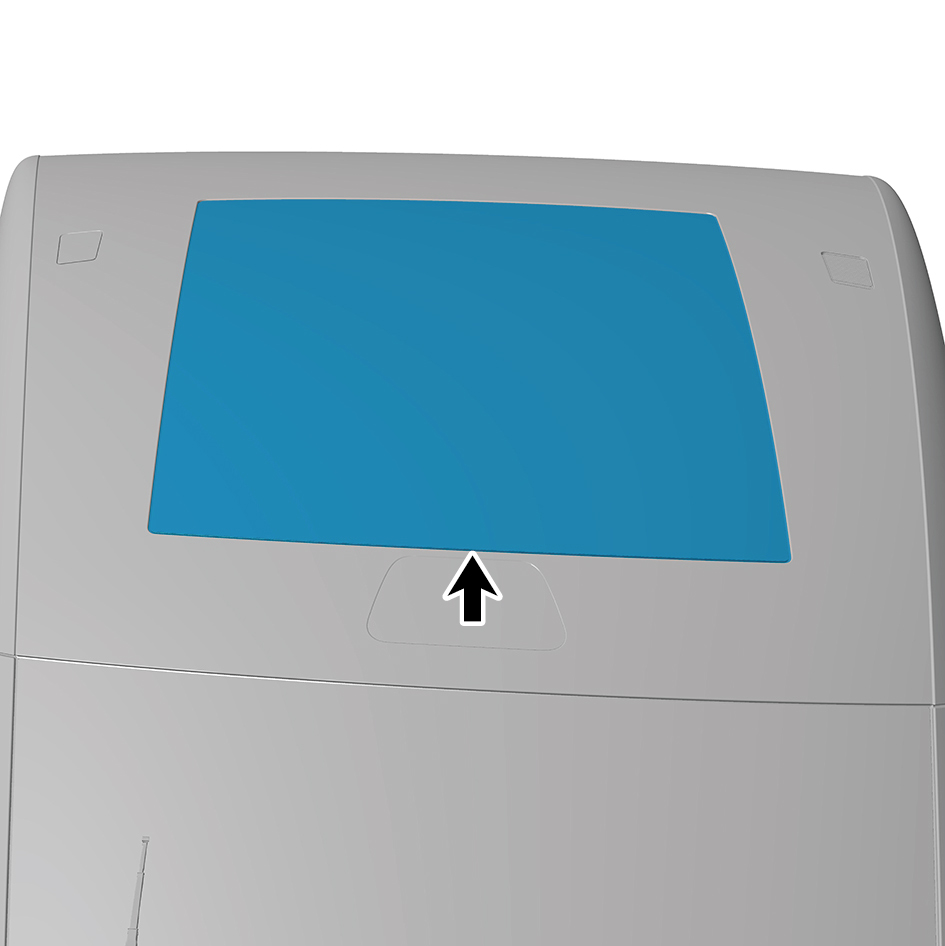
2
Clean the bonding surfaces of the window frame and
glass separately with activated cleaning agents.
caution
Dry for 3 minutes after cleaning.
3
Use a clean degreased cotton or brush to evenly and
thinly apply the bottom coat of polyurethane glass
adhesive to the pre bonding area of the body sheet metal.
caution
After coating, let it dry for at least 30 seconds.
4
Apply polyurethane glass adhesive evenly to the glass
bonding position.
caution
The glue nozzle of the glue gun needs to be cut with
an art knife according to the standard.
5
Attach the glass suction cup to the outer curved surface of
the glass, align one of the clips with the corresponding
body sheet metal hole, then align the diagonal clips with
the corresponding sheet metal hole, and evenly press the
entire circumference to ensure that the locating clips are
effectively engaged with the body sheet metal.
caution
To ensure that the glass is not damaged, two people
need to simultaneously grab the suction cup for
operation.
6
Install the awning sunshade assembly.
7
Install the middle ceiling assembly.
8
Install the right ceiling lamp.
9
Install the left ceiling lamp.
10
Install the sunshade cover plate assembly.
11
Install the front camera trim cover assembly.
12
Install the sunshade rail assembly.
13
Install the right A-pillar protective plate assembly.
14
Install the left A-pillar protective plate assembly.
15
Connect the battery negative cable.
16
Close the front flip cover plate.
17
Close the door.
6.8.3.9 Replacement of Left Side Wall Quadrangle Window
Quadrangle Window
Removal Procedures
1
Open the door.
2
Open the front flip cover plate.
3
Disconnect the battery negative cable.
caution
power down the high-voltage system before
disconnecting the negative pole of the storage
battery.
4
Remove the IP left upper trim panel assembly.
5
Remove the left A-pillar protective plate assembly.
6
Remove the left front side wall protective plate assembly.
7
Remove the front USB interface.
8
Remove the IP left access cover plate assembly.
9
Remove the left switch panel assembly.
10
Remove the left switch panel lower trim panel assembly.
11
Remove the IP left lower trim panel assembly.
12
Remove the left middle side wall lower trim panel
assembly.
13
Remove the left middle side wall middle trim panel
assembly.
caution
1.First remove the break glass hammer's zipper
cover, carefully take out the break glass hammer's
pull ring and place it inside the trim panel.
2.Be careful to avoid accidentally pulling the break
glass hammer's pull ring.
14
Remove the left middle side wall protective plate
assembly.
15
Remove the side wall clothes rail assembly.
16
Remove the left rear side wall protective plate assembly.
17
Remove the left side wall quadrangle window
weatherstrip.
18
Clear away the glass debris inside and outside the
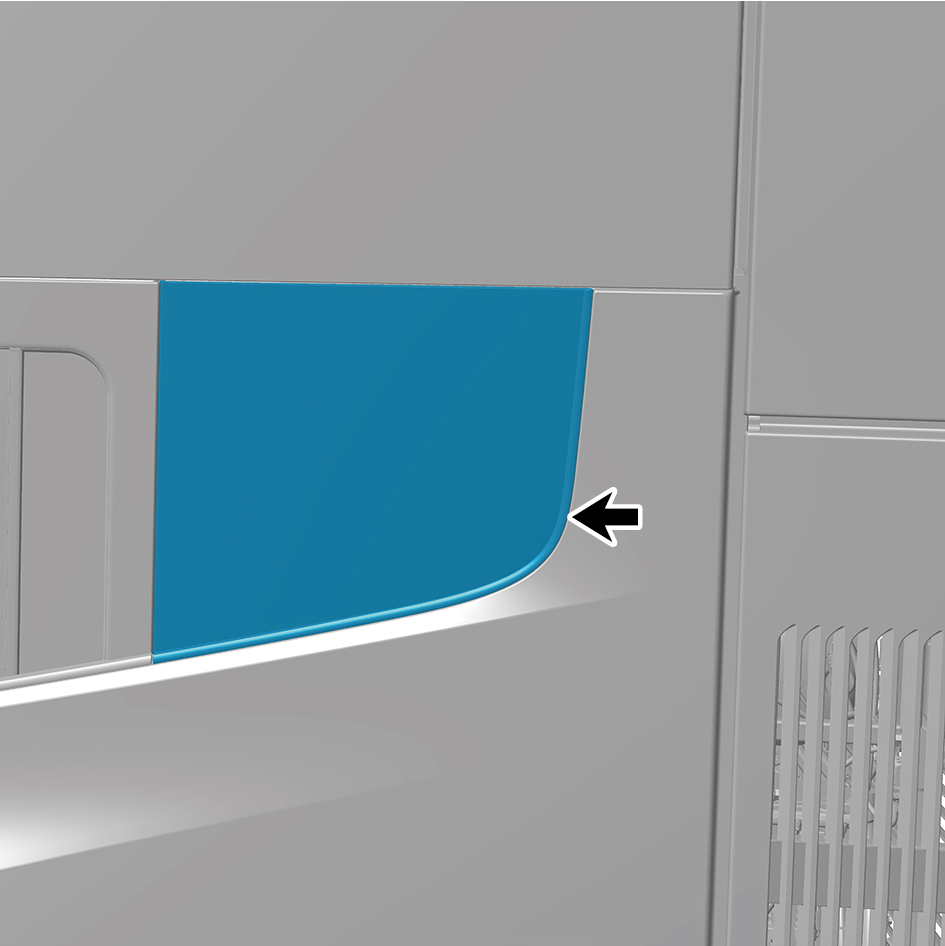
vehicle.
caution
Do not sweep debris, or score or scratch the vehicle
body.
19
Use an extended straight screwdriver to thread through
the windshield sealant.
caution
Install the floor mat, driver seat cover, sleeper
protective cover, and other protective measures
inside the cab.
20
Extend the wire rope through the glass adhesive, pull out
the joint of the wire rope at the other end, and cooperate
with the personnel inside and outside the cab to pull the
two ends of the wire rope and cut the glass adhesive.
caution
Before using the wire rope to pull and cut glass
sealant, the wire rope shall be wrapped around a
wooden stick before operation to avoid hand injury.
Personnel working at heights outside the cab must
take necessary safety precautions.
21
Remove the left side wall quadrangle window using the
suction cup.
caution
Wear goggles and cut resistant gloves when
removing glass. Damaged glass can be removed
using a rubber hammer and cutting knife.
Installation Procedures
1
Move the left side wall quadrangle window to the mounting
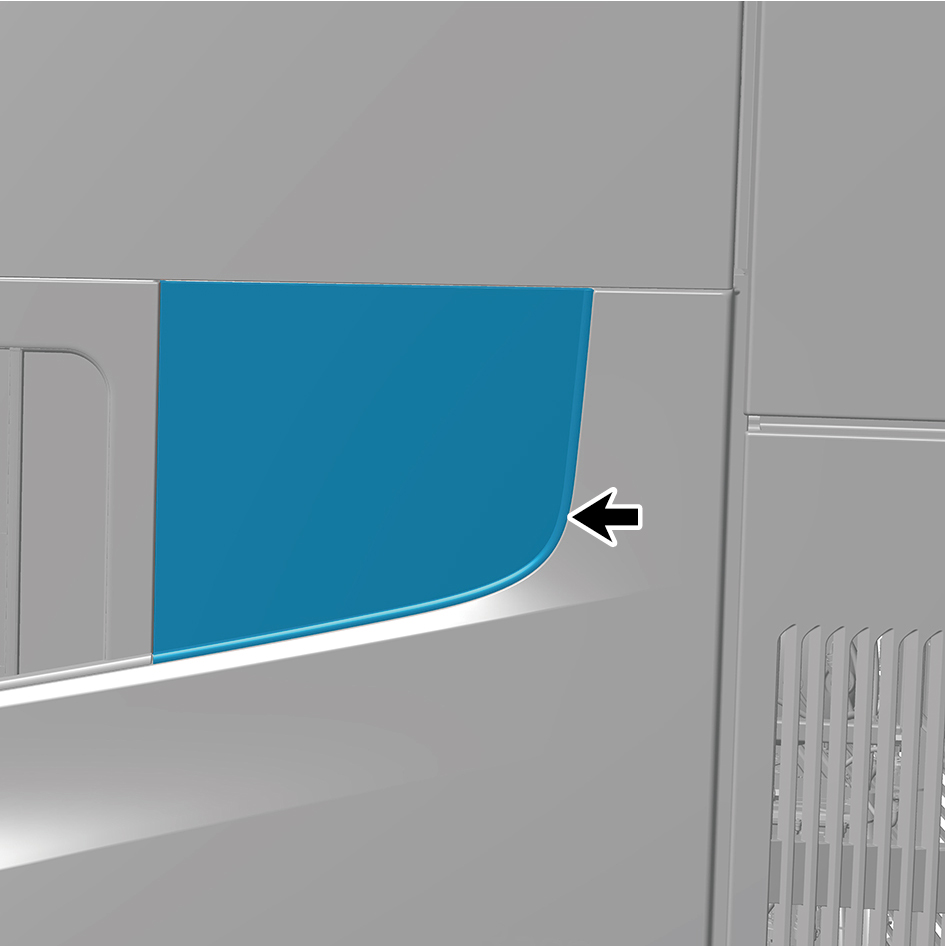
position.
2
Clean the bonding surfaces of the window frame and glass
separately with activated cleaning agents.
caution
Dry for 3 minutes after cleaning.
3
Use a clean degreased cotton or brush to evenly and
thinly apply the bottom coat of polyurethane glass
adhesive to the pre bonding area of the body sheet metal.
caution
After coating, let it dry for at least 30 seconds.
4
Apply polyurethane glass adhesive evenly to the glass
bonding position.
caution
The glue nozzle of the glue gun needs to be cut with
an art knife according to the standard.
5
Attach the glass suction cup to the outer curved surface of
the glass, align one of the clips with the corresponding
body sheet metal hole, then align the diagonal clips with
the corresponding sheet metal hole, and evenly press the
entire circumference to ensure that the locating clips are
effectively engaged with the body sheet metal.
caution
To ensure that the glass is not damaged, two people
need to simultaneously grab the suction cup for
operation.
6
Install the left side wall quadrangle window weatherstrip.
7
Install the left rear side wall protective plate assembly.
8
Install the side wall clothes rail assembly.
9
Install the left middle side wall protective plate assembly.
10
Install the left middle side wall middle trim panel assembly.
11
Install the left middle side wall lower trim panel assembly.
12
Install the IP left lower trim panel assembly.
13
Install the left switch panel lower trim panel assembly.
14
Install the left switch panel assembly.
15
Install the IP left access cover plate assembly.
16
Install the front USB interface.
17
Install the left front side wall protective plate assembly.
18
Install the left A-pillar protective plate assembly.
19
Install the IP left upper trim panel assembly.
20
Connect the battery negative cable.
21
Close the front flip cover plate.
22
Close the door.
6.8.3.10 Replacement of Right Side Wall Quadrangle Window
Quadrangle Window
Removal Procedures
1
Open the door.
2
Open the front flip cover plate.
3
Disconnect the battery negative cable.
caution
power down the high-voltage system before
disconnecting the negative pole of the storage
battery.
4
Remove the right sill molding assembly.
5
Remove the door opening sealing strip assembly.
6
Remove the safety hammer fixing bracket.
7
Remove the rear boarding handrail assembly.
8
Remove the SSM.
9
Remove the right rear side wall protective plate assembly.
10
Remove the right side wall quadrangle window
weatherstrip.
11
Clear away the glass debris inside and outside the
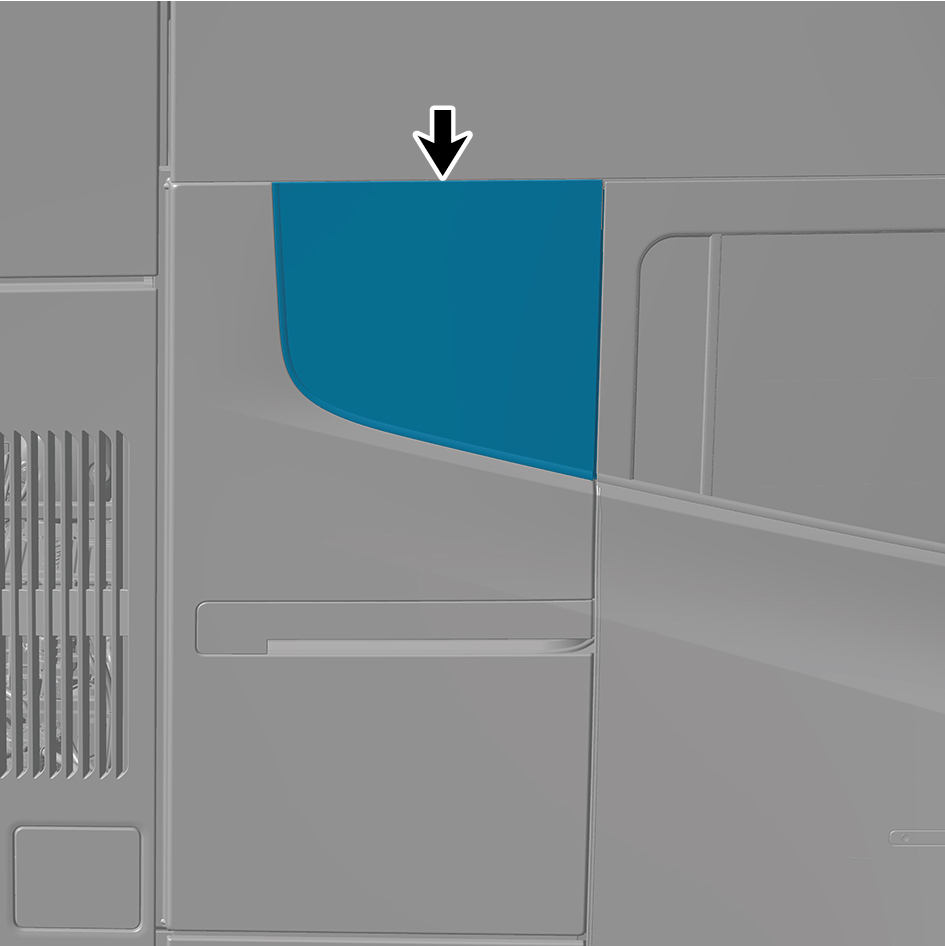
vehicle.
caution
Do not sweep debris, or score or scratch the vehicle
body.
12
Use an extended straight screwdriver to thread through
the windshield sealant.
caution
Install the floor mat, driver seat cover, sleeper
protective cover, and other protective measures
inside the cab.
13
Extend the wire rope through the glass adhesive, pull out
the joint of the wire rope at the other end, and cooperate
with the personnel inside and outside the cab to pull the
two ends of the wire rope and cut the glass adhesive.
caution
Before using the wire rope to pull and cut glass
sealant, the wire rope shall be wrapped around a
wooden stick before operation to avoid hand injury.
Personnel working at heights outside the cab must
take necessary safety precautions.
14
Remove the right side wall quadrangle window using the
suction cup.
caution
Wear goggles and cut resistant gloves when
removing glass. Damaged glass can be removed
using a rubber hammer and cutting knife.
Installation Procedures
1
Move the right side wall quadrangle window to the
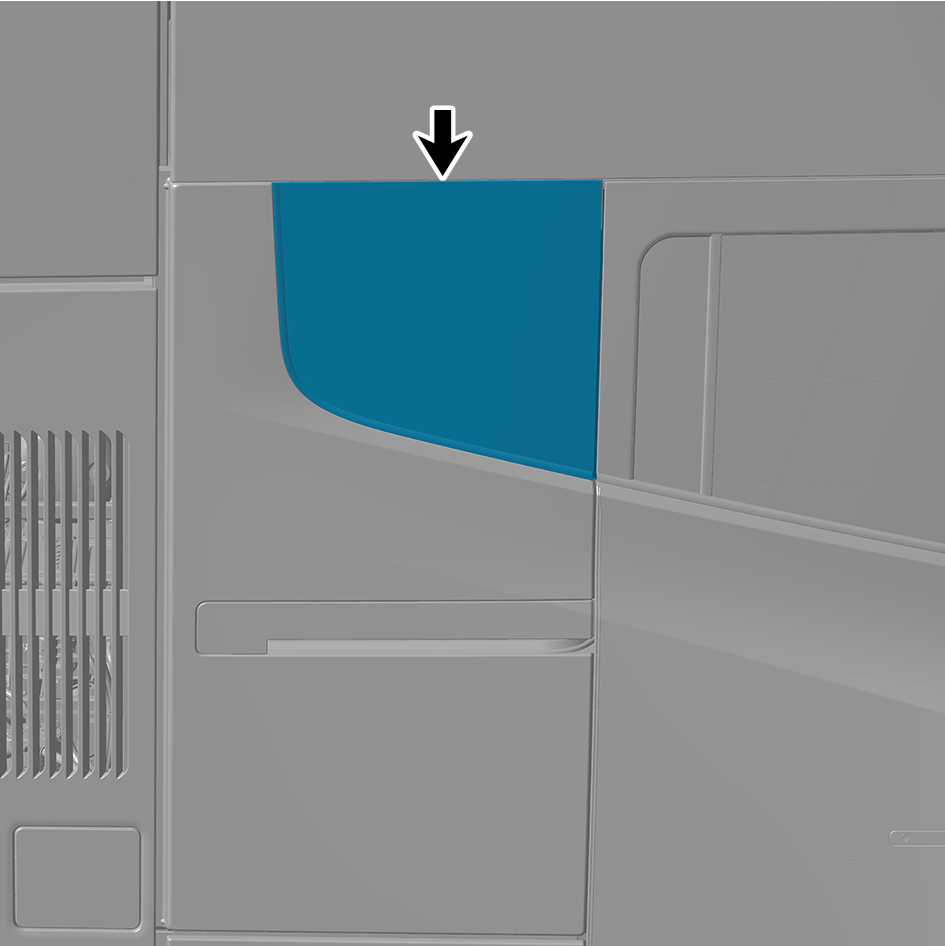
mounting position.
2
Clean the bonding surfaces of the window frame and glass
separately with activated cleaning agents.
caution
Dry for 3 minutes after cleaning.
3
Use a clean degreased cotton or brush to evenly and
thinly apply the bottom coat of polyurethane glass
adhesive to the pre bonding area of the body sheet metal.
caution
After coating, let it dry for at least 30 seconds.
4
Apply polyurethane glass adhesive evenly to the glass
bonding position.
caution
The glue nozzle of the glue gun needs to be cut with
an art knife according to the standard.
5
Attach the glass suction cup to the outer curved surface of
the glass, align one of the clips with the corresponding
body sheet metal hole, then align the diagonal clips with
the corresponding sheet metal hole, and evenly press the
entire circumference to ensure that the locating clips are
effectively engaged with the body sheet metal.
caution
To ensure that the glass is not damaged, two people
need to simultaneously grab the suction cup for
operation.
6
Install the right side wall quadrangle window weatherstrip.
7
Install the right rear side wall protective plate assembly.
8
Install the SSM.
9
Install the rear boarding handrail assembly.
10
Install the safety hammer fixing bracket.
11
Install the door opening sealing strip assembly.
12
Install the right sill molding assembly.
13
Connect the battery negative cable.
14
Close the front flip cover plate.
15
Close the door.